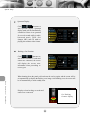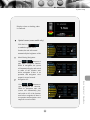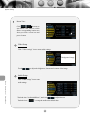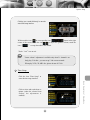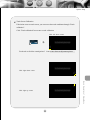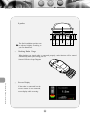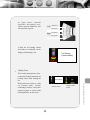
1
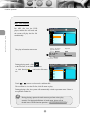
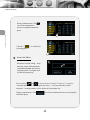
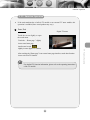
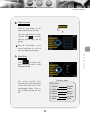
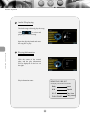
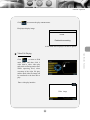
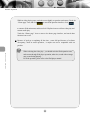
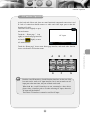
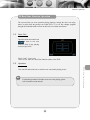
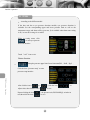
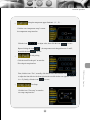
Contents
Contents
1.Basic Operation----------------------------------------------------------------- 01
2.Function Operation-------------------------------------------------------------- 03
2.1 RADIO Function Operation-------------------------------------------------03
2.2 DVD Function Operation--------------------------------------------------- 05
2.3 Bluetooth Handfree ------------------------------------------------------- 22
2.4 CDC Function Operation --------------------------------------------------- 28
2.5 TV Function Operation ----------------------------------------------------30
2.6 iPod Function Operation --------------------------------------------------- 31
2.7 AV Function Operation ---------------------------------------------------- 36
2.8 OBD Function Operation---------------------------------------------------37
2.9 NAV Function Operation--------------------------------------------------- 38
2.10 Rear Zone Function Operation----------------------------------------------- 40
2.11 TPMS------------------------------------------------------------------- 41
2.12 CAM Function Operation-------------------------------------------------- 44
2.13 Button Background Adjustment----------------------------------------------- 45
2.14 Steering wheel calibration--------------------------------------------------- 46
3.System Setup------------------------------------------------------------------- 48
4.Accessories(optional)------------------------------------------------------------ 58
4.1 Car Backing Sensor Installation--------------------------------------------- 58
4.2 Car Backing Camera Installation -------------------------------------------- 63
4.3 Description of the Buttons on Remote Control--------------------------------- 64
4.4 RDS Function Operation(optional)------------------------------------------- 66
5.Precautions-------------------------------------------------------------------- 68
6.Trouble Shooting--------------------------------------------------------------- 70
Note
For use the product safely and correctly, please read this manual carefully.
Because of technology improvement, the specifications is subject to change
without further notice!
Basic Operation
1、Basic Operation
1.1
Turn on/off the Host Unit
Tu r n i n g O n / O f f t h e m a i n m a c h i n e / A c c e s s i n g t o h o m e p a g e m e n u
Turn on
If you pull out the car key to turn off the host unit last time, insert the key again, and the
host unit will be turn on automatically.
If you press the power button on the panel to turn off the host unit last time, press the power
button slightly again to turn on the host unit .
Turn off
Pull out the car key, and the system will recognize the information to turn off the host unit.
Press and hold the power button for more than 2s, and the system will turn off automatically
(Subject to the actual model).
1.2
Enter to Home Page Menu
During start-up state, touch the screen
slightly, and “Home page” icon will
be displayed on the upper left corner
of the screen. Press the “Home page”
icon slightly again to enter the main
page menu.
.
Touch the icon of each function to enter the corresponding function operation.
Note
If touch the above-mentioned icon slight, and “Device not connected” will be
indicated, which represents no connection between the device and the host unit
at present.
1
Basic Operation
3
Spectrum Display
Touch “Spectrum mode” slightly to switch among different spectrum display modes
(as figure shows).
Rectangle Spectrum
Panel Board Spectrum
DVD
Switch Sound Field Mode
62Hz
4
62Hz
Sound Field Mode
During spectrum mode interface,
touch
CUSTOM
POP
ROCK
CLASSIC
JAZZ
FLAT
to switch among
different sound field modes.
5
T-1 00:12
Play Information
Switch spectrum mode
Volume adjustment of main machine
Press the volume adjustment key on the panel to adjust the volume.
Press the Mute key on the panel to execute mute function, and “
the mute state.
2
” icon will indicate
Spectrum display/ Sound field mode
While the spectrum display is enabled, screen will automatically switch to spectrum
mode if there is no operation within 10 seconds when playing in radio, DVD or disc
changer status, or disc without video.
At video playing status, open the home page, the screen will switch to spectrum mode
after 10s.
Function Operation
2、Function Operation
1 RADIO Function Operation
1
Enter/Exit
Touch the screen slightly to open
the touch menu.
RADIO Function Operation
Touch the “ Home page ” icon
slightly to enter home page interface,
and touch
slightly to enter
radio interface.
On radio interface, the small spectra shown in the right-side of screen, click the icon “EXIT”
to return to Main menu. If no operation within 10 seconds, the unit enters the spectra mode
Click the icon "the spectra mode" to adjust the spectra value, click the screen again to return
to the radio interface
Click the icon "Main menu" to enter Main menu, click these icons to enter the corresponding
interface
2
搜索
Automatic Search
Touch “SEEK” icon to enter automatic
search status, and save the station
automatically during automatic search.
Touch the “SEEK” icon again to
stop automatic search.
FM:87.50MHz~108.00MHz
AM:522KHz~1620KHz
18 radio stations can be stored for
FM (6 stations for each of FM1,
FM2 and FM3), 6 stations can be
stored for AM.
3
Function Operation
3
Semi-automatic Search
Touch
/
icon to enter semi-automatic tuning state of LF/HF channel.
Click “Start tuning” once to start search, and click it again to stop search.
4
Band Selection
Touch “Band” icon slightly to
switch among FM1, FM2, FM3
and AM.
5
Play a Selected Radio
Select the band first, and then
touch the screen preset station No.
M1-M6 to play the preset station
corresponding to the number
(station selected will turn green);
For example: The figure on the
right represents FM1,and
frequency of 102.50MHz.
4
RADIO Function Operation
When a radio station is received,search will be stopped. Press and hold one radio
station number for more than 2s,and the received radio station will be stored to
the station number.
Function Operation
2 DVD Function Operation
This unit plays discs in formats like DVD/VCD/CD/MP3/JPEG/MPEG4/CD-R, etc.
(Limited to diameter 12cm standard disc).
Enter/Exit
1
DVD Function Operation
Touch the screen slightly to open the
touch menu.
Touch the MAIN icon slightly to
enter home page interface, and
touch
slightly to enter
DVD interface.
Touch “Home page” icon slightly to enter home page, and then touch other function
to exit from DVD function.
If a portable hard disc is connected, touch the “DVD” icon slightly again to enter USB
playing status.
On radio/AV/TV/iPod interface, insert the disc, the unit enters to DVD interface.
On Navigation state, insert the disc, the unit can play the DVD, no video but sound;
on GPS mode, insert the disc, the unit do not enter DVD interface.
2
Disc in/out
In the DVD status, when “Open the compartment” is displayed on the screen, with the
printed face upward, insert the disc into the compartment. When the system detects the
disc, the disc will be automatically in-taken, read and played.
If there is a disc in the DVD ROM, press “
” button on the panel to exject the disc.
If the disc isn't removed within 12s, the system will take in the disc again and play.
5
Function Operation
3
Digit Keyboard
Touch the
icon slightly(as the
Figure on the right shows )
主页
the number key on the number pad to
select a song directly, and then press
to confirm the play, or wait for
some seconds until the song is played
automatically. Click
to hide the
number pad.
Note: While DVD/VCD/CD playback, if you want to select the track more than 10 to
play, first, click the button “10+”, second, click the designed button (Button 1-----9).
For example, to select the track 58, first, clicks the button “10+” 5 times, second, click
the button 8, it is OK.
While MP3/MP4 playback, if you want to select the track more than 10 to play, first,
directly click the digital button of soft keyboard on the screen, second, click the button
“OK” to begin playback. For example, to select the track 12, first, clicks the button “1”,
second, click the button 2, finally, click the button“OK” to play.
4
Description of Touch the Menu Function
× FR
× FF
Next track
Play/pause
6
Previous track
DVD Function Operation
When the number pad pops out, click
Function Operation
Stop/Back to title menu/PBC switch (disc support is required)
Switch DVD language (disc support is required); switch VCD sound.
DVD Function Operation
Switch DVD caption (disc support is required)
Menu column of
the next page
Image can be captured when playing JPEG disc
Menu column of the
previous page
Repeat
Enlarge/diminish image
Turn on/off DVD setting menu
On fast-forward playback, click the button fast-reverse to enter the normal playback.
On fast-reverse playback, click the button fast- forward to enter the normal playback.
Touch the screen blank to show/hide the menu
Touch
icon slight to exit from touch menu.
Touch
icon slight to enter home page menu.
7
Function Operation
DVD Disc Playing
If a DVD inside the host unit, and
the disc doesn't have a play menu,
the system will automatically read
the disc and play directly; if the
disc has a play menu,Click the
icon to play
DVD Function Operation
Click the icon” ###
Normal
Select song
” to return DVD mode (DVD disc required)
During playing a disc, click the
upper right part of the screen to
display the play information.(as
right picture show)
DVD T-01 02:16
play
My HEART WILL GO ON
Near, far, wherever you are, I believe that the
heart does go on.
DVD
T-01
Current track
number
Note
02:16
Play time
play
Play status
During playing, operate the touch menu to perform various play
controls. For function definitions of touch menu, please refer to
the 4th item of DVD function operation “ Functions of Touch Menu ”.
8
Function Operation
VCD Disc Playing
Put a VCD into the DVD player,and
the disc will be read and automatically
played in normal order.
BIG BIG WORLD
DVD Function Operation
I’m a big big girl, I’m a big big world.
It’s not a big big thing if you leave me.
1.约定
1.BIG
BIG WORLD
2.大城小爱
2.WHAT
A WONDERFUL WORLD
During play a disc, click
to
return to disk PBC menu contents.
(Disc support be required)
3.牵牛花
3.SAY
YOU SAY ME
4.童话
4.YEATERDAY
ONCE MORE
5.突然的自我
5.BECAUSE
YOU LOVE ME
6.TAKE
6.空白 ME AWAY
7.RIGHT
7.第一次HERE WAITING
If the disc supports function which you can
select digit directly to play selected song,
open the digit keyboard to select song to
play directly.
Select
songs
01/15
My HEART WILL GO ON
Near, far, wherever you are, I believe that the
heart does go on.
Select
songs
01/15
/
The current track Track amount of sub menu
Note
During playing, operate the touch menu to perform various play
controls. For function definitions of touch menu, please refer to
the 4th item of DVD function operation “ Functions of Touch Menu ”.
9
Function Operation
CD Disc Playing
Put a CD into the DVD player,and
the disc will be read and automatically
played in normal order.
Songs 03/17
03
/
17
/
The current track Track amount of sub menu
While the disc playing, click the icon“
continue playing.
” to pause, click the icon“
00:34
Play time
” again to
During playing a disk, the system will automatically switch to spectrum state if there is no operation
within 10s.
If the disc has the title, the track can be chosen directly by the soft key board
Note
During playing, operate the touch menu to perform various play
controls. For function definitions of touch menu, please refer to
the 4th item of DVD function operation “ Functions of Touch Menu ”.
10
DVD Function Operation
Songs
00:34
Function Operation
Mp3 Disc Playing
DVD Function Operation
Put MP3 disc into the DVD
player, and the disc will read, and
the system will play the first file
automatically.
00:15 03:42
001/018
\001\
..
MP3
MP3
MP3
MP3
MP3
001
002
003
004
005
Current The current
play time track time
Disc play information state name
Play status
00:15 03:42
001/018
The current track Track amount
of sub menu
During playing mode , click
at the first time ,it can back to file menu.
or click directly
too.
Touch
/
00:15 03:42
001/018
128kbps
\001\
..can back to file menu
001
002
003
004
005
006
cursor to select track. and then click
The scroll bar to view the file list, click file name to play.
During playing a disc, the system will automatically switch to spectrum status if there is
no operation within 10s.
Note
During playing, operate the touch menu to perform various play
controls. For function definitions of touch menu, please refer to
the 4th item of DVD function operation “ Functions of Touch Menu ”.
11
Function Operation
MPEG4 Disc Playing
MPEG is the abbreviation of "Moving Pictures Experts Group", the Chinese
denomination for "Dynamic image specialist group", and the MPEG4 is the fourth
The play operation of MPEG4 disc is basically same as the DVD disc, no longer
rewording here.
The MPEG4 disc available on the market adopts different kinds of engraving format,
such as: XVID, the AVI DIVX, RM, etc. And it is a normal phenomena if part of discs
not available to be played at the player because of the format reason.
MPEG files are displayed on the player in the form of folder/file. Move the cursor to
the small icon at the front through the direction button and press the play button for
play. The detailed operation refer to the “MP3 disc playing”.
Contents interface:
00:15 03:42
001/018
\001\
..
MP3
MP3
MP3
MP3
MP3
001
002
003
004
005
The other play interface is the same as the one of DVD play.
12
DVD Function Operation
generation encoder standard for video audio as released by the specialist's group.
Function Operation
JPEG Disc Playing
Play Status:
Put JPGE disc into the DVD player,
and the disc will be read, and the system
will play the first file automatically.
DVD Function Operation
Browse interface:
During playing, click
once to
return to image browse interface.
Random
Previous Next
Click directly the picture to begin playing
Click
Previous
Next
to page up/down to browse images.
Click the icon” random” to play the picture in the current folder at random.
Click
one more time , it
can return to the catalogue menu
interface.
Contents menu interface:
00:15 03:42
001/018
..
A02
A03
A04
A05
Image preview window
A06
Resolution
1150X866
DISC
Current image resolution
13
Function Operation
Click
to page up/down to browse images.
Click the scroll bar to view the file list, click file name to play.
On the directory menu, to return the folder directory menu, click the icon“
..
again or Click the icon“
”.
”
While in browse interface, click
image for DVD state custom mode.
Note
to obtain current image and use it as the start-up
Only by setting “Startup Picture” on the “Universal Setup Page” as the
“Customer image” in the DVD setting menu can the snatched picture be
used as the startup picture display.
When you capture an image again, the previously captured image
will be replaced automatically.
14
DVD Function Operation
On the subdirectory menu, click the subdirectory to play the picture.
Function Operation
SD Card Playing
If the player is equipped with a multi-media SD card port, this operation is available.
1
Insert /Take out SD Card
DVD Function Operation
Open the monitor and insert the SD card, with media information into the SD card slot
directly until the card is locked.
For taking out the SD card, exit from SD card playing status first, and then press the
SD card slightly to cancel the locking status of the SD card and exject the card automatically.
2
Enter to SD Card Playing Mode
00:15 03:42
001/018
While in DVD function status,
touch the “Home page” icon to
enter home page menu, and then
touch
to enter SD card
\001\
..
MP3
MP3
MP3
playing mode.
MP3
MP3
001
002
003
004
005
SD/MMC
After the SD card is read, the operation is the same as the one for playing MP3 disc. For
detailed information, please refer to “play Mp3 disc ”.
15
Function Operation
Play Portable Hard Disc
If the player is equipped with a USB port, this operation is available.
1
Insert / Take out Portable Hard Disc
For taking out portable hard disc, please exit from portable hard disc play image first and
then taking out the disc.
2
Enter Portable Hard Disc Playing Mode
While in DVD function status
touch the “Home page” icon to
enter home page menu, and then
touch
to enter portable
00:15 03:42
001/018
\001\
..
MP3
MP3
MP3
hard disc playing mode.
MP3
MP3
001
002
003
004
005
USB
After the portable hard disc is read, the operation is the same as the one for playing MP3 disc.
For detailed information, please refer to “MP3 disc play”.
As standards of manufacturers which produce portable hard disc with MP3 player are
different, it may cause that some portable hard disccan not be played.
The USB connecting wire is better to be the shortest when used to connect, or else it ay
cause abnormal operation of the portable hard disc.
Note
If the main machine is connected to both multi-media SD card and USB
flash disk simultaneously while in DVD function state, touch “DVD” once
to access SD card play, touch it twice to access USB flash disk play, and
touch it three times to access disk play.
16
DVD Function Operation
If the player is equipped with a USB port, portable hard disc can be connected
through USB wire or directly inserting into the USB port.
Function Operation
DVD System Setup
1
Turn on/off
DVD Function Operation
Enter to DVD state, open the touch
menu.
Gently touch “DVD to set” .
General Setup Page
Audio Setup Page
- -General Setup Page- Tv Display
Angle Mark
Osd Lang
Captions
Last memory
Loge Type
Preference Setup
Page
Exit from the
Setup Menu
To Audio setup page
Password Setup Page
Click
Ps
On
Eng
On
On
DEF
(General setup page interface)
again to exit from the setting menu.
On the DVD mode, click the icon to enter the corresponding function interface.
2
Operation
Touch directly the icon of each setup menu on the screen to select the item to confirm
the current setup. Click icon
to exit.
17
Function Operation
General Setup Page
TV Display
Images will be scanned and output in the format of “Panorama”
Wide
Images will be output in the format of “Wide screen (16:9)”
Normal/LB Images will be output in the format of “Message box”
Angle Mark
On/Off
It display the angle mark
SPDIF Setup Page
SPDIF Setup
Output/Off
Meaning that the output signal is an analog signal
SPIDF/RAW Meaning that the ture form source code flow of the DVD disc is delivered
directly through digital port
SPIDF/PCM Meaning that the code flow of the disc had been decoded before it was
encoded into the PCM digital signal output. That entry is selected when
the DVD audio output analog signal is connected with 2-channel digital
stereo amplifier.
Osd Lang
English/Chinese/French/Swedish/
Italian/Russian
Select the DVD system interface language
of the player
Captions
On/Off
Select display or hidden the subtitle of the disc (needing the disc backing)
Loge Type
Default
Display the default logo type
Captured
The Logo type is the grabbing picture of the consumer.
18
DVD Function Operation
Normal/Ps
Function Operation
Audio Setup Page
DOWNMIX
DVD Function Operation
LT/RT
Dolby stereo, distributing the sound from the middle and the surround channels
to the left and right stereo.
Stereo
During disc is playing, the audio output left and right channel signal.
V Surr
The left and right channels create surround sound effect
OFF
The audio output 5.1 channel audio signal
(only support 5.1ch DVD disc)
Dual Mono
Stereo/L-Mono
This entry is the selection of Dolby digital channel setup
R-Mono/Mix-Mono
Preference Setup Page
- -Preference Setup Page- -
Preference Page can only be set
up when the disc exiting from
compartment and under no disc
status.
Tv Type
PBC
Audio
Subtitle
Disc Menu
Parental
Country Region
Default
Ntsc
Off
Chi
Chi
Chi
PAL
Multi
NTSC
Chn
To Preference setup Page
TV Type
PAL/AUTO/NTSC
Audio
Setup the type of the video system
(This system is recommended to set up NTSC mode).
English/Chinese/French/Swedish/Italian/Russian/German/Spaish/Portuguese/Others
It select the language of the sound when disc is playing(needing disc backing)
19
Function Operation
Subtitle
English/Chinese/French/Swedish/Italian/Russian/German/Spaish/Portuguese/Others
It select the language of the subtitle on the disc(needing disc backing)
Disc Menu
It select the language of the disc menu(needing disc backing)
Parental
1 KID SAF/2 G/3 PG/4 PG 13/5 PGR/6 R/7 NC17/8 ADULT
It set the locking level of the disc menu.
Default
Reset
Resumes the function setup column to the original status of player before
delivery from the plant.
Note: while the icon sound/caption//language selected, the icon”
right screen, click it to select the item up or down.
/
” shown in the
Password Setup Page
Password
Select sub-item “Change” in
password options and press OK to
access password change page. As
the figure below shows, enter the
new and old passwords
respectively, and press OK key to
end.
****
Old Password
New Password
Confirm PWD
OK
The original password of the system is“1389”
20
DVD Function Operation
English/Chinese/French/Swedish/Italian/Russian/German/Spaish/Portuguese/Others
Function Operation
Click the numbering key to enter the new and old password and confirm, click the
icon OK” to complete the setup
“
Exit from the Setup Menu
Press
to confirm and exit from the setting menu.
DVD Function Operation
21
Function Operation
3 Bluetooth Handfree
The system provides bluetooth hands free communication function. If your mobile
phone is bluetooth enabled, it can establish a point-to-point connection with the system,
providing telephone dial up and call answering Phonebook, bluetooth music play
functions.
1
Enter/Exit
Touch the screen slightly to open
the touch menu.
Touch the “ Home page ” icon
slightly to access home page interface,
and touch
slightly to enter
bluetooth main interface.
Touch “Exit” icon slightly to exit from
bluetooth interface.
Enter the Bluetooth interface
Phone book enable
Enter the Bluetooth setup interface
The Bluetooth music interface
Call the last incoming phone number
2
Match/Connect
For using the Bluetooth handsfree
function, establish the connection
first. Match the main machine
with the Bluetooth cell phone and
touch
icon:
22
Bluetooth Handfree
Note: As the bluetooth modules and software of cell-phones with different brands are
different, some functions may be different or even not compatible with other systems in
actual use. Please forgive us for this.
Function Operation
Bluetooth main interface
(as figure shows).
Bluetooth Handfree
Click
,open the bluetooth function of your cell phone and enable the
bluetooth device searching function, and “Matching” will be displayed on the screen.
After the connection succeeded, the cell phones will display the device name (Ample
1). While connecting, the cell phone indicates the input device connection password
(0000). After matching, “Connected” will be displayed on the screen, the matched cell
phone model will be displayed on the screen automatically, and
icon will be
displayed on the upper right part of the screen.
For manual connection, if matching succeeds, click this button to reestablish
the connection after the main machine or the connection is off.
For automatic connection, if matching succeeds, the connection can be
reestablished automatically after the main machine is off; and the
connection can be reestablished automatically after several seconds if the
connection is off.
Automatically answer means at connection mode , after hints of incoming
call ring three times ,it can automatically answer the phone.
3
Modify the name and password
on the setup interface,Click the icon
enter the modify the
password interface
Click the icon “Modify the name”, the character to be modified are shown in the display
box on the right screen, you can enter the new character by means of a soft keyboard, click
the icon
again to confirm the operation.
23
Function Operation
If input error, click the icon
to delete it. click the icon
to exit.
The method of modifying the password is similar to the method of the modifying name. If
modifying the password is OK and disconnect, the modified the password and name shown
on the Bluetooth setup interface.
Pairing is OK
4
Dial Number
Phone number list
123* * * * * * * *
Make a call
Clean
Hang up
Call the last
incoming phone
Voice switch between the
cell phone and speakers
Press number button to enter number,
Number line show input number,if
input wrong number,you can click
to delete one by one.
123* * * * * * * *
After enter telephone number,click
to dial number.
123* * * * * * * *
123* * * * * * * *
Touch
to hand up
24
Bluetooth Handfree
You can dial number through
mobile phone or enter telephone
number on the number button
from screen.
Function Operation
During communication, Click
can switch communication
between car amplifier and mobile
phone.
123* * * * * * * *
Bluetooth Handfree
123* * * * * * * *
Click the “
” to call the last
incoming phone #.
5
Answer the Phone
When there is outside calling, In any
mode,the system will automatically
switch Bluetooth hand-free interface,
and playing music for original mode
will turn to incoming ring.
Press interface
or
to choose answer or refuse. If “answer ” is set up for :
“automatically answer”,after ring for three times ,it will automatically connect
telephone,incoming number will be displayed in the number line.
During communication,Click
and mobile phone.
can switch communication between car amplifier
25
Function Operation
6
Phonebook
Click
character
123* * * * * * * *
Bluetooth Handfree
Phonebook image appears. The
phonebook can used to record
incoming numbers, received
numbers, and missed numbers.
(It will show 5 telephone number for each style).
7
Bluetooth Music Play
Match and establish the connection
If the cell phone has Bluetooth
music playing function, the audio
of the cell phone can be
transferred to the vehicle speaker
system to playing the music
stored in the cell phone.
Click
已连接:***
character
After matching succeeds, open the
stereo connection on the cell
phone and open the cell phone
music playing function, and the
cell phone's audio will be
transferred to the vehicle speaker
system.
26
Function Operation
Play/pause
Stop
Play next track
Play previous track
Click the setting icon to exit or close the cell phone music playing function to exit from
bluetooth music play.
Bluetooth Handfree
Only support bluetooth mobile phone has “stereo player” or“telecontrol” function ,
which can operate music playing interface.
Music of the cell phone can be played only while in the bluetooth music play interface.
While in music playing state, the screen will automatically switch to spectrum interface
if there is no touch operation within several seconds.
27
Function Operation
4. CDC Function Operation
This function is available only when connected with Disc Changer .
1
Enter/Exit
CDC Function Operation
While play CD, touch the icon “save” to
copy the contents of CD into the virtual
CD.
During copying CD, playing CD
continues; touch the icon “EXIT” twice to
Note: During copying CD, if click the icon the disc 1---5, copying CD starts from
track 1; if click the icon “my favors”, copying CD starts from the current track, the
virtual CD, my favors, can store about 60 songs.
DISC1
00:30
TRACK001.....PLAY
Touch the “ Home page ”icon slightly to
TRACK002
enter home page interface,and touch
TRACK003
TRACK004
slightly to enter disc changer function playing
TRACK005
我的最爱
TRACK006
Touch the “ Home page ” icon to enter to the home page interface,and touch
other function icon to exit.
2
Touch button function
Delete
Next song
Previous song
Play/pause
Previous track
Next track
28
Function Operation
3
Play
After CD contents are copied to the
DISC1
DISC1
virtual CD. Click the icon“CDC” to
00:30
00:30
TRACK001.....PLAY
当前播放的碟
PLAY
play.
片号
CDC Function Operation
我的最爱
TRACK002
当前播放时间
TRACK003
TRACK004
TRACK005
TRACK006
Click the icon“
” to select
the previous track/next track to play;
Touch directly the song name to play
too.
Note:the character “play” shows behind the song which is playing
29
Function Operation
5 TV Function Operation
If the main machine has a built-in TV module or an external TV tuner module, this
operation is available (Note: actual product may vary).
1
Enter/Exit
Digital TV menu
Touch the screen slightly to open
the touch menu.
Touch the “ Home page ” slightly
icon to enter home page
interface,and touch
After touching the “Home page” icon to enter home page interface, touch other function
icon to exit from TV function.
Note
For detailed TV function information, please refer to the operating instructions
of the TV module.
30
TV Function Operation
slightly to enter digital TV function
Function Operation
6 iPod Function Operation
When the host unit is connected with an external iPod player, the audio and video files
stored in iPod player can be played by the host unit.
1
Enter/Exit
Touch the “ Home page ”icon slightly
to enter home page interface,
PLAYING
and touch
******
***
PLAY
slightly to enter
02:17
002/017
PLAYING 002/017
PLAY
******
***
02:17
ipod main interface.
Ipod Function Operation
Touch the “ Home page ” icon to enter to the home page interface,and touch other
function icon to exit.
Note
2
If the iPod player is connected when the host unit is on, the iPod player
can be detected after restarting the host unit.
Description of Touch Button
Pop up/hide the number pad
Repeat the current played song
return to
upper menu
Previous
track
Scan and play songs in the
current folder. The next
song will be played after
the current song has been
finished for 10 seconds.
Display playing
information
Play songs in the current
folder at random.
Turn a page up
Next track
Play/pause
Turn a page down
31
Function Operation
3
Digit Keyboard
Enter the song number by the
digit keyboard to play the song.
Click the digit button to select,
and then click
to confirm,
and the selected song will be
played.
现在播放 002/017
PLAY
******
***
02:17
Press 10+ will invalid , if you
choose track above 10 ,you can
press two digits directly to play.
Main Menu
Click
to return to the
upper menu, and enter to iPod
main menu finally:
未连接设备
播放列表
演唱者
专辑
风格
所有音乐
Directory name
The system classifies files
according to the above-mentioned
6 types and stores files in the
corresponding folders. Click to
open a folder and play the first
file.
0.NO iPod
1.Playlists
2.Artists
3.Albums
4.Genres
5.All Music
6.Video
32
Playlists
Artists
Albums
Genres
All Music
Video
Ipod Function Operation
4
Function Operation
5
Audio File playing
Touch the song to directly play the song.
Click
to select and
play the previous/next song.
****
one I love
***
baby
only you
****
Open the digit keyboard and enter
the song No. to play.
6
Ipod Function Operation
Playing Information
Click the center of the control
plate, and the play information
will be displayed on the box on
the right:
PLAYING 002/017
PLAY
Baby
M.N
02:17
Play information name
NOW PLAY 002/017
Current play track number/total number
33
Baby
opern
M.N
Special
02:17
Play time
PLAY(PAUSE)
Play/pause
Function Operation
Click
to return to the play contents menu.
iPod player display image:
iPod
KOGND
Enable disconnecting
At this mode the iPod player can not be operate
Video File Playing
Click
to return to iPod
main menu, and then click 6
video item to select video play
and switch to iPod operation state.
While operating iPod, select
execution of the video file play,
and the iPod video file image can
be transferred to the host unit to
play.
Video play
Video play
Enter video play interface:
Video image
34
Ipod Function Operation
7
Function Operation
While in video playing state, touch the screen slightly to open the touch menu. Touch the
“Home page” icon, and click
to enter iPod operation interface, click
to return to iPod main menu, and then click 1.Playlists item to exit from video play and
returnto audio play.
Touch the “Home page” icon to enter to the home page interface, and touch other
function icon to exit.
Because of ipod go on updating all the time , some old ipod because of software
discrepancy, when in actual operation , it maybe can not be compatible with our
product.
Ipod Function Operation
Note
When selecting the video play,you should switch to iPod operation state,
and execute through iPod player operation; otherwise, sound with no image
may occurs during playing.
For iPod operation, please refer to the iPod player manual.
35
Function Operation
7 AV Function Operation
At the back end of host unit ,there are muti-functional compound connection A and
D. both of connection should connect to audio and video input port,so that this
function will valid.
Touch the screen slightly to open
the touch menu.
Touch the “ Home page ” icon
AV input
sightly to enter home page interface,
and touch
slightly to enter
AV main interface.
Touch the “Home page” icon to enter home page interface, and touch other function
icon to exit from the AV function status.
E
Note
B
C
F
D
G
Both the A and D interfaces of multi-function interfaces on the rear of the
host unit can be used as AV input interface, but it can not make two AV
input port at the same time,only one of them can be used.
When both the A and D interfaces are not connected to other device,
please select A interface prior to B when selecting AV input; otherwise,
AV input will be disabled.
The built-in TV interface A cannot be used for AV input.
36
AV F u n c t i o n O p e r a t i o n
A
Function Operation
8. O B D Function Operation
OBD (On Board Diagnostics) can read or erase the vehicle each system fault code
stored in ECU and store these information in SD card, it can read the vehicle the real
time information, these information are useful for repairing the vehicle.
Put the OBD in the vehicle OBD socket, a LED lights, starts the engine, power the unit
on, on the main menu, click the icon”OBD” to enter the OBD interface.
Because the unit is compatible with a number
Please choice CARS'series
of the vehicles, if the unit is used for the first
time, the pair required with the vehicle.
OBD Function Operation
NOTE
1、For more information about OBD, refer to OBD instruction.
2、OBD option
37
OK
Function Operation
9 NAV Function Operation
This function is available only when connected with GPS module.
1
Enter/Exit
Touch the screen slightly to open the touch menu. Touch the “ Home page ”icon slightly
to enter home page interface, and touch
slightly to enter navigation main
interface.
While in navigation status, press GPS button on the panel to exit from navigation status
and return to other playing state.
At navigation mode, only the corresponding touch operation functions about GPS
will be available,If other functions needed,it must exit the navigation mode.
2
Navigation Audio and Video Function
When switching to GPS navigation from AV/DVD/disc changer/TV/Video playing
status, you can enjoy music or video in the former status in case of no navigation voice
indication; and the system will automatically switch to navigation map interface in
case of navigation indication. (For details, please refer to “System settings” in
“Settings”).
Music Function During Navigation
When switching to GPS navigation from radio/AV/DVD/disk changer/TV/Video
playing state, you can enjoy music or video in the former state in case of no navigation
voice indication; and the system will automatically switch to navigation map interface
in case of navigation voice indication.
4
Volume Adjustment
Under GPS navigation status and when there is music output, it is to adjust the system
volume at this time.
Under the voice navigation status, it is only used for GPS navigation volume
adjustment.
5
PIP(Picture in picture) function (some model only)
On Navigation state, press the button NAV more than 3 seconds to enter the PIP
interface, you can watch both the DVD and navigation map at the same time(the function
is available only while the input mode of DVD/AV/TV/Ipod/Video/Camera switch to
navigation state)
38
N AV F u n c t i o n O p e r a t i o n
3
Function Operation
6
Function Operation
This product also allows touch and write for destination search all operation functions of
GPS please refer to manual of GPS navigation module.
N AV F u n c t i o n O p e r a t i o n
39
Function Operation
10 Rear Zone Function Operation
The system offers rear zone operation playing function, namely the driver can enjoy
music or radio while the passage can watch DVD, TV or AV disc changer program
through the dedicated headset screen on the back row without interference.
2.91
Enter/Exit
Open the touch menu and touch
to enter to rear zone
interface while in any playing
status.(except NAV)
Touch“exit”icon to exit.
Note: in CDC state, the Rear Zone function cannot select DVD.
2.92
Operation
Note
For detailed operation of headset screen rear zone playing, please
refer to headset screen manual.
40
REAR Zone Function Operation
User can click the touch icon to select the rear zone media playing source.
Function Operation
11 TPMS
According to the different model
If the host unit has a tyre pressure detection module, tyre pressure detection is
available. Set the corresponding upper and lower pressure limit as well as the
temperature range, and alarm will be given out, (It is available when alarm tone setting
is on.) in case the set range is exceeded.
While in setting menu, click
to enter tyre pressure
detection interface.
SPARE
Touch “exit”icon to exit.
Button function
Setup the pressure upper limit /lower limit/unit(PSL、BAR、Kgf)。
Click the icon“pressure setup” to enter
pressure setup interface.
Kgf
TPMS Function Operation
After click the icon“
” or “
”, click the icon“
adjust value, then click the icon“
” to
” to save.
Repeat clicking the icon”
”, the pressure unit, PSL/BAR/Kgf, switches in
turn,then click the icon “
” to save
41
Function Operation
Setup the temperature upper limit/unit( C 、F)。
Click the icon “temperature setup” to enter
the temperature setup interface.
Click the icon “
” to adjust value, then click the icon“
Repeat clicking the icon“
then click the icon“
” to save.
”, the temperature unit changed between C and F,
” to save.
ID code pairing
Click the icon“ID code pair” to enter the
ID code pair setup interface.
”
to adjust the front left tire/ the front right tire/the rear left tire/the rear right tire value(0--9,A---F), finally, click the icon“
” to save.
Tire Swap
Click the icon “Tire swap” to enter the
tire swap setup interface.
前方
42
TPMS Function Operation
First, click the icon “Tire”, secondly, click the ID code, then click the icon “
Function Operation
Click the icon “Confirm” to swap tire, just follow the arrow.
Open/close warning sound
Recover the last setup value
TPMS Function Operation
43
Function Operation
12 CAM Function Operation
On this mode, if the rear camera connected, you can view the picture from the rear
camera.
On the main menu, click the icon“
镜头输入
”to enter the rear camera interface
后视镜头显示
CAM input
Click the icon “Main menu” to enter Main menu, click these icon to enter the
corresponding interface.
CAM Function Operation
44
Function Operation
13 Button Background Adjustment
According to the different model
Enter “System setting” menu, and
touch
character to
change the background color of
the panel buttons.
Numerical value of red,green,blue
can be adjusted to change LED color
of the panel ,Click
icon
to adjust.
Button
Background Adjustment
Operate the direction cursor to
move the light ring to select the
background color.
127
120
0
To u c h d i r e c t l y t o s e l e c t
background color, and click
to store the selected
t
background color.
45
Function Operation
14 Steering Wheel Calibration
According to the different model
:
Function implemented qualification
1、Steering wheel learning function is the same with the original steering wheel which
not bus-mastering.
2、 Key-press of original steering wheel must adopt the control way of voltage
inputting. (when you operate each Key-press, enter each voltage into original sounder
port )
3、When installation, find the three sorts of wires of original car steering wheel keys,
one is its ground wire, one is its keys controlling wire(2 strips for some cars) and the
last is its battary wire(+5V or +10V),then connect them to corresponding steering
wheel wires of our host.
(When pull out the connector of audio host of original car, and original car steering
wheel keys still power on, there is no need to connect extra battery; otherwise, you
need to connect them to the output(+5V or +10V) of our host steering wires. Use the
“Key control wire 1”first when connecting the keys controlling wire, if normal control,
please choose the “Key control wire 2” and relearn for use.)
Mode test
Release the buttons in the steering wheel,
click the icon“Mode Test” to test.
While in setting menu, click
“Control calibration” icon and
click
to enter steering
wheel calibration.
Mode test
Press any button in the steering wheel for
more than 3 seconds
按键学习
请在屏上选择所要学习的功能
Select the icon to be identified
Steering wheel mode test
Press any key of the steering
wheel to confirm the steering
wheel state.
Identify Button
46
Steering Wheel Calibration
模式测试
模式测试
请按压方向盘任一按钮三秒钟
请按压方向盘任一按钮三秒钟
Function Operation
Click the desired function key on
the screen first.
Identify Button
Press the corresponding button in the
steering wheel for more than 3 seconds
Press the corresponding button on
the steering wheel.
Identify Button
Select the another button
After training, the system will indicate the training of the next function key. Repeat
these procedures until trainings of all control keys of the steering wheel are finished.
Click
to end and exit, and the main machine can be controlled by using the
steering wheel of the car.
Note
In fact, user can set steering wheel button function as needed. For example,
click
on the screen, and press the “Vol. +” key on the steering wheel
to set the key as “Song +” function.
Steering Wheel Calibration
47
System Setup
3、 System Setup
Basic Operation of Setup Menu
1
Enter/Exit
Touch the screen slightly to open
the touch menu.
Touch the “ Home page ” icon slightly
to enter home page interface, and touch
slightly to enter system setting
main interface.
Touch “exit”icon to exit the current menu.
2
System Setup
Click
to enter system
settings.
Touch “exit”icon to exit.
Click
/
Basic Operation of Setup Menu
Time Setup
character to
start time display function, and
the time will displayed on the
lower right corner of the screen.
48
System Setup
Spectrum Display
Click
character to
start spectrum display. Spectrum
display mode will be automatically
switched to if there is no operation
for several seconds while in radio,
bluetooth music, DVD, disc
changer, MP3, and CD mode or
playing disc without video format.
Backing a Car Function
Click
character to
start reverse function. If radar and
camera are connected, the screen
will display the reverse state
information when proceeding to
reverse gear.
Basic Operation of Setup Menu
When shutting down the panel, pull out/insert the car key again, and the screen will be
on automatically to display the backing a car image. After backing a car, the screen will
be off automatically to enter standby state.
Displays when backing car radar and
camera are connected.
Car Backing
Camera display
1.5
49
M
System Setup
Displays when car backing radar
is connected.
Optical sensor (some model only)
Click the icon“
”
to enable the optical sensor
function, the unit will control
automatically the brightness of the
Music During Navigation:
Click
character to
start music navigation function.
While in navigation, the system
will automatically play and switch
to audio of the function state
before navigation if there is no
operation and navigation voice
output for several seconds.
Navigation AV:
Basic Operation of Setup Menu
Click
character to
start navigation AV function.
While in navigation state, the
system will automatically play
and switch to AV of the function
state before navigation if there is
no operation and navigation voice
output for several seconds.
50
System Setup
Button Tone:
Click
character to
start button tone function, which
allows corresponding button tone
when you click a screen icon and
press a button.
3
Video Setup
Click “Video settings” icon to enter audio settings.
Background image
Touch
to adjust the brightness, chroma and contrast of the image.
50
4
50
Audio Setup
50
Basic Operation of Setup Menu
Click “Audio settings” icon to enter
audio settings.
Touch the icon“treble/middle/bass”, touch icon
Touch the icon“
to adjust the tone
”to setup the audio to the default value.
51
各种设置
System Setup
Click the icon “sound field setup” to enter the
sound field setup interface.
+5
+0
+5
+5
+0
+4
While touch the icon
, the corresponding icon
shown in the right
corner of the screen, touch the icon
to adjust the speaker volume, touch the
icon“
” to setup the audio to the default.
Touch “exit”icon to exit .
Note
“Center volume” adjustment is available only when 5.1-channel is on.
Only play 5.1ch disc , you can set up 5.1ch on turn on mode.
When play VCD ,CD ,MP3 disc ,please do turn off 5.1ch.
5
Time Setup
Click the icon “Time Setup” to
enter the time setup interface.
12:00
12:00
52
Basic Operation of Setup Menu
Click to select and set the hour or
minute (when the selected item
f l a s h e s , t h e adjus tment is
enabled).
System Setup
Touch
character to
adjust hour/minute, and touch
character to save the adjusted
time.
13
Touch
character ,click 12
hours mode to display “PM”
character.
00
主页
各种设置
PM
12
12
00
00
Touch
character to select
24-hour system.
6
Control Calibration
Basic Operation of Setup Menu
Click “Control calibration” icon
to enter control calibration.
各种设置
Touch “exit”icon to exit .
53
主页
System Setup
Touch Screen Calibration
If deviation occurs to touch screen, you can correct the touch coordinates through “Touch
calibration”.
Click “Touch calibration”icon to enter touch calibration
.
Click left-down corner
!
Use the neb to click the central point of
Click right-down corner
icon to enter the next adjustment picture.
!
!
54
Basic Operation of Setup Menu
Click right-up corner
System Setup
!
Click left-up corner
Click center
Over!
Note
If error occurs to touch position, you can correct the touch coordinates
through “Touch calibration”.
When doing touch correction, the center point of the cross must be accurate,
or else the precision of touch correction will be affected.
Basic Operation of Setup Menu
Steering Wheel Calibration
(For details, please refer to “14. Steering wheel calibration”)
55
System Setup
Factory Mode Settings
During factory mode, radio antenna power switch, handbrake control, small lamp
control, headset number, system reset, etc. can be set.
Click
to enter AV mode,
click
to open the digit
keyboard, and input password
“7253” as the right figure shows:
AV INPUT
Enter to factory mode interface.
Click
1
to exit from factory mode interface.
Factory Setup
System software version No.
Click the icon “Factory Setup” to enter
the factory setup interface.
On
Off
When the radio antenna wire was used as antenna amplifier power wire, the setting
shall be on, whereas the setting shall be off.
56
Factory Mode Settings
Radio ANT_P
System Setup
Brake
Off
Level
Pulse
When there is no handbrake control, the setting is off.
When the handbrake control power supply uses DC power, the setting is level.
When the handbrake control power uses pulse voltage, the setting is pulse width.
Lamp
Off
Level
Pulse
When small lamp switch control is not necessary for button background, the setting is off.
When the small lamp control power uses DC power, the setting is level.
When the small lamp control power uses pulse voltage, the setting is pulse width.
H_ Num
1
2
The headrest number shall be set according to the actual number, (this product supports
up to 2 headsets).
Reset
Click system settings to reset to the factory state.(Under factory mode,each setup is
compelling setup,it can not be restored.
Factory Mode Settings
2
Factory Setup (no user setup items)
3
System Information
Click the icon “System Information” to show the system configuration information of the
unit.
4
Corporate Identity
Click the icon “Corporate Identity” to select the corporate identity of the unit.
57
Accessories
4、Accessories ( optional )
Our products are in series, there will be slightly differences in functions and
accessories according to the specific specifications, for example, GPS and backing
camera. So for your own interests, please check all the accessories and packing list.
Car Backing Sensor Installation
The Requirements and Method
of Installation
Sensors should be inserted
vertically into rear bumper as the
arrow's direction. Any direction's
inclination will affect the usage.
According to the quantity installed,
the positions can be as follows:
×
×
×
×
2 probes
L
58
2L
L
Car Backing Sensor Installation
50-70cm
1
Accessories
50-70cm
4 probes
The final installation position can
be adjusted slightly according to
your car dimensions.
2L
3L
4L
3L
2L
Backing Radar Usage
When backing car signal cable is connected properly, radar function will be started
automatically when you backing your car.
B
Sl rak
o
in
W wd ga
ow re
ar
ngi
a
n
n
a
ar rea
ea
Sensor's Effective Scope Diagram
Car Backing Sensor Installation
Reverse Display
If the radar is connected but the
reverse camera is not connected,
screen display while reversing:
59
Accessories
Left
Sensor1
Right
Sensor3
Braking area
Sensor2
Slow down area
Warning area
As figure shows, emerald
represents forewarning area,
yellow represents amble area, and
red represents stop area.
Sensor4
If both the car backing camera
and radar are connected, screen
display while backing a car.
Car Backing
Camera display
1.5
M
Display Form
There is only camera picture if just
connect the backing camera but not
backing sensor when backing the
car.
TO_hinder
camera display
connect camera
60
without connect
camera
Car Backing Sensor Installation
When head unit connect to radar
car backing mode, without
connecting to camera, it only show
analog car photo as well As radar
detecting distance on the screen .
0.8m
Accessories
When radar backing car module is
connected to left and right sensor
and the distance between radar
sensor and barrier is less than 1.2
but more than 0.3, monitor will
display left and right radar
signpost, and actual measure
distance, which as shown in right
picture.
When radar and all sensors have
been connected and the distance
between radar sensor and barrier
is less than 0.3 monitor will
display red signpost and STOP.
TO_hinder
camera display
STOP
0.8m
connect camera
Display signpost (yellow)
without connect
camera
Display signpost (red)
TO_hinder
camera display
STOP
STOP
connect to camera
without connecting to
camera
Display of Radar Detection
1.When the distance between radar sensor and barrier is more than 2.0m, there will be
a "BACK” on screen bottom.
2.When the distance is less than 2.0m but more than 1.2m, the distance will be
displayed on screen bottom and buzzer does not work, and sensor is now working in
warning area.
3.When the distance is less than 1.2m but more than 0.3m,the distance is displayed on
the screen bottom and buzzer beeps, the more closer, the more frequent buzzer beeps.
Sensor is now working in slow down area.
Car Backing Sensor Installation
4.When the distance is less than 0.3m, it will display “STOP!” on screen bottom,
buzzer gives out continuous sound, sensor is now working in stop area.
5. RPA (Reverse Parking Assistant) display while the distance between the vehicle and
obstacle decreases, the red bar increases; while the distance between the vehicle and
obstacle increases, the green bar increases.
6.The unit analyzes the data from 4 sensors, and the minimum value, its meaning is the
distance between the vehicle and obstacle, will be shown on the screen.
61
Accessories
Precautions for Using Radar
Detection can be affected by:
smooth slope
When in a smooth slope, signal
can be reflected out.
smooth spherical object
When in the near of a smooth
spherical object, signal can be
reflected out.
sound absorption
cotton like object
When in the near of a sound
absorption cotton like object,
signal can be absorbed greatly.
62
Car Backing Sensor Installation
similar special
objects
If meeting similar special objects,
reflection of the detecting wave
will be blocked.
Accessories
similar special
circumstances
If meeting similar special
circumstances, the detecting wave
can not be detected.
After installation, please first Confirm the function, then use.
When there is a rainstorm, or the inductor is polluted or is damaged,
the detecting results will be affected.
Note
2
The system is only designed to help you back your car, our company will
not take any responsibilities for any accident. So, please pay attention in
driving.
Car Backing Camera Installation
The standard installation position
of the water-proof concave
camera is as shown in right figure.
The ordinary camera can be
installed in any water-proof
position needed.
Camera
Car Backing Sensor Installation
63
Accessories
3
Description of the Buttons on Remote Control
1
2
3
4
5
6
7
O/C
RADI O
DVD
USB
CDC
TV
AV
NAV
OSD
MAP
FR /R E
VIDEO
SETUP
RTN
8
9
10
11
12
13
14
MUTE
16
17
18
19
20
21
22
ENTER
23
ZOOM+
ZOOM-
L/R
AUDIO
BAND
RPT
SEEK
LANG
MEM
CAPTION
DEL
ABC
24
25
26
27
28
29
DEF
15
GHI
JKL
MNO
PQRS
TUV
WXYZ
IR012
NO.
Button
2
Slide down(unavailable for fixed monitor)
DVD/USB
4
RADIO
5
OSD/ MAP
6
NAV
7
SETUP
1.Switch to DVD status in any status.
2.In DVD status, press it repeatedly to switch the mode among USB/SD/
DVD mode in turn.
Switch to RADIO status.
1.In DVD or CDC status, turn on playing information display;
2.In navigation status, switch menu between the map and current place.
1. Select navigation status;
2.Press this button in navigation status can enter navigation main menu.
Turn on/ off the setup menu.
64
Description of the Buttons on Remote Control
3
Description of Button Function
Slide up(unavailable for fixed monitor)
1
Accessories
NO.
Button
Description of Button Function
1. In RADIO status, seek previous/next station for play; 2. Fast forward /backward
in CDC status; 3.Maunal fine tuning in TV status; 4. In menu setup status,adjust
parameters. 5.In DVD status, no function for playing;
1.Adjust previous/next station step by step in RADIO status;
2. In TV status, select previous/next stationfor play; 3.In CDC status, select next/
previous track or chapter; 4. In menu setting status, select setting menu item.
5.In DVD status, no function for playing;
8
ENTER
1.Press it vertically as function confirm button; 2.In the fast forward/backward
multiplication speed play status, press it vertically can return to normal status.
9
1.In RADIO status, search high frequency station semi-automatically;
2. Fast forward in CDC, DVD status; 3.In navigation status, press it to magnify
map function.
10
1.In RADIO status, search low frequency station semi-automatically;
2. Fast backward in CDC, DVD status; 3.In navigation status, press it to
minify the map.
11
Sound/
BAND
12
13
14
Description of the Buttons on Remote Control
15
Input
SEEK/LANG
RPT
1. In RADIO status, switch band among FM1,FM2 and AM in turn;
2.Switch sound channels during VCD playing.
3. Switch the language of the disc during DVD playing.(needing disc backing)
1. At DVD or CDC mode, switch status between play and pause;
2. Select different input methods in navigation status.
1. In TV and RADIO status, search station automatically;
2. Switch language of the disc in CDC, DVD status(needing disc backing).
In CDC, DVD status, repeat single track or all the tracks in the disc.
1. During DVD playing, select track directly;
2. When inputting characters in navigation status, you can use input method
to do it.
Number button 3. In CDC playing status, press 1~6 buttons to select discs directly, press 7
to open DVD setup menu and press 8 or 9 button to select disc up/down.
4. In navigation status, when you want input the words, press the button
directly to input the words.(navigation system is required.)
Open/close monitor. (Unavailable for fixed monitor)
16
O/C
17
MUTE
Turn on/off volume. (Unavailable for fixed monitor)
18
CDC
Select CDC function when connect with DVD changer.
19
TV/AV
Select TV/AV function(It is valid when connect with external TV box or AV
signal).
65
Accessories
NO.
Button
Description of Button Function
20
FR/RE
Switches between dual zone.
21
VIDEO
It is unavailable for this player.
22
RTN
1.During disc playing, return to main menu;
2. Return to map display menu as the main menu of navigation is turn on.
23
1.Select the next station in RADIO/TV status;
2.In CDC, DVD status, select next track/chapter.
24
1.Select the previous station in RADIO/TV status;
2.In CDC, DVD status, select previous track/chapter.
25
AUDIO
26
27
+
-
28
MEM/CAPTION
29
DEL
Select EQ among FLAT, CUSTOM, POP, ROCK, CLASSIC and JAZZ.
Increase volume.
Reduce volume.
1.Store the station in the RADIO or Tvstatus;
2.Switch subtitle in DVD, CDC status(needing disc backing).
Delete the words in the navigation status.
Description of the Buttons on Remote Control
66
Accessories
4
RDS Function Operation(optional)
Touch “AF” character on the screen, it will open or close AF function of RDS. When
AF function of RDS is open and to touch“SEEK”, it will search AF signal of RDS
automatic.
If the signal of RDS is received,
one channel of M1-M6 will show
the frequency of RDS.
Meanwhile,there is“
” icon
on the top right corner of screen.
Several seconds later, the channel name and style will be showed in “PS” and“PTY”
status column on the screen. To choose any channel of M1-M6,the RDS message at this
Frequency will be showed in“PS”and“PTY”status column. At the same time, play
the right broadcasting station program.
If there is no PTY signal, PTY will
show NONE character:
NONE
RDS Function Operation
If RDS signal becomes weak, it will change other frequency automatic which the signal
is good enough. When RDS is close,
the icon will disappear and it will not receive
RDS signal.
67
Precautions
5、Precautions
1
Precaution When Using the Product
Please don't insert the coins or some metal things.
Please don't try to repair.This product is composed of lots of precise electonic
commponents.
.
They will be broken or cracked if disassembled or reritted.if the failure happens,please
turn off the power supply immediately and notefy distributor.
Please don't let the display screen incur the pollution like dampness, dust, stream,
lampblack, etc.
Please don't use thinner or other chemical to wipe the surface of the display screen. The
dirt should be wiped off by soft cloth.
If water or other substance enters into the product ,please turn off the power supply
immediately and contact the distributor.
Please don't let the display screen be disposed in insolation.
Please turn off the power supply first when you plan to clean the machine.
Do NOT plugging and unplugging the map card and connect a wire or accessory during
start-up to avoid damage to the main machine or accessory while plugging and
unplugging.
If the drive mechanism is blocked, do NOT handle it by force. Please call a dedicated
maintenance personnel to repair.
2
Precautions for Installation of AMP
Check if the resistance of the speaker matcher with that of the AMP.
Please use high-quality speaker wires, and the length of the wire must be exact.
Connect jack must be inserted correspondingly.
To reduce the static noise, adjust the volume to the 2/3 of the max volume, and adjust the
wires of the car computer, or it will cause noise.
68
Precautions
volume of the AMP to the distortion when with AMP.
While installing, the input and output wire must be away from the power wires and the
Precautions
3
Precaution for Discs
Discs which was dirt,dust,scratches and bending on surface will cause malfunction.
Do not place a disc on sharp object, or the disc may be scratched.
When not used, a disc should be taken out.
The following places are not suitable to place a disc.
1.Under direct sunshine.
2.Dirty,dusty and damp places.
3.Near auto heater.
4.Seats or dashboard of a car.
Do not use discs with a diameter less than 12cm (not including 12cm)or discs with
irregular shapes such as heart or octangular shape,etc.
Disc cleaning: Rub the disc surface by soft damp cloth; If the disc is quite dirty, use soft
damp cloth with alcohol to rub gently. Please don't use dissolvent such as gasoline,
dilution or common disc cleanser, since they may damage discs.
Precautions
69
Trouble Shooting
6、Trouble Shooting
Before sending this player for service as required, please carry out inspection or small
adjustment according to possible causes of occurred problems stated on the list below. It is
possible that problems will be solved and this player will go back to normal operation. If you
have any doubt about the problems on the list or the problem can't be solved effectively by
following the remedy as instructed, please contact with our company or professional service
center.
Problem
No display
of LCD
Possible Cause
Replace with a new fuse
Reconnect properly.
Communication between main machine
and vehicle control system failed
Main machine control system
communication failed
Too low storage battery voltage.
System's automatic protection activated
Press Reset key of the main machine
and reconnect
Press Reset key of the main machine
and restart
Charge the storage battery to 12V
Mis-set as blank state
Touch the screen to restore the display
System in mute state
Press Mute key exit from mute state
No sound played Loose sound cabinet wire
Reconnect properly.
Damaged sound cabinet
Replace with a new sound cabinet
Wrong disk position
Surface with label upwards on the tray
Dirty or damaged disk
Try another disk
No image played Loose/bad wire connection
Wrong use of AV input port
Wrong iPod play video file setting
Occasional sound Dirty or damaged disk
skipping
Reconnect properly.
Please refer to AV function operation
for selecting ports
Please refer to descriptions of iPod
function operation
Try another disk
Wrong installation of the main
machine
Wrong twisting direction of the
disk changer installation screws
Disabled Bluetooth Wrong matching with the main
handsfree function machine
70
Ensure fixing the main machine
securely
Place angle adjusting screws
marked with V or H to the
correction installation directions.
Rematch
Trouble Shooting
Sound skipping
during vibration
Remedy
Fuse blowing
Loose wire
Trouble Shooting
Bluetooth matching
failed or unable to
match
Touch failed/too
slow action
Car reversing
failed
No key tone
There is music but
no accompanying
sound during DVD
playing
Key backlight
can't be lit or
Compatible problem exists
between some models of cell phone
Bluetooth and the product.
Replug the car key to start up
and match
Touch coordinate offset
Recalibrate the touch
coordinate
Main machine control system
communication error
Press the Reset key to restart
or restart the machine
Wrong or bad reversing wire connection
Reconnect
Wrong or bad camera and radar connection
Reconnect
Reversing setting isn't set as “On”
Access system settings, and set
the reversing as “On”.
The “Key tone” is set as “On”
Access system settings, and
set “Key tone” as “On”
Wrong language setting
Reset the language key
Set the speaker as 5.1CH state and
vehicle sound cabinet as 2CH/4CH.
The setting doesn't match the device.
Set the speaker as stereo, and
set the audio setting “5.1” as
“Off”.
The “Small lamp control” setting in
factory mode is not corresponding
the small lamp control wire
connection state or small lamp
power supply.
Reset the small lamp control
form
Wrong or bad handbrake connection
Reconnect
Under factory mode , grip brake
control is set up to turn off mode .
Renew set up grip brake control
to turn on mode.
Wrong connection between steering
wheel wire and steering wheel
control wire of the main machine
Reconnect
Disabled handbrake
Disabled steering
wheel control
Trouble Shooting
Disabled tire pressure
detection Not accurate
Failed connection between steering
Redo steering wheel training
wheel and main machine
please contact with our company
The way of steering wheel control can after professional service for
not campatible with our host.
technical sustain.
Tire pressure detection setting error
Reset
Insufficient or no tire pressure
detection probe battery
71
Replace the battery