1
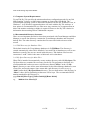
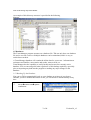
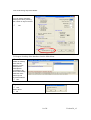
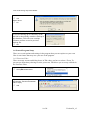
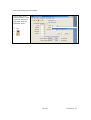
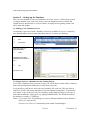
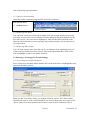
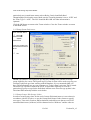
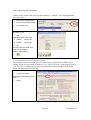
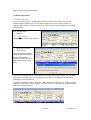
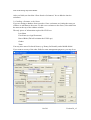
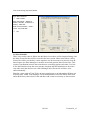
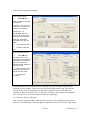
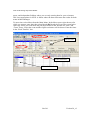
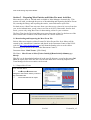
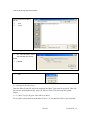
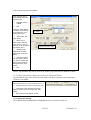
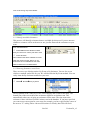
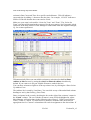
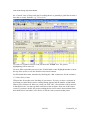
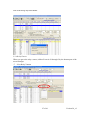
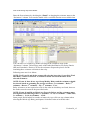
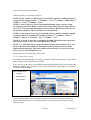
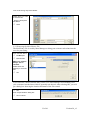
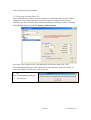
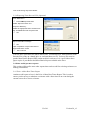
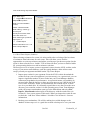
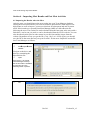
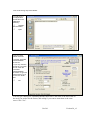
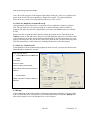
NVSL Team Manager
Operations Manual
For use with
Hy-Tek Team Manager V5.0
Last update:
3/21//2010
NVSL Team Manager 5.0 Operations Manual
Foreword
In the summer of 2008, the Northern Virginia Swim League (NVSL) began using two
software programs from Hy-Tek Ltd.: Team Manager used by each team to maintain
their roster, create meet entries, and maintain meet results; and Meet Manager used to
run NVSL meets. The NVSL operating instructions for these two Hy-Tek programs are
provided in separate documents. This was done to make them more manageable in size,
and also because different persons are often doing the team management/meet entries and
running the meets
This document covers the operation of the Team Manager program. Each user of the
Team Manager program is expected to be familiar with basic Windows operations, such
as opening and saving files, copying files, and running programs. Each user should also
have a basic familiarity with the Hy-Tek software. A user’s manual is available on the
Hy-Tek website and each program also contains a robust help function.
Hy-Tek provides two technical support options (for licensed users) as follows:
E-Mail: [email protected]
Telephone: 866-941-5123
NVSL support for use of these programs is provided first by your Division Data
Coordinator and then the Automation Committee. See the NVSL website
http://nvsl.nvblu.com
for the current contact information for the Automation Committee (Contacts |
Committees tab). Additional information on NVSL use of Hy-Tek software is also
available under the Information | Documents Center tab in the NVSL | Hy-Tek |
Documentation directory.
Comments and suggestions on this manual are also welcome and should be forwarded to
the Automation Committee.
2 of 41
Version 50_v2
NVSL Team Manager 5.0 Operations Manual
Contents
Section 1 - Introduction ...................................................................................................... 5
1.1 Program Description ..................................................................................................... 5
1.2 Program Versions and Licenses.................................................................................... 5
1.3 Computer System Requirements................................................................................... 6
1.4 Recommended Directory Structure............................................................................... 6
1.4.1 TM5 Directory for Database Files ......................................................................... 6
1.4.2 Hy-Sport Directory for Meet Files......................................................................... 6
1.5 Databases ...................................................................................................................... 7
1.5.1 Backing Up the Database....................................................................................... 7
1.6 General Program Setup ................................................................................................. 9
1.6.1 Favorites Filter ....................................................................................................... 9
Section 2 – Setting up the Database.................................................................................. 11
2.1 Making a New Database for Use ................................................................................ 11
2.2 Using Last Year’s Database for the Coming Season .................................................. 11
2.2.1 Open the New Database....................................................................................... 12
2.2.2 Removing Old Meets ........................................................................................... 12
2.2.3 Removing Other Teams ....................................................................................... 12
2.3 Entering or Verifying Key System Settings................................................................ 12
2.3.1 Correcting Your Team Information ..................................................................... 12
2.3.2 Setup System Preferences .................................................................................... 13
2.3.3 Setup Groups/ Sub Groups/ Codes ...................................................................... 13
2.3.4 Verify/Setup Course Conversion Factor.............................................................. 14
2.4 Roster Operations........................................................................................................ 15
2.4.1 Roster Cleanout.................................................................................................... 15
2.4.2 Adding a Swimmer to the Roster......................................................................... 16
2.5 Team Records ............................................................................................................. 17
2.6 Meet Schedule............................................................................................................. 18
2.6.1 Entering Times for B-Meets ................................................................................ 19
Section 3 – Preparing Meet Entries and Other Pre-meet Activities.................................. 21
3.1 Downloading and Importing the Meet Event File ...................................................... 21
3.1.1 Import Meet Events .......................................................................................... 21
3.1.2 Designate the Meet Type ..................................................................................... 22
3.1.2.1 Meet Type for Regular Dual Meets (A-Meet) ............................................... 22
3.1.2.2 Meet Type and Best Times Restrictions for Divisional Entries .................... 23
3.2 Creating the Lineup..................................................................................................... 23
3.2.1 Identify Available Swimmers .............................................................................. 24
3.2.2 Entering Swimmers in an Event .......................................................................... 24
3.2.3 Meet Entry Limits ................................................................................................ 26
3.2.4 Relay Entries........................................................................................................ 27
3.2.5 Verifying Your Lineup ........................................................................................ 29
3.3 Exporting Files and Printing Reports for Dual Meets ................................................ 31
3.3.1 Printing the Meet Entries Report (“Firm Entries List”)....................................... 31
3.3.2 Exporting the Meet Entries File........................................................................... 33
3 of 41
Version 50_v2
NVSL Team Manager 5.0 Operations Manual
3.3.3 Exporting the Team Roster File........................................................................... 34
3.3.4 Exporting Team Records File (Optional) ............................................................ 35
3.4 Other useful pre-meet reports ..................................................................................... 35
3.4.1 Prior A-Meet Best Times Report ......................................................................... 35
3.4.2 Best Times Report (Ladders) ............................................................................... 36
Section 4 – Importing Meet Results and Post Meet Activities ......................................... 38
4.1 Importing the Results After the Meet ......................................................................... 38
4.2 Check for Duplicate Swimmer Records ..................................................................... 40
4.3 Check for Team Records ............................................................................................ 40
4.4 Backup ........................................................................................................................ 40
4.5 Other Post-Meet Reports............................................................................................. 41
4 of 41
Version 50_v2
NVSL Team Manager 5.0 Operations Manual
Section 1 - Introduction
1.1 Program Description
Team Manager 5.0 (hereafter, called Team Manger or just TM) is used by NVSL teams
to maintain their rosters and submit their entries for league meets. It can also be used to
maintain your team mailing list and contact information.
This manual will only cover those features of TM needed for NVSL operations. You can
learn how to use the full range of features from the program documentation or the built-in
Help.
1.2 Program Versions and Licenses
All NVSL teams were provided version 5.0 of the Team Manager software. The version
number is shown, along with the name of the license holder, in the box at the lower, lefthand side of the main program screen (see below). Updating to the latest version is free
and easy to do using the Check for Updates function in the program. You can also check
for the latest version and download the update from the Hy-Tek web site at
http://www.hy-tekltd.com
Please note that according to the Hy-Tek software license, your TM license must be in
the name of your NVSL team.
5 of 41
Version 50_v2
NVSL Team Manager Operations Manual
1.3 Computer System Requirements
To run TM, Hy-Tek specifies the minimum hardware configuration needed is any 500
MHz Pentium, Celeron, or AMD class computer or faster with 1 GB RAM. The
recommended operating system is Microsoft's Windows XP/XP Pro, Windows Vista, or
Windows 7. Any Windows-supported printer will work with the Hy-Tek software. A
laser printer is recommended for use at the meet. Any monitor size is supported but an
800 x 600 monitor resolution or higher is required. Please see the Hy-Tek website for
information about running TM on a Macintosh computer.
1.4 Recommended Directory Structure
There are two important directories where data associated with Team Manager and Meet
Manager is stored. One directory contains the Team Manager database and associated
backup files. The other directory contains the files associated with each meet of the
season.
1.4.1 TM5 Directory for Database Files
The default location for Team Manage databases is C:\TM5Data. The directory is
created automatically when TM is installed. Converted TM 4.0 databases as well as new
databases created by the user are stored in this directory. TM database files have the
extension of “mdb” which is the same as Microsoft Access databases.
1.4.2 Hy-Sport Directory for Meet Files
When TM is installed it automatically creates another directory called C:\Hy-Sport. The
Hy-Sport directory contains files necessary for the Hy-Tek programs to function. It is
recommended that each team create a sub-directory named “Meets” in the “C:\HySport” directory to store all the meet information such as Meet Manager databases, meet
events files, and results output. Some teams add a sub-directory for each year (e.g.
“2008”) under the C:\Hy-Sport\Meets directory. The user then makes a sub-directory in
“Meets” where all files pertaining to that meet will be kept. The recommended NVSL
naming standard for this directory is:
yyyy-mm-dd [Meet Type]-[Visitor Initial]@[Home Initial]
e.g.
2008-06-21 A-Meet S@V
6 of 41
Version 50_v2
NVSL Team Manager Operations Manual
An example of this directory structure is provided in the following
diagram.
1.5 Databases
The Team Manager program operates on a database file. TM can only have one database
file active at a time, however multiple databases can be maintained, and it is easy to
switch between them.
A Team Manager database will contain the all the data for your team – information on
swimmers and families, meet entries and results, team records, etc.
Team Manager has the capability to easily backup and restore the currently active
database. You are encouraged to make regular use of this backup capability, especially
prior to importing any data into the program or making any major changes to the
database.
1.5.1 Backing Up the Database
You can set TM to automatically back up your database at an interval you choose.
Whether you have enabled this feature or not, you can initiate a manual backup at any
time.
From the Main Menu
Set-upPreferencesSystem
Preferences
7 of 41
Version 50_v2
NVSL Team Manager Operations Manual
You can set the automatic
backup intervals by entering
the number of days in the box.
OK
To Request a backup of the database from the Main Menu:
FileBackup
Select the backup
drive and the
directory on the
backup drive.
Add optional
comments to be
stored with backup
Read the notes
about Hy-Tek
recommendations.
OK
To proceed:
Yes
Else to abort
No
8 of 41
Version 50_v2
NVSL Team Manager Operations Manual
To continue:
Yes
Else to abort:
No
If you are backing up to a directory of the
hard drive that already contains a backup of
this database, TM will create a unique
filename and not overwrite previous
backup file.
OK
1.6 General Program Setup
There are several options and settings in the program that you can explore on your own.
Here is one feature that may ease your use of the program.
1.6.1 Favorites Filter
There are many screens and dialog boxes in TM where you have to select a Team. To
prevent you from always having to select your team, TM allows you to set up a default in
the Favorites Filter.
From the Main Menu:
Set-upFavorite Filters
If you had not previously selected a
favorite filter, the Favorite Defaults
will be empty
Add
9 of 41
Version 50_v2
NVSL Team Manager Operations Manual
Type a name in the
“Favorite Name” field
(required), and select
your team from the
pull down menu.
OK
10 of 41
Version 50_v2
NVSL Team Manager Operations Manual
Section 2 – Setting up the Database
There are two methods to start a team database for a new season – starting from scratch
or using a database from a previous season. Once the database has been created and
opened the user should enter or verify a number of settings before getting started with
roster input and updates.
2.1 Making a New Database for Use
Occasionally a previous season’s database will not be available for use so a completely
new, blank database must be started and data entered. To start a new database:
From the Main Menu:
File
Open/New
Type File name (i.e.
Springfield2008)
Open
Complete the System
Preferences as shown in
2.3.2
OK
Proceed to 2.3
2.2 Using Last Year’s Database for the Coming Season
If you have a database from a previous season, you will be able to retain all the swimmers
names and information including meet results from past years.
It is generally a good idea to start with a new database file each year. This provides an
archive record of each season and helps to keep the database manageable. To do this the
user makes a copy of the previous year’s database using Windows and gives the copy a
name that includes the current year (e.g. Springfield2008.mdb). The default location of
the database is usually C:\TM5Data.
Notes: 1) You must close Team Manager or select a different database before Windows
will let you copy the file
2) There is no “Save As” functionality from within Team Manager.
11 of 41
Version 50_v2
NVSL Team Manager Operations Manual
2.2.1 Open the New Database
Open this season’s database using the File->Open/New function.
From the Main Menu:
FileOpen/New
2.2.2 Removing Old Meets
You can clean out any meet data you no longer need, for example meets not involving
your team or meets two or more seasons old. Select Meets on the Main Menu bar at the
top of the screen. Click on a meet to highlight it. Then use the Delete function on the
menu bar and follow the on-screen prompts. Repeat this procedure for any other meets
you want remove.
2.2.3 Removing Other Teams
You can clean out any other teams that are in your database (from importing prior year
results) using a similar procedure. Select Teams on the Main Menu Bar. Click on the
team to highlight it, and use the Delete function.
2.3 Entering or Verifying Key System Settings
2.3.1 Correcting Your Team Information
Select Teams from the Main Menu. Double click on the team name or highlight the team
and select the Edit Function.
Make sure the Team Name is how you wanted it listed in reports. The “Short” Name
should be the same as in the NVSL handbook. Do not use names like Barracudas as the
“Short” Name since most spectators do not know teams by their nicknames. This is
12 of 41
Version 50_v2
NVSL Team Manager Operations Manual
particularly true in multi-team meets such as Relay Carnival and Individual
Championship (Divisionals) meets. Make sure the Team Registration is set to “OTH” and
the Team Type is “AGE”. The LSC should be BLANK. All other information is
Optional.
Click the OK button to return to the Teams window. Close the Teams window to return
to the Main Screen.
2.3.2 Setup System Preferences
From the Main Menu:
Set-up
Preferences
System
Preferences
Verify the preferences
are the same as those
show.
OK
NOTE: The athlete's actual physical age may have nothing to do with his or her age
group eligibility for a meet. The System Age-Up-Date is what will be used to age up your
swimmer's physical age when working with the database. It is recommended that you
have TM automatically age up your swimmers to "Today's Date" each time TM is started.
The Meet Age-Up Date is used in the NVSL to determine eligibility to swim in a
particular age group except for the Individual All Star meet where the age-up date is the
Divisional Meet normally held the week before.
2.3.3 Setup Groups/ Sub Groups/ Codes
In order to restrict entry times for the end of season Divisional meet to A-meet times in
accordance with NVSL rules, we use the Groups/Sub Groups/Codes feature to specify
meet types. Time trials, B-meets, IM Invitationals, and other meets that are not NVSL
sanctioned dual meets (A-Meets) will be characterized as “B-Meets” and the software
13 of 41
Version 50_v2
NVSL Team Manager Operations Manual
will be used to restrict entry times for Divisionals to “A-Meets”. To set up appropriate
meet type codes:
Set-up from the Main Menu
Groups/ Sub Groups/ Codes
Check Meet Type
If missing A or B
Add
Code Description Code Type
A
A-Meet
Meet Type
B
B-Meet
Meet Type
OK
You may add other Meet Type
codes for other Meets.
When finished adding
2.3.4 Verify/Setup Course Conversion Factor
The default Course Conversion factor for Short Course Yards (SCY) to Short Course
Meters (SCM) for Age Group swimmers is 1.11. The NVSL uses a Conversion Factor of
1.10. To verify or change the Course Conversion Factor select Set-up from the Main
Menu and then Course Conversion.
Set-up from the Main Menu
Course Conversion
Edit Yards to SC Meters factor to
read 1.1
Select
14 of 41
Version 50_v2
NVSL Team Manager Operations Manual
2.4 Roster Operations
2.4.1 Roster Cleanout
If you are working from a TM database from a previous season, the roster in your
database might contain some 19-year old swimmers who are no longer eligible to
compete in the NVSL, swimmers who have left the area or will no longer be swimming
with the team.
From the Main Menu:
Athletes
”Age” column
Oldest swimmer will be at top of the list..
Swimmer
”Yes” OR “No”
to delete
Use same process to delete
all the 19 year old swimmers
Use the same deletion
process to remove any other
swimmers no longer on the
team.
If you have swimmers on the roster that have not registered for the season, but you think
may register at a later time, you can mark them as inactive instead of removing them
completely from the database.
To make a swimmer inactive, check the “Show Inactive Swimmers” box at the top of the
Athletes screen. That creates an “Inact” column in the list. Click the box in that column to
make the swimmer inactive.
15 of 41
Version 50_v2
NVSL Team Manager Operations Manual
After you finish, un-check the “Show Inactive Swimmers” box to hide the inactive
swimmers.
2.4.2 Adding a Swimmer to the Roster
If you are starting a database from scratch or if new swimmers are joining the team you
will have to add them to the roster. To add a new swimmer to the roster, select Add from
the menu at the top of the Athletes window.
The only pieces of information required for NVSL are:
Last Name
First Name (use legal first name)
Date of Birth (TM will calculate the NVSL age)
Gender
Team
You may also enter a Preferred Name (e.g. Donny for Donald), and a Middle Initial.
If you want to use any of the other fields for team management purposes, you may do so.
16 of 41
Version 50_v2
NVSL Team Manager Operations Manual
When you have completed entering all the required and optional information, click “OK”.
The swimmer will be added to the roster and the box will be cleared for entry of the next
swimmer.
NOTE: Click on the Use Sibling Information button to duplicate the contact and
mailing information from a previously entered member of the same family.
When you are finished entering swimmers onto the roster, click “Cancel” to close the
dialog box.
2.5 Team Records
If you do not yet have Team records, it is easy to enter them. You only have to do it once,
as you can export the records to a meet database. To learn the procedure for adding
records, consult the Team Manager User’s Manual or the on-line Help.
The standard NVSL internal naming convention for a Team Record file is [Team
Initials]-S or [Team Initials]-Y. An example would be S-S or HRA-Y. TM adds the S or
Y depending on the type of record set is entered – S for Short Course Meters and Y for
Yards. The associated external .REC exported file name will automatically become SS.REC or HRA-Y.REC.
NOTE: Team Manager only keeps the latest updated record for particular age group,
stroke, and distance.
To create new record set
From Main Menu:
RecordsAdd/Edit Records
RecordsCreate New Record Set
Enter Team Initials in “Record Name”
From “Course” pull down menu:
”SCM” if pool is meters ELSE
“Yards” if pool is yards
Enter Description.
OK
Add or Edit record
17 of 41
Version 50_v2
NVSL Team Manager Operations Manual
From Records Menu”
ADD or EDIT
Pick “Age Range”, “Distance”
Stroke”, Gender”, “Individual” or
“Relay”, “Date Set”
Enter “Record Holder”, “Team”,
“Time”, and “Date Set”
OK
2.6 Meet Schedule
There is no need to enter A-Meets into the Meets list as those will be imported along with
the Meet Events file that will be covered in the next section. Other meets where a Meet
Events file will be provided by a meet organizer also do not need to be entered. Some BMeet leagues use Meet Manager to run their meets and generate Meet Events files. This
requires coordination between the teams that are swimming against each other. It is best
if one individual develops the meet structure template and then distributes to the teams.
Any other meet that does not use a Meet Manager Meet Events file will have to be
entered manually.
Entering a meet such as Time Trials, an inter-squad meets or an independent B-Meet can
be done easily within Team Manager. From the Main Menu select the Meets menu item
and Add the meet, then select Events and then Add events as necessary as shown below.
18 of 41
Version 50_v2
NVSL Team Manager Operations Manual
From the Main Menu:
MeetsAdd
Enter a name for the meet
and location.
“Course” = SO or YO for
meters (no conversion) or
yards (no conversion)
”Meet Type” = B
If B (B-Meet) does not
show up in the pull down
menu see 2.3.3 to add it.
Enter the “Start Date”,
“End Date” and “Age-up
Date”.
OK to save the data
Cancel to close the
box
From the Meets Screen:
EventsAdd
For each event in your
meet enter the appropriate
information. For example
Event 1A could be an
Individual, Male, 6&Under,
25, Free event.
OK to save the event
selections and clear the
box for the next event.
Cancel when
complete
Events from other meets can be used by using the Copy Events menu selection from
inside the Events window. Note every meet has Entry and Result Events. They do not
need to be the same, but generally are and can be copied from one to the other (for
example an Entry Event may be for 13 and Over swimmers, but Results Event might be
for 13-14 and 15-18 year old swimmers broken out separately).
2.6.1 Entering Times for B-Meets
One a meet is entered and the events have been set, times for swimmers can be entered
directly in Team Manager. This only applies to B-Meets such as Time Trials, Inter-squad
19 of 41
Version 50_v2
NVSL Team Manager Operations Manual
meets, and independent B-Meets where you are only entering data for your swimmers.
This is not appropriate for NVSL A-Meets where the host team enters the results for both
teams in Meet Manager.
To enter times select Meets from the Main Menu. In the Meet screen select the meet for
which you want to enter data, then select Results Results by Event. The screen below
comes up. Select your team from the pull down menus in the “Results for Team” and
“Team” boxes. Select the event and the eligible swimmers will be shown. Enter the times
in the “Final Time/Pts” box.
Select Event
Enter times here
Select Swimmer
20 of 41
Version 50_v2
NVSL Team Manager Operations Manual
Section 3 – Preparing Meet Entries and Other Pre-meet Activities
Meet entries are done in TM and made available to Meet Manager electronically. This
section will walk you through the process of downloading and importing the Meet Events
file, entering the lineup, and exporting the entries, roster and entries report files.
For dual meets, a Best Time can come from a previous meet, a time trial, a meet from last
year, an invitational meet, coach’s time or no time at all (NT). Remember, that for dual
meets, you are only using Best Time for determining a lane for your swimmer.
The Best Time for the Divisional Meet must come from one of the five dual meets of the
same season if the swimmer swam in that stroke in a NVSL dual meet.
3.1 Downloading and Importing the Meet Event File
Each A-Meet meet requires a Meet Events file. Meet Events files for A-Meets will be
created by the Automation Committee and placed in the Document Center of the NVSL
web site http://www.nvsl.nvblu.com no later than the Sunday prior to each A-Meet.
The naming convention for the file in the Document Center is:
Document Name: Both Teams – [File Name]
File Name: Meet Events-A-Meet [Visitor Initial]@[Home Initial]-ddmmmyyyy00x.zip
This file is to be downloaded and saved in the specific directory set up for that meet. DO
NOT un-zip the files. Once the file is saved to the hard drive it must by imported into
Team Manager before meet entries can be made.
3.1.1 Import Meet Events
From the Main Menu:
FileImportMeet Events
Navigate to the location where you stored
the downloaded file.
The downloaded file to import
OK
21 of 41
Version 50_v2
NVSL Team Manager Operations Manual
There should be one file on
the list.
File
Open
OK - If the file name, course
and start date are correct
ELSE
CANCEL
OK
3.1.2 Designate the Meet Type
Once the Meet Events file has been imported, the Meet Type must be specified. This will
prevent you from inadvertently using “B” Meet or Time Trial times for Divisional
entries.
3.1.2.1 Meet Type for Regular Dual Meets (A-Meet)
For a regular season, dual meet the Meet Type is “A” but the Best Time is not restricted.
22 of 41
Version 50_v2
NVSL Team Manager Operations Manual
From the Main Menu
select Meets. From the
Meets screen
Highlight meet to
update
Edit
Verify the “Meet Name”,
“Location” and “Course”
(S for meters or Y for
yards) are correct
A-Meet
”Meet Type” pull
down button
Select “A” for
Meet Type in the pull
down menu. If you do
not see “A” as an option
see section 2.3.3.
Restrict Prior Times
”Restrict Entry
Best Times to same
Meet Type” should be
blank
”Use Since Date”
box and enter a date if
you want to restrict the
times used for entries.
Not required for dual
meets.
OK
NOTE: By definition any NVSL meet is an A-Meet; any other meet is B-Meet or blank.
3.1.2.2 Meet Type and Best Times Restrictions for Divisional Entries
As noted above entry times for Divisionals must come from a current season, dual meet
(A-Meet) if available.
When making entries for the Divisional meet, make
the Divisional meet an “A” meet as shown in 3.1.2.1
”Restrict Entry Best Times to same Meet Type”
”Use Since Date” checkbox and enter
06/01/yy where yy is the current year. See
above.
OK to return to the “Meets” screen
3.2 Creating the Lineup
Select Meets from the Main Menu. Highlight the meet you want to work on.
23 of 41
Version 50_v2
NVSL Team Manager Operations Manual
3.2.1 Identify Available Swimmers
This process will identify swimmers that are available for this meet. If you are not sure
whether a swimmer will be at the meet or not, just Pre-Enter all the swimmers on your
team.
From the Meets Menu:
EntriesPre-Enter Athletes in Meet
Pick your team from “Team” pull down menu
Enter All button
This indicates that all are available for meet
Clear the check from the “Entrd” for any
swimmer that is unavailable for this meet.
When finished return to Meets Menu.
3.2.2 Entering Swimmers in an Event
There are two ways of doing entries: By Event or By Swimmer. You are free to use
whichever method works best for you. We will describe the By Event method. You can
easily learn the By Swimmer method on your own.
From the Main Menu:
Meets EntriesEntry by Event
The top portion of the “Entry by Event” screen displays the events for the meet. The
bottom part of the screen shows the swimmers eligible to swim that event. TM
automatically takes care of aging up swimmers for the meet. The time next to the
swimmer’s name is his/her best time in that event in the database. If you have specified
you want course conversion for your meet (for example, you have specified the course of
the meet as "Y" asking TM to convert all best times to Yards), then TM will find a
24 of 41
Version 50_v2
NVSL Team Manager Operations Manual
swimmer's Best Converted Time for a specific stroke/distance. TM will indicate a
converted time by adding a ' character after the time - for example, 1:23.45Y' indicates a
SCM or LCM time that has been converted to Yards.
Make sure your team is selected for “Swim for Team” and “Team”. The “Swim for
Team” selection will determine the team used for the meet entries. See Frequently Asked
Questions in the Help menu of Team Manager to understand when this might be changed,
e.g. for an inter-squad meet.
TM automatically filters out unavailable swimmers (as declared on the Pre-Enter
Athletes in Meet screen) by setting the Only Pre-Entered Athletes checkbox by
default. If you want to see all your eligible swimmers, uncheck the box.
You can show swimmers eligible to swim up to that event, by clicking the “Show SwimUp Athletes” box.
The Athletes list is sorted by Last Name. You can click on any of the underlined column
headings to sort by that field (e.g. Best Time).
Enter a swimmer in the event by checking the box to the right of the swimmer’s name in
the “Entrd” column. The row with the swimmer’s name will be highlighted in yellow.
Meet Manager will assign lanes in the following order: Home 3, 5 and 1 based on Best
Times; Visitor 4, 2 and 6. If a team desires a swimmer in another lane, then enter an
appropriate time in “Custom” column that will result in assignment to the desired lane. If
25 of 41
Version 50_v2
NVSL Team Manager Operations Manual
the “Custom” time is being used just for seeding then it is generally a good idea to enter a
time that is clearly fictitious, e.g. 1.23 or 9.99.
To remove a swimmer from an event, un-check the “Entrd” box. The yellow
highlighting will be removed.
For an A-Meet repeat this process for the 38 individual events. Highlight another event at
the top of the screen, or use the Next/Previous arrow buttons.
For Divisional Meet enter alternates by checking the “Alt” column box for the swimmer.
3.2.3 Meet Entry Limits
TM provides for modest error checking of your entries. If you try to enter a swimmer in
more than two individual events a warning dialog appears and the number of Individual
Entries (IE) cell turns red. However, when you click “OK”, the swimmer will be entered
in that third event. You must go back and remove that swimmer from one of their three
events. If you don’t do this, the person seeding the meet will remove that swimmer from
their third listed event (there is no choice of which event to scratch at that point).
26 of 41
Version 50_v2
NVSL Team Manager Operations Manual
3.2.4 Relay Entries
When you get to the relay events (A-Meet Event #s 39 through 50), the bottom part of the
screen changes.
“New Relay” button
27 of 41
Version 50_v2
NVSL Team Manager Operations Manual
Enter the first swimmer by checking the “Entrd” or dragging the swimmer name to the
“Swimmers” column. You can also double-click a swimmer into the next available lane.
You can remove a swimmer by double-clicking on the swimmers name in the
“Swimmers” column. TM will keep track of the Individual Entries (IE), Relay Entries
(RE) and Cumulative Entries (CE) for the swimmers. Repeat the process for the
remaining three swimmer selections in the relay.
Following notes are for A-Meets:
NOTE: For Event 39 and 40 the system will select the best relay if you click “Find
Best Relay” button. It will also “Calculate Custom” based on the times of the
selected swimmers.
NOTE: Events 41 thru 48 are Age Group Medley Relays and the swimmers should
be selected based on swimming the strokes as follows: 1st swimmer – Back; 2nd
swimmer—Breast; 3rd swimmer – Fly; 4th swimmer – Free.
Relay swimmers are not required to swim in the order in which they are listed, however
the strokes must be swum in the proscribed order.
NOTE: Events 49 and 50 are Mixed Age Freestyle Relays and the swimmers must
be assigned in the following order: 1st swimmer – 11-12; 2nd swimmer -- 10&Under;
3rd swimmer -- 13-14; 4th swimmer – 15-18.
Some people find it helpful to sort the swimmers by Age (click on Age column) when
selecting the Mixed Age Relay participants. Swimmers must swim in this order.
28 of 41
Version 50_v2
NVSL Team Manager Operations Manual
Following Notes are for Relay Carnival:
NOTE: Events 1 and 2 are Mixed Age Freestyle Relays and the swimmers must be
assigned in the following order: 1st swimmer – 11-12; 2nd swimmer – 10&Under; 3rd
swimmer – 13-14; 4th swimmer – 15-18.
NOTE: Events 3 and 4 are Age Group Modified Medley Relays and are swum
according the the NVSL Relay Carnival rules in the following order: Back, Breast,
Free, Free. The time card will assign strokes as follows: Back, Breast, Fly, Free to
the selected swimmers. The NVSL rules are to be followed.
NOTE: Events 5 thru 12 are Age Group Medley Relays and the swimmers should
be selected based on swimming the strokes as follows: 1st swimmer – Back; 2nd
swimmer – Breast; 3rd swimmer – Fly; 4th swimmer – Free.
NOTE: For Event 19 thru 22 (13-14 and 15-18 200M Free Relays) the system will
select the best relay if you click “Find Best Relay” button.
NOTE: For All Events enter 1 in the Ht column and the Lane number in LN. For
Event 1 the Lane (LN) number is determined at the Pre-Relay Carnival Team
Representatives meeting. The Lane number is increased by 1 for each event and
starts over as 1 after assigning lane 6.
Repeat this process for the other relay events.
3.2.5 Verifying Your Lineup
It is highly recommended that you verify your entries. What you send out is your official
lineup, subject to the scratch rules of NVSL.
You can verify your entries by scrolling back through the Entries By Event or Entries By
Swimmer windows. But, an easier way to verify your entries is by using two (2) reports
in the Meet Entries Report.
From the Main Menu:
Reports
Meet Reports
Meet Entries
Select your Team and the Meet Name, if they aren’t already selected. You can have the
report sorted by Name or Event Number. And you can select various other options as
shown on the dialog box. You can play with the various options until you get exactly
what you want.
29 of 41
Version 50_v2
NVSL Team Manager Operations Manual
The Report by Event Number (Option #1) is handy for verifying that you have the
desired number of swimmers in each event. Things to check in Report by Event Number
report include:
•
•
•
Only three swimmers in each individual event
Four and only four swimmers in each relay event
Mixed Age Relays (Events 49 and 50) swimmers in the proper order (11-12,
10&Under, 13-14 and 15-18)
The Report by Name (Option #2) is handy for verifying that each swimmer is in the
desired number of events, in the correct events, and not in too many events. Things to
check in Report by Name report include:
•
No swimmer entered in more than two individual events
To print a report from the Report Preview Screen, use the buttons at the top of the screen.
Print Report
Export Report in a variety of formats
30 of 41
Version 50_v2
NVSL Team Manager Operations Manual
3.3 Exporting Files and Printing Reports for Dual Meets
Each team must prepare a “Firm Entry List” or Meet Entries Report containing the first
and last names of each swimmer and the event(s) in which they are entered in the dual
meet. This paper copy will be exchanged with the other Team Representative at the preA-Meet meeting between team representatives which must be held not later than 24 hours
prior to the time of the meet, usually on Thursday evening. The paper copy is the team’s
official list of entries for the meet. In addition to the paper copy of the Meet Entries
Report, each team will also need to provide the following electronic files as part of the
pre-meet process:
1. Meet Entries File
2. Team Roster File
3. (Optional) Team Records File, and
4. (Optional) the visiting team can provide an electronic copy (*.pdf) of the meet
entries report.
The Meet Entries File, Team Roster File, Team Records File (optional), and the
electronic copy of the Meet Entries Report (optional) should be provided on external
media (e.g. thumb drive or CD) to the host team at the pre-meet meeting. For the
Divisional meets (Individual and Relays), the files will be provided to the Division
Coordinator at the pre-meet planning meeting. This section will tell you how to print the
Meet Entries Report (“Firm Entry List”) and how to export the files above.
3.3.1 Printing the Meet Entries Report (“Firm Entries List”)
This is the same as the Report by Event Number used in section 3.2.5 to verify your
entries are correct.
Note: The “Firm Entries List”, also called the Meet Entries Report, is your official
list of entries for the meet and under NVSL meet rules each team is committed to
follow those entries regardless of what is in the electronic file. It is best to verify
your entries and to check with your coach to make sure that all the necessary
swimmer entries are correct and follow the NVSL entry rules.
31 of 41
Version 50_v2
NVSL Team Manager Operations Manual
From the Main Menu:
ReportsMeet
ReportsMeet Entries
Meet Select the
appropriate meet from
the pull down menu
Team Select
your team
Check the “Do Not Show
Entry Times” check box
and select the “Individual
and Relays” option.
Verify sort by “Meet
Event Number” is
selected.
Create Report
Verify the entries are correct and then print the report. After printing the report it is
recommended that you identify this report as your official firm entry list by writing
“Official” or something to that effect on the top of the first page. You should also save it
electronically to a disk to share with the other team. Use the “Export Report” button on
the Print / Export Reports screen.
Format: Use the pull down menu and select
“Adobe Acrobat (PDF)”.
Destination: Use the pull down menu and
select “Disk file”.
OK
32 of 41
Version 50_v2
NVSL Team Manager Operations Manual
Select where you want
to save the file
Give it a descriptive
File Name.
Save
3.3.2 Exporting the Meet Entries File
The Meet Entry File is used by Meet Manager to bring your swimmer selections into the
meet for processing.
From the Main Menu:
FileExport
Meet Entries
Make sure “Export
Relays” box is
checked.
Select Drive and
Directory to save the
File.
OK
If you select the “Do not include Entry Times” box, Meet Manager will randomly seed
your swimmers into the lanes which is generally not desired. After selecting OK, you will
get a dialog box showing the location and name of the file created.
OK
From “Export Entries” dialog box
OK or Cancel
33 of 41
Version 50_v2
NVSL Team Manager Operations Manual
3.3.3 Exporting the Team Roster File
The Team Roster File ensures all your swimmers are pulled into the meet file in Meet
Manager in case a substitution has to be made at the meet and precludes having to
manually enter the swimmers name with the possibility of making a mistake in spelling.
From the Main Menu, select File | Export | Athletes/Teams.
Select the Team, Export to Drive and the Export to Directory, then click “OK”.
The confirmation dialog box will include the location and name of the file created, as
well as the number of swimmers in the roster file.
OK
From “Export Athletes” dialog box
OK or Cancel
34 of 41
Version 50_v2
NVSL Team Manager Operations Manual
3.3.4 Exporting Team Records File (Optional)
From Main Menu:
RecordsExport Records
Select “Export to Drive” and
“Export to Directory”
Select the appropriate set of records from
the “Available Records” drop down list
OK
Export verification message
OK
Upon completion of export will return to
“Export Records” screen
OK or Cancel
You now have your three files (Meet Entries File, Team Roster File, and (Optional) Team
Records File) ready on a thumb drive or can burn them to a CD. You may also want to
put the Meet Entries Report (PDF) on the media for reference. It is a good idea to have
paper copies of your Roster and Meet Entries Report available at the meet.
3.4 Other useful pre-meet reports
This section will describe some other reports that can be useful for selecting swimmers or
making substitutions.
3.4.1 Prior A-Meet Best Times Report
Another useful report to have is the Prior A-Meet Best Times Report. This is used to
ensure you do not try to substitute a swimmer with a faster time in an event during the
current season for a slower swimmer.
35 of 41
Version 50_v2
NVSL Team Manager Operations Manual
From Main menu:
ReportsPerformance
ReportsTop Times
Enter your team initials in
“Team”
Check “Use Since Date”
Enter “0601yy” where yy =
current year
If host pool is meter check
“SS” else check “YY”
From “Meet Type” pull down
menu pick “A”
Create Report
Follow instructions in 3.3.1 to
Print or Export Report
3.4.2 Best Times Report (Ladders)
When selecting swimmers for events it is often useful to have a listing of the best times
of swimmers from both teams for each event. This will allow you to look for
opportunities to swim-up swimmers and adjust your lineup to get the most points. Such a
report is often referred to as a “ladder”. This section will show you how to build a ladder
for your upcoming dual meet to aid in swimmer selection.
The basic process is to import your next opponent’s times from the NVSL website, make
a copy of your master team database, open the copied database, delete all the teams
except you and your opponent and then run the Top Times Report.
1. Import meet results for your opponent. From the NVSL website download the
results file from your next opponent’s previous meet(s). As a general rule you can
import a significant number of meet results into your Team Manager database
without any degradation in performance. As a practical matter you probably do
not need more than the last two or three previous meets to get a feel for the skill
level of their swimmers. When you download the file from the NVSL website
save it to your hard drive. It is normally a good idea to save the files to the meet
directory you created in section 1 for the upcoming meet. From Team Manager
(with your master team database open) go to the Main Menu and select File |
Import | Meet Results and navigate to the directory with the results files (see
Section 4.1 for a screen capture of this task). When you import the results be sure
to check the “Add New Teams/Athletes” checkbox. See Section 4.1 for more
information.
2. Backup you team database. We will be making irreversible changes to the
database in later steps so it is a good idea to make a backup to be sure your team
36 of 41
Version 50_v2
NVSL Team Manager Operations Manual
data is protected. From the Main Menu select File | Backup and follow the
prompts.
3. Close Team Manager and make a copy of your master team database. Your team
database is normally stored in the C:\TM5Data directory. Navigate to this
directory using Windows Explorer, highlight the file and make a copy (CTRL + C
or right mouse click Copy). Navigate to the meet directory set up for your dual
meet (normally in the C:\Hy-Sport directory) and paste the database file into that
directory (CTRL+V or right mouse click Paste). You will not be allowed to paste
the file if it is still being used by Team Manager. At this point it is a good idea to
rename the file so it will not be confused with the master database. Give the file a
descriptive name such as “Team1 vs Team2 Ladder Date”.
4. Open Team Manager and open the copy of the database. From Team Manager go
to the Main Menu and select File | Open/New and navigate to the copy of the
database file created in Step 2. Select the file. Verify at the top of the Team
Manager Main Menu in the title bar that it shows the copy of the database file
name. The next step will make irreversible changes to the database so be sure you
are working on the copy and not the master database.
5. Delete all the teams except your team and your opponent. From the Main Menu
select Teams and delete the other teams using the Delete menu item or the symbol. Close the Teams window when done.
6. Run the Top Times Report. From the Main Menu select Reports | Performance
Reports | Top Times. In the dialog box select Meets: All Meets. For Teams
select the Blank option (such that no team is selected). Select a Course Option
normally SO or SS. Using SS will convert yard times to meters while SO will not
convert yard times. Sort by Event (Current Age). Leave the Meet Type blank in
order to see B-Meet and Time Trials times for your swimmers. For Top How
Many? select 0. This will show the best time for each swimmer in each event.
7. Print or save the report.
8. Open your team master database. From the Main Menu select File and at the
bottom of the window you should see a list of recently opened databases. Select
the correct database and verify it is loaded in the title bar.
37 of 41
Version 50_v2
NVSL Team Manager Operations Manual
Section 4 – Importing Meet Results and Post Meet Activities
4.1 Importing the Results After the Meet
After the meet you should import the meet results into your Team Manager database.
Having the meet results allows you to track swimmers performance (most improved or
high points) as well as improve your meet selections for subsequent and end of season
meets. Meet results are exported from Meet Manager (MM) as a Meet Results file
following the meet. The results file can be obtained from the host team at the meet with a
flash drive, can be sent via email or can be downloaded from the NVSL website. You can
also download results files for other teams in your division and the league from the
website. Regardless of how you get the file (*.zip, *.hy3 or *.cl2 file types) you should
save the file to the meet directory set up in Section 1 for the meet. Import the results file
into Team Manager as follows:
From the Main Menu:
FileImportMeet
Results
Navigate to the drive and
directory containing the
Meet Results file.
Open
If the file is a *.zip format
Team Manager will unzip
the file and make it available
for importing as in the
following screen captures.
OK
38 of 41
Version 50_v2
NVSL Team Manager Operations Manual
You will see the
un-zipped HY3
results file in the
TM5Temp
Directory.
Highlight
the File Name
Open
Verify the Meet
Name and Date.
Click the “Add New
Teams/Athletes”
check box.
If you only want the
results for your team
do not check the
“Add New
Teams/Athletes”
checkbox or type the
Team Code (e.g. S)
in the ‘One Team”
box.
OK
You may get a dialog box explaining that the Meet Date is the same as the Meet Date of
the meet you used to do the entries, and asking if you want to treat them as the same
meet. Click “Yes”.
39 of 41
Version 50_v2
NVSL Team Manager Operations Manual
You will see the progress of the import at the bottom of the box. After it is complete, the
status in the lower left corner should say “Import Successful”. The Import Statistics
shows how may swims were imported from the meet. Click “Close”.
4.2 Check for Duplicate Swimmer Records
After importing your team results, it is possible to have duplicate swimmer records in
TM. This can only occur if someone typed in or edited swimmers while in MM. If
someone did, they may not have matched the exact name and birthday that were already
in TM.
Refer to the list of swimmers that someone jotted down at the meet. Find them on the
Athletes screen in TM and sort by name. If you find duplicate names for a swimmer, then
open up each one-at-a-time and examine the information to decide which entry you want
to keep. Then drag the one you do not want to keep onto the one you do want to keep and
TM will merge the two entries into one, retaining all the times from both entries.
4.3 Check for Team Records
Team Manager will not automatically update the team records; you must use the Records
Match Report to update the records.
From the Main Menu:
ReportsPerformanceRecord
Match
Pick “Meet”
Pick Your Team
Pick any other option desired
Note that the “Records” tab has more
Options.
Create Report
NOTE: TM does not keep a history of
Records
4.4 Backup
After completing all the tasks related to importing your team results file, it is a good idea
to do a TM backup to an external device. From the Main Menu select File | Backup and
follow the prompts to save the backup file to a safe location.
40 of 41
Version 50_v2
NVSL Team Manager Operations Manual
4.5 Other Post-Meet Reports
Explore the Reports menu for other reports that may be of interest to your team. Common
reports include:
Performance Reports
Top Times – can be used to get time improvements as seconds or percent. You
will need to select a Use Times Since date and check the Chronological box.
High Points – used to track points earned at scored meets.
Meet Reports
Meet Results – used to show meet results in a variety of formats including
personal best times and time improvement by swimmer or event
41 of 41
Version 50_v2