1
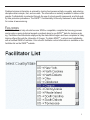
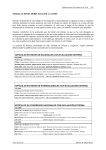
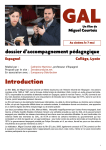
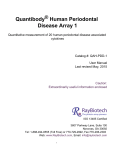
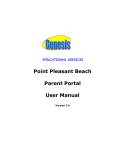
TM
School-Wide Information System
Becoming Swift at SWISTM
User’s Manual
September 2006
Version 4.0
This manual is available on-line at http://www.swis.org
SWIS™ User’s Manual 2006
Version 4.0
Edited by:
Anne W. Todd, Robert H. Horner, Nadia K. Sampson & Megan Amedo
Educational and Community Supports
University of Oregon
Appreciation for contributions to previous editions of SWIS™ User’s
Manuals goes to:
Audrey Desjarlais, Jody Esperanza, Emma Martin, Seth May, Jean Nakasato, Danielle Phillips,
Terri Reese, George Sugai, Tary Tobin, & Jim Watson
Software requirements for SWIS™ include:
• Internet Explorer 6 or higher for PC (SWISTM is not supported on IE for Macs.)
• Safari 1.0 or higher
• Mozilla 1.5 or higher
• Firefox 1.0 or higher
• Netscape 7.0 or higher
Note: Users with slower internet connections may experience difficulties unrelated to the
SWIS™ system.
For full citation use:
May, S., Ard, W., Todd, A., Horner, R., Glasgow, A., Sugai, G. & Sprague, J. (2000). School-wide
Information System (SWIS™(c) ), University of
Oregon, Educational and Community Supports.
SWIS Facilitator:
Email:
Phone:
Table of Contents
Getting to Know SWIS™
1
Who should use this manual
Brief overview
Facilitators
The SWIS™ Structure
1
1
2
3
Using SWIS™ Data for Discipline Decisions
Big 5 basic reports
Big 5 Basic Report Examples
Other reports
Other Report Examples
SWIS™ Data Entry and Reporting Schedule
Common SWIS™ Navigation Features
Logging Into and Out of SWISTM
Data Entry
School Information
Enrollment and Days Per Month
Staff and Student Information
Add/Revise Student/Staff Information
Display Staff/Student Status
Merge Staff/Student
Referrals
Adding a Referral
Copying Referral Information to Next Referral
Using Extra Info. Fields
Find and Revise Referral
Generating Reports
Big 5 Basic Reports
Other Reports
Advanced Reporting Options
Tools
4
4
5
8
8
17
18
19
20
20
21
22
22
23
23
24
24
25
26
27
28
29
30
32
33
Data Integrity Report
Data Download
Preferences
33
33
34
Account Preferences
School Preferences
34
34
Building Fluency Activities
35
Data Entry Activities
Accuracy and Modification Activities
Reporting Activities
Getting Support
SWIS™ Data Entry and Reporting Schedule
35
36
36
38
41
Getting to Know SWIS™
WHO SHOULD USE THIS MANUAL
The purpose of this manual is to provide SWIS™ users with a quick reference and troubleshooting guide. The manual is for use by SWIS™ Facilitators and SWIS™ Users during initial
start-up, training, and on-going use.
Individuals new to SWIS™ should go to the SWIS™ website at www.swis.org for information
about the features of SWIS™ and how to obtain access to SWIS™. The website also provides
access to a demonstration of the SWIS™ structure, functions, and reports.
BRIEF OVERVIEW
The School-Wide Information System (SWIS™) is a web-based information system used to improve the behavior support in elementary, middle (junior high), and high schools. The purpose of
SWIS™ is to provide school personnel with accurate, timely, and practical information for making
decisions about discipline systems. School personnel collect ongoing information about discipline events in their school, and enter this information through a protected, web-based application. SWIS™ provides summaries of this information for use in the design of effective behavior
support for individual students, groups of students, or the whole student body. With accurate and
timely information, school personnel can make decisions that transform schools into safe, orderly, and supportive environments.
SWIS™ has three elements:
1. Information gathering
2. Web-based computer application for data entry and summary
3. Use of information for decision-making.
SWIS™ is more than just a computer application. It is a practical process for helping school
personnel make decisions about the design and management of school-wide behavior support
systems, targeted interventions for problem areas, and/or individual student behavior support
systems.
SWIS™ is a coherent and flexible system for gathering problem behavior information. However,
problem behavior categories used within a school must be mutually exclusive (one problem behavior cannot fit more than one category) and exhaustive (a category for all problem behaviors).
A list of definitions for all SWISTM problem behavior categories is availble on the SWISTM website.
1
Problem behavior information is entered by local school personnel daily or weekly, and entering
discipline data is simple, fast, and accurate. The information is instantly available in tables or bar
graphs. Confidentiality is protected through the use of school-specific passwords, and high quality data protection procedures. The SWIS™ Confidentiality & Security statement is also available
for review at www.swis.org.
FACILITATORS
SWIS™ Facilitators help schools become SWISTM compatible, complete the licensing process
and provide on-going technical support as schools learn to use SWISTM data for decision-making. Facilitators are individuals employed by the state/district/region and have completed a 3-day
training offered through the University of Oregon. To obtain SWISTM, a school must collaborate
with a certified SWISTM Facilitator. Your school’s facilitator contact information is available on the
facilitator list on the SWISTM website.
2
THE SWIS™ STRUCTURE
SWIS™ is organized around three features:
1. Data Entry
2. Reporting
3. Tools
Each SWIS™ account can be accessed through two levels. A full-access password provides
access to all three SWIS™ features. A read-only password provides access to all reports including those reports with staff and student name options. A read-only password does not allow data
entry. The SWIS™ main menu gives a picture of the SWIS™ structure.
3
Using SWIS™ Data for Discipline
Decisions
SWIS™ reporting options are structured for decision-making in three areas:
1. Design and management of school-wide behavior support systems
2. Targeted interventions for problem areas and groups of students
3. Individual student behavior support plans and systems
The Big 5 Basic Reports on the main menu provide information for answering general questions
on a monthly basis. To monitor school-wide patterns of problem behavior, start with the Big 5
Basic Reports.
BIG 5 BASIC REPORTS:
1.
2.
3.
4.
5.
Average Referrals Per Day Per Month
Referrals by Problem Behavior
Referrals by Location
Referrals by Time
Referrals by Student
The Big 5 Basic Reports are available for:
• Minors, majors, or all referrals
• Any period of time for which SWIS™ data is entered
• Table or graph format
• Fixed order of reporting (Non-Fixed Graphs are orded from least to most frequent)
4
BIG 5 BASIC REPORT EXAMPLES
AVERAGE REFERRALS PER DAY PER MONTH
5
REFERRALS BY PROBLEM BEHAVIOR
REFERRALS BY LOCATION
6
REFERRALS BY STUDENT
REFERRALS BY TIME
7
OTHER REPORTS
Other reports are available for queries of the basic reports. When targeted problem areas and
individual student questions arise, other reports and graphs contain current information for more
detailed problem solving. (It is recommended that SWISTM data be entered on a daily or weekly
basis.) A variety of reports and graphs can be generated to answer specific questions related to
office discipline referral information. These include:
• Custom Referral Report
• Custom Graph
• Referrals by Staff
• Suspension/Expulsion Report
• School Ethnicity Report
• Individual Student Report
• Year End Reports
• Staff and Student Lists
OTHER REPORT EXAMPLES
CUSTOM REPORT
8
CUSTOM GRAPH
SUSPENSION/EXPULSION REPORT
9
SCHOOL ETHNICITY REPORT
Three graphs are available in the School Ethnicity Report. These include:
1. Percentage of all Enrolled Students by Ethnicity and Percentage of Referrals by Ethnicity
2. Percentage of All Enrolled Students by Ethnicity and Percentage of Students with Referrals by Ethnicity
3. Percentage of Students Within each Ethnic Group Who have Referrals.
GRAPH #1: PERCENTAGE OF ALL ENROLLED STUDENTS BY ETHNICITY AND PERCENTAGE OF REFERRALS BY
ETHNICITY:
This graph allows comparison of the proportion of students within a school by ethnic grouping
(number of students within an ethnic group divided by total enrollment) with the proportion of
office discipline referrals from each ethnic group (number of office discipline referrals from an
ethnic group divided by the total number of office discipline referrals). The graph allows assessment of the extent to which the proportion of referrals over-represents any specific ethnic group.
10
GRAPH #2: PERCENTAGE OF ALL ENROLLED STUDENTS BY ETHNICITY AND PERCENTAGE OF STUDENTS
WITH REFERRALS BY ETHNICITY:
This graph allows comparison of the proportion of students within a school by ethnic grouping
(number of students within an ethnic group divided by total enrollment) with the proportion of
students with office discipline referrals from each ethnic group (number of students with a discipline referral divided by the total number of students with discipline referrals). The graph allows
assessment of the extent to which the proportion of students being referred over-represents the
proportion of students in any ethnic group.
11
GRAPH #3: PERCENTAGE OF STUDENTS WITHIN EACH ETHNIC GROUP WHO HAVE REFERRALS
The number of students with office discipline referrals from each ethnic group is divided by the
number of enrolled students in that ethnic group. This allows comparison of rates of referrals
across ethnic groups in the school, and provides identification of any ethnic group that is experiencing a proportionally higher rate of referrals.
12
INDIVIDUAL STUDENT REPORT
The individual student report provides a discipline summary for any student in the SWIS™ database. The individual student report includes:
• Summary of Referrals Per Year
• Average Referrals Per Day Per Month
• Referrals by Problem Behavior
• Referrals by Location
• Referrals by Possible Motivation
• Referrals by Time
• Suspension/Expulsion Summary
• Individual Referral Information
13
14
YEAR END REPORT
The Year End Report is designed to summarize referral rates per 100 students in a school by:
• Year
• Problem Behavior
• Grade Level
• Location
In addition, a suspension/expulsion report and triangle data report are provided. Summaries are
organized for use at the district-level. Two of the available reports are provided below
15
16
SWIS™ Data Entry and Reporting
Schedule
A schedule for data entry and report generation is helpful in getting organized for and sustaining the use of SWIS™ data. The SWIS™ schedule below is an example of how to organize data
entry and reporting needs around discipline decision timelines and meeting schedules. A blank
SWIS™ Data Entry and Reporting Schedule is located at the back of your manual.
Who
Tanya
Tanya and Jose
Who
Climate Committee
BEP Team
IEP Teams
Administrators
17
Data Entry
What
Office Referrals
Accuracy Checks
Report Generated
What
Office Referrals the 5
basic reports
Referrals by student
individual student reports for students 5+
referrals
Individual Student
Report
All options
When
End of Each Day
10 minutes monthly
before Climate Committee Meeting
When
Every two weeks
meetings 3:00
Thursdays 3:15
Scheduled IEP meetings
Student meeting
Parent meeting
Staff meeting
School Board meeting
Common SWIS™ Navigation
Features
A small number of features are standard across SWIS™. Review the list below as you get to
know SWIS™.
• Tab Activated Movement - Users can move from one field to the next within a data entry
screen by using the Tab button on their computer keyboard.
• Navigation Menu - At the top of each data entry screen is a gray navigation bar that allows users to scroll through records one at a time, click to add a new record or delete the
current record.
• Main Menu - There is a main menu button located on every screen that will take users
back to the SWISTM main menu.
• Pop-Up Windows - For PC users, blue boxes activate pop-up windows for student and
staff names. For MAC users, white ovals activate pop-up windows.
• Drop-Down Lists - Arrows activate drop-down lists within the SWISTM application. Users
can also click anywhere within the drop-down window to activate the lists.
• Required Information - Some fields within SWISTM are required in order to save a record. All required fields are noted with a red “(required)”
• Dates - For schools in the United States, all dates must be entered in the following
format: DD/MM/YYYY. For schools outside of the US, dates are formatted based on the
locale set up within Account Preferences.
• Report Date - When generating reports and entering referrals, the date will default to the
current day. Users may change the date to previous days, but must follow the specified
date format.
• Auto Logout - SWISTM will automatically time out after 15 minutes of inactivity. This is to
ensure confidentiality is maintained.
• Space and Case Sensitivity - All usernames, passwords and all Extra Info fields are
space and case sensitive. Be sure to log into the account using the login information
provided on your school’s School Information Form. To avoid multiple entries in Extra Info
fields, be consistent when defining these in data entry.
18
Logging Into and Out of
SWISTM
For computer set-up:
1. Check accuracy of date and time.
2. Click on the Control Panel, click on Date/Time option and revise as needed.
3. Log onto Internet.
4. Type in website address www.swis.org. (You might want add this site to your favorites or
bookmarks.)
To Log Into SWISTM:
1. At far right, click on Login/Demo.
a. For specific school
Username: login name
Password: 7 character password
b. For demo
Username: ebs
Password: ebs
2. Click on Continue to go to SWIS™ main menu.
To Logout:
1. Click on Logout button at top right of any SWIS™ page.
To maintain confidentiality, always logout when leaving work station
LOGIN SCREEN
19
Data Entry
SCHOOL INFORMATION
This information is initially entered for SWIS™ Users when the school account gets set up. To
revise the information, follow the steps outlined below.
1. At main menu, click School Information.
2. Click in the corresponding fields to enter:
a. School mailing address
b. Physical address IF different from mailing address
c. Grade range
• Click lowest grade level served
• Click highest grade level served
d. School phone number
e. School fax number
f. School’s contact person
• To revise the school’s contact person name, click on the Select button. If the
name is not on the list, enter name in Staff Information
• Click on the new contact person’s name from pop-up list
• Type in contact person’s email address
3. Click Save.
SCHOOL INFORMATION
20
ENROLLMENT AND DAYS PER MONTH
To graph and report Average Referrals Per Day Per Month, Individual Student Reports and all
Ethnicity Reports, there must be data entered in the Enrollment and Days Per Month section of
your account. If these reports show up blank when you run them, it is likely your account has no
enrollment figures entered.
Ethnicity enrollment data is optional. To activate Ethnicity as a required field in your school’s account, see School Preferences in this manual. To generate Ethnicity Reports, student ethnicity
data must be entered in two different ways. Enter the number of students in each ethnic group in
Enrollment and Days Per Month and enter each student’s ethnic background in Student Information.
To enter your Enrollment and Days Per Month:
1. At main menu, click Enrollment/Days Per Month.
2. Select school year from the drop-down list located in the upper right corner.
3. Enter enrollment number based on annual census count (typically generated by October
1st).
4. Enter ethnicity enrollment and number of students in each group. The total ethnicity enrollment should equal the total school enrollment number.*
5. Enter number of school days for each month.** (If your school starts during a different
month, go to Preferences in the Tools folder.)
6. Click Save.
ENROLLMENT AND DAYS PER MONTH
21
STAFF AND STUDENT INFORMATION
ADD/REVISE STUDENT/STAFF INFORMATION
To add new staff/students:
1. At main menu, click Add/Revise Staff/Student.
2. Click Jump to Staff/Student button to preview existing staff/student lists.
If staff/student name you’re looking for is not on the list:
a. Click Close Window.
b. Click New.
c. Type last and first names and district staff/student ID number.
4. Click Save.
To revise staff/student information:
1. At main menu, click Add/Revise Staff/Student.
2. Click Jump to Staff/Student button to preview existing staff/student lists.
3. Click staff/student name to change and make necessary revisions.
4. Click Save.
When adding or revising student information follow these additional steps:
1. Select student gender.
2. Check the IEP box if student has one or gets one.
3. Enter district’s ID number for student (optional, but necessary for merging SWISTM data
with district database).
4. Enter Other Information (optional).
5. Select student Ethnicity (optional if preference is unselected).
6. Click Save.
22
DISPLAY STAFF/STUDENT STATUS
By unchecking the display box next to student or staff names, they will no longer be available to
select from staff or student name drop-down lists or pop-up windows. (All referral data attached
to this person’s name will remain in the SWISTM account.) Use this feature when students or staff
transfer or no longer attend the SWISTM school.
1. At the main menu, click Display Staff/Student Status.
2. Click in box to un-check the staff/student who are no longer active school members.
3. Click Save.
MERGE STAFF/STUDENT
Merging two names of staff or students will combine all referrals from the “Staff/Student to Delete” to the “Staff/Student to Retain”. To merge staff/student information:
1. At the main menu, click Merge Staff/Student.
2. Click Select Staff/Student from the Staff/Student to Retain field and select staff/student
name to keep in the SWISTM account.
3. Click Select Staff/Student from the Staff/Student to Delete field and select staff/student
name to delete from the SWISTM account.
4. Click Merge.
To delete students or staff from your SWISTM account, go to Add/Revise Student/Staff; select
the name of the person to delete and click Delete in the upper right-hand corner of the screen.
SWISTM will not allow you to delete a student or staff name if there is referral data attached to his
or her name.
23
REFERRALS
ADDING A REFERRAL
1. At main menu, click Add/Revise Referral. This opens the add/revise referral data entry
screen.
2. Click Student Name.
a. If the student’s name does not appear on the list, click Add Student.
b. Follow the steps outlined in Add/Revise Staff/Student Information found in this manual to add the student to the SWISTM account.
3. Enter all required information. All required fields are noted with a red (required).
a. SWISTM allows users to select one problem behavior per referral.
b. If the problem behavior event is minor, click in the box to the right of the word Minor.
This activates the minor problem behavior categories in the required Problem Behavior drop-down list.
c. When the administrative decision results in In-School/Out-of-School Suspension or
Expulsion, enter the number of days the student was suspended or expelled. Half or
Full-day increments for the suspension/expulsion may be entered.
4. Enter other necessary information.
a. Other Information can hold up to 255 characters if anecdotal information about the
problem behavior event is needed.
b. Extra Info. is a field for defining problem behavior events at a more specific level.
Examples of how to use Extra Info can be found in this manual.
5. Click Save.
24
EXAMPLE REFFERAL:
COPYING REFERRAL INFORMATION TO NEXT REFERRAL
When more than one student is involved in the same incident, some of the referral information
can be carried over from one referral to the next one entered. For example, two students are
involved in a fight. The referring staff, the date, the time, the location, the problem behavior and
others involved will be the same for each of the student’s referrals. To copy this information from
one referral to the next referral:
1. Complete referral data entry for the first student.
2. Click in the Copy Data to Next New Referral box at the bottom of the referral data entry
screen.
3. Click Save.
4. This will save the first student’s referral and open a new referral data etntry screen.
5. Enter the missing information into the second student’s referral.
25
USING EXTRA INFO. FIELDS
Schools use the extra info. fields when they want to examine problem behavior event patterns
more specifically. A few categories useful for extra information fields include:
• Harassment Type
• Fighting (# of peers involved)
• Homeroom Teacher
• Defining “other” in any SWIS™ category
For example, some schools may need to define harassment by type. To enter that data, choose
harassment for the problem behavior and type a school-defined code (e.g. gender, sexual, racial)
in the identified extra information field.
Each school account is allowed 3 categories for extra info. When using this option, label each
extra info. field and use them consistently. For example:
• Use Extra Info 1 for harassment type
• Use Extra Info 2 to specify how many peers involved in a fight
• Use Extra Info 3 to identify homeroom teachers
Data entered into Extra Info fields will not show up on any of the Big 5 graphs. The only places it
is displayed are the Custom Report and Custom Graph.
When defining Extra Info in your school’s account, be consistent in the way Extra Info is entered.
Abbreviations, capitalization, spacing are all things to consider when deciding to define a field.
26
FIND AND REVISE REFERRAL
The Find Referral function within SWISTM provides an easy way to locate a specific referral or
group of referrals to open for revisions.
1. At main menu, click Find Referral. This will open the find referral screen.
2. Without entering any information in the given fields, click Find.
3. All referrals in the SWISTM account will appear as a report sorted by date.
4. Click on the date highlighted in blue of a referral to revise. This will open the chosen referral in the add/revise referral data entry screen.
5. Revise referral information as necessary.
6. Click Save.
To find a group of referrals based of specific information:
1. In the Find Referral screen, select a student name, staff name, date or problem behavior
from the drop-down list.
a. More search options are available by clicking Advanced Options and refining your
search further.
1. Click Find.
2. All referrals matching the specified details will appear as a report.
3. Click on date highlighted in blue of a referral to revise. This will open the chosen referral
in the add/revise referral data entry screen.
4. Revise referral information as necessary.
5. Click Save.
To delete a referral from your SWISTM account, use Find Referral to locate it; click the blue date
and click Delete in the upper right-hand corner of the screen. There is no way to retrieve a referral if it has been accidentally deleted. It will have to be re-entered.
27
Generating Reports
SWIS™ reporting is organized to provide the Big-5 basic reports for quick access as well as
a variety of other reports to give more detailed information about your school. SWIS™ data is
available in table and graph formats.
The Big-5 Basic Reports and Graphs Include:
1. Average Referrals Per Day Per Month
2. Referrals by Problem Behavior
3. Referrals by Location
4. Referrals by Time
5. Referrals by Student
Other Reports Include:
• Custom Report
• Custom Graph
• Referrals by Staff
• Suspension/Expulsion Report
• Ethnicity Reports
• Individual Student Report
• Year End Report
• Student and Staff Lists
28
BIG 5 BASIC REPORTS
The first 5 reports on the main menu are used for making decisions about problem behaviors at
a school-wide level. At the main menu, click on each reporting option as needed.
1. Click Average Referrals Per Day Per Month.
a. Select school year from the drop-down list.
b. Select referral type from the drop-down list.
c. Select other report features.
d. Click Generate Report.
2. Click Referrals by Problem Behavior.
a. Enter report begin date.
b. Enter report end date (if different from current day).
c. Select other report features.
d. Click Generate Report.
3. Click Referrals by Location.
a. Enter report begin date.
b. Enter report end date (if different from current day).
c. Select other report features.
d. Click Generate Report.
4. Click Referrals by Time.
a. Enter report begin date.
b. Enter report end date (if different from current day).
c. Select referral type from the drop-down list.
d. Select other report features.
e. Click Generate Report.
5. Click Referrals by Student.
a. Enter report begin date.
b. Enter report end date (if different from current day).
c. Enter the number of referrals per student you wish to see.
d. Select referral type from the drop-down menu.
e. Select other report features.
29
OTHER REPORTS
Other reports provide more detailed information to answer questions the Big 5 reports may not
fully describe. Some reports can also provide much of the information districts and states require
schools to submit. Other Reports are found under Reports on the main menu. To access:
Custom Report
1. Click Custom Report.
2. Select referral type.
3. Select a student name from pop-up window or leave blank to generate a report based on
all students.
4. Select specific staff name if needed, or leave blank to generate a report based on all
staff.
5. Enter report begin date.
6. Enter report end date (if different from current day).
7. Select a begin time and end time.
8. Select specific grade or grade range. Leave blank to generate a report based on all
grades.
9. Select a category from the Sort By drop-down list. The SWISTM default Sort By category
is Date. This default is a preference you may choose to change in Account Preferences.
10. Click Generate Report.
Custom Graph
1. Click Custom Graph.
2. Follow same steps for custom report.
3. Select a graph type from the Graph Type drop-down list. The SWISTM default Graph Type
is Problem Behavior. This default is a preference you may choose to change in Account
Preferences.
4. Click Generate Report.
Referrals by Staff
1. Click Referrals by Staff.
2. Enter report begin date.
3. Enter report end date (if different from current day).
4. Select referral type.
5. Enter the number of referrals per staff you wish to see.
6. To view the number of referrals per staff in a table format, click Show Table.
7. To view the number of referrals per staff in a graph format, click Show Graph.
8. Click Generate Report.
30
Suspension/ Expulsion Report
1. Click Suspension/Expulsion Report.
2. Enter report begin date.
3. Enter report end date (if different from current day).
4. Select a student name or leave blank to generate a report based on all students.
5. Select Show Individual Student Data if needed.
6. Select a group of students to report on from the Student IEP drop-down menu.
7. Click Generate Report.
Ethnicity Reports
1. Click School Ethnicity Report.
2. Select referral type.
3. Select school year.
4. To view the referral information in a table format, click Show Table.
5. To view the referral information in a graph format, click Show Graph.
6. Click Generate Report.
Individual Student Report
1. Click Individual Student Report.
2. Click on Student Name and select a student on which to report from the pop-up list.
3. Click Show Referrals to generate a list of the referral information.
4. Click Generate Report.
Year End Report
1. Click Year End Report.
2. Select school year.
3. Click Generate Report.
Staff and Student Lists
1. Click Student and Staff Lists.
2. Select list type (Student or Staff) from drop-down list.
3. Select a category from the sort by drop-down list.
a. Last name
b. SWIS™ ID - this number is automatically generated when the student/staff name is
entered into the application.
c. District ID - this number is generated at the district level and entered by SWISTM Users.
4. Click Generate Report.
31
ADVANCED REPORTING OPTIONS
Advanced reporting options allow SWIS™ Users to get more specific information about the data.
These options are available in:
• The Big 5 Basic Reports
• Custom Reports
• Custom Graphs
• Referrals by Staff
• Ethnicity Reports
Advanced Options for the Big 5 basic reports include:
• Fixed order (Non-Fixed Graphs are orded from least to most frequent)
• Show names when applicable
• Values shown on graph
• Graph size
• Scale on Y axis
To utilize Advanced Options:
1. Click the Advanced Options button to activate additional data fields.
2. Select the desired options.
3. Click on Generate Report.
Note: For Custom Reports and Custom Graphs check the show box next to the categories needed for your report or graph.
32
Tools
The Tools folder within SWISTM provides a variety of files for setting up, managing, revising and
downloading the data in your SWISTM account. Often discrepancies in your account can be located by using the functions within the Tools folder.
DATA INTEGRITY REPORT
The Data Integrity Report provides a brief snapshot of common errors such as duplicate staff
and student names or referrals that may need to be revised due to data entry errors. To access
the Data Integrity Report:
1. On the main menu, click Data Integrity Report.
2. Select the reports to run by checking the box next to each report name.
3. Click Generate Report.
4. The report generated will list any potential errors. Print a copy of the report and make
the necessary revisions to any of the listed items within your school’s SWISTM account.
Instructions on how to correct common errors can be found within this manual. (e.g. To
revise a referral, see the Find and Revise Referral section of the User’s Manual.)
DATA DOWNLOAD
The Data Download folder provides a way to download your SWISTM data into:
• Excel spreadsheets to manually sort and graph the data
• Comma delimited tables for importing SWISTM data into other student information systems.
• XML format for systems integration purposes.
To download your SWISTM data:
1. On the main menu, click Data Download.
2. Select the format in which you will download your data for the following categories by
clicking the button marked Download.
a. Documentation - defines data entry fields for student, staff and referral layouts.
b. Human Readable Data - downloads all student, staff and referral data entered into
the SWISTM account.
c. Database Import Data - downloads all student, staff and refer
33
a. ral data entered into the SWISTM account and uses numeric identifiers for specific
fields.
b. Database Lookup Tables - defines the numeric identifiers for the specific fields.
3. The file you’ve selected to download will appear.
PREFERENCES
Users have the ability to change defaults within SWISTM to give it a look that is personal to them.
ACCOUNT PREFERENCES
Account Preferences are stored individually for each password accessing SWISTM, allowing each
user to customize SWISTM for their individual usage.
1. On the main menu, click Account Preferences.
2. Change any of the defaults for the following categories:
a. General
b. Data Entry
c. Reporting Preferences
3. Click Save.
SCHOOL PREFERENCES
School Preferences are set for the entire school and will be the same in all the school’s SWISTM
passwords. Only full-use SWISTM passwords may change School Preferences.
1. On the main menu, click School Preferences.
2. Change any of the defaults for the following categories:
a. General
b. District Id’s and Integration
3. Click Save.
34
Building Fluency Activities
DATA ENTRY ACTIVITIES
Use Demo Account:
What is the contact person’s name?
What is the current years enrollment?
What fields are required for referral data entry?
Where do you go to change the school address?
What is David Anderson-Jones District ID number?
Does Willie Loman have an IEP?
Logout.
Use SWIS™ Facilitator Account:
Enter 5 referrals.
Enter 3 staff names.
Enter 5 referrals with 2 students being new.
Enter enrollment for this year.
Undisplay 3 staff and 3 students in the account.
Enter days per month for this year.
Copy referral information from one referral to the next.
Enter a referral using one of the extra info fields.
Enter a referral using the other information field.
Enter a referral where the student was suspended for 2.5 days.
35
ACCURACY AND MODIFICATION ACTIVITIES
Use SWIS™ Facilitator Account:
Enter 5 referrals.
Check accuracy on last 5 referrals or trade 5 other referrals with neighbor and check accuracy.
Record accuracy of 10 fields on 5 referrals, how many were accurate?
Change date on one referral.
Change time on one referral.
Merge two student names.
Change school days: you had 2 snow days in Jan and they were made up in June.
Change location of one referral.
A student has been given an IEP; make that change.
Change the area code for you school’s phone number.
Make two staff members inactive.
REPORTING ACTIVITIES
Use Demo Account:
What basic reports do you use to begin a meeting discussing the status of school-wide efforts?
What report(s) do you use to begin a meeting discussing the status of an individual
student?
What report(s) do you use to begin a discussion about problem behavior events in specific
locations?
The administrator asks you the time of day when the highest frequency of problem behaviors
occurs. What report(s)/information do you give?
The administrator asks you for the two students with the most referrals.
Who are those students?
How many referrals does the student with the most referrals have?
What is the student most likely to do?
Where is the student most likely to have difficulty?
When is the student most likely to have difficulty?
36
A family with 3 kids moves in after the census enrollment was entered. Do you change enrollment?
You have entered referrals and generate the average referrals per day per month graph. It
shows that there is no data to report. You find the referrals in the other basic reports. What
could be happening? What are your next steps?
The Student Services Team is meeting in 5 minutes and needs some information for an individual student. What report(s) do you provide?
The school district office calls and asks for the number of out-of-school suspensions that
have occurred since the beginning of the year. What is your response?
What do you do when the referral form does not have all completed information?
37
Getting Support
Problems do arise from time to time. The following are ways that you can get support for the
problems you may encounter.
1. Check the User’s Manual.
2. Contact your SWIS™ Facilitator. Your facilitator can answer most questions that are beyond the scope of this User’s Manual. Locate the name and the number of your SWIS™
Facilitator on your copy of the School Information Form, inside the front cover of your
SWIS™ User’s Manual, on the back of your password card, or under Facilitator Information in the Help menu at the top of any SWISTM page in your school’s SWISTM account.
3. Ask another SWIS™ User at your school or in your district/region.
4. Click Help, located on the green menu bar in your SWISTM account. The Help Menu gives
you direct access to:
a. The SWISTM homepage
b. Answers to Frequently Asked Questions
c. Your SWISTM Facilitator’s contact information.
d. A link to how to get support if you are unable to reach your facilitator.
38
NOTES
39
NOTES
40
SWIS™ Data Entry and Reporting
Schedule
School:
Facilitator:
Who
Data Entry
What
When
Office Referrals
Accuracy Checks
Who
41
Report Generated
What
When