1
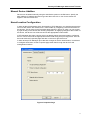
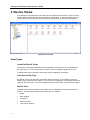
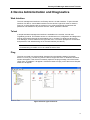
Exterity IPTV Manager
Administrator’s Guide
Exterity IPTV Manager Administrator’s Guide
Notices
Disclaimer
© Exterity Limited 2003-2008
The information contained in this document is
subject to change without notice.
This document contains information that is
protected by copyright. Reproduction,
adaptation, or translation without prior
permission is prohibited, except as under the
copyright laws.
Document Reference
1300-0011-0001
EXTERITY LIMITED MAKES NO WARRANTY
OF ANY KIND WITH REGARD TO THIS
MATERIAL, INCLUDING, BUT NOT LIMITED
TO, THE IMPLIED WARRANTIES OF
MERCHANTABILITY AND FITNESS FOR A
PARTICULAR PURPOSE. Exterity Limited
shall not be liable for errors contained herein or
for incidental or consequential damages in
connection with the furnishing, performance, or
use of this material.
Edition
3.1 Issue 1 (December 2008)
Printed in UK
Exterity Limited
Ridge Way
Hillend Industrial Park
Dalgety Bay,
Fife,
KY11 9JD
Scotland, UK
http://www.exterity.co.uk
Products Covered By This Guide
•
IPTV Manager
Trademarks
Microsoft®, Windows®, and Windows Media
Player® are U.S. registered trademarks of
Microsoft Corporation.
The Exterity Building IPTV logo, prodaptor,
avediaServer, avediaCentre and isocket are
trademarks or registered trademarks of Exterity
Ltd. All other trademarks are the property of
their respective owners. All rights reserved.
2
Warranty
A copy of the specific warranty terms applicable
to your Exterity products and replacement parts
can be obtained from Exterity. To request more
information or parts, email
[email protected]
Safety Notices
Before installing and operating any Exterity
product, please read the safety information in
the associated installation guide.
Exterity IPTV Manager Administrator’s Guide
Contents
Contents ...................................................................................................................................................... 3
About this Manual ....................................................................................................................................... 5
Summary........................................................................................................................................... 5
Scope ................................................................................................................................................ 5
Audience ........................................................................................................................................... 5
How this manual is organised ........................................................................................................... 5
1
Introduction ....................................................................................................................................... 7
System Requirements ...................................................................................................................... 7
Installation ......................................................................................................................................... 7
Licensing ........................................................................................................................................... 7
Basic Version .................................................................................................................................... 7
Starting IPTV Manager ..................................................................................................................... 8
SNMP................................................................................................................................................ 8
Logging ............................................................................................................................................. 9
Local Logging .............................................................................................................................. 9
Remote Logging .......................................................................................................................... 9
2
Discovering Devices ....................................................................................................................... 10
Discovery ........................................................................................................................................ 10
Discovering Devices on Different Subnets ................................................................................ 10
Manual Device Addition .................................................................................................................. 11
Name/Location Configuration ......................................................................................................... 11
3
Device Views .................................................................................................................................. 12
View Types ..................................................................................................................................... 12
Icons/List/Details Views ............................................................................................................. 12
View Devices By Type ............................................................................................................... 12
Details View ............................................................................................................................... 12
Status Bar ....................................................................................................................................... 13
Device Ageing ................................................................................................................................. 14
4
Device Administration and Diagnostics .......................................................................................... 15
Web Interface.................................................................................................................................. 15
Telnet .............................................................................................................................................. 15
Ping ................................................................................................................................................. 15
5
Device Management ....................................................................................................................... 16
3
Exterity IPTV Manager Administrator’s Guide
Status Information ........................................................................................................................... 16
Maintenance Tasks ......................................................................................................................... 16
Name/Location Configuration .................................................................................................... 16
TFTP Server Configuration ........................................................................................................ 16
Device Reboot ........................................................................................................................... 16
Device Upgrade ......................................................................................................................... 16
Receiver: Factory Reset ............................................................................................................ 17
Receiver: Export/Import Configuration ...................................................................................... 17
Configuration Tasks ........................................................................................................................ 17
Receiver: Display Mode ............................................................................................................. 17
Receiver: Current Channel ........................................................................................................ 17
Receiver: Browser Homepage ................................................................................................... 17
Receiver: Splash Screen ........................................................................................................... 18
Receiver: Audio Volume ............................................................................................................ 18
Receiver: Groups ....................................................................................................................... 18
6
Channel List .................................................................................................................................... 19
Channel Information ....................................................................................................................... 19
Part-time Channels ......................................................................................................................... 19
Channel Ageing .............................................................................................................................. 19
Channel Monitoring ......................................................................................................................... 19
Configuring Channel Monitoring ................................................................................................ 20
Viewing Channels ........................................................................................................................... 20
7
Scheduled Tasks ............................................................................................................................ 21
Creating Tasks ................................................................................................................................ 21
Viewing/Changing/Deleting Tasks .................................................................................................. 21
8
IR Assistant ..................................................................................................................................... 23
Using the IR Assistant .................................................................................................................... 23
9
Troubleshooting .............................................................................................................................. 24
APPENDIX A
iSocket Manager Compatibility ................................................................................... 26
APPENDIX B
Support and Contact Information ............................................................................... 27
4
Exterity IPTV Manager Administrator’s Guide
About this Manual
Summary
This manual explains how to install and use the Exterity IPTV Manager. This is a Windows PC
application which enables configuration and management of Exterity IPTV products. This
manual should be used in association with the manuals for the individual Exterity products.
Scope
This edition of the manual refers to version 3.1.x.y of the IPTV Manager.
Audience
This manual is intended for use by systems integrators or systems administrators who are
installing, setting up and using Exterity products. The manual assumes that readers are
familiar with installing and configuring both network-based products and AV products.
How this manual is organised
This manual is organised as follows:
Section 1 – Introduction
This section describes how to install and license
IPTV Manager. It also explains the use of IPTV
Manager in unlicensed mode.
Section 2 – Discovering Devices
This section describes how IPTV Manager
discovers Exterity devices on the network.
Section 3 – Device Views
This section describes the various ways to view
information about the devices on the network.
Section 4 – Device Administration and
Diagnostics
This section describes the basic device
administration and diagnostics available via the
IPTV Manager
Section 5 – Device Management
This section describes how to carry out device
configuration and maintenance via the IPTV
Manager.
5
Exterity IPTV Manager Administrator’s Guide
6
Section 6 – Channel List
This section describes the channel list within the
IPTV Manager.
Section 7 – Scheduled Tasks
This section describes the setting up of
scheduled tasks.
Section 8 – IR Assistant
This section describes the use of the IR Assistant
to send commands to remote devices attached to
Exterity equipment.
Section 9 – Troubleshooting
This section describes some common problems
and solutions.
Exterity IPTV Manager Administrator’s Guide
1 Introduction
System Requirements
Before you install IPTV Manager, ensure that the PC meets the following minimum
requirements:
•
Windows XP or Windows Vista
•
Pentium 4 2GHz or equivalent
•
512MB RAM
•
20MB free space on hard disk
Installation
The Exterity IPTV Manager is distributed on CD. The advanced features of the application are
enabled by the USB dongle which will be shipped along with the CD.
Note: Do NOT insert the USB dongle until the IPTV Manager application has been
installed.
To install the IPTV Manager simply run the file IPTV-Manager-Setup-a.b.c.d.exe which can be
found on the CD.
If you want to be able to view channels in Windows Media Player, you will also need to install
the Exterity MPEG Codec package. This can also be found on the CD and is installed by
running the file ExterityMPEG2CodecsSetup.a.b.c.d.exe.
Licensing
If you have purchased the Pro version of IPTV Manager you will have been supplied with a
green USB dongle. The advanced features of the application will not work unless the dongle is
attached to your PC.
To ensure that the product is licensed, carry out the following steps:
•
Install the IPTV Manager as described above.
•
Insert the dongle into an available USB port.
•
The Windows Found New Hardware Wizard will start, prompting you to install software for
USB Dongle – Software Protection Device. Choose the option Install the software
automatically and click Next.
•
On the next page of the wizard, choose USB Dongle – Software Protection Device and
click Next.
•
The software will then be installed following which you can click Finish to close the wizard.
•
Start the IPTV Manager which will now run in licensed mode with all features enabled.
Basic Version
If the dongle is not present, the basic version of IPTV Manager will run. This will enable a
limited amount of functionality, allowing you to discover your Exterity devices on the network,
and open a web interface to them to carry out any necessary configuration.
7
Exterity IPTV Manager Administrator’s Guide
Features which will not be enabled in the basic version include:
•
Channel list
•
Details view
•
Device ageing
•
Scheduled task creation
•
Right-click/Mass configuration items (including upgrade of devices, etc)
•
IR Assistant
•
Syslog
Starting IPTV Manager
To start IPTV Manager go to the Start menu and click All Programs. The IPTV Manager can
then be found in the Exterity folder. Click on IPTV Manager to start the application.
To check the software version number, choose the About option from the Help menu to display
the dialog shown in Figure 1.
Figure 1 About IPTV Manager
SNMP
In most cases, IPTV Manager uses SNMP to communicate with Exterity devices. To configure
SNMP settings, use the Options screen from the Tools menu and choose SNMP.
The following settings can be configured (default values are shown in brackets):
•
8
R/W Community String (public): The community string is a password which the Manager
must present to a device in order to change any settings. All Exterity devices on the
network must use the same community string. If you want to use a non-default community
string, this must first be configured on the individual devices via the web interface or by
importing configuration.
Exterity IPTV Manager Administrator’s Guide
•
SNMP Retries (0): The number of times the Manager retries an SNMP request before
deciding that it cannot communicate with the device.
•
SNMP Retry Timeout (10 seconds): The time the Manager waits for a response from a
device before retrying or deciding it cannot communicate with the device.
Logging
The Manager syslog file can be used to view historical information about major events on the
Exterity system e.g. devices or channels going down. To configure logging settings, use the
Options screen from the Tools menu and choose Syslog.
Local Logging
The logging information is by default saved to a local file syslog.txt in the IPTV Manager folder.
The Syslog options screen allows you to change the location of this file, or to disable local
logging. It is also possible to view the log file from this screen.
Remote Logging
It is possible to send the log messages to a remote syslog server. Before enabling remote
logging, ensure you have a syslog server running on the network.
To configure remote logging:
1. Choose the Options screen from the Tools menu and choose Syslog.
2. Check the Enable UDP logging box.
3. In IP address, enter the IP address of the syslog server.
4. In port, enter the port number on the syslog server. The default value is 514.
5. For logging level, select an option ranging from 0-Emergency to 7-Debug, where 0
represents the least debug information and 7 represents the most.
6. Click OK.
9
Exterity IPTV Manager Administrator’s Guide
2 Discovering Devices
This section describes the process of device discovery and addition.
Discovery
The IPTV Manager discovers Exterity devices by listening for device discovery messages.
Each Exterity device sends such a message every 30 seconds. On discovering a new device,
an icon representing this device is placed in the Discovered folder as shown in Figure 2.
The device discovery messages sent by Exterity devices are SNMP traps broadcast to UDP
port 162. In order for IPTV Manager to receive these messages, it is necessary for your PC
firewall to allow these messages through.
Discovering Devices on Different Subnets
The broadcast nature of the device discovery messages can cause problems on networks split
into separate subnets/VLANs, as typically broadcasts are contained within the local subnet.
There are three mechanisms to get round this problem:
•
Configure broadcast forwarding on the router (sometimes called IP Helper) to forward
UDP port 162 broadcasts to the subnet where the IPTV Manager PC is located.
•
Temporarily move the IPTV Manager PC onto each subnet where Exterity devices are
located. Once all devices have been discovered it can then be relocated to the correct
position.
•
Add devices manually (see below).
In all cases above, once the IPTV Manager knows the correct IP address of a device it will be
able to communicate with it across subnets, assuming the PC and the device have the correct
default gateway configured.
Figure 2 Discovered Devices
10
Exterity IPTV Manager Administrator’s Guide
Manual Device Addition
Devices can be added manually using the Add Device option on the Edit menu. Specify the
MAC address, IP address and device type and then click OK. An icon for the device will
appear in the Discovered view.
Name/Location Configuration
In order to take full advantage of the functionality of IPTV Manager, you should ensure that the
icons for each device are moved into a Location folder by configuring a name and location for
the devices. This is done via the Properties pages (shown in Figure 3), which you can access
by right-clicking on the device and choosing Properties. On applying changes to the location of
the device, the device icon will be moved into the appropriate location folder.
If IPTV Manager discovers a device which has already had its name and location configured,
the icon can be moved to the appropriate location folder using Accept Configuration. This can
be found within the Properties page and also on the icon’s right-click menu.
In order to keep IPTV Manager up-to-date with changes in device name/location, it is advised
to configure these items via the Properties page rather than through the device’s web
management interface.
Figure 3 Properties Page
11
Exterity IPTV Manager Administrator’s Guide
3 Device Views
IPTV Manager organises devices according to their location field as shown in Figure 4. Each
location folder lists the devices configured to be in that location. It is also possible to view all
known devices (in the All folder) and newly discovered devices (in the Discovered folder).
Figure 4 Device View
View Types
Icons/List/Details Views
The format of information displayed can be changed by choosing Icons, List or Details from
the View menu. In icons and list mode, the device name is displayed along with the icon.
In details mode more information about each device is displayed. See below.
View Devices By Type
By default, icons for all devices in a particular folder are shown. It is possible to choose to
display only a particular type of device, e.g. receivers or TVgateways, by selecting that device
type from the View menu. To revert to displaying devices of all types, choose All device types.
Details View
In details mode, status information about each device is displayed in list format as shown in
Figure 5. The information shown about each device is as follows:
12
•
Name
•
MAC address
•
IP address
•
Version number
•
TFTP server address
Exterity IPTV Manager Administrator’s Guide
For receivers, more specific information can be shown. To view this, choose Receivers and
Type-specific details from the View menu. The information shown about each device in this
case is as follows:
•
Name
•
Display mode
•
Current channel
•
Group membership
•
Audio volume
•
TV status (only applicable if receiver is connected via serial interface to a supported TV).
Note: To keep the information displayed in details views up to date, IPTV Manager uses
SNMP to query each device when changing view. It will therefore take a finite amount of
time when changing from one location folder to another if details mode is selected. You can
also choose F5 or Refresh from the View menu to use SNMP to update the contents of the
current view.
Figure 5 Device Details View
Status Bar
The status bar at the bottom of the IPTV Manager window displays information about the
current view settings e.g. it will indicate if only devices of a certain type are being displayed.
When configuring/querying multiple devices, the status bar will display an indication of
progress of this task.
By single-clicking on a device icon, you can view the name, MAC address and IP address of
that device in the status bar.
13
Exterity IPTV Manager Administrator’s Guide
Device Ageing
Device ageing is enabled by default and allows the status of the devices on the network to be
monitored. To enable/disable device ageing, use the Options screen from the Tools menu and
choose Device Ageing.
When a device is known to be alive, its name is shown normally with black text on a white
background.
If no device discovery message is received from the device for over a minute, the device will
be highlighted yellow, indicating a potential problem. The device will also be highlighted yellow
if the IPTV Manager carries out an operation which would cause the unit to reboot, e.g.
upgrading the unit.
If no device discovery message is received from the device for over ten minutes, the device
will be highlighted red, indicating with more certainty that a problem has occurred.
Note: Devices will be permanently highlighted red if the IPTV Manager cannot receive
device discovery messages from them e.g. because the devices are on a different
subnet/VLAN. In this case it may be desirable to disable the device ageing feature.
14
Exterity IPTV Manager Administrator’s Guide
4 Device Administration and Diagnostics
Web Interface
The main management interface to an Exterity device is its web interface. To open the web
interface of a device, choose Web Interface from the device’s right-click menu as shown in
Figure 6, or simply double-click on the device. You will be prompted for a username and
password. The defaults for all products are user: admin, password: labrador.
Telnet
A simple text-based management interface is available on the receiver, encoder and
TVgateway products. This enables access to a limited amount of configuration and diagnostics
and can be accessed through the serial admin port or via telnet. To telnet to a device from
IPTV Manager, choose Telnet from the right-click menu. You will be prompted for a username
and password, with defaults being as for the web interface (see above).
Note: In Windows Vista, the telnet client is by default disabled. See the section on
Troubleshooting for details on how to enable the telnet client.
Ping
The ping command is a simple method of determining the operating status of a network
device. To run a ping, choose Ping from the device’s right-click menu. A Windows command
window will appear. If the device successfully replies to the ping message, text of the format
“Reply from <IP address>” will appear. If the device does not reply, text of the format “Request
timed out” will appear.
Figure 6 Device right-click menu
15
Exterity IPTV Manager Administrator’s Guide
5 Device Management
Status Information
The Common Status page reports some basic information about the device including the IP
address, MAC address and firmware version number. To access these pages for a device
choose Properties from the device’s right-click menu.
Maintenance Tasks
This section details some maintenance tasks which can be carried out on Exterity devices via
the Common Properties page and/or directly from the right-click menu. The Common
Properties page for a device is accessed by choosing Properties from that device’s right-click
menu.
Maintenance items on the right-click menu can also be set on multiple devices simultaneously.
Simply select multiple icons using Ctrl-Click or Shift-Click before using the right-click menu.
Name/Location Configuration
The name and location of a device can be changed using the Common Properties page.
Simply edit the Name and Location fields and click OK.
TFTP Server Configuration
Exterity devices use TFTP to download firmware images and other files (e.g. IR config files
and splash screen files). In order to carry out any of these tasks, the device must be
configured with the IP address of the TFTP Server. To do this, use the Common Properties
page. Put the TFTP Server IP address into the TFTP Server field and click OK.
Alternatively, choose Set TFTP Server from the right-click menu. Put the TFTP Server IP
address into the TFTP Server field and click OK.
Device Reboot
Devices can be rebooted using the Common Properties page. Check the box marked Reboot
device.
Alternatively, reboot one or more devices by selecting Reboot from the right-click menu.
Device Upgrade
Before upgrading, ensure that the TFTP server address is set correctly on the device(s) you
wish to upgrade and that the appropriate firmware files are present on the TFTP server. Once
the upgrade is initiated using one of the mechanisms below, the device(s) will download
firmware from the TFTP server and copy to flash. This process will take a few minutes.
A device can be upgraded from the Common Properties page. Check the box to Upgrade
device firmware and click OK.
Alternatively, carry out a device upgrade on one or more devices by selecting Upgrade from
the right-click menu.
Note: Some types of Exterity device allow the filename of the upgrade image to be
changed. This information cannot be viewed/changed directly from IPTV Manager. Use the
web interface to check that this filename is correct before attempting to upgrade.
16
Exterity IPTV Manager Administrator’s Guide
Receiver: Factory Reset
To reset an Exterity receiver to factory defaults use the Common Properties page, check the
box Return to default configuration and click OK. The device will be automatically rebooted to
complete the factory reset process.
Alternatively, carry out a factory reset on one or more devices by selecting Factory Reset from
the right-click menu.
Receiver: Export/Import Configuration
The Exterity receivers allow their configuration to be exported/imported. This means that you
can set configuration on one receiver and copy this configuration to a number of other
receivers. The configuration is exported to/imported from a file on the TFTP server, so ensure
that the TFTP server address is set correctly before carrying out these tasks.
To export configuration from a device, choose Export configuration from the device’s right-click
menu. Specify a name for the configuration file and click OK. The configuration file will then be
uploaded to the TFTP server.
To import configuration to one or more devices, choose Import configuration from the rightclick menu. Specify the name of the configuration file you want to import and click OK. The
configuration file will then be downloaded from the TFTP server and the devices(s) will be
automatically rebooted to complete the import process.
Configuration Tasks
This section details some configuration tasks which can be carried out on Exterity devices via
the right-click menu. Configuration items on the right-click menu can be set on multiple devices
simultaneously. Simply select multiple icons using Ctrl-Click or Shift-Click before bringing up
the right-click menu.
Receiver: Display Mode
To change the display mode of Exterity receivers, choose Set Display Mode from the rightclick menu. Select a display mode from the dropdown list and click OK. The display mode on
the selected receiver(s) will change to this mode. Options for display mode are Off (Standby),
AV, Browser, Splash, Playlist and EPG.
Receiver: Current Channel
To change the currently playing channel on Exterity receivers, choose Set Channel from the
right-click menu to bring up the dialog shown in Figure 7. Select a channel from the list, or
alternatively use the radio button to specify the URI of a stream not in the list. On clicking OK,
the selected receiver(s) will start playing the new channel (assuming the display mode is set to
AV).
Note: The IPTV Manager has the ability to change the channel of a receiver to any known
channel on the network. This allows the administrator to override the Groups configuration
on the receiver.
Receiver: Browser Homepage
To change the browser homepage of Exterity receivers, choose Set Homepage from the rightclick menu. Enter the new homepage and click OK for the new homepage setting to take effect
on the selected receiver(s).
17
Exterity IPTV Manager Administrator’s Guide
Receiver: Splash Screen
To change the splash screen on Exterity receivers, first ensure that the TFTP server IP
address is set correctly on each device and that the splash screen file is present on the TFTP
server.
To change the splash screen of the selected receiver(s), choose Set Splash Screen from the
right-click menu. Enter the name of the splash screen file and click OK. The receiver(s) will
then download the splash screen file from the TFTP server.
Receiver: Audio Volume
To change the volume of audio output from Exterity receivers, choose Set Volume from the
right-click menu. Enter a value between 0 (min volume) and 40 (max volume) and click OK.
The volume level on the selected receiver(s) will then be set to this value.
Receiver: Groups
To change the group membership setting on Exterity receivers, choose Set Groups from the
right-click menu. Enter a comma-separated list of groups that you want the receiver to be a
member of. If you want the receiver to be a member of all groups, enter all or leave the field
blank. On clicking OK, the new setting will be applied to the selected receiver(s).
Figure 7 Channel Selection Dialog
18
Exterity IPTV Manager Administrator’s Guide
6 Channel List
The IPTV Manager builds up a list of the channels on the network by listening for SAP
announcements from head-end equipment. This channel list can be viewed by selecting
Channels from the folder list as shown in Figure 8.
Note: Windows Vista users may see an empty channel list. See the Troubleshooting
section of this manual for an explanation and solution.
Channel Information
The information displayed about each channel is as follows:
Name
The name of the channel as it appears in the channel list on an Exterity
receiver or PC client.
Number
The channel number as it appears in the channel list on an Exterity receiver
or PC client.
URI
The URI of the channel which includes the multicast address and port
number.
Device
The name of the head-end device which is transmitting this channel. If the
name is not known the IP address will be displayed.
Video
The transport stream video pid of the channel.
Audio
The transport stream audio pid of the channel.
The list can be sorted on all columns and can be refreshed by pressing F5 or choosing
Refresh from the View menu. It will also automatically refresh every 30 seconds.
Part-time Channels
Part-time channels not currently streaming will be highlighted yellow.
Channel Ageing
Channels which are no longer being announced will be highlighted red as this may indicate a
problem has occurred with the device transmitting this channel. If any channels in the list have
been highlighted red, the Channels icon in the folder list will change to draw attention to this.
If the channels have been deliberately stopped from streaming, they can be deleted from the
list by using the Delete button or by choosing Delete from the Edit menu.
Channel Monitoring
The channel monitoring feature allows more accurate and faster reporting of a channel being
down. It does this by connecting to the multicast stream of each channel in turn, and verifying
that a valid MPEG2 Transport Stream is detected. Streams on RTP and UDP transports are
detected. If a valid stream is not detected, the channel will be highlighted magenta.
19
Exterity IPTV Manager Administrator’s Guide
Note: The channel monitoring feature must be used with caution, as it can result in
unwanted multicast flooding on the network. In particular, ensure that the IPTV Manager
PC is connected directly to the IGMP querier before enabling this feature.
Configuring Channel Monitoring
Channel monitoring is disabled by default. To configure this feature, use the Options screen
from the Tools menu and choose Channel Monitoring.
A number of settings exist which allow you to tune the feature to your particular PC and
network. The following settings are available (default values are in brackets):
•
Enable/disable (disabled): Check/un-check the box as appropriate
•
Number of simultaneous channels (10): Set the number of channels the Manager will
open simultaneously. Note that each channel will create approximately 4Mbps network
traffic to the PC (assuming an average SD channel).
•
Time between starting streams (3): Set the delay after closing a channel before opening
the next channel.
•
Time before declaring channel inactive (2): Set the time to wait for data before
declaring that a channel is not streaming.
Viewing Channels
To view a channel, double-click on the channel details, or choose View Channel from the
channel’s right-click menu. This will start Windows Media Player to play that channel.
Note: In order to play channels in Windows Media Player it is required to install the Exterity
MPEG Codecs package. See the Installation section of this manual for more details.
Figure 8 Channel List
20
Exterity IPTV Manager Administrator’s Guide
7 Scheduled Tasks
The IPTV Manager can schedule changes in the display mode and currently playing channel
of Exterity receivers. This is done by scheduling events via the Windows Scheduled Tasks
function.
Note: Windows Vista users may experience problems setting up scheduled tasks. See the
Troubleshooting section of this manual for an explanation and solution.
Creating Tasks
Tasks are scheduled by selecting the receivers to which the task applies, and choosing Create
Scheduled Task from the right-click menu or Scheduled Tasks Create from the Tools menu.
This brings up the wizard shown in Figure 9, which lets you specify the details of the task as
follows:
•
Type of task i.e. change display mode or change channel.
•
The display mode (i.e. Off, AV, Browser, Splash, Playlist, EPG) or channel (from list or
user-specified URI).
•
The date/time when this event should take place. To schedule repeated tasks see
Viewing/Changing Tasks below.
•
A name for the event.
On clicking Finish in the wizard, this task will be added to the Windows Scheduled Tasks.
Note: In order for the scheduled task to be carried out, the PC must be running at the time
the event is due to take place.
Viewing/Changing/Deleting Tasks
To view tasks, choose Scheduled Tasks View/Edit from the Tools menu. This brings up the
Windows Scheduled Tasks Manager. Use this to change details of a task, including scheduling
repeated events, or to delete a task.
21
Exterity IPTV Manager Administrator’s Guide
Figure 9 Scheduled Tasks Wizard
22
Exterity IPTV Manager Administrator’s Guide
8 IR Assistant
The IR Assistant, shown in Figure 10, enables the administrator to send IR commands from
Exterity encoders and receivers to their connected AV equipment. This can be used, for
example, to change the channel on the set-top box connected to an encoder, or to turn on the
television attached to a receiver.
Note: Before the IR Assistant can be used with an encoder or receiver, that device must be
set up to be able to send out IR commands. Please refer to the user documentation for
these products for further details.
Using the IR Assistant
To start the IR Assistant for a particular encoder or receiver, choose IR Assistant from the
right-click menu for that device. To instruct the device to send an IR command, simply click the
appropriate button on the IR Assistant.
The history of commands sent to that device can be viewed in the history window at the
bottom of IR Assistant.
Figure 10 IR Assistant
23
Exterity IPTV Manager Administrator’s Guide
9 Troubleshooting
Problem
Possible Cause
Solution
I inserted the dongle before I
installed IPTV Manager and now
I can’t get the product licensed.
The dongle drivers were
installed wrongly.
With the dongle inserted,
uninstall the drivers for the
dongle via Start -> Control Panel
-> System -> Hardware ->
Device Manager. Expand out the
USB section, choose the USB
dongle and choose right-click ->
Uninstall.
Next remove the dongle and
ensure that the IPTV Manager is
installed. Re-insert the dongle
and follow the normal
instructions for installing the
drivers.
IPTV Manager is not discovering
any devices
The PC firewall is blocking the
incoming device discovery
messages from Exterity devices.
Ensure that the PC firewall
allows the IPTV Manager to
receive SNMP traps on UDP
port 162.
The IPTV Manager PC is on a
different subnet/VLAN to the
devices.
See discussion in the
Discovering Devices section of
this manual.
Right-click -> Telnet does not
work.
In Windows Vista, this is
probably because the telnet
client is not enabled (this is the
case by default).
Enable the telnet client via Start
-> Control Panel -> Programs
and Features ->Turn Windows
Features on or off. In the list,
scroll down and select Telnet
Client. Click OK to start the
installation
I have no channels in the
channels list.
The PC firewall is blocking the
incoming channel
announcements from Exterity
devices.
Ensure that the PC firewall
allows the
avediaChannelListener service
to receive SAP announcements
on UDP port 9875.
In Windows Vista, User Account
Control is not allowing the IPTV
Manager to start the
avediaChannelListener service.
Either of the two solutions on the
right can be used.
Set the avediaChannelListener
service to start automatically
when the PC starts. Use Control
Panel -> Administrative Tools ->
Services. Double-click on
avediaChannelListener, set
Startup type to Automatic or
Automatic (Delayed Start) and
click Apply. You will then need to
restart the computer for this
change to take effect.
Turn off User Account Control
via Control Panel -> User
Accounts -> Turn User Account
Control on or off. Un-check the
box marked Use User Account
Control (UAC) to help protect
your computer and click OK. You
24
Exterity IPTV Manager Administrator’s Guide
will then need to restart the
computer for this change to take
effect.
I am unable to setup Scheduled
Tasks.
In Windows Vista, User Account
Control is not allowing the IPTV
Manager to add tasks to the
Windows Scheduled Tasks
Manager.
Turn off User Account Control
via Control Panel -> User
Accounts -> Turn User Account
Control on or off. Un-check the
box marked Use User Account
Control (UAC) to help protect
your computer and click OK. You
will then need to restart the
computer for this change to take
effect.
I cannot communicate with the
device to view properties or to
accept configuration
There is an apostrophe in the
name or location of the device
Remove the apostrophe from the
name or location.
25
Exterity IPTV Manager Administrator’s Guide
APPENDIX A iSocket Manager Compatibility
The precursor to IPTV Manager was iSocket Manager. There is no upgrade path from iSocket
Manager to IPTV Manager i.e. there is no way of transferring the device database from
iSocket Manager to IPTV Manager.
It is not necessary to uninstall iSocket Manager before installing IPTV Manager; the two
products can co-exist on the same PC.
26
Exterity IPTV Manager Administrator’s Guide
APPENDIX B Support and Contact Information
Technical Support for Exterity products is provided by authorised Systems Integrators and
Resellers. Please contact your Systems Integrator or Reseller with any Support issues.
27