1
BREW® Developer Training
BREW® Developer Training
QUALCOMM Confidential and Proprietary
1
QUALCOMM Confidential and Proprietary
BREW® Developer Training
QUALCOMM Incorporated
5775 Morehouse Drive
San Diego, CA. 92121-1714
U.S.A.
This manual and the BREW® software described in it are copyrighted, with all rights reserved. This
manual and the BREW software may not be copied, except as otherwise provided in your software
license or as expressly permitted in writing by QUALCOMM Incorporated.
Copyright © 2005–2006 QUALCOMM Incorporated
All Rights Reserved.
Not to be used, copied, reproduced in whole or in part, nor its contents revealed in any manner to
others without the express written permission of QUALCOMM.
Export of this technology may be controlled by the United States Government. Diversion contrary
to U.S. law prohibited.
BREWChat and MSM are trademarks of QUALCOMM Incorporated.
QUALCOMM is a registered trademarks and registered service mark of QUALCOMM
Incorporated. TRUE BREW, MobileShop, BREWStone, The Grinder, and QChat are registered
trademarks of QUALCOMM Incorporated.
Microsoft and Windows are either registered trademarks or trademarks of Microsoft Corporation in
the United States and/or other countries.
Adobe and Acrobat are trademarks of Adobe Systems Incorporated.
Other product and brand names may be trademarks or registered trademarks of their respective
owners.
BREW® Developer Training Student Guide
80-D4429-1, Rev. D
November 17, 2006
QUALCOMM Confidential and Proprietary
2
BREW® Developer Training
BREW® Developer Training
Student Guide
Supporting the
BREW®
Software Development Kit
A Unifying Platform for Wireless Data Applications
QUALCOMM Confidential and Proprietary
3
BREW® Developer Training
This page intentionally
left blank
QUALCOMM Confidential and Proprietary
4
BREW® Developer Training
Table of Contents
Acknowledgements
5
Section 1 – Environment and Architecture
7
Section 2 – User Interface Development
143
Section 3 – Working with Persistent Data
187
Section 4 – Graphics, Sound, and Multimedia
217
Section 5 – Wireless Connectivity
269
Section 6 – Testing and Commercialization
359
QUALCOMM Confidential and Proprietary
5
BREW® Developer Training
Acknowledgements
On behalf of the BREW Training Team, I would like to extend our gratitude to QUALCOMM Internet
Services Product Management, Engineering, Product Support, and Technical Publications groups
who helped make project possible.
Special thanks is given to the following for their key contributions to this project:
Jonathan Woodbridge, Maggie Logan, Rick Fitch, Laurie Caledonia, Paul Phillips, Mahesh
Moorthy, Apul Nahata, Nalin Wijayatilleke, Dennis Hernandez, Max Ohlendorf, Ajay Iyengar, Yahil
Zamir, Argenis Perez, Nathan Parrish, and Paul Anderson of Anderson Software Group.
Sincerely,
Ken Davis, Senior Technical Training Specialist
QUALCOMM Internet Services – BREW
QUALCOMM Confidential and Proprietary
6
BREW® Developer Training
BREW® Developer
Training
Section 1 – BREW
Environment and
Architecture
7
QUALCOMM Confidential and Proprietary
7
BREW® Developer Training
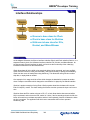
Section 1
BREW Development Fundamentals
Introduction
Module 1
Module 2
Module 3
Module 4
Module 5
Course Materials and Agenda
BREW Environment and Architecture Basics
Development Tools
Building BREW Applet Projects
Overview of Fundamental BREW APIs and Data Types
Troubleshooting and Debugging
8
Welcome to BREW® Developer Training! This is a comprehensive course that is focused on the
fundamentals of BREW application development, designed to get you up to speed quickly.
In the next few pages, we’ll introduce the course materials and agenda, and give you a road map of
how the course will progress. After this introduction, we’ll get down to BREW business with a quick
discussion of the BREW environment from both a technical and consumer perspective, and we’ll
get started on building your first BREW application using the BREW development tools. While
building your first app, you’ll be introduced to some fundamental BREW components, APIs, and
learn how to use these tools for debugging your application.
So, let’s get started!
QUALCOMM Confidential and Proprietary
8
BREW® Developer Training
Module 1.1
Course Introduction
Provide overview of course objectives
Review course material and presentation
Introduce students
9
QUALCOMM Confidential and Proprietary
9
BREW® Developer Training
Course Goals
The overall goals of this course are to:
9 Teach developers how to write BREW® applications
9 Provide hands-on instruction for programming BREW
applications and using the tools in the BREW SDK®
10
The overall goal of this course is to prepare developers to write BREW platform applications. To
promote discovery and for concept retention, this class makes use of extensive hands-on
instruction.
QUALCOMM Confidential and Proprietary
10
BREW® Developer Training
Course Objectives
9
Introduce BREW environment and architecture fundamentals
9
Write a BREW application that does several things:
9
Define the BREW environment
Describe the various BREW capabilities
Illustrate the application development process
Define APIs and Data Types
Describe BREW development tools
Provide a user interface using control and graphic APIs
Consume and manipulate persistent data through file and database APIs
Present advanced graphics, animation, and multimedia
Use networking and web interfaces to share and receive data
Use telephony APIs to communicate via SMS and telephone
Describe processes for commercializing applications
Load the application on the device
Discuss extensions and multi-module applications
Become an Authenticated BREW Developer
Describe the submittal processes and tools
11
Upon completing this class, students will be better equipped to write BREW platform applications
by achieving the goals listed here. Students will be able to describe the BREW environment and
architecture, write a basic BREW application, and describe the processes for commercializing the
application.
QUALCOMM Confidential and Proprietary
11
BREW® Developer Training
Course Presentation and Structure
Presentation
Slides
Lecture
Labs (many hands-on exercises)
Group discussion
Scope
Fundamental application development using the BREW SDK and Visual C++
Processes for developing and submitting applications for commercial distribution
Audience
Application developers, software engineers, and technical leads with an interest in
entering the BREW application market
Prerequisites
Completion of pre-course homework
2 years experience in object oriented programming
Course length
3 days
12
The presentation format for the course includes a combination of slides, lecture, hands-on lab
exercises, and group discussion to reinforce the concepts presented.
Participants can expect this course to focus on fundamental application development and
commercialization processes. Attendees should include application developers and technical leads
with programming experience, preferably 2 years of object-oriented programming (OOP). Expect a
full three days for this course.
QUALCOMM Confidential and Proprietary
12
BREW® Developer Training
Course Agenda
Day 1
Section 1 – BREW Environment and Architecture
Section 2 – Interface Development
Day 2
Section 3 – Working with Persistent Data
Section 4 – Graphics and Multimedia
Day 3
Section 5 – Networking, Wireless Web, and eCommerce
Section 6 – Testing and Commercialization
13
In general, the course will adhere to the outline described above. Individual classes may move
more quickly or slowly depending on the needs of the group.
The first day is a primer on the BREW environment, the wireless industry, and basic user interface
development. These skills are necessary for the myriad of exercises over the rest of the course.
On the second day, students will learn to work with various forms of persistent data, including
writing files and databases to the handset, working with application preferences, accessing with the
device’s contact list, and being able to store ring tones and wallpapers. To add some excitement
to the user interface, we’ll also take a look at the multimedia capabilities of displaying two- and
three-dimensional graphics, add sound to applications, and even render complex audio and video
media.
On the third day, students will be exposed to the various forms of connectivity and communications
available with BREW. From SMS and telephony to full socket connectivity to interacting with web
pages, students will build an application capable of downloading data and storing it on the device.
At the end of the course, we put it all together, placing the application on a BREW-enabled handset
and how to get it tested and into the market.
QUALCOMM Confidential and Proprietary
13
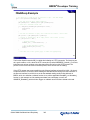
BREW® Developer Training
Getting to Know You
Name
Company
Job function
Familiarity with BREW
14
Please use this as an outline for introducing yourself to the group. This will help class members
identify others with similar objectives, and will give the instructor some input for directing the
content of the course, when possible.
QUALCOMM Confidential and Proprietary
14
BREW® Developer Training
Module 1.2
BREW Environment and Architecture
Wireless Landscape
BREW Customer Experience
BREW Download Process
Handset Software
15
QUALCOMM Confidential and Proprietary
15
BREW® Developer Training
Module Objectives
After completing this module, students will be able to:
9
9
9
9
Discuss wireless data opportunities
Describe how BREW applications are downloaded
Illustrate BREW device architecture and layering
Use a BREW phone to download and run apps
16
In our first section, we will explore BREW as a product and as a technology. We will look at the
unique opportunities provided by the BREW platform in today’s wireless industry, experience
BREW from the customer’s perspective, and review the processes and technology that make it
work. From here we will review the tools and processes for building BREW applications.
QUALCOMM Confidential and Proprietary
16
BREW® Developer Training
Today’s Wireless Industry
Network operators
“We have a large customer base and
a significant investment in spectrum
and infrastructure. How can we
increase our revenues while keeping
our customers happy?”
Handset manufacturers
Application developers
“We have powerful, feature
rich handsets, but we need
to get them to market faster
and with less cost. How
can we do this?”
“We have applications, but
how do we get them to
customers, and how do we
get paid for them?”
Subscribers
“I’m unique, just like everyone
else! Give me applications and
data that are fun, secure, and
easy to use.”
17
In the new era of wireless service, subscribers are demanding compelling services that provide
meaningful information.
QUALCOMM Confidential and Proprietary
17
BREW® Developer Training
BREW Answers the Challenges
Network operators
BREW provides operators new
opportunities in data revenue as well as
the ability to offer compelling services that
attract and retain customers
Application developers
Handset manufacturers
Developers have access to
markets never before available,
through a world wide distribution
system and a clean, easy-to-use
development environment to build
new and exciting applications
A common environment for
applications and user interfaces
makes it faster and more costeffective to offer new
functionality
Subscribers
Applications, ring tones, and
other data is available to
consumers when they want it,
in an easy-to-use, secure
system
BREW connects the
mobile marketplace
value chain with a full
offering of products
and services
18
With BREW:
• Applications are easy to use, with secure and transparent billing.
• Applications leverage the capabilities of the device, making data access always available
and always aware of device and location.
• All of this is included in a package that is customizable, making the service as unique as
the subscriber.
QUALCOMM Confidential and Proprietary
18
BREW® Developer Training
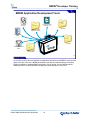
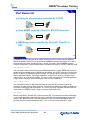
BREW from the Customer’s Perspective
1.
Buy a BREW-enabled handset
2.
Connect to the “online store”
3.
Select, purchase, and download
applications over the air
4.
Start using applications
immediately
19
Today’s wireless service subscribers, the customers of wireless carriers and the ultimate
consumers of wireless applications, are increasingly sophisticated in their demands. They are
looking for the latest in data services that are easy to use and provide them access to the
information or entertainment they want, and they want to be able to do this any time, any where,
without having to provide personal information each time. And they want this all at an affordable
price.
From the customer’s perspective, BREW is a service that lets them use their handset to access a
wealth of applications and content. They can browse a selection of applications, chose the way
they want to pay for the application, and then after the download they can use the application
immediately. No credit cards, wires, or extensive processes required!
QUALCOMM Confidential and Proprietary
19
BREW® Developer Training
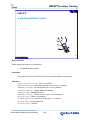
Lab 1.2
Using a BREW Device
20
Before You Start
Before beginning this exercise, you should have:
•
either an Internet connection or a BREW-enabled device with service.
•
completed course materials.
Description
These first two lab exercises are designed to give you the “user” experience. Your instructor will
guide you through a hands-on exercise in downloading an application to your wireless device as
well as managing downloaded applications using the BREW Application Manager. Later on, you
will see how to build these applications.
APIs Used
None
QUALCOMM Confidential and Proprietary
20
BREW® Developer Training
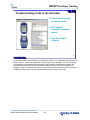
Procedure
Follow these steps to complete the exercise:
Exercise 1 - Download an Application
NOTE: This exercise shows the download of an application using the online BREW Demo. The
same procedure can be followed on a BREW-enabled device. If an actual BREW device is being
used, make sure it is powered on before continuing.
1. To use the BREW online demo, open an Internet browser and point it to
www.qualcomm.com/brew. Click on the BREW Demos link on the left hand side of the screen,
then navigate through the page until you find the Interactive BREW Demo. Click on the link for
your language (i.e., English) to open the demo in a new window.
QUALCOMM Confidential and Proprietary
21
BREW® Developer Training
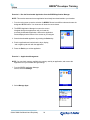
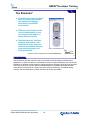
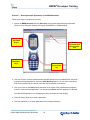
1. From the main screen, press the BREW button. Phones have different buttons that are the
designated BREW button. Your instructor will show the correct button. Press the Select button
(OK) to make your selection. On the online demo, you may need to do this again when presented
with the Get Apps screen.
2. If not already highlighted, select the shopping cart icon.
This is the MobileShop® application that you will use to
view new applications to purchase and download. Press
Select.
3. You will see a list of available categories. Use the
Navigation Pad (up, down, left, right) to move to the
Games category. Press Select.
4. Highlight Yao Ming Basketball and press Select.
5. Notice that you are prompted to select a price option.
In the demo, you are only offered a Free Demo, but this
is when the customer could choose the purchase method
that best suits them. Press Select to chose the Free Demo
option.
QUALCOMM Confidential and Proprietary
22
BREW® Developer Training
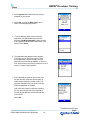
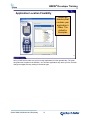
6. Notice the next window. Users are given the
opportunity to acknowledge the charge for the
application, and if they desire, to cancel. Highlight
Next and press Select.
7. After the installation completes, select Yes to
run the downloaded application. Read the notes
in the Demo window to learn how the application
works.
8. Press the End (power) button once to end the application.
.
QUALCOMM Confidential and Proprietary
23
BREW® Developer Training
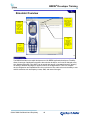
Exercise 2 - Run the Downloaded Application from the BREW Application Manager
NOTE: This exercise assumes that an application has already been downloaded to your handset.
1. From the main screen, press the selection for BREW. Phones have different buttons that are the
designated BREW button. Your instructor will show the correct button.
2. The BREW Application Manager is now on the screen.
Navigate through the applications until you locate the
previously downloaded application. Observe the application
names displayed at the bottom of the screen as you navigate.
3. Start the downloaded application by pressing the Select key.
4. Run the application and notice how the keys, display,
and navigation pad work with the application.
5. Press the End key to exit the application.
Exercise 3 – Application Management
NOTE: You can check memory available, the memory used by an application, and remove the
application from your handset through Settings.
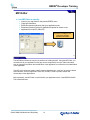
1. From the BREW Application Manager
screen, select the Settings.
2. Select Manage Apps.
QUALCOMM Confidential and Proprietary
24
BREW® Developer Training
3. Select System Info to determine the memory
available on your device.
4. Select OK, or press the Back (clear) key to
return to the Manage Apps screen.
5. From the Manage Apps screen, select the
application you downloaded in the previous
exercise (Yao Ming Basketball). Notice the size
of the application is indicated at the bottom of the
screen. Press Select.
6. The Application Management menu appears.
From here you can check the memory used
by the application, remove the app, lock the
app to prevent it from being disabled, or remove it.
First, we’ll se how much memory it takes, then we’ll
remove it. Select View Properties.
7. Notice the data provided for size. In this case,
the App Size and Total Size are the same at
200K, and the Data size is listed at 29K. The
App Size indicates how much space is saved
when the application is disabled.
Also notice the License is Unlimited, meaning
the user has unlimited use of the application.
We will discuss different license methods later
in the course.
Select OK
Continued on the next
page…
QUALCOMM Confidential and Proprietary
25
BREW® Developer Training
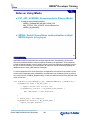
8. To remove the application, select Remove from the
Manage Apps window. You will be prompted
if the application is not expired, or in other words,
still has a valid license.
Select Yes. The application is removed.
9. Go back to System Info and determine how much memory
is available now.
10. Go back to the Manage Apps Screen, and select the
Nineball application. Select the Restore option.
11. Go back to System Info and determine how much memory
is available now.
After You Finish
After you complete this lab, you should have:
•
Selected an application and downloaded it to a
wireless device.
•
Run the downloaded application.
•
Checked memory usage on the handset.
•
Removed an application.
QUALCOMM Confidential and Proprietary
26
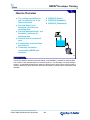
BREW® Developer Training
That’s nice, but how does it work?
27
QUALCOMM Confidential and Proprietary
27
BREW® Developer Training
BREW Advantages
BREW SDK can emulate APIs
in a Windows environment
Developers can write and test
applications using the BREW
Simulator
Eliminates need to establish
relationships with wireless
OEMs
Defers need to have a handset
for testing
BREW manages complex
telephony features so you
don’t have to
BREW provides a common
runtime environment
BREW eliminates the need to
rewrite an application for
every different device
Existing applications can be
ported to BREW®
The TRUE BREW™ testing
process helps ensure
applications are stable and
BREW-compliant
Operators access the
applications through BREW’s
distribution system
28
The BREW SDK enables developers to work in a familiar, high-level environment (using Windowsbased tools and C/C++) and test their applications under Windows on emulated devices. This
eliminates the need for third-party developers to have established relationships with wireless
OEMs or physical possession of a handset prototype or production unit in order to begin writing
applications.
By tapping into the powerful capabilities of the underlying chipsets, BREW enables developers to
access local storage and processing as well as built-in multimedia extensions, connectivity
features, position location information and more in order to create powerful and compelling
applications. BREW also frees developers from dealing with complex telephony functions.
The BREW SDK can emulate APIs in a Windows environment using the BREW Simulator. This
makes it especially easy for programmers who are already familiar with writing Windows
applications in Visual C++ to develop BREW applications on their Windows machines.
QUALCOMM Confidential and Proprietary
28
BREW® Developer Training
Since the BREW Simulator displays “skins” for various BREW-enabled handsets, the developer
doesn’t need to deal directly with handset OEMs to get details on the phones. Most of the debugging
and testing of a BREW application can be carried out under Windows, using the full capabilities of the
Visual C++ development environment. Testing on actual handsets can thus be deferred.
When the time does come to test on a handset, QUALCOMM offers a BREW Developer Lab where
developers can test their applications on various BREW-enabled handsets and receive real-time
technical support.
Once an application is written, BREW provides a common runtime environment across many makes
and models of devices, giving developers access to a large and growing mass market. BREW
eliminates the need to rewrite an application for each different device. Existing applications can be
ported to BREW as well.
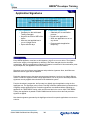
Through the TRUE BREW testing process, an application is verified as being stable and BREWcompliant, and is given a digital signature that identifies it to BREW-enabled handsets.
Carriers can place the application on their own server, making it available for end users to download.
In this way, developers are given access to end users through a channel that has never before
existed. QUALCOMM offers a distribution solution that supports this new channel and allows thirdparty developers to negotiate terms and pricing directly with carriers.
QUALCOMM Confidential and Proprietary
29
BREW® Developer Training
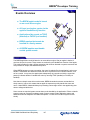
Fundamental BREW Concepts
BREW is a set of Application Programming
Interfaces (APIs), a library of functions, used to
write applications for mobile devices
These APIs offer a wide range of services such as
Display, Memory, Files, etc.
BREW shields application developer from phone
internals
BREW applications are portable
30
The BREW platform provides the means for creating robust applications for all levels of handsets
quickly and easily.
The following points characterize BREW from an application developer’s perspective:
• BREW is a set of functions (APIs) that can be used to write applications for mobile
devices.
• These APIs offer a wide range of services such as access to the device display, memory
management, and access to the file system.
• BREW shields the application developer from the phone internals.
• BREW applications are portable from one target device to another. This allows
developers to write once and run on many devices from the low end, mass-market
handsets to top-of-the-line devices.
QUALCOMM Confidential and Proprietary
30
BREW® Developer Training
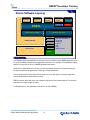
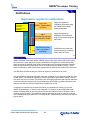
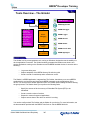
Device Software Layering
App Module
Private
Extension
App Module
App using
Viewer
VM App
Viewers
VM Engine
BREW
Mobile Interface Layer (MIL)
Chip Interface Layer (ChIL)
Sockets
USER INTERFACE
File System
TAPI
OS Services
Device Drivers
Internet LaunchPad™
• gpsOne®
• Bluetooth
• CMX™
• VR
•MP3
•MPEG4 Video
Chipset
31
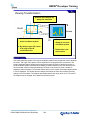
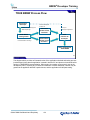
This diagram shows where BREW fits among the device’s software layers. BREW applications can
run on any handset that supports the application’s functions. For example, not all handsets support
gpsOne, but any that do can run a BREW application that uses it.
Because your applications sit at the top, you save a tremendous amount of time and energy not
having to hard-wire each application to each type of hand-held device.
The lower right-hand column shows services that come from the chip set. The lower right-hand
section shows what the manufacturers create.
BREW is the thin layer that sits on top of both the chipset and user interface layers. The functions
exposed by this layer remain the same.
In VM Applications, Java applications can sit here on top of BREW.
QUALCOMM Confidential and Proprietary
31
BREW® Developer Training
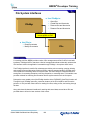
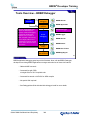
Easier Application Development with BREW
Out with the Old In with the BREW
Application
Application
OEM 1
OEM 2
OEM 1
OEM 3
10 integration tasks:
One for each phone
task
Sw
Sw
OEM 3
1 integration task
task task task task
task
task
tasktask
task
Sw Sw Sw Sw Sw Sw
OEM 2
Sw
BREW
Handset Software
Sw
32
Prior to BREW, each application had to be integrated individually for each type of wireless device.
With BREW, you can test your application on each device, right on your Windows desktop, by
using the BREW Simulator. The BREW SDK includes the required configurations for the most
popular BREW-enabled devices.
QUALCOMM Confidential and Proprietary
32
BREW® Developer Training
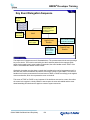
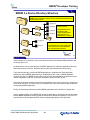
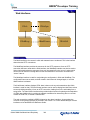
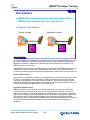
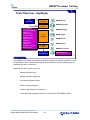
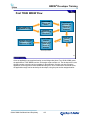
Phone and Download Server Interaction
MobileShop® and IDownload form the download client
Application Download Server (ADS) filters requests from
BREW handsets
Handset and ADS mutually authenticate
Subscriber authorization
Advanced application handling:
Shared libraries
Upgrades/patches
Subscriptions
Application recall
Digital signatures
BREW Handset
Mobile
Shop
Application
Download
Server
(ADS)
IDownload
HTTP
TCP/IP
HTTP
App 1
Apps n
BREW
Handset ASIC
33
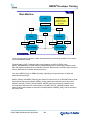
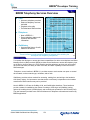
Above is an illustration of the interaction between a BREW-enabled device and the Application
Download Server (ADS) that provides the application catalog and applications for download. This
interaction is a form of client-server relationship, and while it is simple in concept, there are several
important steps taking place.
A BREW-enabled device is a device with BREW software and firmware installed for purposes of
downloading and executing applications. Part of this software is the BREW MobileShop®
application. MobileShop provides the user with an interface for interacting with the ADS.
MobileShop, along with an interface called IDownload, form the mobile client. MobileShop initiates
the call to the ADS, which is a TCP/IP connection to the ADS address. This setting is established
when the device is provisioned. Upon connection a mutual authentication takes place, which
determines if the device can access the ADS. During this process the handset provides the
subscriber and platform identification necessary for determining authorization to the ADS and filters
the applications provided based on capabilities of the device.
After the connection and authentication, the device provides the ADS with a manifest of
applications, extensions, and settings on the device. The ADS can at this point provide needed
shared libraries, application upgrades as well as recall applications that may have been pulled from
the catalog. In effect, the BREW client and the ADS represent a wireless systems management
service.
QUALCOMM Confidential and Proprietary
33
BREW® Developer Training
Extensions/Libraries
Developers can create their own extensions
Similar to a Windows DLL
Can be shared with other developers
Extension is automatically downloaded to the device
34
BREW provides for developers to create their own libraries. This extensible means in BREW
allows for the capabilities to grow beyond that which BREW provides.
Developers can create the libraries, called extensions. The developer may make the extensions
available to other developers to use. If another developer uses the extension, the extension is
automatically downloaded to the device when the application requiring it is downloaded. This
dynamic download capability adds to the flexibility of extension use.
QUALCOMM Confidential and Proprietary
34
BREW® Developer Training
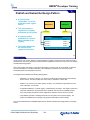
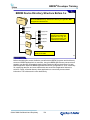
Dynamic Download of BREW Extension
App and
extension
download
BREW-enabled phone
requests application
Phone & server
“handshake” to define
what phone needs
extension
BREW
BREW
ASIC Software
BREW is air-interface independent and can support
GSM/GPRS, UMTS, cdmaOne & CDMA2000 1X/1xEV-DO
Music
Browser
Video Games
QChatTM
Position Location
Email
Instant Messenger
User
Interface
Music
Browser
Video Games
QChatTM
Position Location
Email
Instant Messenger
User
Interface
Phone needs extension
Java
Applet
extension
ASIC Software
BREW is air-interface independent and can support
GSM/GPRS, UMTS, cdmaOne & CDMA2000 1X/1xEV-DO
35
Because of the extensible nature of BREW, support for other platforms and services, such as
viewers and parsers, can be easily added. Take, for instance, the above example of an application
requiring extended services in the BREW environment. Upon request for app by the client, the ADS
determines whether or not the device has the supporting extension and, if necessary, downloads it
prior to downloading the app. The extension remains on the device for other applications using the
same extension and it is removed from the device only after all apps using the extension have
been removed.
QUALCOMM Confidential and Proprietary
35
BREW® Developer Training
Advanced Capabilities Built Into Hardware
ARM core (CPU)
Audio Synthesizer
PureVoice™ (audio)
Bluetooth
MPEG4 Video
3D – OpenGL ES
GPS
MP3
CMX/MIDI
More…
36
Today’s mobile communications users expect more features from their mobile devices, which
range from very high-end integrated mobile personal digital assistants (PDA) to mass-market
mobile phones that focus on low cost and easy operation. While there has been much enthusiasm
surrounding the possibility of leveraging high-speed ASIC technology to bring new application
functionality even to low-cost devices, the actual task has been complicated by cost and size
factors related to integrating the high-end operating systems seemingly required to host such
applications.
Thus, mass-market devices are often characterized by proprietary solutions that support unique
sets of services and interfaces. Although most of these devices share the same underlying
environment, proprietary layers above the ASIC have discouraged the development of generic
applications that can be leveraged across offerings from device manufacturers.
QUALCOMM has capitalized on its considerable expertise in the areas of ASICs, mobile devices,
and desktop applications to develop the BREW platform. BREW’s mission is to provide an efficient,
low-cost, extensible, and familiar AEE especially focused on developing applications that can be
seamlessly ported to virtually any handheld device. Unlike the high-end offerings built on operating
systems requiring substantial memory, processor speed, and associated hardware, BREW runs on
the types of devices available today. With BREW, application developers are able to extend
functionality to even the lowest-cost devices.
QUALCOMM Confidential and Proprietary
36
BREW® Developer Training
Key Points Review
During this module, students learned to:
9
9
9
9
Discuss wireless data opportunities
Describe how BREW applications are downloaded
Illustrate BREW device architecture and layering
Use a BREW phone to download and run apps
37
During this first module, we explored BREW as a product and as a technology. We looked at the
unique opportunities provided by the BREW platform in today’s wireless industry, experienced
BREW from the customer’s perspective, and reviewed the processes and technology that make it
work. From here we will review the tools and processes for building BREW applications.
QUALCOMM Confidential and Proprietary
37
BREW® Developer Training
Module 1.3
BREW Application Development Basics
Application Development Tools
Using The BREW Simulator
Building a BREW Project
BREW API Overview
38
QUALCOMM Confidential and Proprietary
38
BREW® Developer Training
Module Objectives
After completing this module, students will be able to:
9
9
9
9
9
9
9
Identify the components of a BREW application
Describe the contents of the BREW SDK
Illustrate the relationship of different components of BREW apps
Use the BREW Simulator to test apps
Use the MIF Editor
Use the Resource Editor
Create a simple BREW application
39
This module provides the basis for application development in BREW, with a comprehensive
overview of the tools and processes. Specific emphasis is given to the key points listed above.
QUALCOMM Confidential and Proprietary
39
BREW® Developer Training
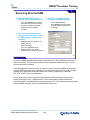
Downloading the BREW SDK
BREW Website
Register as a BREW
Developer
www.qualcomm.com/brew
Access to free tools and
services
No cost registration
Download the appropriate
version
Latest releases as well as
previous versions
Localized versions
available
40
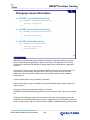
When you initially download the BREW SDK, you must register as a developer. The registration is
free and simple, and best of all, entitles you to SDK updates, tools, and limited product support.
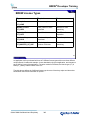
It’s important to download the right version of the SDK. Currently, BREW 1.1, 2.0, 2.1, and 3.1
versions are available. You can install as many different versions of the SDK as you like, but be
sure that you build your application in the version that matches the target device. For instance, if
you’re developing for a 3.1 device, the 3.1 SDK should be used. Let’s take a closer look at BREW
versions discussed in this course.
QUALCOMM Confidential and Proprietary
40
BREW® Developer Training
BREW Versions
This course was built using the BREW SDK version
3.1.2
Most information in this course applies to previous
versions as well
While there is a BREW 3.0 version released, no devices
were built to this version
Look for this logo throughout the course for exclusive
3.x features
3.x
New Feature
41
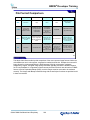
As mentioned on the previous page, there are several versions of BREW and the BREW SDK
available. It is usually best to match the BREW SDK version with the version of BREW on the
target device although in many cases an application will be supported across all versions.
First of all, BREW versions are usually backward-compatible, meaning that applications written for
a 2.1 BREW version will run fine on a BREW 3.1 device. However, the converse is not always true.
Because new features and capabilities are added regularly to new versions of BREW, those new
features won’t be available on previous devices. Each SDK version provides documentation on
new features and late-breaking updates to documentation are provided on the BREW web site.
Throughout this course, look for the BREW 3.x label above for features introduced in BREW 3 and
higher. When possible, previous version equivalents are provided. Ultimately, it is up to developers
to be aware of issues specific to their application development efforts.
QUALCOMM Confidential and Proprietary
41
BREW® Developer Training
BREW Application Development Tools
The BREW
Simulator
Examp
les
The BREW
Compressed Image
Authoring Tool
r
Heade
s
e
il
F
BREW Interface
definitions
Some nifty sample
programs to explore
The BREW MIF
Editor
s
Utilitie
Some helpful utility
programs
The BREW Resource
Editor
Docs
Helpful, in-depth
documentation
42
Ok, it’s time to look at the tools available for application development with BREW. In the next few
pages, we’ll take a tour of the BREW development tools that are illustrated above. Everything
shown is available to registered BREW developers, free of charge, from the BREW website.
Additional tools for commercialization and testing are described later in the course.
QUALCOMM Confidential and Proprietary
42
BREW® Developer Training
What’s in the SDK
The BREW
Simulator
r
Heade
Files
les
Examp
BREW Interface
definitions
Some nifty sample
programs to explore
Docs
Helpful, in-depth
documentation
43
First, let’s consider the BREW SDK. Above, you see the contents of the BREW SDK for any
version after 2.1.14. Versions prior to 2.1.14 included the SDK Tools to be described shortly.
The BREW Simulator is a Windows based application that simulates a BREW device. It can be
used for testing your application during development without having to compile and load on a
device, thus improving the speed at which applications can be developed.
The Examples directory has several applications and source code for illustration purposes. By
running these applications in the Simulator and reviewing the code, you can get insight into how to
build BREW applications.
The BREW Docs directory contains the API Reference and user guides for the tools and examples
in the SDK.
In addition to the Simulator, the Examples, and the Documents folder, there’s a folder containing all
the BREW header files and some BREW SDK utilities. The contents are all version-specific,
including the Simulator.
QUALCOMM Confidential and Proprietary
43
BREW® Developer Training
The Simulator*
Simulates a selected handheld
device, allowing you to load
test applets and classes
developed in the BREW
environment
Different wireless device files
can be loaded easily so that
you can test your applet on
many different devices
Simulated devices can have
different dimensions, color
capabilities, fonts, keypads,
amounts of available memory,
supported languages, and
other parameters
3.x
*In previous versions of the SDK, this was called the BREW Emulator
New Feature
44
The Simulator is provided with each version of the SDK to allow developers to load and test
applications on various handsets in a simulated environment. With the Simulator you can test your
application on different devices simply by changing the device file used. The devices are provided
in files known as device “packs” that can be downloaded from the BREW Developer Extranet.
These device packs provide an image of the device with functional keys, a simulated display,
memory, and other parameters to match the device as closely as possible.
QUALCOMM Confidential and Proprietary
44
BREW® Developer Training
BREW Documentation
Sample Applications Guide
API Reference Guide
BREW Programming Concepts
SDK User Docs
Docs
Helpful, in-depth
documentation
45
All BREW development tools come with documentation in either Windows help files or Adobe PDF.
The documentation is well-organized and easy to navigate, making it easy to get answers.
• Sample Applications Guide – overview, usage, and programming notes for each of the
applications in the Examples directory.
• API Reference Guide – The core of the SDK documentation suite, this comprehensive
guide to all BREW APIs and supporting data structures and functions is used extensively
during this course.
• SDK User Docs – a great first reference to the contents of the SDK and a complete
guide to the BREW Simulator.
• BREW Application Programming Concepts – detailed instructions, guidelines, and
considerations to help you with your application development efforts.
QUALCOMM Confidential and Proprietary
45
BREW® Developer Training
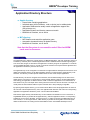
Example Applications
HelloWorld
MediaPlayer
NetDiagnostics
RoadWarrior
Whiteboard
le
Examp
s
Some nifty sample programs to
explore
46
So, where do you begin when you are new to BREW application development? A great place to
start is the Example Apps provided with the SDK. Networking, web content, playing MP3 files, even
the basic Hello World. You can just use them as a reference, or copy the code into your own
applications to help you get up and running quickly.
• Hello World – the beginning application you have seen before, now with a BREW
framework.
• MediaPlayer – the basics of working with multimedia, shows you how to work with
sounds, images, and animation.
• NetDiagnostics – not only a great overview of networking in BREW but a handy app to
check IP address, DNS lookups, and other useful network operations.
• RoadWarrior – The first real killer app, at least in San Diego. Shows real-time traffic
speeds on the freeways throughout San Diego on an exit by exit basis. The app includes
some insightful routines for reading web content and presenting it in a useful way.
• Whiteboard – draw pictures to the display, much like a paint program, so that you always
have a whiteboard in your pocket. Great coverage of UI tools and interaction with the
user.
QUALCOMM Confidential and Proprietary
46
BREW® Developer Training
BREW Header Files
Located in
<BREW SDK DIR>/inc
The header file provides
The definition of each of the member functions
Useful documentation
Each BREW interface has an associated header file
Each applet must include the header file of each
interface used by the applet
47
One of the best sources of information on BREW APIs and capabilities is directly from the API
definitions provided in the header files located in the <BREW SDK DIR>/inc directory. These
header files provide the coded definition of the APIs along with in depth comments.
For most of the interfaces, the developer is required to #include the associated header file in the
source code of the BREW application. Throughout this course, the required header file for APIs
used will be noted as part of the introduction of that interface.
QUALCOMM Confidential and Proprietary
47
BREW® Developer Training
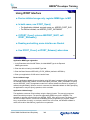
Using the BREW Simulator
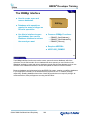
3.x
New Feature
48
It’s easy to get up and running with the BREW Simulator. The next few pages show you the
fundamentals.
QUALCOMM Confidential and Proprietary
48
BREW® Developer Training
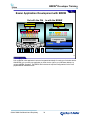
Simulator Overview
Properties Page
Easy control of the
settings controlling
the session,
including location
of MIF and Applet
directories
Device
Interface
Provides the
look and feel of
the chosen
device.
Display, keys
memory, and
other features
simulated here
Device Details
Page
Online device
data sheet,
showing the
configuration and
capabilities of the
device
Navigation
Keys
Use these for
navigating the
menus and
running apps
49
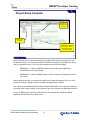
The BREW Simulator is the rapid development tool for BREW application developers. Flexibility
allows for storage of applications anywhere that suits the developer, and it can be changed at any
time. Module Information Files (MIFs) can be stored with apps or in separate directories, allowing
for testing of different languages or regional versions of the applications. There is a complete
device configuration and capabilities list built in to the device file, and there’s even the ability to test
real-life scenarios such as telephony events, SMS, and network changes.
QUALCOMM Confidential and Proprietary
49
BREW® Developer Training
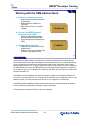
Changing Device for Testing
Choose the
device that
will run your
application.
(You can
change this
later if you
like.)
50
First, you choose a device to test the application with. The SDK ships with two generic handset
“skins” such as the one above, and others are available for download from the Developer Extranet.
QUALCOMM Confidential and Proprietary
50
BREW® Developer Training
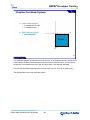
Application Location Flexibility
Select the
directory that
contains your
application’s
folder. The
default is
Examples
51
Next, you will want to make sure you’re running applications from the right directory. The great
thing about the Simulator is the flexibility. You can store applications any where you like, and then
change the Applet Directory setting to read those apps.
QUALCOMM Confidential and Proprietary
51
BREW® Developer Training
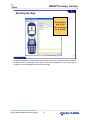
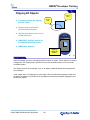
Running the App
Running the
app is just
like running it
on a device
52
Running the application in the Simulator is almost like running it on the device. Simply navigate to
the app you want to run and press the Select or OK key run the application. Then, use the keys on
the phone to use the application and test for functionality.
QUALCOMM Confidential and Proprietary
52
BREW® Developer Training
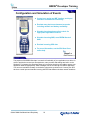
Configuration and Simulation of Events
Control over applet and MIF location, serial port
emulation and network connectivity
Emulate many device environment scenarios
including network and battery availability
Simulate incoming phone calls to check for
appropriate application behavior
Simulate incoming SMS, even BREW-directed
SMS
Emulate incoming GPS data
For more information, see the SDK User Docs
online help
3.x
New Feature
53
The purpose of the BREW Simulator is to test the functionality of your application on a device. In
order to provide the most true-to-life experience, many controls and settings are built in to the
Simulator. For instance, the Simulator allows you to emulate incoming voice calls to ensure your
application behaves appropriately. SMS messages can be sent directly to a BREW application.
You can even emulate the battery on the device going below a critical level. Connect your GPS
device to a serial port and read the incoming data. Emulate different wireless network situations.
QUALCOMM Confidential and Proprietary
53
BREW® Developer Training
BREW Emulator and SDK 2.x Versions
Similar use to the BREW Simulator
Can change device (.qsc files, not device packs)
Emulate application look and feel with display and keypad use
Can emulate TAPI and SMS events
Lacks some more advanced functionality
Serial port connectivity not available
No device details or properties pages
Backward compatibility is limited
Best practice – match Simulator/Emulator with SDK
Use the Emulator or Simulator supplied in SDK download
54
In all BREW versions before 3.0, the BREW Emulator was provided. When BREW 3.0 was
released, the BREW Simulator replaced the Emulator. Developers may find themselves writing for
several versions of BREW. As of this writing, BREW 1.1, 2.0, 2.1 versions are readily available,
and development of 3.1 devices is underway. Therefore, it’s important to know the similarities and
differences between the different versions of BREW and the capabilities of the associated Emulator
or Simulator.
The BREW SDK User Docs provides complete documentation on backward-compatibility. In
addition, developers should watch the BREW web site and the SDK Readme for late-breaking
news and issues.
QUALCOMM Confidential and Proprietary
54
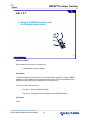
BREW® Developer Training
Lab 1.3.1
Using the BREW Simulator and
the Example Applications
55
Before You Begin
Before starting this exercise, you should have:
• Completed the previous exercises.
Description
This lab is designed to familiarize you with running a wireless application using the BREW
Simulator. It also highlights some of the differences between running an application on the
BREW Simulator and running an application on an actual device.
This lab consists of two exercises:
• Exercise 1 - Using the BREW Simulator.
• Exercise 2 - Changing device configurations on the BREW Simulator.
APIs Used
None
QUALCOMM Confidential and Proprietary
55
BREW® Developer Training
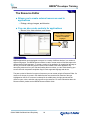
Exercise 1 – Running Example Applications in the BREW Simulator
Follow these steps to complete the exercise:
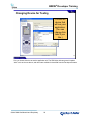
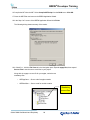
1. Launch the BREW Simulator from the Start menu. Set both the Applet Directory and the MIF
Directory to the Examples directory (C:\Program Files\BREW x.x.x\sdk\examples).
Simulated
Device
Device
Properties and
Device Details
Tabs
Navigation
keys
Power (End)
key
2. Use your mouse to click the multidirectional navigation buttons on the simulated phone, and scroll
through the sample applications. Select the Hello World application. You can also use the arrow
keys on the keyboard, but the idea is to simulate the key presses on the device.
3. Click your mouse on the Select button (the button in the center of the multidirectional navigation
button) to run the selected application. You can also press Enter when the application is selected.
The Hello World application runs, displaying the string “Hello World” on the display.
4. Press the Power (End) key to exit the application.
5. Take this opportunity to try other applications in the Examples directory.
QUALCOMM Confidential and Proprietary
56
BREW® Developer Training
Exercise 2 – Change the Device Configuration on the BREW Simulator
Follow these steps to complete the exercise:
Note: Device configuration, handset configuration, and handset skin are often used as synonyms.
1. To change phones in the Simulator select File -> Load Device.
2. Navigate up to the the Device Pack 2 folder, and select DevicePack2.dpk.
3. Click Open.
4. Observe the change in the appearance of the device in the Simulator. The device will change to
the phone selected, including changing the screen dimensions and key locations.
We will explore the Simulator further in upcoming exercises. Additional information is available in
the BREW SDK User Docs online help.
After You Finish
Once you complete this lab, you should have:
•
Run a wireless application using the BREW Simulator.
•
Changed the handset configuration on the BREW Simulator.
QUALCOMM Confidential and Proprietary
57
BREW® Developer Training
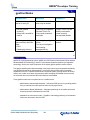
Handset vs. Simulator
What are some of the differences between running an app
on the handset and running it on the Simulator?
Speed – Most often, the Simulator will run applications faster than
the real device. Be sure to run performance tests on the real device
at some point in the development cycle
Appearance – Some slight visual differences exist between the
Simulator and the handset. These include the exact positioning and
look of annunciator icons, as well as branding and aesthetic logos
Memory – The Device Details tab of the Simulator shows available
RAM (heap), stack, and EFS space that is simulated for the device
pack used. The RAM setting can be changed to allow for a larger
RAM space during testing. This additional RAM is not available on
the device and care should be taken when changing this setting.
58
The previous lab demonstrated just how similar the BREW Simulator is to a real BREW-enabled
device. This allows applications to be designed, developed, and tested primarily on the Simulator.
Display speed and embedded file system speed can be simulated on the Simulator to help provide
realistic performance. Despite the vast similarities, there are some slight differences between the
two, as shown above.
QUALCOMM Confidential and Proprietary
58
BREW® Developer Training
BREW SDK Tools
Common tools to all SDK
versions (after BREW 2.1.3)
Separate download from BREW
SDK download page
The BREW
Compressed Image
Authoring Tool
s
Utilitie
Some helpful utility
programs
The BREW MIF
Editor
The BREW Resource
Editor
59
A companion download to the BREW SDK is the BREW SDK Tools. Since BREW 2.1.14, these
non-version-specific tools are now available as a separate download package, and can be used
with any version of the BREW SDK.
The BREW MIF Editor is used for creating Module Information Files, which provide an entry point
and application information for your application.
The BREW Resource Editor provides for the creation and maintenance of external resources, such
as strings, bitmaps, and dialogs, that need to be changed for different locations or devices without
recompiling the application.
The BREW Compressed Image Authoring Tool is a fun and useful tool for managing images,
converting them to the compact .bci format that is optimized for the handset environment. It also
helps create simple animations.
Other utilities are included converting bitmaps, waveform files, and GPS navigation data.
For further information, see the user guides provided with the SDK.
QUALCOMM Confidential and Proprietary
59
BREW® Developer Training
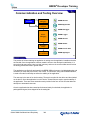
The Parts of a BREW Application
MIF file
Application binary file
Viewed and tested in the
BREW Simulator
Resource file
60
BREW applications are developed as modules. We will see more about this later. But it helps to
think of these applications as modules to understand the relationship of the different components.
From a basic perspective, all BREW applications start out as above. An application MIF file,
resource file, and application binary are created using the tools just mentioned and then used in the
Simulator for testing.
MIF (Module Information File) – Provides the application entry point for your application.
Additionally the MIF is an application descriptor, providing information about external libraries the
app needs for execution.
Binary file – Windows Win32.dll file build in your development environment.
Resource file – Compiled, binary file that contains resource information. These resources are
localizable strings in menu controls, regional images, step-through dialogs, or any resource that
may change based on handset, language, or region.
QUALCOMM Confidential and Proprietary
60
BREW® Developer Training
MIF Editor
Use MIF Editor to specify:
Icons for your app used on the phone’s BREW menu
Copyright information
External extensions (libraries) that your application uses
Extensions (libraries) that your application exposes for others to use
Application’s unique ID (Class ID)
The MIF is the application
descriptor, providing an icon,
entry point, and other
application information
MIF file
61
The MIF Editor provides an easy-to-use interface for building the MIF. Using the MIF Editor, you
can add icons to your application so the app can be recognized by the user. Other information,
such as copyright information and classification of the application, are offered here as identification
of the application.
The MIF is the component used to identify external dependencies, in the form of external classes
and extensions, that your application uses. Also, the MIF is used to provide classes and
functionality to other applications.
Most importantly, the MIF Editor is used to define your application with a unique BREW ClassID.
This is described next.
QUALCOMM Confidential and Proprietary
61
BREW® Developer Training
BREW ClassIDs
Each BREW application has a unique ID that identifies it
anywhere in the world
IDs are obtained for free from the BREW ClassID
Generator on the Developer Extranet
They can be created locally for trial and testing
purposes
That unique ID is then specified in your application’s
MIF file
62
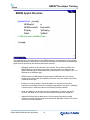
ClassIDs are an important part of application execution and security. All production BREW
applications have to have an ID that is unique anywhere in the world. These IDs are 32-bit
hexadecimal numbers that are provided by the BREW ClassID Generator available on the BREW
Extranet. Trial IDs can be generated locally using the MIF Editor, but these must be changed to
commercially generated IDs using the ClassID Generator. The ClassID for an application is stored
in an external .bid resource file as well as embedded in the MIF. Next, we’ll see how this all ties
together.
QUALCOMM Confidential and Proprietary
62
BREW® Developer Training
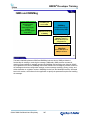
How the MIF and the App are Connected
User selects app by choosing icon
on the device provided by the
MIF. The MIF provides the
ClassID to the BREW Application
Manager requesting it to start
MIF Editor
MIF
Provides the
ClassID in both the
.bid file and the MIF
Icon
.bid is generated either
locally or by the
ClassID Generator
.bid
0xABCD1234
0xABCD1234
Source Code
Device
APP
#include the .bid file
and the ClassID is
embedded in the
application
63
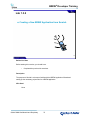
Here’s how class IDs work. The MIF Editor is used to create a MIF, which has an embedded icon
and ClassID. The icon is presented to the user as a graphical representation of the application, and
the ClassID is of course used to identify the application to launch when selected. The .bid contains
the class ID, declared through a #define statement matching it to a ClassID name used in
application startup, and this same ClassID is embedded in the MIF. A #include is used to embed
the ClassID into the executable when the application is compiled. Now, there’s a bridge between
the icon that the user selects and the application that should launch through the ClassID embedded
in each. When the application is installed, it’s ClassID is registered with the BREW runtime and the
icon is made available. So, when the user selects the icon from the Simulator or the device, the run
time environment matches the ClassID from the MIF to the application and launches the app. A
similar process takes place with external dependencies, such as when an app calls to an extension
or another app.
QUALCOMM Confidential and Proprietary
63
BREW® Developer Training
The Resource Editor
Allows you to create external resources used in
applications
Dialogs, strings, images, and binaries
You can also create controls for applications
Menus, lists, date selectors, and timers
Resources are useful if you need
to create applications that will
run on a variety of wireless
devices or in different
languages
Resource file
64
BREW applications can be designed to execute on a variety of different devices, in a number of
different languages. The BREW Resource Editor is used to create resource files that support the
different devices and languages. To create a version of an application for a particular language or
device, you need to create only system resource files instead of the entire application. By
decoupling resources from your code and loading them at runtime, you can avoid cluttering your
source code with a separate compilation flag for each supported language and device.
The pane on the left lists the four types of resources you can create using the Resource Editor. If a
resource file is open, the pane in the middle lists the resources that file contains of the type
highlighted on the left. If a resource is selected in the middle pane, the right pane shows the
resource name, value, and other value specific to the resources. For more information about the
Resource Editor, please see the BREW Resource Editor Guide.
QUALCOMM Confidential and Proprietary
64
BREW® Developer Training
BREW Compressed Image (BCI) Authoring Tool
Allows you to store images in a
compressed form on the handset
Compressing the images greatly
reduces the size of graphic images
and increases the speed at which
they can be loaded by the device
The BCI Tool provides a means for
compressing and combining
standard Windows BMP, PNG,
JPEG, and JPG files to create
animations on the handset
65
One of the most useful utility tools provided with the BREW SDK Tools download is the BREW
Compressed Image Authoring Tool. BREW Compressed Images, or .bci files, are image files
optimized for the BREW environment. The utility can take images from almost any source and
convert them to this highly compressed file type, improving the efficiency of download and display
while keeping images of high quality.
In addition to image conversion, the BCI Authoring Tool can be used to build basic animations by
adding progressing images to a film strip and then defining a frame rate for the playback.
QUALCOMM Confidential and Proprietary
65
BREW® Developer Training
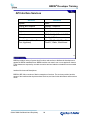
Other BREW Utilities
BREW 2Bit Tool
convert 4-bit BMPs to 2-bit BMPs
PureVoice™ Converter
Converts (WAV) files to QUALCOMM PureVoice™ (QCP)
NMEA Logger Tool
Reads National Marine Electronics Association (NMEA) messages
GPS or GNSS data can then be simulated on the Simulator
66
BREW 2Bit Tool
• Allows you to convert 4-bit BMPs to 2-bit BMPs (and vice versa) for image editing
purposes. You can run the 2Bit Tool like other BREW SDK tools, using its GUI, or you
can run the 2Bit Tool from the command line.
PureVoice™ Converter
• Converts pulse code modulation (PCM) waveform (WAV) files to QUALCOMM
PureVoice™ (QCP) files (and vice versa).
NMEA Logger Tool
• Retrieves National Marine Electronics Association (NMEA) messages received from a
Global Positioning System (GPS) or Global Navigation Satellite System (GNSS) device.
• The GPS or GNSS data can then be simulated on the Simulator, either as live data
communication recorded from a serial connection between the device and a laptop
computer, or from a previously recorded file.
QUALCOMM Confidential and Proprietary
66
BREW® Developer Training
Visual Studio Add-ins
BREW Application Wizard automates the creation of a BREW
applet project
Easily access each of the BREW SDK tools with custom toolbar
buttons
Create your make files within the Visual Studio environment
Compile your code for the ARM platform right from Visual Studio
Same functionality is available to .NET users
67
Along with the BREW SDK Tools download, and also provided as a separate download to BREW
2.1 developers, is the Visual Studio Add-ins. This powerful set of tools for the Visual Studio or .NET
environment provides very useful automation, including the BREW Application Wizard for building
a baseline BREW application project, access to BREW SDK tools such as the MIF Editor and
Resource Editor. For code compilation, the tools automate the creation of .mak files and even allow
for compilation for the device from within the Visual Studio or .NET development environment.
QUALCOMM Confidential and Proprietary
67
BREW® Developer Training
Building BREW Applet Projects
68
QUALCOMM Confidential and Proprietary
68
BREW® Developer Training
Steps to Build an Application
1.
Launch Microsoft Visual C++
2.
Use the BREW Application Wizard to create your
application’s project, .c, .mif, and .bid files
3.
Include the .bid file in your .c file
4.
Build your application as a Windows 32-bit DLL in
Visual C++
5.
Launch the BREW Simulator and set the directories
appropriately
6.
Run your applet in the Simulator
69
In general, BREW application development follows the steps above. We’ll be taking a look at each
of these steps through the coming exercises.
QUALCOMM Confidential and Proprietary
69
BREW® Developer Training
Writing Source Code
Use sample applications in the SDK Examples Directory as a
guide
Open .dsw files to see the use of BREW libraries
Look for comments on mandatory structure
Examine for programming commonalities
Compile and run these in the Simulator
Step through applications to see functionality
Choosing a Development Environment
Microsoft Visual Studio 6.0 used in this course
any compiler that generates a Windows DLL will work
BREW helper add-ins for Visual Studio and .NET
Code is written in C
Libraries are in C
C++ can be used with some limitations
70
There is no better way to learn about a programming environment than to delve into the source
code for sample applications. The BREW SDK includes many sample applications that you can
study and use as a basis for your own applications.
In general, to view and edit the source code:
• Run Visual C++ and open one of the sample project workspaces (*.dsw). Sample .dsw
and .dsp files for use with Microsoft Visual C++ have also been shipped with the SDK.
• Make a small change to the source code (for example, showing a different text message)
and rebuild the application using the Build menu in your compiler. Be sure to backup any
projects you use prior to making changes
• Run the BREW Simulator, choose the applet, and run it to verify that your change has
taken effect.
While any development tool that can compile a Win32 DLL will work fine, keep in mind the useful
functionality provided by the BREW Visual Studio Add-ins. Visual Studio 6.0 is used in this course.
When looking at the code, you may find many familiar things, such as function calls, loops, switch
statements. What you will also find is that the code is written in C with some C++ nuances. We will
explore the use of C++ in BREW later in the course. For now, focus on the programming concepts
you already know and get ready for the new and easy way BREW fits into your programming
experience.
QUALCOMM Confidential and Proprietary
70
BREW® Developer Training
Application Directory Structure
Applet directory
Parent folder containing applications
Individual apps (.dll for Simulator, .mod on device) are in subdirectories
Application subdirectories usually contain all application support files
(text, pictures, etc.)
Application filename and directory name must match
Modifiable in Simulator, not on device
MIF directory
MIF filename must match the application name
Assumed to be same directory as Applet Directory
Modifiable in Simulator, not on device
Note that the file system is case-sensitive and all files that BREW
reads must be lowercase
71
The applet directory is defined as a parent directory for BREW applications, with each application stored in a
sub directory under this parent. Individual applications reside in subdirectories that include supporting files,
such as text files, images, or data files for the application. The binary image for an application is a .dll file for
use in the BREW Simulator, and in a .mod file on the device. Note that it is required that the application and
the application’s subdirectory have the same name.
The applet directory can be configured in the Simulator to support different development environments. As a
default, the Examples directory of the SDK installation directory is configured as the applet directory in the
Simulator. This directory contains separate subdirectories for each of the example applications.
The MIF directory can also be configured in the Simulator, with the default setting to be the same as the
applet directory. One reason you might want to change the MIF directory setting is to select different MIFs
when testing your application on different devices. A MIF contains the application’s icons and therefore is
best suited for only one color depth. When working with devices that don’t all have the same color depth, it’s
usually easier to switch between different copies of the MIF than to keep modifying a single MIF.
By exploring the Examples directory you can see that all the MIFs for the sample applications are stored at
the root level of the Examples directory. Also, each application MIF filename must match the corresponding
application and application subdirectory name. This is fundamental to BREW.
Note that the applet directory and MIF directory can be modified in the Simulator but not on the device. A
single BREW directory is provided as the applet directory, with each application stored in a corresponding
subdirectory such as in the Simulator. For devices prior to 3.1, MIFs are stored in this BREW directory as
well. However, in 3.1 and higher devices, a MIF directory is provided for storing MIFs. Device file system
details are discussed in the Testing and Commercialization section of the BREW Developer Course.
QUALCOMM Confidential and Proprietary
71
BREW® Developer Training
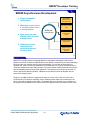
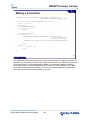
Setting up a Project
BREW Application Wizard
Create a new application
using the BREW
Application Wizard in
Visual C++
Follow the step-by-step
instructions
End result is shell
application with
ready-to-compile
baseline source code
72
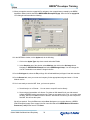
When you initially set up a project, we recommend using the BREW Application Wizard, which is
integrated with Visual C++, to automate the process. The wizard creates a .c source file that has
some of the “bookkeeping” code already filled in.
Alternately, you can use an existing project as the basis for the new project. Create a new
workspace (.dsw file) within Visual C++. Then, copy and rename all of the sample files to the
directory structure outlined above. Once you have done this, edit the workspace to add the list of
source files.
Once you have completed those steps, you may begin editing the source code in order to make
your application functional.
QUALCOMM Confidential and Proprietary
72
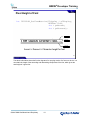
BREW® Developer Training
Project Setup Complete
Includes for
headers and
ClassID
Source files
included
Applet structure
defined with elements
for the applet, device
information, display
and shell services
73
When complete, you will have a baseline project complete with comments to guide you in your
development efforts. You see above that the source files are included in your project files. Along
with your application source .c file, two other mandatory source files are included:
• AEEAppGen.c – Defines a BREW application and provides general application
functionality such as event handling.
• AEEModGen.c – Defines a BREW module, loads it in memory, and provides access to
the module.
Without these source files, you would have to define your module and applet on your own. Look
through these files for insight into how the module and application are created.
The wizard has also added the header files into the #includes section. This is automatic, based on
selections made using the wizard. As you build your app, you will continue to add header files here.
Finally, the BREW applet structure is defined. This is an important part of building a BREW
application that deserves some further review.
QUALCOMM Confidential and Proprietary
73
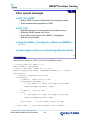
BREW® Developer Training
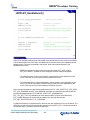
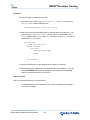
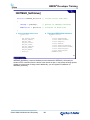
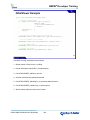
BREW Applet Structure
typedef struct _myapp {
AEEApplet
a;
AEEDeviceInfo DeviceInfo;
IDisplay
*pIDisplay;
IShell
*pIShell;
// add your own variables here….
} myapp;
74
The Applet Structure is the data definition of a BREW application. Interface pointers, large buffers,
and global data should be included here. Among other elements we will add later, the fundamental
applet structure provided by the wizard includes these elements:
•
AEEApplet must be the first element in the structure. This is defined in AEE.h as a
BREW applet type. By placing this element in the first position, the address of the
applet is defined with the same address as the data structure for the applet. Here “a” is
declared as an AEEApplet type.
•
AEEDeviceInfo is a BREW data structure defined in AEEShell.h and it is used for
holding device configuration and capability information. Here the variable “DeviceInfo”
is declared as this type.
•
IDisplay is a primary interface, used by all applets, for rendering text and other
information to the display. Because it’s used by all applications, the pointer “*pIDisplay”
is declared here to make the instance of the IDisplay interface available.
•
IShell, like IDisplay, is an interface used by all applications. Therefore, the pointer
“*pIShell” is defined here for access to shell services throughout the application.
•
Additional interfaces will be added here in kind, along with large buffers, global
variables, and other data that needs to be allocated at application creation. We will see
more as the course progresses.
QUALCOMM Confidential and Proprietary
74
BREW® Developer Training
Lab 1.3.2
Creating a New BREW Application from Scratch
75
Before You Start
Before starting this exercise, you should have:
•
Completed the previous lab exercises.
Description
The purpose of this lab is to become familiar with the BREW Application Wizard and
setting up the necessary project files for a BREW application
APIs Used
None
QUALCOMM Confidential and Proprietary
75
BREW® Developer Training
Exercise 1
Follow these steps to complete the exercise:
1. From the File menu in Visual C++, select New…
The New window appears.
2. Select the Projects tab.
3. Select BREW Application Wizard from the projects type list shown in the main window.
4. Enter myapp for the project name.
5. Click Browse next to the Location field, and select <BREW SDK>\Examples, where, <BREW
SDK> is the location of your BREW SDK installation.
Typically, this is c:\Program Files\BREW x.x.x \sdk\Examples where x.x.x represents the BREW
SDK version.
6. Make sure Create new workspace and Win32 are selected, and then press Enter or click OK.
Continued next page…
QUALCOMM Confidential and Proprietary
76
BREW® Developer Training
7. Step 1-2 Dialog appears, allowing you to select the services needed for your application. For this
application, leave them blank. We will discuss how to add header files later. The first of three
dialog boxes appears.
8. Click Next. The Step 2 of 2 box appears, describing the purpose of a MIF and providing a button
to access the MIF Editor. Additionally, the box provides the option of generating source file
comments. We will create the MIF first, then return to the wizard to complete the project.
Click on the MIF Editor button. The MIF Editor starts, providing the following screen:
QUALCOMM Confidential and Proprietary
77
BREW® Developer Training
New
Applet
button
9. Click the New Applet button.
The BREW ClassID dialog appears.
10. Enter the values seen above, and click Yes.
You will be creating the BREW ClassID locally, for development purposes, so you will receive a
warning about this action. Click OK to accept the confirm the action.
QUALCOMM Confidential and Proprietary
78
BREW® Developer Training
11. When prompted to save the myapp.bid file, navigate to the myapp directory created by the BREW
Application Wizard, which should be <BREW SDK>\Examples\myapp. Save the file as myapp.bid.
Your dialog should resemble the following.
12. In the MIF Editor window, on the Applet tab, do the following:
1. Click on the Applet Type drop down control and select Tools.
2. In the Graphics part of the window, select Medium, then click on the Set Image button.
Navigate to <BREW SDK>\Bitmaps\ and select BREWImage-8.bmp. You can change the
view to Thumbnails to see what the image looks like.
13. On the Privileges tab, select the File privilege. We will add additional privileges in later lab exercises.
14. On the General tab, enter your name and company for the appropriate strings and enter 1.0 for the
Module version.
15. You’re now ready to save the MIF. Here, you have two options:
a. Save directly to a .mif format – You can save to a specific version directly.
b. Save using an intermediate .mfx format - Provides an XML-based file for use with external
editors and BREW testing automation tools. There are two steps to this. First, you need to save
the MFX, which is an editable version of the MIF. After the MFX is saved, you can compile the
final MIF. We will use this option.
We will use option b. From the File menu, select Save. Navigate to your project directory (<BREW
SDK>\Examples\myapp. Enter myapp in the file name field and select BREW Module Information
Resources (*.mfx) as the format. Click Save.
QUALCOMM Confidential and Proprietary
79
BREW® Developer Training
16. Compile the MFX into the MIF. Select Compile MIF Script from the Build menu. Click OK.
17. Close the MIF Editor and return to the BREW Application Wizard.
18. In the Step 2 of 2 screen of the BREW Application Wizard click Finish.
The following dialog shows summary of the results.
19. In Visual C++, click the File View tab in the Navigation pane. Expand myapp files, then expand
Source Files to see the source code files in your project.
Along with the myapp.c source file for your applet, notice the two
mandatory files:
•
AEEAppGen.c – Source code for applet creation
•
AEEModGen.c – Source code for module creation
•Mandatory
source files
QUALCOMM Confidential and Proprietary
80
BREW® Developer Training
20. Double-click on myapp.c to display it in the editor. Note the following in the code.
In the Includes and Variables section
#include "AEEModGen.h"
#include "AEEAppGen.h"
#include "AEEShell.h"
Module interface definitions
Applet interface definitions
Shell interface definitions
#include "myapp.bid"
ClassID definition for myapp
In the Applet Structure
typedef struct _myapp {
AEEApplet
a ;
AEEDeviceInfo DeviceInfo;
IShell
*pIShell;
// add your own variables here...
} myapp;
This structure represents the data of your application. The first element, a, of the structure must be
AEEApplet to address the applet correctly. DeviceInfo is a pointer to an AEEDeviceInfo struct providing
access to device configuration information. IDisplay and IShell are interfaces that are fundamental BREW
interfaces, used by all BREW applications, so their pointers are created for you here.
We will see more of this structure in upcoming exercises.
21.From the Project menu, select Settings… . In order to make sure the binary is placed in the proper
directory, blank out the Output files: setting. Your dialog should appear as below. Click the OK button.
QUALCOMM Confidential and Proprietary
81
BREW® Developer Training
After You Finish
After you complete this exercise, you should have:
• Created a new BREW application project using the BREW Application Wizard.
• Created a ClassID and MIF using the MIF Editor.
• Reviewed the structure of the code created by the wizard.
QUALCOMM Confidential and Proprietary
82
BREW® Developer Training
Key Points Review
During this module, students learned to:
9
9
9
9
9
9
9
Identify the components of a BREW application
Describe the contents of the BREW SDK
Illustrate the relationship of different components of BREW apps
Use the BREW Simulator to test apps
Use the MIF Editor
Use the Resource Editor
Create a simple BREW application
83
This module presented the basis for application development in BREW, with a comprehensive
overview of the tools and processes. Specific emphasis was given to the key points listed above.
QUALCOMM Confidential and Proprietary
83
BREW® Developer Training
Module 1.4
Overview of Fundamental APIs and Data
Types
BREW API Services
IShell
IDisplay
Helper Functions and Macros
Data Types
84
QUALCOMM Confidential and Proprietary
84
BREW® Developer Training
Module Objectives
After completing this module, students will be able to:
9
9
9
9
Identify and describe components of the BREW API Library
Use the BREW API Reference to find Class APIs
Describe services provided by IShell
Identify services provided by IDisplay
85
This module covers a BREW API overview with special emphasis on the objectives listed above.
QUALCOMM Confidential and Proprietary
85
BREW® Developer Training
Purpose of the BREW APIs
To standardize programming environment for
portability to multiple wireless products
To minimize usage of system resources
To shield application developers from having to deal
directly with device drivers, telephony, etc.
86
BREW provides a programming interface that’s consistent from device to device. Formerly,
developers who wanted their programs to run on multiple wireless devices had to laboriously port
their code from device to device and master the details of each environment. But with BREW, once
you’ve written an application, the Simulator makes it easy to check how it will work on various
devices without leaving the Windows desktop.
BREW has been optimized for use in low-memory devices, and therefore minimizes the usage of
limited resources. This allows BREW applications to be run on low-end devices, exposing a large
target market.
By tapping into the powerful capabilities of the underlying chipsets, BREW enables developers to
access local storage and processing as well as built-in multimedia extensions, connectivity
features, position location information and more in order to create powerful and compelling
applications. BREW also frees developers from dealing with complex telephony functions by
managing these tasks itself.
QUALCOMM Confidential and Proprietary
86
BREW® Developer Training
The BREW API Reference Guide
Supplied with the SDK as a Windows online help
library
Comprehensive resource for all BREW interfaces,
helper functions, and data structures in hierarchical
format
Provides hyperlinks to related information for easy
navigation
87
The BREW API Reference guide provides comprehensive information about the usage of all
BREW interfaces and helper functions, along with the data structures and constants that
accompany them. Each interface is explained in an overview, followed by detailed information for
each interface function. Related topics are hyperlinked for easy navigation to relevant information.
This document is not tutorial in nature. Numerous how-tos and examples can be found in the
BREW SDK User’s Guide.
QUALCOMM Confidential and Proprietary
87
BREW® Developer Training
API Interface Services
Services
Interfaces
System
IShell*
Display and Graphics
IDisplay*, IGraphics*
Base Class
IBase*
Applet
IApplet*
Network
IDNS, INetMgr*, ISocket*, ISSL
File system
IFileMgr*, IFile*
Controls (Menu, Date, Time,
Text, Hypertext)
IMenuCtl*, IDateCtl, ITimeCtl,
ITextCtl*, IStatic, IHtmlViewer
* APIs which will be covered during class
88
BREW provides a variety of system-level functions and services to facilitate the development of
applets for BREW-enabled devices. BREW modules can contain one or more applets or classes.
These classes are exposed by a module at runtime and are loaded or unloaded on an as-needed
basis.
Interface Services and Descriptions
BREW’s AEE offers a number of distinct categories of services. The services provided, and the
names of the interfaces that implement those services, are listed in the table above and those that
follow.
QUALCOMM Confidential and Proprietary
88
BREW® Developer Training
API Interface Services (cont.)
Services
Interfaces
Database Management
IDBMgr*, IDatabase*,
IDBRecord
OEM Database Management
IAddrBook, IAddrRec,
IRingerMgr
Tones and Sounds
ISound*, ISoundPlayer*
Dialog Controls
IDialog
Notification
INotifier
Image Drawing and Animation
IBitmap, IDIB, IImage, ISprite
* APIs which will be covered during class
89
Database management, tones and sounds, dialog controls, notification, and image drawing and
animation services are show along with the respective interfaces.
QUALCOMM Confidential and Proprietary
89
BREW® Developer Training
API Interface Services (cont.)
Services
Interfaces
Web access
IWeb*, IWebResp,* IWebUtil
Encryption
IRSA, ICipher
Data Hashing
IHash
Read/Readable Data
ISource*, ISourceUtil, IPeek,
IGetLine
Geographic Location
IPosDet
Standard C Library Functions
AEE Helper Functions
* APIs which will be covered during class
90
Web access, encryption, data hashing, reading data, geographic location, and the standard C
library functions are shown along the respective interfaces.
QUALCOMM Confidential and Proprietary
90
BREW® Developer Training
BREW API Data Structures
Define format and content of application data passed to
BREW API functions and received by applications as
output from functions
Type definitions are contained in BREW header files
shipped with BREW SDK
Most are specific to a particular BREW interface
General, widely used data structures are found in AEE.h
91
The data structures used by the BREW API functions define the format and content of the
input/output data passed between the functions and applications. Type definitions for the BREW
data structures are contained in the header files shipped with the SDK.
Most data structures are specific to a particular BREW interface, and their type definitions are
contained in the header file for that interface. More general, widely used data structures are found
in the files AEE.h. The description of each function contains links to the descriptions of all relevant
data structures.
QUALCOMM Confidential and Proprietary
91
BREW® Developer Training
API Data Structure Types
Structures and unions
Example: IGraphics shape-drawing functions
Enumerated types
Example: font types supported by IDisplay interface's text-drawing
functions
Constants
Example: BREW menu, time, text and static text controls all have a
32-bit variable used to store control properties, with one bit per
property
92
Structures and Unions
Many BREW functions take pointers to structures as input parameters. To use these functions, you
populate an instance of a structure and pass a pointer to the instance when calling the function. For
example, the IGraphics shape-drawing functions have structures as input parameters that define
the dimensions of the shape to be drawn. Many BREW functions return pointers to structures as
output. The IFile and IImage interface functions, for example, return information about files and
images in structures.
Enumerated Types
Many BREW variables and structure members take on values from a finite set defined by the C
typedef enum construct. For example, the font types supported by the IDisplay interface’s textdrawing functions are specified with an enumerated-type definition.
Constant Definitions
The BREW API functions make use of a number of constants defined with the #define directive.
One common use of constants is to define a set of bit masks for testing and setting the values of
the bits in a bit-vector variable. For example, the BREW menu, time, text and static text controls all
have a 32-bit variable used to store control properties, with one bit per property. Each control
defines a set of bit-mask constants used to test and set the values of each of the control’s
properties.
QUALCOMM Confidential and Proprietary
92
BREW® Developer Training
API Helper Functions
Types include String and Utility functions, among
others
Subset of standard ANSI C library functions
Applications must not invoke standard C or Windows
libraries
Applications can call helper functions directly – no
interface pointer is required
93
The various helper functions provided by the AEE include string functions, functions in the standard
C library, utility functions, and other items. Standard C library refers to the ANSI standard C library
supplied with C/C++ compilers/Integrated Development Environments.
Applications must not directly invoke the standard C library functions (memcpy(), for example).
Instead, applications must use the helper functions provided by the BREW AEE such as
MEMCPY(). A distinct difference between the helper functions and the rest of the AEE functions is
that interface-specific information is not needed to access the helper functions.
QUALCOMM Confidential and Proprietary
93
BREW® Developer Training
API Helper Function Benefits
Eliminate unnecessary linkage with standard C library
for less baggage
Eliminate unnecessary static data in dynamic
applications thus making application portable
Example:
void * MEMCPY(void * dest,
const void * src,
uint16 count);
Provides the same functionality as the memcpy() function provided by
standard C library: copies count bytes from src to dest and
returns a pointer to its first argument
94
AEE offers the helper functions, some of which are wrappers that directly call the standard C
library functions in order to:
• Eliminate unnecessary linkage with the standard C library – When there are multiple
applications loaded on the device, each application carries the extra baggage of the
standard C runtime library. To avoid this, AEE maintains a single copy of the standard C
library. All applications can make use of this copy. Applications must not make direct
calls to the standard C library functions so that the static C runtime library will not
become part of the binary image.
• Eliminate static data in dynamic applications – Linkage to standard C library functions
can introduce static data into an application, preventing it from being dynamically
loadable.
QUALCOMM Confidential and Proprietary
94
BREW® Developer Training
The IShell Interface
95
QUALCOMM Confidential and Proprietary
95
BREW® Developer Training
IShell Overview
Access to all external services from the root
IShell interface
Send events to other applications
Poll for other applications and status
Primary means of using exportable interfaces
Applets and Modules request pointers to all other
interfaces using IShell
All interfaces called by a unique ID
Standard application control interface
App 1
Creating Interfaces
Determine device configuration
Inventory applications resident on device
Call extensions via ClassID
Include .bid file for external class
Must also have ClassID defined in MIF
SHELL
Resource
App 2
Access to external resources
BREW application resource (.bar) files
External text, image, or data files
Extension
96
IShell is the most fundamental interface in BREW. As the name suggests, it acts as the BREW
core interface, providing a wide range of services as noted above and in the following slides.
Modules and applets gain access to all external services using interfaces retrieved from the root
IShell interface. This module interface is passed to the load function and initialized for functions of
the module..
Using the IShell interface, applets and modules can request pointers to all the other interfaces they
require. Each interface has an ID that uniquely identifies the given interface.
Additionally, IShell is the standard application control interface, which is responsible for loading and
unloading applications, maintaining a manifest of resident applications, and providing
communication between applications.
IShell also provides access to external resources, whether available in a BREW Resource Editor
generated .bar file or from files stored on the device.
QUALCOMM Confidential and Proprietary
96
BREW® Developer Training
IShell Services
Building BREW
interfaces
Application
management
Resource files and file
handlers
Device and application
configuration
information
Notifications
Alarms
Timers
Dialogs, message boxes
and prompts
Miscellaneous functions
(e.g., beep)
97
The IShell interface provides several types of services to applets. Individual overviews of the
services listed above will be provided in the upcoming slides.
QUALCOMM Confidential and Proprietary
97
BREW® Developer Training
Using BREW Interfaces
Before any interface is used (except IShell and IDisplay)
you need to “load that library”
BREW is very memory-compact
Interfaces (libraries) are initialized and memory taken up for them
only when the interface is needed
To “load the library”
int ISHELL_CreateInstance(IShell * pIShell,
AEECLSID cls,
void ** ppobj);
98
IShell’s CreateInstance method is used to create instances of classes, especially BREW
interfaces. The use of this method allows applications to gain access to the wide variety of services
exposed by BREW interfaces.
In the usage example shown, the pIShell argument is a valid pointer to the IShell interface – this is
available to all running applets. The cls argument is the ClassID of the desired class. Finally, the
ppobj variable is a pointer to a pointer, to be filled with the address of the instantiated class when
the call completes successfully.
QUALCOMM Confidential and Proprietary
98
BREW® Developer Training
Releasing Interfaces
To “close a library”
For example, to close the graphics interface, call
“IGRAPHICS_Release()
The “open” is in the IShell interface, and the “close” is
in each respective interface
Closing the interface (library) when no longer needed
Generally done when your app is exiting
You can close them in the FreeAppData() function that is already
provided for you
Lets BREW free up the resources you were using in
that interface
99
When an interface is no longer needed, it can be released (or closed) to free the resources for that
interface. That is the opposite of the ISHELL_CreateInstance() function.
To release an interface you call the specific interface’s Release() function. For example to release
the graphics interface you would call the function IGRAPHICS_Release().
QUALCOMM Confidential and Proprietary
99
BREW® Developer Training
Application Management
You can start and stop other
BREW applications
IPC - Allow applications to
send events to each other
Apps do not need to be running
to receive an even you send to
another app. BREW will start it if
not running
Common Application
Management Functions
Allow BREW applications to
execute without interfering
with other activities the device
must perform
ISHELL_ActiveApplet()
ISHELL_Busy()
ISHELL_CanStartApplet()
ISHELL_CheckPrivLevel()
ISHELL_CloseApplet()
ISHELL_EnumAppletInit()
ISHELL_EnumNextApplet()
ISHELL_ForceExit()
ISHELL_PostEvent()
ISHELL_SendEvent()
100
The AEE Shell’s application management functions have a number of purposes.
The AEE Shell provides programmatic control of creating, starting, and stopping BREW classes
and applications. This allows suites of applications to work together, passing control between
applications when needed.
The AEE Shell can provide information about other classes and applications present on the device.
This allows programmers to query for the presence of other classes and application, instead of
making assumptions.
The AEE Shell allows applications to send events to one another. This provides inter-application
communication capabilities.
The AEE Shell allows BREW applications to execute without interfering with other activities that the
device must perform. Applications are suspended when critical activities take place, and resumed
afterwards. More detail on suspend/resume behavior will be given during the upcoming event
handling discussion.
For more information on the application management functions, visit the ISHELL listing in the
BREW API Reference.
QUALCOMM Confidential and Proprietary
100
BREW® Developer Training
Resource Files & File Handlers
Read in the strings, graphics, and sounds that you
put into your resource file
Launches an app on the handset based on a file’s
extension or MIME type
Tell BREW to launch an app that can, for example, display .txt
files, or that can display .html files, or that can play .mp3 music
files
You can create your own apps to use as the app for any file
extension or MIME type
101
The AEE Shell provides a number of functions that your application can use to read in various
types of data from files. These files can be BREW resource (.bar) files created with the BREW
Resource Editor, or they can be files whose content is associated with a MIME type and/or
identified by the file’s extension. You can also extend the set of file types that BREW recognizes by
defining your own handler classes and using them to manipulate files of particular MIME types.
You can use the following functions to access BREW resource files. Each function’s parameters
include the name of the resource file and the integer resource ID:
QUALCOMM Confidential and Proprietary
101
BREW® Developer Training
Resource Management Functions
ISHELL_LoadResData( )
Is used to load data in raw form from resource files.
ISHELL_LoadResImage( )
Loads a bitmap image from a specified resource file
Returns a pointer to an instance of the IImage interface
ISHELL_LoadResObject( )
Utility function used in the implementation of the sound and image loading functions
ISHELL_LoadImage( ), ISHELL_LoadResImage( ), ISHELL_LoadSound( ), and
ISHELL_LoadResSound( ) are all macros that invoke this function with different
parameters.
ISHELL_LoadResSound( )
Loads a sound resource from the specified resource file
Returns a pointer to an instance of the ISoundPlayer Interface that contains the
sound file.
ISHELL_LoadResString( )
Reads a string resource into a character buffer, a pointer to which is one of the
function’s arguments.
102
ISHELL_LoadResData( ) is used to load data in raw form from resource files. The memory used to
store the resource information is freed by calling ISHELL_FreeResData( ).
ISHELL_LoadResImage( ) loads a bitmap image from a specified resource file and returns a
pointer to an instance of the IImage interface that can be used to access the bitmap.
IIMAGE_Release( ) frees the data used to store the bitmap.
ISHELL_LoadResObject( ) is a utility function used in the implementation of the sound and image
loading functions. The functions ISHELL_LoadImage( ), ISHELL_LoadResImage( ),
ISHELL_LoadSound( ), and ISHELL_LoadResSound( ) are all macros that invoke this function with
different parameters.
ISHELL_LoadResSound( ) loads a sound resource from the specified resource file and returns a
pointer to an instance of the ISoundPlayer Interface that contains the sound file.
ISOUNDPLAYER_Release( ) frees the data used to store the sound data.
ISHELL_LoadResString( ) reads a string resource into a character buffer, a pointer to which is one
of the function’s arguments.
QUALCOMM Confidential and Proprietary
102
BREW® Developer Training
ISHELL_LoadResString
Use to load strings, of nearly any language, from
resource file created with the Resource Editor
int ISHELL_LoadResString(
IShell * pIShell,
const char * pszResFile,
int16 nResID,
AECHAR * pBuff,
int nSize);
103
The function signature for ISHELL_LoadResString() is shown above. This function reads a string
from a resource file and loads it into memory. The function gives easy access to reading strings
from a resource file. The resource file can easily be changed to support additional languages. In
such a case the developer’s code will not need to change as long as the ISHELL_LoadResString()
function is used to read the strings.
The first argument is a pointer to the IShell interface. The second argument is the name of the
resource file that will be used. This argument is typically a defined constant in the header file
provided with the resource file is generated. The third argument identifies which resource item to
use from the resource file. The fourth argument is a buffer to hold the string with it’s size given by
the fifth argument, nSize.
QUALCOMM Confidential and Proprietary
103
BREW® Developer Training
ISHELL_GetDeviceInfo()
Dynamically ask phone for hardware
capabilities including screen width, height,
and number of colors
Example
// Create a Device Info struct
AEEDeviceInfo DeviceInfo;
DeviceInfo.wStructSize = sizeof(AEEDeviceInfo);
// Now simply call to query the device info
ISHELL_GetDeviceInfo (pMe->pIShell,
&DeviceInfo);
104
One of the most useful and important functions provided by ISHELL is ISHELL_GetDeviceInfo.
This function allows specific information about the device to be obtained. ISHELL_GetDeviceInfo( )
fills an AEEDeviceInfo structure for the device, which includes information about its screen size
and color support, amount of available memory, character encoding, and other items. Using the
information provided by this function in application development makes applications more
dynamically aware of device capabilities therefore reducing the need to for rework to support
different devices.
QUALCOMM Confidential and Proprietary
104
BREW® Developer Training
Using IDisplay
105
This module covers the IDisplay interface with special emphasis on the objectives listed above.
QUALCOMM Confidential and Proprietary
105
BREW® Developer Training
IDisplay Overview
IDisplay draws text, bitmaps,
straight lines, and simple
geometrics on the device display
To draw more complex lines and
shapes, use the IGraphics
Interface functions
IDisplay is used by all
applications, therefore it’s already
been created or “opened”
Allows for control of the device’s
backlight and annunciators (icons
at the top of the display)
Common display functions
IDISPLAY_DrawText()
IDISPLAY_MeasureText()
IDISPLAY_MeasureTextEx()
IDISPLAY_GetFontMetrics()
IDISPLAY_DrawRect()
IDISPLAY_FillRect()
IDISPLAY_DrawHLine()
IDISPLAY_DrawVLine()
IDISPLAY_SetColor()
IDISPLAY_ClearScreen()
IDISPLAY_Backlight()
IDISPLAY_SetAnnunciators()
IDISPLAY_BitBlt()
IDISPLAY_Update()
106
Through the IDisplay interface, several services for rendering information to the device display are
provided. These include:
• Draw text, bitmaps, simple geometric shapes like such as vertical and horizontal straight
lines, solid rectangles and frames.
• Get and set the display attributes such as color, text height, etc.
• Construct and work with graphical user interface objects such as menus, dialogs and
controls.
• Turn on and off the backlight as well as the annunciators, on the device.
The IDisplay interface functions draw text, bitmaps, and simple geometric shapes such as straight
lines and rectangles on the device display. (To draw more complex lines and shapes, use the
IGraphics interface functions). Because the IDisplay interface is used by all applications, an
instance of IDisplay is created automatically when you create an application.
BREW natively supports the Windows BMP format; however, you can subclass the IImage
interface to add a class to support your image format. See the Media Player example application
and the IBitmap interfaces for more details. Bitmaps and images are discussed in Section 4 of the
BREW Developer course.
QUALCOMM Confidential and Proprietary
106
BREW® Developer Training
IDisplay Example
IDISPLAY_DrawText() is a low-level function for simply drawing text
onto the screen
// display our string on the device’s screen – bold and centered
IDISPLAY_DrawText(pMe->pIDisplay,
AEE_FONT_BOLD,
pMe->UnicodeString,
// here is our string to print
-1, 0, 0, 0,
IDF_ALIGN_CENTER | IDF_ALIGN_MIDDLE);
// this refreshes the display, and our string now appears
IDISPLAY_Update (pMe->pIDisplay);
107
The example shown above demonstrates how to draw a string of text to the display. The arguments provide
information as follows:
• The first argument supplies a pointer to the display interface.
• The second argument provides the desired font face to draw the text with.
• The third argument supplies the actual string to draw.
• The fourth argument supplies the number of characters to draw (-1 causes the entire string to be
drawn).
• The fifth and sixth arguments supply the x and y coordinates to draw the text at, respectively
(either or both of these may be ignored, depending on the alignment flags specified in the eighth
argument).
• The seventh argument supplies an optional clipping rectangle to draw the text within
• The eighth argument supplies optional flags to control horizontal and vertical alignment as well as
other settings.
The AEEFont ENUM specifies the logical font type used in IDisplay text drawing operations. The valid
AEEFont values are AEE_FONT_NORMAL, AEE_FONT_LARGE, and AEE_FONT_BOLD.
Check the API Reference for IHTMLViewer and IStatic for high-level display interfaces that will automatically
wrap text, format it, and let the user scroll the cursor around.
QUALCOMM Confidential and Proprietary
107
BREW® Developer Training
Common Issues for IDisplay
Convert “char *” strings to “AECHAR” Unicode strings
when displayed on device
AECHAR * STRTOWSTR(const char * pszIn,
AECHAR * pDest,
int nSize);
char * WSTRTOSTR ( const AECHAR *pIn,
char * pszDest,
int nSize);
Call IDISPLAY_Update() in order to refresh the screen
108
The above information helps to provide guidance for a few common issues when working with the
IDisplay interface. The input type for the strings in the IDisplay APIs are not standard C strings, but
are Unicode strings of type AECHAR.
As seen above, standard C strings can be converted to AECHAR Unicode strings using the
STRTOWSTR conversion helper function. The inputs to this function are a pointer to a string (const
char * pszIn), a pointer to the AECHAR buffer to hold the converted string (AECHAR * pDest), and
size of the buffer provided by nSize. The inverse is also possible, converting an AECHAR Unicode
string to a string.
Finally, if you do not call IDISPLAY_Update() the screen will not be refreshed and will not show
what you’ve just drawn.
QUALCOMM Confidential and Proprietary
108
BREW® Developer Training
Working with Text
IDISPLAY_DrawText()
IDISPLAY_MeasureText()
IDISPLAY_MeasureTextEx()
IDISPLAY_GetFontMetrics()
Note: The functionality in these APIs is also available
in the IFont interface
109
The functions listed above are commonly used to draw text on the display. The details of
each of the functions are given below.
• IDISPLAY_DrawText() renders the specified text to the display, at the designated
x and y coordinates. It also allows the programmer to specify the font to use, and
several text alignment flags. All text to be rendered to the screen must be in wide
character string format. The BREW type AECHAR is used for this purpose.
• IDISPLAY_MeasureText() measures the width of a given input string. In order to
be accurate, the desired font type must also be provided.
• IDISPLAY_MeasureTextEx() measures the width of a given input string for a
particular font, but provides some additional functionality. A maximum allowable
width in pixels can be specified, and this method will indicate how many
characters of the string will fit within that width.
• IDISPLAY_GetFontMetrics() measures the height of a particular font. It provides
information about the ascent, descent, and overall height of the supplied font.
The IFont interface contains APIs with the same functionality as those shown above. The
font and text APIs may be called in either the IFont interface or the IDisplay interface as
shown above. The APIs above are not deprecated and are as valid as the APIs in the IFont
interface. See the IFont interface in the API Reference Manual for a complete list of font
related APIs.
QUALCOMM Confidential and Proprietary
109
BREW® Developer Training
Pixel Width of String
int IDISPLAY_MeasureText(IDisplay *pIDisplay,
AEEFont Font,
const AECHAR *pcText)
Returns number of pixels to draw the Unicode string
Pixel Width
The quick brown fox
110
The above information shows the function signature for querying the width of a string. This can be
used along with the height of a string (from the previous slide) to know the complete width and
height of any given string.
QUALCOMM Confidential and Proprietary
110
BREW® Developer Training
Pixel Height of Font
int IDISPLAY_GetFontMetrics(IDisplay * pIDisplay,
AEEFont Font,
int * pnAscent,
int * pnDescent);
Ascent
The quick brown fox…
Baseline
Descent
Ascent + Descent = Character height for font
111
The above information shows the function signature for querying metrics of a font on a device. You
can obtain the length of the ascending and descending components of the font, which gives the
total height of a given font.
QUALCOMM Confidential and Proprietary
111
BREW® Developer Training
Drawing to the Alternate Display
Some handsets have an alternate display, which is
typically on the front of the handset
Applications can draw to the alternate display by
creating an instance of the display interface and
specifying AEECLSID_DISPLAY2 for the ClassID
parameter
3.x
New Feature
112
Display access is granted differently for the primary display and any secondary displays. For the
primary display, access is granted to the currently active BREW app. Secondary display access is
granted first to the currently active app, and if that app is not trying to use the display, BREW goes
through the background app list, starting with the most recent background app, and ending with the
app that has been running in the background the longest. An app that is trying to use a display is
defined as an app that has a reference to device bitmap for that display. The OEM layer may
preempt access to any display at any time.
QUALCOMM Confidential and Proprietary
112
BREW® Developer Training
Lab 1.4.1
Display a Resource String on the Display
113
Before You Start
Before starting this exercise, you should have:
•
Completed the previous labs
Description
The purpose of this lab is to read a string from a BREW resource file and display it on the
screen.
APIs Used
ISHELL_LoadResString() - read resource string
IDISPLAY_DrawText() - draw text on screen
IDISPLAY_Update() - update screen display
IDISPLAY_ClearScreen() - clear screen display
STRTOWSTR() – helper function for string conversion
QUALCOMM Confidential and Proprietary
113
BREW® Developer Training
Procedure
Follow these steps to complete the exercise:
1. Launch the BREW Resource Editor from within the Start Menu or from the Tool Bar in Visual
C++.
2. Right Click on Strings under Resource Type and select New String from the toolbar (or click
Resource/New String from the Main menu).
3. Enter IDS_HELLO for the Resource Name and Hello BREW as the Data. Make sure
Unicode is the String format. Then click Apply.
4. Select Save from the File Menu and save the file as:
..\Examples\myapp\myapp.brx
5. Select Compile Resource Script from the Build menu. You will see a dialog confirming that
myapp.bar (the compiled resource file) and myapp.brh were written to the file system.
Click OK to close it.
6. Launch Visual C++ if you have not done so.
7. Include the standard library header file and newly created header file myapp.brh at the top
of your source code, underneath the "include’s.
#include "AEEStdLib.h"
#include "myapp.brh"
8. After the #include section is the Applet structure section of your program. Add the following
line after the comment that says to add your own variables here.
// add your own variables here...
AECHAR UniCodeString[50];
// string buffer
9. In the Function Prototypes section, add the following function prototypes:
void DisplayResString(myapp *pMe, int16 text);
void DisplayText(myapp *pMe, const AECHAR *string);
void DisplayMessage(myapp *pMe, const char *string);
10. Scroll down to the function myapp_HandleEvent(). In the case statement for
EVT_APP_START, add the following code:
DisplayResString(pMe, IDS_HELLO);
QUALCOMM Confidential and Proprietary
114
BREW® Developer Training
11. At the end of your program, add the following code:
void DisplayText(myapp *pMe, const AECHAR *string) {
IDISPLAY_ClearScreen(pMe->pIDisplay);
IDISPLAY_DrawText(pMe->pIDisplay,
AEE_FONT_BOLD,
// Use BOLD font
string,
// Text to display
-1,
// -1 = Use full string length
0,
// Ignored - IDF_ALIGN_CENTER
0,
// Ignored - IDF_ALIGN_MIDDLE
NULL,
// No clipping
IDF_ALIGN_CENTER | IDF_ALIGN_MIDDLE);
// Update Screen Display
IDISPLAY_Update (pMe->pIDisplay);
}
void DisplayResString(myapp *pMe, int16 text) {
ISHELL_LoadResString(pMe->pIShell,
MYAPP_RES_FILE,
text,
pMe->UniCodeString,
sizeof(pMe->UniCodeString));
DisplayText(pMe, pMe->UniCodeString);
}
void DisplayMessage(myapp *pMe, const char *pText) {
DisplayText(pMe, STRTOWSTR(pText, pMe->UniCodeString,
sizeof(pMe->UniCodeString)));
}
12. Compile and test your application in the Simulator. Make sure the MIF directory is set to the
myapp directory(C:\Program Files\BREW x.x.x\sdk\examples\myapp). You should see the string
Hello BREW appear on the display.
After You Finish
After you complete this exercise, you should have:
•
created a new string resource with the BREW Resource Editor.
•
read the string resource into a memory in your application.
•
displayed the string on the screen.
QUALCOMM Confidential and Proprietary
115
BREW® Developer Training
Working with Timers and Alarms
116
QUALCOMM Confidential and Proprietary
116
BREW® Developer Training
BREW Asynchronous Development
Single threaded UI
environment
Watchdog resets device
if functions don’t return
in timely fashion
App registers
callback function
with AEE Shell
App makes function
call
BREW task
process loop
Apps must use nonblocking calls to avoid
locking device
Asynchronous
result
AEE Shell monitors
task process
Callbacks provide
mechanism for
processing without
blocking calls
AEE Shell calls
callback function
when process
finishes
117
BREW uses a single thread UI model that allows for cooperative multitasking on this thread.
Because resources are limited on BREW devices, this thread is monitored by an internal watchdog
device to make sure function calls do not block this thread. You can think of this thread as a
dispatch loop, where functions are passed to be processed and on very short intervals the return
values are passed back to the calling function. If a function makes a call that takes time to process,
then the watchdog would shut down the application. This typically occurs around 30 seconds. In
order to prevent this blocking situation, callbacks can be used to monitor the dispatch loop for
return of the calling function.
Simply put, a callback function is registered to listen for a return value. Then a function call is
processed, and if it results in a blocking call, the callback function takes over monitoring for the
return value and the calling function waits. The dispatch loop is not blocked. Upon completion of
the original call the callback returns control back to the calling function to process the return value.
QUALCOMM Confidential and Proprietary
117
BREW® Developer Training
Timers
Perform an action when a
specific amount of time has
passed
Used for animation
Set timer
When function is called draw
graphics then set another timer.
Repeat the behavior and you
should have smooth animation
Same timer and animation routine
will work on faster CPUs
automatically, without any recoding
on your part
Time periods are typically
short
Milliseconds to seconds
Callback based
Each timer only triggers once
Common functions
ISHELL_SetTimer()
ISHELL_CancelTimer()
ISHELL_GetTimerExpiration()
118
The AEE Shell’s timer facility is used by a currently instantiated application (that is, an application
whose reference count is non zero) to perform an action when a specified amount of time has
passed.
These time periods are typically short (on the order of seconds or milliseconds); you can use the
AEE Shell’s alarm functions to obtain notification when longer time periods have passed, even
when your application is not currently instantiated.
Note that timers do not repeat. The user must reset the timer if they desire a repeating timer. This
is usually done inside the callback function itself if a repeating timer is needed.
QUALCOMM Confidential and Proprietary
118
BREW® Developer Training
Alarms
Allow for notification when
time reaches a specified value
ISHELL_SetAlarm()
ISHELL_CancelAlarm()
If application is not running,
BREW will start it and then send
it the alarm event!
Typically used when time of
notification is in distant future,
e.g., calendar alarms
Each alarm only triggers once
Common functions
119
The AEE Shell’s alarm functions enable an application to be notified when the current time reaches
a specified value. Unlike timers, which can only be active while your application is running, you can
receive notification that an alarm has expired even when your application is not running. Alarms
are typically used when the time of notification is in the fairly distant future. For example, a
calendar application can use an alarm to alert the user when a time of the calendar appointment is
about to be reached.
Note that like timers, alarms do not repeat.
QUALCOMM Confidential and Proprietary
119
BREW® Developer Training
Using Callbacks with Timers
First, create a function prototype for your callback
function
Next, call ISHELL_SetTimer() with the address of the
callback function and a pointer to an applicationspecific data structure
ISHELL_SetTimer(pMe->IShell, TIMER_VAL,
(PFNNOTIFY)MyFunc, pMe);
When the timer expires, the Shell calls the callback
function
120
QUALCOMM Confidential and Proprietary
120
BREW® Developer Training
Canceling Timers
An individual timer can be cancelled with
ISHELL_CancelTimer
ISHELL_CancelTimer(pMe->pIShell,
(PFNNOTIFY)MyFunc, pMe);
All timers with the same data pointer can be canceled
by passing NULL as the function pointer
ISHELL_CancelTimer(pMe->pIShell, NULL, pMe);
121
QUALCOMM Confidential and Proprietary
121
BREW® Developer Training
Callbacks in BREW via AEECallBack
Recommended over function pointers alone
When passing in an AEECallback, you are specifying a
function as well as a data pointer to be associated to an
asynchronous request
The AEECallback is just a structure that contains a
function pointer, a data pointer, and other book keeping
info
Much of the book keeping info is instantiated by BREW
and should not be directly accessed by your application
122
While callbacks can be registered through function pointers, the use of AEECallback is the
preferred method. AEE Callback is a structure that contains a function pointer, a data pointer, and
some other bookkeeping data and this structure can be passed quite easily.
QUALCOMM Confidential and Proprietary
122
BREW® Developer Training
Initializing a AEECallback
To initialize use CALLBACK_Init
CALLBACK_Init(&pMe->myCallBack,
(PFNNOTIFY)MyFunc, pMe);
This macro takes in a pointer to the structure as well as
a function and data pointer
The AEECallback structure should be valid throughout
the life of the asynchronous request
Callbacks can be canceled with CALLBACK_Cancel
CALLBACK_Cancel(&pMe->myCallBack);
123
To initialize the AEECallback, simply call the CALLBACK_Init() method shown above, passing in a
pointer to the structure and a pointer to your callback function. Note that this AEECallBack
structure should remain valid throughout the asynchronous request to ensure that the function
pointer and data are available. Calling CALLBACK_Cancel can be used to cancel the callback,
such as in the case of suspend events or other situations to be described later in this course.
QUALCOMM Confidential and Proprietary
123
BREW® Developer Training
AEECallback Example
//In App Struct
AEECallback myCallBack;
// MyFunc is a function defined in your application
// pMe is the pointer to your app struct
CALLBACK_Init(&pMe->myCallBack, (PFNNOTIFY)MyFunc, pMe);
ISHELL_SetTimerEx(pMe->pIShell, TIMER_VAL, &pMe->myCallBack);
124
The above code fragment shows the initialization of a callback structure AEECallback named
myCallBack and is a member of the applet struct. The structure is initialized using the
CALLBACK_INIT() function, marking MyFunc as the function to call when task processing is
returned to the app. Now, when the timer is set using ISHELL_SetTimerEx() the callback is set as
the third parameter.
QUALCOMM Confidential and Proprietary
124
BREW® Developer Training
Lab 1.4.2
Timers and Callbacks
125
Before You Start
Before starting this exercise, you should have:
•
Completed the previous labs
Description
The purpose of this lab is to call a timer to schedule a callback to your function to display a
resource string on the screen.
APIs Used
ISHELL_SetTimer() - set a timer to call your function after a period of time
ISHELL_CancelTimer() - reset timer
QUALCOMM Confidential and Proprietary
125
BREW® Developer Training
Procedure
Follow these steps to complete the exercise:
1.
Include new function prototypes in your application as follows.
void TimerCB(myapp *pMe);
void DisplayFlashText(myapp *pMe);
2. Add code in your event handler for EVT_APP_START to call the DisplayFlashText()
function.
3. Write the DisplayFlashText() function and have it call the ISHELL_SetTimer()
API function. Make ISHELL_SetTimer() call your TimerCB() function after 200
milliseconds.
4. Add code in your event handler for EVT_KEY to cancel the timer with the
ISHELL_CancelTimer() API function.
5. Write the TimerCB() function. Make this function “flash” the string Hello BREW on the
display by starting up the timer again in 200 milliseconds. (Hint: Use a boolean flag to
toggle the display.) Make sure you access the flashing string from your resource file.
6. Compile and run your application.
7. Test your solution in the simulator. When you start your application, the display should
flash the Hello BREW string. When you press any other key, the timer should stop.
After You Finish
After you complete this exercise, you should have:
•
an understanding of how to use ISHELL_SetTimer() to set a timer and schedule a
callback to your function.
•
an understanding of how to use ISHELL_CancelTimer() to reset a timer.
QUALCOMM Confidential and Proprietary
126
BREW® Developer Training
Key Points Review
During this module, students learned to:
9
9
9
9
Identify and describe components of the BREW API Library
Use the BREW API Reference to find Class APIs
Describe services provided by IShell
Identify services provided by IDisplay
127
This module presented an overview of the BREW API library with special emphasis on the
objectives listed above.
QUALCOMM Confidential and Proprietary
127
BREW® Developer Training
Module 1.5
Troubleshooting and Debugging
128
QUALCOMM Confidential and Proprietary
128
BREW® Developer Training
Module Objectives
After completing this module, students will be able to:
9 Identify common problems when developing BREW apps
9 Use Visual Studio tools for debugging code
9 Use the Simulator for troubleshooting applications
129
In our first section, we will explore BREW as a product and as a technology. We will look at the
unique opportunities provided by the BREW platform in today’s wireless industry, experience
BREW from the customer’s perspective, and review the processes and technology that make it
work. From here we will review the tools and processes for building BREW applications.
QUALCOMM Confidential and Proprietary
129
BREW® Developer Training
BREW Programming Considerations
Programming for confined environments
Limited stack space – .5-50K
Limited storage on devices 2-50MB
Visual C++ and BREW
Virtual function mechanism cannot be used on BREW libraries
Inheritance of BREW libraries should not be used
Global and static variables cannot be used
Apps must be relocatable
Not detectable with Simulator
Other programming constraints
Floating point operations must use helper functions
130
BREW is a powerful platform for application development and execution, providing the developer
with access robust handset features while shielding the developer from the more complex
hardware coding. In order to provide this rich, efficient environment, several considerations must
be made.
First, remember that the wireless device is a very confined environment. Along with limitations on
input and display capabilities, wireless devices are typically very short on memory and storage
space.
Also, you may find that some of the familiar coding concepts you have used in other programming
platforms will not work in BREW. For instance, while C++ can be used, some of the more elegant
concepts, such as encapsulation and inheritance, are limited. Virtual functions cannot be used to
inherit from BREW libraries. You can create your own classes, and you can use certain C++
constructs with BREW, and this is described later in this course.
All BREW applications must be relocatable. In other words, you cannot expect to be able to access
specific data areas with applications. Global and static variables are written to specific heap space.
If you use them, your app will compile and run fine in the Simulator, but will fail to compile for the
device.
Finally, several helper functions and macros are provided with BREW to help keep applications
small and efficient as well as to ensure they function within the device environment. Additionally,
limitations such as lack of a floating point processor require the use of these functions to provide
the functionality expected.
We will take a closer look at these considerations on the next few pages
QUALCOMM Confidential and Proprietary
130
BREW® Developer Training
Declarations
Place local variable declarations at the beginning of a
block
Immediately after a left-brace {
Compilation errors can occur otherwise
Declare local arrays or structures in your app structure
This way they will be created on the heap
Declarations inside functions can take up valuable stack space
Don't declare static or global variables
This generates non-relocatable code
Will not port to the device.
131
Make sure you place local variable declarations at the beginning of a block (immediately after a
left-brace {). Otherwise, compilation errors can occur.
Declaring local arrays or structures inside functions can take up valuable stack space. It's better to
declare them in your app structure, so they will be created on the heap.
Don't declare static or global variables. This generates non-relocatable code and will not port to the
device.
QUALCOMM Confidential and Proprietary
131
BREW® Developer Training
Functions
Check return values from BREW API functions
Check for NULL prior to use
Use void * signatures in function prototypes and
function definitions if you need to pass pointers of any
data type
Avoid recursive functions
They use stack space at run time
They make programs execute slowly
132
Check return values from BREW API functions. If a function returns a pointer, make sure you
check for NULL before using it.
Use void * signatures in function prototypes and function definitions if you need to pass pointers of
any data type.
Avoid recursive functions, since they use stack space at run time and make programs execute
slowly.
QUALCOMM Confidential and Proprietary
132
BREW® Developer Training
Pointers
Make sure your pointers are initialized properly
When possible, pass structure pointers to functions
this is more efficient at run time
uses less stack space.
Passing a structure by value to a function may
introduce unnecessary runtime overhead
133
Make sure your pointers are initialized properly. Otherwise, programs can generate runtime errors
when you try and use them.
When possible, pass structure pointers to functions, since this is more efficient at runtime and uses
less stack space. Passing a structure by value to a function doesn't cause compilation errors or
warnings but may introduce unnecessary runtime overhead.
QUALCOMM Confidential and Proprietary
133
BREW® Developer Training
BREW APIs
Include "AEEStdLib.h" when calling BREW Helper functions
Call IDISPLAY_Update() or IGRAPHICS_Update() when updating
the display
Use BREW Helper Functions for floating point operations
Generates non-relocatable code otherwise
C-string literals "hello" (char *) are not the same as BREW wide
strings (AECHAR *)
Use Helper functions STRTOWSTR() and WSTRTOSTR() to perform the
necessary conversions
Use BREW Helper Functions MALLOC() and FREE() to
allocate/deallocate heap memory
Always free heap memory to avoid memory leaks
134
Make sure you include "AEEStdLib.h" when calling BREW Helper functions. Otherwise, compiler
warnings or error messages may occur.
Make sure you call IDISPLAY_Update() or IGRAPHICS_Update() when updating the display for
text or graphics, respectively. Otherwise, nothing may appear or change on the screen.
Use BREW Helper Functions for floating point operations (multiply, divide, add, subtract). Failure to
do so generates non-relocatable code and will not port to the device.
C-string literals "hello" (char *) are not the same as BREW wide strings (AECHAR *). Use Helper
functions STRTOWSTR() and WSTRTOSTR() to perform the necessary conversions.
Use BREW Helper Functions MALLOC() and FREE() to allocate/deallocate heap memory. Make
sure you always free heap memory to avoid memory leaks.
QUALCOMM Confidential and Proprietary
134
BREW® Developer Training
BREW SDK Mistakes
Don't write your .dll file in the Debug folder
Default in Visual C++ Studio
App will not start up
Don't use the Windows heap
Generates non-relocatable code
Will not port to the device
135
Make sure you don't write your .dll file in the Debug folder (default in Visual C++ Studio).
Otherwise, you're app will not start up.
Don't use the Windows heap, as this generates non-relocatable code and will not port to the
device.
QUALCOMM Confidential and Proprietary
135
BREW® Developer Training
Debugging Code
Set breakpoints on
execution lines
Run Visual Studio
in Debug mode
Set watches
Check values in
watch windows and
call stacks
Write values to log
files during
execution
136
Debugging code for BREW applications is the same as most other applications. You are looking for
syntax errors, but most of these will come up when you compile. You are also looking for logic
errors that either affect program execution or provide incorrect data, and as you may know, these
can be hard to find. Let’s look at some ways of finding these bugs.
First, try setting breakpoints on execution lines in your code. A breakpoint stops execution at that
line of code, allowing you to check return values, variables, and status of the app at this time. You
can then step through the code from this point to check execution. In Visual Studio, go to Build>Start Debug-> Go, and your app will run to your break point. You can also chose to run to the
current position of the cursor or step over a line of code as needed.
While you’re running your code in debug mode, it’s possible to watch return values of variables,
check for allocation of memory, check for initialization of variables and data elements, and even set
watches, or on the fly variables, to check for logic errors during execution. Or, you can have your
application write these values along with other messages of your design to a log file that can be
analyzed for problems.
QUALCOMM Confidential and Proprietary
136
BREW® Developer Training
Troubleshooting Code in the Simulator
Check functionality
in debug mode
Use beeps,
prompts, message
boxes
Use the Output
window
137
As mentioned before, the Simulator is provided with the SDK to aid in application development and
testing. When you launch your application in debug mode as just described, you can step through
your application while watching the functionality in the Simulator. Adding beeps, prompts, and
message boxes temporarily can provide instant feedback of either successful completion or of
problems. Finally, the Simulator provides an output window that not only shows real-time execution
of BREW function calls but can also log anything marked for tracing in your code.
QUALCOMM Confidential and Proprietary
137
BREW® Developer Training
Lab 1.5
Simulator Debugging
138
Before You Start
Before starting this exercise, you should have:
•
Completed the previous labs
Description
The purpose of this lab is to learn how to use the Simulator and Visual C++ for debugging
BREW applications.
APIs Used
DBGPRINTF() – helper function to display debug information in output window
QUALCOMM Confidential and Proprietary
138
BREW® Developer Training
Procedure
Follow these steps to complete the exercise:
Set Breakpoints
1. Go to the line in your code where you call the API function ISHELL_SetTimer(). Right
click on this line and select Insert/Remove Breakpoint.
2. Go to the line in your code where you call the API function ISHELL_CancelTimer().
Right click on this line and select Insert/Remove Breakpoint.
3. Go the line in your program where the MyApp_InitAppData() function is defined.
Right click on this line and select Insert/Remove Breakpoint.
4. Go the line in your program where the MyApp_FreeAppData() function is defined.
Right click on this line and select Insert/Remove Breakpoint.
5. Go the line in your program where your TimerCB() function is defined. Right click on
this line and select Insert/Remove Breakpoint.
Start Debugger
6. Select Build->Start Debug->Go from the main toolbar (or press function key F5)
7. The Simulator should appear on your screen with Visual C++ in debug mode.
8. Start your application in the Simulator.
9. The Debugger will stop execution at the first breakpoint. This should be the
MyApp_InitAppData() function.
10. Select Debug->Step Into (or press function key F11) to single step through this function
as it executes. Examine the values of the variables in the variable window as you do this.
11. Select Debug->Go (or press function key F5). You will now be at your next breakpoint.
This should be the call to the ISHELL_SetTimer() function.
QUALCOMM Confidential and Proprietary
139
BREW® Developer Training
12. Select Debug->Step Over (or press function key F10) to single step through the code
and treat each function call as a single statement.
13. Select Debug->Go (or press function key F5). You will now be at your next breakpoint.
This should be the TimerCB() function.
14. Select Debug->Step Over (or press function key F10) to single step through the code.
When you get to your boolean flag variable (or another local variable), drag it to the
adjacent Watch window. This will enable you to watch your variable change as the
program runs.
15. Select Debug->Go (or press function key F5). You should be back at your TimerCB()
function breakpoint.
16. Right click on this line (the TimerCB() function) and select Disable Breakpoint. This
will turn off this breakpoint as you program executes.
17. Select Debug->Go (or press function key F5). The Simulator should now run and flash
Hello BREW on the display.
18. Press any key on the phone in the Simulator.
19. The Debugger will stop execution at the next breakpoint. This should be the call to the
ISHELL_CancelTimer() function.
20. Select Debug->Go (or press function key F5). The Simulator should now appear and the
display will not be flashing anymore.
21. Stop your application in the Simulator now.
22. The Debugger will stop execution at the final breakpoint. This should be the
MyApp_FreeAppData() function.
Stop Debugger
23. Select Debug->Stop Debugging (or press the Shift and F5 function key). This will stop
the debugger.
24. Remove all breakpoints from your program when you are done.
QUALCOMM Confidential and Proprietary
140
BREW® Developer Training
Using DBGPRINTF
25. Include a call to DBGPRINTF() to print something in your application. Compile your
application and bring up the Simulator. Before you start your application, select Output
Window from View on the Simulator toolbar. When you run your application, the output
from the DBGPRINTF() should appear in the Output Window.
After You Finish
After you complete this exercise, you should have:
• an understanding of how to start and stop the Visual C++ debugger during the
execution of a BREW application .
• an understanding of how to enable and disable breakpoints in your application.
• an understanding of how to watch a variable’s value change as your program executes.
• an understanding of how to use DBGPRINTF() to display debug information in the output
window of the Simulator.
QUALCOMM Confidential and Proprietary
141
BREW® Developer Training
Key Points Review
During this module, students learned to:
9 Identify common problems when developing BREW apps
9 Use Visual Studio tools for debugging code
9 Use the Simulator for troubleshooting applications
142
During this module we explored the common problems faced by developers and how to
troubleshoot them. Special emphasis was given to the key points listed above.
QUALCOMM Confidential and Proprietary
142
BREW® Developer Training
BREW® Developer
Training
Section 2 – Interface
Development
143
QUALCOMM Confidential and Proprietary
143
BREW® Developer Training
Section 2
BREW® User Interface Development
Module 2.1
Module 2.2
Event Handling
Building UI Controls
144
QUALCOMM Confidential and Proprietary
144
BREW® Developer Training
Module 2.1 – Event Handling
The BREW Event Model
The HandleEvent() Function
System, Application, and User Events
Event Delegation
145
At the core of every BREW application is an event handler that accepts incoming user and system
events, dispatches them to the application’s user interface controls, and does whatever the
application needs to do. In this module, you’ll learn about the event model in BREW and how to
process different types of events in your application. This knowledge is then put to use in a handson exercise.
QUALCOMM Confidential and Proprietary
145
BREW® Developer Training
Module Objectives
After completing this module, students will be able to:
9
9
9
9
Describe the applet event model and different types of events
Describe event delegation
Handle different control and system events in an application
Apply a state management framework to an application
146
The next section describes the event model in BREW with specific emphasis on the key points
listed above.
QUALCOMM Confidential and Proprietary
146
BREW® Developer Training
Events Overview
The BREW applet model is based
on an event-driven engine
All input received as events via the
applet’s HandleEvent() function
Applications flag events as TRUE
(handled) or FALSE (not handled)
BREW requires that events be
handled in a timely manner
All BREW applets must handle
certain system events
147
The BREW application model is based on an event-driven engine. After an applet is loaded, it
receives all input via events. These events are received by the HandleEvent function of the applet.
This model provides for clean, efficient execution with minimum demand on system resources and
also provides for simple, task-based development.
When BREW passes an event to an applet, the event is handed off to the application’s main event
handler. This handler can handle the event and return or pass the event to another handler, such
as for a control. In any case, the applet (and subsequently any controls to which the event was
passed) indicates whether it handled the event by returning TRUE (handled) or FALSE (not
handled).
Note that as a simple event-driven environment, BREW demands that events are handled in a
timely manner. In short, this means that an applet is expected to quickly handle the event and
return. Under BREW, substantial delays in processing events might result in the applet being shut
down to safeguard the device.
Some events are required system events that must be handled by the application. Failure to handle
system events can cause the handset to crash. System events include application startup and
shutdown as well as telephone and SMS interruptions. You will see more about system events
shortly.
QUALCOMM Confidential and Proprietary
147
BREW® Developer Training
IApplet and the Event Handler
IApplet is the interface for
handling events
Called by AEE Shell in response
to events
All applets must implement
IApplet
Event code (eCode) defined in
AEEEvent data structure
wParam and dwParam are word
and double-word, contextsensitive data parameters
IAPPLET_HandleEvent()
Main event processing for
BREW applets
Used by AEE Shell to send
events to applet
AEE Shell passes event
specific data to the event
handler through IApplet
Only called by AEE Shell
To send events to other apps
use ISHELL_SendEvent()
148
The IApplet interface implements services provided by an applet. The main service of the IApplet
interface is providing a mechanism to the shell to pass events to an applet. When the shell
responds to an event, it calls IAPPLET_HandleEvent() and passes certain event-specific
parameters to the function.
Specifically, the shell provides an event code, or eCode, defined in the AEEEvent data structure.
Depending on the event code, certain word or doubleword event specific data is also sent. Note
that this is context specific, and either the wParam, dwParam, or both, or neither may be sent. This
is explained in more detail shortly.
The HandleEvent() function can only be called by the shell. For sending events to other
applications the function ISHELL_SendEvent must be used.
QUALCOMM Confidential and Proprietary
148
BREW® Developer Training
IAPPLET_HandleEvent()
boolean myapp_HandleEvent
(
myapp * pMe,
AEEEvent eCode,
uint16 wParam,
uint32 dwParam
)
//Main Event Handler
//pointer to applet
//event eCode
//context sensitive short param
//context sensitive long param
boolean IMENUCTL_HandleEvent
//Control event handler
(
IMenuCtl * pIMenuCtl,
//pointer to control interface
AEEEvent eCode,
//event eCode
uint16 wParam,
//context sensitive short param
uint32 dwParam
//context sensitive long param
)
149
Above is an example prototype of the main applet event handler and a menu control event handler
to show that the basic use is the same. As stated before, there are three event-related inputs that
applets receive. The three are passed in the second, third, and fourth parameters of the
HandleEvent() function.
• AEEEvent specifies the event code received by the applet. EVT_APP_START,
EVT_KEY, and EVT_ALARM are some examples of events received by applets.
• The third parameter is a short value (word), context-sensitive value dependent on the
event. There may or may not be a wParam related to the event.
• The fourth parameter is a long (doubleword), context-sensitive value dependent on the
event. This can be a bitmodifier, constant string or other long value dependent on the
event. There may or may not be a dwParam related to the event.
Some events that contain no data in either data field are the EVT_APP_START, EVT_APP_STOP,
EVT_APP_SUSPEND, and EVT_APP_RESUME. Examples of events that have data in both the
short and long data fields are EVT_DIALOG_START, EVT_COMMAND and
EVT_CTL_SET_TITLE. An example of an event that has data in only the short data field is
EVT_ALARM. Examples for events that have data only in the long data field are
EVT_NET_STATUS and EVT_CTL_CHANGING.
Consider the example of a keypress event, where as the user presses the 5 key on the device. The
AEECode (eCode) sent to the event handler would be the event EVT_KEY. The wParam would be
the keycode AVK_5, and there would be no dwParam.
QUALCOMM Confidential and Proprietary
149
BREW® Developer Training
Event Types
Applet events
Events generated by applets or by
Shell for applet control
EVT_APP_START
EVT_APP_STOP
EVT_APP_SUSPEND
EVT_APP_RESUME
EVT_BROWSE_URL, etc
AEE Shell events
Events generated by the shell
EVT_NOTIFY
EVT_ALARM
Device events
Generated by device state changes
EVT_FLIP
EVT_HEADSET
EVT_KEYGUARD
Key events
Generated by keypad use
EVT_KEY
EVT_KEY_PRESS
EVT_KEY_RELEASE
User events
Private to application
EVT_USER
Control events
Related to control use
EVT_COMMAND
EVT_CTL_TAB
For
Foraacomprehensive
comprehensivelist
listof
ofevents
events
see
the
AEEEvent
structure
see the AEEEvent structurein
inthe
theAPI
API
Reference
document
provided
Reference document providedwith
with
the
theBREW
BREWSDK
SDK
150
Above is a summary of the various event types used in BREW. Basically, these event categories
classify the type of event based on where the event was generated. For instance, control events
and dialog events are based on user interaction with the active control on the screen while applet
events are generated from specific applet activity, such as starting up or stopping. While many of
the above will be discussed in detail or used in exercises through the course of this section, the
total list of events can be found in the header file AEE.h as well as in the API Reference.
QUALCOMM Confidential and Proprietary
150
BREW® Developer Training
Critical Events
These events should be handled
Not returning TRUE closes the applet
•
•
•
•
EVT_APP_START
EVT_APP_SUSPEND
EVT_APP_RESUME
EVT_APP_STOP
These events may need to be handled
Should return as TRUE or FALSE if registered
•
•
•
•
EVT_APP_CONFIG
EVT_APP_MESSAGE
EVT_ALARM
EVT_NOTIFY
151
When implementing an applet, consider and handle only those events that your applet might want
to process. Many events can likely be ignored. For example, if the applet implements a game that
uses only the up, down, left and right arrow keys as input, and an event corresponding to a
keypress of keys 0-9 is received, it can be ignored.
Critical events received by the applet cannot be ignored, regardless of the state of the applet.
EVT_APP_STOP and EVT_APP_START are examples of critical events that impact the applet in
any state. Pay careful attention to receiving all the critical events in any given state of the applet.
You might have to save data/context in processing a received event.
Some events will not be sent to the applet unless it specifically indicates that it wants such
notifications. Applets must register for these notification events either permanently in the MIF Editor
or dynamically using ISHELL_RegisterNotify( ).
QUALCOMM Confidential and Proprietary
151
BREW® Developer Training
Handling Suspend/Resume
Many events can cause the applet to be suspended
For example, low battery warning, incoming phone call, and nonBREW SMS message
Recommended when EVT_APP_SUSPEND received
Set UI controls inactive
Reset or release IStatic controls
Cancel callback functions and timers
Stop animations
Release socket connections
Unload memory intensive resources
These steps are covered in later sections
152
Suspending and Resuming Applications
The following are examples of situations that may cause an application to be suspended:
•
Low battery warning
•
Incoming phone call
•
Incoming non-BREW SMS message
•
Keyguard is activated
•
OEM needs to display a message, such as "Entering Service“
•
BREW Core App needs to run (for example, when there are pending acknowledgements to be
sent to the Application Download Server, the BREW Core App starts up and displays "Preparing
Applications" while trying to send acknowledgements)
To demonstrate what happens during suspend/resume, consider the case of an incoming call while a
BREW application is running. BREW sends the EVT_APP_SUSPEND event to the running application. If,
and only if, the application does not process the EVT_APP_SUSPEND (i.e., returns FALSE), BREW
sends EVT_APP_STOP to the application.
When the call ends, BREW sends EVT_APP_RESUME OR EVT_APP_START to the application,
depending on whether the EVT_APP_SUSPEND was processed earlier. That is, EVT_APP_SUSPEND
and EVT_APP_RESUME go hand-in-hand, while the events EVT_APP_STOP and EVT_APP_START go
hand-in-hand.
NOTE: Each carrier has different guidelines for how an application performs when it is
suspended/resumed; refer to carrier guidelines for details.
QUALCOMM Confidential and Proprietary
152
BREW® Developer Training
Other special messages
EVT_NO_SLEEP
Return TRUE to prevent “Sleep Mode” from slowing the applet
Exact implementation dependant on OEM
EVT_FLIP
Expected behavior is to close applet when flip phone closes
Returning FALSE signals shell to exit
Some phones also require call to ISHELL_CloseApplet()
Both are recommended
Note that ISHELL_CloseApplet is different on BREW 2.x
vs. 3.x
Some applets continue; see Knowledge Base for details
153
Sample Code to Handle EVT_NOTIFY_FLIP under both BREW 2.x and 3.x
// version number for BREW 3.0.0.0
#define BREW_V3 (0x03000000l)
// macro to determine if BREW ver >= 3.0.0.0
#define IS_BREW_V3_OR_LATER() (GETAEEVERSION(NULL,0,0) >= BREW_V3)
case EVT_FLIP:
// wParam == FALSE when flip closed
if(!wParam){
// BREW V3 - cannot return to idle
if(IS_BREW_V3_OR_LATER()){
// close applet for legacy flip support, pass FALSE
ISHELL_CloseApplet(pIShell, FALSE);
}
// BREW V2 - return to idle
else{
// close applet for legacy flip support, pass TRUE
ISHELL_CloseApplet(pIShell, TRUE);
}
return FALSE;
// return FALSE to close all apps
}
return TRUE; // else flip was opened, don’t terminate
QUALCOMM Confidential and Proprietary
153
BREW® Developer Training
Keypress Events
EVT_KEY
Standard key press event
Used to receive the action of
pressing and releasing a key
When a key is pressed down
• EVT_KEY_PRESS
When a key is released
• EVT_KEY first, then
• EVT_KEY_RELEASE
EVT_KEY_PRESS
When a key is held
Response to a key press event
Used to receive only the press
(down) action of the key
• BREW 2.x and lower sends
EVT_KEY_HELD
• BREW 3.x sends multiple EVT_KEY
events
• Best to check interval between
EVT_KEY and EVT_KEY_HELD
EVT_KEY_RELEASE
Response to a key being released
Assumes the key press event has
occurred
Key press events sequence
The Clear key
wParam = AVK_CLR
Move to previous screen
Key press parameters
wParam = key pressed
dwParam – bitmodifier flags
AEEVCodes.h for details
154
Key press events are sent to the event handler as EVT_KEY. When a key is released the event
EVT_KEY_RELEASE is sent to the event handler. An application can determine if a key is being
held by being notified when the EVT_KEY event is sent, then simply waiting for the
EVT_KEY_RELEASE event. The key is being held until the EVT_KEY_RELEASE event is sent.
Along with pressing and releasing keys, applications can also respond when a key is pressed and
held. BREW 2.1 and earlier versions supported the EVT_KEY_HELD event, but this event was
OEM specific and has been removed in BREW 3.x which sends multiple EVT_KEY events when a
key is pressed and held. Because EVT_KEY_HELD has been removed and to make applications
version agnostic, for key held events check first for EVT_KEY, then for an interval before
EVT_KEY_RELEASE to determine if the key was held. While the interval before sending multiple
EVT_KEY events is OEM specific, the application can check for a relatively short interval before
EVT_KEY_RELEASE and execute accordingly.
QUALCOMM Confidential and Proprietary
154
BREW® Developer Training
User Interface Control Events
User interface controls
Have their own event handler
Events must be passed to these handlers
IText
• ITEXTCTL_HandleEvent()
• Allows user to select different text or numeric entry methods
• AVK_CLR handled already as a backspace
IMenu
• IMENUCTL_HandleEvent()
• Navigation (up, down, left, right) is built in
• EVT_COMMAND when Select key pressed
155
When a control is active, events should be passed along to the active control to allow it to properly
update itself. This update might include changing which menu item was selected and redrawing a
menu, for example.
Event Feedback From Controls
Just like your event handling function returns TRUE or FALSE to the AEE Shell, controls return
TRUE or FALSE to indicate which events they handle. Each control type handles only the events
that are necessary. The standard menu control handles the up, down, and select key events, while
the SoftKey menu control handles the left, right and select key events. If a control returns TRUE
from a delegated event, your applet should exit the event handling function early. If a control
returns FALSE from a delegated event, your applet should continue event handling as usual.
Feedback about user activity is also provided by controls. For example, a menu control will notify
the applet when a user selects a menu item. In this case, a delegated EVT_KEY event from the
select key is handled by the menu control. In addition to any visual updates the menu control might
make, it also sends an EVT_COMMAND event back to the applet. All control types provide this
type of feedback mechanism.
QUALCOMM Confidential and Proprietary
155
BREW® Developer Training
User Interface Conventions
The Select key is akin to a
mouse click
Used to select item in menu
control
EVT_KEY event sent to menu
control event handler with eCode
AVK_SELECT
Control handler calls
ISHELL_PostEvent() with
EVT_COMMAND back to the
applet’s main event handler
Clear Key (AVK_CLR)
Should return to previous screen
or end application
Automatically backspaces in text
controls
Important to return TRUE or
FALSE
156
In order to enhance the user experience and to be sure the applet is integrated into the system,
certain interface development conventions should be used. Two fundamental conventions are
listed above.
The Select key should provide functionality similar to a mouse click. In other words, your
application should handle the EVT_COMMAND as appropriate to select and process based on a
menu selection. The sequence is as follows:
1. Assume the menu control is active.
2. The user presses the Select (Ok) key.
3. EVT_KEY is sent to the IMENUCTL_HandleEvent() function as the eCode and
AVK_SELECT as the wParam.
4. On this event, IMENUCTL_HandleEvent calls ISHELL_PostEvent(), sending
EVT_COMMAND to the applet’s main event handler.
5. The applet handles the Select key press as eCode EVT_COMMAND and retrieves the
current selected menu item and process accordingly.
The Clear key, which processes the EVT_KEY eCode and the AVK_CLR keycode, should be used
to take the user back to the previous screen. This key can also be used to terminate the
application. The AVK_CLR keycode is processed by the ITEXTCTL_HandleEvent() when a text
control is active to perform a backspace operation.
QUALCOMM Confidential and Proprietary
156
BREW® Developer Training
Event Delegation Flexibility
User presses
a key
That key is sent to
your applet event handler
Applet can optionally
handle event first
You can pass it to a control
Applet can optionally
handle event again
157
The event delegation model provides a great deal of flexibility. You may handle the event before
and/or after delegating the event to an active control. This provides the ability to do additional
processing behind the scenes, and even to override or customize the behavior of a control.
QUALCOMM Confidential and Proprietary
157
BREW® Developer Training
Key Event Delegation Sequence
User presses a
key on the
keypad
Shell
receives key
press event
Applet event handler
returns TRUE if
handled or FALSE if
not handled
Shell
Shell publishes
event to applet
Applet Event
Handler
Applet event
handler passes
event to control
event handler
Control event handler
returns TRUE if handled
or FALSE if not handled
Control Event
Handler
158
The sequence of a keypress event is illustrated above. The process starts with the user pressing a
key on the device. This event is received by the shell, and then passed to the topmost visible
applet via the applet’s main event handler. If processed, the event handler returns TRUE. If the
event is not handled the handler returns FALSE.
Optionally, the applet may also have a control that is registered to receive keypresses as well. In
this case, the main event handler will pass the event to the control’s event handler. The control’s
handle event function processes the event and returns TRUE or FALSE accordingly to the applet’s
main event handler, which in turn passes the return to the shell.
This return of TRUE or FALSE is very important. If the shell does not receive a return from either
the control or the applet in a timely fashion it cannot report the event as handled and the event
thread watchdog will shut down the applet to conserve system resources.
QUALCOMM Confidential and Proprietary
158
BREW® Developer Training
Publish and Subscribe Design Pattern
A service client
“subscribes” to receive
notification from a given
service
This subscription is
registered in a registry
maintained by the system
A service provides
notification of a service
being available to the
registry
The system dispatches
the service to the
registered subscriber
Subscriber 1
Publisher 1
Subscribe
Publish
Event Registry
Subscriber
Service
Subscriber 1
Publisher 1
Subscriber 1
Publisher 2
Subscriber 2
Publisher 1
159
Certain events, such as EVT_NOTIFY, require the applet to register to receive the event. When the event is
generated, the event is only sent to those clients that have registered to receive the event. This is the Publish
and Subscribe design pattern.
As the name implies, this design is much like a subscription to a service such as a newspaper or magazine.
The user subscribes for a service (subscribes to the newspaper) and waits for the service to provide
information (deliver the newspaper to the door).
The diagram above illustrates the following design pattern:
• Subscriber 1, a client for a service, is an object or interface that requests data to be provided by
another service. The data provided is an event code, a notification, or other data.
• Publisher 1 is a service, such as the system, an object, or an interface that generates the event
code, notification, or other data.
• A registration database, or system registry, is maintained by the system. This registry records and
maps each subscriber to the requested service publisher and, beyond our simplified example
here, several other parameters could be registered to determine how the service is posted.
• The publisher generates a message and sends it to the system into the system registry. The
system then dispatches the message to all registered subscribers for that message.
The next few slides illustrate how BREW implements the Publish and Subscribe design pattern for handling
events.
QUALCOMM Confidential and Proprietary
159
BREW® Developer Training
Notifications
Applications register for notifications
•Notifications
SHELL
•Shell dispatches
notifications to
subscribers
registered for the
notification
App 1 calls
ISHELL_RegisterNotify
at runtime
• Apps can register for
notification at runtime using
the ClassID of the class
posting notification
App 2
Dormant app registers
for notification via MIF
• Apps can register for
notification to be received
even if not running using the
MIF Editor
BREW Class (timer
alarm, etc) posts a
notification
• Notification can come from
system events or a notifying
class, such as ITimer
160
IShell’s notification mechanism allows a BREW class to notify other classes that certain events
have occurred. A class wishing to receive a notification must register its interest with the AEE
Shell, specifying the ClassID of the notifier class and the events for which notification is desired.
When an event requiring a notification occurs, the notifier class calls ISHELL_Notify( ), which
sends a notification to each class that has registered to be notified of the occurrence of that event.
The AEE Shell provides two ways for a class to register for notification of an event:
You can register by specifying information about the notification in your application’s MIF file using
the MIF Editor. This method of registering is used by applications that must be notified of events
even when they are not running. One example is a call-logging application that receives notification
of each incoming and outgoing call; such an application would need to process notifications even
while the user was not running the application to display the call log.
If notification is required only at certain times while your application is running, you can call
ISHELL_RegisterNotify( ) to initiate event notification. For example, a game application might
display a message when an incoming call arrives that would allow the user to accept the call or
continue playing the game. This application requires notification of incoming calls only while the
user is actually playing the game, so it would call ISHELL_RegisterNotify( ) when the user starts to
play the game.
QUALCOMM Confidential and Proprietary
160
BREW® Developer Training
Apps
Appsand
andcontrols
controlsare
are
registered
registeredas
as
subscribers
subscribersfor
forevents
events
Event
Registry
App
BREW Application
Control
Application HandleEvent()
SHELL
Application
Applicationand
and
controls
controlsregister
registerfor
for
events
eventsthrough
throughthe
the
HandleEvent()
HandleEvent()
Function
Function
Control HandleEvent()
System
Device Environment
Event Registration
161
The first step in the design pattern is to subscribe to receive events. As show above, the AEE Shell
maintains an event registry. Applets and controls register with the shell via the IApplet interface.
Applets and controls call their own HandleEvent() function that, through the IApplet interface, posts
their intent to receive certain events for processing. This registration is posted in the event registry.
The above applies mostly to the process for registered notification is discussed later.
QUALCOMM Confidential and Proprietary
161
BREW® Developer Training
Event Publish and Dispatch
BREW Application
Control
Application HandleEvent()
Through
Throughthe
the
HandleEvent()
HandleEvent()function
function
the
theapplet
appletprocesses
processes
the
theevent
event
Control HandleEvent()
IfIfthe
thecontrols
controlsare
are
registered
registeredthen
then
the
theprocessing
processingisis
handed
handedto
tothe
the
control
control
System
Events
Eventsare
aregenerated
generated
from
fromdevice
deviceor
orsystem
system
processes
and
processes andhanded
handed
to
the
Shell
to the Shell
App
SHELL
Event Registry
Device
Environment
These
Theseevents
eventsare
arehanded
handed
off
offto
tothe
theregistered
registered
“subscribers”
“subscribers”
162
Events can be generated from several sources, including the device environment (keypresses, etc.)
or from the system (battery level warning, etc.). Since these services post events without knowledge
of what clients will be receiving the events, a mechanism is required to send the event to the
appropriate subscribers.
The publishing of events from services, the system, or device environment, is handled through the
AEE Shell and the event registry mentioned before. The shell receives the events as native event
codes and then posts them to the event registry. The registry then publishes the event out to each
subscribing service.
As the subscriber receives the event, the HandleEvent() function receives the event as an event code
along with other contextual data. The subscriber then processes the event in the application’s main
event loop.
QUALCOMM Confidential and Proprietary
162
BREW® Developer Training
Application Interface Flow
Application state machine
Build different components, screens, or functions as states
Structure these states in a stack of states
Easy to move through the stack of states
Current application state is topmost state
Application pushes new states on the stack
Clear key pops state off the stack, presenting the
previous state
163
As a suggested approach to application development, consider an application state machine
framework to simplify application development and improve the efficiency of user interfaces. In this
state machine framework, each component, screen, or function of your application can be built as a
state. Each state can then be stacked with other states, allowing the application to move freely
through the stack. For instance, a menu is activated thus activating the menu state. This menu
state is pushed onto the stack by the application. When a menu option is selected and the
command is processed, this in turn activates a new state on the stack. If the clear key is pressed
while the menu is activated, the menu state could be popped off the stack, thus presenting the
previous state.
QUALCOMM Confidential and Proprietary
163
BREW® Developer Training
Lab 2.1: Key Press Events
164
Before You Start
Before starting this exercise, you should have:
•
Completed the previous labs
Description
The purpose of this lab is to control your flashing timer when you press a key.
APIs Used
None.
QUALCOMM Confidential and Proprietary
164
BREW® Developer Training
Procedure
Follow these steps to complete the exercise:
1. Scroll down to the function myapp_HandleEvent(). In the case statement for
EVT_APP_START, add the following code:
DisplayMessage(pMe, “Press the 1 Key”);
2. Modify your code so that the flashing timer is activated when you press the “1” key.
(Hint: call your DisplayFlashText() function from the event handler. Use a
switch statement with wParam and a case statement for the AVK_1 key code to
process the EVT_KEY event.)
case EVT_KEY:
// Add your code here..
switch (wParam) {
case AVK_1:
DisplayFlashText(pMe);
break;
. . .
}
return(TRUE);
3. Cancel the flashing timer on the display when you press any other key.
4. Compile and test your application in the Simulator. When you press the “1” key, the
string Hello BREW should flash on the display. The string should stop flashing
when you press any other key on the device.
After You Finish
After you complete this exercise, you should have:
•
an understanding of how to respond to a key event by activating and canceling a
timer from the keypad.
QUALCOMM Confidential and Proprietary
165
BREW® Developer Training
Key Points Review
During this module, students learned to:
9
9
9
9
Describe the applet event model and different types of events
Describe event delegation
Handle different control and system events in an application
Apply a state management framework to an application
166
The next section describes the event model in BREW with specific emphasis on the key points
listed above.
QUALCOMM Confidential and Proprietary
166
BREW® Developer Training
Module 2.2 – Building UI Controls
BREW UI Controls Overview
Menu Controls
Text and Static Controls
Dialogs
167
QUALCOMM Confidential and Proprietary
167
BREW® Developer Training
Module Objectives
After this module, students will be able to:
9 Describe the different native user interface controls available
9 Build controls for entering and displaying text
9 Create and manage a menu control
168
This module introduces BREW user interface controls with special emphasis on the objectives
listed above.
QUALCOMM Confidential and Proprietary
168
BREW® Developer Training
BREW UI Controls
169
QUALCOMM Confidential and Proprietary
169
BREW® Developer Training
Native UI Controls
IStatic – read only text message and title
IText – user text entry control using device keypad
IMenuCtl – scrolling items for single or multiple
selections
170
Here is a list of several native BREW controls that will be used throughout this course. If you have
built user interfaces before, many of these controls will be familiar to you. In essence, each control
is provided as a separate interface that is created with ISHELL_CreateInstance() with the ClassID
for each passed as the AEESCLSID argument. Once they are created, each control can be
manipulated and used through its own library of member functions. Let’s take a look at these.
QUALCOMM Confidential and Proprietary
170
BREW® Developer Training
IStatic Control
Uses a control rectangle for size and
position
ISTATIC_SetRect()
Title and text from resource file or
from code
ISTATIC_SetText() for title and message
ISTATIC_Redraw() to display the text
Automatically scrolls the text unless
ST_NOSCROLL property is set
To set properties for IStatic
void ISTATIC_SetProperties(IStatic * pIStatic,
uint32 nProperties)
Properties can be combined using Or
operator
ST_CENTERTEXT | ST_MIDDLETEXT
Common IStatic functions:
ISTATIC_GetProperties()
ISTATIC_GetRect()
ISTATIC_GoToLine()
ISTATIC_HandleEvent()
ISTATIC_IsActive()
ISTATIC_IsScrollable()
ISTATIC_Redraw()
ISTATIC_Reset()
ISTATIC_SetFont()
ISTATIC_SetProperties()
ISTATIC_SetRect()
ISTATIC_SetText()
ISTATIC_SetTextEx()
ISTATIC_SizeToFit()
Requires AEEShell.h
ClassID
AEECLSID_STATIC for new 3.1.3+
functionality
AEECLSID_STATIC_10 for backward
compatibility
171
First, let’s take a look a the IStatic control. This control is useful for providing messages such as a
welcome message or instructions, to the user during the use of your application. To use the
control, first set the size and position by calling ISTATIC_SetRectangle() and pass in an AEERect
structure. Add title and text using ISTATIC_SetText() and pass in text read in from a resource file
or from a buffer for both the title (optional) and the message. Call ISTATIC_Redraw() to show the
text on the display. By default, the IStatic control provides scrolling text if there is more text than
can be read at one time. Other methods are listed above. For more detail, see the API Reference.
QUALCOMM Confidential and Proprietary
171
BREW® Developer Training
ITextCtl Overview
Optional title and rectangular window
Only need to pass key press events while
active and retrieve when key entry is
finished
Handles the translation of key presses into
characters
While active, must send all keypress events
to it by calling ITEXTCTL_HandleEvent()
from main event handler
Requires AEEText.h
ClassIDs
Common ITextCtl functions
Translation process depends on text entry mode
selected on device
User can select entry mode while control is
active using soft key menu
While the soft key menu is active, user can press
UP key to return to edit mode
AEECLSID_TEXTCTL - Provides new
functionality for BREW 3.1.3+
AEECLSID_TEXTCTL_10 - Text Control 2 for
backward compatibility
ITEXTCTL_EnableCommand()
ITEXTCTL_EnumModeInit()
ITEXTCTL_EnumNextMode()
ITEXTCTL_GetCursorPos()
ITEXTCTL_GetInputMode()
ITEXTCTL_GetProperties()
ITEXTCTL_GetPropertiesEx()
ITEXTCTL_GetRect()
ITEXTCTL_GetSelection()
ITEXTCTL_GetText()
ITEXTCTL_GetTextPtr()
ITEXTCTL_HandleEvent()
ITEXTCTL_IsActive()
ITEXTCTL_Redraw()
ITEXTCTL_Release()
ITEXTCTL_Reset()
ITEXTCTL_SetActive()
ITEXTCTL_SetCursorPos()
ITEXTCTL_SetInputMode()
ITEXTCTL_SetMaxSize()
ITEXTCTL_SetProperties()
ITEXTCTL_SetPropertiesEx()
ITEXTCTL_SetRect()
ITEXTCTL_SetSelection()
ITEXTCTL_SetSoftKeyMenu()
ITEXTCTL_SetText()
ITEXTCTL_SetTitle()
172
The ITextCtl is used for presenting and receiving text from the user. It is a rectangular window, like
IStatic, with an optional title. When the control is active, key press events are passed to the control
so that text characters can be recorded in the control. The text that is entered is dependent on the
native text entry method on the device. When the user is finished with entering text, some means
of accepting the information (moving from one control to another, a soft key menu choice for Save,
etc.) can then retrieve the text entered in the control and process it as needed. The next slide
illustrates how to create a text control.
QUALCOMM Confidential and Proprietary
172
BREW® Developer Training
Creating a Text Control
1.
Create an instance of ITextCtl
2.
ISHELL_CreateInstance()
AEECLSID_TEXTCTL
Specify the rectangle for the
control
4.
Set the properties of the
control
5.
ITEXTCTL_SetRect()
Set the soft key menu
associated with the control, if
any
3.
Set the title and initial
(default) text value
6.
ITEXTCTL_SetSoftKeyMenu()
Activate the control
ITEXTCTL_SetTitle()
ITEXTCTL_SetText()
ITEXTCTL_SetProperties()
ITEXTCTL_SetActive()
173
As shown above, the first step is to create an instance of ITextCtl by calling
ISHELL_CreateInstance and passing in AEECLSID_TEXTCTL as the class ID. Specify the
rectangle for the control with ITEXTCTL_SetRect() and pass in an AEERect structure for the
rectangle. Provide the title for the control using ITEXTCTL_SetTitle() and pass in text either from a
resource file or from code. Optionally, you can provide default text in the same way using
ITEXTCTL_SetText(). Set the properties of the control as needed, and your control is almost ready.
Be sure to create a soft key menu control, using IMenuCtl, for options for saving and text entry
method if needed, and link this to your control through the use of ITEXTCTL_SetSoftKeyMenu().
Activate the control when needed by calling ITEXTCTL_SetActive().
QUALCOMM Confidential and Proprietary
173
BREW® Developer Training
Using the Text Control
While active, pass key press
events to the text control
Call ITEXTCTL_HandleEvent()
from Applet event handler
Pass the eCode and wParam in
the call
Signal completion of text entry
Soft key menu should provide
option for Done
Optionally, Select or other key
press can signal completion
Retrieve the text
Call ITEXTCTL_GetText() or
ITEXTCTL_GetTextPtr()
174
While the text control is active, pass key presses to it from the applet event handler using
ITEXTCTL_HandleEvent(), making sure to pass the eCode and wParam in the call. These codes
will then be used by the control’s event handler to record the text. When finished, provide some
method for signaling completion, such as a soft key menu or code for the Select key being
pressed, and then retrieve the text using ITEXTCTL_GetText(), which copies the text to a
destination buffer, or with ITEXTCTL_GetTextPtr(), which returns a pointer to the text buffer
maintained by the text control.
QUALCOMM Confidential and Proprietary
174
BREW® Developer Training
Using the IMenuCtl interface
175
QUALCOMM Confidential and Proprietary
175
BREW® Developer Training
IMenuCtl Overview
User selects from list of items using up, down, left and
right arrow keys to highlight and identify currently
selected menu item
Pressing the SELECT key sends an EVT_COMMAND
event to your event handler
176
IMenuCtl allows you to create menus in your applications. Menu controls allow the device user to
make a selection from a list of items. The up, down, left and right arrow keys are used to identify
the currently selected menu item, which appears highlighted on the screen. When the user presses
the SELECT key and command sending is enabled (see later in this section), an EVT_COMMAND
is sent to the application or dialog that created the menu, which includes the identifier of the
currently selected item. There are four types of menu controls (you select the type you want by
specifying its ClassID when you create an instance of the menu control).
NOTE: Before creating a new type of menu or other user interface control, review the
documentation, settings, etc., for the existing BREW controls. In many cases, the type of control
you wish to create may already exist. For example, IMENUCTL can be used for everything from
simple menus to much more complicated icon views.
As mentioned above, IMENUCTL_HandleEvent( ) handles the up, down, left and right arrow keys
and the SELECT key. If a calendar view menu is specified (see later in this section), a standard
menu control also handles the device number keys (AVK_0 through AVK_9), which are used to
enter the time of a calendar appointment. Except for soft key controls, a menu control sends a
control tabbing event (EVT_CTL_TAB) when the user presses the left and right keys. You can use
control tabbing to move between controls in a multicontrol screen (if your menu control is part of a
dialog, the dialog intercepts the control tabbing events and changes control focus appropriately).
QUALCOMM Confidential and Proprietary
176
BREW® Developer Training
IMenuCtl Types
Standard menu control
ClassID
AEECLSID_MENUCTL
List control
ClassID
AEECLSID_LISTCTL
SoftKey menu control
ClassID
AEECLSID_SOFTKEYCTL
Icon-view menu control
ClassID
AEECLSID_ICONVIEWCTL
177
A standard menu control (ClassID AEECLSID_MENUCTL) displays one menu item per row on the
screen, with each row containing the item’s bitmap icon and/or text string. If all the items do not fit
on the screen, you can use the UP and DOWN arrow keys to scroll the menu up or down.
A list control (ClassID AEECLSID_LISTCTL) displays only the currently selected menu item on the
screen. This type of menu is useful in applications where the available screen real estate is limited.
Items in a list control menu contain only text (there are no bitmap icons). You use the UP and
DOWN arrow keys to navigate to the desired menu selection.
A SoftKey menu control (ClassID AEECLSID_SOFTKEYCTL) displays the menu items side by
side along the bottom portion of the screen. You use the LEFT and RIGHT arrow keys to designate
the selected menu item.
An icon-view menu control (ClassID AEECLSID_ICONVIEWCTL) uses a bitmap icon to represent
each menu item. The bitmap icons are displayed in one or more rows on the screen, and the arrow
keys are used to move between rows and between the icons in each row. The text string
corresponding to the currently selected item appears at the bottom of the screen.
QUALCOMM Confidential and Proprietary
177
BREW® Developer Training
Building a Menu Control
1.
Add menu strings to resource file
2.
4. Populate the values of the menu from
the resource file
Create the menu
3.
Resource files should be used for menu
titles and menu items
Easier to build and make localized
changes
ISHELL_CreateInstance()
AEECLSID_MENUCTL for standard
menu
AEECLSID_SOFTKEYCTL for soft key
menu
AEECLSID_ICONVIEWCTL for icon
menu
AEECLSID_LISTCTL for list menu
control
5.
Use IMENUCTL_AddItem() for each string
in the menu
Put the menu item names into your
resource file, then IMENUCTL_AddItem()
will automatically pull each one into the
menu
Activate the menu control
Call IMENUCTL_SetActive()
Set menu properties
Set title using IMENUCTL_SetTitle()
Change the menu look by calling
IMENUCTL_SetColors() and
IMENUCTL_SetStyle()
178
First, add your strings to a resource file. Strings should be put into a resource file rather than hardcoding the strings into the source code. The IMenuCtl Interface allows strings to be loaded directly
from a resource file and inserted into a menu. The function IMENUCTL_AddItem() will load a string
from a resource file and insert it into a given menu.
Create the menu using ISHELL_CreateInstance() and pass in the appropriate ClassID for the
menu being created.
Set the desired settings, such as title, color, and style, by calling the appropriate function calls.
Populate the menu with the strings from your resource file by calling IMENUCTL_AddItem().
Once you are ready to use your menu, call IMENUCTL_SetActive to activate it.
QUALCOMM Confidential and Proprietary
178
BREW® Developer Training
IMenuCtl Functions
IMENUCTL_GetProperties()
IMENUCTL_SetProperties()
IMENUCTL_SetColors()
IMENUCTL_SetStyle()
IMENUCTL_IsActive()
IMENUCTL_SetActive()
IMENUCTL_MoveItem()
IMENUCTL_SetTitle()
IMENUCTL_AddItem()
IMENUCTL_GetItemCount()
IMENUCTL_GetItem()
IMENUCTL_SetItem()
IMENUCTL_GetSel()
IMENUCTL_DeleteItem()
IMENUCTL_GetFocus()
IMENUCTL_SetFocus()
179
The functions above allow programmers to manipulate a menu and to tailor it to the application’s
needs. See the BREW API Reference for a complete list of this interface’s APIs.
QUALCOMM Confidential and Proprietary
179
BREW® Developer Training
Sample Event Handler
static boolean myapp_HandleEvent(myapp* pMe, AEEEvent
eCode, uint16 wParam, uint32 dwParam) {
...
case EVT_KEY:
// Add your code here...
// let BREW scroll the menu by calling the menu's
function
if (pMe->pIMenu &&
IMENUCTL_HandleEvent(pMe->pIMenu, eCode,
wParam, dwParam))
return(TRUE);
...
180
The above code fragment shows where the IMENUCTL_HandleEvent call fits into an applets
HandleEvent code. It passes all Key events to the menu control, but any key events not processed
by the menu are passed to the rest of the code.
QUALCOMM Confidential and Proprietary
180
BREW® Developer Training
Lab 2.2: Building Menu Controls
181
Before You Start
Before starting this exercise, you should have:
•
Completed the previous labs
Description
The purpose of this lab is to build a scrolling Menu on the display when you press a key and
read selected Menu items initialized from resource strings.
APIs Used
ISHELL_CreateInstance() - open the menu library
ISHELL_CloseApplet() - close application
IMENUCTL_SetTitle() - set title for menu
IMENUCTL_AddItem() - add items to the menu
IMENUCTL_SetActive() - make the current menu active
IMENUCTL_IsActive() – see if the current menu is active
IMENUCTL_HandleEvent() - have Menu control respond to key events
IMENUCTL_Release() - close the menu library
QUALCOMM Confidential and Proprietary
181
BREW® Developer Training
Procedure
Follow these steps to complete the exercise:
Exercise 1 – Build Menu Control with State Machine
1. Launch the BREW Resource Editor from within the Start Menu or from the Tool Bar
in Visual C++. Open the myapp.brx file in your myapp directory.
2. Select New String from the toolbar or Resource/New String from the menu.
3. Add the resource names IDS_MAIN_MENU , IDS_FLASH_TEXT, IDS_QUIT. Give
them the string values of “Main Menu”, “Flash Text”, and “Quit”, respectively.
Make sure you click Apply.
4. Select Save from the File Menu and save file.
5. Select Compile Resource Script from the Build menu. You will see a dialog
confirming that myapp.bar (the compiled resource file) and myapp.brh were
updated and written to the file system. Click OK to close it.
6. Launch Visual C++ if you have not done so.
7. Include “AEEMenu.h” in your application to use Menu controls.
8. Keeping track of an application’s state is important with menu-driven designs. Include
the following code after the #include’s in your program to track state information.
typedef enum {
APP_STATE_MAIN,
APP_STATE_FLASH
} EAppStateType;
9. Add the following variables to your applet structure.
EAppStateType eAppState;
IMenuCtl *pIMenu;
// Menu app state
// Menu control
10. Add the following function prototypes to your code:
void DisplayMainMenu(myapp *pMe);
void ResetControls(myapp *pMe);
void QuitApplication(myapp *pMe);
QUALCOMM Confidential and Proprietary
182
BREW® Developer Training
11. In your myapp_InitAppData() function, create the Menu Control with
ISHELL_CreateInstance() using AEECLSID_MENUCTL, as follows.
if (ISHELL_CreateInstance(pMe->pIShell,
AEECLSID_MENUCTL, (void **)&pMe->pIMenu) != SUCCESS) {
pMe->pIMenu = NULL;
return FALSE;
}
12. Release the Menu Control with IMENUCTL_Release() in your
myapp_FreeAppData() function, as follows.
if (pMe->pIMenu != NULL) {
// check for NULL
IMENUCTL_Release(pMe->pIMenu); // release interface
pMe->pIMenu = NULL;
// set to NULL
}
13. Scroll down to your event handler and call DisplayMainMenu() for the
EVT_APP_START event.
14. Write the DisplayMainMenu() function. Call IMENUCTL_AddItem() to add menu
items to your Menu, as follows.
void DisplayMainMenu(myapp *pMe) {
ResetControls(pMe);
// call IMENUCTL_AddItem to add menu item strings
// from resource file to main menu, including title
IMENUCTL_SetActive(pMe->pIMenu, TRUE);
pMe->eAppState = APP_STATE_MAIN;
}
15. Now modify your DisplayFlashText() function to call ResetControls() initially
and set the state to APP_STATE_FLASH at the end of the function.
16. Write the ResetControls() function. Make the menu inactive in this function.
You should also cancel your timer and clear the display.
17. Write the QuitApplication() function to terminate your application from the
menu. Call ISHELL_CloseApplet() to quit the application.
18. Compile and test your application in the Simulator. When you run your application, a
menu should appear with selections to displaying flashing text or quit the application.
The menu will not scroll at this point.
QUALCOMM Confidential and Proprietary
183
BREW® Developer Training
Exercise 2 – Scroll the Menu and Select a Menu Item
1. Add IMENUCTL_HandleEvent() to your source code to scroll the menu if it is active.
Verify that your menu is active before scrolling (pMe->pIMenu is not NULL ).
2. Include the EVT_COMMAND event in your event handler to process menu selections. Use
the following format.
case EVT_COMMAND:
switch (wParam) {
case IDS_FLASH_TEXT:
DisplayFlashText(pMe);
return(TRUE);
case IDS_QUIT:
QuitApplication(pMe);
return(TRUE);
}
return(TRUE);
// ...
3. Now activate the clear key on the phone. Include an AVK_CLR event in your event
handler inside the EVT_KEY case statement to use your state machine. Use the
following format.
case AVK_CLR:
switch (pMe->eAppState) {
case APP_STATE_FLASH:
DisplayMainMenu(pMe);
return(TRUE);
default:
return(FALSE);
}
break;
// ...
After You Finish
After you complete this exercise, you should have:
•
learned how to create a menu with menu selections
•
learned how to allocate and deallocate interfaces in BREW applications
•
learned how to scroll a menu, select menu items, and enable the CLR key
QUALCOMM Confidential and Proprietary
184
BREW® Developer Training
Key Points Review
During this module, students learned to:
9 Describe the different native user interface controls available
9 Build controls for entering text, date, and time
9 Create and manage a menu control
185
This module introduced BREW user interface controls with special emphasis on the key points
listed above.
QUALCOMM Confidential and Proprietary
185
BREW® Developer Training
186
This page intentionally
left blank
QUALCOMM Confidential and Proprietary
186
BREW® Developer Training
BREW® Developer
Training
Section 3 – Working
with Persistent Data
187
QUALCOMM Confidential and Proprietary
187
BREW® Developer Training
Section 3
Programming for Persistent Storage
Module 3.1 File I/O Programming
Module 3.2 Databases and Address Books
188
QUALCOMM Confidential and Proprietary
188
BREW® Developer Training
Module 3.1
File I/O Programming
SDK and Device File System Structure
File Management Interfaces IFile and IFileMgr
189
QUALCOMM Confidential and Proprietary
189
BREW® Developer Training
Module Objectives
9 Discuss the file system found on BREW devices
9 Review the file interfaces that allow applications to read
from and write to the mobile device’s file system
9 Work with a BREW application that creates and
accesses files
190
This module covers the file and database APIs with special emphasis on the objectives listed
above.
QUALCOMM Confidential and Proprietary
190
BREW® Developer Training
General File and Database Information
Allows standard file I/O
operations found on other
common platforms
Provides a set of interfaces to
handle data persistence
through files
Allows for data persistence
through record-oriented
databases
Contacts
Name
___________
Address ___________
Phone
___________
191
One of the most common requirements of any application is the ability to read and write data on a
persistent storage medium. The BREW platform offers a set of interfaces that allow applications to
read from and write to the file system located on the mobile device. These interfaces offer services
such as creating and deleting files and directories, reading from and writing to files, enumerating
directories, testing existence of files and directories, etc.
In addition to these file management services, the BREW platform also offers interfaces that
provide database management services. These interfaces allow applications to create and access
databases, thereby allowing a more controlled form of data storage.
This section will discuss in detail how to use the BREW interfaces in order to perform file and
database operations.
QUALCOMM Confidential and Proprietary
191
BREW® Developer Training
BREW SDK Directory Structure
Application directories and application MIF files typically stored in one
Applications directory (e.g., Examples)
Applications
Directory
Developer can optionally store MIFs with the applications or in another
directory
myapp.dll/
myapp.bar
MyApp
Directory
myapp.txt
Each application has its own
directory
that contains the
application, supporting files,
and subdirectories as
needed
DATA
OtherApp
Directory
Shared
Directory
SDK Development
flexibility
Applications can
conveniently
share data here
Developer can create any
directory structure needed
Settings on Simulator are
changed accordingly
192
Before considering file access familiarize yourself with the BREW file system and the directory
structure of BREW applications. As seen here, the typical BREW SDK directory structure has a
central or root directory (Examples by default) that contains the MIFs and a directory for each
BREW application. Within the BREW application directories, the application’s .dll or .mod binary
file, supporting data files, and even subdirectories are stored. Each application follows this
structure. Finally, a Shared directory allows applications to conveniently access shared
information. This is discussed in more detail shortly.
QUALCOMM Confidential and Proprietary
192
BREW® Developer Training
BREW Device Directory Structure Before 3.x
Topmost directory of the BREW file space is the /brew directory, known
also as the BREW directory. Stored in this directory are application MIFs
and application subdirectories
/brew
myapp.mif
app2.mif
myapp.mod
myapp.bar
myapp
myapp.sig
Each application has its own
directory that contains the
application .mod, .sig, .bar,
other supporting files, and
subdirectories as needed
myapp.txt
app2
DATA
shared
Shared data, the location is
specific to the OEM
193
Before considering file access familiarize yourself with the BREW file system and the directory
structure of BREW applications. As seen here, the typical BREW SDK directory structure has a
central or root directory (Examples by default) that contains the MIFs and a directory for each
BREW application. Within the BREW application directories, the application’s .dll or .mod binary
file, supporting data files, and even subdirectories are stored. Each application follows this
structure. Finally, a Shared directory allows applications to conveniently access shared
information. This is discussed in more detail shortly.
QUALCOMM Confidential and Proprietary
193
BREW® Developer Training
BREW 3.x Device Directory Structure
The top level directory is the BREW applications directory, or simply the
BREW directory. Device file systems are case sensitive and the directory is
usually named as shown.
/brew
myapp.mod
myapp.sig
Applications are stored in
the mod directory.
myapp
myapp.bar
/mod
myapp.txt
app2
Each application has its
own directory that
contains the application,
supporting files, and
subdirectories as needed
DATA
myapp.mif
MIFs are stored in the mif directory.
/mif
Each application has a corresponding mif
fie. The name of the mif must match the
name of the application directory
app2.mif
/shared
3.x
New Feature
194
The file system on 3.x devices is much more structured than in the standard SDK installation and
on devices prior to 3.1.
As shown above, the top most directory for BREW applications is called the Applications directory
and shows as /brew on device. Below this directory are three subdirectories worth noting.
The /brew/mod directory contains all BREW applications in subdirectories. Each application
subdirectory has the BREW application as a compiled binary file (.mod), a BREW application
signature file (.sig), any BREW resource files (.bar) and any other application support files such as
.txt files. Application .mod and .sig files are described in Section 6 of this course.
The /brew/mif directory contains the mifs for all applications on the device. Previously, all mifs were
stored at the root level. The name of the mif must match the name of the directory that contains the
corresponding BREW application.
Finally, the /brew/shared directory provides BREW applications with a location for shared data.
The file system flexibility of the BREW SDK allows the developer to simulate this file structure while
building BREW applications. Simply create the mod and mif directories anywhere in your PC’s file
system and then set the Applet and MIF directory settings appropriately in the Simulator.
QUALCOMM Confidential and Proprietary
194
BREW® Developer Training
BREW 3.1 File System Namespace
BREW root directory
"fs:/“-(AEEFS_ROOT_DIR)
Current application’s directory
"fs:/~/“-(AEEFS_HOME_DIR)
Location of all the module
directories
"fs:/mod/”-(AEEFS_MOD_DIR)
"fs:/ringers/“ (AEEFS_RINGERS_DIR)
Specific application’s directory
"fs:/~<clsid>/“ – Application needs to
export <clsid> via a module ACL
BREW system files
"fs:/sys/“ - (AEEFS_SYS_DIR)
Access to this directory is restricted
Location of the shared directory
"fs:/shared/“(AEEFS_SHARED_DIR)
Location of the removable media
card if the device supports one.
"fs:/card0/“ -(AEEFS_CARD0_DIR)
Location of all the MIF files
"fs:/mif/“-(AEEFS_MIF_DIR)
Location of the ringer directory
Location of the address book
directory
"fs:/address/“(AEEFS_ADDRESS_DIR)
3.x
New Feature
195
Beginning with BREW 3.1, the BREW file namespace has been expanded to allow applications to
name anything in the BREW file system in a case-sensitive manner. Using the same file system
APIs, an application gains access to this new BREW file namespace by prefacing filenames with
"fs:/". Filenames that do not begin with "fs:/" are interpreted in a backward-compatible manner.
A note about privilege levels
An application must have a privilege level of PL_FILE (File) or PL_SYSTEM (All) to be able to
create files and directories in the application's module directory. An application must have a
privilege level of PL_SHARED_WRITE (Shared) or PL_SYSTEM (All) to create files and
directories in the shared application directory. PL_SHARED_WRITE implies PL_FILE for the
shared directory only. Similar rules apply to AEECLSID_CARD0, PL_ADDRBOOK, and
PL_RINGER_WRITE.
Let’s take a closer look at privilege levels.
QUALCOMM Confidential and Proprietary
195
BREW® Developer Training
Wallpaper Directory
Before 3.1.4, wallpapers were stored in the
“Media Storage Location”
3.1.4 added two new variables
AEEFS_MCF_PICTURE_DIR
AEEFS_MCF_PICTURE_LOCK_DIR
196
Media Content Management in BREW 3.1.3 and lower
BREW devices up to version 3.1.3 designate a single specific directory for media content. The type
of content stored in this directory is limited to wallpaper images, caller ID images, and power on/off
images. To determine which services are supported, and in which directory content is stored,
application developers must look in the Device Data Sheet for a given handset. In the section,
"Image and Other Media Interaction," details of each supported service, including media formats
supported for that service, can be found. Given the information from the DDS, making an image
available to the wallpaper service (or any other supported service) is as simple as creating a file
within the specified Media Storage Location. The most common location for media storage on
BREW 3.1.3 and earlier devices is the Shared Directory.
Media Content Management in BREW 3.1.4 and above
BREW 3.1.4 introduced the concept of Media Content File (MCF) directories, which allow for
different types of content to be stored and managed separately. Each different service (wallpapers,
caller ID, etc.) may pull in content from one or more MCF directory. The MCF directories are
accessed via the IFileMgr API, using the "fs:/" naming convention (refer to the BREW API
reference for more information). The exact path for each MCF directory is defined in AEEMCF.h.
For example :
#define AEEFS_MCF_PICTURE_DIR "fs:/~0x0102382c/"
#define AEEFS_MCF_PICTURE_LOCK_DIR "fs:/~0x0102e5fc/"
Files within these directories can be accessed similarly to the AEE_SHARED_DIR. Note that while
the unlocked MCF directories are accessible without any special privileges, the locked directories
require specific privileges to access them. These required Access Privileges are detailed in the
AEEMCF.h header file. See the Online Knowledge Base for more details.
QUALCOMM Confidential and Proprietary
196
BREW® Developer Training
Privilege Levels
BREW App
Read
From App
Dir?
Write
to App
Dir?
Read
from Shared
Dir?
Write
to Shared
Dir?
No
privilege
required
File
privilege
required
No
privilege
required
Shared
privilege
required
App
directory
Shared
directory
197
The above illustration shows the relationship between privilege levels and file access. In the MIF
privilege levels can be set for a variety of services, including file and shared directory access. It is
important to know when the privilege is needed and how to set it. Let’s first consider file access to
the application’s own directory. In the case of reading files, all BREW applications can read files
from the application’s own directory without a need for a privilege level. Only when the application
needs to write to the directory does the application need the File privilege.
Likewise, in the case of shared directory access, all BREW applications can read from this
directory with no additional privilege level needed. This makes it easy for applications to access
shared information. If the application needs to write to the directory, the Write Access to Shared
Directory privilege must be set.
QUALCOMM Confidential and Proprietary
197
BREW® Developer Training
File System Interfaces
Use IFileMgr to:
IFileMgr
Open files
Create files and directories
Remove files and directories
Rename files and directories
IFILEMGR_OpenFile()
returns pointer to IFile
Use IFile to:
Read file contents
Modify file contents
IFile
198
For working with files, BREW provides a suite of file management and file I/O APIs in two basic
interfaces, IFileMgr and IFile, that share a kind of manager/subordinate relationship, whereas the
IFile interface used in the application is created through IFileMgr. Let’s explore these further.
The IFileMgr interface is used for file maintenance activities such as creating, opening, deleting
and renaming files and directories. Similar to DOS or other file access interfaces, IFileMgr is the
main interface for interacting with the file system itself. Use the IFileMgr to create directories for
storing files, for accessing directories, removing directories, or renaming them. This interface even
provides methods for retrieving file information and file system metrics such as free space.
Perhaps the most notable point of the IFileMgr interface is the IFILEMGR_OpenFile() function call.
Through this call, IFileMgr opens file, creates an instance of the IFile interface, and returns the
pointer to it. IFile provides various APIs for reading from files, writing to files, and moving through
file data.
Along with these fundamental interfaces for working with stored data, several other APIs are
provided that we will see in later sections of this course.
QUALCOMM Confidential and Proprietary
198
BREW® Developer Training
The IFileMgr Interface
Used to create, remove, and
rename files and directories
IFileMgr
Common IFILEMgr Functions:
IFILEMGR_CheckPathAccess()
IFILEMGR_EnumInit()
IFILEMGR_EnumNext()
IFILEMGR_EnumNextEx()
IFILEMGR_GetInfo()
IFILEMGR_GetInfoEx()
IFILEMGR_GetLastError()
IFILEMGR_OpenFile()
IFILEMGR_ResolvePath()
IFILEMGR_SetDescription()
IFILEMGR_UnUse()
IFILEMGR_Use()
Requires AEEFile.h
ClassID AEECLSID_FILEMGR
Also used to check the file
system for space or for files
IFILEMGR_OpenFile()
IFILEMGR_MkDir()
IFILEMGR_Remove()
IFILEMGR_RmDir()
IFILEMGR_Rename()
IFILEMGR_GetFreeSpace()
IFILEMGR_GetFileUseInfo()
IFILEMGR_Test()
Use this to interface to open
the file
IFILEMGR_OpenFile()
Returns a pointer to the IFile
interface
199
The IFileMgr interface functions are used to create, remove and rename files and directories. It
also provides the tools to obtain information about them. To create an instance of the IFileMgr
interface, you call ISHELL_CreateInstance with AEECLSID_FILEMGR as the ClassID.
IFileMgr operations can be used to access files in your application’s directory. BREW also provides
a shared application directory that allows files to be shared among applications. This is done by
starting the target path with the name of the shared directory, which is defined by the constant
AEE_SHARED_DIR in the header file AEE.h (the actual name of the shared directory is selected
by the device manufacturer).
Creating or modifying files in your application’s directory or the shared directory requires the “file”
or “shared” privilege respectively. Reading files from either of these directories does not require a
privilege. As mentioned before, these privileges are set using the MIF Editor.
File and directory names in BREW are case-sensitive and therefore file and directory names need
to be specified exactly as they are.
QUALCOMM Confidential and Proprietary
199
BREW® Developer Training
The IFile Interface
Allows you to read and
modify contents of files
created by IFileMgr
IFile
Call IFILEMGR_OpenFile()
to open the file and get a
file pointer
Call IFILE_Read() and
IFILE_Write() to read and
write
Call IFILE_Release() to
close the file
Common IFile Functions:
IFILE_Read()
IFILE_Write()
IFILE_Truncate()
IFILE_GetInfo()
IFILE_Readable()
IFILE_Seek()
IFILE_SetCacheSize()
Requires AEEFile.h
200
The IFile interface functions allow you to read and modify the contents of files created with the
IFileMgr interface. To obtain an instance of the IFile interface for a file, you call
IFILEMGR_OpenFile( ) for that file. You then use the IFile interface pointer returned by
IFILEMGR_OpenFile( ) to access that file with the operations described later in this section. When
you have completed access to the file, you call IFILE_Release( ) to close it.
Note that IFile is one of several BREW interfaces that you do not create through
ISHELL_CreateInstance. In fact, the only way to get an IFile instance is through the IFileMgr
interface.
QUALCOMM Confidential and Proprietary
200
BREW® Developer Training
Lab 3.1: Read Data From a File
201
Before You Start
Before starting this exercise, you should have:
• Completed the previous labs
Description
The purpose of this lab is to read a text file and display it in a formatted text window.
APIs Used
ISHELL_CreateInstance() - open file manager interface
ISHELL_CreateInstance() - open static text window interface
IFILEMGR_OpenFile() - open file for reading
IFILE_Read() - read data from file
IFILE_Release() - close file interface
ISTATIC_SetProperties() – use ASCII instead of Unicode for text window
ISTATIC_SetText() - set text to display in text window
ISTATIC_Redraw() - redraw text window
ISTATIC_SetActive() - make text window active
ISTATIC_Release() - close static text window
IFILEMGR_Release() - close file manager
QUALCOMM Confidential and Proprietary
201
BREW® Developer Training
Procedure
Follow these steps to complete the exercise:
1. Launch the BREW Resource Editor from within the Start Menu or from the Tool Bar
in Visual C++. Open the myapp.brx file in your myapp directory.
2. Select New String from the toolbar or Resource/New String from the menu.
3. Add the string “Read Text File” with the resource name IDS_READ_FILE.
4. Rebuild the myapp.bar file.
5.
Launch Visual C++ if you have not done so.
6.
Include “AEEFile.h” and “AEEText.h” in your application.
7. Add the following variables to your applet structure.
IFileMgr
IFile
IStatic
*pIFileMgr;
*pIFile;
*pIStatic;
// File Manager interface
// File interface
// Static control
8. Add APP_STATE_READ_FILE to your enum list of application states.
9. Add the following function prototype to your code.
void DisplayReadFile(myapp *pMe, const char *filename);
10. For the EVT_COMMAND event in your event handler, call DisplayReadFile(pMe,
“news.txt”) in a case statement for IDS_READ_FILE.
11. Add APP_STATE_READ_FILE to your case statements that handle the clear key
(AVK_CLR event).
12. Call ISHELL_CreateInstance() in your myapp_InitAppData() function to
open the IFileMgr interface with AEECLSID_FILEMGR and the IStatic
interface with AEECLSID_STATIC. Release these interfaces in your
myapp_FreeAppData() function.
QUALCOMM Confidential and Proprietary
202
BREW® Developer Training
13. Call IMENUCTL_AddItem() in DisplayMainMenu() to add resource string
IDS_READ_FILE to the menu.
14. Write the DisplayReadFile() function to open the text file and read the data into a
character buffer. Close the file after you have read the data.
15. Call ISTATIC_SetProperties() to set the text to ASCII for the Static text box.
16. Call ISTATIC_SetText() with the character buffer that contains the text data. Then
call ISTATIC_SetActive() to display the text on the display.
17. Make sure you call ResetControls() at the beginning of your
DisplayReadFile() function. Set the application state to APP_STATE_READ_FILE.
18. Call ISTATIC_HandleEvent() for an EVT_KEY event in your event handler. This
enables scrolling of the static text box. Verify that the static text box is active before
scrolling (pMe->pIStatic is not NULL).
19. Open Notepad in Windows and type in “This is the news of the day.” Save
the Notepad file in news.txt in your myapp directory.
20. Compile and test your application in the Simulator. When you select Read Text File
from the menu, the contents of the news.txt file should appear on the display.
After You Finish
After you complete this exercise, you should have:
•
learned how to open a text file and read its contents in to memory
•
learned how to display a text file in a static text box on the display
•
learned how to enabling scrolling of the static text box
QUALCOMM Confidential and Proprietary
203
BREW® Developer Training
Module 3.2
Databases and Address Books
Native BREW Database Development
Database APIs
Device Address Book Access
204
QUALCOMM Confidential and Proprietary
204
BREW® Developer Training
Module Objectives
After completing this module, students will be able to:
9 Discuss the types of databases supported by BREW
9 Review the database interfaces that allow applications to create and
access structured data
9 Review the address book interfaces used to access the native
address book on the device
9 Work with a BREW application that creates and accesses files
205
This module covers the file and database APIs with special emphasis on the objectives listed
above.
QUALCOMM Confidential and Proprietary
205
BREW® Developer Training
BREW Database Overview
BREW native databases
Provide structured data storage in
variable length fields
OEM address book
Native address book on the device
Structure is proprietary to the OEM
Built using database APIs
• IDBMgr
• IDatabase
• IDBRecord
Only one OEM database is allowed
on the device
Access to BREW applications must
be permitted on the device
Basic address book structure by
default, but can be modified to
support any need
BREW APIs retrieve, read, and
modify records
Fixed list of data types and field
names provided by BREW
• IAddrBook
• IAddrRec
Provide storage for text, numbers,
bitmaps, and even binary data
206
QUALCOMM Confidential and Proprietary
206
BREW® Developer Training
Introduction to Database Operations
IDBMgr
DB maintenance – create, open, and
remove
Open – pointer for record
manipulation
IDatabase
Create and access records from
IDBMgr
IDBRecord
Manipulate data within a record from
IDatabase
IDBMgr
IDatabase
IDBRecord
207
This slide shows the relationship of the IDBMgr, IDatabase, and IDBRecord interfaces. The
IDBMgr interface is used to open and/or create a database. The IDatabase interface is create new
records and access existing records in a database. The IDBRecord interface is used to read and/or
modify data in a record.
QUALCOMM Confidential and Proprietary
207
BREW® Developer Training
The IDBMgr Interface
Used to create, open and
remove databases
IDBMgr
Database write operations
require the same privileges as
file write operations
Use this to interface to open
the database, then use the
IDatabase interface to retrieve
the record you want
Common IDBMgr Functions:
IDBMGR_OpenDatabase()
IDBMGR_OpenDatabaseEx()
IDBMGR_Remove()
Requires AEEDB.h
AEECLSID_IDBMGR
208
The IDBMgr interface functions are used to create, open and remove databases, which are
collections of multi-field records. Once a database has been opened, you use functions in the
IDatabase interface to create and retrieve database records and close the database, and you use
functions in the IDBRecord interface to access and update the fields of individual records.
Because databases are implemented using the BREW file system, creating or modifying databases
in your application’s directory or the shared directory requires the “file” or “shared” privilege,
respectively. Reading databases from either of these directories does not require a privilege. As
mentioned before, these privileges are set using the MIF Editor.
QUALCOMM Confidential and Proprietary
208
BREW® Developer Training
The IDatabase Interface
Allows you to create/access
records in databases created
and opened with the IDBMgr
interface
Call IDBMGR_OpenDatabase()
to open
Call IDATABASE_Release() to
close
IDatabase
Other common IDatabase
Functions:
Use this interface to find the
record you want, then use the
IDBRecord interface to get the
data out of the record
IDATABASE_CreateRecord()
IDATABASE_GetNextRecord()
IDATABASE_GetRecordByID()
IDATABASE_GetRecordCount()
IDATABASE_Reset()
Requires AEEDB.h
209
The IDatabase interface functions allow you to create and access records in databases created
and opened with the IDBMgr interface. To obtain an instance of the IDatabase interface, you call
IDBMGR_OpenDatabase( ) to open the desired database. You then use the IDatabase interface
pointer returned by this function to access the database with the operations described later in this
section. You can also use functions in the IDBRecord interface to access the fields of individual
database records.
When you have completed access to the database, you call IDATABASE_Release() to close it.
QUALCOMM Confidential and Proprietary
209
BREW® Developer Training
The IDBRecord Interface
Used to access and update fields
Obtain a record pointer to access
fields using functions
Call IDBRECORD_NextField() to
move from field to field
Call IDBRECORD_GetFieldXX() to
retrieve the data
Call IDBRECORD_Release() to
close it
IDBRecord
Common IDBRecord Functions:
IDBRECORD_GetField()
IDBRECORD_GetFieldWord()
IDBRECORD_NextField()
IDBRECORD_GetFieldDWord()
IDBRECORD_GetFieldString()
IDBRECORD_GetID()
IDBRECORD_Remove()
IDBRECORD_Reset()
IDBRECORD_Update()
Requires AEEDB.h
210
The IDBRecord interface contains a set of functions that are used to access and update the fields
of database records. You use functions in the IDatabase interface to obtain an instance of the
IDBRecord interface for a particular record. An IDBRecord interface pointer is returned by
IDATABASE_CreateRecord( ) when a new record is created, and by
IDATABASE_GetNextRecord( ) and IDATABASE_GetRecordByID( ) when existing records are
retrieved from a database. Once you have obtained an IDBRecord interface pointer for a record,
you can use it to access its fields with the operations shown on the next slide. When you have
completed access to the database record, you call IDBRECORD_Release( ) to close it.
QUALCOMM Confidential and Proprietary
210
BREW® Developer Training
Field Definitions
Allow for variable length data types
Types supported are:
Byte, word, double-word
Character string
Binary
Phone number
Bitmap
Fixed list of field names
211
The IDBRecord interface does allow for record types to be of variable length. The slide above
shows some of the types that are supported. The filed names must conform to a specific set of
names defined by BREW.
QUALCOMM Confidential and Proprietary
211
BREW® Developer Training
Working with the OEM Address Book
Collection of address records
Address record contains collection
of data fields
Each field has a FieldID and
FieldType
Each record can be of a specific
category
IAddrBook
Access from BREW apps at
discretion of the OEM
OEM can add additional fields
beyond standard address fields
List of categories controlled by the
OEM
IAddrRec
Address Book Interfaces
IAddrBook: Access records in the
address book
IAddrRec: Access and modify field
contents in the address book
212
Another option to data storage is the OEM book, sometimes referred to as the native address
book, that provides the user with a database of several hundred records. The records stored here
are in a proprietary format defined by the OEM and contain contact information such as name,
address, phone number, etc., in various fields. Each field can only contain one value. In addition to
the defined fields for records, the OEM address book may also provide categories for organizing
the records into groups. The categories are defined by the OEM, and may include such names as
Personal, Business, etc.
The BREW interface IAddrBook provides the developer a means for accessing the collection of
records in a given address book. For our purposes, an address book is a collection of one or more
address records, and may be stored on the device or, if so equipped, on a RUIM card.
The BREW interface IAddrRec provides the developer access to individual fields in an address
records, add fields, update data, and change category information.
These interfaces are explained further in the next few slides.
QUALCOMM Confidential and Proprietary
212
BREW® Developer Training
The IAddrBook Interface
Enumerate the address categories
IADDRBOOK_CreateRec()
Other Common IAddrBook
functions:
Search the address book by specific
fields and categories
IADDRBOOK_EnumFieldsInfoInit()
IADDRBOOK_EnumNextFieldsInfo()
Add new records to an address book
IAddrBook
Enumerate the types of fields supported
IADDRBOOK_EnumCategoryInit()
IADDRBOOK_EnumNextCategory()
IADDRBOOK_GetCategoryName()
IADDRBOOK_GetFieldName()
IADDRBOOK_GetRecByID()
IADDRBOOK_GetProperties()
IADDRBOOK_Release()
IADDRBOOK_RemoveAllRecs()
IADDRBOOK_SetProperties()
Requires AEEAddrBook.h
Browse through all records in the address
book
IADDRBOOK_GetNumRecs()
IADDRBOOK_EnumNextRec()
IADDRBOOK_EnumRecInit()
IADDRBOOK_EnumRecInitEx()
213
The IAddrBook interface is the main interface for working with the address book. It is used to
access a collection of address records, browse or search for records, or add new records to the
collection.
As shown above, the interface provides a means of enumerating the address categories provided
by the OEM. This allows the developer to programmatically access record categories and fields
that may be different from device to device. IADDRBOOK_EnumCategoryInit() initializes the
enumeration of address record categories supported by the address book on the device and
IADDRBOOK_EnumNextCategory() enumerates the next address record category supported by
the address book of the device.
Additionally, the interface provides the same enumeration capability for field types.
IADDRBOOK_EnumFieldsInfoInit() initializes the enumeration for field types, and
IADDRBOOK_EnumNextFieldInfo() enumerates the next field type.
The function call IADDRBOOK_CreateRecord() creates a new record in the address book. When
creating the record, the function provides the category and field types to be created in the record
and returns a pointer to the IAddrRec interface for accessing the fields in the record.
QUALCOMM Confidential and Proprietary
213
BREW® Developer Training
IAddrRec Interface
Provides the capability to access
individual fields inside an address
record
IADDRREC_RemoveField()
Other common functions:
IADDRREC_UpdateField()
IADDRREC_UpdateAllFields()
Delete fields in an existing address
record
IADDRREC_AddField()
Update fields in an existing address
record
IAddrRec
Add new fields to a record
IADDRREC_GetCategory()
IADDRREC_GetField()
IADDRREC_GetFieldCount
IADDRREC_GetFieldCount()
IADDRREC_GetLastError()
IADDRREC_GetRecID()
IADDRREC_RemoveRec()
Requires AEEAddrBook.h
Change the address category of a
record
IADDRREC_SetCategory()
214
By calling IADDRBOOK_CreateRec() a new record is created and a pointer to the IAddrRec
interface is returned. This interface can then be used to access individual fields within the
record, and new fields can be added. Adding a new field is performed through the
IADDRREC_AddField() function. This is akin to creating a new record with name and address
data fields and then adding a new field for phone number. The fields added have to be
supported types, as described previously. The fields can be accessed and modified
individually by calling IADDRREC_GetField() and passing an index that is from 0 to
NumFields-1, which can be determined by calling IADDRREC_GetFieldCount().
The records can also be changed by using the IADDRREC_UpdateField() function and
passing the field index and a reference to the data to be updated.
IADDRREC_UpdateAllFields() replaces all field information with new information provided.
This does not create new fields with data contained in the fields, but merely replaces the fields
used to store data.
QUALCOMM Confidential and Proprietary
214
BREW® Developer Training
Key Points Review
During this module, students learned to:
9 Discuss the types of databases supported by BREW
9 Review the database interfaces that allow applications to create and
access structured data
9 Review the address book interfaces used to access the native
address book on the device
9 Work with a BREW application that creates and accesses files
215
This module focused on the file and database APIs with special emphasis on the objectives listed
above.
QUALCOMM Confidential and Proprietary
215
BREW® Developer Training
216
This page intentionally
left blank
QUALCOMM Confidential and Proprietary
216
BREW® Developer Training
BREW® Developer
Training
Section 4 – Graphics
and Multimedia
217
QUALCOMM Confidential and Proprietary
217
BREW® Developer Training
Section 4
Sound, Graphics, and Multimedia Services
Module 4.1
Module 4.2
Module 4.3
Module 4.4
2D Graphic Development
Working with Images and Bitmaps
Adding Sound and Music
Advanced Media Rendering
218
QUALCOMM Confidential and Proprietary
218
BREW® Developer Training
Module 4.1
2D Graphic Development
2D primitives provided by IGraphics
Coordinate systems
Viewing transformation
219
QUALCOMM Confidential and Proprietary
219
BREW® Developer Training
Module Objectives
After completing this module, students will be able to:
9 Describe the 2D graphics functionality provided by the BREW®
platform
9 Define the world and screen coordinate systems
9 Define viewports and windows
9 See how clipping can mask out parts of the display
220
This module covers the IGraphics APIs with special emphasis on the objectives listed above.
QUALCOMM Confidential and Proprietary
220
BREW® Developer Training
IGraphics Overview
Extends services provided
by IDisplay
Common IGraphics Services
Attribute management with
Get/Set functions
2D primitive drawing with Draw
functions
Clipping area support
Viewport and viewing
transformation management
functions
More complex lines
Supports display updates with
IGRAPHICS_Update()
IGraphics interface enables
2D graphical interface and
game development
Viewing transformation
management
Geometric primitive drawing
functions
Graphics attributes
management
Based on coordinate system
Requires AEEGraphics.h
ClassID AEECLSID_GRAPHICS
221
The IGraphics interface functions extend the drawing capability of the IDisplay interface to more
complex 2D geometric primitives, such as circles and arbitrary polygons. The IGraphics interface
also supports clipping and viewing transformation. IGraphics drawing operations get updated on
the screen only after either the IGRAPHICS_Update( ) function or the IDISPLAY_Update( )
function is called. It is recommended to use IGRAPHICS_Update( ) over IDISPLAY_Update( ).
The graphics topics covered in this module are:
• IGraphics coordinate systems
• IGraphics set and get functions
• IGraphics clipping
• IGraphics drawing primitives
• IGraphics graphics attribute management
• IGraphics transformation
QUALCOMM Confidential and Proprietary
221
BREW® Developer Training
IGraphics Coordinate Systems
Left-handed system
X increases to the right
Y increases down
Pixel is the only unit
0,0
No floating point
+
X
Screen
+
Y
222
The coordinate systems are expressed in terms of pixels. In the IGraphics interface, a distinction is
made between the world-coordinate system and the screen-coordinate system. In both systems,
the positive x-axis extends from left to right, and the positive y-axis extends downward.
They are both left-handed systems where the pixel is the only unit. There is no floating point.
The diagram above shows the coordinate system.
QUALCOMM Confidential and Proprietary
222
BREW® Developer Training
Common IGraphics Primitive Functions
IGRAPHICS_DrawLine()
Draws an arc which is part of a circle
Given the center point and radius of a circle plus starting
and ending angles that define the portion of the circle to be
displayed
Creates an arc that is a portion of an ellipse
Given a rectangle to hold the ellipse, the start angle of the
arc in degrees, and the size of the arc in degrees.
For the start angle, 0 is positive x-axis and increasing
angles go counterclockwise
IGRAPHICS_DrawEllipse()
Draws an ellipse
Given its center point and the half-length of its major and
minor axis.
The major axis must be aligned with either x-axis or y-axis.
IGRAPHICS_DrawPie()
Draws a pie, which is a wedge-shaped portion of a circle
Defined as the region included between two lines drawn
from the center of the circle to its circumference.
Specified by the center point and radius of the circle and
the angles of the two lines.
Draws a point at the specified x and y coordinate
The point's height and width in pixels are equal to the
current point size
IGRAPHICS_DrawRect()
Draws a rectangle
Given the top left corner in x and y coordinates plus width
and height specified in pixels.
IGRAPHICS_DrawPolyline()
Draws a circle
Specified by its center x and y coordinate
Radius specified in pixels.
IGRAPHICS_DrawPoint()
IGRAPHICS_DrawEllipticalArc()
IGRAPHICS_DrawCircle()
IGRAPHICS_DrawArc()
Draws a line
Given its starting and ending x and y coordinates
Draws a polyline, which is defined by a list of points
Draws line segments that connect each adjacent pair of
points in the list.
IGRAPHICS_DrawPolygon()
IGRAPHICS_DrawRoundRectangle()
Draws a rectangle with rounded corners
Given the top left corner in x and y coordinates, width and
height specified in pixels, and the width and height of the
ellipse used for corner arcs.
Draws a polygon, which is defined by a set of points
specifying its vertices
223
The IGraphics functions used to draw various 2D geometric primitives are shown above. Basically,
the functions take a set of given coordinates, usually in a data structure, that are matched to the
information needed by the function to draw the shape. For a detailed explanation of each of these,
see the API Reference provided in the SDK documentation.
All input to the IGraphics drawing functions are in the world-coordinate system.
QUALCOMM Confidential and Proprietary
223
BREW® Developer Training
Graphics Attributes Management
Set and Get functions for each
attribute
Common IGraphics attribute
management functions:
Color
Fill color
Fill mode
Paint mode
Clipping area
Background color
Size of a point
Stroke Style
Default values provided
Attributes effective for all
subsequent drawing until set
to other values
IGRAPHICS_SetColor()
IGRAPHICS_SetFillColor()
IGRAPHICS_SetFillMode()
IGRAPHICS_SetPaintMode()
IGRAPHICS_SetStrokeStyle()
224
For each graphics attribute, there is a set function and a get function; for example,
IGRAPHICS_SetColor( ) and IGRAPHICS_GetColor( ). Setting an attribute affects subsequent drawing
but does not alter anything that’s already been drawn. The background color is used for clear
operations, such as IGRAPHICS_ClearRect. The point size attribute affects only the drawing of
individual points; it does not create a wider “paintbrush” for drawing other objects.
Here is the complete list of attributes supported, along with their defaults:
Color
Black
Fill color
Black
Fill mode (on or off)
Off
Paint mode (copy or exclusive OR)
Copy
Clipping area
Entire display
Background color
White
Point size
1 pixel
QUALCOMM Confidential and Proprietary
224
BREW® Developer Training
Common Attribute Management Functions
Get/Set background RGB value
IGRAPHICS_GetBackground()
IGRAPHICS_SetBackground()
Get/Set foreground RGB value
IGRAPHICS_GetFillMode()
IGRAPHICS_SetFillMode()
IGRAPHICS_GetColor()
IGRAPHICS_SetColor()
Get/Set raster operation for
drawing (copy or XOR)
IGRAPHICS_GetPaintMode()
IGRAPHICS_SetPaintMode()
Get/Set fill color RGB value
IGRAPHICS_GetFillColor()
IGRAPHICS_SetFillColor()
Get/Set fill mode True or False
Get/Set point size in pixels
IGRAPHICS_GetPointSize()
IGRAPHICS_SetPointSize()
Get color depth of device
IGRAPHICS_GetColorDepth()
Get/Set stroke style as solid or
dotted
IGRAPHICS_GetStrokeStyle()
IGRAPHICS_SetStrokeStyle()
225
The attribute management functions listed above are useful for checking or changing the attributes
set for different objects. The color attributes return or set RGB values for the different attributes of
an drawn object. The other attributes are used to set whether or not an object is filled, whether the
line is solid or dotted, what the point size is, and what raster operation to use. Raster operation
determines how the drawing is created. Given a display buffer with data for an object, when
another object is drawn to that buffer and the paint mode is Copy (AEE_PAINT_COPY) the original
data is overwritten. In a XOR mode (AEE_PAINT_XOR) operation, the result of the new and old
content is written into the display buffer.
We will see how to use these shortly.
QUALCOMM Confidential and Proprietary
225
BREW® Developer Training
Four simple steps to draw a line
1. Choose the color for the line in
RGB
+
X
50,15
2. Set the x and y coordinates of
the starting and ending points
3. Call the API to draw the line
10,50
4. Refresh the screen
Y
+
226
The code below implements the steps listed in the slide for drawing a line.
// Choose the color we want the line to be: red.
// The format is R, G, B, Alpha
IGRAPHICS_SetColor(pIGraphics, 255, 0, 0, 0);
//define place to hold the line
AEELine
myLine;
// Set the starting and ending points: from
// 10,50 to 50,15 (50 pixels down and
// 50 to the right).
myLine.sx = 10;
// start x
myLine.sy = 50;
// start y
myLine.ex = 50;
// end x
myLine.ey = 15;
// end y
// Now make the call to draw the line.
IGRAPHICS_DrawLine (pIGraphics, &myLine);
// Remember to update the screen.
IGRAPHICS_Update(pIGraphics);
QUALCOMM Confidential and Proprietary
226
BREW® Developer Training
Clipping 2D Objects
Drawing
object
Only objects within the clipping
area are visible
Clipping area is specified in
world-coordinate system
Clipping area shape can be one of
several primitives
IGRAPHICS_SetClip() used to set
the clipping shape and location
IGRAPHICS_GetClip()
Clipping
area
Clipping
Clipping
shown
shownon
on
device
device
227
When the clipping area is set, only objects within this area are visible. This is useful for “occlusion”
management. The clipping area is specified in the world-coordinate system, not in the screencoordinate system.
The clipping area can be a rectangle, circle, or an ellipse; additional shapes will be supported in
future releases.
In the images above, the clipping area is the ellipse. When the blue-filled rectangle is drawn and
the display is updated, only the part of the rectangle that intersects the elliptical clipping area will
show on the display
QUALCOMM Confidential and Proprietary
227
BREW® Developer Training
Viewing Transformation
Window
Windowand
andViewport
Viewportare
are
always
the
same
always the samesize
size
X
World
Screen
X
Window
Window––what
whatto
todisplay
displayin
in
world-coordinate
system
Y
world-coordinate system
Y
By
Bydefault,
default,upper
upperleft
leftcorner
corner
is
at
origin
of
world
is at origin of world
coordinate
coordinateframe
frame
Viewport
Viewport––where
whereto
to
display
displayititin
inscreenscreencoordinate
coordinatesystem
system
Default
Defaultsize
sizeis
isthe
the
entire
screen
entire screen
228
The world-coordinate system is the logical coordinate system that a programmer uses to describe
the scene. The origin of this system can be anywhere for the programmer’s convenience. The
screen-coordinate system always has its origin at the upper left corner of the device screen. A
world-coordinate system area selected for display is called a window (notice the difference from
what a window means for Microsoft Windows). An area on the screen to which a window is
mapped is called a viewport. The window defines what is to be viewed; the viewport defines where
it is to be displayed. The window and the viewport are always the same size, however that may
change in a future release. The window and viewport start at the origin, which is 0,0. The size of
the viewport can be changed, but it defaults to the entire screen.
QUALCOMM Confidential and Proprietary
228
BREW® Developer Training
Animation Capabilities
IGRAPHICS_Translate()
Relative motion of window from its previous position
IGRAPHICS_Pan()
Sets new center of window (camera)
IGRAPHICS_SetViewport()
Specifies your own rectangular portion of screen for display
229
Since IGraphics does not support scaling (other than bitmaps), the window and viewport have
identical size. The IGraphics interface supports the viewing transformation (also referred to as the
window-to-viewport transformation) with the following three functions:
IGRAPHICS_SetViewport( ) – Provides the ability to set a rectangular area (viewport) within the
screen-coordinate system. This viewport is the displayable area for all IGraphics operations.
IGRAPHICS_GetViewport( ) returns the current viewport in screen coordinates. By default, the
entire screen is the IGraphics viewport.
IGRAPHICS_Translate( ) – Provides the ability to move the window in the world-coordinate
system. By default the upper left corner of the window is at the origin (0, 0) of the world-coordinate
system.
IGRAPHICS_Pan( ) – Re-centers the window in the world-coordinate system. In effect, the point
passed to IGRAPHICS_Pan( ) is where your “camera” is pointing, expressed in world coordinates.
QUALCOMM Confidential and Proprietary
229
BREW® Developer Training
General Program Structure
1.
Create an IGraphics interface
2.
Call IGRAPHICS_SetXXXX functions as needed
3.
Call IGRAPHICS_SetViewport
4.
Call IGRAPHICS_Translate or IGRAPHICS_Pan
5.
Call IGRAPHICS_ClearViewport as necessary
6.
Call IGRAPHICS_DrawXXXX functions to draw objects
7.
Call IGRAPHICS_Update to update the screen
230
Follow these steps to create graphics:
1. Call ISHELL_CreateInstance to create an IGraphics interface
2. Call IGRAPHICS_SetXXXX functions as needed to set non-default values for attributes such as
colors and fill mode
3. Call IGRAPHICS_SetViewport to specify where on screen to display your “world”
4. Call IGRAPHICS_Translate or IGRAPHICS_Pan to point your “camera” at correct portion of
your “world”
5. Call IGRAPHICS_ClearViewport as necessary
6. Call IGRAPHICS_DrawXXXX functions to draw objects
7. Call IGRAPHICS_Update to update the screen
QUALCOMM Confidential and Proprietary
230
BREW® Developer Training
Lab 4.1:
Drawing to the Display using 2D Graphics
231
Before You Start
Before starting this exercise, you should have:
• Completed the previous labs
Description
The purpose of this lab is to draw random colored lines at random endpoints on the
display.
APIs Used
ISHELL_CreateInstance() - open graphics interface
ISHELL_SetTimer() - set a timer for a callback after a period of time
ISHELL_CancelTimer() - cancel timer
IGRAPHICS_DrawLine() - draw a line
IGRAPHICS_SetColor() - set color of line
IGRAPHICS_Update() - update display
IGRAPHICS_Release() - close graphics interface
IDISPLAY_ClearScreen() - clear display
GETRAND() - helper function to generate random numbers
QUALCOMM Confidential and Proprietary
231
BREW® Developer Training
Procedure
Follow these steps to complete the exercise:
1. Launch the BREW Resource Editor from within the Start Menu or from the Tool Bar in
Visual C++. Open the myapp.brx file in your myapp directory.
2. Select New String from the toolbar or Resource/New String from the menu.
3. Add the string “Random Lines” with the respective resource name IDS_RANDOM_LINES.
4. Rebuild the myapp.bar file.
5. Launch Visual C++ if you have not done so.
6. Include “AEEGraphics.h” in your application.
7. Add the following variable to your applet structure.
IGraphics
*pIGraphics;
// Graphics interface
8. Add APP_STATE_RANDOM_LINES to your enum list of application states.
9. Add the following function prototype to your code.
void DrawRandomLines(myapp *pMe);
10. For the EVT_COMMAND event in your event handler, call DrawRandomLines(pMe) in a
case statement for IDS_RANDOM_LINES.
11. Add APP_STATE_RANDOM_LINES to your case statements that handle the clear key
(AVK_CLR event).
12. Call ISHELL_CreateInstance() in your myapp_InitAppData() function to open
the IGraphics interface with AEECLSID_GRAPHICS. Release this interface in your
myapp_FreeAppData() function.
13. Call IMENUCTL_AddItem() in DisplayMainMenu() to add resource string
IDS_RANDOM_LINES to the menu.
QUALCOMM Confidential and Proprietary
232
BREW® Developer Training
14. Write the DrawRandomLines() function to draw 100 lines on the screen every 50
milliseconds. Use a callback timer to repaint the screen and keep the line endpoints
within the screen dimensions of the display.
15. Use pMe->DeviceInfo.cxScreen and pMe->DeviceInfo.cyScreen for the
display screen dimensions.
16. Make sure you call ResetControls() at the beginning of your function and set the
application state to APP_STATE_RANDOM_LINES.
17. You’ll need a random number generator, so here is one you can use.
uint8 RandInt(int max) {
uint8 value;
GETRAND((byte *)(&value), sizeof(uint8));
return value % max;
}
18. Compile and test your application in the Simulator. When you select Random Lines
from the menu, the display should show colored lines randomly drawn on the display.
After You Finish
After you complete this exercise, you should have:
• learned how to draw lines on the display
• learned how to set colors on the display
• learned how to generate random numbers in BREW
QUALCOMM Confidential and Proprietary
233
BREW® Developer Training
Key Points Review
During this module, students learned to:
9 Describe the 2D graphics functionality provided by the BREW®
platform
9 Define the world and screen coordinate systems
9 Define viewports and windows
9 See how clipping can mask out parts of the display
234
This module focused on the IGraphics APIs with special emphasis on the objectives listed above.
QUALCOMM Confidential and Proprietary
234
BREW® Developer Training
Module 4.2
Working with Images and Bitmaps
IImage, IImageCtl
235
QUALCOMM Confidential and Proprietary
235
BREW® Developer Training
Module Objectives
After completing this module, students will be able to:
9 Define capabilities for rendering images using IImage and IBitmap
9 Describe the attributes of various image formats
9 Use the BREW Compressed Image Authoring Tool to compress
images
9 Create and play simple animations
236
This module focuses on image and bitmap operations with special emphasis on the objectives
listed above.
QUALCOMM Confidential and Proprietary
236
BREW® Developer Training
Digital Imaging Primer
Image types
Main image formats
BMP – Basic Multilingual Plane
TIFF – Tagged Image File Format
GIF – Graphics Interchange Format
JPEG – Joint Photographic Experts Group
PNG – Portable Network Graphics
BCI – BREW Compressed Image*
Compression
Bitmap – grid with bits defining image
Vector – mathematically defined series of
points and Bezier curves defining image
Lossy looses data each time it is saved
Lossless looses only redundant data on
first save
Color depth
Number of colors that can be shown
* BCI is a proprietary format developed by QUALCOMM
237
Before looking into BREW’s image capabilities, let’s take a moment to look at some fundamentals of
digital imaging. There are basically two ways a digital image can be created. The first, and most
common, is the bitmap which, as the name implies, is merely an image made up of a grid (or map) of
bits. Vector images are made up of mathematical calculations to define either a large number of points to
create lines or defined connection points for curves, called Bezier curves, to form the shape. These are
typically used in drawings. Since bitmaps are more widely supported in BREW, let’s take a closer look at
bitmap type images. Most of the actual science is outside of the scope of this course, but some
fundamentals of the more popular image types will be described on the next few slides.
There are several types of bitmap images. How an image format defines the image data, how much data
can be stored for each pixel, how much data can be compressed, and other factors will determine the
right format for a particular purpose.
One of the most important attributes of an image format is color depth, or the number of colors that can
be rendered, when the image is displayed. Each pixel in the image holds the data needed to render the
color, and the larger this is, the more data can be stored. For instance, a GIF image pixel can hold up to
256 color values, whereas a JPEG can hold from grayscale to millions of colors, depending on the
predefined size of the pixel (1 to 24 bit).
Another consideration is compression. TIFF images are the least compressed of the file formats shown.
This is considered to be the most universal image format as well as the largest file size, provides the
maximum number of colors, and requires the most processing to render to the screen. There is no data
lost when saving files. On the other hand, JPEG has a variable compression algorithm, depending on the
defined bit depth, that scans and deletes image data when it is saved in an effort to save the image in the
smallest size possible.
QUALCOMM Confidential and Proprietary
237
BREW® Developer Training
File Format Comparison
Color support
File size
Compression
Transparency
Best use
BMP
256 colors
Large
None
None
Windows PCs for
compatibility
JPEG
1-bit to 24-bit
Greyscale to
millions of colors
Variable from large
uncompressed to
smaller highly
compressed
Lossy
compression.
Loses data at
conversion and
with each
subsequent save
Supported
Natural full color or
grayscale images
PNG
PNG-8=256 colors
PNG-24 = Millions
of colors
Variable from small to
large. Larger than
GIF but smaller than
JPEG
Better than GIF
without loss of
data like JPEG
Up to 254 levels
Image quality of JPEG,
faster rendering on
display, small size,
perfect for constrained
environments
Smallest file size
Lossy during
conversion but
preserves image
data on
subsequent saves
Binary by setting
pixel color as
transparent.
Affects same color
throughout image
Most widely used on
the web. Supports
animation. Best for
logos, drawings, etc.
GIF
256 colors
238
The above chart shows a side-by-side comparison of the most common image formats. Notice the
main differences are in color support, compression method, and file size. Perhaps the most useful
image format for wireless applications is PNG because of its high compression, moderate
transparency support, and good image quality while BMP typically provides the broadest support
for PCs and handsets. It is important to note that many devices have their own derivative of a BMP
format, a Device Dependent Bitmap (DDB), to which images must be converted to be rendered
correctly. The IImage and IBitmap interfaces along with several helper functions are provided to aid
in these conversions.
QUALCOMM Confidential and Proprietary
238
BREW® Developer Training
IImage Overview
Supports various file types to be
discussed shortly
File Transfer
Progress
78%
Status
Status
Indicators
Indicators
Useful for displaying still and
animated images
Can be used in status
messages when the user is
waiting
For instance, transferring a
large document over the
network
Still
Still
Images
Images
Provides for simple animation
For game type of animation, see
the ISprite interface
Frame
Frame
Animation
Animation
239
The IImage interface can be used for displaying both still and animated images. These types of
images can be used for things like displaying images when the user needs to wait for network
transmission to the complete. This interface is not useful for fast motion of the animated objects.
See the ISprite interface for that type of functionality.
QUALCOMM Confidential and Proprietary
239
BREW® Developer Training
The IImage Interface
Still and animated images
Common IImage Functions
Read from BREW resource file or
directly from an image file
PNG
WBMP
JPEG
Progressive JPEG
BCI
ISHELL_LoadResImage()
ISHELL_LoadImage()
Each returns pointer to an IImage
instance
Each instance is associated with a single
bitmap
Image data can be streamed from file
or socket
IIMAGE_Draw()
IIMAGE_DrawFrame()
IIMAGE_DrawOffscreen()
IIMAGE_GetInfo()
IIMAGE_HandleEvent()
IIMAGE_Notify()
IIMAGE_SetAnimationRate()
IIMAGE_SetDisplay()
IIMAGE_SetDrawSize()
IIMAGE_SetFrameCount()
IIMAGE_SetFrameSize()
IIMAGE_SetOffset()
IIMAGE_SetParm()
IIMAGE_SetStream()
IIMAGE_Start()
IIMAGE_Stop()
Requires AEEImage.h
ClassID AEECLSID_IMAGE
240
The IImage Interface is used for drawing bitmap images and displaying animated bitmaps to the
screen. This interface supports bitmaps in the Windows Bitmap (BMP) format and may support
native bitmap formats specific to each device. Each instance of the IImage Interface is associated
with a single bitmap image, which can be read in either from a resource file created with the BREW
Resource Editor or directly from a file containing the bitmap. A call to IDISPLAY_Update() or
IDISPLAY_UpdateEx() is required to update the screen.
Along with the above supported image formats, IImage supports the display of animated bitmaps.
An animated bitmap consists of multiple frames that are side by side along the width of the bitmap
(for example, an animated bitmap with four 20x20 frames is 80 pixels wide and 20 pixels high).
When you start animation, IImage displays the frames of the image one after the other at a rate
you specify. When the last frame has been displayed, the animation starts again with the first
frame, and IImage repeatedly cycles through the frames until you explicitly stop the animation or
release the IImage Interface instance.
IIMAGE_Draw() draws a bitmap image on the screen at a specified position.
IIMAGE_DrawFrame() draws a single frame of an animated bitmap. IIMAGE_GetInfo() retrieves
information about a bitmap including its height and width in pixels, the number of colors, and the
number of frames it contains if the bitmap is animated.
IIMAGE_Start() starts the animation of an animated bitmap displaying its frames at the specified
screen coordinates (before you call this function, you must use IIMAGE_SetParm() to define the
number of frames in the image, as described later in this section). IIMAGE_Stop() stops the
animation with the last displayed frame of the image remaining on the screen until it is overwritten.
IIMAGE_SetParm() sets the values of various image parameters.
QUALCOMM Confidential and Proprietary
240
BREW® Developer Training
Using IImage
1.
Obtain an IImage instance
ISHELL_LoadResImage() if loading from a BREW resource file
ISHELL_LoadImage() if loading an image file
2.
Call IIMAGE_Notify to register for notification when
complete
3.
Draw the image
IIMAGE_Draw() if a still image
IIMAGE_Start() if an animated image. Call IIMAGE_Stop() when done
4.
Release when done
IIMAGE_Release()
241
1. Obtain an instance of the IImage Interface that contains the bitmap you choose to display, by
doing one of the following:
• If your bitmap is contained in a BREW resource file, call ISHELL_LoadResImage(),
which returns a pointer to an IImage instance that contains the bitmap you specified.
• Use ISHELL_LoadImage() to load the bitmap format image directly from the file. If your
bitmap is contained in a file, call ISHELL_LoadImage() and pass the file name of the
bitmap file. If the function is successful, it returns a valid pointer to the IImage Interface
object.
2. Call IIMAGE_Notify() to register for notification that decoding is complete. Some of the image
viewers do their decoding asynchronously, so you must wait for this notification before proceeding
to the next step.
3. If your image is not animated, call IIMAGE_Draw() to draw the image at the specified position on
the screen. If your image is animated, call IIMAGCall E_Start() to begin animation at a specified
screen position and use IIMAGE_Stop() to stop the animation.
4. Call IIMAGE_Release() to free the IImage Interface instance. NOTE: This also stops animation,
if necessary.
In addition to the simple drawing ability, the IImage Interface also supports animated images. This
includes image formats that do not normally support animation (such as Windows BMP). Let’s take
a look.
QUALCOMM Confidential and Proprietary
241
BREW® Developer Training
BREW Compressed Image (BCI) Authoring Tool
The BCI Authoring Tool lets
you assemble multiple
images into a .bci file
Images in various formats
can be used and even mixed
BMP
PNG
JPEG
Provides for rapid decoding
and display of animated
images
Animation frame rate is in
milliseconds
You can specify different frame
rate for each frame
242
The BREW Compressed Image Authoring Tool, or BCI Tool, is provided in the BREW SDK® Tools
download from the BREW web page. With this utility, you can convert different file formats to the
highly compressed BCI format, which is highly optimized for handheld devices. Additionally, with
the BCI Authoring Tool you can assemble BMP, PNG, and JPEG images to create animated
images. The BCI format provides for rapid decoding and display of the animated images. Each
frame can have its own frame-rate specified, rather than a single frame rate for the entire
animation.
QUALCOMM Confidential and Proprietary
242
BREW® Developer Training
Display and Animate BCI
Loaded frames are animated via IIMAGE_Start()
Flexibility to display individual frames
IIMAGE_DrawFrame()
IDISPLAY_Update()
Set drawing area (outside will be clipped)
IIMAGE_SetDrawSize()
IIMAGE_SetOffset()
243
To load an animated image the API ISHELL_LoadResImage() or ISHELL_LoadImage() can be
used. Once the image is loaded, the IImage API IIMAGE_Start() is used to simply start animating
the image. The IImage interface provides flexibility to draw individual frames of the animated image
by calling IIMAGE_DrawFrame().
QUALCOMM Confidential and Proprietary
243
BREW® Developer Training
Displaying an Animated Image
1. Call ISHELL_LoadResImage( )
Tell it the name of the (animated) image to load
2. Call IIMAGE_Start( )
Start playing the animated image
244
The steps to load and animate an animated image are quite simple. Simply call
ISHELL_LoadResImage(), or ISHELL_LoadImage(), then call IIMAGE_Start() to begin animating
the image. The animation will continue until it is stopped with IIMAGE_Stop(). The application
continues to run in the background as the animation is continuing.
QUALCOMM Confidential and Proprietary
244
BREW® Developer Training
Configurable Parameters
Several parameters can be configured via the
IIMAGE_SetParm( ) function
Specify different than default area to show
Use single large image and section-off individual
frames
Animate sectioned-off frames, for image types that
don’t support animation such as BMP
Specify raster operations (or, xor, not, etc.) for
displaying images over a background
245
There are several configurable parameters that are available. The function IIMAGE_SetParm() will
allow any of the parameters to be adjusted. The parameters include specifying a different area of
the image to show than the standard whole image, using a single wide image to be sectioned off as
an animated image, and specifying standard raster operations for the image as it is displayed over
the background.
QUALCOMM Confidential and Proprietary
245
BREW® Developer Training
Lab 4.2
Displaying animated images
246
Before You Start
Before starting this exercise, you should have:
• Completed the previous labs
Description
The purpose of this lab is to have an animated image appear on the display.
APIs Used
ISHELL_LoadImage() - load animated image from file
IIMAGE_GetInfo() - get image properties
IIMAGE_Start() - start playing animated image
IIMAGE_Stop() - stop playing animated image
IIMAGE_Release() - free image resources
QUALCOMM Confidential and Proprietary
246
BREW® Developer Training
Procedure
Follow these steps to complete the exercise:
1. Launch the BREW Resource Editor from within the Start Menu or from the Tool Bar
in Visual C++. Open the myapp.brx file in your myapp directory.
2. Select New String from the toolbar or Resource/New String from the menu.
3. Add the string “See Spot Run” with the respective resource name
IDS_ANIMATION.
4. Rebuild the myapp.bar file.
5. Launch Visual C++ if you have not done so.
6. Include “AEEImage.h” in your application.
7. Add the following variable to your applet structure.
IImage
*pIImage;
// Image interface
8. Add APP_STATE_ANIMATION to your enum list of application states.
9. Add the following function prototype to your code.
void ShowAnimation(myapp *pMe);
10. For the EVT_COMMAND event in your event handler, call ShowAnimation(pMe) in
a case statement for IDS_ANIMATION.
11. Add APP_STATE_ANIMATION to your case statements that handle the clear key
(AVK_CLR event).
12. Navigate to sdk\examples\mediaplayer\media and copy the dog.bci file to
your myapp directory.
13. Call ISHELL_LoadImage() in your myapp_InitAppData() function to open the
dog.bci image file. Make sure you release the resources in your
myapp_FreeAppData() function.
QUALCOMM Confidential and Proprietary
247
BREW® Developer Training
14. Call IMENUCTL_AddItem() in DisplayMainMenu() to add resource string
IDS_ANIMATION to the menu.
15. Write the ShowAnimation() function to start the animation. Call
IIMAGE_GetInfo() to get the width of the image. Call IIMAGE_Start() to start the
animation.
16. Make sure you call ResetControls() at the beginning of your ShowAnimation()
function and set the application state to APP_STATE_ANIMATION.
17. Stop the animation with IIMAGE_Stop() if any key is pressed. Also add the call to
stop the animation to Resetcontrols().
18. Compile and test your application in the Simulator. When you select See Spot Run
from the menu, you should see a running dog on the display.
After You Finish
After you complete this exercise, you should have:
• learned how to load an image file into a BREW program
• learned how to start and stop an animation
QUALCOMM Confidential and Proprietary
248
BREW® Developer Training
Key Points Review
During this module, students learned to:
9 Define capabilities for rendering images using IImage and IBitmap
9 Describe the attributes of various image formats
9 Use the BREW Compressed Image Authoring Tool to compress
images
9 Create and play simple animations
249
This module focused on image and bitmap operations with special emphasis on the objectives
listed above.
QUALCOMM Confidential and Proprietary
249
BREW® Developer Training
Module 4.3
Adding Sound and Music
Basic sound services with ISound
Complex audio rendering with IMedia
250
QUALCOMM Confidential and Proprietary
250
BREW® Developer Training
Module Objectives
After this module, students will be able to:
9 Describe the sound capabilities that are available
9 Execute beeps, rings, and vibrations on the wireless device
9 Play audio files like MP3
251
This module covers the sound and multimedia APIs with special emphasis on the objectives listed
above.
QUALCOMM Confidential and Proprietary
251
BREW® Developer Training
Multimedia Services
Play complex audio formats like MIDI and MP3
Set and control audio devices, audio method, audio
levels, and audio paths of device
Play predefined tones or list of tones
252
This section provides an overview of the BREW sound and multimedia services, including:
• Setting various parameters of the sound services
• Playing tones that are built into wireless devices
• Playing complex standard audio formats including MIDI and MP3
QUALCOMM Confidential and Proprietary
252
BREW® Developer Training
Sound Interfaces
ISound
ISoundPlayer
IMedia
253
The ISound interface is used for playing simple sounds such as the key tones that are built into
wireless phones. The ISoundPlayer interface is used for playing more complex audio sounds such
as MIDI and MP3 songs. The IMedia interface is used for playing complex audio and video.
QUALCOMM Confidential and Proprietary
253
BREW® Developer Training
ISound Overview
Provides basic sound services
Beeps
Rings
Tones
Lists of tones
Predefined tones are provided
Custom frequency tones can
be played as well
Make the device vibrate
Control volume
Common ISound functions
ISOUND_PlayTone()
ISOUND_StopTone()
ISOUND_PlayToneList()
ISOUND_PlayFreqTone()
ISOUND_SetVolume()
ISOUND_GetVolume()
ISOUND_Set()
ISOUND_Get()
ISOUND_Vibrate()
ISOUND_StopVibrate()
Requires AEESound.h
ClassID AEECLSID_SOUND
254
The ISound interface provides the basic sound services. These services enable playing of beeps,
rings, vibrations, various tones and list of tones. ISound defines a set of tones that can be played
for a period of time or continuously until explicitly stopped. The tone identifiers can be put in a list
and all the tones in the list can be played using a single function call.
The ISound interface also provides functions to get and set volume:
ISOUND_GetVolume() – Gets the current volume level on the device
ISOUND_SetVolume() – Sets the volume on the device to a specified level
QUALCOMM Confidential and Proprietary
254
BREW® Developer Training
Playing a Tone
1. Create a sound tone structure
// Make a sound struct. Only need to fill the tone
// and time.
AEESoundToneData MySoundToneData;
2. Fill in the tone to play
// Fill in the tone to play (the tone of the “1”
// key).
MySoundToneData.eTone = AEE_TONE_1;
3. Fill in time to play (in milliseconds)
// Fill in time to play (1/2 second is 500
// milliseconds)
MySoundToneData.wDuration = 500;
4. Call the function to play the tone
// Now make the call to play the tone.
ISOUND_PlayTone(pMyISound, MySoundToneData);
255
The slide above shows the four simple steps required to play a simple tone with ISound. This
example establishes a sound tone structure, populates it with the AEE_TONE_1 tone, which is the
tone associated with the 1 key. Next, the duration is set. Finally, ISOUND_PlayTone() is called with
these parameters to play the tone.
If there were more than one tone to play, the only difference would have been to add additional
tones to the structure and call ISOUND_PlayToneList().
QUALCOMM Confidential and Proprietary
255
BREW® Developer Training
The ISoundPlayer Interface
Provides sound player services
for formats such as MIDI and MP3
Play
Stop
Rewind
Fast forward
Pause
Resume
Deprecated in BREW 3.1
Runs on 3.x devices to provide
backward compatibility
May still be used on 2.x devices
Common ISoundPlayer functions
Provides following functionality:
ISOUNDPLAYER_Play()
ISOUNDPLAYER_Stop()
ISOUNDPLAYER_Pause()
ISOUNDPLAYER_Resume()
ISOUNDPLAYER_FastForward()
ISOUNDPLAYER_Rewind()
ISOUNDPLAYER_GetVolume()
ISOUNDPLAYER_SetVolume()
ISOUNDPLAYER_Set()
ISOUNDPLAYER_SetTempo()
ISOUNDPLAYER_SetTune()
Requires AEESoundPlayer.h
AEECLSID_SOUNDPLAYER
256
This interface provides the sound player services for MIDI and MP3. The functionality is as follows:
• Play - Plays a tone given a tone ID for the specified amount of time.
• Stop - Stops playing current tone or ends the playback of tone list.
• Rewind - Issues a command to rewind the current MIDI/MP3 playback.
• Fast Forward - Issues a command to fast-forward the current MIDI/MP3 playback.
• Pause - Issues a command to pause the current MIDI/MP3 playback.
• Resume - Issues a command to resume the current MIDI/MP3 playback.
QUALCOMM Confidential and Proprietary
256
BREW® Developer Training
Advanced Media Rendering
IMedia
257
QUALCOMM Confidential and Proprietary
257
BREW® Developer Training
IMedia
Interface for playing audio and
video
Can play multiple types
MIDI
MP3
QCP
MPEG4 – in a future release
PMD – synchronized audio, video,
and text
And others as supported depending
on device support
Playback and record
Seek by time, frame, chapter, etc
Asynchronous operation
IMEDIA_Play()
IMEDIA_Record()
IMEDIA_Pause()
IMEDIA_Resume()
IMEDIA_Seek()
IMEDIA_SetMediaData()
IMEDIA_SetMediaDataEx()
Required includes and source
files
AEEMedia.h
Record not available for all formats
Controls for fast forward, rewind
Common IMedia functions
258
This interface class represents an abstract base class for all BREW multimedia objects. In addition
to facilities to play, fast forward, rewind, record, etc., this interface can either represent a type of
multimedia format or a format played through a specific device. BREW multimedia objects can be
MIDI, MPEG4, MP3, or other formats that are supported on the device. Additionally, multimedia
objects can combine audio, video, and karaoke text.
QUALCOMM Confidential and Proprietary
258
BREW® Developer Training
State Machine
IDLE
SetMediaData()
Play()
READY
IMedia maintains this
state machine.
Implementers can
extend this machine
as needed
Record()
Stop()
PLAY
Resume()
Seek()
RECORD
Pause()
Resume()
PLAY_PAUSE
Seek()
Pause()
REC_PAUSE
Seek()
Seek()
259
The above state machine shows the basic states provided and maintained by IMedia. This machine
can be extended as needed.
The initial state is IDLE. Following the flow, state changes from IDLE to READY when
IMEDIA_SetMediaData() is called. IMEDIA_SetMediaData() sets the media class, loads the media
data, and allocates required device multimedia resources. Note that once in READY state, the way to
return to IDLE state is to release allocated resources.
From here, IMEDIA_Play() or IMEDIA_Record(), depending on required function, is called and
playback/recording begins.
IMEDIA_Pause() and IMEDIA_Resume() are called from either the PLAY or RECORD state to pause
the process and resume as needed. IMEDIA_Pause() pauses the media and returns the current
position in the MM_STATUS_PAUSE callback. IMEDIA_Resume() resumes the media from the
current position and returns the current position in the MM_STATUS _RESUME callback. Once
loaded, media position based on eSeek and ITimeMS params of IMEDIA_Seek() can be returned to
the current state.
QUALCOMM Confidential and Proprietary
259
BREW® Developer Training
IMediaUtil Interface
Multimedia utility service
IMEDIAUTIL_CreateMedia()
IMEDIAUTIL_CreateMediaEx()
IMEDIAUTIL_EncodeMedia()
Helps create IMedia object
based on input media data
The following are wrappers
• IMEDIAUTIL_EncodeJPEG()
• IMEDIAUTIL_EncodePMD()
Assists in encoding media
Depends on device capabilities
Using
IMEDIAUTIL_CreateMedia
results in correct IMedia type
being created and set media
data
Common IMediaUtil functions
AEEMediaUtil.h required
header
AEEMediaUtil.c must be
added to project
AEECLSID_MEDIAUTIL
260
The IMediaUtil interface provides a mechanism for handling much of the administrative tasks
required for rendering media data, including creating appropriate IMedia objects based on the data
being presented, allocating resources, and encoding based on device capabilities.
In order to use the IMediaUtil interface, the AEEMediaUtil.h and AEEMediaUtil.c files must be
included in the project.
QUALCOMM Confidential and Proprietary
260
BREW® Developer Training
IMEDIAUTIL_CreateMedia()
This method calls
ISHELL_CreateInstance
internally followed by
IMEDIA_SetData with
appropriate media type
Advantages
• Media type discovered
at runtime
IDLE
• BREW creates most
efficient interface for
media type
READY
Play()
Record()
Stop()
PLAY
Resume()
Seek()
RECORD
Pause()
Resume()
PLAY_PAUSE
Seek()
Pause()
REC_PAUSE
261
Here we see the same flow for creating a media object to render data with one very important
change. IMEDIAUTIL_CreateMedia() is being used to discover media type and creating the most
efficient type for the media being rendered. Behind the call, ISHELL_CreateInstance() is called
internally followed by IMEDIA_SetData with the appropriate type. This greatly simplifies the calls to
create and play media in an app. Once the media is opened the same state machine to play,
pause, etc. still applies.
For more information, see the summary page of the IMediaUtil interface in the API Reference.
QUALCOMM Confidential and Proprietary
261
BREW® Developer Training
Playing an MP3
1.
Create a media data structure to specify the MP3
AEEMediaData MediaData;
2.
Set media source as buffer in IMedia object
MediaData.clsData = MMD_FILE_NAME;
MediaData.pData = "44khz128kbps.mp3";
3.
Call IMEDIAUTIL_CreateMedia() with name of the MP3 to play
IMEDIAUTIL_CreateMedia(pMe->pIMediaUtil, &MediaData,
&pMe->pIMedia);
4.
Optional register for notification
IMEDIA_RegisterNotify(pMe->pIMedia, pfnNotify, pUserData)
5.
Call IMEDIA_Play() to Start playing the MP3
IMEDIA_Play(pMe->pIMedia);
262
The above slide shows the basic steps for playing an MP3 using IMedia and IMediaUtil. Basically,
you set up an AEEMediaData structure, use IMEDIAUTIL_CreateMedia() to load the media file into
the buffer, and then play the file. As described previously, the IMEDIAUTIL_CreateMedia() function
creates an instance of the IMedia interface with the appropriate AEEMediaData media type for the
media being read.
QUALCOMM Confidential and Proprietary
262
BREW® Developer Training
Notes on Using IMedia
EVT_APP_SUSPEND: Recommended to Release IMedia
2 ways to save current position:
• IMEDIA_GetMediaData with MM_PARM_POS
• MM_STATUS_TICK_UPDATE sent to callback from
IMEDIA_RegisterNotify
IMEDIA_EnableChannelShare enables/disables multiple
IMEDIA objects to be played
263
Applications must first stop media play during a suspend event. Subsequently, all resources
relevant to the IMedia interface must be explicitly released by the application. These resources
include the IMedia interface, memory buffers, and any resources required for streaming (such as
an IFile or ISource interface). Upon resumption, all resources must be reinitialized allowing the
IMedia interface to enter a safe state for media play.
To resume playback at time of the interruption, an application must also save the media’s current
tick time when suspended. After reinitialization, an application can call IMedia_Seek() to properly
set current tick time. If IMEDIA_RegisterNotify() is used, the callback function below will keep track
of the current time:
void MediaNotify(StreamExample* pMe, AEEMediaCmdNotify * pCmdNotify) {
if(pCmdNotify->nCmd == MM_CMD_PLAY) {
// Update current time for each tick
if(pCmdNotify->nStatus == MM_STATUS_TICK_UPDATE) {
pMe->dwSeekTime += pMe->dwTickInc;
}
}
// IMEDIA_Seek() has completed
if(pCmdNotify->nStatus == MM_STATUS_SEEK) {
IMEDIA_Play(pMe->pIMedia);
}
}
QUALCOMM Confidential and Proprietary
263
BREW® Developer Training
Lab 4.3
Playing MP3 Files with IMedia
264
Before You Start
Before starting this exercise, you should have:
• Completed the previous labs
Description
The purpose of this lab is to play an MP3 file on the device.
APIs Used
ISHELL_CreateInstance() - open Media Utility interface
IMEDIAUTIL_CreateMedia() - name the MP3 file to play
IMEDIA_Play() - play the MP3
IMEDIA_Stop() - stop the MP3
IMEDIAUTIL_Release() - close Media Utility interface
IMEDIA_Release() - close Media interface
QUALCOMM Confidential and Proprietary
264
BREW® Developer Training
Procedure
Follow these steps to complete the exercise:
1. Launch the BREW Resource Editor from within the Start Menu or from the Tool Bar in Visual C++.
Open the myapp.brx file in your myapp directory.
2. Select New String from the toolbar or Resource/New String from the menu.
3. Add the string “Play Music” with the respective resource name IDS_PLAY_MUSIC.
4. Rebuild the myapp.bar file.
5.
Launch Visual C++ if you have not done so.
6. Include “AEEMediaUtil.h” in your application.
7. Add the following variables to your applet structure.
IMediaUtil
IMedia
*pIMediaUtil; // Media Utility interface
*pIMedia;
// Media interface
8. Add APP_STATE_PLAY_MUSIC to your enum list of application states.
9. Add the following function prototype to your code.
void PlayMP3(myapp *pMe, char *pTune);
10. For the EVT_COMMAND event in your event handler, call PlayMP3(pMe, “sample.mp3”) in a
case statement for IDS_PLAY_MUSIC.
11. Add APP_STATE_PLAY_MUSIC to your case statements that handle the clear key (AVK_CLR
event).
12. Call ISHELL_CreateInstance() in your myapp_InitAppData() function to open the
IMediaUtil interface with AEECLSID_MEDIAUTIL. Release this interface in your
myapp_FreeAppData() function. Make sure you also release the IMedia interface here (this
pointer will be set in your PlayMP3() function).
13. Call IMENUCTL_AddItem() in DisplayMainMenu() to add resource string IDS_PLAY_MUSIC
to the menu.
QUALCOMM Confidential and Proprietary
265
BREW® Developer Training
14. Write the PlayMP3() function to play the music file. Call
IMEDIAUTIL_CreateMedia() to set pMe->pIMedia and use this pointer to call
IMEDIA_Play() to play the MP3.
15. Make sure you call ResetControls() at the beginning of your PlayMP3() function
and set the application state to APP_STATE_PLAY_MUSIC.
16. Stop the music if any key is pressed.
17. Navigate to sdk\examples\mediaplayer\media and copy any MP3 file to your
myapp directory. Rename it to sample.mp3.
18. In the Project Workspace window of Visual Studio, right-click on Source files and
select Add Files to Folder. Navigate to sdk\src and select AEEMediaUtil.c. Follow
the steps to add this file to your project. You should now see the file name appear in the
project window of your workspace.
19. Compile and test your application in the Simulator. When you select Play Music from
the menu, you should hear the MP3 play.
After You Finish
After you complete this exercise, you should have:
• learned how to use the IMEDIAUTIL and IMEDIA interfaces to play MP3 files on the
device
• learned how to start and stop playing an MP3 file
QUALCOMM Confidential and Proprietary
266
BREW® Developer Training
Key Points Review
During this module, students learned to:
9 Describe the sound capabilities that are available
9 Execute beeps, rings, and vibrations on the wireless device
9 Play audio files like MP3
267
This module focused on the sound and multimedia APIs with special emphasis on the objectives
listed above.
QUALCOMM Confidential and Proprietary
267
BREW® Developer Training
268
This page intentionally
left blank
QUALCOMM Confidential and Proprietary
268
BREW® Developer Training
BREW® Developer
Training
Section 5 – Wireless
Connectivity with
BREW
269
QUALCOMM Confidential and Proprietary
269
BREW® Developer Training
Section 5
Wireless Connectivity with BREW
Module 5.1
Module 5.2
Module 5.3
Module 5.4
Telephony and SMS
Networking Overview
Retrieving Web Content
Other Connectivity
270
QUALCOMM Confidential and Proprietary
270
BREW® Developer Training
Module 5.1
Telephony and SMS Overview
Telephony Services Overview
Voice and Data Calls
Working with SMS
271
QUALCOMM Confidential and Proprietary
271
BREW® Developer Training
Module Objectives
After completing this module, students will be able to:
9
9
9
9
Describe telephony support provided by BREW
Identify telephone access APIs for voice and data
Explain Mobile-terminated and BREW-directed SMS
Make phone calls and send SMS messages in a BREW application
272
This module covers the use of BREW’s networking APIs with special emphasis on the objectives
listed above.
QUALCOMM Confidential and Proprietary
272
BREW® Developer Training
BREW Telephony Services Overview
ITAPI
Access to telephony services
Status of telephony services
and calls
Originate voice calls
Provides basic SMS services
ICallMgr
Provides control interface for making
and receiving calls
Set up options for call management
Originates a call then passes control
to ICall
ICall
Provides call related services for incall management
ITelephone
New in BREW 3.1
Query telephony status such
as active calls and line
information
ICallOrigOpts
Builds and provides access to
options structure for controlling and
maintaining ICallMgr calls
ICallHistory
Accesses the history of calls
made on the device
3.x
New Feature
These interfaces provide powerful telephony features while shielding the
developer from telephony complexities
273
To empower the developer to access the inherent capabilities of a device as a telephone and Short
Message Service (SMS) terminal, BREW provides several interfaces to access the telephony layer
on the device. As seen above, the ITAPI interface provides telephony services such as checking
device and call status, the ability to make voice calls, and basic capability to send and receive
SMS messages.
ITelephone, a new interface in BREW 3.1, provides access to services that can report on several
device states, such as network type, call status, and so forth.
ICallHistory provides various methods for accessing, reading from, and writing to the handset’s
Call History registry. It’s important to note that access to call history is dependent on the handset
manufacturer and this access may not be provided.
New for BREW 3.1 API are the ICallMgr, ICall, and ICallOrigOpts interfaces. These interfaces
provide a means for establishing the context of making or receiving a call (ICallMgr), setting
options for handling the call, (ICallOrigOpts), and controlling the operations of the call itself (ICall).
The new framework provides more control and features for telephone calls made and received by
BREW applications.
QUALCOMM Confidential and Proprietary
273
BREW® Developer Training
BREW SMS Services Overview
ITAPI
New APIs in BREW 3.1
Basic SMS services for sending
and receiving messages
ISMS – Send and receive SMS
messages
Provides for mobile-originated
and BREW-directed SMS
messages
ISMSMsg – Encapsulate
messages sent via ISMS
ISMSBCConfig – Configure
broadcast SMS
Supports IS-637 standards
Currently supported in all
devices BREW devices
ISMSNotifier – Notifier class
ISMSStorage – Encapsulates
SMS storage
3.x
New Feature
274
As for SMS services, currently there are two options for BREW developers.
First, ITAPI provides methods for sending and receiving SMS based on IS-637 SMS protocols. The
interface supports mobile-originated messages to be sent from or received by the device.
Additionally, BREW-directed, or messages sent to a specific application, can be generated via
ITAPI.
In BREW 3.1, a new family of interfaces provides more options and control. Specifically, BREW 3.1
and higher includes a series of separate interfaces are provided for building, sending/receiving,
and storing SMS messages. These interfaces are as follows:
• ISMS – Send and receive SMS messages with various controls and options
encapsulated with ISMSMsg
• ISMSMsg – Encapsulate messages sent via ISMS and lets application specify or access
various parameters of the message
• ISMSBCConfig – Configure broadcast SMS
• ISMSNotifier – Notifier class provides special SMS notification flags that apps use to
register for receipt notifications
• ISMSStorage – Encapsulates SMS storage and allows for storage on RUIM or external
storage cards
QUALCOMM Confidential and Proprietary
274
BREW® Developer Training
The Telephony Interface ITAPI
Simple interface to the
telephony layer in the device
Provides the following services:
Retrieving Telephony status
Placing voice calls
Extracting SMS text from SMS
messages
Obtaining caller ID on incoming
or in-progress calls
Registering for SMS Messages
Sending SMS Messages
The ITAPI interface is obtained
via
ISHELL_CreateInstance
(
IShell * pIShell,
AEECLSID_TAPI,
&pITAPI
);
Common ITAPI Functions
ITAPI_GetStatus()
ITAPI_GetCallerID()
ITAPI_MakeVoiceCall()
ITAPI_IsVoiceCall()
ITAPI_OnCallStatus()
ITAPI_OnCallEnd()
ITAPI_IsDataSupported()
ITAPI_ExtractSMSText()
ITAPI_SendSMS)
ITAPI_Release()
The header file AEETapi.h is
required
ClassID is AEECLSID_TAPI
275
BREW provides access to the telephony layer on the device via the ITAPI interface. These
services include checking status, placing and checking status on voice calls, caller ID, and SMS
services. As with all other BREW interfaces, an instance is created through the
ISHELL_CreateInstance() function call with AEECLSID_TAPI given as the class ID. The class
definitions are provided in the AEETapi.h header file.
The next several pages provide more in-depth explanation of these services.
QUALCOMM Confidential and Proprietary
275
BREW® Developer Training
Registering for Device Status Change
Current status of the telephony device
ITAPI_GetStatus(ITAPI * pITAPI, TAPIStatus * ps)
Populates ITAPIStatus struct
Returns SUCCESS or EBADPARAM
Apps can register to receive status information
Call ISHELL_RegisterNotify() or register for notification in MIF
Use NMASK_TAPI_STATUS notification mask
Apps receive EVT_NOTIFY with dwParam AEENotify
AEENotify pData member provides access to ITAPIStatus
276
Applications can use the TAPI class to be notified whenever there is a change in the telephony
status of the device. To register for this notification, applications must use the mask
NMASK_TAPI_STATUS.
Whenever there is a status-change, applications receive the EVT_NOTIFY event. The dwParam of
this event is of type AEENotify. The pData member inside this AEENotify structure is of type
TAPIStatus and contains detailed information about the current telephony status of the device. The
TAPIStatus struct is as follows:
typedef struct
{
char
AEEPhoneState
flg
flg
flg
flg
flg
flg
flg
flg
flg
flg
} TAPIStatus;
szMobileID[MOBILE_ID_LEN + 1];
state;
bData:1;
bDigital:1;
bRoaming:1;
bCallEnded:1;
bE911CallbackMode:1;
bRestricted:1;
bRegistered:1;
bDormancy:1;
bHDRMode:1;
bAirplaneMode:1;
See the API Reference for further information.
QUALCOMM Confidential and Proprietary
276
BREW® Developer Training
Registering for On Call Status Change
Register a callback that is called on a change in call
status
Incoming Call
Call origination
Call entering conversation state
Call is ended
Device loses coverage
int ITAPI_OnCallStatus (
pITAPI,
PFNNOTIFY pfn,
void * pUser,
uint32 dwDelay,
uint16 wFlags
//ITAPI pointer
//Notification function
//User data to pass to pfn
//Delay in MS before notify
//various options
);
277
This method can be used to register a callback function (PFNNOTIFY pfn) that will be invoked by BREW
when there is a change in the call-status and, if needed, specific data (pUser) can be passed. The
method does allow for a time delay to be established prior to sending the notification after the function is
called. The following optional flags can be used to specify what type of call-states the application cares
about.
• OCS_CANCEL : Cancel a previously registered Callback Function
• OCS_UNIQUE_PFN : When this flag is set, any previous registrations of the same callback
function with different data pointers are cancelled.
• OCS_ONE_SHOT : Informs BREW that this CB function is to be registered for just one
notification. Once a single call-status change occurs, this notification is invoked and the CB
function is removed from the internal list. This CB will not longer be invoked.
• OCS_INCOMING : Register for notifications when there is an incoming call
• OCS_ORIG : Register for notifications when call-originations happen
• OCS_CONVERSATION : Register for notifications when call enters the conversation state (i.e.
Two way state)
• OCS_IDLE : Register for notifications when the call is ended
• OCS_OFFLINE : Register for notifications when the device loses coverage
• OCS_ALL : Register for all call-state transitions (incoming, orig, conversation, idle)
QUALCOMM Confidential and Proprietary
277
BREW® Developer Training
Making a Voice Call
int ITAPI_MakeVoiceCall
(
ITAPI * pITAPI,
const char * pszNumber,
AEECLSID clsReturn
)
//ITAPI interface
//Number to call
//Applet to run when finished
Number provided in char string
No call is placed if NULL
Only 0-9, #,and * are allowed
5558881212
Ring…Ring…
Hello?
Calls in progress
EALREADY returned if voice call
Data call is suspended
Operator privacy policies are enforced
Informs user of app making call
Provides user option to not allow the call
Devices prior to BREW 3.1.0
278
The method ITAPI_MakeVoiceCall() is called to place a voice call. The number dialed is specified
in the digits string. No call is placed if the input string is empty or NULL. Only the following digits
are allowed: 0-9, #, *. All other digits are ignored. If a voice call is in progress EALREADY is
returned. If a data call is in progress the data call is suspended and the voice call is placed. This
function enforces the privacy policies established by the carrier. This may include intermediate
prompts to the user using dialogs. Typically, when this function is invoked, a dialog is displayed to
the user requesting whether it is OK to place a call.
QUALCOMM Confidential and Proprietary
278
BREW® Developer Training
Event Flow for Making Voice Call
Privacy message
dialog presented to
user
(prior to 3.1)
User selects “YES” to
make voice call
EVT_DIALOG_END is
sent to APP
Screen is redrawn
EVT_APP_SUSPEND
is sent to app
Call is made
Call is finished
EVT_APP_RESUME
sent to app
279
Depending on operator privacy policy, a dialog is presented to the user requesting whether it is OK
to place a voice call. If the user selects “yes” the call is placed.
1. On devices prior to BREW 3.1, a dialog is displayed to the user.
2. When that dialog is dismissed, the event EVT_DIALOG_END is sent to the application.
3.At this point, the application must re-draw the screen.
4. If user accepted to place the call, the event EVT_APP_SUSPEND is sent to the application.
5.When the call finishes, the event EVT_APP_RESUME is sent to the application.
6.The application must re-draw the screen.
QUALCOMM Confidential and Proprietary
279
BREW® Developer Training
Obtaining Caller ID
boolean ITAPI_GetCallerID
(
ITAPI * pITAPI,
//ITAPI Interface
AECHAR * pDest,
//Buffer to hold result
int nSize
//size of buffer
)
5558881212
• TRUE if call in progress and
buffer filled
• FALSE if no call in progress
or invalid buffer
280
An application can check the phone number of an incoming or outgoing call. The call retrieves the
ID, in digits, of an incoming or outgoing voice call and stores them in an AECHAR string buffer for
on screen display or other purpose. The function returns TRUE if a voice call is in progress and a
valid buffer is returned.
QUALCOMM Confidential and Proprietary
280
BREW® Developer Training
SMS Overview
BREW phone layer monitors incoming messages
Messages are conditionally dispatched to applications
if one or more of the following are true:
Application is registered to receive specific (IS-637) messages
based upon the Teleservice ID of the message
The application is registered to receive all IS-637 (CMT-95 4098)
text messages using NMASK_TAPI_SMS_TEXT notification mask
The application is a BREW application to which a (CMT-95) text
message has been directed (no notification registration required)
Applications can register via ISHELL_RegisterNotify()
or via the MIF
281
Standard SMS messages may be directed to a BREW application. If so, the device will not be
notified of the SMS message, and the message will instead be sent to the BREW application, if it is
on the device. If the application is not running, BREW will start the application then send it the SMS
message.
QUALCOMM Confidential and Proprietary
281
BREW® Developer Training
Sending SMS Messages
ITAPI_SendSMS( )
Remote device addressed by phone number or email
Optionally directed to BREW app’s unique ID
• Pass in zero if not directed to a specific app
Result delivered to callback function
Applications typically are not suspended but this is OEM specific
ITAPI_SendSMS (pITapi,
"8581234567",
"Hi There",
0x12345678,
MySMSCallback,
pMe);
//
//
//
//
//
//
interface pointer
phone or email
message text
Remote BREW app
callback
my own data
282
When sending SMS messages, the target device can be specified by either phone number or
email. Additionally, a BREW application to start on the target device can be optionally specified.
The slide above shows an example of sending a BREW-directed message to a device with phone
number 858-123-4567 with the string “Hi There” as the message, and sent to the application with a
class ID of 0x12345678. After the SMS message is sent, the function MySMSCallback() will then
be called to notify of the status.
QUALCOMM Confidential and Proprietary
282
BREW® Developer Training
BREW-Directed SMS
To application via ClassID
//BREW:<App’s Unique ID>:<Text Payload>
//BREW:0x000000ff:This is a sample message
or
//BREW:255:This is a sample message
To application via MIME type
//BREW:<SMS_Type>:<Text Payload>
//MYMIMETYPE:This is a sample message
283
It is possible to send a BREW-directed SMS message from an operator’s web site if the operator
allows sending standard SMS messages. The format for the message is shown above.
QUALCOMM Confidential and Proprietary
283
BREW® Developer Training
Receive MIME Handler Targeted Message
Message must be formatted as:
//<SMS_Prefix>:<Message_Text>
Applet must register itself as handler for <SMS_Prefix>
MIME type
Applet need not have PL_TAPI privilege
Message is delivered as an EVT_APP_BROWSE_URL
event
•dwParam contains pointer to //<SMS_Prefix>:<Message_Text>
•If applet is not active at the time of message delivery, it receives
EVT_APP_START before receiving EVT_APP_BROWSE_URL
284
In addition to sending a BREW directed SMS to an application for processing, BREW has the
capability to launch an application based on a MIME type when an incoming SMS message
specifies one. When an SMS message specifies a MIME type handler as shown on the slide
above, BREW will launch the application that is registered to view those types of files, then it will
send it the SMS message as an EVT_APP_BROWSE_URL event to the application’s
HandleEvent() function.
QUALCOMM Confidential and Proprietary
284
BREW® Developer Training
Receiving Directed SMS
Main HandleEvent() function
receives event notification above
EVT_APP_MESSAGE is received
when message received by device
dwParam contains the message
wParam specifies message
encoding
You can use the Simulator to
send your app SMS messages
Tools ->SMS Simulation…
Chose BREW Directed or Mobile
Terminated and set parameters
accordingly
The receiving application does
not need to be running to receive
an SMS message, except in the
simulator
BREW will start your app if it’s not
already running
App processes the
EVT_APP_MESSAGE event
Must send EVT_APP_START
separately if app needs to be started
285
To receive a BREW-directed SMS message, simply handle EVT_APP_MESSAGE eCode in the
main event handler. The event dwParam points to the message as a standard (char *), and the
wParam specifies the encoding.
The BREW application does not need to be running in order to receive the BREW-directed SMS
message. BREW will wake up the application if it is not already running and then send it the SMS
message. If the application needs to be started, then ISHELL_SendEvent() is called with
EVT_APP_START as the eCode parameter.
The Simulator can be used to simulate sending applications SMS messages. Simply run the
Simulator and select Tools -> SMS Simulation. In the resulting dialog choose either BREWdirected or Mobile Terminated SMS and add the parameters. For more details see Simulating SMS
under the BREW Simulator section of the BREW SDK® User Docs.
QUALCOMM Confidential and Proprietary
285
BREW® Developer Training
ISMS Interface Services
Interface allows developers to
write full SMS applications
Use this interface for powerful
SMS capabilities
• ISMS - Enables applications to
send/receive SMS messages
• ISMSMsg - Provides abstract
representation of SMS message
Set encoding type
Control storage
Set originating and destination
numbers
Set priority and privacy settings
Use original ITAPI interface for
simple app
Notification
• ISMSNotifier - Enables
applications to listen for various
types of SMS messages
Storage
• ISMSStorage - Enables
applications to store SMS
messages and templates in
RUIM/SIM
Air-interface independent
Supports GSM 7, ISOLATIN, and
Unicode encoding
Capabilities are contained within
6 interfaces:
Message
Broadcast capabilities
• ISMSBCSrvOpts - Provides
abstract representation of SMS
broadcast service options
• ISMSBCConfig - Enables
applications to configure
broadcast service
Requires AEESMS.h
286
The ISMS interface can be used for powerful SMS capabilities including encoding and storing SMS
messages, as well as managing SMS broadcast messages. ISMS is a part of a family of interfaces
that provide SMS message, notification, storage, and broadcast capabilities and the more widely
used services are explored on the next few slides.
While ISMS is a very useful set of APIs, for simple SMS capabilities the standard ITAPI_Interface()
should continue to be used.
QUALCOMM Confidential and Proprietary
286
BREW® Developer Training
ISMS and ISMSMsg
ISMS
Send and receive
messages
Check payload bytes
available
Check encoding support
on the device
Message created
via ISMSMsg and
sent via ISMS
ISMSMsg
Message received via
ISMS and handed off
to ISMSMsg
Encapsulates message
sent/received by ISMS
ISMSMsg_AddOpt,
ISMSMsg_GetOpt, or
ISMS_Remove Opt sets
configuration for
IWebOpts
Stores SMS options in
SMSOpts structure
287
The basic relationship between ISMS and ISMSMsg is shown above. ISMS provides the
functionality for sending or receiving the message. Additionally, ISMS provides a means for
checking bytes available for payload (provided by ISMSMsg) and encoding type (Unicode, GSM7,
etc) supported on the device. ISMSMsg controls the context of the message. It provides a buffer for
the message and various configuration settings, such as message encoding, privacy, priority, and
either destination or origination number. ISMSMsg inherits from the IWebOpts interface, discussed
later in this section, which allows for the application to specify the parameters required for handling
the message.
QUALCOMM Confidential and Proprietary
287
BREW® Developer Training
ISMS Interface
Send/receive messages
encapsulated by the ISMSMsg
interface
Check bytes available
Check supported encoding
Set application’s acknowledgement of
different message types
Message notification via
EVT_NOTIFY
((AEENotify *)dwParam)->pData
contains message ID
Common functions
Used to send messages from the
handset.
Messages can be sent to a specific
BREW application
Check or set configuration settings
ISMS_AddRef()
ISMS_GetBytesAvailableForPayload()
ISMS_GetEncodingsAvailableForMOSMS()
ISMS_QueryInterface()
ISMS_ReceiveMsg()
ISMS_Release()
ISMS_SendMsg()
ISMS_SetClientStatus()
Requires AEESMS.h
ClassID is AEECLSID_SMS
288
ISMS is used in conjunction with ISMSMsg for robust SMS client applications. ISMS is responsible
for sending and receiving SMS messages encapsulated with ISMSMsg as previously described. The
additional duties of ISMS include checking for available payload buffer space, encoding support on
the device, and setting the application’s acknowledgement of different message types.
QUALCOMM Confidential and Proprietary
288
BREW® Developer Training
ISMSMsg Interface
Encapsulates message that
can be sent/received using an
ISMS interface
Common functions
Inherits from IWebOpts
Application can specify/access
various parameters associated
with the message
Options are stored in a
SMSMsgOpt structure as ID and
value pair
ISMSMsg
ISMSMSG_AddOpt()
ISMSMSG_GetOpt()
ISMSMSG_GetOptWithIndex()
ISMSMSG_RemoveOpt()
Requires AEESMS.h
ClassID is
AEECLSID_SMSMSG
Interface supports multiple
callers
Set options once
Use for multiple message
instances
289
The ISMSMsg interface encapsulates message that can be sent/received by an application using
ISMS interface. It inherits from IWebOpts to let application specify/access various parameters
associated with the message.
QUALCOMM Confidential and Proprietary
289
BREW® Developer Training
To Send SMS via ISMS
Register a callback to notify application when message sent
CALLBACK_Init(&pMe->pcb, (PFNNOTIFY)SMSMessageCb, pMe);
void SMSMessageCB(myapp*pMe) {
DBGPRINTF(“retVal = %x”, pMe->retVal);
}
Create ISMS and ISMSMsg interfaces
if (ISHELL_CreateInstance(pMe->pIShell, AEECLSID_SMS, (void**)&pMe->pISMS) !=SUCCESS)
{
return FALSE;
}
if (ISHELL_CreateInstance(pMe->pIShell, AEECLSID_SMSMSG, (void**)&pMe->pISMSMsg)
!=SUCCESS) {
return FALSE;
}
Set WebOpt with message options
pMe->msgopt[0].nID = MSGOPT_FROM_DEVICE_SZ;
pMe->msgopt[0].pVal = STRCPY(pMe->pNumber, “8582433599”);
…
pMe->msgopt[6].nID = MSGOPT_END;
pMe->msgopt[6].nVal = NULL;
ISMSMSG_AddOpt(pMe->pISMSMsg, pMe->msgopt);
Call ISMS_SendMsg to send message
ISMS_SendMsg(pMe->pISMS, pMe->pISMSMsg, &pMe->pcb, &pMe->retVal);
290
The slide above shows the basics of using ISMS and ISMSMsg to send a message. Assume in the
code above that the application data is referenced through pMe. Also, assume the following
members of the applet struct:
AEECallback pcb
callback function
ISMS
*pISMS
ISMS interface
ISMSMsg
*pISMSMsg
ISMSMsg interface
WebOpt
msgopt[7]
Message options
uint32
retVal
Error type and error
The above example creates an ISMS and ISMSMsg interface, registers an AEECallback, sets the
options in a WebOpt, and sends the message. This of course has been simplified for purposes of
illustration here, but the fundamental elements are here.
With regards to the WebOpt, there are a couple of noteworthy points. First, options are appended to
the option set through ISMSMSG_AddOpt() with an index and value pair. It is possible, through
ISMSMSG_GetOpt() to retrieve the value of an option with a given ID. Options may be removed
with ISMSMSG_RemoveOpt() with the same ID. Secondly, with regard to the option set, notice that
the last value in the type must be MSGOPT_END.
The return value (retVal) of the ISMS_SendMsg() function contains a unsigned 32 bit error code
value. The Higher 16 bits specify the error type specified as AEESMS_ERRORTYPE_XXX where
as lower 16 bits specify the error specified as AEESMS_ERROR_XXX. The app should call the
function AEESMS_GETERRORTYPE() to access error type and AEESMS_GETERROR() to
access error.
QUALCOMM Confidential and Proprietary
290
BREW® Developer Training
Receive SMS via ISMS and ISMSMsg
Register to receive SMS messages either through the
MIF or ISHELL_RegisterNotify()
AEECLSID_SMS is the notifying class
NMASK_SMS_TYPE is the notify mask
Message ID is provided in
((AEENotify *)dwParam)->pData parameter of
EVT_NOTIFY
Applications can then receive message corresponding
to the message ID using ISMS_ReceiveMsg()
int ISMS_ReceiveMsg(pMe->pISMS, uMsgID, ISMSMsg
**ppMsg)
291
The slide above shows the basic steps for receiving SMS via the ISMS and ISMSMsg interfaces.
While there is a bit more complexity to this method versus the ITAPI interface, it is worth noting the
biggest advantage is through the ISMSMsg interface you can build a reusable context for working
with SMS content.
The first step is to register the app to receive SMS at all times via the MIF or at runtime through
ISHELL_RegisterNotify(), using AEECLSID_SMS as the notifier class and NMASK_SMS_TYPE as
the mask.
Once registered, the app should handle EVT_NOTIFY and retrieve the MessageID provided in the
dwParam that is sent to the handler. Using this ID, applications can call ISMS_ReceiveMsg and
using the pointer to the ISMSMsg interface.
QUALCOMM Confidential and Proprietary
291
BREW® Developer Training
Lab 5.1
Using TAPI to Receive SMS
292
Before You Start
Before starting this exercise, you should have:
• Completed the previous labs
Description
The purpose of this lab is to receive a TAPI SMS message on the device.
APIs Used
ISHELL_CreateInstance() - open TAPI interface
ITAPI_Release() - release TAPI interface
QUALCOMM Confidential and Proprietary
292
BREW® Developer Training
Procedure
Follow these steps to complete the exercise:
1.
Launch Visual C++ if you have not done so.
2.
Launch the MIF editor, and add TAPI privilege. (And Network for later labs.)
3. Include “AEETapi.h” in your application.
4. Add the following variable to your applet structure.
ITAPI
*pITapi;
// Tapi interface
5. Add APP_STATE_RECEIVE_SMS to your enum list of application states.
6. Add the following function prototype to your code.
void GetSMSMessage(myapp *pMe, uint32 dwParam);
7. For the EVT_APP_MESSAGE event, call GetSMSMessage(pMe,dwParam) in your
event handler.
8. Add APP_STATE_RECEIVE_SMS to your case statements that handle the clear key
(AVK_CLR event).
9. Call ISHELL_CreateInstance() in your myapp_InitAppData() function to
open the ITAPI interface with AEECLSID_TAPI. Release this interface in your
myapp_FreeAppData() function.
10. Write the GetSMSMessage() function to display the message on the display Cast
the dwParam pointer to char * to access the message. Use your
DisplayMessage() function to display the message on the screen.
11. Make sure you call ResetControls() at the beginning of your
GetSMSMessage() function and set the application state to
APP_STATE_RECEIVE_SMS.
12. Compile and Run your application in the Simulator. Click on the SMS Emulation
from the Tools Toolbar in the Simulator. Click the Brew Directed SMS radio button
and type the application ClassID (ABCD1234). Supply a text message in the
Message text field that you want to send to the device. Click the Send button.
13. You should see your message appear on the display.
After You Finish
After you complete this exercise, you should have:
•
learned how to receive an SMS message and display it on the device.
QUALCOMM Confidential and Proprietary
293
BREW® Developer Training
Module Objectives
During this module, students learned to:
9
9
9
9
Describe telephony support provided by BREW
Identify telephone access APIs for voice and data
Explain Mobile-terminated and BREW-directed SMS
Make phone calls and send SMS messages in a BREW application
294
This module focused on the use of BREW’s networking APIs with special emphasis on the
objectives listed above.
QUALCOMM Confidential and Proprietary
294
BREW® Developer Training
Module 5.2
Networking Overview
The BREW networking architecture
INetMgr and ISocket interfaces
Building network connections
Socket connectivity and communications
295
QUALCOMM Confidential and Proprietary
295
BREW® Developer Training
Module Objectives
After completing this module, students will be able to:
9
9
9
9
Describe network connectivity support in BREW
Define the asynchronous networking model
Explain how BREW networking APIs INETMgr and ISocket are used
Make TCP and UDP connections
296
This module covers the use of BREW’s networking APIs with special emphasis on the objectives
listed above.
QUALCOMM Confidential and Proprietary
296
BREW® Developer Training
Networking Overview
Modeled after de-facto standard BSD
“sockets”
Some Internet-specific simplifications
Non-blocking asynchronous interfaces
Callback-based notification
Internet access based on:
Standard TCP sockets
• Reliable bi-directional byte streams
• Underlies other protocols including HTTP
• Delivery guaranteed
Standard UDP sockets
• Connectionless packet delivery
• Lower overhead
• Delivery not guaranteed
Listening sockets are supported on devices
with MSM6100 chipsets or higher
297
The BREW networking APIs provide Internet access using TCP and UDP sitting on top of IP
(Internet Protocol). The APIs use a socket interface modeled after BSD Sockets.
TCP provides reliable bi-directional byte streams and underlies a great many application protocols,
including HTTP. UDP provides connectionless packet delivery. While UDP has lower overhead
than TCP, it does not guarantee packet delivery.
BREW does support “listening” sockets on devices with chipsets of the MSM6100 family or higher.
This means BREW can accept incoming connections.
QUALCOMM Confidential and Proprietary
297
BREW® Developer Training
INetMgr and ISocket API Overview
INetMgr
Get and set network subsystem parameters
DNS lookups
Open a socket to be used by ISocket
ISocket
Connect
Transmit and receive data
Close
INetMgr
ISocket
AEENet.h provides interface definitions
Your
Yourapplication
applicationmust
musthave
havethe
theNetwork
Network
privilege
privilegelevel
levelin
inorder
orderto
toinvoke
invokethe
the
functions
functionsin
inthese
theseinterfaces.
interfaces.
298
The primary APIs to conduct networking functions include:
INetMgr – works with the network subsystem of the device.
ISocket – provides the methods to transmit and receive data via sockets.
Both of these interfaces are modeled after the BSD Sockets API; the socket is either a TCP or
UDP endpoint. As these are not “conventional” network APIs and deal mostly with the Internet,
some Internet-specific simplifications have been made.
Both of these interfaces are non-blocking, and notifications are based on callbacks. You can use
ISOCKET_Readable( ) or ISOCKET_Writeable( ) to be notified when it is safe to read or write.
The INetMgr( ) interface is used for getting and setting network subsystem parameters (for
example, getting the device’s IP address), and for DNS lookups. Also, INETMGR_OpenSocket( )
creates an instance of the ISocket interface and opens a socket. This is similar to the way
IFILEMGR_OpenFile( ) creates an instance of the IFile interface and opens the file.
The ISocket interface performs the usual operations on a socket, such as connecting to a host,
transmitting and receiving data, and closing the socket.
The AEENet.h file provides the interface definitions for INetMgr and ISocket and must be included
in your source in order to use these services. Additionally, the Network privilege level must be set
in the MIF in order to access network services.
QUALCOMM Confidential and Proprietary
298
BREW® Developer Training
The INetMgr Interface
Basic interface for access to network
subsystem on device
Get and set parameters
Status of network
Creates multiple ISocket interfaces for
TCP and UDP connections
To create socket
ISocket * pISocket;
pISocket = INETMGR_OpenSocket(
pINetManager,
NetSocketType);
For NetSocketType
•
•
AEE_SOCK_STREAM for TCP
AEE_SOCK_DGRAM for UDP
INetMgr must outlive all ISocket
connections
Common INetMgr functions
INETMGR_GetDefaultNetwork()
INETMGR_GetHostByName()
INETMGR_GetLastError()
INETMGR_GetMyIPAddr()
INETMGR_GetOpt()
INETMGR_GetUMTSCount()
INETMGR_GetUMTSInfo()
INETMGR_NetStatus()
INETMGR_OnEvent()
INETMGR_OpenSocket()
INETMGR_SelectNetwork()
INETMGR_SetDormancyTimeout()
INETMGR_SetLinger()
INETMGR_SetOpt()
AEENet.h is required
Open the Net Manager interface:
ISHELL_CreateInstance
(pIShell, AEECLSID_NET,
(void**)(&pMe->pINetMgr))
299
The INetMgr interface functions provide mechanisms to get and set parameters associated with the
network subsystem of the device. It also provides a means to create multiple ISocket interfaces
that use TCP or UDP to transmit and receive data over the network. The ISocket interface contains
functions that connect the sockets, read and write data over the connections, and close the
sockets.
INetMgr is obtained via a call to ISHELL_CreateInstance with AEECLSID_NET provided as the
ClassID.
NOTE: If ISHELL_CreateInstance( ) returns ECLASSNOTSUPPORT when you attempt to create
an instance of the net manager (AEECLSID_NET), you probably have the wrong permissions on
your applet. Open the MIF file in the MIF Editor and check the checkbox for Network privileges,
then save.
To create a socket by calling INETMGR_OpenSocket( ):
ISocket * mySocket = INETMGR_OpenSocket(pINetMgr, NetSocketType)
Once you’ve used INetMgr to open a socket, you should not release that instance of INetMgr until
every socket that was created with it has been closed.
QUALCOMM Confidential and Proprietary
299
BREW® Developer Training
Lookup IP Address from Host Name
void INETMGR_GetHostByName
(
INetMgr * pINetMgr,
//Pointer to INetMgr interface
AEEDNSRESULT * pres, //Pointer to result structure
const char * psz,
//Domain name to be resolved
AEECALLBACK * pcb
//Pointer to callback structure
)
Results are placed in AEEDNSRESULT structure
Function call assigns values
AEECALLBACK notifies the caller of completion
Pointers to the result and callback must remain valid for the
duration of the operation
Callback must be cancelled first
INETMGR_Release() does not cancel the callback
300
The function INETMGR_GetHostByName() performs a DNS lookup and retrieves IP addresses
associated with the specified host name. Results are placed in the AEEDNSRESULT structure and
a callback notifies the caller of completion. The memory pres and pcb pointers must remain valid
for the entire duration of the operation (that is, until the completion callback is called, or until the
operation is canceled).
The result structure does not need to be initialized before the operation;
INETMGR_GetHostByName() assigns its values.
AEECallback must be properly initialized. The text string at psz can be discarded after the call to
INETMGR_GetHostByName(). The call to this function always succeeds in that it guarantees the
callback is called. Any errors related to handling the request are delivered to the callback, so all
error checking can be done there. Calling INETMGR_Release() does not automatically cancel the
callback for this function. Therefore, if it is to be called before this operation completes, the
specified callback must be canceled first.
QUALCOMM Confidential and Proprietary
300
BREW® Developer Training
Retrieving the IP Address of the Device
INETMGR_GetMyIPAddr( )
INAddr INETMGR_GetMyIPAddr
(
INetMgr * pINetMgr
//Pointer to INetMgr Interface
)
INAddr return value denotes the network byte-order values for the
IP address of an IP socket or endpoint
IP not present on device until network connection is made
Initiate PPP connection to get an IP address from the network
Lease on IP address is network specific and may release after inactivity
In the Simulator
Returns the result of GetHostByName(GetHostName()) unless the key
"IPAddress" is set in the [Settings] section of BREW_Emu.dat
301
INETMGR_GetMyIPAddr() is another useful lookup function. As the name implies, this function
retrieves the IP address of the device and places it in a INAddr return value in network byte order.
Note that device IP addresses are not static or fixed. The device may not have an IP address until
a PPP network connection is initiated. This is operator network specific, but usually the leases on
network addresses is quite short. If the return value is zero, then there is no IP address and a
connection must be initiated in order to retrieve an IP. Inactivity may cause the device to loose this
assigned IP.
The function returns the result of GetHostByName(GetHostByName()) when executed in the
BREW Simulator unless the key “IPAddress” is set in the [Settings] section of the BREW_Emu.dat
configuration file, which can be found in <BREW Dir>\sdk\bin directory.
QUALCOMM Confidential and Proprietary
301
BREW® Developer Training
INETMGR_NetStatus()
NetState INETMGR_NetStatus // returns status from enum
(
INetMgr * pINetMgr,
// pointer to INetMgr interface
AEENetStats * pNetStats // structure to hold stats
)
Returns NetState status enum
Populates AEENetStats structure
typedef struct
{
uint32 dwOpenTime;
uint32 dwActiveTime;
uint32 dwBytes;
uint32 dwRate;
uint32 dwTotalOpenTime;
uint32 dwTotalActiveTime;
uint32 dwTotalBytes;
uint32 dwTotalRate;
} AEENetStats;
typedef enum
{
NET_INVALID_STATE,
NET_PPP_OPENING,
NET_PPP_OPEN,
NET_PPP_CLOSING,
NET_PPP_CLOSED,
NET_PPP_SLEEPING,
NET_PPP_ASLEEP,
NET_PPP_WAKING,
} NetState;
302
INETMGR_NetStatus( ) returns a NetState (an enum declared in AEENet.h), which tells you
whether a PPP connection from the device to the Internet is open, in the process of being opened,
closed, or in the process of being closed. Additionally, you can register for NetStatus via
INETMGR_OnEvent().
QUALCOMM Confidential and Proprietary
302
BREW® Developer Training
ISocket Overview
Created by INetMgr
INETMGR_OpenSocket()
Apps cannot invoke ISocket directly
Standard Internet connectivity
Network address = Internet IP
address and port number
Automatically connects
Connect( ) and Bind( ) auto trigger
network connection on the handset
behind the scenes
Asynchronous, non-blocking
calls
Common ISocket functions
Bind( )
Cancel( )
Connect( )
GetLastError( )
GetPeerName( )
Read( )
Readable( )
RecvFrom( )
SendTo( )
Write( )
Writeable( )
Requires AEENet.h
Function returns immediately
Register callback based on return
Socket supports Stream (TCP)
and Datagram (UDP) sockets
303
The ISocket interface provides methods to perform standard operations – connect, transmit, receive,
close – on TCP and UDP sockets that have been opened using INETMGR_OpenSocket().
ISocket is designed exclusively for Internet use. Network addresses as passed as simple 32-bit IP
addresses and port numbers (INAddr and INPort, respectively, which are both defined in AEENet.h).
Unlike BSD Sockets, there is no “struct sockaddr,” nor is there a notion of address families.
The Connect( ) and Bind( ) calls trigger network connections, and any error codes returned by these
calls reflect network-level failure.
ISocket I/O is asynchronous (non-blocking) only, and the functions return immediately. Per-socket
notifications are delivered via callbacks; there is no equivalent of the Unix select( ) call, which returns
a list of file descriptors that are ready for reading or writing.
QUALCOMM Confidential and Proprietary
303
BREW® Developer Training
Non-Blocking Asynchronous
Trying to read or write can take some time over the Internet
ISOCKET_Read() and ISOCKET_Write() will return right away even
if there is no data to read or write
The return value will be AEE_NET_WOULDBLOCK letting you know there
is no data and that it would normally block, except it will continue
Simply tell BREW to jump to a function that you specify when the
data is ready to be read or written
You program continues to run in the meantime. You can get key presses,
move your graphics, etc. while waiting for your function to be called
ISOCKET_Readable() and ISOCKET_Writeable() are the functions that you
use to specify the function(s) you want called when data is ready to be read
or written
304
ISocket functions return the status AEE_NET_WOULDBLOCK in situations where an operation will
complete later – in other words, AEE_NET_WOULDBLOCK is returned when the process would
block, if blocking I/O were supported. In these situations, the application should call
ISOCKET_Readable( ) or ISOCKET_Writeable( ) to register a callback function to be invoked at
the appropriate time.
This simple, single-threaded, non-blocking I/O model helps to keep the BREW AEE small and to
conserve stack space.
QUALCOMM Confidential and Proprietary
304
BREW® Developer Training
TCP Socket Usage Example
1.
Open the ISocket Interface
INETMGR_OpenSocket( ) opens it
2.
Connect to remote computer on the Internet
ISOCKET_Connect( ) connects to a computer on the Internet
3.
Read and Write data over the Internet
ISOCKET_Read( ) and ISOCKET_Write( ) will do the reading
and writing over the Internet
4.
AEE_NET_WOULDBLOCK return value signals
when Writeable( ) / Readable( ) need to be called.
305
The steps above illustrate a TCP socket usage example. The ISocket interface itself can be
obtained by calling INETMGR_OpenSocket( ). Once you have an ISocket, call ISOCKET_Write( )
or ISOCKET_WriteV( ) to send data to the target. To receive data from the target, call
ISOCKET_Read( ) or ISOCKET_ReadV( ). If any of these methods return
AEE_NET_WOULDBLOCK, register a callback function by calling ISOCKET_Writeable( ) or
ISOCKET_Readable( ), respectively. When the callback function is invoked, you can resume
sending/receiving data, just as in steps 2 and 3. Repeat steps 2 thru 4 as necessary, until all data
has been sent/received successfully.
QUALCOMM Confidential and Proprietary
305
BREW® Developer Training
Creating a TCP Socket
ISocket
ISocket *mySocket;
*mySocket;
mySocket
mySocket == INETMGR_OpenSocket(
INETMGR_OpenSocket(
pMe->pINetMgr,
pMe->pINetMgr,
AEE_SOCK_STREAM);
AEE_SOCK_STREAM);
if(!mySocket)
if(!mySocket) {{
DBGPRINTF(“Error
DBGPRINTF(“Error value:
value: %x”,
%x”,
INETMGR_GetLastError(pMe->pINetMgr));
INETMGR_GetLastError(pMe->pINetMgr));
}}
Create an ISocket interface pointer to hold the socket
Call INetMgr_OpenSocket() with AEE_SOCK_STREAM as the
socket type
Optionally check if the socket was created. Use
INETMGR_GetLastError to retrieve the error. This example
performs DBGPRINTF to display the error result.
306
This example shows the basics to creating a TCP socket. Simply create an ISocket object to hold
the socket, call INETMGR_OpenSocket() to create it, and be sure to pass in the
AEE_SOCK_STREAM to identify the socket type.
QUALCOMM Confidential and Proprietary
306
BREW® Developer Training
Making a Connection
ISOCKET_Connect(pMe->pISocket, HTONL(myIP), HTONS(myPort),
(PFNCONNECTCB)ConnectionMade, pMe);
static void ConnectionMade(myApp*pMe, int error){
//check error code
switch(error){
case AEE_NET_ETIMEDOUT:
//connection timed out
break;
case AEE_NET_SUCCESS:
//send some data
if(AEE_NET_WOULDBLOCK==ISOCKET_Write(pMe->pISocket,
(byte*)”helloworld”,
sizeof(“helloworld”)){
ISOCKET_Writable(pMe->pISocket,(PFNNOTIFY)SendDataCB,pMe);
}
break;
default:
// some other error
break;
}
}
307
This sample code shows the basic steps for using an ISocket instance to create a connection. The
ISOCKET_Connect() method uses the pointer pISocket filled by the call to INETMGR_OpenSocket
as the first parameter. The second parameter, INAddr, is the connection address converted to
network byte order using the HTONL helper function. The third is the port address to use, again
converted to network byte order (HTONS). The fourth is the callback registered to pass control
back when the connection is made and data can be sent.
QUALCOMM Confidential and Proprietary
307
BREW® Developer Training
Writeable Callback
// writable callback
static void SendDataCB(myApp* pMe){
if(AEE_NET_WOULDBLOCK==ISOCKET_Write(pMe->pISocket,
(byte*)”helloworld”,
sizeof(“helloworld”))
{
ISOCKET_Writable(pMe->pISocket,
(PFNNOTIFY)SendDataCB,
pMe);
}
}
308
This call handles the asynchronous return AEE_NET_WOULDBLOCK, indicating data is to be
written but would result in a blocking call. When the connection is made (AEE_NET_SUCCESS)
and then ISOCKET_Write() returns AEE_NET_WOULDBLOCK, the callback uses the function
ISOCKET_Writeable() to monitor if data is available and then calls SendDataCB to commence
writing data to the socket.
QUALCOMM Confidential and Proprietary
308
BREW® Developer Training
UDP Considerations
Connectionless protocol
Packet delivery / order are not guaranteed
Typically used for streaming data
Best if all data fits in a single packet – 64K theoretical
maximum, but generally much less
Internet MTU standard is ~1500 bytes
309
UDP sockets work differently than TCP sockets, and therefore require some special
considerations. First and foremost, UDP is a connectionless protocol – packet delivery and order
are not guaranteed. When sending data, you specify the target address and port with every send,
and simply hope that it gets there. This makes UDP especially suitable for use in situations where
dropped packets are less critical, such as streaming data.
Since UDP doesn’t guarantee delivery and order, it is best if all data for a logical transmission fits
in a single packet. This eliminates the need to create your own sequencing/delivery checksums,
and greatly simplifies development. The theoretical size limit of a UDP packet is 64K (minus the
28-byte UDP header information). In practice, this limit is much less. Most internet devices support
of Maximum Transmission Unit (MTU) of at least 576 bytes. Testing your application is the best
way to determine the optimum data payload size per UDP packet.
QUALCOMM Confidential and Proprietary
309
BREW® Developer Training
UDP Socket Usage Example
1.
Obtain ISocket interface by calling
INETMGR_OpenSocket( )
2.
Call Bind( ) to specify listening port (address is fixed)
3.
Call SendTo( ) to send data
4.
Call RecvFrom( ) to receive data
5.
AEE_NET_WOULDBLOCK and Writeable( ) and
Readable( ) still apply.
310
The steps above illustrate a UDP socket usage example. Just as in the TCP usage example, the
ISocket interface itself can be obtained by calling INETMGR_OpenSocket( ). Once you have an
ISocket, call Bind( ) to specify the port you would like to listen on (the address is fixed, as the
handset only has one). Sending/receiving data is done slightly different than with TCP. With UDP,
you specify the target address every time you send data, and learn the target address every time
you receive data. To send data, call ISOCKET_SendTo( ). To receive data, call
ISOCKET_RecvFrom( ). If these methods return AEE_NET_WOULDBLOCK, register a callback
function by calling ISOCKET_Writeable( ) or ISOCKET_Readable( ), respectively. When the
callback function is invoked, you can resume sending/receiving data, just as in steps 3 and 4.
Repeat steps 3 thru 5 as necessary, until all data has been sent/received successfully.
QUALCOMM Confidential and Proprietary
310
BREW® Developer Training
Sending UDP Data
//create socket
ISocket * my Socket;
mySocket = INETMGR_OpenSocket(pMe->pINetMgr, AEE_SOCK_DGRAM);
if(!mysocket){
DBGPRINTF(“Error code: %x:, INETMGR_GetLastError(pMe->pINetMgr));
}
//send packet
void SendPacket(App* pMe){
retVal = ISOCKET_SendTo(pMe->pISocket,
(byte*)”HelloWorld:,sizeof(“HelloWorld”),0, pMe->inAddr, HTONS(pMe->port));
switch(retVal){
case AEE_NET_WOULDBLOCK:
ISOCKET_Writeable(pMe->pISocket, (PFNNOTIFY)SendPacket, pMe);
return;
//Some sort of network Error
case AEE_NET_ERROR:
DBGPRINTF(“Network Error”);
break,
default:
if(retVal==sizeof(“HelloWorld”))
//Success
else
//some other error
}
}
311
The above example shows the basic steps for creating a socket for sending UDP data. Again, this
is an asynchronous call, so the code uses a callback and ISOCKET_Writeable() to monitor the
delivery of the data.
QUALCOMM Confidential and Proprietary
311
BREW® Developer Training
SMS as a Bootstrap
Typically used to open a connection between two devices
Calling application sends IP address in payload of message
Receiving application uses IP address to create connection
1. Get IP address using
INETMGR_GetMyIPAddress
2. Send IP address in
BREW directed SMS
4. Remote device opens
network connection back
to calling device
Calling device
3. Process IP
in directed app
Remote device
312
SMS messages can be used as a bootstrap to notify an application of a server’s IP address. An
application on a device can check its IP address, then send the IP address as an SMS message to
another device. The receiving application can then read the SMS message and it will then know
the IP address of the originating application.
QUALCOMM Confidential and Proprietary
312
BREW® Developer Training
Lab 5.2
Using TCP sockets
313
Before You Start
Before starting this exercise, you should have:
•
Completed the previous labs
Description
The purpose of this lab is to display your IP address on the device.
APIs Used
ISHELL_CreateInstance() - open net manager interface
INETMGR_OpenSocket() - open socket interface
INETMGR_OnEvent() - register callback for socket
INETMGR_GetMyIPAddr() - get IP address
INETMGR_SetLinger() - set linger time
ISOCKET_Realize() - activate socket for IP address
INETMGR_Release() - release net manager interface
ISOCKET_Release() - release socket interface
INET_NTOA() – network to ASCII for byte ordering
QUALCOMM Confidential and Proprietary
313
BREW® Developer Training
Procedure
Follow these steps to complete the exercise:
1. Launch the BREW Resource Editor from within the Start Menu or from the Tool Bar in
Visual C++. Open the myapp.brx file in your myapp directory.
2. Select New String from the toolbar or Resource/New String from the menu.
3. Add the string “Socket Connection“ with the respective resource name
IDS_SOCKET_CONNECT.
4. Rebuild the myapp.bar file.
5. Launch Visual C++ if you have not done so.
6. Include “AEENet.h” in your application.
7. Add the following variables to your applet structure.
AEEDNSResult
AEECallback
dnsResult;
// DNS Result Structure
dnsCallback;
// Callback for DNS
INetMgr
*pINetMgr;
// InetMgr interface
ISocket
*pISocket;
// ISocket interface
char
webServer[50];
// Web server name
char
htmlReply[256];
// Buffer for HTML reply.
8. Add APP_STATE_SOCKET to your enum list of application states.
9. Add the following function prototypes to your code.
void MakeConnection(myapp *pMe, const char *webServer);
void DNSResultCB(myapp *pMe);
void ConnectionMade(myapp *pMe, int error);
void SendDataCB(myapp *pMe);
void ReadDataCB(myapp *pMe);
10. For the EVT_COMMAND event in your event handler, call MakeConnection(pMe,
“webber2.qualcomm.com“) in a case statement for IDS_SOCKET_CONNECT.
11. Add APP_STATE_SOCKET to your case statements that handle the clear key (AVK_KEY
event).
12. Call ISHELL_CreateInstance() in your myapp_InitAppData() function to open
the INetMgr interface with AEECLSID_NET. Use InetMgr to open the socket using
AEE_SOCK_STREAM. Release both interfaces in your myapp_FreeAppData() function.
13. Call IMENUCTL_AddItem() in DisplayMainMenu() to add resource string
IDS_SOCKET_CONNECT to the menu.
QUALCOMM Confidential and Proprietary
314
BREW® Developer Training
14. In the ResetControls() function, use
CALLBACK_Cancel(&pMe->dnsCallback) to cancel the DNS callback, and
ISOCKET_Close(pMe->pISocket) to close the socket, if open.
15. Go to the SocketExer folder in the labs solutions, and open the socket.c file. Follow the
code in that file to add the following functions to your code.
void MakeConnection(myapp *pMe, const char *webServer);
void DNSResultCB(myapp *pMe);
void ConnectionMade(myapp *pMe, int error);
void SendDataCB(myapp *pMe);
void ReadDataCB(myapp *pMe);
16. Compile and test your application in the Simulator. If you have time, place breakpoints
in the functions to follow how they work together.
After You Finish
After you complete this exercise, you should have:
• learned how to read and write data from a server.
• learned how to use the ISocket interface.
QUALCOMM Confidential and Proprietary
315
BREW® Developer Training
Key Points Review
During this module, students learned to:
9
9
9
9
Describe network connectivity support in BREW
Define the asynchronous networking model
Explain how BREW networking APIs INETMgr and ISocket are used
Make TCP and UDP connections
316
This module focused on the use of BREW’s networking APIs with special emphasis on the
objectives listed above.
QUALCOMM Confidential and Proprietary
316
BREW® Developer Training
Module 5.3
Retrieving Web Content
IWeb and other web interfaces
Reading data through ISource data
abstraction
317
QUALCOMM Confidential and Proprietary
317
BREW® Developer Training
Module Objectives
After completing this module, students will be able to:
9 Identify operations, attributes, and relationships of the web
interfaces provided in BREW
9 Implement a data abstraction method for reading data
9 Read a web page and display data on the screen
318
This module introduces on the services for working with web content with special emphasis on the
objectives listed above.
QUALCOMM Confidential and Proprietary
318
BREW® Developer Training
Web Overview
Standard HTTP web connectivity
Supports standard “secure sockets” for completely
encrypted web connectivity
All automatic. Simply specify the web standard “https://” instead
of “http://” and an encrypted connection will automatically be
established
Flexibility to allow proxying, keep alives, and other
standard web options
319
When all you need to do is read all the data from a web page, there’s a simpler alternative to using
INetMgr and ISocket. This technique involves the IWeb, IWebResp, and ISource interfaces.
While we won’t cover these three interfaces in depth, you’ll learn enough about them to read a web
page’s data. The upcoming Lab will also make use of this technique.
The data comes from an ISource class, a BREW abstraction that’s useful for reading streams of
data without worrying about how they’re implemented. The two ISource functions we’ll use are:
• ISOURCE_Read( ) – Reads data from the data source
• ISOURCE_Readable( ) – Registers your callback function to be invoked when more data
is available to read from the data source.
With IWeb, IWebResp, and ISource, the connection to the web server is transparent; the
application need not be aware of HTTP, TCP/IP, or sockets.
QUALCOMM Confidential and Proprietary
319
BREW® Developer Training
Web Interfaces
IWeb
IWebOpts
IWebResp
IHtmlViewer
IWebUtil
320
The IWeb interface is the context in which web transactions are conducted. This is the interface
that makes the HTTP connections.
The IWebResp interface provides the resources for the HTTP response. Once an HTTP
connection has been made with the IWeb interface, the IWebResp interface can then be used to
find out information about the response. Once such important item is the “source” pointer which
can be used to read the incoming data from the web transaction. We will see more about the
“source” later on.
The IWebOpts interface is used for manipulating the configuration in IWeb and IWebResp. The
configuration items set are static, and will remain in their state until changed again, or until the
IWeb interface is released.
The IHtmlViewer interface displays HTML data. It does not do any web transactions (the IWeb
interface is used for that). The IHtmlViewer interface can be used to display html data from various
sources including streaming in from an HTTP connection, loading from a file, and loading from a
string buffer. The IHtmlViewer interface also provides helper functions for parsing and manipulation
of HTML data. Additionally, it provides the callback mechanism for determining when a user has
clicked an HTML link, or clicked a submit button.
The web connectivity available in BREW is based on the above interfaces. A comprehensive
overview of using these interfaces is provided in this course. For a more detailed analysis of these
interfaces review the BREW API Reference Guide.
QUALCOMM Confidential and Proprietary
320
BREW® Developer Training
IWeb Overview
Asks for a standard HTTP
response (standard web
connection)
Builds a request using the
HTTP standards of GET and
POST
Can specify URL to retrieve data
Can submit data to remote
computer after user has
selected checkboxes, radio
buttons, text fields, etc.
Common IWeb Functions
IWEB_AddOpt( )
IWEB_GetOpt( )
IWEB_GetResponse( )
IWEB_GetResponseV( )
IWEB_QueryInterface( )
IWEB_RemoveOpt( )
Requires AEEWeb.h
ClassID is AEECLSID_WEB
Callback based
Your application continues to
run, then when the web
connection has been made, a
function you specify is then
called
321
The web services provided by BREW can be accessed easily and efficiently through the web APIs.
These APIs allow the developer to request and interpret web content without raw socket connectivity.
One instance of IWeb, the interface responsible for establishing the HTTP connection, can be
instantiated at application start up and remain available for the life of the application to provide for
supervision of proxying, keep-alives, and other optional web behavior. As the primary interface for
creating the web connection, the IWeb interface is designed to have a pointer created at application
start up, be initialized, and remain viable through the life of the application. IWeb builds the context of
the transaction including the connectivity and maintains the structure of the connection. Additionally,
IWeb will build the structure of the request and ask for a response from the server. The connection and
the response are callback based, allowing for efficient and easily coded asynchronous web
connectivity.
IWeb creates a web connection and sets up a method for handling the response through
IWEB_GetResponse( ), which takes a URL and an AEECallback function and kicks off an
asynchronous web transaction. IWEB_GetResponse( ) allows you to specify additional options that
handle how the response is handled in the application. These options act as overrides to the existing
options set provided by IWeb and persist during the lifetime of the response.
Once the connection is made and the response occurs, the data is read from the connection as a
source of data, much like reading from a socket. The callback function registered at the time the
connection is created provides a mechanism for calling the read function when the data from the
source is available.
QUALCOMM Confidential and Proprietary
321
BREW® Developer Training
Calling IWEB_GetResponse
// Request some HTML content.
IWEB_GetResponse(
pMe->pIWeb,
macro arg. 1
( pMe->pIWeb,
&pMe->pIWebResponse,
&pMe->WebCBStruct,
&pMe->pURL,
macro arg. 2
WEBOPT_END ) );
must outlive
transaction
322
GetResponse( ) is likely the most commonly used function on the IWeb interface. Because of this,
it is important to understand the calling conventions to be followed when using it.
Because the prototype is actually a macro that calls through a function pointer, the call must look
like the example in the slide. Notice that the inner parentheses for the variable arguments are part
of the call. The two pointers to IWeb are not an accident – they must both be included in the call.
Additional WEBOPT name/value pairs could be included before the WEBOPT_END parameter.
Each of the options passed into GetResponse( ) in the variable arguments list are added, in order,
to an IWebOpt object that is then handed to the protocol handler. They are treated as overrides to
any options that are already set in the IWeb object.
The arguments passed into GetResponse( ) must outlive the web transaction – that is, they must
remain valid until the specified callback function has been invoked. This applies to the IWeb
pointer, the IWebResponse pointer, the URL string, and any data values provided for WEBOPT
options. The global application structure provides a way to store these values while waiting for the
callback function to be invoked.
QUALCOMM Confidential and Proprietary
322
BREW® Developer Training
static void ConnectToWebsite(…)
{
…
// register callback so we can be notified when connection is open
CALLBACK_Init(&pMe->WebCBStruct,
OpenConnectionCB,
pMe);
}
// makes a connection to the website in pMe->pURL and will jump to
//your function OpenConnectionCB( ) when ready
IWEB_GetResponse(pMe->pIWeb,
( pMe->pIWeb,
&pMe->pIWebResponse,
&pMe->WebCBStruct,
pMe->pURL,
WEBOPT_END ) );
return;
// will be continued in the IWebResp usage
// example
323
Here is an example of a function, ConnectToWebsite(), that builds a web connection.
QUALCOMM Confidential and Proprietary
323
BREW® Developer Training
IWebResp Overview
After IWEB_GetResponse( )
makes the HTTP connection,
IWebResp lets you see the
connection status before
reading the data
IWEBRESP_GetInfo( ) lets you
see lots of info
Common IWebResp functions
IWEBRESP_AddOpt( )
IWEBRESP_GetInfo( )
IWEBRESP_GetOpt( )
IWEBRESP_RemoveOpt( )
Size in bytes of web data
coming down the line
MIME type of the data
Character-set of the data
Document expiration data
Document modification date
324
The IWebResp interface provides the resources for a web transaction on the server or response
side. This API is provided as the answer to an IWEB_GetResponse( ) question. Content and
diagnostic data obtained from the web transaction are loaded into a WebRespInfo structure. This
structure can be obtained by calling IWEBRESP_GetInfo( ).
WebRespInfo is designed to simplify coding of the most basic web transactions, and so holds the
most salient, commonly important pieces of information about how a web transaction went. This
includes protocol or error codes, a pointer to the stream obtained and MIME type and character set
if known.
The body of content obtained is provided as a stream through the ISource interface, and the
Read( ) and Readable( ) methods are then used to consume the data.
QUALCOMM Confidential and Proprietary
324
BREW® Developer Training
IWebResp Example
// this function is called as soon as connection is open – from IWeb example
static void OpenConnectionCB(MyApp *pMe)
{
// get info about the newly opened connection
pMe->pWebRespInfo = IWEBRESP_GetInfo(pMe->pIWebResponse);
// check for a successful return code
if ( !WEB_ERROR_SUCCEEDED(pMe->pWebRespInfo->nCode) )
{
DisplayError( … );
return;
}
// now that the connection is open, we’ll read from the “source” a little later
pMe->pISource = pMe->pWebRespInfo->pisMessage;
// “source” of incoming data. We’ll simply read it like a socket (or file)
if ( pMe->pISource != NULL )
{
// register callback
CALLBACK_Init(…, ReadFromWebSiteCB, … );
// call us back when data is ready
ISOURCE_Readable(pMe->pISource, … );
return;
}
// else there was an error getting page, so handle that appropriately
325
The function OpenConnectionCB( ) is called after initiating an HTTP connection. The first thing we
do is get the status, or info, about the HTTP connection by called IWEBRESP_GetInfo( ). From this
information we can get a pointer to the data that will be coming from this HTPP request. The
pointer is in the form of an ISource interface pointer, which we can use for reading.
If the HTTP request was not successful then the ISource interface pointer will be NULL. We check
to make sure that it is not NULL before reading the data that will be coming from this connection. If
the ISource interface is not NULL then we do the standard reading and/or writing behavior in
BREW, which is to initialize a callback function, then call the applicable Readable( ) or Writeable( )
function. In this example we’ll be reading some data from a web page, so we’ll call
ISOURCE_Readable( ) which will then trigger our callback as soon as there is data to be read.
QUALCOMM Confidential and Proprietary
325
BREW® Developer Training
IWebOpts Overview
An abstraction layer for
handling web transaction data
IWEBOPTS_AddOpt()
IWEBOPTS_GetOpt()
IWEBOPTS_RemoveOpt()
Initiated through IWeb,
IWebResp interfaces
IWebOpts Functions
Handy Web Opts
WEBOPT_HEADERHANDLER
Maintains the array of web
options within IWeb,
IWebResp
• Callback invoked once for each
header received
WEBOPT_STATUSHANDLER
• Callback invoked for each status
change
Single- and multi-value
options are added in order to
a stack and may be overridden
WEBOPT_HANDLERDATA
• Used to pass memory pointer.
Can be application structure.
326
The IWebOpts interface provides an abstraction layer for handling web transaction data. It is a web
option management API that is used to manipulate the IWeb and IWebResp interface
configurations. The methods provided by IWebOpts are called on either the IWeb or IWebResp
interfaces.
The options are maintained in a stack of single- or multi-valued options and access to the options
stack is dictated by the order in which they were added. Options can be added at the time the IWeb
object is created, or they can be provided when calling the IWEB_GetResponse( ) method.
Options set with IWEB_AddOpt( ) will persist through the life of the IWeb object and should be
options that will be needed through the entire life of the application. The options provided in the
IWEB_GetResponse( ) method only affect that request, but may temporarily override options set
previously by calling IWEB_AddOpt( ).
QUALCOMM Confidential and Proprietary
326
BREW® Developer Training
Reading Web Data through Data Abstraction
ISource and Related Interfaces
327
QUALCOMM Confidential and Proprietary
327
BREW® Developer Training
Data Abstraction
Related interfaces provide
generalized means of
buffering data from various
sources.
Conversion between various
interfaces is supported.
Buffer control ranges from
basic to advanced.
328
BREW provides several interfaces that provide abstract and generalized ways of dealing with data
from various sources. These interfaces, as we’ll soon learn, can be converted from one type to
another, to satisfy the type requirements of many different API functions and developer
programming needs. The primary difference between these interfaces is the level of control over
the internal buffer that they offer the developer.
QUALCOMM Confidential and Proprietary
328
BREW® Developer Training
ISource Overview
The reading capabilities for
web connectivity are in the
ISource interface
Provides Read( ) and
Readable( ) functions for
obtaining data
Provides baseline Read( ) and
Readable( ) methods for
obtaining data
Provides test for exhausted
data
Functionality underlies IPeek
and IGetLine
Commonly provided or
consumed by BREW web
interfaces
ISOURCE_Read( )
ISOURCE_Readable( )
ISOURCE_Exhausted( )
329
The ISource interface introduces the basic Read( ) and Readable( ) methods for obtaining data
from a buffer. These methods allow the interface consumer – the developer or another interface
method – to read buffered data from a number of different source types. ISource also provides a
means of determining if the data buffer has been exhausted, to prevent further unnecessary read
attempts.
QUALCOMM Confidential and Proprietary
329
BREW® Developer Training
Interface Relationships
ISource
IAStream
IPeek
IGetLine
IFile
ISocket
IMemAStream
ISource is base class for IPeek
IPeek is base class for IGetLine
IAStream is base class for IFile,
ISocket, and IMemAStream
330
As the diagram illustrates, the ISource interface underlies IPeek, and IPeek underlies IGetLine. In a
separate hierarchy chain, the IAStream interface underlies IFile, ISocket, and IMemAStream. As
we discuss each of these interfaces in detail, we’ll see how the functionality of the underlying
interfaces trickles down into their descendents.
IPeek allows data still in the buffer to be examined without being consumed, and even modified.
IPeek uses two functions, Peek() and Peekable(), which work similarly to Read() and Readable().
IPeek can also move the read pointer using Advance(). This allows the calling function to either
skip data, or replay data as needed.
One example of it’s usage would be a filter which changes the data before it passes to another
class. Perhaps a sound filter which changes the sound before it’s played by the IMedia interface.
IGetLine is another example of using IPeek. IGetLine peeks ahead into the data until it sees an
End-of-Line(EOL) marker. The class reading the IGetLine can then process the input one line at a
time.
IGetLine allows the EOL marker to be set to CR, LF, or both. Note that the data returned will be
NULL-terminated, and not have the EOL marker in it. Also, if the line was larger than the buffer, the
buffer will contain as much data as possible, and the LineCompleted() function will determine when
the line is complete. The application will then have to reassemble the line from repeated
ReadLine() calls.
QUALCOMM Confidential and Proprietary
330
BREW® Developer Training
Getting There From Here
Memory
IAStream
ISource
IPeek
ISocket
IGetLine
331
The diagram above illustrates the conversion capabilities offered by the ISourceUtil interface.
ISource is central to many of the conversion routines, allowing conversion between many different
interfaces.
QUALCOMM Confidential and Proprietary
331
BREW® Developer Training
ISourceUtil Overview
Converts between various
types of data sources
Used for argument
compatibility, or developer
convenience
Common ISourceUtil functions
ISOURCEUTIL_AStreamFromSource( )
ISOURCEUTIL_GetLineFromSource( )
ISOURCEUTIL_PeekFromMemory( )
ISOURCEUTIL_PeekFromSource( )
ISOURCEUTIL_SourceFromAStream( )
ISOURCEUTIL_SourceFromMemory( )
ISOURCEUTIL_SourceFromSocket( )
332
QUALCOMM Confidential and Proprietary
332
BREW® Developer Training
ISource Usage Example
1.
Call ISOURCE_Read( ) to read a chunk of data
2.
If return value is ISOURCE_WAIT, then tell it which
function you want called as soon as the data has come
over the web
•
ISOURCE_Readable( ) lets you specify that function
3.
If return value is ISOURCE_END, then you’re all done
4.
Otherwise call ISOURCE_Readable( ) to tell it which
function to call as soon as the next chunk of data has
arrived
333
The steps above illustrate a typical usage example for the ISource interface. The ISource interface
itself can be obtained many ways – we’ll leave that discussion for later. Once you have an ISource,
call ISOURCE_Read( ), providing a buffer to receive data, along with the desired number of bytes
to read into that buffer. If the return value of ISOURCE_Read( ) equals the ISOURCE_WAIT
constant, register a callback function by calling ISOURCE_Readable( ). If the return value of
ISOURCE_Read( ) tests TRUE when passed into ISOURCE_Exhausted( ), stop reading – either
you’ve reached the end of the data gracefully (ISOURCE_END) or an error has occurred
(ISOURCE_ERROR). When the callback function registered via ISOURCE_Readable( ) is called,
you can resume reading data. Simply call ISOURCE_Read( ) again, just as in step 2. Repeat steps
2 thru 5 as necessary, until all data has been read successfully.
QUALCOMM Confidential and Proprietary
333
BREW® Developer Training
IAStream and IMemAStream Overview
Non-QueryInterface
equivalents to ISource
Provides Read( ) and
Readable( ) methods, just like
ISource
IFile and ISocket extend
IAStream
IMemAStream extends
IAStream to read a specific
memory block as a stream
IImage and ISoundPlayer are
examples of consumers, with
their SetStream( ) methods
IAStream Functions
IASTREAM_Cancel( )
IASTREAM_Read( )
IASTREAM_Readable( )
IMemAStream Functions
IMEMASTREAM_Cancel( )
IMEMASTREAM_Read( )
IMEMASTREAM_Readable( )
IMEMASTREAM_Set( )
IMEMASTREAM_SetEx( )
334
The IAStream and IMemAStream interfaces are the non-QueryInterface equivalents to the ISource
interface. They provide the same Read( ) and Readable( ) asynchronous data acquisition methods,
and can be used in much the same way.
QUALCOMM Confidential and Proprietary
334
BREW® Developer Training
IAStream Usage Example
1.
Create an instance of consuming interface
IImage, IMedia, or ISoundPlayer for example
2.
Register callback
Use IIMAGE_Notify( ) or ISOUNDPLAYER_RegisterNotify( ), etc.
3.
Call SetStream( ) on above interface to associate a stream (IFile or
ISocket).
4.
When retrieval is complete, the callback is invoked.
5.
Access the retrieved image or sound data with appropriate
interface methods.
335
The usage example above demonstrates one way that IAStream might be utilized – to supply data
to the IImage or ISoundPlayer interfaces. After an instance of the IImage or ISoundPlayer interface
has been created, a callback function should be registered. This registration is done by calling
IIMAGE_Notify( ) or ISOUNDPLAYER_RegisterNotify( ). Next, a stream is associated with the
media interface by calling SetStream( ) on either interface. Since both IFile and ISocket extend
IAStream, an interface pointer to either of these interfaces is a valid argument for the SetStream( )
method. When the data from the stream has been retrieved, the callback function is invoked, to
allow the developer to begin playback, etc.
QUALCOMM Confidential and Proprietary
335
BREW® Developer Training
IAStream and IMemAStream Considerations
IFile and ISocket can used where IAStream is expected
DO NOT free memory referenced by
IMEMASTREAM_Set( )
it will be freed on Set( ) or Release( ) calls
IMEMASTREAM_SetEx( ) accepts a callback, where
developer can free memory appropriately
336
As mentioned in the IAStream usage example, both IFile and ISocket extend IAStream. Because of
this, an interface pointer to either of these interfaces can be used wherever a pointer to IAStream is
expected.
It is important to understand the memory freeing responsibilities when using IMemAStream. When
IMemAStream references memory specified by calling IMEMASTREAM_Set( ), the developer
should NOT free the referenced memory. It will automatically be freed by calls to
IMEMASTREAM_Set( ) or IMEMASTREAM_Release( ).
In situations where it is imperative that the developer have control of freeing the memory
referenced by IMemAStream, the memory should be specified by calling IMEMASTREAM_SetEx(
), rather than IMEMASTREAM_Set( ). IMEMASTREAM_SetEx( ) accepts a callback function,
which will be invoked when the memory needs to be freed. The developer can then free the
memory as desired.
QUALCOMM Confidential and Proprietary
336
BREW® Developer Training
IHtmlViewer Overview
Supports a subset of HTML
3.2 tags.
Not an application or browser,
but an object provided
Does not follow links, but tells
you when a link has been
clicked (or submit button
pressed)
Common IHTMLViewer
functions
Use the IWeb interface for
following the link or submitting
the page
IHTMLVIEWER_FindElem( )
IHTMLVIEWER_GetElemText( )
IHTMLVIEWER_HandleEvent( )
IHTMLVIEWER_LoadSource( )
IHTMLVIEWER_LoadStream( )
IHTMLVIEWER_ParseBuffer( )
IHTMLVIEWER_SetNotifyFn( )
337
QUALCOMM Confidential and Proprietary
337
BREW® Developer Training
IHtmlViewer Example
static void DisplayWebContent(MyApp *pMe)
{
// instantiate IHtmlViewer
if ( ISHELL_CreateInstance( pMe->a.m_pIShell,
AEECLSID_HTML,
(void**)&(pMe->pHTMLViewer))
!= SUCCESS )
{
DisplayError( … );
return;
}
// set the size (assuming rect was initialized)
IHTMLVIEWER_SetRect( pMe->pHTMLViewer, &pMe->rectHtmlViewer );
// set our callback for the viewer
IHTMLVIEWER_SetNotifyFn( pMe->pHTMLViewer, ViewerCallback );
// load the HTML content
IHTMLVIEWER_LoadSource( pMe->pHTMLViewer, pMe->pISource )
// activate the viewer
IHTMLVIEWER_SetActive( pMe->pHTMLViewer, TRUE )
338
The basics to using IHtmlViewer are as follows:
1. Obtain content in ISource form, via IWeb.
2. Create IHtmlViewer with ISHELL_CreateInstance( ).
3. Call IHTMLVIEWER_SetRect to set size.
4. Set other IHtmlViewer properties as desired.
5. Call IHTMLVIEWER_SetNofityFn( ) to set status callback function.
6. Call IHTMLVIEWER_LoadSource( ) to load contents.
7. Wait for status callback function to be invoked.
QUALCOMM Confidential and Proprietary
338
BREW® Developer Training
Lab 5.3
Working with Web Content
339
Before You Start
Before starting this exercise, you should have:
•
Completed the previous labs
Description
The purpose of this lab is to read a text file from the web and display it on the screen.
APIs Used
ISHELL_CreateInstance() - open IWeb interface
IWEB_GetResponse() - initiate web connection, open IWEBRESP interface
IWEBRESP_GetInfo() - get web response, get ISOURCE interface
ISOURCE_Readable() - register callback to read data
ISOURCE_Read() - read data from web
IWEBRESP_Release() - release IWEBRESP and ISOURCE interfaces
IWEB_Release() - release IWEB interface
IFILEMGR_OpenFile() – open file for writing, get IFile interface
IFILE_Write() – write web data to file
IFILE_Release() – close file
QUALCOMM Confidential and Proprietary
339
BREW® Developer Training
Procedure
Follow these steps to complete the exercise:
1. Launch the BREW Resource Editor from within the Start Menu or from the Tool Bar
in Visual C++. Open the myapp.brx file in your myapp directory.
2. Select New String from the toolbar or Resource/New String from the menu.
3. Add the string “Read Web Page” with the respective resource name
IDS_READ_WEB.
4. Rebuild the myapp.bar file.
5. Launch Visual C++ if you have not done so.
6. Include “AEEWeb.h” and “AEEHTMLViewer.h” in your application.
7. Add the following variables to your applet structure.
IWeb
IWebResp
WebRespInfo
IHtmlViewer
AEECallback
*pIWeb;
// IWeb interface
*pIWebResp;
// IWebResp interface
*pWebRespInfo; // WebRespInfo interface
*pIHtmlViewer;
// HTML Viewer interface
WebCBStruct;
// Web Callback
9. Add APP_STATE_READ_WEB to your enum list of application states.
10. Add the following function prototypes to your code.
void DisplayWebPage(myapp *pMe, const char *webURL);
void WebConnectCB(myapp *pMe);
11. For the EVT_COMMAND event in your event handler, call
DisplayWebPage(pMe, "http://webber2.qualcomm.com");
in a case statement for IDS_READ_WEB.
12. Add APP_STATE_READ_WEB to your case statements that handle the clear key
(AVK_CLR event).
13. In your myapp_InitAppData(), set pMe->pIWebResp to NULL, and call
ISHELL_CreateInstance() in your myapp_InitAppData() function to open
the IWeb interface with AEECLSID_WEB and the IHtmlViewer interface with
AEECLSID_HTML. Release them all in your myapp_FreeAppData() function.
14. Call IMENUCTL_AddItem() in DisplayMainMenu() to add resource string
IDS_READ_WEB to the menu.
QUALCOMM Confidential and Proprietary
340
BREW® Developer Training
15. At the end of your program, add the following code:
void DisplayWebPage(myapp *pMe, const char *webURL) {
ResetControls(pMe);
pMe->eAppState = APP_STATE_READ_WEB;
CALLBACK_Init(&pMe->WebCBStruct, WebConnectCB, pMe);
if (pMe->pIWebResp) {
IWEBRESP_Release(pMe->pIWebResp);
pMe->pIWebResp = NULL;
}
IWEB_GetResponse(pMe->pIWeb, ( pMe->pIWeb,
&pMe->pIWebResp, &pMe->WebCBStruct,
webURL, WEBOPT_END ) );
}
void WebConnectCB(myapp *pMe) {
AEERect myRect;
myRect.x = 0;
myRect.y = 0;
myRect.dx = pMe->DeviceInfo.cxScreen;
myRect.dy = pMe->DeviceInfo.cyScreen;
pMe->pWebRespInfo = IWEBRESP_GetInfo(pMe->pIWebResp);
if (!WEB_ERROR_SUCCEEDED(pMe->pWebRespInfo->nCode) ) {
DisplayMessage(pMe, "Unable to open web page!");
return;
}
IHTMLVIEWER_SetRect(pMe->pIHtmlViewer, &myRect);
IHTMLVIEWER_LoadSource( pMe->pIHtmlViewer,
pMe->pWebRespInfo->pisMessage);
IHTMLVIEWER_SetActive(pMe->pIHtmlViewer, TRUE);
}
16. Cancel the WebCBStruct callback, and set the IHTMLViewer inactive in ResetControls().
17. Compile and test your application in the Simulator.
After You Finish
After you complete this exercise, you should have:
•
learned how to read a web page from the web and display it using the IHtmlViewer interface.
•
learned how to use the IWeb interface.
QUALCOMM Confidential and Proprietary
341
BREW® Developer Training
Key Points Review
During this module, students learned to:
9 Identify operations, attributes, and relationships of the web
interfaces provided in BREW
9 Implement a data abstraction method for reading data
9 Read a web page and display data on the screen
342
This module focused on the services for working with web content with special emphasis on the
objectives listed above.
QUALCOMM Confidential and Proprietary
342
BREW® Developer Training
Module 5.4
Other Connectivity Interfaces
ISockPort
IPort
IPosDet
IRingerMgr
343
QUALCOMM Confidential and Proprietary
343
BREW® Developer Training
Module Objectives
After completing this module, students will be able to:
9 Describe the use of ISockPort to support other protocols
9 Describe connecting to external devices using IPort
9 Describe how IPosDet allows the development of Location Based
Services (LBS)
9 Describe how to use IRingerMgr to manage ring tones
344
QUALCOMM Confidential and Proprietary
344
BREW® Developer Training
ISockPort Interface
An interface based on IPort for network access
Uses ISOCKPORT_OpenEx to open a socket instead of
INETMGR_OpenSocket
Allows for different address families
Currently only AEE_AF_INET for IPv4 and AEE_AF_INET6 for IPv6
Functions such as reading and writing are the same as
ISocket
3.x
New Feature
345
The ISockPort interface provides standard socket networking services, both stream and datagram.
It provides methods to open and close, connect, transmit and receive data and more, over TCP
and UDP sockets.
NOTE: Your application must have a privilege level of Network or All to be able to invoke the
functions in this interface.
ISockPort supports multiple address families, which is specified once during
ISOCKPORT_OpenEx() and later by using the appropriate address structure. Currently,
AEE_AF_INET and AEE_AF_INET6 address families are supported. IPv6 mapped IPv4 addresses
are not supported.
ISOCKPORT_OpenEx() is used to open a socket. When calling this function, the following is
specified:
• Address family, e.g. AEE_AF_INET
• Socket type, e.g., AEE_SOCKPORT_STREAM
• Protocol, e.g. AEE_IPPROTO_TCP
For reading and writing, ISockPort includes functions that work identically to those covered in the
section for ISocket, such as ISOCKPORT_Readable() and ISOCKPORT_Writeable(). Refer to the
BREW API Reference for more details on ISOCKPORT.
QUALCOMM Confidential and Proprietary
345
BREW® Developer Training
IPort Interface
BREW SIO functionality allows communication between
BREW phone and other devices, such as PCs
Supports two modes:
Device-initiated
Application-initiated
Device
sends
request to
start
applet
Applet
takes
control of
the port
346
By using the BREW SIO functionality, an external device communicates with a BREW entity, such
as a dynamic application or a BREW internal object. Once the link is established between the
application and device, it determines the protocol with which to facilitate communication. The
BREW SIO acts as a dumb pipe.
A BREW SIO connection can be initiated by either an external device or a BREW application. The
management of the connection setup varies based on the initiator. The device-initiated service
involves a well-defined protocol to discover which application or internal entity services the device.
Device-initiated service
When a device is connected, it initially communicates with the AT Command Processor (ATCOP).
By issuing a command, the device informs the ATCOP to transfer control of the particular SIO
connection to the BREW SIO Command Processor (BSCOP). When the device gets a positive
response from BREW, it issues commands to the BSCOP. These commands allow the device to
communicate with a BREW application or perform other tasks.
Application-initiated service
BREW SIO also allows an application to unilaterally seize control of a serial port. This action
succeeds or fails depending on what other client is currently active on that port. ATCOP and
BSCOP usually yield to a requesting application, but another client, such as service programming,
might refuse to release the port. Situations that prevent an application from gaining control of the
port differ from OEM to OEM. Application-initiated connections may be necessary to initiate
communication with devices that are not BREW-aware. In application-initiated scenarios, however,
the user must somehow coordinate connecting the device with launching the appropriate
application.
QUALCOMM Confidential and Proprietary
346
BREW® Developer Training
IPort Interface
Allows communication with
external devices
Supports connections such as
serial port and USB
Supports configuration of
connection
IPORT_IOCtl()
Uses different ClassID and
header file for different
connection types
Common IPort functions
IPORT_Open( )
IPORT_Close( )
IPORT_Read( )
IPORT_Readable( )
IPORT_Write( )
IPORT_Writeable( )
IPORT_GetLastError( )
Reading and writing is very
similar to ISocket usage
AEECLSID_SERIAL and
AEESio.h for serial port,
including virtual serial port over
USB
347
IPort is a generic interface, which must be created using a class id specific for its usage. For
example, AEECLSID_SERIAL is used for serial ports or virtual serial ports over USB. When an
instance of AEECLSID_SERIAL is created, an IPort is returned that is not associated with any
physical port. IPORT_Open() indicates the name of the desired port.
Open() is a non-blocking call that might return AEEPORT_WAIT when it cannot be immediately
satisfied. The caller then uses IPORT_Writeable() to receive a notification of subsequent attempts.
Open() on the subsequent attempt should be issued with NULL as the parameter for the port
name.
When calling Open(), the caller indicates the serial port desired by a zero-terminated string
containing its name. BREW defines some names for types of ports that are generally available
across many devices. Serial port names consist of short ASCII sequences, allowing different
mobile devices to support different ports in an extensible manner. Usually the main port at the
bottom of a phone is an UART. All the UARTs are represented with strings,
AEE_PORT_SIO1(PORT1), AEE_PORT_SIO2(PORT2), and the like. The USB ports are
represented using USB1, USB2, etc. BREW also defines a special name,
AEE_PORT_INCOMING, which establishes a link with a device attempting communications with
an application.
IPORT_Read(), IPORT_Readable(), IPORT_Write(), and IPORT_Writeable() are all used in a
similar fashion to ISOCKET. IPORT_Read() and IPORT_Write() will both return AEEPORT_WAIT
if the port has no data available. IPORT_Readable() or IPORT_Writeable() can be called in that
case to have a callback when data is available.
IPORT_Close() closes the port. IPORT_Release() will also close it automatically.
QUALCOMM Confidential and Proprietary
347
BREW® Developer Training
IPort Device Init
At plug-in, physical port controlled by ATCOP
01AT$BREW
Once BREW command received, BSCOP takes over
01ATOK
BREW app can be specified by DeviceID, ClassID, or
URL
02DEV:BREW.siotest
348
AT$BREW is the command sent to the mobile device’s ATCOP to transfer control to BREW. If
BSCOP is already in control, this is interpreted as a $BREW command with a tag of AT, and the
resulting response packet, including the tag, is ATOK. As a result, when AT$BREW is sent to
initiate communication, the device synchronizes, whether the port was in ATCOP or BSCOP mode.
DEV:<devid>:<args>
This command initiates communication with a BREW application or object. BREW tries to find the
handler using the identifier string. If BREW finds the handler, the START response is issued to the
device. On failure, the ERROR response is issued. The <devid> value is the registry key used to
find the application handler. These keys should be of a regular form, such as <company code><devicename>, to avoid naming conflicts. The <args> value is passed to the launched application.
<args> value is a string of bytes excluding the <CR> and <LF> characters.
APP:<clsid>:<args>
This command gives the CLSID of the application to open. BSCOP proceeds to launch an
application as it does with the DEV command. This is less extensible than the DEV command, but
it is useful for debugging and development. The <clsid> is a string of hexadecimal letters that are
constructed into a BREW ClassID. <args> is the same as defined in DEV.
URL:<url>
BSCOP calls ISHELL_Browse URL() with the named URL. This launches a browser, MobileShop,
or some other application, depending upon which application has registered support for the URL
scheme. After failing to launch a required application, a device could use MobileShop URLs to
point the user to the required download option. <url> is of same format as the DEV: <args>.
QUALCOMM Confidential and Proprietary
348
BREW® Developer Training
Using IPORT Interface
Device-initiated usage only: register MIME-type in MIF
In both cases, use IPORT_Open()
For Application-initiated, use port name, ex., AEESIO_PORT_SIO1
For Device-initiated, use AEESIO_PORT_INCOMING
If IPORT_Open() returns AEEPORT_WAIT, call
IPORT_Writeable()
Reading and writing, same interface as ISocket
Use IPORT_Close() or IPORT_Release() when done
349
Application MIME type registration
1. In the Extensions tab of the MIF Editor, click Add MIME Type in the Exported
MIME types section.
2. Enter the device id string in the MIME Type field.
3. Enter the Base Class as AEECLSID_HTYPE_SERIAL (defined in AEESIO.h).
4. Enter your application’s CLSID as the Handler Class.
Device-initiated usage
When an application capable of communicating using SIO starts, it creates an IPort interface using
the ClassID of AEECLSID_SERIAL and then calls Open() with AEE_PORT_INCOMING. If Open()
returns AEEPORT_WAIT, the application waits for the device-initiated connection by registering a
callback using Writeable(). When a device is connected, the Writeable callback is called, prompting
the application to retry the Open() operation, which succeeds.
Application-initiated usage
The application creates an IPort interface using the Open() function. The port string argument
determines which port opens. The port IDs supported by BREW are given in AEESio.h. For
example, to open the main serial port, the AEESIO_PORT_SIO1 string is used. The Open() could
fail due to multiple reasons, such as non-availability (service programming in progress, mobile
busy, no-permission for open), no such port, and the like. In this case, the Writeable callback is
called, and a call to GetLastError() reports the error particular.
QUALCOMM Confidential and Proprietary
349
BREW® Developer Training
IPosDet Overview
Returns current latitude
and longitude of a phone
Supports multiple modes
Uses gpsOne hardware
in most CDMA phones
Used to create LocationBased Services (LBS)
350
QUALCOMM Confidential and Proprietary
350
BREW® Developer Training
IPosDet Interface
Determines the phone’s
current position
Data available includes
latitude, longitude, altitude,
and velocity
Supports configuration of
different modes
Provides a variety of way to
specify accuracy of results
Generally speaking, increased
accuracy gives longer “time to
fix”
Common IPosDet functions
IPORT_GetGPSInfo( )
IPORT_GetGPSConfig( )
IPORT_SetGPSConfig( )
IPORT_Readable( )
IPORT_ExtractPositionInfo( )
IPORT_Release( )
Requires AEEPosDet.h
AEECLSID_POSDET
Requires permission to be set
in MIF
351
The IPosDet interface provides services for position determination using sector information or GPS
information. To use the sector-based position determination methods such as
IPOSDET_GetSectorInfo(), SectorInfo privileges are required. Similarly, for GPS-based position
determination methods such as IPOSDET_SetGPSConfig(), IPOSDET_GetGPSConfig(), and
IPOSDET_GetGPSInfo(), Position Determination Privileges are required.
IPOSDET_GetGPSInfo() is an asynchronous method that uses AEECallback. Care must be taken
to ensure that callbacks and information structures passed to these methods by reference remain
in scope until the callback returns.
BREW SDK users can set the GPS emulation in the Tools->GPS Emulation menu to use a
prerecorded NMEA file as GPS input or connect to an NMEA-output capable GPS device. An
offline utility called NMEALogger.exe can be used to record an NMEA file from data coming from a
GPS device connected to the serial port of the desktop/laptop. This NMEA file can be used later as
GPS input. See the SDK User's Guide and SDK Utilities Guide for details.
QUALCOMM Confidential and Proprietary
351
BREW® Developer Training
gpsOne Modes
MS-Assisted
MS-Based
Standalone
Assistance data sent from
server for every fix
Assistance data sent from
server only as needed
NO assistance data
•
Has the greatest
sensitivity
• A data call is needed for
each fix
•
Uses only GPS satellites
• Shortest Time to Fix
• Only needs occasional
data calls
•
Best for apps requiring
max sensitivity and fewer
fixes:
• E-911
• Challenging locations
Best for apps requiring lots Best when out of wireless
of fixes:
network
• Turn-by-turn navigation
• Fast tracking
apps/geofencing
Longer Time to Fix and
battery consumption
• Lower accuracy
• No data calls needed
352
gpsOne is a hybrid positioning system. AGPS, (the PDE-Position Determination Entity assisted
handset-based GPS technology), and AFLT (the network-dependent position by triangulation
technology), are the two major components of the hybrid gpsOne position location solution.
The gpsOne hybrid system takes advantage of the pinpoint accuracy and expanded availability
from AGPS and uses those characteristics in conjunction with the deep indoor penetration
capabilities of the AFLT network-based solution to expand system coverage across all terrains
(urban, rural, indoor and outdoor environments) while leveraging GPS-based accuracy across
environments where conventional GPS was otherwise not available.
Three gpsOne modes can be implemented on a mobile device:
• Mobile Station-Assisted (MS-Assisted) – Utilizes the PDE (the server providing position
fixes) to calculate the mobile position and is the only hybrid mode
• Mobile Station-Based (MS-Based) – Calculates positioning on the mobile device with
limited and periodic assistance from the PDE
• Standalone or Autonomous mode – Capable of calculating positioning on the handset
without any intervention from the PDE
QUALCOMM Confidential and Proprietary
352
BREW® Developer Training
IPOSDET_SetGPSConfig
Selects mode
AEEGPS_Mode_One_Shot selects based on optimization
AEEGPS_Mode_Track_Network forces MS-assisted
AEEGPS_Mode_Track_Local forces MS-based
Can set optimization for speed or accuracy
Specifying expected number or interval between
requests can yield better performance
Values placed in AEEGPSConfig structure
353
• AEEGPS_Mode_One_Shot
This is the default mode. This mode is highly dependent on what you choose for optim. If optim is set to
AEEGPS_OPT_SPEED, this mode gets you a fix in the fastest manner possible. If the device is capable of
performing MS-Based fix faster than the MS-Assisted, the MS-Based method is used. If assistance data is
not available or not valid anymore, it gets you an MS-Assisted fix. If optim is set to
AEEGPS_OPT_ACCURACY, this mode gets you a fix in the most accurate manner possible. Currently, it
is an MS-Assisted fix to leverage the advanced computing capabilities of the PDE. If optim is set to
AEEGPS_OPT_DEFAULT, the default mode is selected, which is to optimize for speed.
• AEEGPS_Mode_Track_Network
Use this mode if you want to force the underlying gpsOne engine to MS-Assisted mode.
• AEEGPS_Mode_Track_Local
Use this mode if you want to force the underlying gpsOne engine to MS-Based mode.
• nFixes + nInterval
This parameter represents the estimated number of position fixes an application intends to perform. A
value 0 for this parameter implies an unknown number of position requests.
This parameter represents the estimated interval (in seconds) at which an application intends to perform
position requests. When used, nFixes and nInterval enables the underlying gpsOne engine to yield better
performance in terms of battery life and time to fix.
QUALCOMM Confidential and Proprietary
353
BREW® Developer Training
IPOSDET_GetGPSInfo()
Can request location, velocity, altitude in any
combination
Accuracy only applies to MS-Based mode
AEEGPSInfo structure is filled out when callback
occurs
Use WGS84_TO_DEGREES() to convert longitude and
latitude into degrees
See the Knowledge Base for more details
354
Once the gpsOne mode has been configured, the
int IPOSDET_GetGPSInfo(IPosDet *pIPosDet, AEEGPSReq req,
AEEGPSAccuracy accuracy, AEEGPSInfo *pGPSInfo, AEECallback *pcb)
function can be called to obtain a position fix.
IPOSDET_GetGPSInfo() is an asynchronous function which uses the AEECallback and
AEEGPSInfo structure. This means that care must be taken to ensure that the callback and
information structures passed to this method remain in scope until the callback returns.
The callback function gets called on completion of position determination. The position response is
fills up the AEEGPSInfo structure.
NOTE: If you want to implement a position tracking application that periodically requests for
position, you need to wait for the callback to return and then initiate a new IPOSDET_GetGPSInfo()
call.
QUALCOMM Confidential and Proprietary
354
BREW® Developer Training
Ringer Overview
Supported
Types
.mp3
.wav
…
Ringer
IAStream
IFile
…
RingerID
1001
…
Ringer
CategoryID
Default
CallerID
…
BREW Ringer Support allows custom ringers to be set
for OEM-specified categories
355
QUALCOMM Confidential and Proprietary
355
BREW® Developer Training
IRingerMgr Interface
Provides list of supported
formats
IAddrRec
IRINGERMGR_GetNumberFormats()
IRINGERMGR_GetFormats()
Lists ringer categories
IRINGERMGR_EnumCategoryInit()
IRINGERMGR_NextCategory()
AEE_RINGER_CATEGORY_ALL is
default ringer
Ringer created from
media stream
IRINGERMGR_Create()
RingerID used to set ringer
for category
IRINGERMGR_GetRingerID()
IRINGERMGR_EnumRingerInit()
IRINGERMGR_EnumNextRinger()
IRINGERMGR_SetRinger
Requires AEERinger.h
ClassID AEECLSID_RINGER
356
IRingerMgr provides the BREW interface to OEM-supported ringer functions. This interface is
obtained by calling IRINGERMGR_CreateInstance with AEECLSID_RINGER. The class allows the
caller to:
• Obtain the list of supported formats
• Obtain the list of ringer categories
• Obtain the list of ringers in a category
• Play a ringer
• Remove a ringer
• Set the ringer for a category (or default)
QUALCOMM Confidential and Proprietary
356
BREW® Developer Training
Steps to Set Up Ringer
Check supported ringer types
Create ringer from IAStream (Such as from IFile)
Retrieve Ringer ID
Set ringer for category
Categories and default behavior are OEM dependant
357
1. To check supported ringer types:
numberFormats = IRINGERMGR_GetNumFormats(pIRingerMgr);
pwFormats = MALLOC(numberFormats * sizeof(AEESounePlayerFile) );
If (SUCCESS = IRINGERMGR_GetFormats(pIRingerMgr, pwFormats, numberFormats) )
// check pwFormats array for supported types
// ...
}
FREE(pwFormats);
{
2. Use format found above and an IAStream object. (See Networking section to create IAStream from socket).
if (SUCCESS = IRINGERMGR_Create(pIRingerMgr, pszRingerName, format, pIAStream) ) {
//Ringer is being created, with pszRingerName as it’s name in AECHAR format.
//…
}
3. Retrieve RingerID
AEERingerID ringerID;
ringerID = IRINGERMGR_GetRingerID(pIRingerMgr, pszFileName);
4. Set ringer for category
//AEE_RINGER_CATEGORY_ALL for default ringer
// or use IRINGERMGR_EnumCategoryInit() and IRINGERMGR_EnumNextCategory() to list categories
if (SUCCESS = IRINGERMGR_SetRinger(pIRingerMgr, AEE_RINGER_CATEGORY_ALL, ringerID) ) {
//Ringer was successfully set
//…
}
QUALCOMM Confidential and Proprietary
357
BREW® Developer Training
Key Points Review
During this module, students learned to:
9
9
9
9
Describe the use of ISockPort to support other protocols
Describe connecting to external devices using IPort
Describe how IPosDet allows the development of LBS
Describe how IRingerMgr allows BREW applets to manage ringers
358
QUALCOMM Confidential and Proprietary
358
BREW® Developer Training
BREW® Developer
Training
Section 6 –
Commercialization
and Testing
359
QUALCOMM Confidential and Proprietary
359
BREW® Developer Training
Section 6
Testing and Commercialization
Module 6.1
Module 6.2
Module 6.3
Module 6.4
Module 6.5
BREW Authenticated Developer Overview
Testing Applications on a Device
Building Usage Based Applications
True BREW® Testing
The BREW Developer Alliance
360
QUALCOMM Confidential and Proprietary
360
BREW® Developer Training
Module 6.1
BREW Authenticated Developer Overview
Authentication Process
Tools for Authenticated Developers
361
QUALCOMM Confidential and Proprietary
361
BREW® Developer Training
Module Objectives
After completing this module, students will be able to:
9 Describe the process to become a BREW authenticated developer
9 Identify testing and commercialization tools
9 Explain the testing and commercialization process
362
This module provides an overview of the process for becoming a BREW authenticated developer
and introduces the tools available for authenticated developers. Special emphasis is given on the
key points listed above.
QUALCOMM Confidential and Proprietary
362
BREW® Developer Training
You’ve built an application…
Now what????
363
Building applications in the BREW Software Development Kit (BREW SDK®) is only part of the
journey in BREW application development. It’s a fact that the whole reason for building BREW
applications is to run them on a BREW-enabled device. On-device testing is an essential part of
the commercialization process. Applications should be tested on all targeted devices, and that
testing starts with compiling and running the application on test applications prior to third-party
testing.
Access the tools and services provided for testing and commercialization is restricted to BREW
Authenticated Developers. This authentication is a necessary component of the security built into
the BREW application distribution model. Let’s take a look at the process.
QUALCOMM Confidential and Proprietary
363
BREW® Developer Training
Becoming an Authenticated Developer
Apply for
VeriSign
Authentic
certificate
$400 US for
1 year or 100
signatures.
Once
certificate is
installed
BREW ISV
registration
info is sent by
QUALCOMM.
Complete
BREW ISV
Registration
Form
User name
and password
sent by
QUALCOMM.
Registration is
for Developer
Extranet
Accounts sent
to business
contact on
VeriSign
application.
Accept BREW
Developer
Agreement
Legal
agreement
between
developer
company and
QUALCOMM.
Extranet
accounts are
created and
notification
sent via email.
Register with
NSTL Test
Center
NSTL provides
third-party
testing.
Complete the
registration
form, then
review, and
fax signed
master
agreement
back to NSTL.
Review
Operator
Guidelines
Most
operators
provide
guidelines.
Review and
sign any
necessary
agreements.
364
The process for becoming an Authenticated BREW Developer is a straightforward process of five
basic steps.
1. First, apply for a VeriSign Class 3 digital document ID certificate. To apply, go to:
http://www.verisign.com/products-services/security-services/code-signing/
brew-document-ids/index.html.
2. Next, a user name and password for the BREW ISV registration form is sent via email.
Access the BREW ISV (Independent Software Vendor) Registration Form here:
https://brewx.qualcomm.com/signup/index.jsp?return=companysignup.jsp
3. Then, accept the BREW Developer Agreement, located on the same site as the
registration form. At this point, access to the BREW Developer Extranet is granted to
accounts specified in the registration form.
4. Next, register with NSTL Test Center here:
https://www.nstl.com/nstl/index.htm
5. Finally, review the Operator Guidelines for operators you intend to market your apps.
Most operators provide guidelines and requirements for application submittal. Contact
the operator for clarification and details.
For more details, see the Become a BREW® Developer/Authentication page at
www.qualcomm.com/brew
QUALCOMM Confidential and Proprietary
364
BREW® Developer Training
BREW Testing and Commercialization Tools
The BREW Tools Suite
Other Downloadable Tools
BREW Debugger
BREW AppLoader
BREW Perl I/F APIs
BREW AppSigner
BREW Logger
BREW Grinder®
Web-based Tools
• TestSig Generator
BREW Shaker
• ClassID Generator
365
Once authenticated, you have access to the various tools, software suites, and other services
provided for on-device testing and commercialization. The BREW Tools Suite is a family of tools
provided in a single download. Additional tools, such as the BREW Debugger and BREW Perl I/F
APis are also available to download. Over the next several slides, we will review the tools listed
above.
QUALCOMM Confidential and Proprietary
365
BREW® Developer Training
Commercialization and Testing Overview
Create
executable
DLL
MOD
Simulator
debugging
Load application
on device
BREW Grinder
BREW AppLoader
BREW Debugger
Device
debugging
BREW Logger
BREW Grinder
BREW Shaker
Automation
testing
BREW Perl I/F APIs
Packaging for
TBT submission
BREW AppSigner
366
The process of commercializing an application is making sure the application is stable and works
as intended. Once the application has been tested in-house to the developer’s satisfaction, it is
sent to be third-party tested. Here is a brief summary, and over the next few slides we will review
the testing process and tools in greater detail
The applications are first built and tested in the BREW SDK environment, including debugging and
rework as you most likely have done in this course. The Simulator, along with the BREW Grinder,
is used to test the functionality as well as the stability of the application.
The next step is the start of on-device testing. The app is compiled for the device and then loaded
on the device. Once the application is on the device, several tools are used to test the stability of
the application. There are some automation tools provided in the form of Perl APIs that allow the
developer to automate these tests.
Once the application has been tested and is deemed ready for submittal, the application is
packaged and signed, then shipped off to the testing lab.
QUALCOMM Confidential and Proprietary
366
BREW® Developer Training
Tools Overview – The Grinder
Create
executable
DLL
MOD
TheGrinder
Grinder
The
sendskeykeysends
strokes
and
strokes and
other
events
other events toto
yourdevice,
device,toto
your
the
Simulator,
the Simulator,
ortotoyour
your
or
deviceand
and
device
the
Simulator
the Simulator
simultaneously
simultaneously
Simulator
debugging
Load application
on device
BREW Grinder
BREW AppLoader
BREW Debugger
Device
debugging
BREW Logger
BREW Grinder
BREW Shaker
Automation
testing
BREW Perl I/F APIs
Packaging for
TBT submission
BREW AppSigner
367
The Grinder is a key events-generator tool, running on Windows, designed to test the stability of a
device application’s execution. The Grinder randomly generates and sends events known as a
grind to applications running on the Simulator as well as BREW-enabled devices. It can also do the
following:
•
Log events being sent.
•
Capture snapshots of the BREW directory file after the grind.
•
Create a record of crash dumps when a fatal error occurs.
The Shaker is a BREW application, integrated into The Grinder, that allows you to set up BREWenabled device environments and send certain BREW messages to other applications on the
device. You can access the Shaker application from The Grinder Options dialog box before starting
the grind process. The Shaker allows you to perform the following tasks:
•
Specify the amount of device memory or Embedded File System (EFS) to be
maintained.
•
Create a certain number of sockets.
•
Suspend or resume foreground applications.
•
Capture screen shots of the device on which it is running.
You need to configure both The Grinder and the Shaker for your device. For more information, see
the documentation provided with the BREW Tools Suite or visit the BREW Web site.
QUALCOMM Confidential and Proprietary
367
BREW® Developer Training
Tools Overview – BREW AppLoader
Create
executable
DLL
MOD
Simulator
debugging
Load application
on device
BREW Grinder
BREW AppLoader
BREW Debugger
TheAppLoader
AppLoader
The
is
a
GUI
andCLI
CLI
is a GUI and
toolthat
thatisisused
usedtoto
tool
loadapplications
applications
load
on
a
devicefrom
from
on a device
your
computer.
your computer.
transfersdata
data
ItIttransfers
filesfrom
fromthe
the
files
devicetotothe
the
device
computer
overaa
computer over
serial
connection
serial connection
Device
debugging
BREW Logger
BREW Grinder
BREW Shaker
Automation
testing
BREW Perl I/F APIs
Packaging for
TBT submission
BREW AppSigner
368
AppLoader helps developers manage files/modules on a BREW-enabled device, providing access
to these and other features:
• Copy files and modules to device.
• Copy files from the device.
• Remove files and modules from the device.
• View modules on the device.
• View BREW file system .
• View device memory information.
• Automate and use Perl support via BREW Perl interfaces.
QUALCOMM Confidential and Proprietary
368
BREW® Developer Training
Tools Overview – BREW Debugger
Create
executable
DLL
MOD
TheOn-Target
On-TargetDebugger
Debugger
The
allows
the
developer
allows the developer toto
executeclassical
classicaldebugging
debugging
execute
commands(breakpoints,
(breakpoints,
commands
watches,etc.)
etc.)on
onGCC
GCCor
or
watches,
ADS
compiled
code
running
ADS compiled code running
onthe
thetarget
targetplatform.
platform.ItItisis
on
composed
of
clientrunning
running
composed of aaclient
on
the
device
and
front-end
on the device and front-end
UIon
onaaPC
PC
UI
Simulator
debugging
Load application
on device
BREW Grinder
BREW AppLoader
BREW Debugger
Device
debugging
BREW Logger
BREW Grinder
BREW Shaker
Automation
testing
BREW Perl I/F APIs
Packaging for
TBT submission
BREW AppSigner
369
BREW application debugging goes beyond the Simulator. Now, with the BREW Debugger,
developers can debug BREW applications on-target and make use of these rich features:
• Gdb and AXD front-ends
• Command line gdb, DDD,
or Insight GUIs for GCC compiled code
• Command line armsd or AXD GUI for ARM compiler
• No special H/W required!
• See DebuggerUserGuide included with debugger install for more details
QUALCOMM Confidential and Proprietary
369
BREW® Developer Training
Tools Overview – BREW Logger
DLL
Create
executable
MOD
TheLogger
Loggerprovides
provides
The
diagnosticmessages
messagestoto
diagnostic
assistinintroubleshooting
troubleshooting
assist
problematic
areasofofBREW
BREW
problematic areas
applications.
The
Logger
applications. The Logger
connectsyou
youtotoaadevice
deviceinin
connects
diagnosticmode
modeso
sothat
that
diagnostic
messagescan
canbe
be
messages
exchangedbetween
betweenthe
the
exchanged
diagnostic
monitor
and
the
diagnostic monitor and the
device
device
Simulator
debugging
Load application
on device
BREW Grinder
BREW AppLoader
BREW Debugger
Device
debugging
BREW Logger
BREW Grinder
BREW Shaker
Automation
testing
BREW Perl I/F APIs
Packaging for
TBT submission
BREW AppSigner
370
The BREW logger helps developers log and view debug information from a BREW-enabled device.
With the logger, you can:
• Record and filter dbgprintf data.
• Record and filter ILogger binary data.
• View log information at runtime.
• Save log information to file.
• Manage the log file size, the log record time, and the log format.
• Get Perl support via BREW Perl interfaces.
QUALCOMM Confidential and Proprietary
370
BREW® Developer Training
Tools Overview – Grinder and Shaker
Create
executable
DLL
MOD
TheGrinder
Grindersends
sends
The
keystrokesand
andother
otherevents
events
keystrokes
yourdevice
deviceor
orthe
the
totoyour
Simulator
Simulator
simultaneously.ItItisisalso
alsoused
used
simultaneously.
to
set
up
the
Shaker
tool
to set up the Shaker tool
TheShaker
ShakerisisaaBREW
BREW
The
applicationthat
thatisisintegrated
integrated
application
intoThe
TheGrinder
Grindertool.
tool.ItItallows
allows
into
youtotoset
setup
upthe
thedevice
device
you
environment
environment
Simulator
debugging
Load application
on device
BREW Grinder
BREW AppLoader
BREW Debugger
Device
debugging
BREW Logger
BREW Grinder
BREW Shaker
Automation
testing
BREW Perl I/F APIs
Packaging for
TBT submission
BREW AppSigner
371
The Grinder and Shaker, as described before, can be used on the device as well. The Grinder is a
key events-generator tool, running on Windows, designed to test the stability of a device application’s
execution. The Grinder randomly generates and sends events known as a grind to applications
running on the Simulator as well as BREW-enabled devices. It can also do the following:
• Log events being sent.
• Capture snapshots of the BREW directory file after the grind.
• Create a record of crash dumps when a fatal error occurs.
The Shaker is a BREW application, integrated into The Grinder, that allows you to set up BREWenabled device environments and send certain BREW messages to other applications on the device.
You can access the Shaker application from The Grinder Options dialog box before starting the grind
process. The Shaker allows you to perform the following tasks:
• Specify the amount of device memory or Embedded File System (EFS) to be maintained.
• Create a certain number of sockets.
• Suspend or resume foreground applications.
• Capture screen shots of the device on which it is running.
You need to configure both The Grinder and the Shaker for your device. For more information, see
the documentation provided with the BREW Tools Suite or visit the BREW Web site.
QUALCOMM Confidential and Proprietary
371
BREW® Developer Training
Tools Overview – Perl Interface
Create
executable
DLL
MOD
TheBREW
BREWPerl
PerlI/F
I/FAPIs
APIs
The
allowyou
youtotowrite
writePerl
Perlscripts
scripts
allow
to
automate
regression
to automate regression
testingofofyour
yourapplication.
application.
testing
They
can
be
used
perform
They can be used totoperform
file
operations
with
the
file operations with the
device,perform
performkeypress
keypress
device,
emulation,
set
log
filters,and
and
emulation, set log filters,
get
logging
information
from
get logging information from
thedevices
devices
the
Simulator
debugging
Load application
on device
BREW Grinder
BREW AppLoader
BREW Debugger
Device
debugging
BREW Logger
BREW Grinder
BREW Shaker
Automation
testing
BREW Perl I/F APIs
Packaging for
TBT submission
BREW AppSigner
372
The BREW Perl interfaces help developers write scripts for automation and batched command
execution, including these features:
• Recording device log information
• Simulating device keypress events
• Copying files and directories
QUALCOMM Confidential and Proprietary
372
BREW® Developer Training
Tools Overview – AppSigner
DLL
Create
executable
MOD
Simulator
debugging
Load application
on device
TheAppSigner
AppSigner
The
allows
youtotodigitally
digitally
allows you
notarize
your
notarize your
application’sfiles
files
application’s
using
your
Class
using your Class 33
certificationfrom
from
certification
VeriSign.
After
an
VeriSign. After an
application
is
application is
notarized,the
the
notarized,
application
application isis
submittedfor
forTRUE
TRUE
submitted
BREW®®Testing
Testing
BREW
BREW Grinder
BREW AppLoader
BREW Debugger
Device
debugging
BREW Logger
BREW Grinder
BREW Shaker
Automation
testing
BREW Perl I/F APIs
Packaging for
TBT submission
BREW AppSigner
373
The AppSigner is used when the application has been tested and is ready for submission. It uses
the developer’s Class 3 certificate (described in the authentication process) to digitally sign the
application files prior to submission.
AppSigner provides you with services to:
• Manage application files.
• Manage application signatures.
• View existing signature details.
• Remove existing signatures
• Create or add VeriSign PTA signatures.
• Create application packages (zip files) for submission to TRUE BREW Testing.
QUALCOMM Confidential and Proprietary
373
BREW® Developer Training
Key Points Review
During this module, students learned to:
9 Describe the process to become a BREW authenticated developer
9 Identify testing and commercialization tools
9 Explain the testing and commercialization process
374
This module provided an overview of the process for becoming a BREW authenticated developer
and introduced the tools available for authenticated developers. Special emphasis was given to the
key points listed above.
QUALCOMM Confidential and Proprietary
374
BREW® Developer Training
Module 6.2
Testing Applications on a BREW Device
The BREW Device Environment
Compiling for BREW Devices
The BREW AppLoader
Troubleshooting and Debugging
375
QUALCOMM Confidential and Proprietary
375
BREW® Developer Training
Module Objectives
After completing this module, students will be able to:
9 Describe the difference between the device environment and the
SDK
9 Compile a BREW application for a target device
9 Load an application onto a BREW device using the BREW
AppLoader
376
This module describes on-device testing with special emphasis on the key points listed above.
QUALCOMM Confidential and Proprietary
376
BREW® Developer Training
The BREW Device Environment
377
QUALCOMM Confidential and Proprietary
377
BREW® Developer Training
BREW Device Directory Structure Before 3.x
Topmost directory of the BREW file space is the /brew directory, known
also as the BREW directory. Stored in this directory are application MIFs
and application subdirectories
/brew
myapp.mif
app2.mif
myapp.mod
myapp.bar
myapp
myapp.sig
Each application has its own
directory that contains the
application .mod, .sig, .bar,
other supporting files, and
subdirectories as needed
myapp.txt
app2
DATA
shared
Shared data, the location is
specific to the OEM
378
Before considering file access, familiarize yourself with the BREW file system and the directory
structure of BREW applications. As seen here, the typical BREW SDK directory structure has a
central or root directory (Examples by default) that contains the MIFs and a directory for each
BREW application. Within the BREW application directories, the application’s .dll or .mod binary
file, supporting data files, and even subdirectories are stored. Each application follows this
structure. Finally, a Shared directory allows applications to conveniently access shared
information. This is discussed in more detail shortly.
QUALCOMM Confidential and Proprietary
378
BREW® Developer Training
BREW 3.x Device Directory Structure
The top level directory is the BREW applications directory, or simply the
BREW directory. Device file systems are case sensitive and the directory is
usually named as shown.
brew/
myapp.mod
myapp.sig
Applications are stored in
the mod directory.
myapp
myapp.bar
brew/mod
myapp.txt
app2
Each application has its
own directory that
contains the application,
supporting files, and
subdirectories as needed
DATA
myapp.mif
MIFs are stored in the mif directory.
brew/mif
Each application has a corresponding mif
file. The name of the mif must match the
name of the application directory
app2.mif
shared
3.x
New Feature
379
The file system on 3.x devices is much more structured than in the standard SDK installation and
on devices prior to 3.1.
As shown above, the topmost directory for BREW applications is called the Applications directory
and shows as brew/ on device. Below this directory are three subdirectories worth noting.
The brew/mod directory contains all BREW applications in subdirectories. Each application
subdirectory has the BREW application as a compiled binary file (.mod), a BREW application
signature file (.sig), any BREW resource files (.bar), and any other application support files such as
.txt files. Application .mod and .sig files are described shortly.
The brew/mif directory contains the mifs for all applications on the device. Previously, all mifs were
stored at the root level. The name of the mif must match the name of the directory that contains the
corresponding BREW application.
Finally, the brew/shared directory provides BREW applications with a location for shared data.
QUALCOMM Confidential and Proprietary
379
BREW® Developer Training
BREW Device Process Tasks
1.
Develop and test application with
SDK
2.
Compile application for ARM
3.
Get test signature
4.
Move application to device
5.
Test and debug app on target
380
This section details the steps involved in the process for moving an application to a device. Before
moving applications to a device, they should be developed and tested thoroughly using the SDK.
Testing in the Emulator provides a fast, effective way of confirming most major application
functionality.
The first process step is to compile the application for the ARM processor. Next, a test signature is
obtained for the application. Finally, the application and supporting files are moved to the device.
Each of these steps involves tools, which will be discussed in the coming slides.
QUALCOMM Confidential and Proprietary
380
BREW® Developer Training
Tools and Concepts
Need a compiler to generate code for the ARM CPU that is used
on BREW-enabled devices
RealView compiler from ARM – commercial
GNU GCC compiler – free
Visual Studio Add-ins provide automation of compilation tasks
.mak file generation based on application requirements
Compilation and clean built on .mak and for ARM target
Application signatures provide integrity
TestSig Generator used to create signature used in testing
Production signature created prior to commercialization
AppLoader used to move application and associated files to the
device
381
Moving an application to a device involves the use of several tools, and requires the understanding
of some concepts. Next, each of these tools and concepts will be explored in greater detail.
QUALCOMM Confidential and Proprietary
381
BREW® Developer Training
BREW Visual Studio Add-Ins
Generates BREW
ARM Makefiles
Create .mak files for
both ARM RealView
and GNU compilers
Toolbar buttons for quick
access to SDK tools and
creation of mak files
Compile for ARM
within Visual
Studio
Generate object
code based on .mak
within Visual Studio
See results in output
window
Quickly and easily compile
your application right from
Visual Studio
382
There are several Visual C++ add-ins that simplify the creation of BREW application projects and the
compilation of these applications for the handset:
• BREW Application Wizard – Automates the creation of the files needed for a BREW
application.
• Automated ARM Compiling – Adds two commands to the Tools menu and three new
toolbar buttons:
• BREW ARM Make – On the tools menu, compiles the application and shows results in the
output window in Visual Studio
• BREW ARM Make Clean – On the tools menu, cleans the old object files from the makefile.
• Generate ARM Makefile –A new button on the toolbar creates a makefile for the
application.
• BREW MIF Editor – Opens the BREW MIF Editor for creating or changing the MIF for the
application.
• BREW Resource Editor – Opens the BREW Resource editor for creating or changing
resources.
• BREW Integrated Online Help – Provides access to help on BREW APIs, such as
supporting functions, from within Visual Studio.
For further information, see the BREW SDK User Docs.
QUALCOMM Confidential and Proprietary
382
BREW® Developer Training
Application Signatures
A signature is required for every BREW application
Test Signature or Production Signature
Apps will not run if signature missing or altered
Test Signatures
Generated on the web-based
TestSig Generator
Keyed to the ESN or IMEI of the
device
Allow any test applications to
run on a single device
Expire after 90 days
Production Signatures
Obtained prior to certification
process
Keyed to the application
Allow one application to run on
any device
Protects against application
tampering
383
Every BREW application must have a valid signature (.sig) file to run on a device. The signature
ensures the integrity of the application by detecting if files have changed since the developer
created them. Before any application is started, its signature is examined. If this examination yields
any discrepancies, the application will not be started.
Signatures come in two forms: test signatures and production signatures. Next, the differences
between these two types will be explained.
Production signatures serve the same purpose as test signatures, but do so in a slightly different
manner. Production signatures allow a single application to run on any device and final production
signatures are only applied when submitted to the distribution system.
From the developer’s perspective, the first step is to digitally sign the application using the free
AppSigner tool. The AppSigner uses a Class 3 VeriSign certificate (obtained during authentication)
to digitally notarize application files. Production signatures must obtained before submitting an
application for TRUE BREW Testing, which we’ll discuss later in the course. After TRUE BREW
Testing, the application is passed to QUALCOMM Internet Services where the final production
signature is applied.
Note that the signature generated by the AppSigner alone will not permit applications to execute on
a device.
QUALCOMM Confidential and Proprietary
383
BREW® Developer Training
Compile for ARM
Automated Approach
Create a makefile in Visual
Studio
Create from scratch or
Copy one from a sample
application and modify it
ARM RealView compiler –
GenerateARMMakefile toolbar
button
GNU Compiler –
GenerateGCCMakefile toolbar
button
Manual Approach
Create a .mak file
Open an MS-DOS command
window
Compile application from MSDOS
Run the compiler
Tools ->BREW Application Make
Compiler output is shown in the
status window.
You can double-click any
warnings or errors and it will
jump to the offending line of code
nmake /f myapp.mak all
Monitor output window for
errors
384
The Real View ARM compiler is a specialized package from ARM that compiles application source
code into an ARM-compatible binary module. It includes the Compiler, Linker, and Assembler
components of the ARM Developer Suite. Please refer to the BREW Web site for more information
and pricing details.
The GNU ARM compiler is available from GNU and is free of charge. It also includes a compiler,
linker, and assembler. Please refer to the BREW Web site for more information.
Both compilers can be run from a GUI front end in Visual Studio. When the SDK is installed, it
creates the necessary plug-ins for Visual Studio so that you can perform the compilation from
within a menu in Visual Studio.
QUALCOMM Confidential and Proprietary
384
BREW® Developer Training
AppLoader Overview
Available via Developer Extranet
Uses familiar file explorer interface
Compatible with all BREW-enabled
devices
Auto-detects connected devices
Perl support via BREW Perl
interfaces
AppLoader helps developers
manage files/modules on a BREWenabled device
Copy files and modules to device
Copy files from the device
Remove files and modules from the
device
View modules on the device
View BREW file system
View device memory information
Supports basic interactions:
Putting device offline
Resetting device
385
The BREW AppLoader makes loading and managing files on a device quick and easy. It provides
a familiar, easy to use file explorer interface, with a directory tree to the left and a contents window
to the right. Files can be copied to the device by simply dragging them to the appropriate directory.
AppLoader also provides simple device operations such as setting the device off-line and resetting
the device. Additionally, the BREW Perl interfaces provide APIs that can be used to automate
loading and removing files.
QUALCOMM Confidential and Proprietary
385
BREW® Developer Training
Lab 6.2 Moving an Application to a Device
386
Before You Start
Before you begin this exercise, you should have:
•
Completed the previous labs.
Description
The purpose of this lab is to familiarize you with the tools and processes for compiling a BREW
application for an actual handset. In this lab you will compile myapp for the ARM processor. Once
compiled, you will use the BREW AppLoader to download the application to the device.
This lab consists of two exercises:
•
Exercise 1 – Compiling for ARM
•
Exercise 2 – Using AppLoader
APIs Used
None
QUALCOMM Confidential and Proprietary
386
BREW® Developer Training
Exercise 1 – Compiling for ARM
There are two methods for compiling for ARM. The first requires manual creation of a .mak file
and then uses the nmake utility from a command prompt to compile the application. The second
uses the Visual Studio Add-ins GenerateARMMakeFile, BREW ARM Make, and BREW ARM
Make Clean to generate the .mak file and then compile the application.
Follow this procedure if you do not have the Visual Studio Add-ins installed:
1. Open the MS-DOS command prompt.
2. Copy the existing makefile from:
C:\Program Files\BREW\Examples\ RoadWarrior\RoadWarrior.mak
to:
C:\Program Files\BREW\Examples\ myapp\myapp.mak
3. Edit myapp.mak and replace all occurrences of RoadWarrior with myapp.
4. Change your current directory to
<BREW SDK>\Examples\myapp
5. Type nmake /f myapp.mak all to compile the application.
Follow this procedure if you do have the Visual Studio Add-ins installed:
1. If you completed the first procedure of this exercise, delete the .mak and .mod files generated in
the first part of this exercise.
2. Select the GenerateARMMakeFile button on the toolbar to generate .mak file. This utility creates
a .mak file customized for your project settings, including situations with multiple header and
source files.
3. Select the Tools / BREW ARM Make menu option to compile the application and create the
.mod file. Notice that the ARM compilation results are displayed in the output pane of Visual
C++.
4. Select the Tools / BREW ARM Make Clean menu option to clean the compilation files from the
directory.
QUALCOMM Confidential and Proprietary
387
BREW® Developer Training
Exercise 2 – Using Apploader
Apploader is the tool used to move BREW applications to a BREW-enabled device. In this
exercise you will take the application you compiled in Exercise 1 and install it on your BREW
device. Because there are slight differences in file structure and method, alternative procedures
are provided for 2.x and 3.x devices.
Follow this procedure for BREW 2.x devices:
1. Ensure the handset is powered on.
2. Launch the BREW AppLoader program using the shortcut on your desktop.
3. Select the following option
My device has the following BREW version: 1.x/2.x
4. Select the option for Do not auto-detect my device. Select the COM port on which the handset
is connected and click OK.
Note: Leaving this option is convenient for connecting to devices but if you have several
devices connected, it may take several minutes to detect your device.
5. Create a new directory in the “/” directory, named myapp.
Note: Ensure that the files and directories are in lowercase when put on the handset’s file
system.
6. Copy the myapp.mod, myapp.bar, and dog.bci files from the <BREW
SDK>\Examples\myapp directory to the newly created \myapp directory on the handset.
7. Your instructor will provide you with a test signature for your device. Rename the test signature
file on your PC desktop to match the applet name, myapp.sig, and copy it back into the newly
created /myapp directory on the handset.
8. Copy the MIF for the applet, myapp.mif, to the “/” directory on the handset.
9. Power the handset off and back on.
10. Launch the BREW Application Manager on the device.
11. Scroll through the BREW applications to ensure that myapp appears correctly.
12. Select myapp to test your BREW application.
QUALCOMM Confidential and Proprietary
388
BREW® Developer Training
Follow this procedure for BREW 3.x devices
1. Ensure the handset is powered on.
2. Launch the BREW AppLoader program using the shortcut on your desktop.
3. Select the following option
My device has the following BREW version: 3.x
4. Select the option for Do not auto-detect my device. Select the COM port on which the handset
is connected and click OK.
Note: Leaving this option is convenient for connecting to devices but if you have several
devices connected, it may take several minutes to detect your device.
5. Create a new directory in the “brew/mod” directory, named myapp.
Note: Ensure that the files and directories are in lowercase when put on the handset’s file
system.
6. Copy the myapp.mod, myapp.bar, and dog.bci files from the <BREW
SDK>\Examples\myapp directory to the newly created brew/mod/myapp directory on the
handset.
7. Your instructor will provide you with a test signature for your device. Rename the test signature
file on your PC desktop to match the applet name, myapp.sig, and copy it into the newly created
brew/mod/myapp directory on the handset.
8. Copy the MIF for the applet, myapp.mif, to the “brew/mif” directory on the handset.
9. Power the handset off and back on.
10. Launch the BREW Application Manager on the device.
11. Scroll through the BREW applications to ensure that myapp appears correctly.
12. Select myapp to test your BREW application.
QUALCOMM Confidential and Proprietary
389
BREW® Developer Training
Alternative procedure
Instead of creating the directories by hand, you can use this procedure to easily create applet
directories and upload applets to a BREW device. This procedure works for all BREW applets,
easily placing the components in the appropriate directories.
1. Create a single directory on your desktop containing the myapp.mif, myapp.mod, myapp.sig, and
myapp.bar files.
2. In AppLoader, select Module \ New Module.
3. Next to Select Module Directory from Hard Disk: click Browse. Navigate to the directory you
created in step 1. Click Open.
4. In the field under Specify Module Name to Persist on Device, enter myapp. Click on OK.
Note: This name must be the same as the name specified in the MIF.
Check that the module components were loaded into the right directories.
5. Run the app as described previously.
QUALCOMM Confidential and Proprietary
390
BREW® Developer Training
Key Points Review
During this module, students learned to:
9 Describe the difference between the device environment and the
SDK
9 Compile a BREW application for a target device
9 Load an application onto a BREW device using the BREW
AppLoader
391
This module described on-device testing with special emphasis on the key points listed above.
QUALCOMM Confidential and Proprietary
391
BREW® Developer Training
Module 6.3
Building Usage Based Applications
Usage-based Applications
Maintaining Usage with ILicense
Refreshing Licenses through
MobileShop®
392
QUALCOMM Confidential and Proprietary
392
BREW® Developer Training
Module Objectives
After completing this module, students will be able to:
9 Describe usage-based applications
9 Build usage management into an application with the ILicense
interface
9 Discuss the process for using MobileShop® to update usage based
licenses
393
This module focuses on usage-based application development with special emphasis on the key
points listed above.
QUALCOMM Confidential and Proprietary
393
BREW® Developer Training
BREW Pricing Types
Type
Description
Demo
PT_DEMO
Free demonstration
Purchase
PT_PURCHASE
Normally purchased version
Subscription
PT_SUBSCRIPTION
Monthly recurring billing
Upgrade
PT_UPGRADE
Upgrade of existing application
version
Auto Installed
PT_AUTOINSTALL
Application is automatically
installed
394
When a BREW application is downloaded, the user is presented with various options on how the
application is purchased. These pricing types include Demo, Purchase, Subscription, Upgrade, and
Preinstall. These purchase types, along with the license type (explained on the next page) and a
value, determine the cost of the application to the user and how much the application can be used
before it expires.
QUALCOMM Confidential and Proprietary
394
BREW® Developer Training
BREW License Types
Type
Expiration
Value
No expiration
LT_NONE
Does not expire
None
Number of uses
LT_USES
After number of uses
specified
Number of uses
remaining
Expiration Date
LT_DATE
Specified date
Date/Time of
expiration
Number of days
LT_DAYS
Number of days after
download
Time of expiration
Number of minutes use
LT_MINUTES_OF_USE
After being active certain
number of minutes
Number of minutes
remaining
395
An application can be purchased with one of 5 different license types with one to three different
values offered. Consider this example. A user downloads a ring tone application, and chooses to
pay $1US for 5 uses of the application. The price method is Purchase, the license type (LT) is
Uses (LT_USES), and the license value is 5.
The table above defines the 5 different license type in terms of how they expire and what value
shows when the license information is queried.
QUALCOMM Confidential and Proprietary
395
BREW® Developer Training
ILicense Overview
Interface for accessing and
setting license parameters
Provide user feedback when license
is about to expire
Use to modify application
functionality based on license type
ILICENSE_DecrementUsesRemaining()
ILICENSE_GetInfo()
ILICENSE_GetPurchaseInfo()
ILICENSE_IncrementUsesRemaining()
ILICENSE_IsExpired()
ILICENSE_SetUsesRemaining()
Requires AEELicense.h
ClassID is AEECLSID_LICENSE
Increment and decrement
licenses
Common ILicense Functions
Query for module license information
Set module usage-based license
information
Applies to current module only
Check for license type and
expiration
USE
SE for
LICEN
s
e
m
ti
Use 5
Add to number of uses as a bonus,
such as on high score
Reduce number of uses as
functionality used, such as when a
ring tone is downloaded
396
Application license information is stored on a module basis in the MIF. For testing purposes, as we
will see shortly, this information can be changed via the MIF Editor. For production applications, the
BREW runtime controls the license information and expiration of all license types except for usage
based (LT_USES) applications. For usage based apps, it is up to the application to maintain
license expiration. This is because the “use” of an application may not be just starting the
application but rather using some functionality, such as downloading a ring tone.
The ILicense interface allows applications to query license information, such as license type and
expiration, for their application module. Additionally, ILicense can be used to increment,
decrement, or set the number of uses programmatically if the license type is usage-based
(LT_USES).
QUALCOMM Confidential and Proprietary
396
BREW® Developer Training
Retrieving License Information
ILICENSE_GetInfo()
AEELicenseType
ILICENSE_GetInfo(
ILicense * pILicense,
uint32 * pdwinfo
);
AEEPriceType
ILICENSE_GetPurchaseInfo(
ILicense pILIcense,
AEELicenseType * LType,
uint32 * pdwExpire;
uint32 * pdwSeq
)
License type (LT_USES,
LT_DATE, LT_DAYS, etc)
pdwInfo provides expiration
information
ILICENSE_GetPurchaseInfo()
AEEPriceType – PT_DEMO,
PT_PURCHASE,
PT_SUBSCRIPTION, etc.
AEELicenseType - LT_USES,
LT_DATE, LT_DAYS, etc.
pdwExpire provides expiration value
pdwSeq provides sequence number
of downloaded version
LT_USES apps must call this
function prior to use
Optionally fills license type and
expiration
Check for PT_DEMO to disable
features
397
There are two methods of retrieving license information. The method used depends on the
information required.
ILICENSE_GetInfo() returns the type of licensing that applies to the currently running application
module. It also provides expiration information specific to the type of licensing employed. BREW
does not enforce restrictions on access to usage-based applications, so applications licensed per
use must call this function to determine if use is permitted. If the license is expired, the application
itself must restrict further use.
ILICENSE_GetPurchaseInfo() returns the manner in which the application was purchased. In other
words, this method returns the pricing method as described previously. Optionally, this method can
return the license type and expiration value. This method can check for PT_DEMO to disable
features thus enticing the user to buy the full version of the application.
QUALCOMM Confidential and Proprietary
397
BREW® Developer Training
Changing License Information
ILICENSE_IncrementUsesRemaining()
int ILICENSE_IncrementUsesRemaining
(
ILicense *pILicense
);
ILICENSE_DecrementUsesRemaining()
int ILICENSE_DecrementUsesRemaining
(
ILicense *pILicense
);
ILICENSE_SetUsesRemaining()
int ILICENSE_SetUsesRemaining
(
ILicense *pILicense,
uint32 dwCount,
);
398
BREW does not automatically update usage counts based on application startup or any other
events. Responsibility for upgrading the usage counts rests on the application. The ILicense
methods above provide the functionality to change usage license counts based on application
specifics.
For example, consider a game that decrements available uses every time a game is played. To
entice the user to keep playing, the game offers a free play if a certain score is achieved.
Additionally, if the user reaches a perfect score, then a certain number of uses is added to
remaining uses.
Further consider that the user purchased 5 uses initially.
When the user plays the game, ILICENSE_DecrementUsesRemaining() is called, reducing the
usage count to 4.
Next, the user achieves a high score resulting in a free play.
ILICENSE_IncrementUsesRemaining() adds a use to the remaining count. The count is now back
to 5.
Finally, the user breaks the record score and wins five free plays. The program can either call
ILICENSE_IncrementUsesRemaining() five times or, a better solution, use ILICENSE_GetInfo() to
retrieve number of uses, add 5 to it, and then calls ILICENSE_SetUsesRemaining() with this value.
QUALCOMM Confidential and Proprietary
398
BREW® Developer Training
Testing a Usage-Based Application
Add uses to MIF
License tab
Set License Type,
Price Type, and
License Usage
Count
Run application
Check remaining
uses either
programmatically or
in MIF
Expire all uses
Check functionality
on expiration
Important Note
Remember to clear this information prior to
commercialization. Select No License to clear
the test license information
399
Once you have built license management into your applications, test it on the Simulator, and on a
device, to make sure the functionality works as expected. It is relatively easy to set preliminary test
information in the MIF. Set the License Type, Price Type, and License Usage Count parameters
and then recompile the MIF. You can then test the functionality to ensure your application
increments/decrements/sets license data correctly and, more importantly, disables functionality
upon expiration.
It is very important to remember to remove this information from the MIF prior to submitting your
application for testing. The preliminary license information will be established when the user
chooses a price type and value at time of download. Remove your testing parameters simply by
selecting No License.
QUALCOMM Confidential and Proprietary
399
BREW® Developer Training
Refreshing Licenses with MobileShop
MobileShop is registered handler of cmshop MIME type
Invoke MobileShop via ISHELL_BrowseURL() with one of the URLs below
ISHELL_BrowseURL(pIShell, “cmshop:Catalog”);
cmshop:Catalog
cmshop:Search
Display MobileShop Search UI. Users can enter the name of the app and have MobileShop
search for the app
cmshop:ItemID =<Download Item ID>
Display top-level catalog. Users can then browse the catalog for the application
Purchase options for app with matching Item ID
BREW 1.x and 2.x apps cannot retrieve Item ID and must use alternative method
(cmshop:Catalog or cmshop:Search)
BREW 3.x provides ISHELL_DetClassItemID() to find Item ID corresponding to ClassID
cmshop:UpgradeCheck=<Download Item ID>
Display upgrade options for app with matching Item ID
Same 1.x and 2.x restrictions apply
400
BREW applications can register themselves as handlers of MIME types (and URLs).
ISHELL_GetHandler() can be used to see if an application has registered itself as handler of
specified MIME type, and ISHELL_BrowseURL() can be used to invoke such registered
applications by passing the URL. This results in the handler application being started with
EVT_APP_START and then being delivered EVT_APP_BROWSE_URL with dwParam pointing to
the URL string. This concept is central to enabling applications use MobileShop.
MobileShop 2.x and higher registers itself as a handler of the cmshop MIME type and provides
following URLs of interest to third-party applications:
• “cmshop:Catalog” Applications can invoke MobileShop 2.x to display the top-level
catalog by calling ISHELL_BrowseURL(pIShell, “cmshop:Catalog”).
• “cmshop:Search”Applications can invoke MobileShop 2.x to display the search UI by
calling ISHELL_BrowseURL(pIShell, “cmshop:Search”). In response to this command,
the user is presented with the MobileShop 2.x Search UI, from where the user can
search for an application or catalog.
• “cmshop:ItemID=<Download Item ID>”Applications can invoke MobileShop 2.x to display
their purchase options by calling ISHELL_BrowseURL(pIShell,
“cmshop:ItemID=<Download Item ID”).
• “cmshop:UpgradeCheck=<Download Item ID>” Applications can invoke MobileShop 2.x
to display their upgrade options by calling ISHELL_BrowseURL(pIShell,
“cmshop:UpgradeCheck=<Download Item ID”).
There is no means in BREW 1.x and BREW 2.x for applications to find their download item ID, so
applications must use alternate ways of finding their download item ID on the application download
server. BREW 3.x provides ISHELL_GetClassItemID() to enable applications to retrieve the
download item ID corresponding to the application’s ClassID.
QUALCOMM Confidential and Proprietary
400
BREW® Developer Training
Lab 6.3: Using ILicense
401
Before You Start
Before starting this exercise, you should have:
• Completed the previous labs
Description
The purpose of this lab is to monitor the number of uses for an application.
APIs Used
ISHELL_CreateInstance() - open ILicense interface
ILICENSE_DecrementUsesRemaining() - decrement number of uses
ILICENSE_GetInfo() - get current number of uses
SPRINTF() - helper function to format message string
ILICENSE_Release() - close ILicense interface
QUALCOMM Confidential and Proprietary
401
BREW® Developer Training
Procedure
Follow these steps to complete the exercise:
1. Launch the BREW Resource Editor from within the Start Menu or from the Tool Bar in
Visual C++. Open the myapp.brx file in your myapp directory.
2. Select New String from the toolbar or Resource/New String from the menu.
3. Add the string “Usage Count for Spot” with the respective resource name
IDS_USAGE.
4. Rebuild the myapp.bar file.
5. Launch Visual C++ if you have not done so.
6. Include “AEELicense.h” in your application.
7. Add the following variables to your applet structure.
ILicense
unit32
*pILicense;
usageCount;
// License interface
// for counting apps run
8. Add APP_STATE_USAGE to your enum list of application states.
9. Add the following function prototype to your code.
void ShowUsageCount(myapp *pMe);
10. For the EVT_COMMAND event in your event handler, call ShowUsageCount(pMe) in a
case statement for IDS_USAGE.
11. Add APP_STATE_USAGE to your case statements that handle the clear key (AVK_CLR
event).
12. Call ISHELL_CreateInstance() in your myapp_InitAppData() function to open
the ILicense interface with AEECLSID_LICENSE. Release this interface in your
myapp_FreeAppData() function.
13. Call IMENUCTL_AddItem() in DisplayMainMenu() to add resource string
IDS_USAGE to the menu.
QUALCOMM Confidential and Proprietary
402
BREW® Developer Training
14. Call ILICENSE_GetInfo() in your myapp_InitAppData() function to initialize the
pMe->usageCount variable. This information will be read from your MIF file.
15. Modify your ShowAnimation() function so that it calls
ILICENSE_DecrementUsesRemaining() when its selected. Use
ILICENSE_GetInfo() to get this information from the MIF file. When the number of
uses (pMe->usageCount ) reaches zero, prompt the user to renew.
16. Write the ShowUsageCount() function to display the current number of uses left. Use
helper function SPRINTF() to format the message and call your DisplayMessage()
function to display it.
17. Make sure you call ResetControls() at the beginning of your ShowUsageCount()
function and set the application state to APP_STATE_USAGE.
18. Compile your application.
19. Launch the MIF Editor with your myapp.mfx file. Click the License tab and uncheck
the No License checkbox. Set LicenseType to Number of Uses, Price Type to Demo,
and set the License Usage Count to 5.
20. Save your myapp.mfx, then click on Build in the MIF Editor to rebuild your
myapp.mif file.
21. Test your application in the Simulator.
22. Run the Animation several times, then select Usage Count for Spot from the
menu to view the current number of uses left. Continue to run the Animation until your
application prompts you to renew.
After You Finish
After you complete this exercise, you should have:
• learned how to use the MIF Editor to create fixed usage counts for applications
• learned how to use the ILICENSE interface to read the MIF file and decrement the
number of uses of an application
QUALCOMM Confidential and Proprietary
403
BREW® Developer Training
Key Points Review
During this module, students learned to:
9 Describe usage-based applications
9 Build usage management into an application with the ILicense
interface
9 Discuss the process for using MobileShop™ to update usage based
licenses
404
During this module, students learned about usage-based applications with special emphasis on the
key points listed above.
QUALCOMM Confidential and Proprietary
404
BREW® Developer Training
Module 6.4
TRUE BREW Testing (TBT)
TRUE BREW Testing Process
Test Cases
Preparing Applications for TBT
405
QUALCOMM Confidential and Proprietary
405
BREW® Developer Training
Module Objectives
After completing this module, students will be able to:
9 Describe the TRUE BREW Testing processes
9 Outline tips for passing TRUE BREW
9 Describe the TRUE BREW Submittal Process
406
This module focuses on TRUE BREW Testing with special emphasis on the key points listed
above.
QUALCOMM Confidential and Proprietary
406
BREW® Developer Training
TRUE BREW® Testing
Purpose is to ensure stability and safety on
carrier networks
Provided by QUALCOMM and NSTL
QUALCOMM digitally signs application after
successful testing
Carriers may require their own tests in addition
to, or instead of, TRUE BREW Testing
407
TRUE BREW® testing evaluates your application against the established levels of stability, quality,
and compliance with standard platform requirements that QUALCOMM’s carrier partners demand.
The National Software Testing Laboratories (NSTL), a global leader in IT testing, planning and
consulting, performs TRUE BREW Testing. NSTL performs testing that slices and dices your
application under real world conditions. NSTL will test for basic functionality, compliance with the
BREW platform, interaction with core phone functions, and compatibility with specific BREWenabled phones and other BREW applications.
While testing of applications is at the discretion of the carrier, most QUALCOMM carrier partners
require some level of third-party testing before they will introduce an application onto their
networks. TRUE BREW Testing ensures BREW applications meet a minimum level of stability,
quality and compliance with standard platform requirements.
Being tested by one lab/carrier does not necessarily qualify your application to run on another
carrier’s network. Your application may need to be tested by multiple labs in order to gain the
distribution you desire. It may even need to go through both carrier-specific as well as application
specific testing.
QUALCOMM Confidential and Proprietary
407
BREW® Developer Training
What Does TRUE BREW Test?
Applications are tested for:
Stability and BREW compliance
Basic functionality, according to documentation
provided by developer
Interaction with core phone functionality
Compatibility with targeted phones
Compatibility with available accessories
Compatibility with other applications
408
The TRUE BREW Testing process focuses on compatibility with BREW, not on the details of
application. Exactly what will be tested will differ from application to application, but generally,
testing will cover the following:
• How the application interacts with core phone functionality. For example, how the
application handles scenarios such as an instant message or other system alerts being
pushed to the device while the user is in another application.
• Core application stability over time. Numerous events will be sent into the event queue to
see how the application handles them and to look for instability (i.e. crashes), memory
problems (i.e. leaks), etc.
• Major application functionality. Testing will be conducted to make sure the major
functionality you claim for your application actually is in the application. TBT will not test
this functionality for “correctness” from an end-user perspective.
• A standard set of tests for each area of BREW functionality used by the application. For
example, TBT will use a standard file system test suite if the application uses the BREW
file system calls. Similarly, if an application uses the BREW networking calls, TBT will
test this with a standard networking test suite.
• Any carrier- or manufacturer-specific look and feel requirements.
• Compatibility with a subset of target phones, accessories and other applications
• Interaction with required accessories.
• Compliance with BREW and BREW privilege levels.
QUALCOMM Confidential and Proprietary
408
BREW® Developer Training
Why TRUE BREW Testing is Important
Addresses carrier concerns:
Apps used to come only from handset manufacturers
Now opening their networks to a new, often unknown, set of players
Problems that afflict the wired world could enter their wireless world
• Hacker attacks
• Spreading of viruses
• Interfering or tampering with other applications on phone
409
TRUE BREW Testing came about because of carrier concerns. To address carrier’s concerns,
developers need to assure stability and safety of their applications
Originally, only handset manufacturers were allowed to produce device applications. Now,
however, carriers are opening their network to new and often unknown players. Consequently,
carriers are concerned about problems that affect the wired world entering their wireless world.
Such problems include hacker attacks, viruses and interference with other important applications
on the device. QUALCOMM’s approach with digital signing and TRUE BREW Testing helps to
allay these concerns.
QUALCOMM Confidential and Proprietary
409
BREW® Developer Training
Tips for Passing TRUE BREW
Before submitting your
application:
Follow testing guidelines
provided on the Developer
Extranet
Test your application on the
handsets you intend it to run on
Test your application using The
Grinder
Common TRUE BREW
Failures
Failing to handle suspend and
resume events
Failing to handle network
coverage changes
Improper privilege levels
Not releasing interfaces
Functionality not as described in
documentation provided with
application
Crashes and unexpected
behavior
Incompatibility with devices
Read the Developer FAQ on
the BREW Web site for further
tips and a link to the testing
guidelines
410
Prior to submitting an application for TRUE BREW Testing, some preparation should be made to
ensure that the application passes. Applications should be pre-tested, using the available
developer tools, according to the Guidelines for Testing BREW Applications. In addition, where
Carrier Guidelines are available, make sure your application meets those as well. The testing
guidelines can be found in the Documents section of the Developer Extranet.
The application should also be tested on all of the real devices it is intended to run on, ideally
utilizing the equipment and expertise of the Developer Lab.
Some of the common problems that cause applications to fail the testing process are shown above.
Solutions to common problems, as well as general developer community discussion can obtained
in the FAQ and developer forum on the BREW Web site.
QUALCOMM Confidential and Proprietary
410
BREW® Developer Training
Preparing Submittal Package
Compile application using unique ClassID
obtained via ClassID Generator tool
Digitally sign and notarize ARM version of
application using BREW AppSigner tool
Requires your VeriSign Authentic Document ID
Prepare zip file containing:
Windows version
Signed ARM version
Supporting documents
411
The BREW application developer needs to perform, at a minimum, the following steps in order to
prepare an application for TRUE BREW Testing.
1. Compile the BREW application using the unique ClassID obtained via the BREW ClassID
Generator tool.
2. Digitally sign and notarize the ARM version of the application using the BREW AppSigner tool in
conjunction with their Class 3 VeriSign certificate.
3. Prepare one zip file named (appname.zip) of the application materials containing the following
specific directories:
• Windows Version: Directory named WIN. This directory contains the Windows executable
version (.dll) of the application, the Signature file (.sig), the MIF file (.mif), the BAR file
(.bar), and any applicable data files. This version is used with the BREW SDK Simulator.
• Signed ARM Version: Directory named ARM. This directory contains the ARM executable
version (.mod) of the application, the MIF file (.mif), the BAR file (.bar), and any applicable
data files. This version is used to test the application on handsets.
• Support Documents: Directory named DOC. This directory contains any application-specific
support documents (such as a user manual and core features description). At a minimum,
this directory should contain a simple text document in English describing how to use the
application. The following file naming convention should be used in order to enable
expedited document handling:
QUALCOMM Confidential and Proprietary
411
BREW® Developer Training
Why Sign Applications?
Your VeriSign Authentic Document ID plus QUALCOMM’s
signature means your application is directly traceable to you
Handsets won’t run unsigned applications
The result: no anonymous execution on carrier networks
412
Applications are signed to ensure that they are delivered from the developer’s hands to the handset
without being modified or tampered with. Since the handsets require digital signatures for all
applications, this provides an easily traceable path back to the developer of any given application.
The result is that BREW applications cannot be obtained from an anonymous source, guaranteeing
the safety and security of the carrier networks and end user handsets.
QUALCOMM Confidential and Proprietary
412
BREW® Developer Training
Submitting to TRUE BREW
Submit application questionnaire on NSTL’s web site
http://www.nstl.com/logoprogram/qualcomm_logoprogram.asp
Submit the zip file
Execute legal agreement with NSTL
Pay testing fee to NSTL by credit card
Continue to deal with NSTL throughout the testing
process
413
Once your application is prepared for submittal, it is submitted for testing at NSTL’s web site,
located at http://www.nstl.com/brew. First, an application questionnaire is completed, providing
NSTL with the necessary detailed information to test the application properly. When NSTL’s legal
agreement has been reviewed and accepted, the previously mentioned zip file is uploaded. Finally,
the testing fee is paid to NSTL using credit card information provided during the submittal process.
It is important to keep an open line of communication with NSTL during the testing process. They
may have questions about application use or behavior, and prompt answers from the developers
could expedite the process substantially.
QUALCOMM Confidential and Proprietary
413
BREW® Developer Training
TRUE BREW Process Flow
Application
Developer
Submits PC-compiled app and
ARM-compiled app
Provides stability and
duration test
Test report
PC-based
portion of test
execution
TRUE BREW
Testing Center
First lab located in San Diego
Phone-based
portion of test
execution
Working through failures
NSTL
interacts w/
developer
NSTL recommends
TRUE BREW
414
The diagram above provides an illustrated review of the application submittal and testing process
just described. Notice that the application is tested in both the PC and phone environments before
earning a TRUE BREW recommendation. When testing is complete, a test report is sent to the
developer by NSTL, reporting any unusual circumstances. In certain situations, a waiver may be
granted to an application that fails a particular test, and the application will still pass testing.
QUALCOMM Confidential and Proprietary
414
BREW® Developer Training
Post TRUE BREW Flow
QUALCOMM
assigns part
number
QUALCOMM grants
TRUE BREW moniker
Developer uses part
number to track
application usage
Application
activated and
available for
carrier to
download
Developer
supplies pricing
information
QUALCOMM
confirms
activation and
sends part
number to
developer
Carrier may
perform
testing
Passes
Fails
Part number available
via Developer Extranet
415
Once an application has completed testing, several things take place. First, QUALCOMM grants
the application a TRUE BREW moniker, and assigns a part number to it. The developer then uses
this part number to submit a pricing template for the application. Carriers can then review the
application, and may perform some additional testing on it. Once it reaches the download server,
the application usage can be tracked by the developer, using the part number assigned earlier.
QUALCOMM Confidential and Proprietary
415
BREW® Developer Training
Application Distribution
416
QUALCOMM Confidential and Proprietary
416
BREW® Developer Training
Pricing Templates
Negotiated on a carrier-by-carrier basis
Submitted through the Developer Extranet
Based on a Pricing Option
Demo
Purchase
Subscription
Upgrade
Pre-install
Pricing option determines model and price points
DAP is the Developer Application Price that the developer charges
for the application
417
Pricing templates define the number and types of purchasing options for an application. These
pricing templates are the means by which developers negotiate pricing with carriers, and the
template can be available to all carriers or for specific carrier or promotion. The negotiation of
pricing template is facilitated by the Developer and Carrier Extranets.
Each pricing template is a combination of price option, price model, and price points. Price options
include demo, purchase, subscription, upgrade, and pre-install. Price model refers to options like
the number of uses or number of days use, and these will be different for each different option
selected. Price points represent different choices for purchase available to the user with a different
value and cost for each price point presented. For instance, for a pricing model in a Purchase
option, there are up to four different Price Points available.
Each of these pricing options and the associated models are explained on the next few slides.
QUALCOMM Confidential and Proprietary
417
BREW® Developer Training
Submitting a Pricing Template
Enter Pricing Template Name and Effective Date
Different templates for promotions, carriers, or other needs
Select a Pricing Option
Select Pricing Model
Enter value for different price points
Number of days = 30
Enter DAP value each Price Point
This is similar to the wholesale price
80% of DAP is revenue to the developer
418
For a given application, there can be one or many pricing templates and a template can be issued
for a specific carrier, a promotion, or for some other purpose. Each template has a name and an
effective date so that it can be created ahead of time and managed through the Developer
Extranet.
Once the name and effective date are entered, a pricing option is selected. This pricing option
determines which models will be available. For instance, a subscription price option will provide
only one model, a monthly subscription, where as a Purchase pricing option will provide models for
number of uses, number of days, elapsed days, or an expiration date. Depending on the model
selected, there may be from one to three different price points, or alternative values that the user
may select, such as 5, 10, or 30 days for price points in a Purchase Number of Days Use template.
QUALCOMM Confidential and Proprietary
418
BREW® Developer Training
Demo Pricing Option
Presumed no cost to user
Models include
Number of uses
Number of days
Elapsed Time
Enter value for selected model. Ranges are:
Number of Uses = 1 to 10 uses
Elapsed Time = 1 to 10 minutes
Number of Days = 1 day
DAP is always $0 USD
419
The Demo option allows applications to be tried by users before purchase, and is limited to number
of uses, number of days or elapsed time as pricing models. DAP is always $0 US for demo
applications. Number of uses will be explained in a following slide.
QUALCOMM Confidential and Proprietary
419
BREW® Developer Training
Purchase Pricing Option
Select one of the models supported
Number of days
Elapsed time
Expiration Date
Enter up to three price point values for selected model.
Example:
15 days, 30 days, 90 days
Can select unlimited use
Enter DAP for each price point
420
The purchase pricing option provides models for number of uses, number of days, elapsed time, or
an expiration date. With Purchase pricing options, up to three different price points can be set, and
one of these price points can be Unlimited. For instance, the price plan could be number of days,
with three different price points of 15, 30, and 90 days. Each of these price points has a
corresponding DAP value.
In order to use the Number of Uses model, the application must call the ILicense interface to
increment or decrement the number of uses. Allowing developers to control the number of uses
through ILicense provides a mechanism for giving bonus plays for high scores or otherwise
controlling the number of uses within the application.
QUALCOMM Confidential and Proprietary
420
BREW® Developer Training
Subscription Pricing Option
Monthly cycles renewing on date of first download
Use is unlimited
Retail price is charged on same cycle
Subscriptions purchased on 29th – 31st of a month will
be charged on 28th for every successive month
421
A simple pricing option, the Subscription option, provides for a monthly recurring subscription
which renews on the date of the download each month until removed from the handset. There are
no price points, as use is unlimited during the subscription period. DAP is for the subscription rate
for a subscription application and will be charged on the renewal date. Subscriptions purchased on
the 29th through the 31st of any month will be charged on the 28th of every successive month
since not all months have more than 28 days.
QUALCOMM Confidential and Proprietary
421
BREW® Developer Training
An Example Pricing Template
Attributes
Price Point 1
Price Point 2
Price Point 3
Value
5 Days
Monthly
Subscription
Unlimited Plays
DAP
$1.00
$3.00
$25.00
Purchase Price
$1.00
$5.00
$20.00
422
In the example above, an application is being submitted with a Purchase pricing option with a
Number of Days Use pricing model. This means that the user, when downloading, will be
purchasing the application for a set number of days. The pricing model has three price point values
of 5 days, 10 days, or Unlimited. Each of these price points has an associated DAP value as
shown in the table.
Now, consider for a moment the Purchase Price, which is what the carrier will charge the user for
the application. Given the first price point, the user will have unlimited use of the application for 5
days and will pay $1 US. The carrier is not charging any markup for the application and is perhaps
looking to profit from the airtime used to download or use the application. In the second scenario
the Purchase Price is $2 US greater than the DAP, representing a profit for the operator for each
monthly subscription. The interesting scenario is the third price point, where the user is charged
$20 for the application but the DAP is $25. In this situation, the carrier is wholesaling the
application, making it available at a lower price in hopes of capitalizing on the increased airtime
used by the application.
QUALCOMM Confidential and Proprietary
422
BREW® Developer Training
BREW Distribution Model
Application
Developers
QUALCOMM
Carriers
Consumers
423
In this diagram, you can see how BREW simplifies the process of getting applications to
consumers. Application developers provide applications to carriers through QUALCOMM Internet
Services (QIS). Application developers create applications, certify them, and then upload them
along with pricing information. QIS helps in developer/carrier relations. The carriers have an
opportunity to choose the applications that they want to provide to their consumers, and then these
applications are placed on a download server. This in turn provides consumers a location for
downloading applications to their handsets.
QUALCOMM Confidential and Proprietary
423
BREW® Developer Training
BREW Payment Model
Consumers
Phone Bill
Carriers
QUALCOMM
Application
Developers
424
One of the challenges application developers have had is getting paid for applications made
available for download over the Internet. This problem is solved with the BREW payment model
which ensures prompt payment for downloads.
As consumers download applications, the BREW billing system records the transaction. The carrier
is invoiced for the transaction and issues payment to the developer. The carrier then invoices the
customer on their phone bill.
QUALCOMM Confidential and Proprietary
424
BREW® Developer Training
Key Points Review
During this module, students learned to:
9 Describe the TRUE BREW Testing processes
9 Outline tips for passing TRUE BREW
9 Describe the TRUE BREW Submittal Process
425
This module focused on TRUE BREW Testing with emphasis on the key points listed above.
QUALCOMM Confidential and Proprietary
425
BREW® Developer Training
Module 6.5
BREW Developer Alliance
Program Overview
Membership Levels and Benefits
426
QUALCOMM Confidential and Proprietary
426
BREW® Developer Training
Module Objectives
After completing this module, students will be able to:
9 Describe the BREW Developer Alliance
9 Identify support services available to BREW developers
427
This module addresses the BREW Developer Alliance program and support services offered to
developers.
QUALCOMM Confidential and Proprietary
427
BREW® Developer Training
The BREW Developer Alliance Program
Provides developers the following services:
Opportunity to showcase apps to carriers
Means for differentiation
Support throughout all phases of app development
Ability to monetize wireless applications
428
The BREW Developer Alliance Program is designed to speed the creation of wireless applications
by providing developers with technical training and support, product development guidance, and
marketing assistance. The goal of the program is to provide tools and information that streamline
the process of application development and help ensure the success of the wireless Internet.
The BREW Developer Alliance Program was developed by benchmarking against some well
known, established programs in the industry. By evaluating the effectiveness of these programs,
QUALCOMM was able to find out what services were provided to developers and what services
were used. Most of these programs provided technical support and documentation, training, and
access to newsgroups and forums. Some of these programs also offered different business
operations support such as marketing and business development.
QUALCOMM also went out into the development community to find out what BREW developers
needed. In addition to technical and business support, developers expressed a need for support for
new product development and cooperative assistance in marketing. This research also showed
that there were different levels of service required by different developers. Based on this research,
the Alliance Program provides the best of all worlds.
QUALCOMM Confidential and Proprietary
428
BREW® Developer Training
BREW Standard Developer Benefits
Developer Support
–
–
–
–
–
–
–
–
–
–
SDK updates
Technical documentation
Developer FAQ
Online knowledge base
Email support
Training ($)
Online forum
Phone details*
ARM BREW Builder ($)*
Access to Developer Lab ($)*
News and
Information
–
–
–
–
–
Case studies
BREW News
Industry news
Events calendar
Testimonials
Marketing and
Business
Operations
–
–
–
–
–
BREW logo*
BREW Developer
Directory*
PR assistance*
App. available to
carrier*
Consolidated payment*
*Developer Extranet:
https://brewx.qualcomm.com/developer/extranet/devexhome.jsp
429
Above is a listing of support, news and information, and marketing and business development
benefits provided to all standard BREW developers. Some of these services, indicated with an
asterisk (*) are available to BREW authenticated developers via the BREW Extranet.
QUALCOMM Confidential and Proprietary
429
BREW® Developer Training
Additional Levels of Membership
Standard BREW Developer Benefits
plus….
Select and Standard BREW Developer
benefits plus…
Concept Exploration
Discounted market research
Wireless World 101 Webcasts
BREW Developers Roundtable
BREW Developer Directory
Company name, logo, and link
Company name, logo, link, and company
bio.
Discounted TRUE BREW
Testing
5%
10%
Technical Support
Priority Email
Phone Support
Marketing Cooperative Match
Dollars
25% up to $50,000 USD
50% up to $100,000 USD
Cost
$5,000/yr
$15,000/yr
Plus much more…See the BREW Developer web site for details
430
In addition to the standard levels of support, the BREW Developer Alliance program offers the
Select and Elite membership levels shown above.
QUALCOMM Confidential and Proprietary
430
BREW® Developer Training
Developer Support Options
Free support on the web
BREW Developer Forums
BREW Developer Lab
BREW engineers available to
help troubleshoot and provide
expert insight
Commercial and pre-commercial
phones
Data cables for connecting
phones to computers
Development tools
Internet connectivity for your
laptop
• Free to all developers
• Moderated by BREW
development experts
Online Knowledge Base and
FAQ
Documentation
Email support
•
[email protected]
QISHelp for authenticated
developers
qishelp.qualcomm.com/
BREW Training Courses
431
Several free and fee-based services are available for BREW developers. Many of these services,
including the BREW Forums, on line Knowledge Base and FAQ, and documentation are available
through the BREW Web site and BREW Developer Extranets.
The BREW developer lab is a fully equipped testing facility, designed to help developers test
applications on BREW-enabled devices. QUALCOMM engineers are available to help developers
troubleshoot their applications, and to provide expert insight. Several commercial and precommercial phones are available, to allow testing on the latest and greatest hardware. All of the
necessary data cables and tools for debugging are provided, along with Internet connectivity for
developers’ laptop computers.
QISHelp is a service providing technical support to BREW Authenticated developers. This formbased request system is a direct link into the BREW support center. A case is created and
escalated to a support engineer to ensure you get the support you need.
QUALCOMM Confidential and Proprietary
431
BREW® Developer Training
For More Information . . .
http://www.qualcomm.com/brew/developer
432
Group O
Of course, for new and updated information, stay tuned to the BREW Developer Web site.
QUALCOMM Confidential and Proprietary
432
BREW® Developer Training
Key Points Review
During this module, students learned to:
9 Describe the BREW Developer Alliance
9 Identify support services available to BREW developers
433
This module focused on TRUE BREW Testing with emphasis on the key points listed above.
QUALCOMM Confidential and Proprietary
433