1
MySQL™ Cluster Manager 1.2.4 User Manual
Abstract
Deprecated release.
MySQL Cluster Manager 1.2 has been superseded by later releases adding new features
and incorporating fixes to bugs found in previous MySQL Cluster Manager releases, and is no longer available; users
of MySQL Cluster Manager 1.2.4 should upgrade as soon as possible. Thus, this document is archival in nature, and
no longer actively maintained. Information about the most recent MySQL Cluster Manager 1.3 release can be found at
http://dev.mysql.com/doc/mysql-cluster-manager/1.3/en/.
This is the User Manual for the MySQL™ Cluster Manager, version 1.2.4. It documents the MySQL Cluster Manager
Agent and MySQL Cluster Manager Client software applications which can be used to administer MySQL Cluster,
a version of the MySQL Database System (referred to hereafter as “MySQL Server” or simply “MySQL”) that
incorporates the NDB storage engine for high availability and data redundancy in a distributed computing environment.
This Manual applies to MySQL Cluster Manager 1.2.4 and contains information that may not apply to older versions of
the MySQL Cluster Manager software. For documentation covering previous MySQL Cluster Manager releases, see
MySQL Documentation: MySQL Cluster, on the MySQL website.
MySQL Cluster Manager features.
This manual describes features that may not be included in every version of
MySQL Cluster Manager, and such features may not be included in the version of MySQL Cluster Manager licensed
to you. If you have any questions about the features included in your version of MySQL Cluster Manager, refer to your
MySQL Cluster Manager license agreement or contact your Oracle sales representative.
MySQL Cluster Manager, MySQL Server, and MySQL Cluster features.
This manual contains certain basic
information about MySQL Server and MySQL Cluster; however, it is not in any way intended as an exhaustive
reference for either of these products.
Current versions of MySQL Cluster compatible with MySQL Cluster Manager are based on versions 7.2 and 7.3 of
the NDB storage engine; these versions of MySQL Cluster are known as “MySQL Cluster NDB 7.2” and “MySQL
Cluster NDB 7.3”, respectively. MySQL Cluster functionality varies between MySQL Cluster releases; MySQL Cluster
Manager cannot supply or emulate MySQL Cluster features that are not present in the version of the MySQL Cluster
software in use.
For complete information about MySQL Server and MySQL Cluster, please refer to the appropriate version of the
MySQL Manual:
• For information about MySQL Cluster NDB 7.2, see MySQL Cluster NDB 7.2.
• See MySQL Cluster NDB 7.3 and MySQL Cluster NDB 7.4, for information about MySQL Cluster NDB 7.3.
If you do not have the MySQL Server and MySQL Cluster documentation, you can obtain it free of charge from the
MySQL Documentation Library, on the MySQL website.
For legal information, see the Legal Notices.
For help with using MySQL, please visit either the MySQL Forums or MySQL Mailing Lists, where you can discuss
your issues with other MySQL users.
For additional documentation on MySQL products, including translations of the documentation into other languages,
and downloadable versions in variety of formats, including HTML and PDF formats, see the MySQL Documentation
Library.
Document generated on: 2015-12-18 (revision: 45930)
Table of Contents
Preface and Legal Notices ................................................................................................................. v
1 Overview of MySQL Cluster Manager .............................................................................................. 1
1.1 MySQL Cluster Manager Terminology ................................................................................... 1
1.2 MySQL Cluster Manager Architecture ................................................................................... 2
2 MySQL Cluster Manager Installation, Configuration, Cluster Setup .................................................... 5
2.1 Obtaining MySQL Cluster Manager ....................................................................................... 5
2.2 Operating Platform and MySQL Cluster Version Compatibility ................................................. 5
2.3 MySQL Cluster Manager Agent Installation ........................................................................... 7
2.3.1 Installing MySQL Cluster Manager on Unix Platforms .................................................. 7
2.3.2 Installing MySQL Cluster Manager on Windows Platforms ........................................... 9
2.3.3 Setting the MySQL Cluster Manager Agent User Name and Password ........................ 18
2.4 MySQL Cluster Manager Configuration File ......................................................................... 19
2.5 Upgrading MySQL Cluster Manager .................................................................................... 20
3 Using MySQL Cluster Manager ..................................................................................................... 23
3.1 mcmd, the MySQL Cluster Manager Agent ........................................................................... 23
3.2 Starting and Stopping the MySQL Cluster Manager Agent .................................................... 32
3.2.1 Starting and Stopping the Agent on Linux ................................................................. 32
3.2.2 Starting and Stopping the MySQL Cluster Manager Agent on Windows ....................... 33
3.3 Starting the MySQL Cluster Manager Client ........................................................................ 36
3.4 Setting Up MySQL Clusters with MySQL Cluster Manager .................................................... 39
3.4.1 Creating a MySQL Cluster with MySQL Cluster Manager ........................................... 39
3.4.2 Migrating a MySQL Cluster to MySQL Cluster Manager ............................................. 40
3.5 MySQL Cluster Backup and Restore Using MySQL Cluster Manager .................................... 44
3.5.1 Requirements for Backup and Restore ..................................................................... 44
3.5.2 Basic MySQL Cluster Backup and Restore Using MySQL Cluster Manager ................. 44
4 MySQL Cluster Manager Client Commands ................................................................................... 49
4.1 Online Help and Information Commands ............................................................................. 55
4.2 MySQL Cluster Manager Site and Agent Commands ........................................................... 61
4.2.1 The add hosts Command ..................................................................................... 62
4.2.2 The change log-level Command ....................................................................... 62
4.2.3 The create site Command ................................................................................. 63
4.2.4 The delete site Command ................................................................................. 64
4.2.5 The list sites Command ................................................................................... 65
4.2.6 The list hosts Command ................................................................................... 65
4.2.7 The stop agents Command ................................................................................. 66
4.2.8 The version Command ......................................................................................... 66
4.3 MySQL Cluster Manager Package Commands .................................................................... 67
4.3.1 The add package Command ................................................................................. 67
4.3.2 The delete package Command ........................................................................... 69
4.3.3 The list packages Command ............................................................................. 70
4.4 MySQL Cluster Manager Cluster Commands ....................................................................... 71
4.4.1 The create cluster Command ........................................................................... 72
4.4.2 The delete cluster Command ........................................................................... 74
4.4.3 The list clusters Command ............................................................................. 75
4.4.4 The restart cluster Command ......................................................................... 75
4.4.5 The show status Command ................................................................................. 76
4.4.6 The start cluster Command ............................................................................. 79
4.4.7 The stop cluster Command ............................................................................... 80
4.4.8 The upgrade cluster Command ......................................................................... 80
4.5 MySQL Cluster Manager Configuration Commands .............................................................. 82
4.5.1 The get Command ................................................................................................. 84
iii
MySQL™ Cluster Manager 1.2.4 User Manual
4.5.2 The reset Command ............................................................................................. 94
4.5.3 The set Command ................................................................................................. 99
4.6 MySQL Cluster Manager Process Commands ................................................................... 106
4.6.1 The add process Command ............................................................................... 106
4.6.2 The change process Command ......................................................................... 108
4.6.3 The list processes Command ......................................................................... 111
4.6.4 The start process Command ........................................................................... 111
4.6.5 The stop process Command ............................................................................. 112
4.7 MySQL Cluster Manager Backup and Restore Commands ................................................. 113
4.7.1 The abort backup Command ............................................................................. 113
4.7.2 The backup cluster Command ......................................................................... 113
4.7.3 The list backups Command ............................................................................. 114
4.7.4 The restore cluster Command ....................................................................... 114
5 MySQL Cluster Manager Limitations and Known Issues ................................................................ 117
5.1 MySQL Cluster Manager Usage and Design Limitations ..................................................... 117
5.2 MySQL Cluster Manager 1.2.4 Limitations Relating to the MySQL Server ............................ 118
5.3 MySQL Cluster Manager Limitations Relating to MySQL Cluster ......................................... 119
5.4 Syntax and Related Issues in MySQL Cluster Manager ...................................................... 119
A Changes in MySQL Cluster Manager ........................................................................................... 121
B Licenses for Third-Party Components Used in MySQL Cluster Manager 1.2.4 ................................ 123
B.1 GLib License (for MySQL Cluster Manager) ...................................................................... 123
B.2 GNU Lesser General Public License Version 2.1, February 1999 ........................................ 124
B.3 libevent License ............................................................................................................... 132
B.4 libintl License ................................................................................................................... 134
B.5 LPeg Library License ....................................................................................................... 134
B.6 Lua (liblua) License .......................................................................................................... 135
B.7 LuaFileSystem Library License ......................................................................................... 135
B.8 PCRE License ................................................................................................................. 136
B.9 SHA-1 in C License ......................................................................................................... 137
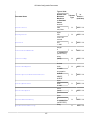
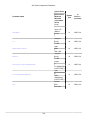
C Attribute Summary Tables ........................................................................................................... 139
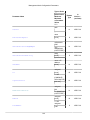
C.1 Management Node Configuration Parameters ................................................................... 139
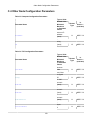
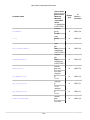
C.2 Data Node Configuration Parameters ................................................................................ 141
C.3 API Node Configuration Parameters ................................................................................. 156
C.4 Other Node Configuration Parameters .............................................................................. 159
C.5 MySQL Server Option and Variable Reference for MySQL Cluster ...................................... 163
Index ............................................................................................................................................. 185
iv
Preface and Legal Notices
This is the User Manual for the MySQL™ Cluster Manager, version 1.2.4. It documents the MySQL Cluster
Manager Agent and MySQL Cluster Manager Client software applications which can be used to administer
MySQL Cluster, a version of the MySQL Database System (referred to hereafter as “MySQL Server” or
simply “MySQL”) that incorporates the NDB storage engine for high availability and data redundancy in a
distributed computing environment.
This manual does contain certain basic information about MySQL and MySQL Cluster; however, it is not
in any way intended as an exhaustive reference for either of these products. Current versions of MySQL
Cluster compatible with MySQL Cluster Manager are based on MySQL Server 5.5 and version 7.2 of the
NDB storage engine, and MySQL Server 5.6 and NDB version 7.3; these versions of MySQL Cluster are
known as “MySQL Cluster NDB 7.2” and “MySQL Cluster NDB 7.3”. For information about MySQL MySQL
Cluster NDB 7.2, see MySQL Cluster NDB 7.2); for information about MySQL MySQL Cluster NDB 7.3,
see MySQL Cluster NDB 7.3 and MySQL Cluster NDB 7.4). If you do not have the MySQL and MySQL
Cluster documentation, this documentation can be obtained free of charge from the MySQL Documentation
Library on the MySQL website.
For license information, see the Legal Notices. This product may contain third-party code. For license
information on third-party code, see Appendix B, Licenses for Third-Party Components Used in MySQL
Cluster Manager 1.2.4.
Legal Notices
Copyright © 2009, 2014, Oracle and/or its affiliates. All rights reserved.
This software and related documentation are provided under a license agreement containing restrictions
on use and disclosure and are protected by intellectual property laws. Except as expressly permitted
in your license agreement or allowed by law, you may not use, copy, reproduce, translate, broadcast,
modify, license, transmit, distribute, exhibit, perform, publish, or display any part, in any form, or by any
means. Reverse engineering, disassembly, or decompilation of this software, unless required by law for
interoperability, is prohibited.
The information contained herein is subject to change without notice and is not warranted to be error-free.
If you find any errors, please report them to us in writing.
If this is software or related documentation that is delivered to the U.S. Government or anyone licensing it
on behalf of the U.S. Government, then the following notice is applicable:
U.S. GOVERNMENT END USERS: Oracle programs, including any operating system, integrated software,
any programs installed on the hardware, and/or documentation, delivered to U.S. Government end users
are "commercial computer software" pursuant to the applicable Federal Acquisition Regulation and agencyspecific supplemental regulations. As such, use, duplication, disclosure, modification, and adaptation of the
programs, including any operating system, integrated software, any programs installed on the hardware,
and/or documentation, shall be subject to license terms and license restrictions applicable to the programs.
No other rights are granted to the U.S. Government.
This software or hardware is developed for general use in a variety of information management
applications. It is not developed or intended for use in any inherently dangerous applications, including
applications that may create a risk of personal injury. If you use this software or hardware in dangerous
applications, then you shall be responsible to take all appropriate fail-safe, backup, redundancy, and other
measures to ensure its safe use. Oracle Corporation and its affiliates disclaim any liability for any damages
caused by use of this software or hardware in dangerous applications.
v
Legal Notices
Oracle and Java are registered trademarks of Oracle and/or its affiliates. Other names may be trademarks
of their respective owners.
Intel and Intel Xeon are trademarks or registered trademarks of Intel Corporation. All SPARC trademarks
are used under license and are trademarks or registered trademarks of SPARC International, Inc. AMD,
Opteron, the AMD logo, and the AMD Opteron logo are trademarks or registered trademarks of Advanced
Micro Devices. UNIX is a registered trademark of The Open Group.
This software or hardware and documentation may provide access to or information about content,
products, and services from third parties. Oracle Corporation and its affiliates are not responsible for and
expressly disclaim all warranties of any kind with respect to third-party content, products, and services
unless otherwise set forth in an applicable agreement between you and Oracle. Oracle Corporation and its
affiliates will not be responsible for any loss, costs, or damages incurred due to your access to or use of
third-party content, products, or services, except as set forth in an applicable agreement between you and
Oracle.
Documentation Accessibility
For information about Oracle's commitment to accessibility, visit the Oracle Accessibility Program website
at
http://www.oracle.com/pls/topic/lookup?ctx=acc&id=docacc.
Access to Oracle Support
Oracle customers that have purchased support have access to electronic support through My Oracle
Support. For information, visit
http://www.oracle.com/pls/topic/lookup?ctx=acc&id=info or visit http://www.oracle.com/pls/topic/lookup?
ctx=acc&id=trs if you are hearing impaired.
This documentation is NOT distributed under a GPL license. Use of this documentation is subject to the
following terms:
You may create a printed copy of this documentation solely for your own personal use. Conversion to other
formats is allowed as long as the actual content is not altered or edited in any way. You shall not publish
or distribute this documentation in any form or on any media, except if you distribute the documentation in
a manner similar to how Oracle disseminates it (that is, electronically for download on a Web site with the
software) or on a CD-ROM or similar medium, provided however that the documentation is disseminated
together with the software on the same medium. Any other use, such as any dissemination of printed
copies or use of this documentation, in whole or in part, in another publication, requires the prior written
consent from an authorized representative of Oracle. Oracle and/or its affiliates reserve any and all rights
to this documentation not expressly granted above.
vi
Chapter 1 Overview of MySQL Cluster Manager
Table of Contents
1.1 MySQL Cluster Manager Terminology ........................................................................................... 1
1.2 MySQL Cluster Manager Architecture ........................................................................................... 2
This chapter provides a overview of MySQL Cluster Manager, as well as its architecture, purpose, and
capabilities.
1.1 MySQL Cluster Manager Terminology
This section provides definitions of key terms used to describe MySQL Cluster Manager and its
components in this manual and in other documentation relating to MySQL Cluster Manager and MySQL
Cluster.
Site.
A set of hosts on which MySQL Cluster processes to be managed by MySQL Cluster Manager are located.
A site can include one or more clusters.
Cluster.
A MySQL Cluster deployment. A cluster consists of a set of MySQL Cluster processes running on one or
more hosts. A minimal cluster is usually considered to include one management node, two data nodes, and
one SQL node. A typical production cluster may have one or two management nodes, several SQL nodes,
and 4 or more data nodes. The exact numbers of data and SQL nodes can vary according to data size,
type and rating of hardware used on the hosts, expected throughput, network characteristics, and other
factors; the particulars are beyond the scope of this document, and you should consult MySQL Cluster
NDB 7.3 and MySQL Cluster NDB 7.4, for more specific information and guidelines.
Host.
A computer. The exact meaning depends on the context:
• A computer where one or more MySQL Cluster processes are run. In this context, we sometimes refer
more specifically to a cluster host.
The number of cluster processes and number of cluster hosts may be, but are not necessarily, the same.
• A computer where an instance of the MySQL Cluster Manager agent runs.
In order to run a MySQL Cluster using MySQL Cluster Manager, the MySQL Cluster Manager agent must
be running on each host where cluster processes are to be run. In other words, when using MySQL Cluster
Manager, all cluster hosts must also be MySQL Cluster Manager agent hosts (although the reverse is not
necessarily true). Therefore, you should understand that anytime we use the term host, we are referring to
a host computer in both of the senses just given.
Process.
In the context of MySQL Cluster, a process (more specifically, a cluster process) is a MySQL Cluster node,
of one of the following 3 types: management node (ndb_mgmd), data node (ndbd or ndbmtd), or SQL
node (mysqld). For more information about these node types and their functions in a cluster, see MySQL
Cluster Core Concepts, and MySQL Cluster Nodes, Node Groups, Replicas, and Partitions.
Package.
1
MySQL Cluster Manager Architecture
A copy of the MySQL cluster software. This should include the binary executables needed to run the
cluster processes of the desired types on a given host. The simplest way to make sure that this is done
is to place a copy of the entire MySQL Cluster distribution on each computer that you intend to use as a
cluster host.
Configuration attribute.
A value whose setting affects cluster operations in a clearly defined and measurable way. When running
MySQL Cluster manually, configuration is accomplished using cluster configuration parameters, MySQL
server options, and MySQL system and status variables; MySQL Cluster Manager masks the differences
between these, provides a unified view of them; see Configuration attributes, for more information.
Agent.
A MySQL Cluster Manager process that runs on each cluster host, responsible for managing the cluster
processes running on that host.
Client.
The MySQL Cluster Manager client is a software application that allows a user to connect to MySQL
Cluster Manager and perform administrative tasks, such as (but not limited to): creating, starting, and
stopping clusters; obtaining cluster and cluster process status reports; getting cluster configuration
information and setting cluster configuration attributes.
1.2 MySQL Cluster Manager Architecture
This section provides an architectural overview of MySQL Cluster Manager, its components, and their
deployment.
MySQL Cluster Manager is a distributed client-server application consisting of two main components.
The MySQL Cluster Manager agent is a set of one or more agent processes that manage MySQL
cluster nodes, and the MySQL Cluster Manager client provides a command-line interface to the agent's
management functions.
Agent.
The MySQL Cluster Manager agent is comprised of the set of all MySQL Cluster Manager agent processes
running on the hosts making up a given management site. A MySQL Cluster Manager agent process is a
daemon process which runs on each host to be used in the cluster. In MySQL Cluster Manager, there is no
single central server or process; all agents collaborate in managing a cluster as a whole. This means that
any connected agent can be used to carry out tasks that effect the entire cluster.
Each agent process is responsible for managing the MySQL Cluster nodes running on the host where the
agent is located. MySQL Cluster management and SQL nodes are managed directly by the MySQL Cluster
Manager agent; cluster data nodes are managed indirectly, using the cluster management nodes.
Management responsibilities handled by the MySQL Cluster Manager agent include the following:
• Starting, stopping, and restarting cluster nodes
• Cluster configuration changes
• Cluster software upgrades
• Host and node status reporting
• Recovery of failed cluster nodes
Creating, performing initial configuration of, or starting a cluster, requires that agent processes be running
on all cluster hosts. Once the cluster has been started, it continues to run even if one or more agent
2
MySQL Cluster Manager Architecture
processes fail. However, any failed agent processes must be restarted before you can perform addition
cluster management functions.
Client.
A MySQL Cluster Manager client is a software application used to access an MySQL Cluster Manager
agent. In MySQL Cluster Manager, the client is actually nothing more than the mysql command-line client,
started with the options that are necessary for it to connect to an MySQL Cluster Manager agent. MySQL
Cluster Manager 1.2.4 and later releases include an mcm client for ease of use; this client consists of a
script that acts as a wrapper for the mysql client with these options.
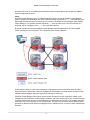
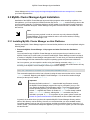
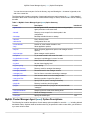
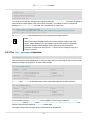
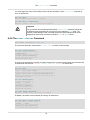
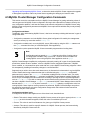
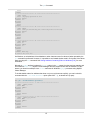
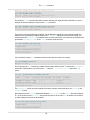
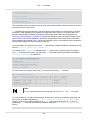
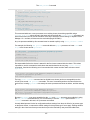
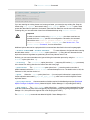
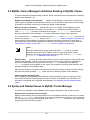
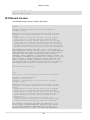
By way of example, we show how MySQL Cluster Manager would be deployed for use with a MySQL
Cluster running on 4 host computers. This is illustrated in the following diagram:
In this example cluster, 2 of the hosts each house a management server and an SQL node; the other 2
hosts each house 2 data nodes. However, regardless of the distribution of cluster nodes among the hosts,
a MySQL Cluster Manager agent process must be runnings on each host.
A MySQL Cluster Manager client can be used to access the agent from any of the hosts making up the
management site to which the cluster belongs. In addition, the client can be used on any computer that has
a network connection to at least 1 of the hosts where an agent process is running. The computer where the
client itself runs is not required to be one of these hosts. The client can connect to and use different agent
processes on different hosts within the management site, at different times, to perform cluster management
functions.
3
4
Chapter 2 MySQL Cluster Manager Installation, Configuration,
Cluster Setup
Table of Contents
2.1 Obtaining MySQL Cluster Manager ............................................................................................... 5
2.2 Operating Platform and MySQL Cluster Version Compatibility ......................................................... 5
2.3 MySQL Cluster Manager Agent Installation ................................................................................... 7
2.3.1 Installing MySQL Cluster Manager on Unix Platforms .......................................................... 7
2.3.2 Installing MySQL Cluster Manager on Windows Platforms ................................................... 9
2.3.3 Setting the MySQL Cluster Manager Agent User Name and Password ............................... 18
2.4 MySQL Cluster Manager Configuration File ................................................................................. 19
2.5 Upgrading MySQL Cluster Manager ............................................................................................ 20
This chapter discusses basic installation and configuration of the MySQL Cluster Manager Management
Agent, connecting to the agent with the MySQL Cluster Manager client, and the basics of creating or
importing a cluster using MySQL Cluster Manager.
2.1 Obtaining MySQL Cluster Manager
MySQL Cluster Manager is available only through commercial license. To learn more about licensing
terms, and to obtain information about where and how to download MySQL Cluster Manager, visit http://
www.mysql.com/products/cluster/mcm/, or contact your Oracle representative.
2.2 Operating Platform and MySQL Cluster Version Compatibility
MySQL Cluster Manager 1.2.4 is currently available for and supported on the following operating systems:
• Oracle Linux 5 and 6 (32-bit and 64-bit)
• Novell SUSE Enterprise Linux 11 (64-bit only)
• Solaris 10 and 11, x86 and SPARC (64-bit only)
• Recent versions of Microsoft Windows (MySQL Cluster NDB 7.1.4 and later) (32-bit binaries only; can be
used on 64-bit Windows)
MySQL Cluster Manager binaries for Oracle Linux 5 and 6 can also be used with Red Hat Enterprise Linux
5 and 6.
Generic Linux binaries are also available in 32-bit and 64-bit versions. These should work with most recent
Linux distributions.
MySQL Cluster Manager is currently supported for use in the following MySQL Cluster release versions, on
the platforms shown:
• MySQL Cluster NDB 7.1 (see MySQL Cluster NDB 6.1 - 7.1), beginning with MySQL Cluster NDB 7.1.4
(Linux, Solaris, Windows)
• MySQL Cluster NDB 7.2 (see MySQL Cluster NDB 7.2), beginning with MySQL Cluster NDB 7.2.4
(Linux, Solaris, Windows)
5
Operating Platform and MySQL Cluster Version Compatibility
• MySQL Cluster NDB 7.3 (see MySQL Cluster NDB 7.3 and MySQL Cluster NDB 7.4), beginning with
MySQL Cluster NDB 7.3.2 (Linux, Solaris, Windows)
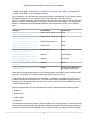
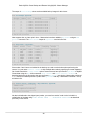
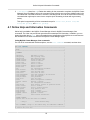
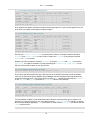
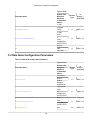
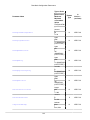
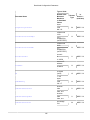
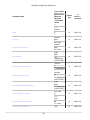
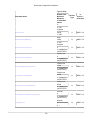
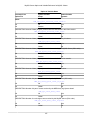
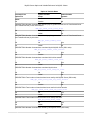
Prior to installation, you must obtain the correct build of MySQL Cluster Manager for your operating system
and hardware platform. For Unix platforms, MySQL Cluster Manager is delivered as a Unix .tar.gz
archive. For Windows platforms, an MSI installer file is provided. The name of the file varies with the target
platform. All MySQL Cluster Manager 1.2.4 packages include MySQL Cluster NDB 7.3.2 on all supported
platforms. Available packages with applicable platforms and architectures are shown in in the following
table:
Package
OS / Platform
Architecture
mcm-1.2.4-cluster-7.3.2-linux- Oracle Linux 5, Oracle Linux 6 32-bit
rhel5-x86-32bit.tar.gz
mcm-1.2.4-cluster-7.3.2-linux- Oracle Linux 5, Oracle Linux 6 64-bit
rhel5-x86-64bit.tar.gz
mcm-1.2.4-cluster-7.3.2-linux- SUSE Enterprise Linux 11
sles11-x86-64bit.tar.gz
64-bit
mcm-1.2.4-cluster-7.3.2-linux- Generic Linux
glibc2.5-x86-32bit.tar.gz
32-bit
mcm-1.2.4-cluster-7.3.2-linux- Generic Linux
glibc2.5-x86-64bit.tar.gz
64-bit
mcm-1.2.4-cluster-7.3.2solaris10-sparc-64bit.tar.gz
Solaris 10
64-bit (SPARC)
mcm-1.2.4-cluster-7.3.2solaris10-x86-64bit.tar.gz
Solaris 10
64-bit (x86)
mcm-1.2.4-cluster-7.3.2-win32- Windows
x86.msi
32-bit
mcm-1.2.4-win32-cluster-7.3.2- Windows
winx64-x86.msi
MySQL Cluster Manager: 32bit; MySQL Cluster: 64-bit
When selecting the appropriate installer for your operating system and hardware, keep in mind that 32-bit
programs can normally be run on 64-bit platforms, but that the reverse is not true.
It might be possible that some MySQL Cluster Manager 1.2.4 builds are compatible with versions of Linux
or Solaris other than those listed previously. Your Oracle representative and MySQL Support personnel
can assist you in determining whether this is the case, and if so, which build is most suitable for your Linux
or Solaris operating platform.
MySQL Cluster Manager is currently supported on the following Microsoft Windows operating systems:
• Windows 7
• Windows Vista
• Windows 2008
• Windows XP
The information provided in this section is subject to change from release to release. For more specific and
timely information about MySQL Cluster Manager availability and support for different operating platforms
and versions, as well as for different MySQL Cluster software versions, see Supported Platforms: MySQL
6
MySQL Cluster Manager Agent Installation
Cluster Manager at http://www.mysql.com/support/supportedplatforms/cluster-manager.html, or contact
your Oracle representative.
2.3 MySQL Cluster Manager Agent Installation
Installation of the MySQL Cluster Manager agent and client programs varies according to platform. On
Unix platforms, you must extract the binaries and other files from a .tar.gz archive and copy them to the
correct locations manually. For Windows platforms, an MSI installer is provided which largely automates
this process. Installation of MySQL Cluster Manager using each of these methods is covered in the next
two sections.
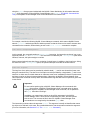
Note
License keys were required in order to use some very early releases of MySQL
Cluster Manager. They are not needed in order to use recent versions, including
MySQL Cluster Manager 1.2.4.
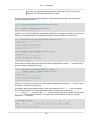
2.3.1 Installing MySQL Cluster Manager on Unix Platforms
Installing the MySQL Cluster Manager agent on Linux and similar platforms can be accomplished using the
following steps:
1. Extract the MySQL Cluster Manager 1.2.4 program and other files from the distribution
archive.
You must install a copy of MySQL Cluster Manager on each computer that you intend to use as a
MySQL Cluster host. In other words, you need to install MySQL Cluster Manager on each host that is
a member of a MySQL Cluster Manager management site. For each host, you should use the MySQL
Cluster Manager build that matches that computer's operating system and processor architecture.
On Linux systems, you can unpack the archive using the following command, using mcm-1.2.4cluster-7.3.2-linux-sles11-x86-64bit.tar.gz as an example (the actual filename will vary
according to the MySQL Cluster Manager build that you intend to deploy):
shell> tar -zxvf mcm-1.2.4-cluster-7.3.2-linux-sles11-x86-64bit.tar.gz
This command unpacks the archive into a directory having the same name as the archive, less the
.tar.gz extension. Beginning with MySQL Cluster Manager 1.2.3, the archive contains a single
directory at the top level, named mcm-1.2.4.
Important
Because the Solaris version of tar cannot handle long filenames correctly,
the MySQL Cluster Manager program files may be corrupted if you try to use
it to unpack the MySQL Cluster Manager archive. To get around this issue on
Solaris operating systems, you should use GNU tar (gtar) rather than the
default tar supplied with Solaris. On Solaris 10, gtar is often already installed
in the /usr/sfw/bin directory, although the gtar executable may not be
included in your path. If gtar is not present on your system, please consult the
Solaris 10 system documentation for information on how to obtain and install it.
In general, the location where you place the unpacked MySQL Cluster Manager directory and the
name of this directory can be arbitrary. However, we recommend that you use a standard location
for optional software, such as /opt on Linux systems, and that you name the directory using the 1.2.4
version number. (This facilitates subsequent upgrades.) On a typical Linux system you can accomplish
this task like this:
7
Installing MySQL Cluster Manager on Unix Platforms
shell> mv mcm-1.2.4-cluster-7.3.2-linux-sles11-x86-64bit /opt/mcm-1.2.4
In MySQL Cluster Manager 1.2.3 and later, you can instead do this:
shell> cd mcm-1.2.4-cluster-7.3.2-linux-sles11-x86-64bit
shell> mv mcm-1.2.4 /opt/mcm-1.2.4
For ease of use, we recommend that you put the MySQL Cluster Manager files in the same directory on
each host where you intend to run it.
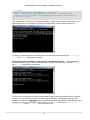
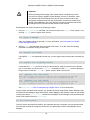
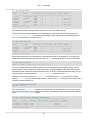
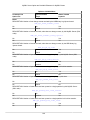
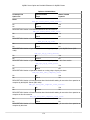
Contents of the MySQL Cluster Manager Unix Distribution Archive.
If you change to the directory where you placed the extracted MySQL Cluster Manager archive and list the
contents, you should see something similar to what is shown here:
shell> cd /opt/mcm-1.2.4
shell> ls
bin cluster etc lib libexec
licenses
share
var
These directories are described in the following table:
Directory
Contents
bin
MySQL Cluster Manager agent startup scripts
cluster
Contains the MySQL Cluster NDB 7.3.2 binary
distribution
etc
Contains the agent configuration file (mcmd.ini)
etc/init.d
Init scripts (not currently used)
lib and subdirectories
Libraries needed to run the MySQL Cluster Manager
agent
libexec
MySQL Cluster Manager agent and client
executables
licenses/lgpl
An archive containing source code (including
licensing and documentation), for glib 2.1
share/doc/mcmd
README.txt file
var
XML files containing information needed by MySQL
Cluster Manager about processes, attributes, and
command syntax
Normally, the only directories of those shown in the preceding table that you need be concerned with are
the bin and etc directories.
For MySQL Cluster Manager 1.2.4 distributions that include MySQL Cluster, the complete MySQL Cluster
NDB 7.3.2 binary distribution is included in the cluster directory. Within this directory, the layout of the
MySQL Cluster distribution is the same as that of the standalone MySQL Cluster binary distribution. For
example, MySQL Cluster binary programs such as ndb_mgmd, ndbd, ndbmtd, and ndb_mgm can be found
in cluster/bin. For more information, see MySQL Installation Layout for Generic Unix/Linux Binary
Package, and Installing a MySQL Cluster Binary Release on Linux, in the MySQL Manual.
If you wish to use the included MySQL Cluster software, it is recommended that you move the cluster
directory and all its contents to a location outside the MySQL Cluster Manager installation directory, such
8
Installing MySQL Cluster Manager on Windows Platforms
as /opt/ndb-version. For example, on a Linux system, you can move the MySQL Cluster NDB 7.3.2
software that is bundled with MySQL Cluster Manager 1.2.4 to a suitable location by first navigating to the
MySQL Cluster Manager installation directory and then using a shell command similar to what is shown
here:
shell> mv cluster /opt/ndb-7.3.2
Note
The mcmd --bootstrap option uses the included MySQL Cluster binaries in the
installation directory's cluster directory and does not work if they cannot be found
there. To work around this issue, create a symbolic link to the correct directory in its
place, like this:
shell> ln -s /opt/ndb-7.3.2 cluster
After doing this, you can use the mcm client commands add package and upgrade cluster to upgrade
any desired cluster or clusters to the new MySQL Cluster software version.
The MySQL Cluster Manager agent by default writes its log file as mcmd.log in the installation directory.
When the agent runs for the first time, it creates a directory where the agent stores its own configuration
data; by default, this is /opt/mcm_data. (Prior to MySQL Cluster Manager 1.2.3, this was mcm_data in
the MySQL Cluster Manager installation directory; see Bug #16521396.) The configuration data, log files,
and data node file systems for a given MySQL Cluster under MySQL Cluster Manager control, and named
cluster_name, can be found in clusters/cluster_name under this data directory (sometimes also
known as the MySQL Cluster Manager data repository).
The location of the MySQL Cluster Manager agent configuration file, log file, and data directory can be
controlled with mcmd startup options or by making changes in the agent configuration file. To simplify
upgrades of MySQL Cluster Manager, we recommend that you change the data repository to a directory
outside the MySQL Cluster Manager installation directory, such as /var/opt/mcm. See Section 2.4,
“MySQL Cluster Manager Configuration File”, and Section 3.2, “Starting and Stopping the MySQL Cluster
Manager Agent”, for more information.
2.3.2 Installing MySQL Cluster Manager on Windows Platforms
To install MySQL Cluster Manager 1.2.4 on Windows platforms, you should first have downloaded the MSI
installer file mcm-1.2.4-cluster-7.3.2-win32-x86.msi (see Section 2.1, “Obtaining MySQL Cluster
Manager”). 1.2.4 for Windows is 32-bit, as is the bundled MySQL Cluster NDB 7.3.2; these run on both 32bit and 64-bit versions of Windows.
As mentioned elsewhere (see, for example, Section 3.4.1, “Creating a MySQL Cluster with MySQL Cluster
Manager”), you must install a copy of MySQL Cluster Manager on each computer where you intend to host
a MySQL Cluster node. Therefore, the following procedure must be performed separately on each host
computer. For ease of installations and upgrades on multiple machines, it is recommended that you install
MySQL Cluster Manager to the same location on each host. This is C:\Program Files\MySQL\MySQL
Cluster Manager 1.2.4\ or C:\Program Files (x86)\MySQL\MySQL Cluster Manager
1.2.4\ by default, but it is possible to install MySQL Cluster Manager to an alternate location such as C:
\mcm\.
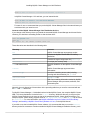
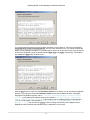
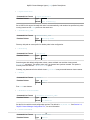
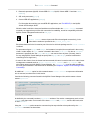
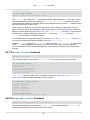
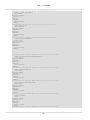
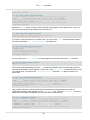
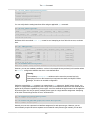
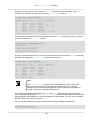
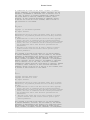
In the discussion that follows, we assume that you have downloaded the MySQL Cluster Manager 1.2.1
MSI installer as user jon to this user's Downloads directory (C:\Users\jon\Downloads\MCM) on a 64bit Windows system. Navigate to this directory in Windows Explorer, as shown here:
9
Installing MySQL Cluster Manager on Windows Platforms
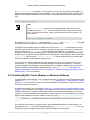
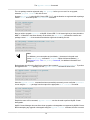
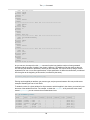
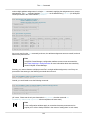
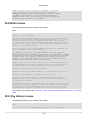
To run the installer, double-click on the file icon in Windows Explorer. Some versions of Windows also
provide an Install item in the Windows Explorer menu that can be used to run the installer. When you start
the installer, you may see a Windows Security Warning screen. If you obtained the installer from a trusted
source and know that it has not been tampered with, choose Run from the dialog, which allows the installer
to continue to the Welcome screen, as shown here:
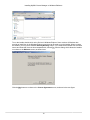
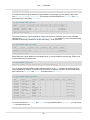
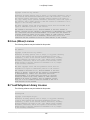
Click the Next button to continue to the License Agreement screen, as shown in the next figure:
10
Installing MySQL Cluster Manager on Windows Platforms
You should read the license text in the text area, and when you have done so, check the box labelled I
accept the terms in the License Agreement. Until you have checked the box, you cannot complete the
MySQL Cluster Manager installation; it is possible only to go back to the previous screen, print the license,
or cancel the installation (using the buttons labelled Back, Print, and Cancel, respectively). Checking the
box enables the Next button, as shown here:
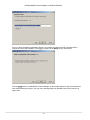
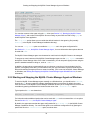
Click the Next button to continue to the Destination Folder screen, where you can choose the installation
directory. The next figure shows the Destination Folder screen with the default location. On Englishlanguage 32-bit Windows systems, this is C:\Program Files\MySQL\MySQL Cluster Manager
version\); on English 64-bit Windows systems, the default is C:\Program Files (x86)\MySQL
\MySQL Cluster Manager version\. (In this example, we are installing MySQL Cluster Manager
1.2.1 on a 64-bit system, so the default is C:\Program Files (x86)\MySQL\MySQL Cluster
Manager 1.2.1\.) You can click the Change button to change the directory where MySQL Cluster
Manager should be installed; the default directory is adequate for most cases.
11
Installing MySQL Cluster Manager on Windows Platforms
Once you have selected the destination directory, the installer has gathered all the information that it
requires to perform the installation. Click Next to continue to the Ready screen, shown here:
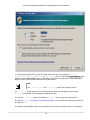
Click the Install button to install MySQL Cluster Manager. As the installer begins to copy files and perform
other tasks affecting the system, you may see a warning dialog from Windows User Access Control, as
shown here:
12
Installing MySQL Cluster Manager on Windows Platforms
If this occurs, click the Yes button to allow the installation to continue. A Setup Wizard screen with a
progress bar is displayed while the installer runs, as shown in the next figure:
The Setup Wizard may require several minutes to copy all of the necessary files for MySQL Cluster
Manager 1.2.4 and MySQL Cluster NDB 7.3.2 to the installation directory and to perform other required
changes.
Note
The MySQL Cluster Manager 1.2.4 installer places MySQL Cluster NDB 7.3.2 in the
cluster directory under the installation directory. (By default, this is C:\Program
Files\MySQL\MySQL Cluster Manager 1.2.4\cluster or C:\Program
Files (x86)\MySQL\MySQL Cluster Manager 1.2.4\cluster.) The
location of the MySQL Cluster binaries is not separately configurable using the
MySQL Cluster Manager installer.
13
Installing MySQL Cluster Manager on Windows Platforms
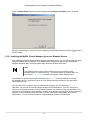
When the Setup Wizard finishes, the installer displays the Installation Completed screen, as shown
here:
MySQL Cluster Manager 1.2.4 has now been installed to the destination directory; click the Finish button to
exit the installer.
2.3.2.1 Installing the MySQL Cluster Manager Agent as a Windows Service
After installing the MySQL Cluster Manager Agent as a Windows service, you can start and stop the agent
using the Windows Service Manager. The installation also configures the agent to start automatically
whenever Windows starts, and to shut down safely whenever Windows shuts down.
Note
The Windows service can be used to control the running of MySQL Cluster
Manager agents on a single host only. To shut down agents on multiple hosts, you
can use the stop agents command in the MySQL Cluster Manager client.
The installation is performed using the command prompt (cmd.exe); as with installing or removing
any Windows service, it must also be done as a user having sufficient permissions, such the system
Administrator account.
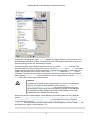
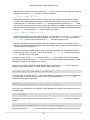
If the account you are currently using has Administrator privileges, you can simply start cmd.exe.
Otherwise, you must run the command prompt program as the Administrator. To do this, first locate a
shortcut to the command prompt. On most Windows systems, you can do this using the Start Menu. Find
Programs (or All Programs, in some Windows versions), then navigate to Accessories. Under Accessories,
right-click on the Command Prompt menu item. From the context menu that appears, select Run as
Administrator. You can see how this looks on a typical Windows system in the next figure.
14
Installing MySQL Cluster Manager on Windows Platforms
If a Windows UAC dialog referring to cmd.exe appears, click Yes to allow the command prompt to run
as Administrator and thus to continue. You should now have a command prompt window open on your
desktop, running a session with Administrator privileges.
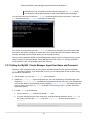
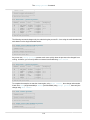
To install the MySQL Cluster Manager agent as a service, we use the SC CREATE command. This
command allows us to specify a name for the service (for use in NET START and NET STOP commands),
a display name (to be shown in the Service Manager), a startup mode (automatic or manual start), and
a path to the executable to be run as a service. (Use mcmd-svc.exe rather than mcmd.exe as the
executable.) The path must also include any arguments needed by the program; in the case of MySQL
Cluster Manager, mcmd-svc.exe must be told where to find its configuration file using the --defaultsfile option. Both of these paths must be absolute.
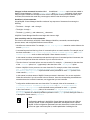
Important
Installation of the MySQL Cluster Manager agent as a service is recommended.
However, you should not install MySQL Cluster processes (ndb_mgmd.exe,
ndbd.exe, ndbmtd.exe, mysqld.exe) as services on Windows hosts to be
used as MySQL Cluster nodes under management by MySQL Cluster Manager,
since the MySQL Cluster Manager agent itself controls MySQL Cluster nodes
independently of the Windows Service Manager.
Assume that you have installed MySQL Cluster Manager to the default location for 64-bit Windows
systems C:\Program Files (x86)\MySQL\MySQL Cluster Manager 1.2.4\ (C:\Program
Files\MySQL\MySQL Cluster Manager 1.2.4\ on 32-bit Windows systems), and that its
configuration file is located in C:\Program Files (x86)\MySQL\MySQL Cluster Manager
1.2.4\etc. Then the following command installs MySQL Cluster Manager as a service named mcm, with
the display name “MySQL Cluster Manager 1.2.4”:
15
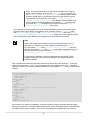
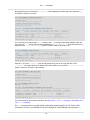
Installing MySQL Cluster Manager on Windows Platforms
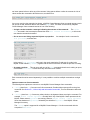
C:\> SC CREATE
"MCM" DisplayName= "MySQL Cluster Manager 1.2.4" Start= "auto"
BinPath= "C:\Program Files (x86)\MySQL\MySQL Cluster Manager 1.2.4\bin\mcmd-svc.exe
--defaults-file=\"C:\Program Files (x86)\MySQL\MySQL Cluster Manager 1.2.4\etc\mcmd.ini\""
[SC] CreateService SUCCESS
C:\>
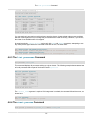
This command can be quite long. For enhanced legibility, we have broken it across several lines, but you
should always enter it on a single line, allowing it to wrap naturally, similar to what is shown here:
In addition, you should keep in mind that the spaces after the equals signs following the DisplayName,
Start, and BinPath arguments are required.
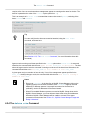
Starting and stopping the MySQL Cluster Manager agent Windows service.
After installing the
service successfully, you can start and stop the service manually, if the need arises, with the NET START
and NET STOP commands, as shown here:
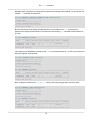
Once the service is installed, the MySQL Cluster Manager agent starts automatically whenever Windows
is started. You can verify that the service is running with the Windows Task Manager. Open the Task
Manager, and switch to the Services tab if it is not already displayed. If the MySQL Cluster Manager agent
is running, you can find it in the list of services under MCM in the Name, column and MySQL Cluster
Manager 1.2.4 in the Description column, as shown here:
16
Installing MySQL Cluster Manager on Windows Platforms
You can also verify if the service is running using the Windows Service Manager, as shown here:
The Service Manager also allows you to start, stop, or pause the MySQL Cluster Manager agent service
manually using a GUI.
Note
When first installing the MySQL Cluster Manager agent as a service, the service
is not started automatically until Windows is started. If you do not wish to restart
17
Setting the MySQL Cluster Manager Agent User Name and Password
Windows, then you must start the service manually using either NET START on the
command line or the graphical control provided in the Windows Service Manager.
You can remove the service using the SC DELETE command and the name of the service—in this case
MCM—that was used in the SC CREATE command, as shown here:
If the service is running at the time that SC DELETE is executed, the removal of the service takes effect
the next time the service is stopped. In such a case, you must stop the previous instance of the service
manually, and allow it to be removed, before you can reinstall the service.
Once you have installed the MySQL Cluster Manager agent and the service is running correctly, you are
ready to connect to it using the MySQL Cluster Manager client. See Section 3.3, “Starting the MySQL
Cluster Manager Client”, for information about how to do this.
2.3.3 Setting the MySQL Cluster Manager Agent User Name and Password
Normally it is not necessary to alter the user name or password used by the user agent to administer
mysqld processes. However, if you should wish to do so, you can change either or both of these, using
the procedure outlined here:
1. Stop all agents. (You can use stop agents for this purpose.)
2. Update the etc/mcmd.ini agent configuration file. Set a new password by uncommenting the line
containing manager-password= and adding the new password as this value; set a new administrative
user account name by uncommenting the line containing manager-username= and setting this to the
new user name. See Section 3.1, “mcmd, the MySQL Cluster Manager Agent”, for more information
about these options.
3. For each mysqld do the following:
a. Log in (using the mysql client) as the MySQL root user
b. If you are changing the user name, do this first, using the following statement, where olduser is
the current user name and newuser is the new manager-user that you set previously in etc/
mcmd.ini:
RENAME USER 'olduser'@'127.0.0.1' TO 'newuser'@'127.0.0.1';
18
MySQL Cluster Manager Configuration File
If you are changing the user name for the first time, use mcmd for olduser. (Prior to MySQL
Cluster Manager 1.2.4, if you are doing this for the first time, use admin for olduser. See Bug
#16476206.) In addition, you should use 127.0.0.1 for the host name (and not localhost).
c. Execute the following statement, where newuser is the new user name, and newpass is the new
password:
SET PASSWORD FOR 'newuser'@'127.0.0.1' = PASSWORD('newpass');
Use mcmd for the user name if you have not changed it—that is, if manager-user has been left
unset in mcmd.ini. (Prior to MySQL Cluster Manager 1.2.4, if you are doing this for the first time,
use admin for olduser.) Use 127.0.0.1 for the host name (and not localhost).
d. Issue a FLUSH PRIVILEGES statement.
4. Restart the agents. All agents should now be using the new password for the mcmd accounts on the
MySQL servers (mysqld processes).
2.4 MySQL Cluster Manager Configuration File
Before starting the MySQL Cluster Manager agent, you should make any necessary changes to the
[mcmd] section of the agent configuration file, supplied with MySQL Cluster Manager as etc/mcmd.ini
in the installation directory. On Linux and similar operating systems, you can edit this file in place; on
Windows, it is recommended that you save a copy of this file to a convenient location for which the path
does not contain any spaces, such as C:\mcm\data.
A # character in the MySQL Cluster Manager configuration file indicates the beginning of a comment; the
comment continues to the end of the line.
The version of this file that is supplied with MySQL Cluster Manager reads similarly to what is shown here:
[mcmd]
plugins=manager
##manager-port=1862
##agent-uuid=
log-file=mcmd.log
log-level=message
##pid-file=
## Username and password for manager plugin
##manager-username=
##manager-password=
## Top-level directory for manager plugins information stored on disk
##manager-directory=
Note
Prior to MySQL Cluster Manager 1.1.1, the [mcmd] section of the configuration file
used the heading [mysql-proxy]. The old name is still supported for backward
compatibility, but is now deprecated and is thus subject to removal in a future
release of MySQL Cluster Manager. For this reason, you should change any
[mysql-proxy] section headings in existing configuration files to [mcmd], when
upgrading to MySQL Cluster Manager 1.2.4.
19
Upgrading MySQL Cluster Manager
A minimal agent configuration file as used in production might look like this:
[mcmd]
plugins=manager
manager-port=1862
manager-directory=/var/opt/mcm-1.2.4
log-file=/var/opt/mcm/mcmd.log
log-level=warning
For more information about these and other options which can be set in the agent configuration file, see
Section 3.1, “mcmd, the MySQL Cluster Manager Agent”.
2.5 Upgrading MySQL Cluster Manager
This section discusses upgrading MySQL Cluster Manager from a version 1.1 release or previous 1.2
release to the latest 1.2 release (currently 1.2.4), as well as providing basic guidance on upgrading the
bundled MySQL Cluster software.
The basic steps for upgrading a MySQL Cluster Manager installation are listed here:
1. Install the new version of the MySQL Cluster Manager software in the desired location.
2. Create a configuration for the new installation such that it uses the previous installation's data.
3. Stop all running MySQL Cluster Manager agent processes on all hosts.
4. Start the new agent processes, ensuring that they use the new configuration created previously.
A more detailed explanation is provided of each of these steps in the next few paragraphs. For purposes
of example, we assume an upgrade from an existing installation of MySQL Cluster Manager 1.2.1 to a new
installation of MySQL Cluster Manager 1.2.2. For a Linux or other Unix-like system, we assume that these
are installed in /opt/mcm-1.2.1 and /opt/mcm-1.2.2, respectively; on Windows, we assume the
default directories C:\Program Files\MySQL\MySQL Cluster Manager 1.2.1\ and C:\Program
Files\MySQL\MySQL Cluster Manager 1.2.2\.
Step 1: Install new MySQL Cluster Manager version.
You can obtain and install a new version of
MySQL Cluster Manager in the same way as for a new installation (see Section 2.1, “Obtaining MySQL
Cluster Manager”, and Section 2.3, “MySQL Cluster Manager Agent Installation”), with the additional
requirement that you should not attempt to install the new version in the same location as the version
which you are currently using.
Step 2: Configure new installation.
In order for the new MySQL Cluster Manager agent binaries to
manage the same MySQL Cluster instances, they must be able to find the data contained in the agent
repository used by the old installation's binaries. In MySQL Cluster Manager 1.2.3 and later, this is /opt/
mcm_data by default, but can be set using the manager-directory directive in mcmd.ini. (Prior to
MySQL Cluster Manager 1.2.3, the default was the mcm_data directory in the agent installation directory;
see Bug #16521396.)
It is simplest for MySQL Cluster Manager software upgrades if the agent repository and the agent
configuration file are located externally to the agent installation directory. Suppose the old version of
the agent is installed to /opt/mcm-1.2.1, and that it uses the directory /var/opt/mcm for its agent
repository and /etc/mcm/mcmd.ini for its configuration file. In this case, to make the new binaries use
20
Upgrading MySQL Cluster Manager
the same configuration and repository, it is necessary only to start the new mcmd processes such that they
use the same configuration file (see Step 4). Otherwise, you should copy the default configuration file to a
location outside the installation driectory, such as /etc/mcm/mcmd.ini, as shown here:
shell> cp -r /opt/mcm-1.2.1/etc/mcmd.ini /etc/mcm/mcmd.ini
Then, add the following line to the new copy of the mcmd.ini file:
manager-directory=/var/opt/mcm
After this, you can save and close the file. See also Section 2.4, “MySQL Cluster Manager Configuration
File”.
Step 3: Stop all agents.
Stop the agent processes using the old binaries on all hosts making up the
management installation. You can stop all agents for a given site, for example mysite, using the stop
agents command in the MySQL Cluster Manager client, as shown here:
mcm> stop agents mysite;
You should execute a stop agents command, similar to the one just shown, for each site listed in the
output of list sites.
Step 4: Start new MySQL Cluster Manager binaries.
Start the new mcmd agent binaries with the -defaults-file option so that it uses the correct configuration file, like this:
shell> mcmd --defaults-file=/etc/mcm/mcmd.ini &
You should now be able to start the mcm client from the new installation and perform management tasks
as usual. Once the client successfully starts and connects to the agent, you can verify that it is running the
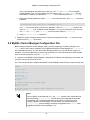
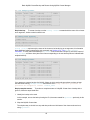
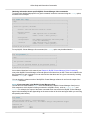
correct version of the MySQL Cluster Manager software using the version command, as shown here:
mcm> version;
+-----------------------------+
| Version
|
+-----------------------------+
| MySQL Cluster Manager 1.2.4 |
+-----------------------------+
1 row in set (0.00 sec)
See Chapter 3, Using MySQL Cluster Manager, for more information about performing common cluster
management tasks with the mcm client.
Upgrading MySQL Cluster.
Although the MySQL Cluster software typically comes bundled with the
MySQL Cluster Manager distribution, it is important to keep in mind that upgrading the MySQL Cluster
Manager software does not upgrade any existing MySQL Cluster installations. Since the new MySQL
Cluster Manager installation uses the same configuration as the old one, the clusters under its control
remain unchanged. If you wish to upgrade a cluster using the bundled MySQL Cluster software, you should
move the cluster directory (see Contents of the MySQL Cluster Manager Unix Distribution Archive) and
all of its contents to a location outside the MySQL Cluster Manager installation directory. After this, you
can use add package and upgrade cluster to upgrade one or more clusters to the new version of the
MySQL Cluster software.
21
22
Chapter 3 Using MySQL Cluster Manager
Table of Contents
3.1 mcmd, the MySQL Cluster Manager Agent ...................................................................................
3.2 Starting and Stopping the MySQL Cluster Manager Agent ............................................................
3.2.1 Starting and Stopping the Agent on Linux .........................................................................
3.2.2 Starting and Stopping the MySQL Cluster Manager Agent on Windows ...............................
3.3 Starting the MySQL Cluster Manager Client ................................................................................
3.4 Setting Up MySQL Clusters with MySQL Cluster Manager ...........................................................
3.4.1 Creating a MySQL Cluster with MySQL Cluster Manager ...................................................
3.4.2 Migrating a MySQL Cluster to MySQL Cluster Manager .....................................................
3.5 MySQL Cluster Backup and Restore Using MySQL Cluster Manager ............................................
3.5.1 Requirements for Backup and Restore .............................................................................
3.5.2 Basic MySQL Cluster Backup and Restore Using MySQL Cluster Manager .........................
23
32
32
33
36
39
39
40
44
44
44
This chapter discusses starting and stopping the MySQL Cluster Manager agent and client, and setting up,
backing up, and restoring MySQL Clusters using the MySQL Cluster Manager.
3.1 mcmd, the MySQL Cluster Manager Agent
mcmd is the MySQL Cluster Manager agent program; invoking this executable starts the MySQL Cluster
Manager Agent, to which you can connect using the mcm client (see Section 3.3, “Starting the MySQL
Cluster Manager Client”, and Chapter 4, MySQL Cluster Manager Client Commands, for more information).
You can modify the behavior of the agent in a number of different ways by specifying one or more of the
options discussed in this sections. Most of these options can be specified either on the command line or in
the agent configuration file (normally etc/mcmd.ini). (Some exceptions include the --defaults-file
and --bootstrap options, which, if used, must be specified on the command line, and which are mutually
exclusive with one another.) For example, you can set the agent's cluster logging level to warning instead
than the default message in either one of the following two ways:
• Include --log-level=warning on the command line when invoking mcmd.
When specifying an agent configuration option on the command line, the name of the option is prefixed
with two leading dash characters (--).
• Include the following line in the agent configuration file:
log-level=warning
Note
In MySQL Cluster Manager 1.2.3 and later, you can change the logging level at
runtime using the mcm client change log-level command.
When used in the configuration file, the name of the option should not be prefixed with any other
characters. Each option must be specified on a separate line. You can comment out all of a given line by
inserting a leading hash character (#), like this:
#log-level=warning
23
MySQL Cluster Manager Agent (mcmd) Option Descriptions
You can also comment out part of a line in this way; any text following the # character is ignored, to the
end of the current line.
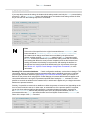
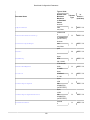
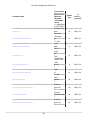
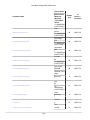
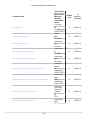
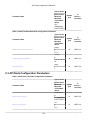
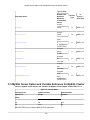
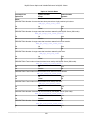
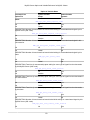
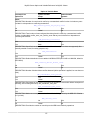
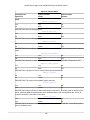
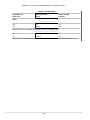
The following table contains a summary of agent options that are read on startup by mcmd. More detailed
information about each of these options, such as allowed range of values, can be found in the list following
the table.
Table 3.1 MySQL Cluster Manager Agent (mcmd) Option Summary
Format
Description
Introduced
--agent-uuid
Set the agent's UUID; needed only when running multiple
agent processes on the same host.
--basedir
Directory to use as prefix for relative paths in the
configuration
--bootstrap
Bootstrap a default cluster on startup.
--daemon
Run in daemon mode.
--defaults-file
Configuration file to use
--event-threads
Number of event handler threads to use.
--help
Show application options.
--help-all
Show all options (application options and manager module
options).
--help-manager
Show manager module options.
--keepalive
Try to restart mcmd in the event of a crash.
--log-backtrace-on-crash
Attempt to load debugger in case of a crash.
--log-file
Name of the file to write the log to.
--log-level
Set the cluster logging level.
--log-use-syslog
Log to syslog.
--manager-directory
Directory used for manager data storage.
--manager-password
Password used for the manager account.
--manager-port
Port for client to use when connecting to manager.
--manager-username
User account name to run the manager under.
--max-open-files
Maximum number of open files (ulimit -n).
--pid-file
Specify PID file (used if running as daemon)
--plugin-dir
Directory in which to look for plugins
--plugins
Comma-separated list of plugins to load; must include
"manager".
--verbose-shutdown
Always log the exit code when shutting down.
--version
Show the manager version.
--xcom-port
Specify the XCOM port.
1.2.3
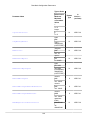
MySQL Cluster Manager Agent (mcmd) Option Descriptions
The following list contains descriptions of each startup option available for use with mcmd, including allowed
and default values. Options noted as boolean need only be specified in order to take effect; you should not
try to set a value for these.
24
MySQL Cluster Manager Agent (mcmd) Option Descriptions
•
--agent-uuid=uuid
Command-Line Format
--agent-uuid=uuid
Permitted Values
Type
string
Default [set internally]
Set a UUID for this agent. Normally this value is set automatically, and needs to be specified only when
running more than one mcmd process on the same host.
•
--basedir=dir_name
Command-Line Format
--basedir=dir_name
Permitted Values
Type
directory name
Default .
Directory with path to use as prefix for relative paths in the configuration.
•
--bootstrap
Command-Line Format
--bootstrap
Permitted Values
Type
boolean
Default true
Start the agent with default configuration values, create a default one-machine cluster named
mycluster, and start it. This option works only if no clusters have yet been created. This option is
mutually exclusive with the --defaults-file option.
Currently, any data stored in the default cluster mycluster is not preserved between cluster restarts.
•
--daemon
Command-Line Format
--daemon
Permitted Values
Type
boolean
Default true
Run mcmd as a daemon.
•
--defaults-file=filename
Command-Line Format
--defaults-file=file_name
Permitted Values
Type
file name
Default etc/mcmd.ini
Set the file from which to read configuration options. The default is etc/mcmd.ini. See Section 2.4,
“MySQL Cluster Manager Configuration File”, for more information.
•
--event-threads=#
Command-Line Format
25
--event-threads=#
Permitted Values
Type
numeric
MySQL Cluster Manager Agent (mcmd) Option Descriptions
Default 1
Min
Value
1
Max
Value
[system dependent]
Number of event handler threads to use. The the default is 1, which is sufficient for most normal
operations.
•
--help, -?
Command-Line Format
--help
Permitted Values
Type
boolean
Default true
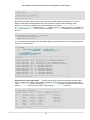
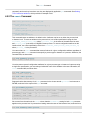
mcmd help output is divided into Application and Manager sections. When used with mcmd, --help
causes the Application options to be shown, as shown here:
shell> mcmd --help
Usage:
mcmd [OPTION...] - MySQL Cluster Manager
•
Help Options:
-?, --help
--help-all
--help-manager
Show help options
Show all help options
Show options for the manager-module
Application Options:
-V, --version
--defaults-file=<file>
--verbose-shutdown
--daemon
--basedir=<absolute path>
--pid-file=<file>
--plugin-dir=<path>
--plugins=<name>
--log-level=<string>
--log-file=<file>
--log-use-syslog
--log-backtrace-on-crash
--keepalive
--max-open-files
--event-threads
Show version
configuration file
Always log the exit code when shutting down
Start in daemon-mode
Base directory to prepend to relative paths in the config
PID file in case we are started as daemon
Path to the plugins
Plugins to load
Log all messages of level ... or higher
Log all messages in a file
Log all messages to syslog
Try to invoke debugger on crash
Try to restart mcmd if it crashed
Maximum number of open files (ulimit -n)
Number of event-handling threads (default: 1)
--help-all
Command-Line Format
--help-all
Permitted Values
Type
boolean
Default true
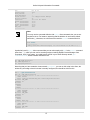
mcmd help output is divided into Application and Manager sections. When used with --help-all, mcmd
displays both the Application and the Manager options, like this:
> mcmd --help-all
Usage:
mcmd [OPTION...] - MySQL Cluster Manager
26
MySQL Cluster Manager Agent (mcmd) Option Descriptions
•
Help Options:
-?, --help
--help-all
--help-manager
Show help options
Show all help options
Show options for the manager-module
manager-module
--manager-port=<clientport>
--xcom-port=<xcomport>
--manager-username=<username>
--manager-password=<password>
--bootstrap
--manager-directory=<directory>
Port to manage the cluster (default: 1862)
Xcom port (default: 18620)
Username to manage the cluster (default: mcmd)
Password for the manager user-account (default: super)
Bootstrap a default cluster on initial startup
Path to managers config information
Application Options:
-V, --version
--defaults-file=<file>
--verbose-shutdown
--daemon
--basedir=<absolute path>
--pid-file=<file>
--plugin-dir=<path>
--plugins=<name>
--log-level=<string>
--log-file=<file>
--log-use-syslog
--log-backtrace-on-crash
--keepalive
--max-open-files
--event-threads
Show version
configuration file
Always log the exit code when shutting down
Start in daemon-mode
Base directory to prepend to relative paths in the config
PID file in case we are started as daemon
Path to the plugins
Plugins to load
Log all messages of level ... or higher
Log all messages in a file
Log all messages to syslog
Try to invoke debugger on crash
Try to restart mcmd if it crashed
Maximum number of open files (ulimit -n)
Number of event-handling threads (default: 1)
--help-manager
Command-Line Format
--help-manager
Permitted Values
Type
boolean
Default true
mcmd help output is divided into Application and Manager sections. When used with --help-manager,
mcmd displays the Manager options, like this:
shell> mcmd --help-manager
Usage:
mcmd [OPTION...] - MySQL Cluster Manager
manager-module
--manager-port=<clientport>
--xcom-port=<xcomport>
--manager-username=<username>
--manager-password=<password>
--bootstrap
--manager-directory=<directory>
•
Port to manage the cluster (default: 1862)
Xcom port (default: 18620)
Username to manage the cluster (default: mcmd)
Password for the manager user-account (default: super)
Bootstrap a default cluster on initial startup
Path to managers config information
--keepalive
Command-Line Format
--keepalive
Permitted Values
Type
boolean
Default true
Use this option to cause mcmd to attempt to restart in the event of a crash.
27
MySQL Cluster Manager Agent (mcmd) Option Descriptions
•
--log-backtrace-on-crash
Command-Line Format
--log-backtrace-on-crash
Permitted Values
Type
boolean
Default true
Attempt to load the debugger in the event of a crash. Not normally used in production.
•
--log-file=filename
Command-Line Format
--log-file=file
Permitted Values
Type
file name
Default mcmd.log
Set the name of the file to write the log to. The default is mcmd.log in the installation directory. On
Linux and other Unix-like pltforms, you can use a relative path; this is in relation to the MySQL Cluster
Manager installation directory, and not to the bin or etc subdirectory. On Windows, you must use
an absolute path, and it cannot contain any spaces; in addition, you must replace any backslash (\)
characters in the path with forward slashes (/).
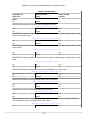
•
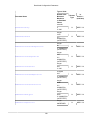
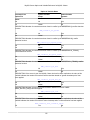
--log-level=level
Command-Line Format
--log-level=level
Permitted Values
Type
enumeration
Default message
Valid
message
Values debug
critical
error
info
warning
Sets the cluster log event severity level; see MySQL Cluster Logging Management Commands, for
definitions of the levels, which are the same as these except that ALERT is mapped to critical and
the Unix syslog LOG_NOTICE level is used (and mapped to message). For additional information, see
Possible values for this option are (any one of) debug, critical, error, info, message, and
warning. message is the default.
You should be aware that the debug, message, and info levels can result in rapid growth of the agent
log, so for normal operations, you may prefer to set this to warning or error.
As with other agent options, changes in the cluster logging level made using this option do not take
effect until mcmd is restarted. Beginning with MySQL Cluster Manager 1.2.3, you can change the cluster
logging level at runtime using the change log-level command in the mcm client. This option also
applies its setting to all hosts running on all sites; change log-level is more flexible and its effects
can be constrained to a specific management site, or to one or more hosts within that site.
•
--log-use-syslog
28
MySQL Cluster Manager Agent (mcmd) Option Descriptions
Command-Line Format
--log-use-syslog
Permitted Values
Type
boolean
Default true
Write logging output to syslog.
•
--manager-directory=dir_name
Command-Line Format
--manager-directory=dir
Permitted Values (<=
1.2.2)
Type
Permitted Values (>=
1.2.3)
Type
directory name
Default mcm_data
directory name
Default /opt/mcm_data
Set the location of the agent repository, which contains collections of MySQL Cluster Manager data files
and MySQL Cluster configuration and data files. The value must be a valid absolute path. On Linux, if
the directory does not exist, it is created; on Windows, the directory must be created if it does not exist.
additionally on Windows, the path may not contain any spaces or backslash (\) characters; backslashes
must be replaced with forward slashes (/).
The default location is /opt/mcm_data. (Prior to MySQL Cluster Manager 1.2.3, this was mcm_data.)
If you change the default, you should use a standard location external to the MySQL Cluster Manager
installation directory, such as /var/opt/mcm on Linux.
In addition to the MySQL Cluster Manager data files, the manager-directory also contains a rep
directory in which MySQL Cluster data files for each MySQL Cluster under MySQL Cluster Manager
control are kept. Normally, there is no need to interact with these directories beyond specifying the
location of the manager-directory in the agent configuration file (mcmd.ini).
However, in the event that an agent reaches an inconsistent state, it is possible to delete the contents of
the rep directory, in which case the agent attempts to recover its repository from another agent. In such
cases, you must also delete the repchksum checksum file from the manager-directory. Otherwise,
the agent reads this file and raises a checksum error due to the now-empty rep directory.
•
--manager-password=password
Command-Line Format
--manager-password=password
Permitted Values
Type
string
Default super
Set a password to be used for the manager agent user account. The default is super.
Using this option together with manager-username causes the creation of a MySQL user account,
having the username and password specified using these two options. This account is created with all
privileges on the MySQL server including the granting of privileges. In other words, it is created as if you
had executed GRANT ALL PRIVILEGES ON *.* ... WITH GRANT OPTION in the mysql client.
•
--manager-port=#
Command-Line Format
--manager-port=port
29
MySQL Cluster Manager Agent (mcmd) Option Descriptions
Permitted Values
Type
numeric
Default localhost:1862
Specify the port used by MySQL Cluster Manager client connections. Any valid TC/IP port number can
be used. Normally, there is no need to change it from the default value (1862).
Previously, this option could optionally take a host name in addition to the port number, but in MySQL
Cluster Manager 1.1.1 and later the host name is no longer accepted.
•
--manager-username=user_name
Command-Line Format
--manager-username=name
Permitted Values (<=
1.2.3)
Type
Permitted Values (>=
1.2.4)
Type
string
Default admin
string
Default mcmd
Set a user name for the MySQL account to be used by the MySQL Cluster Manager agent. The default
is mcmd.
Note
In MySQL Cluster Manager 1.2.3 and earlier, the default user account name was
admin. (Bug #16476206)
When used together with manager-password, this option also causes the creation of a new MySQL
user account, having the user name and password specified using these two options. This account is
created with all privileges on the MySQL server including the granting of privileges. In other words, it is
created as if you had executed GRANT ALL PRIVILEGES ON *.* ... WITH GRANT OPTION in
the mysql client. The existing MySQL root account is not altered in such cases, and the default test
database is preserved.
•
--max-open-files=#
Command-Line Format
--max-open-files=#
Permitted Values
Type
numeric
Default 1
Min
Value
1
Max
Value
[system dependent]
Set the maximum number of open files (as with ulimit -n).
•
--pid-file=file
Command-Line Format
--pid-file=file_name
Permitted Values
Type
file name
Default mcmd.pid
30
MySQL Cluster Manager Agent (mcmd) Option Descriptions
Set the name and path to a process ID (.pid) file. Not normally used or needed. This option is not
supported on Windows systems.
•
--plugin-dir
Command-Line Format
--plugin-dir=dir_name
Permitted Values
Type
directory name
Default lib/mcmd
Set the directory to search for plugins. The default is lib/mcmd, in the MySQL Cluster Manager
installation directory; normally there is no need to change this.
•
--plugins
Command-Line Format
--plugins=list
Permitted Values
Type
directory name
Default
Specify a list of plugins to be loaded on startup. To enable MySQL Cluster Manager, this list must
include manager (the default value). For other possibilities, see MySQL Proxy; however, you should be
aware that we currently do not test MySQL Cluster Manager with any values for plugins other than
manager. For this reason we recommend using the default the value in a production setting.
•
--verbose-shutdown
Command-Line Format
--verbose-shutdown
Permitted Values
Type
boolean
Default true
Force mcmd to log the exit code whenever shutting down, regardless of the reason.
•
--version, -V
Command-Line Format
--version
Permitted Values
Type
boolean
Default true
Display version information and exit. Output may vary according to the MySQL Cluster Manager
software version, operating platform, and versions of libraries used on your system, but should closely
resemble what is shown here, with the first line of output containing the MySQL Cluster Manager release
number (emphasized text):
shell> mcmd -V
MySQL Cluster Manager 1.2.4 (64bit)
chassis: mysql-proxy 0.8.3
glib2: 2.16.6
libevent: 1.4.13-stable
-- modules
manager: 1.2.4
•
--xcom-port
31
Starting and Stopping the MySQL Cluster Manager Agent
Introduced
1.2.3
Command-Line Format
--xcom-port=port
Permitted Values (>=
1.2.3)
Type
numeric
Default 18620
Allows you to specify the XCOM port. The default in 18620.
This option was added in MySQL Cluster Manager 1.2.3.
3.2 Starting and Stopping the MySQL Cluster Manager Agent
Before you can start using MySQL Cluster Manager to create and manage a MySQL Cluster, the MySQL
Cluster Manager agent must be started on each computer that is intended to host one or more nodes in the
MySQL Cluster to be managed.
The MySQL Cluster Manager agent employs a MySQL user account for administrative access to mysqld
processes. It is possible, but not a requirement, to change the default user name, the default password
used for this account, or both. For more information, see Section 2.3.3, “Setting the MySQL Cluster
Manager Agent User Name and Password”.
3.2.1 Starting and Stopping the Agent on Linux
To start the MySQL Cluster Manager agent on a given host running a Linux or similar operating system,
you should run mcmd, found in the bin directory within the manager installation directory on that host.
Typical options used with mcmd are shown here:
mcmd [--defaults-file | --bootstrap] [--log-file] [--log-level]
See Section 3.1, “mcmd, the MySQL Cluster Manager Agent”, for information about additional options that
can be used when invoking mcmd from the command line, or in a configuration file.
mcmd normally runs in the foreground. If you wish, you can use your platform's usual mechanism for
backgrounding a process. On a Linux system, you can do this by appending an ampersand character (&),
like this (not including any options that might be required):
shell> ./bin/mcmd &
By default, the agent assumes that the agent configuration file is etc/mcmd.ini, in the MySQL Cluster
Manager installation directory. You can tell the agent to use a different configuration file by passing the
path to this file to the --defaults-file option, as shown here:
shell> ./bin/mcmd --defaults-file=/home/mcm/mcm-agent.conf
The --bootstrap option causes the agent to start with default configuration values, create a default onemachine cluster named mycluster, and start it. This option works only if no cluster has yet created, and
is mutually exclusive with the --defaults-file option. Currently, any data stored in the default cluster
mycluster is not preserved between cluster restarts; this is a known issue which we may address in a
future release of MySQL Cluster Manager.
The use of the --bootstrap option with mcmd is shown here on a system having the host name torsk,
where MySQL Cluster Manager has been installed to /home/jon/mcm:
32
Starting and Stopping the MySQL Cluster Manager Agent on Windows
shell> ./mcmd --bootstrap
MySQL Cluster Manager 1.2.4 started
Connect to MySQL Cluster Manager by running "/home/jon/mcm/bin/mcm" -a torsk:1862
Configuring default cluster 'mycluster'...
Starting default cluster 'mycluster'...
Cluster 'mycluster' started successfully
ndb_mgmd
torsk:1186
ndbd
torsk
ndbd
torsk
mysqld
torsk:3306
mysqld
torsk:3307
ndbapi
*
Connect to the database by running "/home/jon/mcm/cluster/bin/mysql" -h torsk -P 3306 -u root
You can then connect to the agent using the mcm client (see Section 3.3, “Starting the MySQL Cluster
Manager Client”), and to either of the MySQL Servers running on ports 3306 and 3307 using mysql or
another MySQL client application.
The --log-file option allows you to override the default location for the agent log file (normally
mcmd.log, in the MySQL Cluster Manager installation directory).
You can use --log-level option to override the log-level set in the agent configuration file.
See Section 3.1, “mcmd, the MySQL Cluster Manager Agent”, for more information about options that can
be used with mcmd.
The MySQL Cluster Manager agent must be started on each host in the MySQL Cluster to be managed.
To stop one or more instances of the MySQL Cluster Manager agent, use the stop agents command in
the MySQL Cluster Manager client. If the client is unavailable, you can stop each agent process using the
system's standard method for doing so, such as ^C or kill.
In addition, the agent does not automatically run as a daemon or service on Linux and other Unix-like
systems; if an agent process fails, you must either have your own mechanism in place for detecting the
failure and restarting the agent process or restart it manually. (This is not true for MySQL Cluster Manager
on Windows; see Starting and stopping the MySQL Cluster Manager agent Windows service, for more
information.)
3.2.2 Starting and Stopping the MySQL Cluster Manager Agent on Windows
To start the MySQL Cluster Manager agent manually on a Windows host, you should invoke mcmd.exe,
found in the bin directory under the manager installation directory on that host. By default, the agent
uses etc/mcmd.ini in the MySQL Cluster Manager installation directory as its configuration file; this can be
overridden by passing the desired file's location as the value of the --defaults-file option.
Typical options for mcmd are shown here:
mcmd[.exe] [--defaults-file | --bootstrap] [--log-file] [--log-level]
For information about additional options that can be used with mcmd on the command line or in an option
file, see Section 3.1, “mcmd, the MySQL Cluster Manager Agent”.
By default, the agent assumes that the agent configuration file is etc/mcmd.ini, in the MySQL Cluster
Manager installation directory. You can tell the agent to use a different configuration file by passing the
path to this file to the --defaults-file option, as shown here:
33
Starting and Stopping the MySQL Cluster Manager Agent on Windows
C:\Program Files (x86)\MySQL\MySQL Cluster Manager 1.1.4\bin>
mcmd --defaults-file="C:\Program Files (x86)\MySQL\MySQL Cluster
Manager 1.2.4\etc\mcmd.ini"
The --bootstrap option causes the agent to start with default configuration values, create a default
one-machine cluster named mycluster, and start it. The use of this option with mcmd is shown here on
a system having the host name torsk, where MySQL Cluster Manager has been installed to the default
location:
C:\Program Files (x86)\MySQL\MySQL Cluster Manager 1.2.4\bin>mcmd --bootstrap
MySQL Cluster Manager 1.2.4 started
Connect to MySQL Cluster Manager by running "C:\Program Files (x86)\MySQL\MySQL
Cluster Manager 1.2.4\bin\mcm" -a TORSK:1862
Configuring default cluster 'mycluster'...
Starting default cluster 'mycluster'...
Cluster 'mycluster' started successfully
ndb_mgmd
TORSK:1186
ndbd
TORSK
ndbd
TORSK
mysqld
TORSK:3306
mysqld
TORSK:3307
ndbapi
*
Connect to the database by running "C:\Program Files (x86)\MySQL\MySQL Cluster
Manager 1.2.4\cluster\bin\mysql" -h TORSK -P 3306 -u root
You can then connect to the agent using the mcm client (see Section 3.3, “Starting the MySQL Cluster
Manager Client”), and to either of the MySQL Servers running on ports 3306 and 3307 using mysql or
another MySQL client application.
When starting the MySQL Cluster Manager agent for the first time, you may see one or more Windows
Security Alert dialogs, such as the one shown here:
34
Starting and Stopping the MySQL Cluster Manager Agent on Windows
You should grant permission to connect to private networks for any of the programs mcmd.exe,
ndb_mgmd.exe, ndbd.exe, ndbmtd.exe, or mysqld.exe. To do so, check the Private Networks... box
and then click the Allow access button. It is generally not necessary to grant MySQL Cluster Manager or
MySQL Cluster access to public networks such as the Internet.
Note
The --defaults-file and --bootstrap options are mutually exclusive.
The --log-file option allows you to override the default location for the agent log file (normally
mcmd.log, in the MySQL Cluster Manager installation directory).
You can use --log-level option to override the log-level set in the agent configuration file.
See Section 3.1, “mcmd, the MySQL Cluster Manager Agent”, for more information about options that can
be used with mcmd.
The MySQL Cluster Manager agent must be started on each host in the MySQL Cluster to be managed.
35
Starting the MySQL Cluster Manager Client
It is possible to install MySQL Cluster Manager as a Windows service, so that it is started automatically
each time Windows starts. See Section 2.3.2.1, “Installing the MySQL Cluster Manager Agent as a
Windows Service”.
To stop one or more instances of the MySQL Cluster Manager agent, use the stop agents command in
the MySQL Cluster Manager client. You can also stop an agent process using the Windows Task Manager.
In addition, if you have installed MySQL Cluster Manager as a Windows service, you can stop (and start)
the agent using the Windows Service Manager, CTRL-C, or the appropriate NET STOP (or NET START)
command. See Starting and stopping the MySQL Cluster Manager agent Windows service, for more
information about each of these options.
3.3 Starting the MySQL Cluster Manager Client
This section covers starting the MySQL Cluster Manager client and connecting to the MySQL Cluster
Manager agent.
MySQL Cluster Manager 1.2.4 includes a command-line client mcm, located in the installation bin
directory. mcm can be invoked with any one of the options shown in the following table:
Long form
Short form
Description
--help
-?
Display mcm client options
--version
-V
Shows MySQL Cluster Manager agent/client version.
—
-W
Shows MySQL Cluster Manager agent/client version, with
version of mysql used by mcm.
--address
-a
Host and optional port to use when connecting to mcmd, in
host[:port] format; default is 127.0.0.1:1862.
--mysql-help
-I
Show help for mysql client (see following).
The client-server protocol used by MySQL Cluster Manager is platform-independent. You can connect to
any MySQL Cluster Manager agent with an mcm client on any platform where it is available. This means,
for example, that you can use an mcm client on Microsoft Windows to connect to a MySQL Cluster Manager
agent that is running on a Linux host.
mcm actually acts as a wrapper for the mysql client that is included with the bundled MySQL Cluster
distribution. Invoking mcm with no options specified is equivalent to the following:
shell> mysql -umcmd -psuper -h 127.0.0.1 -P 1862
(These -u and -p options and values are hard-coded and cannot be changed.) This means that you can
use the mysql client to run MySQL Cluster Manager client sessions on platforms where mcm itself (or even
mcmd) is not available. For more information, see Connecting to the agent using the mysql client.
If you experience problems starting an MySQL Cluster Manager client session because the client fails to
connect, see Can't connect to [local] MySQL server, for some reasons why this might occur, as well as
suggestions for some possible solutions.
To end a client session, use the exit or quit command (short form: \q). Neither of these commands
requires a separator or terminator character.
For more information, see Chapter 4, MySQL Cluster Manager Client Commands.
Connecting to the agent with the mcm client.
You can connect to the MySQL Cluster Manager agent
by invoking mcm (or, on Windows, mcm.exe). You may also need to specify a hostname, port number, or
both, using the following command-line options:
36
Starting the MySQL Cluster Manager Client
• --host=hostname or -h[ ]hostname
This option takes the name or IP address of the host to connect to. The default is localhost (which
may not be recongized on all platforms when starting a mcm client session even if it works for starting
mysql client sessions).
You should keep in mind that the mcm client does not perform host name resolution; any name resolution
information comes from the operating system on the host where the client is run. For this reason, it is
usually best to use a numeric IP address rather than a hostname for this option.
• --port=portnumber or -P[ ]portnumber
This option specifies the TCP/IP port for the client to use. This must be the same port that is used by
the MySQL Cluster Manager agent. As mentioned eslewhere, if no agent port is specified in the MySQL
Cluster Manager agent configuration file (mcmd.ini), the default number of the port used by the MySQL
Cluster Manager agent is 1862, which is also used by default by mcm.
mcm accepts additional mysql client options, some of which may possibly be of use for MySQL Cluster
Manager client sessions. For example, the --pager option might prove helpful when the output of get
contains too many rows to fit in a single screen. The --prompt option can be used to provide a distinctive
prompt to help avoid confusion between multiple client sessions. However, options not shown in the
current manual have not been extensively tested with mcm and so cannot be guaranteed to work correctly
(or even at all). See mysql Options, for a complete listing and descriptions of all mysql client options.
Note
Like the mysql client, mcm also supports \G as a statement terminator which
causes the output to be formatted vertically. This can be helpful when using a
terminal whose width is restricted to some number of (typically 80) characters. See
Chapter 4, MySQL Cluster Manager Client Commands, for examples.
Connecting to the agent using the mysql client.
As mentioned previously, mcm actually serves
as a wrapper for the mysql client. In fact, a mysql client from any recent MySQL distribution (MySQL
5.1 or later) should work without any issues for connecting to mcmd. In addition, since the client-server
protocol used by MySQL Cluster Manager is platform-independent, you can use a mysql client on any
platform supported by MySQL. (This means, for example, that you can use a mysql client on Microsoft
Windows to connect to a MySQL Cluster Manager agent that is running on a Linux host.) Connecting to the
MySQL Cluster Manager agent using the mysql client is accomplished by invoking mysql and specifying
a hostname, port number, username and password, using the following command-line options:
• --host=hostname or -h[ ]hostname
This option takes the name or IP address of the host to connect to. The default is localhost. Like the
mcm client, the mysql client does not perform host name resolution, and relies on the host operating
system for this task. For this reason, it is usually best to use a numeric IP address rather than a
hostname for this option.
• --port=portnumber or -P[ ]portnumber
This option specifies the TCP/IP port for the client to use. This must be the same port that is used by
the MySQL Cluster Manager agent. Although the default number of the port used by the MySQL Cluster
Manager agent is 1862 (which is also used by default by mcm), this default value is not known to the
mysql client, which uses port 3306 (the default port for the MySQL server) if this option is not specified
when mysql is invoked.
Thus, you must use the --port or -P option to connect to the MySQL Cluster Manager agent using the
mysql client, even if the agent process is using the MySQL Cluster Manager default port, and even if the
37
Starting the MySQL Cluster Manager Client
agent process is running on the same host as the mysql client. Unless the correct agent port number is
supplied to it on startup, mysql is unable to connect to the agent.
• --user=username or -u[ ]username
Specifies the username for the user trying to connect. Currently, the only user permitted to connect
is “mcmd”; this is hard-coded into the agent software and cannot be altered by any user. (In MySQL
Cluster Manager 1.2.3 and earlier, this was admin—see Bug#16476206.) By default, the mysql client
tries to use the name of the current system user on Unix systems and “ODBC” on Windows, so you must
supply this option and the username “mcmd” when trying to access the MySQL Cluster Manager agent
with the mysql client; otherwise, mysql cannot connect to the agent.
• --password[=password] or -p[password]
Specifies the password for the user trying to connect. If you use the short option form (-p), you must not
leave a space between this option and the password. If you omit the password value following the -password or -p option on the command line, the mysql client prompts you for one.
Specifying a password on the command line should be considered insecure. It is preferable that you
either omit the password when invoking the client, then supply it when prompted, or put the password in
a startup script or configuration file.
Currently, the password is hard-coded as “super”, and cannot be changed or overridden by MySQL
Cluster Manager users. Therefore, if you do not include the --password or -p option when invoking
mysql, it cannot connect to the agent.
In addition, you can use the --prompt option to set the mysql client's prompt. This is recommended,
since allowing the default prompt (mysql>) to be used could lead to confusion between a MySQL Cluster
Manager client session and a MySQL client session.
Thus, you can connect to a MySQL Cluster Manager agent by invoking the mysql client on the same
machine from the system shell in a manner similar to what is shown here.
shell> mysql -h127.0.0.1 -P1862 -umcmd -p --prompt='mcm> '
For convenience, on systems where mcm itself is not available, you might even want to put this invocation
in a startup script. On a Linux or similar system, this script might be named mcm-client.sh, with
contents similar to what is shown here:
#!/bin/sh
/usr/local/mysql/bin/mysql -h127.0.0.1 -P1862 -umcmd -p --prompt='mcm> '
In this case, you could then start up a MySQL Cluster Manager client session using something like this in
the system shell:
shell> ./mcm-client
On Windows, you can create a batch file with a name such as mcm-client.bat containing something
like this:
C:\mysql\bin\mysql.exe -umcmd -psuper -h localhost -P 1862 --prompt="mcm> "
(Adjust the path to the mysql.exe client executable as necessary to match its location on your system.)
38
Setting Up MySQL Clusters with MySQL Cluster Manager
If you save this file to a convenient location such as the Windows desktop, you can start a MySQL
Cluster Manager client session merely by double-clicking the corresponding file icon on the desktop (or in
Windows Explorer); the client session opens in a new cmd.exe (DOS) window.
3.4 Setting Up MySQL Clusters with MySQL Cluster Manager
This section provides basic information about setting up a new MySQL Cluster with MySQL Cluster
Manager. It also supplies guidance on migration of an existing MySQL Cluster to MySQL Cluster Manager.
For more information about obtaining and installing the MySQL Cluster Manager agent and client software,
see Chapter 2, MySQL Cluster Manager Installation, Configuration, Cluster Setup.
See Chapter 4, MySQL Cluster Manager Client Commands, for detailed information on the MySQL Cluster
Manager client commands shown in this chapter.
3.4.1 Creating a MySQL Cluster with MySQL Cluster Manager
In this section, we discuss the procedure for using MySQL Cluster Manager to create and start a new
MySQL Cluster. We assume that you have already obtained the MySQL Cluster Manager and MySQL
Cluster software, and that you are already familiar with installing MySQL Cluster Manager (see Chapter 2,
MySQL Cluster Manager Installation, Configuration, Cluster Setup).
We also assume that you have identified the hosts on which you plan to run the cluster and have decided
on the types and distributions of the different types of nodes among these hosts, as well as basic
configuration requirements based on these factors and the hardware charactersitics of the host machines.
Note
You can create and start a MySQL Cluster on a single host for testing or similar
purposes, simply by invoking mcmd with the --bootstrap option. See Section 3.2,
“Starting and Stopping the MySQL Cluster Manager Agent”.
Creating a new cluster consists of the following tasks:
• MySQL Cluster Manager agent installation and startup.
Install the MySQL Cluster Manager
software distribution, make any necessary edits of the agent configuration files, and start the agent
processes as explained in Chapter 2, MySQL Cluster Manager Installation, Configuration, Cluster Setup.
Agent processes must be running on all cluster hosts before you can create a cluster. This means that
you need to place a complete copy of the MySQL Cluster Manager software distribution on every host.
The MySQL Cluster Manager software does not have to be in a specific location, or even the same
location on all hosts, but it must be present; you cannot manage any cluster processes hosted on a
computer where mcmd is not also running.
• MySQL Cluster Manager client session startup.
Starting the MySQL Cluster Manager client and
connect to the MySQL Cluster Manager agent. You can connect to an agent process running on any of
the cluster hosts, using the mcm client on any computer that can establish a network connection to the
desired host. See Section 3.3, “Starting the MySQL Cluster Manager Client”, for details.
On systems where mcm is not available, you can use the mysql client for this purpose. See Connecting
to the agent using the mysql client.
• MySQL Cluster software deployment.
The simplest and easiest way to do this is to copy the
complete MySQL Cluster distribution to the same location on every host in the cluster. (If you have
installed MySQL Cluster Manager 1.2.4 on each host, the MySQL Cluster NDB 7.2.4 distribution is
already included, in mcm_installation_dir/cluster.) If you do not use the same location on
39
Migrating a MySQL Cluster to MySQL Cluster Manager
every host, be sure to note it for each host. Do not yet start any MySQL Cluster processes or edit any
configuration files; when creating a new cluster, MySQL Cluster Manager takes care of these tasks
automatically.
On Windows hosts, you should not install as services any of the MySQL Cluster node process programs,
including ndb_mgmd.exe, ndbd.exe, ndbmtd.exe, and mysqld.exe. MySQL Cluster Manager
manages MySQL Cluster processes independently of the Windows Service Manager and does not
interact with the Service Manager or any Windows services when doing so.
Note
You can actually perform this step at any time up to the point where the software
package is registered (using add package). However, we recommend that you
have all required software—including the MySQL Cluster software—in place
before executing any MySQL Cluster Manager client commands.
• Management site definition.
Using the create site command in the MySQL Cluster Manager
client, define a MySQL Cluster Manager management site—that is, the set of hosts to be managed. This
command provides a name for the site, and must reference all hosts in the cluster. Section 4.2.3, “The
create site Command”, provides syntax and other information about this command. To verify that the
site was created correctly, use the MySQL Cluster Manager client commands list sites and list
hosts.
• MySQL Cluster software package registration.
In this step, you provide the location of the MySQL
Cluster software on all hosts in the cluster using one or more add package commands. To verify that
the package was created correctly, use the list packages and list processes commands.
• Cluster definition.
Execute a create cluster command to define the set of MySQL Cluster
nodes (processes) and hosts on which each cluster process runs, making up a the MySQL Cluster.
This command also uses the name of the package registered in the previous step so that MySQL
Cluster Manager knows the location of the binary running each cluster process. You can use the list
clusters and list processes commands to determine whether the cluster has been defined as
desired.
If you wish to use SQL node connection pooling, see Setup for mysqld connection pooling before
creating the cluster.
• Initial configuration.
Perform any configuration of the cluster that is required or desired prior to
starting it. You can set values for MySQL Cluster Manager configuration attributes (MySQL Cluster
parameters and MySQL Server options) using the MySQL Cluster Manager client set command. You do
not need to edit any configuration files directly—in fact, you should not do so. Keep in mind that certain
attributes are read-only, and that some others cannot be reset after the cluster has been started for the
first time. You can use the get command to verify that attributes have been set to the correct values.
• Cluster startup.
Once you have completed the previous steps, including necessary or desired
initial configuration, you are ready to start the cluster. The start cluster command starts all cluster
processes in the correct order. You can verify that the cluster has started and is running normally after
this command has completed, using the MySQL Cluster Manager client command show status. At this
point, the cluster is ready for use by MySQL Cluster applications.
3.4.2 Migrating a MySQL Cluster to MySQL Cluster Manager
MySQL Cluster Manager is designed primarily for managing MySQL Cluster deployments that are created
by it, rather than introducing it into existing MySQL Cluster instances that are already in use. Currently,
there is no integrated functionality for importing an existing MySQL Cluster into MySQL Cluster Manager,
and it is not currently possible to perform this task without shutting down and restarting the cluster.
40
Migrating a MySQL Cluster to MySQL Cluster Manager
This section outlines a suggested procedure for importing an existing MySQL Cluster manually into MySQL
Cluster Manager. It is in many ways similar to creating a new cluster in MySQL Cluster Manager, but
differs in how initial configuration of the cluster is carried out. The importation procedure includes the
following steps:
• MySQL Cluster Manager agent installation and startup.
Deploy the MySQL Cluster Manager
software distribution on the cluster hosts, perform any necessary agent configuration, then start the
MySQL Cluster Manager agent, as described in Chapter 2, MySQL Cluster Manager Installation,
Configuration, Cluster Setup. MySQL Cluster Manager agent processes must be running on all hosts
where cluster processes are running before proceeding any further.
• MySQL Cluster Manager client session startup.
Start a MySQL Cluster Manager client session;
you can connect to a MySQL Cluster Manager agent process running on any of the cluster hosts (see
Section 3.3, “Starting the MySQL Cluster Manager Client”).
• Management site definition.
Define a MySQL Cluster Manager site that includes all hosts in the
cluster, using the create site command.
• MySQL Cluster software package registration.
Register a package referencing the location of the
MySQL Cluster software on each cluster host using one or more add package commands. Be sure to
specify the actual location of the MySQL Cluster software on each host.
• Cluster definition.
Define a cluster in MySQL Cluster Manager using the create cluster
command, making sure to reference all cluster processes and hosts when doing so.
• Node IDs generated by MySQL Cluster Manager.
When creating a cluster, MySQL Cluster Manager automatically assigns sequential node IDs, in the
order specified by the process host list used in the create cluster command, using the ranges listed
here for each type of process:
• Data nodes: 1-48
• Management nodes: 48-49
• SQL/API nodes: 50-255
Processes of each type are assigned consecutive IDs from the beginning of the range indicated for that
type.
• Cluster configuration.
There is no facility in MySQL Cluster Manager 1.2.4 for importing configuration data from an existing
cluster; therefore, this step must be performed manually. Consolidate all configuration information
from the existing cluster; this includes parameters set in the cluster's config.ini file (or files),
mysqld options set in my.cnf or my.ini files, and any arguments that were passed to MySQL
Cluster executables on the command line when invoking them. For most attributes, you need to execute
a set statement that is equivalent to a setting in a config.ini or my.cnf file. Suppose that the
config.ini file contains an [ndbd default] setting such as this one:
DataMemory = 2400G
In this case, you would need to execute this set command in the MySQL Cluster Manager client:
mcm> set DataMemory:ndbd = 2400G;
More generally, if you have a my.cnf file entry in a [process_type default] section of
config.ini where process_type is the name of a MySQL Cluster process (ndb_mgmd, ndbd,
41
Migrating a MySQL Cluster to MySQL Cluster Manager
mysqld, or api) then you can use the following regular expression to derive an equivalent MySQL
Cluster Manager client set statement from it.
s/(\w*)\s?=\s?(\w*)/set $1:process_type = $2;/
In the case of [mysql] and [api] sections of the config.ini file, you also need to determine
whether the eqivalent set statement should be applied using mysqld or ndbapi as the
process_name.
Important
Some attributes such as HostName and Id are read-only (HostName is already
defined by create site and create cluster; node IDs are determined by
MySQL Cluster Manager and cannot be overridden).
In addition, you should always keep in mind that MySQL Cluster and MySQL
Cluster Manager do not always use the same default values for parameters
and their corresponding attributes. This is crucial especially in the case of
DataDirectory, since the data nodes must be able to read these following the
importation to acess the cluster's data. See Migrating data directories.
Migrating data directories.
Do not start the new cluster before making sure that you have configured all processes in the new
cluster to use the same data directories used by all nodes in the original cluster. If the data nodes of
the imported cluster are not configured to read the original data directories, the imported cluster will be
unable to access the original cluster's data.
Keep in mind that the default value used by MySQL Cluster Manager for the DataDirectory attribute
(manager_directory/clusters/cluster_name/node_id/data) is not the same as the default
set by MySQL Cluster or MySQL Server, as described here:
For a management node or data node, MySQL Cluster uses the process working directory as the
DataDirectory, which means that, if the DataDirectory was not set explicitly to an absolute path
in the original cluster's config.ini file, the arguments with which which the cluster executable was
invoked and the location it was started from may also affect this value. For a mysqld processes, the
default location of the data directory depends on the method that was used to install the mysqld binary
(see Installation Layouts, for more information); this value can also be overridden from the command line
or in the mysqld's my.cnf file.
Due to these many factors which can affect the locations of the nodes' data directories, you should
always verify the true location of the original data directory for each node in the original cluster by
inspection of the file system, then set DataDirectory (using MySQL Cluster Manager) for each node
in the new cluster explicitly.
For a config.ini setting that applies to a single process of type process_type and having node ID
node_id, you can use the following regular expression to generate a set statement that applies the
same setting to the same cluster process:
s/(\w*)\s?=\s?(\w*)/set $1:process_name:node_id = $2;/
• Cluster shutdown and startup.
Once you have finished migrating the cluster configuration data, you are ready to restart the Cluster
under control of MySQL Cluster Manager. This requires a system restart; that is, the cluster must be
completely shut down, then restarted.
42
Migrating a MySQL Cluster to MySQL Cluster Manager
Important
Before proceding with this step, make certain that the configuration you have
set up for the cluster in MySQL Cluster Manager is correct. In particular, make
sure that the node ID and data directory are the same for each node, in both
the original configuration and the new configuration you have just created using
MySQL Cluster Manager. Also verify that you have set any attributes that cannot
be changed once the cluster has been started for the first time.
Shutting down the cluster consists of the following two steps:
1. Issue an ndb_mgm SHUTDOWN command. You can do this either in an ndb_mgm client session, or by
invoking ndb_mgm from the system shell, like this:
shell> ndb_mgm -e "SHUTDOWN"
(Here, the quotation marks are optional.) For more information, see Commands in the MySQL
Cluster Management Client.
2. Stop all mysqld processes that were connected to the cluster. To do this, issue the following
command on each host running an SQL node:
shell> mysqladmin -uroot shutdown
If the MySQL root user password has been set, you can supply it when invoking the command, like
this:
shell> mysqladmin -uroot -prootpassword shutdown
If more than one mysqld process is running on the same host, each process must use a different
port. In such cases, you must invoke mysqladmin separately for each mysqld process, specifying
the port each time with the --port or -P option, similar to what is shown here:
shell> ./mysqladmin -uroot -P3306 shutdown
110919 12:41:26 mysqld_safe mysqld from pid file /usr/local/mysql/data/m1.pid ended
[1]+ Done ./mysqld_safe --port=3306 --pid-file=/usr/local/mysql/data/m1.pid
shell> ./mysqladmin -uroot -P3307 shutdown
110919 12:41:26 mysqld_safe mysqld from pid file /usr/local/mysql/data/m2.pid ended
[1]+ Done ./mysqld_safe --port=3307 --pid-file=/usr/local/mysql/data/m2.pid
See mysqladmin — Client for Administering a MySQL Server, for more information.
Once all cluster processes have stopped, you can start the cluster using MySQL Cluster Manager. Start
the MySQL Cluster Manager agent and a MySQL Cluster Manager client session if these are not already
running, then issue a start cluster command in the MySQL Cluster Manager client (substituting the
name of the imported cluster for mycluster):
mcm> start cluster mycluster;
Once the cluster has started successfully, the importation process is complete, and you should be able
from this point onwards to manage the cluster as if you had actually created it using MySQL Cluster
Manager.
43
MySQL Cluster Backup and Restore Using MySQL Cluster Manager
3.5 MySQL Cluster Backup and Restore Using MySQL Cluster
Manager
This section describes usage of the NDB native backup and restore functionality implemented in MySQL
Cluster Manager 1.2 to perform a number of common tasks.
3.5.1 Requirements for Backup and Restore
This section provides information about basic requirements for performing backup and restore operations
using MySQL Cluster Manager.
Requirements for MySQL Cluster backup.
Basic requirements for performing MySQL backups using
MySQL Cluster Manager are minimal. At least one data node in each node group must be running, and
there must be sufficient disk space on the node file systems. Partial backups are not supported.
Requirements for MySQL Cluster restore.
is subject to the following conditions:
Restoring a MySQL Cluster using MySQL Cluster Manager
• A complete restore requires that all data nodes are up and running, and that all files belonging to a given
backup are available.
• A partial restore is possible, but must be specified as such. This can be accomplished using the
restore cluster client command with its --skip-nodeid option.
• In the event that data nodes have been added to the cluster since the backup was taken, only those data
nodes for which backup files exist are restored. In such cases data is not automatically distributed to
the new nodes, and, following the restore, you must redistribute the data manually by issuing an ALTER
ONLINE TABLE ... REORGANIZE PARTITION statement in the mysql client for each NDB table in
the cluster. See Adding MySQL Cluster Data Nodes Online: Basic procedure, for more information.
3.5.2 Basic MySQL Cluster Backup and Restore Using MySQL Cluster
Manager
This section describes backing up and restoring a MySQL Cluster, with examples of complete and partial
restore operations. Note that the backup cluster and restore cluster commands work with NDB
tables only; tables using other MySQL storage engines (such as InnoDB or MyISAM) are ignored.
For purposes of example, we use a MySQL Cluster named mycluster whose processes and status can
be seen here:
mcm> show status -r mycluster;
+--------+----------+----------+---------+-----------+-----------+
| NodeId | Process | Host
| Status | Nodegroup | Package
|
+--------+----------+----------+---------+-----------+-----------+
| 49
| ndb_mgmd | tonfisk | running |
| mypackage |
| 1
| ndbd
| tonfisk | running | 0
| mypackage |
| 2
| ndbd
| tonfisk | running | 0
| mypackage |
| 50
| mysqld
| tonfisk | running |
| mypackage |
| 51
| mysqld
| tonfisk | running |
| mypackage |
| 52
| ndbapi
| *tonfisk | added
|
|
|
| 53
| ndbapi
| *tonfisk | added
|
|
|
+--------+----------+----------+---------+-----------+-----------+
7 rows in set (0.08 sec)
You can see whether there are any existing backups of mycluster using the list backups command,
as shown here:
44
Basic MySQL Cluster Backup and Restore Using MySQL Cluster Manager
mcm> list backups mycluster;
+----------+--------+---------+---------------------+---------+
| BackupId | NodeId | Host
| Timestamp
| Comment |
+----------+--------+---------+---------------------+---------+
| 1
| 1
| tonfisk | 2012-12-04 12:03:52 |
|
| 1
| 2
| tonfisk | 2012-12-04 12:03:52 |
|
| 2
| 1
| tonfisk | 2012-12-04 12:04:15 |
|
| 2
| 2
| tonfisk | 2012-12-04 12:04:15 |
|
| 3
| 1
| tonfisk | 2012-12-04 12:17:41 |
|
| 3
| 2
| tonfisk | 2012-12-04 12:17:41 |
|
+----------+--------+---------+---------------------+---------+
6 rows in set (0.12 sec)
Simple backup.
To create a backup, use the backup cluster command with the name of the cluster
as an argument, similar to what is shown here:
mcm> backup cluster mycluster;
+-------------------------------+
| Command result
|
+-------------------------------+
| Backup completed successfully |
+-------------------------------+
1 row in set (3.31 sec)
backup cluster requires only the name of the cluster to be backed up as an argument; for information
about additional options supported by this command, see Section 4.7.2, “The backup cluster
Command”. To verify that a new backup of mycluster was created with a unique ID, check the output of
list backups, as shown here (where the rows corresponding to the new backup files are indicated with
emphasized text):
mcm> list backups mycluster;
+----------+--------+---------+---------------------+---------+
| BackupId | NodeId | Host
| Timestamp
| Comment |
+----------+--------+---------+---------------------+---------+
| 1
| 1
| tonfisk | 2012-12-04 12:03:52 |
|
| 1
| 2
| tonfisk | 2012-12-04 12:03:52 |
|
| 2
| 1
| tonfisk | 2012-12-04 12:04:15 |
|
| 2
| 2
| tonfisk | 2012-12-04 12:04:15 |
|
| 3
| 1
| tonfisk | 2012-12-04 12:17:41 |
|
| 3
| 2
| tonfisk | 2012-12-04 12:17:41 |
|
| 4
| 1
| tonfisk | 2012-12-12 14:24:35 |
|
| 4
| 2
| tonfisk | 2012-12-12 14:24:35 |
|
+----------+--------+---------+---------------------+---------+
8 rows in set (0.04 sec)
If you attempt to create a backup of a MySQL Cluster in which each node group does not have at least
one data node running, backup cluster fails with the error Backup cannot be performed as
processes are stopped in cluster cluster_name.
Simple complete restore.
To perform a complete restore of a MySQL Cluster from a backup with a
given ID, follow the steps listed here:
1. Identify the backup to be used.
In this example, we use the backup having the ID 4, that was created for mycluster previously in this
section.
2. Wipe the MySQL Cluster data.
The simplest way to do this is to stop and then perform an initial start of the cluster as shown here,
using mycluster:
45
Basic MySQL Cluster Backup and Restore Using MySQL Cluster Manager
mcm> stop cluster mycluster;
+------------------------------+
| Command result
|
+------------------------------+
| Cluster stopped successfully |
+------------------------------+
1 row in set (15.24 sec)
mcm> start cluster --initial mycluster;
+------------------------------+
| Command result
|
+------------------------------+
| Cluster started successfully |
+------------------------------+
1 row in set (34.47 sec)
3. Restore the backup.
This is done using the restore cluster command, which requires the backup ID and the name of
the cluster as arguments. Thus, you can restore backup 4 to mycluster as shown here:
mcm> restore cluster --backupid=4 mycluster;
+--------------------------------+
| Command result
|
+--------------------------------+
| Restore completed successfully |
+--------------------------------+
1 row in set (16.78 sec)
Partial restore—missing images.
It is possible using MySQL Cluster Manager to perform a partial
restore of a MySQL Cluster—that is, to restore from a backup in which backup images from one or more
data nodes are not available. This is required if we wish to restore mycluster to backup number 6, since
an image for this backup is available only for node 1, as can be seen in the output of list backups in
the mcm client (emphasized text):
mcm> list backups mycluster;
+----------+--------+---------+---------------------+---------+
| BackupId | NodeId | Host
| Timestamp
| Comment |
+----------+--------+---------+---------------------+---------+
| 1
| 1
| tonfisk | 2012-12-04 12:03:52 |
|
| 1
| 2
| tonfisk | 2012-12-04 12:03:52 |
|
| 2
| 1
| tonfisk | 2012-12-04 12:04:15 |
|
| 2
| 2
| tonfisk | 2012-12-04 12:04:15 |
|
| 3
| 1
| tonfisk | 2012-12-04 12:17:41 |
|
| 3
| 2
| tonfisk | 2012-12-04 12:17:41 |
|
| 4
| 1
| tonfisk | 2012-12-12 14:24:35 |
|
| 4
| 2
| tonfisk | 2012-12-12 14:24:35 |
|
| 5
| 1
| tonfisk | 2012-12-12 14:31:31 |
|
| 5
| 2
| tonfisk | 2012-12-12 14:31:31 |
|
| 6
| 1
| tonfisk | 2012-12-12 14:32:09 |
|
+----------+--------+---------+---------------------+---------+
11 rows in set (0.08 sec)
To perform a restore of only those nodes for which we have images (in this case, node 1 only), we can use
the --skip-nodeid option when executing a restore cluster command. This option causes one or
more nodes to be skipped when performing the restore. Assuming that mycluster has been cleared of
data (as described earlier in this section), we can perform a restore that skips node 2 as shown here:
mcm> restore cluster --backupid=6 --skip-nodeid=2 mycluster;
46
Basic MySQL Cluster Backup and Restore Using MySQL Cluster Manager
+--------------------------------+
| Command result
|
+--------------------------------+
| Restore completed successfully |
+--------------------------------+
1 row in set (17.06 sec)
Because we excluded node 2 from the restore process, no data has been distributed to it. To cause
MySQL Cluster data to be distributed to any such excluded or skipped nodes following a partial
restore, it is necessary to redistribute the data manually by executing an ALTER ONLINE TABLE ...
REORGANIZE PARTITION statement in the mysql client for each NDB table in the cluster. To obtain a list
of NDB tables from the mysql client, you can use multiple SHOW TABLES statements or a query such as
this one:
SELECT CONCAT('' TABLE_SCHEMA, '.', TABLE_NAME)
FROM INFORMATION_SCHEMA.TABLES
WHERE ENGINE='ndbcluster';
You can generate the necessary SQL statements using a more elaborate version of the query just shown,
such the one employed here:
mysql> SELECT
->
CONCAT('ALTER ONLINE TABLE `', TABLE_SCHEMA,
->
'`.`', TABLE_NAME, '` REORGANIZE PARTITION;')
->
AS Statement
-> FROM INFORMATION_SCHEMA.TABLES
-> WHERE ENGINE='ndbcluster';
+--------------------------------------------------------------------------+
| Statement
|
+--------------------------------------------------------------------------+
| ALTER ONLINE TABLE `mysql`.`ndb_apply_status` REORGANIZE PARTITION;
|
| ALTER ONLINE TABLE `mysql`.`ndb_index_stat_head` REORGANIZE PARTITION;
|
| ALTER ONLINE TABLE `mysql`.`ndb_index_stat_sample` REORGANIZE PARTITION; |
| ALTER ONLINE TABLE `db1`.`n1` REORGANIZE PARTITION;
|
| ALTER ONLINE TABLE `db1`.`n2` REORGANIZE PARTITION;
|
| ALTER ONLINE TABLE `db1`.`n3` REORGANIZE PARTITION;
|
| ALTER ONLINE TABLE `test`.`n1` REORGANIZE PARTITION;
|
| ALTER ONLINE TABLE `test`.`n2` REORGANIZE PARTITION;
|
| ALTER ONLINE TABLE `test`.`n3` REORGANIZE PARTITION;
|
| ALTER ONLINE TABLE `test`.`n4` REORGANIZE PARTITION;
|
+--------------------------------------------------------------------------+
10 rows in set (0.09 sec)
Partial restore—data nodes added.
A partial restore can also be performed when new data nodes
have been added to a MySQL Cluster following a backup. In this case, you can exclude the new nodes
using --skip-nodeid when executing the restore cluster command. Consider the MySQL Cluster
named mycluster as shown in the output of the following show status command:
mcm> show status -r mycluster;
+--------+----------+----------+---------+-----------+-----------+
| NodeId | Process | Host
| Status | Nodegroup | Package
|
+--------+----------+----------+---------+-----------+-----------+
| 49
| ndb_mgmd | tonfisk | stopped |
| mypackage |
| 1
| ndbd
| tonfisk | stopped | 0
| mypackage |
| 2
| ndbd
| tonfisk | stopped | 0
| mypackage |
| 50
| mysqld
| tonfisk | stopped |
| mypackage |
| 51
| mysqld
| tonfisk | stopped |
| mypackage |
| 52
| ndbapi
| *tonfisk | added
|
|
|
| 53
| ndbapi
| *tonfisk | added
|
|
|
+--------+----------+----------+---------+-----------+-----------+
7 rows in set (0.03 sec)
47
Basic MySQL Cluster Backup and Restore Using MySQL Cluster Manager
The output of list backups shows us the available backup images for this cluster:
mcm> list backups mycluster;
+----------+--------+---------+---------------------+---------+
| BackupId | NodeId | Host
| Timestamp
| Comment |
+----------+--------+---------+---------------------+---------+
| 1
| 1
| tonfisk | 2012-12-04 12:03:52 |
|
| 1
| 2
| tonfisk | 2012-12-04 12:03:52 |
|
| 2
| 1
| tonfisk | 2012-12-04 12:04:15 |
|
| 2
| 2
| tonfisk | 2012-12-04 12:04:15 |
|
| 3
| 1
| tonfisk | 2012-12-04 12:17:41 |
|
| 3
| 2
| tonfisk | 2012-12-04 12:17:41 |
|
| 4
| 1
| tonfisk | 2012-12-12 14:24:35 |
|
| 4
| 2
| tonfisk | 2012-12-12 14:24:35 |
|
+----------+--------+---------+---------------------+---------+
8 rows in set (0.06 sec)
Now suppose that, at a later point in time, 2 data nodes have been added to mycluster using an add
process command. The show status output for mycluster now looks like this:
mcm> show status -r mycluster;
+--------+----------+----------+---------+-----------+-----------+
| NodeId | Process | Host
| Status | Nodegroup | Package
|
+--------+----------+----------+---------+-----------+-----------+
| 49
| ndb_mgmd | tonfisk | running |
| mypackage |
| 1
| ndbd
| tonfisk | running | 0
| mypackage |
| 2
| ndbd
| tonfisk | running | 0
| mypackage |
| 50
| mysqld
| tonfisk | running |
| mypackage |
| 51
| mysqld
| tonfisk | running |
| mypackage |
| 52
| ndbapi
| *tonfisk | added
|
|
|
| 53
| ndbapi
| *tonfisk | added
|
|
|
| 3
| ndbd
| tonfisk | running | 1
| mypackage |
| 4
| ndbd
| tonfisk | running | 1
| mypackage |
+--------+----------+----------+---------+-----------+-----------+
9 rows in set (0.01 sec)
Since nodes 3 and 4 were not included in the backup, we need to exclude them when performing the
restore. You can cause restore cluster to skip multiple data nodes by specifying a comma-separated
list of node IDs with the --skip-nodeid option. Assume that we have just cleared mycluster of MySQL
Cluster data using the mcm client commands stop cluster and start cluster --initial as
described previously in this section; then we can restore mycluster (now having 4 data nodes numbered
1, 2, 3, and 4) from backup number 4 (made when mycluster had only 2 data nodes numbered 1 and 2)
as shown here:
mcm> restore cluster --backupid=4 --skip-nodeid=3,4 mycluster;
+--------------------------------+
| Command result
|
+--------------------------------+
| Restore completed successfully |
+--------------------------------+
1 row in set (17.61 sec)
No data is distributed to the skipped (new) nodes; you must force nodes 3 and 4 to be included in a
redistribution of the data using ALTER ONLINE TABLE ... REORGANIZE PARTITION as described
previously in this section.
48
Chapter 4 MySQL Cluster Manager Client Commands
Table of Contents
4.1 Online Help and Information Commands ..................................................................................... 55
4.2 MySQL Cluster Manager Site and Agent Commands ................................................................... 61
4.2.1 The add hosts Command ............................................................................................ 62
4.2.2 The change log-level Command ............................................................................... 62
4.2.3 The create site Command ......................................................................................... 63
4.2.4 The delete site Command ......................................................................................... 64
4.2.5 The list sites Command ........................................................................................... 65
4.2.6 The list hosts Command ........................................................................................... 65
4.2.7 The stop agents Command ......................................................................................... 66
4.2.8 The version Command ................................................................................................. 66
4.3 MySQL Cluster Manager Package Commands ............................................................................ 67
4.3.1 The add package Command ......................................................................................... 67
4.3.2 The delete package Command ................................................................................... 69
4.3.3 The list packages Command ..................................................................................... 70
4.4 MySQL Cluster Manager Cluster Commands ............................................................................... 71
4.4.1 The create cluster Command ................................................................................... 72
4.4.2 The delete cluster Command ................................................................................... 74
4.4.3 The list clusters Command ..................................................................................... 75
4.4.4 The restart cluster Command ................................................................................. 75
4.4.5 The show status Command ......................................................................................... 76
4.4.6 The start cluster Command ..................................................................................... 79
4.4.7 The stop cluster Command ....................................................................................... 80
4.4.8 The upgrade cluster Command ................................................................................. 80
4.5 MySQL Cluster Manager Configuration Commands ...................................................................... 82
4.5.1 The get Command ......................................................................................................... 84
4.5.2 The reset Command ..................................................................................................... 94
4.5.3 The set Command ......................................................................................................... 99
4.6 MySQL Cluster Manager Process Commands ........................................................................... 106
4.6.1 The add process Command ....................................................................................... 106
4.6.2 The change process Command ................................................................................. 108
4.6.3 The list processes Command ................................................................................. 111
4.6.4 The start process Command ................................................................................... 111
4.6.5 The stop process Command ..................................................................................... 112
4.7 MySQL Cluster Manager Backup and Restore Commands ......................................................... 113
4.7.1 The abort backup Command ..................................................................................... 113
4.7.2 The backup cluster Command ................................................................................. 113
4.7.3 The list backups Command ..................................................................................... 114
4.7.4 The restore cluster Command ............................................................................... 114
Identifiers in client commands
Case-sensitivity rules for client commands
Options common to client commands
The sections in this chapter describe commands used in the MySQL Cluster Manager 1.2.4 client for tasks
such as defining sites, packages, and MySQL Cluster instances (“clusters”); configuring a MySQL Cluster;
and getting the status of a running MySQL Cluster. These commands are issued to the management agent
49
using the mysql client program included with the MySQL Cluster distribution (for information about the
mysql client not specific to using MySQL Cluster Manager, see mysql — The MySQL Command-Line
Tool). Each MySQL Cluster Manager client command takes the form shown here:
instruction [options] [arguments]
options:
option [option] [...]
option:
|
--option-long-name[=value-list]
-option-short-name [value-list]
value-list:
value[,value[,...]]
arguments:
argument [argument] [...]
For example, consider the following MySQL Cluster Manager command, which starts a MySQL Cluster
named mycluster and backgrounds the deletion process so that the client can be used to execute other
commands in the meantime, without having to wait on the start cluster command to complete:
start cluster --background mycluster;
In this example, the command contains a delete site instruction. An instruction consists of one or two
keywords, such as set, or show status. This instruction is modified by the --background option which
follows it; however, this option assigns no values.
Most command options have short forms, consisting of single letters, in addition to their long forms. Using
the short form of the --background option, the previous example could also be written like this:
delete site -B mysite;
The long form of an option must be preceded by a double dash (--), and is case insensitive (lower case
being the canonical form). The short form of an option must be preceded by a single dash (-), and is case
sensitive. In either case, the dash character or characters must come immediately before the option name,
and there must be no space characters between them. Otherwise, the MySQL Cluster Manager client
cannot parse the command correctly. More information about long and short forms of options is given later
in this section.
Important
Do not confuse options given to MySQL Cluster Manager client commands with
mysql client options. A MySQL Cluster Manager client command option is always
employed as part of a MySQL Cluster Manager client command; it is not passed to
the mysql client when invoking it.
In addition, you cannot issue queries or other SQL statements in the MySQL
Cluster Manager client. These are not recognized by the client, and are rejected
with an error. The converse of this is also true: MySQL Cluster Manager client
commands are not recognized by the standard mysql client.
The instruction just shown takes the argument mysite. The argument is usually an identifier that names
the object to be effected; in this case, the command deletes the site whose name matches the argument.
(For more information, see Section 4.2.3, “The create site Command”.)
50
Changes in client commands in version 1.2.4.
An additional --verbose option has been added in
MySQL Cluster Manager 1.2.4 to the create cluster and add process commands. In both cases,
using the option causes the command to return a list of the MySQL Cluster processes affected by the
command; this includes their node IDs, process types, and the hosts where they are located.
Identifiers in client commands.
A legal MySQL Cluster Manager identifier consists of any sequence of characters from among the
following:
• The letters a through z and A through Z
• The digits 0 through 9
• The dash (-), period (.), and underscore (_) characters
A MySQL Cluster Manager identifier must begin with a letter or digit.
Case-sensitivity rules for client commands.
The rules for case-sensitivity of MySQL Cluster Manager identifiers, commands, command options,
process names, and configuration attributes are as follows:
• Identifiers are case-sensitive. For example, delete site mycluster cannot be used to delete a site
named myCluster.
• Command keywords and the long forms of command options are case-insensitive. For example, any of
the three commands delete cluster mycluster, DELETE CLUSTER mycluster, and DeLeTe
cLuStEr mycluster works to delete the MySQL Cluster instance named mycluster.
In this manual, we show command keywords and the long forms of command options in lowercase, but
you are not required to follow this convention if you do not wish to do so.
• The short forms of command options are case-sensitive. For example, -b (lowercase) is the short form
of the --basedir option, but -B (uppercase) is the short form of the --background option.
• Names of MySQL Cluster processes are case-insensitive. For example, either of the commands
get --include-defaults DataMemory:ndbd mycluster or get --include-defaults
datamemory:NDBD mycluster reports the data memory allocated for each ndbd process in the
cluster named mycluster.
In this manual, we show names of MySQL Cluster processes in lowercase. You are not required to
follow this convention if you do not wish to do so; however, since the corresponding executables are
named and must be invoked in lowercase, we suggest that you use lowercase.
•
Configuration attribute names are case-insensitive. For example, either of the commands get
--include-defaults DataMemory:ndbd mycluster or get --include-defaults
datamemory:ndbd mycluster returns the data memory allocated for each ndbd process
in the cluster named mycluster; either of the commands set engine-conditionpushdown:mysqld:4=0 mycluster or set Engine-Condition-Pushdown:mysqld:4=0
mycluster disables the condition pushdown optimization in the mysqld process having the node ID 4
in the MySQL Cluster named mycluster.
Note
Configuration attributes in the MySQL Cluster Manager derive from two different
sources: MySQL Cluster configuration parameters, and MySQL Server options.
MySQL Cluster configuration parameters are case-insensitive, but their canonical
forms use upper camelcase (that is, medial capitalization including the first
51
letter). This means that whether you set a value for data memory using the
MySQL Cluster Manager client or in the config.ini file, you can refer to it
as DataMemory, datamemory, or dATAmEMORY without any negative impact.
However, MySQL Server command-line options are case-sensitive and use
only lowercase. This means that, for example, set Engine-ConditionPushdown:mysqld:4=0 mycluster in the MySQL Cluster Manager client
works to disable condition pushdown in the indicated mysqld process, but if
you invoke the mysqld executable from a system prompt using --EngineCondition-Pushdown=0, mysqld fails to start.
In this manual, for easy recognition, we show configuration attribute names as having the same
lettercase used in other MySQL documentation; thus, we always refer to DataMemory, rather
than datamemory or DATAMEMORY, and engine-condition-pushdown, rather than EngineCondition-Pushdown or ENGINE-CONDITION-PUSHDOWN. While you are not required to do this
when using MySQL Cluster Manager, we suggest that you also follow this convention.
Note
Values that contain space characters must be quoted using single quote (')
characters. For example, if you wish to define a package named mypackage
for a site named mysite using /usr/local/mysql cluster/7.3 (where a
space occurs between mysql and cluster) as the path to the base directory on
all hosts, the correct command would be add package --basedir='/usr/
local/mysql cluster/7.3' mypackage.
To decrease the possibility of errors in reading and entering MySQL Cluster
Manager commands, we recommend avoiding the use of space characters
whenever possible.
Each command must end with a terminator character. By default, this is the semicolon (;) character.
However, the sequences \g and \G are also supported as command terminators. The \G terminator
causes the output to be vertically formatted (the same as in the standard mysql client), as shown in this
example:
mcm> get DataMemory mycluster\G
*************************** 1. row ***************************
Name: DataMemory
Value: 500M
Process1: ndbd
Id1: 2
Process2:
Id2:
Level: Process
Comment:
*************************** 2. row ***************************
Name: DataMemory
Value: 500M
Process1: ndbd
Id1: 3
Process2:
Id2:
Level: Process
Comment:
2 rows in set (0.22 sec)
By convention (for reasons of readability), we do not normally include the command terminator when
showing the syntax for a command in Backus-Naur format or when including a MySQL Cluster Manager
command inline in this text. However, if you do not use a statement terminator when you enter the
52
command in the MySQL Cluster Manager client, the client displays a special “waiting...” prompt -> until
you supply a terminator, as shown here:
mcm> list sites
->
->
->
-> ;
Empty set (1.50 sec)
(The is the same as the behavior of the mysql client when you fail to end a statement with a terminator.)
A command option can also in many cases accept (or even require) a set of one or more values. The
next example includes such an option, and also demonstrates setting of multiple values in a single option
by passing them to the option as a comma-separated list:
mcm> create site --hosts=tonfisk,flundra mysite;
+---------------------------+
| Command result
|
+---------------------------+
| Site created successfully |
+---------------------------+
1 row in set (7.41 sec)
The command just shown creates a site named mysite, consisting of two hosts named tonfisk and
flundra. (See Section 4.2.3, “The create site Command”, for more information about this command.)
Since we used the long form of the --hosts option, we were required to use an equals sign (=) to mark
the end of the option name and the beginning of the values list. You must not insert any space characters
before or after the equal sign; doing so causes an error, as shown here:
mcm> create site
ERROR 7 (00MGR):
mcm> create site
ERROR 7 (00MGR):
--hosts =grindval,haj yoursite;
Option --hosts requires a value
--hosts= grindval,haj yoursite;
Option --hosts requires a value
The short form of an option does not use an equal sign. Instead, the value-list is separated from the option
by a space. Using the -h option, which is the short form of the --hosts option, the previous create
site command can be entered and executed like this:
mcm> create site -h tonfisk,flundra mysite;
+---------------------------+
| Command result
|
+---------------------------+
| Site created successfully |
+---------------------------+
1 row in set (7.41 sec)
The short forms of options actually accept multiple spaces between the option name and the values list;
however, a single space is sufficient. If you omit the space, or try to use an equal sign, the command fails
with an error, as shown here:
mcm> create site
ERROR 6 (00MGR):
mcm> create site
ERROR 3 (00MGR):
-htonfisk,flundra mysite;
Illegal number of operands
-h=tonfisk,flundra mysite;
Illegal syntax
Any option value containing one or more whitespace characters, one or more dash characters (-), or both,
must be quoted using single quotation marks. Multiple values should be separated by commas only; do
53
not insert spaces before or after any of the commas. Using spaces before or after the commas in a list of
values causes the command to fail with an error, as shown here:
mcm> create site --hosts=tonfisk, flundra mysite;
ERROR 6 (00MGR): Illegal number of operands
As you can see from the examples just shown, a MySQL Cluster Manager client command returns a result
set, just as an SQL statement does in the standard mysql client. The result set returned by a MySQL
Cluster Manager client command consists of one of the following:
• A single row that contains a message indicating the outcome of the command.
The create
site command in the last example returned the result Site created successfully, to inform the
user that the command succeeded.
• One or more rows listing requested objects or properties.
list processes, as shown here:
An example of such a command is
mcm> list processes mycluster;
+--------+----------+----------+
| NodeId | Name
| Host
|
+--------+----------+----------+
| 49
| ndb_mgmd | flundra |
| 1
| ndbd
| tonfisk |
| 2
| ndbd
| grindval |
| 50
| mysqld
| haj
|
| 51
| mysqld
| torsk
|
| 52
| ndbapi
| *
|
+--------+----------+----------+
6 rows in set (0.03 sec)
In the case of list processes, each row in the result contains the ID and type of a node in the
MySQL Cluster named mycluster, together with the name of the host on which the process is running.
• An empty result set.
This can occur with one of the list commands when there is nothing to report,
such as when list sites is used before any sites have been created:
mcm> list sites;
Empty set (0.72 sec)
Each command must be entered separately; it is not possible to combine multiple commands on a single
line.
Options common to client commands.
The following three options are common to most MySQL Cluster Manager client commands:
1. --help (short form: -?): Common to all client commands. Provides help output specific to the given
command. See Section 4.1, “Online Help and Information Commands”, for more information about this
option.
2. --force (short form -f): Causes any safety checks to be bypassed when excuting the command. For
example, delete cluster mycluster normally fails if any of the MySQL Cluster processes in the
MySQL Cluster named mycluster are running; however, delete cluster --force mycluster
forces the shutdown of mycluster, followed by the deletion of mycluster from MySQL Cluster
Manager's inventory.
The --force option is supported for all MySQL Cluster Manager 1.2.4 client commands with the
exception of add hosts.
54
Online Help and Information Commands
3. --background (short form -B): Rather than waiting for the command to complete, the MySQL Cluster
Manager client immediately returns the command prompt, allowing you to perform addition tasks in the
client while that command continues to execute in the background. This can be useful when executing
commands that might require some time to complete (such as starting a cluster with a great many
nodes).
This option is supported by all client commands except for create site, delete site, add
hosts, add package, and delete package.
4.1 Online Help and Information Commands
Online help is available in the MySQL Cluster Manager client for MySQL Cluster Manager client
commands. The client can provide both general and command-specific information. In addition, you can
obtain information about mysql client commands that are independent of the MySQL server and thus are
also available for use when connected to the MySQL Cluster Manager agent.
Listing MySQL Cluster Manager client commands.
For a list of all commands with brief descriptions, use the list commands command, as shown here:
mcm> list commands;
+---------------------------------------------------------------------+
| Help
|
+---------------------------------------------------------------------+
| COMMANDS
|
|
|
| add hosts
Add hosts to site.
|
| add package
Add a package alias.
|
| add process
Add cluster process.
|
| change process
Change process type.
|
| create cluster
Create a cluster.
|
| create site
Create a site.
|
| delete cluster
Delete a cluster.
|
| delete package
Delete a package.
|
| delete site
Delete a site.
|
| get
Get configuration variables.
|
| list clusters
List all clusters.
|
| list commands
List the help text.
|
| list hosts
List hosts in site.
|
| list nextnodeids
List next nodeids to be allocated.
|
| list packages
List all packages.
|
| list processes
List processes.
|
| list sites
List all sites.
|
| reset
Reset configuration variables.
|
| restart cluster
Restart a cluster.
|
| set
Set configuration variables.
|
| show status
Show cluster, process or operation status.
|
| start cluster
Start a cluster.
|
| start process
Start a cluster process.
|
| stop agents
Stop agents in site.
|
| stop cluster
Stop a cluster.
|
| stop process
Stop a cluster process.
|
| upgrade cluster
Upgrade a cluster.
|
| version
Print version information.
|
|
|
| GLOBAL OPTIONS
|
| Options that can be used with all commands
|
|
|
|
--help|-?
Print detailed help.
|
|
|
| Use '<COMMAND> --help' to see verbose help for individual commands. |
+---------------------------------------------------------------------+
37 rows in set (0.00 sec)
55
Online Help and Information Commands
Obtaining information about specific MySQL Cluster Manager client commands.
To obtain more detailed help specific to a given command, invoke the command using the --help option,
as shown in this example:
mcm> create site --help;
+-----------------------------------------------------------------------------+
| Help
|
+-----------------------------------------------------------------------------+
|
|
| create site [options] <sitename>
|
|
|
|
Creates a site from the hosts listed in --hosts.
|
|
|
|
Required options:
|
|
--hosts|-h
Comma separated list of hostnames.
|
|
Format: --hosts = <host>[,<host>]*.
|
|
|
|
Valid options:
|
|
--background|-B
Run command in background, and return prompt
|
to the user immediately.
|
|
--hosts|-h
Comma separated list of hostnames.
|
|
Format: --hosts = <host>[,<host>]*.
|
+-----------------------------------------------------------------------------+
13 rows in set (0.00 sec)
For any MySQL Cluster Manager client command, the --help option may be abbreviated to -?:
mcm> list processes -?;
+-------------------------------------------------------------+
| Help
|
+-------------------------------------------------------------+
|
|
| list processes <sitename>
|
|
|
|
Lists all processes defined in the specified cluster. |
+-------------------------------------------------------------+
4 rows in set (0.00 sec)
As mentioned elsewhere in this manual (see Chapter 4, MySQL Cluster Manager Client Commands),
many other MySQL Cluster Manager command options have short forms as well. These are included in the
documentation for each command. You can also find out what these are for a given command by invoking
it with the --help or -? option.
You can obtain the release version of the MySQL Cluster Manager software in use from the output of the
version command.
mysql client commands in the MySQL Cluster Manager client.
You can also use most standard mysql client commands in the MySQL Cluster Manager client (but not
SQL statements, which depend on being connected to a MySQL server), such as prompt, quit, and
status. For example, the output of the status command when connected to the MySQL Cluster Manager
agent looks something like this (depending on the exact version of the client and agent which you are using
and possibly other factors):
mcm> status
-------------/home/jon/bin/mcm/libexec/../cluster/bin/mysql
Ver 14.14 Distrib 5.6.11-ndb-7.3.2, for linux2.6 (x86_64) using EditLine wrapper
Connection id:
Current database:
Current user:
1
<n/a>
admin
56
Online Help and Information Commands
SSL:
Current pager:
Using outfile:
Using delimiter:
Server version:
Protocol version:
Connection:
Server characterset:
Db
characterset:
Client characterset:
Conn. characterset:
TCP port:
--------------
Not in use
less
''
;
1.2.4 MySQL Cluster Manager
10
127.0.0.1 via TCP/IP
<n/a>
<n/a>
<n/a>
<n/a>
1862
Note
You may use the command delimiter with mysql client commands, but you are not
required to do so. For instance, assuming that the delimiter in use was the default
semicolon (;) character, we could have executed the status command like this:
mcm> status;
-------------/home/jon/bin/mcm/cluster/bin/mysql
Ver 14.14 Distrib 5.6.11-ndb-7.3.2,...
A particularly useful mysql client command that you can also employ with mcm is the source command
(short form: \.), which you can use for executing scripts containing MySQL Cluster Manager client
commands. On a Linux system, you might have a text file in your home directory named getattributes.mcm, whose contents are shown here:
get :ndb_mgmd mycluster\G
get :ndbd mycluster\G
get :mysqld mycluster\G
Assuming that you have created a cluster named mycluster, you can run this script in the client; the
results vary according to how this cluster is actually configured, but should be similar to this:
mcm> \. ~/get-attributes.mcm
mcm> get :ndb_mgmd mycluster\G
*************************** 1. row ***************************
Name: DataDir
Value: /home/jon/bin/mcm/mcm_data/clusters/mycluster/49/data
Process1: ndb_mgmd
NodeId1: 49
Process2:
NodeId2:
Level:
Comment:
*************************** 2. row ***************************
Name: HostName
Value: flundra
Process1: ndb_mgmd
NodeId1: 49
Process2:
NodeId2:
Level:
Comment: Read only
*************************** 3. row ***************************
Name: NodeId
Value: 49
Process1: ndb_mgmd
NodeId1: 49
57
Online Help and Information Commands
Process2:
NodeId2:
Level:
Comment: Read only
*************************** 4. row ***************************
Name: PortNumber
Value: 1186
Process1: ndb_mgmd
NodeId1: 49
Process2:
NodeId2:
Level: Process
Comment:
4 rows in set (0.09 sec)
mcm> get :ndbd mycluster\G
*************************** 1. row ***************************
Name: DataDir
Value: /home/jon/bin/mcm/mcm_data/clusters/mycluster/1/data
Process1: ndbd
NodeId1: 1
Process2:
NodeId2:
Level:
Comment:
*************************** 2. row ***************************
Name: HostName
Value: tonfisk
Process1: ndbd
NodeId1: 1
Process2:
NodeId2:
Level:
Comment: Read only
*************************** 3. row ***************************
Name: NodeId
Value: 1
Process1: ndbd
NodeId1: 1
Process2:
NodeId2:
Level:
Comment: Read only
*************************** 4. row ***************************
Name: DataDir
Value: /home/jon/bin/mcm/mcm_data/clusters/mycluster/2/data
Process1: ndbd
NodeId1: 2
Process2:
NodeId2:
Level:
Comment:
*************************** 5. row ***************************
Name: HostName
Value: grindval
Process1: ndbd
NodeId1: 2
Process2:
NodeId2:
Level:
Comment: Read only
*************************** 6. row ***************************
Name: NodeId
Value: 2
Process1: ndbd
NodeId1: 2
Process2:
58
Online Help and Information Commands
NodeId2:
Level:
Comment: Read only
6 rows in set (0.10 sec)
mcm> get :mysqld mycluster\G
*************************** 1. row ***************************
Name: datadir
Value: /home/jon/bin/mcm/mcm_data/clusters/mycluster/50/data
Process1: mysqld
NodeId1: 50
Process2:
NodeId2:
Level:
Comment:
*************************** 2. row ***************************
Name: HostName
Value: haj
Process1: mysqld
NodeId1: 50
Process2:
NodeId2:
Level:
Comment: Read only
*************************** 3. row ***************************
Name: log_error
Value: /home/jon/bin/mcm/mcm_data/clusters/mycluster/50/data/mysqld_50_out.err
Process1: mysqld
NodeId1: 50
Process2:
NodeId2:
Level:
Comment:
*************************** 4. row ***************************
Name: ndb_nodeid
Value: 50
Process1: mysqld
NodeId1: 50
Process2:
NodeId2:
Level:
Comment: Read only
*************************** 5. row ***************************
Name: ndbcluster
Value:
Process1: mysqld
NodeId1: 50
Process2:
NodeId2:
Level:
Comment: Read only
*************************** 6. row ***************************
Name: NodeId
Value: 50
Process1: mysqld
NodeId1: 50
Process2:
NodeId2:
Level:
Comment: Read only
*************************** 7. row ***************************
Name: port
Value: 3306
Process1: mysqld
NodeId1: 50
Process2:
NodeId2:
59
Online Help and Information Commands
Level:
Comment:
*************************** 8. row ***************************
Name: socket
Value: /tmp/mysql.mycluster.50.sock
Process1: mysqld
NodeId1: 50
Process2:
NodeId2:
Level:
Comment:
*************************** 9. row ***************************
Name: tmpdir
Value: /home/jon/bin/mcm/mcm_data/clusters/mycluster/50/data/tmp
Process1: mysqld
NodeId1: 50
Process2:
NodeId2:
Level:
Comment:
*************************** 10. row ***************************
Name: datadir
Value: /home/jon/bin/mcm/mcm_data/clusters/mycluster/51/data
Process1: mysqld
NodeId1: 51
Process2:
NodeId2:
Level:
Comment:
*************************** 11. row ***************************
Name: HostName
Value: torsk
Process1: mysqld
NodeId1: 51
Process2:
NodeId2:
Level:
Comment: Read only
*************************** 12. row ***************************
Name: log_error
Value: /home/jon/bin/mcm/mcm_data/clusters/mycluster/51/data/mysqld_51_out.err
Process1: mysqld
NodeId1: 51
Process2:
NodeId2:
Level:
Comment:
*************************** 13. row ***************************
Name: ndb_nodeid
Value: 51
Process1: mysqld
NodeId1: 51
Process2:
NodeId2:
Level:
Comment: Read only
*************************** 14. row ***************************
Name: ndbcluster
Value:
Process1: mysqld
NodeId1: 51
Process2:
NodeId2:
Level:
Comment: Read only
*************************** 15. row ***************************
Name: NodeId
60
MySQL Cluster Manager Site and Agent Commands
Value: 51
Process1: mysqld
NodeId1: 51
Process2:
NodeId2:
Level:
Comment: Read only
*************************** 16. row ***************************
Name: port
Value: 3307
Process1: mysqld
NodeId1: 51
Process2:
NodeId2:
Level:
Comment:
*************************** 17. row ***************************
Name: socket
Value: /tmp/mysql.mycluster.51.sock
Process1: mysqld
NodeId1: 51
Process2:
NodeId2:
Level:
Comment:
*************************** 18. row ***************************
Name: tmpdir
Value: /home/jon/bin/mcm/mcm_data/clusters/mycluster/51/data/tmp
Process1: mysqld
NodeId1: 51
Process2:
NodeId2:
Level:
Comment:
18 rows in set (0.05 sec)
mcm>
Note
You are not returned to the client prompt until the script has finished executing.
Similarly, on Windows, you can create a batch file using Notepad or another text editor, copy the same get
commands as shown previously into it, and save it as get-attributes.bat in a convenient location
such as the Windows desktop.
You can view a list of available mysql client commands using the help command. For more information
about these, view the help output or see mysql Commands, in the MySQL Manual.
4.2 MySQL Cluster Manager Site and Agent Commands
In this section, we discuss commands used to work with MySQL Cluster Manager management sites.
In addition, the stop agents and version commands, which relate to management agents, are also
covered in this section.
A site, in terms of MySQL Cluster and MySQL Cluster Manager, is a collection of one or more host
computers where MySQL Cluster Manager agents are running. Each agent is identified by the combination
of two pieces of information:
• The hostname or IP address of the machine where the agent is running
• The number of the port used by the agent for communications
61
The add hosts Command
Note
MySQL Cluster makes extremely intensive use of network connections, and
DNS lookups can contend with MySQL Cluster and MySQL Cluster Manager for
bandwidth, resulting in a negative impact on the performance of MySQL Cluster and
the applications using it. For this reason, we recommend that you use numeric IP
addresses rather than hostnames for MySQL Cluster and MySQL Cluster Manager
host computers whenever feasible.
4.2.1 The add hosts Command
add hosts
--hosts=host_list site_name
host_list:
host[, host[, ...]]
This command adds one or more hosts to an existing management site. Agents using the same port as
the management site must be running on any hosts added using this command. It takes as arguments a
required option --hosts, whose value is a comma-separated list of one or more hosts to be added to the
site, and the name of the site to which the hosts are to be added.
For example, the following command adds two hosts named torsk and kolja to management site
mysite:
mcm> add hosts --hosts=torsk,kolja mysite;
+--------------------------+
| Command result
|
+--------------------------+
| Hosts added successfully |
+--------------------------+
1 row in set (0.48 sec)
None of the hosts added by this command may already be members of management site site_name.
It is not currently possible using MySQL Cluster Manager to drop or delete hosts from a management site.
Notes
• This command does not support the --force option.
• Do not use localhost in the host list, as MySQL Cluster Manager relies on the
operating system for host name resolution, and localhost might be resolved
differently on different systems. Use proper host names for the host list or,
preferably, use the IP addresses for the hosts instead.
• When IPv6-enabled Windows systems are used as MySQL Cluster hosts under
MySQL Cluster Manager, you must reference these hosts using IPv4 addresses.
Otherwise, MySQL Cluster Manager will be unable to connect to the agent
processes on those hosts. See Section 5.1, “MySQL Cluster Manager Usage and
Design Limitations”.
4.2.2 The change log-level Command
change log-level log_level [site_name]
change log-level [{--hosts=|-h }host_list] log_level site_name
62
The create site Command
host_list:
host[,host[,...]]
Set the management agent's cluster logging level. This has the same effect as using the --log-level
option; however, unlike the option, this command can be used at run time and does not require a restart
of mcmd. Issuing this command overrides any value for --log-level set on the command line or in the
agent configuration file.
When used with the log_level alone, this command applies to the agent as a whole—that is, it applies to
all sites on all hosts. In the following example, the logging level is set to warning on all hosts and sites:
mcm> change log-level warning;
+--------------------------------+
| Command result
|
+--------------------------------+
| Log-level changed successfully |
+--------------------------------+
1 row in set (0.00 sec)
You can restrict the effects of the command by specifying the name of a site, or both. For example, the
following invocation of the command applies only to the site named mysite:
mcm> change log-level debug mysite;
+--------------------------------+
| Command result
|
+--------------------------------+
| Log-level changed successfully |
+--------------------------------+
1 row in set (0.05 sec)
You can additionally restrict the change to one or more hosts in a given site using the --hosts option,
with multiple host namesseparated by commas. The following command changes the logging level to
debug on the hosts named tonfisk and haj, but not on any other hosts in mysite:
mcm> change log-level --hosts=tonfisk,haj debug mysite;
+--------------------------------+
| Command result
|
+--------------------------------+
| Log-level changed successfully |
+--------------------------------+
1 row in set (0.09 sec)
You must specify a site when using the --hosts option; trying to use --hosts alone results in an error.
Accepted values for log_level are the same as for the --log-level: one of debug, critical,
error, info, message, or warning. For more detailed information about the meanings and effects of
these values, see MySQL Cluster Logging Management Commands.
The set log-level command was added in MySQL Cluster Manager 1.2.3.
4.2.3 The create site Command
create site {--hosts=|-h }host_list site_name
host_list:
host[,host[,...]]
The create site command is used to create a MySQL Cluster Manager management site; that is, a set
of MySQL Cluster Manager management agents running on one or more host computers. The command
63
The delete site Command
requires a list of one or more hosts where management agents are running and a name for the site. The
host list is passed as the value of the --hosts option (short form: -h).
This is an example of a create site command that creates a site named mysite, consisting of the
hosts tonfisk and flundra:
mcm> create site --hosts=tonfisk,flundra mysite;
+---------------------------+
| Command result
|
+---------------------------+
| Site created successfully |
+---------------------------+
1 row in set (0.31 sec)
Tip
You can verify that the site was created as intended, using the list sites
command, as shown here:
mcm> list sites;
+--------+------+-------+-----------------+
| Site
| Port | Local | Hosts
|
+--------+------+-------+-----------------+
| mysite | 1862 | Local | tonfisk,flundra |
+--------+------+-------+-----------------+
1 row in set (0.06 sec)
(See Section 4.2.5, “The list sites Command”, for more information about this
command.)
Agents must be running on all hosts specified in the --hosts option when create site is executed;
otherwise, the command fails with the error Agent on host host:port is unavailable. The host
where the agent used to issue the command is running must be one of the hosts listed. Otherwise, the
command fails with the error Host host_name is not a member of site site_name.
A given agent may be a member of one site only; if one of the management agents specified in the
host_list already belongs to a site, the command fails with the error Host host is already a
member of site site.
Notes
• Do not use localhost in the host list, as MySQL Cluster Manager relies on the
operating system for host name resolution, and localhost might be resolved
differently on different systems. Use proper host names for the host list or,
preferably, use the IP addresses for the hosts instead.
• When IPv6-enabled Windows systems are used as MySQL Cluster hosts under
MySQL Cluster Manager, you must reference these hosts using IPv4 addresses.
Otherwise, MySQL Cluster Manager will be unable to connect to the agent
processes on those hosts. See Section 5.1, “MySQL Cluster Manager Usage and
Design Limitations”.
4.2.4 The delete site Command
delete site site_name
64
The list sites Command
The delete site command deletes an existing management site. The command does not stop or
remove any agents making up the deleted site; instead, these agents continue to run, and remain available
for use in other sites.
The command takes a single argument, the name of the site to be deleted. This example shows the
deletion of a management site named mysite:
mcm> delete site mysite;
+---------------------------+
| Command result
|
+---------------------------+
| Site deleted successfully |
+---------------------------+
1 row in set (0.38 sec)
If the site to be deleted does not exist, the command fails with the error Command requires a site
to be defined. If there are any packages referencing hosts belonging to the site, delete site fails
with the error Packages exist in site site_name. The command also fails if there are defined any
clusters that include hosts belonging to the site.
Note
The management client must be connected to a site in order to be able to delete it.
In addition, if you execute a delete site command with the --force option
using one management agent while a different management agent is not running,
you must remove the “missing” management agent's site files manually. For more
information on site files, see Section 2.4, “MySQL Cluster Manager Configuration
File”.
4.2.5 The list sites Command
list sites
This command returns a list of the sites known to the management agent. It does not require any
arguments. An example is shown here:
mcm> list sites;
+--------+------+-------+-----------------+
| Site
| Port | Local | Hosts
|
+--------+------+-------+-----------------+
| mysite | 1862 | Local | tonfisk,flundra |
+--------+------+-------+-----------------+
1 row in set (0.06 sec)
The output of list sites contains the following columns:
• Site.
The name of the site.
• Port.
The TCP/IP port used for communications between management agents.
• Local.
• Hosts.
A comma-separated list of the hosts making up the site.
4.2.6 The list hosts Command
list hosts site_name
65
The stop agents Command
The list hosts command is used to obtain a list of the hosts comprising a given management site.
The command requires a single argument, the name of the site to be examined. For each host listed,
the information returned includes the hostname, availability (the Status column), and version of the
management agent software in use, as shown in this example:
mcm> list hosts mysite;
+-----------+-----------+---------+
| Host
| Status
| Version |
+-----------+-----------+---------+
| tonfisk
| Available | 1.2.4
|
+-----------+-----------+---------+
| flundra
| Available | 1.2.4
|
+-----------+-----------+---------+
2 rows in set (0.16 sec)
If you omit the site_name argument, the command fails with an error, as shown here:
mcm> list hosts;
ERROR 6 (00MGR): Illegal number of operands
4.2.7 The stop agents Command
stop agents
[[--hosts=host_list] site_name]
This command stops one or more MySQL Cluster Manager agents on one or more hosts.
When used without any arguments, stop agents stops the agent to which the client is currently
connected.
When used with the name of a management site, the command stops all agents running on hosts making
up the site. The following stops all MySQL Cluster Manager agents running on hosts in mysite:
mcm> stop agents mysite;
You can also stop a subset of the agents in a given management site by listing the hosts where they are
running with the --hosts option, along with the name of the site to which they belong. The result of the
following command is to stop MySQL Cluster Manager agents running on hosts kolja and torsk, both of
which are members of the management site mysite:
mcm> stop agents --hosts=kolja,torsk mysite;
Multiple host names following the --hosts option should be separated by commas, with no intervening
spaces. Invoking stop agents with this option without supplying a site_name causes a syntax error.
Using an undefined site_name or names of hosts not belonging to the site with this command also results
in an error.
Note
When IPv6-enabled Windows systems are used as MySQL Cluster hosts under
MySQL Cluster Manager, you must reference these hosts using IPv4 addresses.
Otherwise, MySQL Cluster Manager will be unable to connect to the agent
processes on those hosts. See Section 5.1, “MySQL Cluster Manager Usage and
Design Limitations”.
4.2.8 The version Command
66
MySQL Cluster Manager Package Commands
version
This command displays the version of the MySQL Cluster Manager software in use by the MySQL Cluster
Manager agent to which this client is connected, as shown here:
mcm> version;
+-----------------------------+
| Version
|
+-----------------------------+
| MySQL Cluster Manager 1.2.4 |
+-----------------------------+
1 row in set (0.00 sec)
The version command takes no arguments.
4.3 MySQL Cluster Manager Package Commands
This section contains information about MySQL Cluster Manager client commands used to register,
extend, unregister, and obtain information about the software packages making up instances of MySQL
Cluster that are to be managed using the MySQL Cluster Manager.
4.3.1 The add package Command
add package {--basedir=|-b }path
[{--hosts=|-h }host_list] package_name
host_list:
host[,host[,...]]
This command creates a new package, or, if the package named package_name already exists, this
command extends the package definition. The --basedir option (short form: -b), which indicates the
location of the MySQL Cluster installation directory on the listed hosts, is required. This must be the path to
the top-level directory where the MySQL Cluster software is located (for example, /usr/local/mysql),
and should not include the MySQL Cluster bin, libexec, or other subdirectory within the installation
directory.
Hosts may be specified as a comma-separated list, using the --hosts option (short form: -h); however,
this option is not required. If --hosts is omitted, the path is assumed to be valid for all hosts in the
cluster that is created using this package (see Section 4.4.1, “The create cluster Command”).
Important
You cannot perform add package if you have not yet defined any sites (each host
referenced in an add package command must be associated with a site). See
Section 4.2.3, “The create site Command”, for more information about defining
sites.
Suppose we have two Linux hosts named tonfisk and flundra, and the MySQL Cluster software
is installed in /usr/local/mysql on both hosts. In this case, you can create a package named
mypackage that accounts for both hosts as shown here:
mcm> add package --basedir=/usr/local/mysql mypackage;
+----------------------------+
| Command result
|
+----------------------------+
| Package added successfully |
+----------------------------+
1 row in set (0.71 sec)
67
The add package Command
When this package is used to create a cluster, the MySQL Cluster Manager knows that it should find the
MySQL Cluster software in the /usr/local/mysql directory on each of the hosts.
For options to MySQL Cluster Manager client command options having Windows paths as values, you
must use forward slashes (/) in place of backslashes (\), so if tonfisk and flundra are Windows hosts
where MySQL Cluster has been installed to the directory C:\mysql, the corresponding add package
command would look like this (with the --basedir option highlighted):
mcm> add package --basedir=c:/mysql mypackage;
+----------------------------+
| Command result
|
+----------------------------+
| Package added successfully |
+----------------------------+
1 row in set (0.71 sec)
In the example just given, we could also have issued the command as add package --basedir=/
usr/local/mysql --hosts=tonfisk,flundra mypackage (or add package --basedir=c:/
mysql --hosts=tonfisk,flundra mypackage on Windows) with the same result, but the --hosts
option was not required, since the MySQL Cluster software's location is the same on each host. Let us
suppose, however, that the software is installed in /usr/local/ndb-host-10 on host tonfisk and in /usr/
local/ndb-host-20 on host flundra. In this case, we must issue 2 separate commands, specifying the host
as well as the base directory in each case, as shown here:
mcm> add package --basedir=/usr/local/ndb-host-10
>
--hosts=tonfisk yourpackage;
+----------------------------+
| Command result
|
+----------------------------+
| Package added successfully |
+----------------------------+
1 row in set (0.68 sec)
mcm> add package --basedir=/usr/local/ndb-host-20
>
--hosts=flundra yourpackage;
+----------------------------+
| Command result
|
+----------------------------+
| Package added successfully |
+----------------------------+
1 row in set (0.81 sec)
Assuming that both hosts belong to a site called mysite, you can verify that these packages have been
created as desired using the list packages command, as shown here:
mcm> list packages mysite;
+-------------+---------------------------------------+-----------------+
| Package
| Path
| Hosts
|
+-------------+---------------------------------------+-----------------+
| yourpackage | /usr/local/ndb-host-10
| tonfisk
|
|
| /usr/local/ndb-host-20
| flundra
|
| mypackage
| /usr/local/mysql
| tonfisk,flundra |
+-------------+---------------------------------------+-----------------+
3 rows in set (1.07 sec)
(For more information about this command, see Section 4.3.3, “The list packages Command”.)
It is possible to assign the same base directory (or directories) on the same host (or hosts) to multiple
packages, as shown in this example, in which we assume that hosts tonfisk and flundra have
previously been assigned to a site named mysite:
68
The delete package Command
mcm> add package -b /usr/local/mysql-cluster mypackage;
+----------------------------+
| Command result
|
+----------------------------+
| Package added successfully |
+----------------------------+
1 row in set (1.41 sec)
mcm> add package -b /usr/local/mysql-cluster yourpackage;
+----------------------------+
| Command result
|
+----------------------------+
| Package added successfully |
+----------------------------+
1 row in set (1.58 sec)
mcm> list packages mysite;
+-------------+--------------------------+-----------------+
| Package
| Path
| Hosts
|
+-------------+--------------------------+-----------------+
| mypackage
| /usr/local/mysql-cluster | tonfisk,flundra |
| yourpackage | /usr/local/mysql-cluster | tonfisk,flundra |
+-------------+--------------------------+-----------------+
2 rows in set (0.50 sec)
Note
When IPv6-enabled Windows systems are used as MySQL Cluster hosts under
MySQL Cluster Manager, you must reference these hosts using IPv4 addresses.
Otherwise, MySQL Cluster Manager will be unable to connect to the agent
processes on those hosts. See Section 5.1, “MySQL Cluster Manager Usage and
Design Limitations”.
4.3.2 The delete package Command
delete package [{--hosts=|-h }host_list] package_name
host_list:
host[,host[,...]]
This command is used to unregister a package. More specifically, it removes any references to MySQL
Cluster software installations added to the agent's repository when the package was created. delete
package does not remove any MySQL Cluster installations; the command removes only references to the
installations. Once a package has been unregistered, it can no longer be used for a create cluster
command. The MySQL Cluster binaries remain, but cannot be used in a MySQL Cluster administered
using the MySQL Cluster Manager unless and until the base directory containing them has been registered
with another package. (It is possible to register a base directory with multiple packages; see Section 4.3.1,
“The add package Command”, for more information and an example.)
If the --hosts option (short form: -h) is used with this command, the base directory settings for the host
or hosts named by the option are removed as well. All hosts given in the host_list must be members of
the site to which the package is registered. Otherwise, the command fails.
A package that is in use by a cluster cannot be unregistered; the cluster must first be deleted (see
Section 4.4.2, “The delete cluster Command”).
Here is an example that demonstrates how to unregister a package named mypackage:
mcm> delete package mypackage;
69
The list packages Command
+------------------------------+
| Command result
|
+------------------------------+
| Package deleted successfully |
+------------------------------+
1 row in set (1.23 sec)
You can also verify that the package was unregistered using the list packages command; the package
name should no longer appear in the output of this command. If you attempt to use the unregistered
package in a create cluster command, the command fails, as shown here:
mcm> create cluster --package=mypackage
> --processhosts=ndb_mgmd@tonfisk,ndbd@grindval,ndbd@flundra,mysqld@tonfisk mycluster;
ERROR 4001 (00MGR): Package mypackage not defined
An upgrade cluster command that references an unregistered package also fails.
Note
When IPv6-enabled Windows systems are used as MySQL Cluster hosts under
MySQL Cluster Manager, you must reference these hosts using IPv4 addresses.
Otherwise, MySQL Cluster Manager will be unable to connect to the agent
processes on those hosts. See Section 5.1, “MySQL Cluster Manager Usage and
Design Limitations”.
4.3.3 The list packages Command
list packages [package_name] site_name
This command lists registered packages. It requires a single argument, that being the name of the site with
which the packages are registered, as shown in this example:
mcm> list packages mysite;
+-------------+---------------------------------------+-----------------+
| Package
| Path
| Hosts
|
+-------------+---------------------------------------+-----------------+
| yourpackage | /usr/local/ndb-host-10
| tonfisk
|
|
| /usr/local/ndb-host-20
| flundra
|
| mypackage
| /usr/local/mysql
| tonfisk,flundra |
+-------------+---------------------------------------+-----------------+
3 rows in set (1.07 sec)
If tonfisk and flundra are Windows hosts, the list of packages might look something like this:
mcm> list packages mysite;
+-------------+---------------------------------------+-----------------+
| Package
| Path
| Hosts
|
+-------------+---------------------------------------+-----------------+
| yourpackage | c:/cluster/ndb-host-10
| tonfisk
|
|
| c:/cluster/ndb-host-20
| flundra
|
| mypackage
| c:/mysql
| tonfisk,flundra |
+-------------+---------------------------------------+-----------------+
3 rows in set (1.07 sec)
In the example just shown, yourpackage uses the MySQL Cluster binaries installed at C:\cluster
\ndb-host-10 on host tonfisk, and at C:\cluster\ndb-host-20 on flundra; mypackage uses
MySQL Cluster binaries installed at C:\mysql on both hosts.
The output contains three columns; these are described in the following list:
70
MySQL Cluster Manager Cluster Commands
• Package.
The name of the package. This can sometimes be empty when a package includes MySQL
Cluster installations that are in different locations on different hosts (see next example).
• Path.
The path to the MySQL Cluster installation directory (base directory) on the indicated host or
hosts. This is the same as the value given for the --basedir option in the add package command
that was used to create or augment the package.
On Windows, paths shown in this column have any backslash characters converted to forward slashes,
just as must be done for the --basedir option (see the earlier example in this section).
• Hosts.
The host or hosts where the MySQL Cluster installation or installations are located.
You can filter the results so that information relating to only a single package is displayed by supplying the
package name before the site name, as shown here:
mcm> list packages yourpackage mysite;
+-------------+---------------------------------------+-----------------+
| Package
| Path
| Hosts
|
+-------------+---------------------------------------+-----------------+
| yourpackage | /usr/local/ndb-host-10
| tonfisk
|
|
| /usr/local/ndb-host-20
| flundra
|
+-------------+---------------------------------------+-----------------+
2 rows in set (0.55 sec)
(See Section 4.3.1, “The add package Command”, for the add package commands that were used to
create yourpackage.)
When a package contains MySQL Cluster installations using different base directories on different hosts,
each unique combination of path and host is shown in its own row. However, the name of the package
is displayed in the first row only; all rows that immediately follow this row and that do not contain the
package name also relate to the same package whose name is shown in the first preceding row to display
a package name. For example, consider the list packages command and output shown here:
mcm> list packages mysite;
+-------------+---------------------------------------+---------+
| Package
| Path
| Hosts
|
+-------------+---------------------------------------+---------+
| yourpackage | /usr/local/ndb-host-10
| tonfisk |
|
| /usr/local/ndb-host-20
| flundra |
| mypackage
| /usr/local/mysql
| tonfisk |
|
| /usr/local/bin/mysql
| flundra |
+-------------+---------------------------------------+---------+
3 rows in set (1.07 sec)
This output shows that there are two packages defined for the site named mysite; these packages are
named yourpackage and mypackage. The package yourpackage consists of the MySQL Cluster
binaries in the directory /usr/local/ndb-host-10 on host tonfisk, and in the directory /usr/
local/ndb-host-20 on host flundra. The package named mypackage consists of the MySQL Cluster
binaries in the directory /usr/local/mysql on host tonfisk, and in the directory /usr/local/bin/
mysql on host flundra.
If you omit the site_name argument, the command fails with an error, as shown here:
mcm> list packages;
ERROR 6 (00MGR): Illegal number of operands
4.4 MySQL Cluster Manager Cluster Commands
71
The create cluster Command
This section contains descriptions of MySQL Cluster Manager commands used to perform operations
on clusters. These include creating and deleting a cluster; starting, stopping, and restarting a cluster;
upgrading a cluster (that is, upgrading the MySQL Cluster software used by a given cluster); and listing
clusters known to MySQL Cluster Manager.
4.4.1 The create cluster Command
create cluster {--package=|-P }package_name
{--processhosts=|-R }process_host_list cluster_name
[--verbose | -v]
process_host_list:
process_name@host[,process_name@host[,...]]
process_name:
{ndb_mgmd|ndbd|ndbmtd|mysqld|ndbapi}
This command creates a cluster to be managed by the MySQL Cluster Manager. However, it does not start
the cluster (see Section 4.4.6, “The start cluster Command”).
create cluster requires the following arguments:
• A package_name, supplied as the value of the --package option (short form: -P). This must be the
name of a package previously registered using add package.
• A list (process_host_list) of MySQL Cluster processes and the hosts on which they are to run,
supplied as the value of the --processhosts option (short form: -R), with list items separated by
commas. As with other lists passed as option values in MySQL Cluster Manager commands, you must
not use spaces before or after the commas.
Each item in the process_host_list consists of the name of a MySQL Cluster process joined with
the name of the host on which it is located using an amphora (@) sign (also sometimes know as the “at”
sign). Permitted values for processes are ndb_mgmd, ndbd, and mysqld. When the cluster employs
MySQL Cluster NDB 7.0 or later, you can also use ndbmtd as process name. In other words, a valid
process name is the name of a MySQL Cluster process daemon binary.
To support running your own NDB API applications with a cluster under MySQL Cluster Manager, it
is also possible to use ndbapi as a process type. Such applications can be connected to a managed
cluster. Currently, MySQL Cluster Manager recognises only that an NDB API application is connected to
the cluster; the NDB API application itself must be started, stopped, and configured manually.
It is also possible to specify one or more “free” mysqld and ndbapi processes without any hosts. To do
this, simply use the wildcard * (asterisk character) in place of the hostname or IP address, as shown in
the following table:
“Free” mysqld process:
mysqld@*
“Free” ndbapi process:
ndbapi@*
A mysqld process or ndbapi process that is specified without a host in this fashion is permitted to
connect to the cluster from any host that can access the cluster over the network. Otherwise, the
process may connect to the cluster only from the specified host.
By convention, items in the process_host_list are listed according to the process type, in the
following order:
1. Management node processes (ndb_mgmd)
72
The create cluster Command
2. Data node processes (MySQL Cluster NDB 6.3: ndbd; MySQL Cluster NDB 7.0 and later: ndbd,
ndbmtd)
3. SQL node processes (mysqld)
4. Custom NDB API applications (ndbapi)
For information about writing your own NDB API applications, see The NDB API, in the MySQL
Cluster API Developer Guide.
While the order in which the items are listed does not affect whether the create cluster command
succeeds, we suggest that you follow this convention for readability, as well as compatibility with other
MySQL Cluster management tools such as ndb_mgm.
Note
create cluster causes cluster node IDs to be assigned consecutively, in the
order that the nodes are specified in the process_host_list.
Each host referenced in the list must be part of the site for which the package used in create cluster
is defined.
For processes of types mysqld and ndbapi, the hostname is required, but not enforced in the running
cluster. In other words, an [api] section is created in the cluster config.ini file, but no HostName
parameter is specified; thus, the mysqld or ndbapi can connect from any host. (Currently, there is
no way using MySQL Cluster Manager to specify that a mysqld or ndbapi process is restricted to
connecting from a single host.)
• A name for the cluster. Once the cluster has been created, this name is used to refer to it in other cluster
management commands such as delete cluster, start cluster, and stop cluster. Like
other object names used with MySQL Cluster Manager, the cluster_name must be valid according to
the rules given elsewhere in this document for identifiers (see Chapter 4, MySQL Cluster Manager Client
Commands).
An additional --verbose option for this command causes create cluster to output extra information
as it is executed, as shown later in this section.
Consider the following command issued in the MySQL Cluster Manager client, which creates a cluster
named mycluster:
mcm> create cluster --package=mypackage
-> --processhosts=ndb_mgmd@flundra,ndbd@tonfisk,ndbd@grindval,mysqld@flundra
-> mycluster;
+------------------------------+
| Command result
|
+------------------------------+
| Cluster created successfully |
+------------------------------+
1 row in set (7.71 sec)
As defined by the command just shown, mycluster consists of four nodes: a management node on host
flundra; two data nodes—one on each of the hosts tonfisk and grindval; and one SQL node, also
on host flundra.
Using the --verbose option causes the command to print output similar to that produced by the list
processes command, as shown here:
73
The delete cluster Command
mcm> create cluster --verbose --package=mypackage
-> --processhosts=ndb_mgmd@flundra,ndbd@tonfisk,ndbd@grindval,mysqld@flundra
-> mycluster;
+--------+----------+----------+
| NodeId | Name
| Host
|
+--------+----------+----------+
| 49
| ndb_mgmd | flundra |
| 1
| ndbd
| tonfisk |
| 2
| ndbd
| grindval |
| 50
| mysqld
| flundra |
+--------+----------+----------+
4 rows in set (0.32 sec)
You can also create this cluster in such a way that the mysqld process is permitted to connect to the
cluster from any host able to reach the other cluster hosts over the network as shown here:
mcm> create cluster --package=mypackage
-> --processhosts=ndb_mgmd@flundra,ndbd@tonfisk,ndbd@grindval,mysqld@*
-> mycluster;
+------------------------------+
| Command result
|
+------------------------------+
| Cluster created successfully |
+------------------------------+
1 row in set (7.71 sec)
Note
In the case of a “free” ndbapi process, it is not necessary to have the MySQL
Cluster Manager software installed on the host where the ndbapi process is
running.
Configuration changes to the newly-created cluster can be made using the set command prior to starting
the cluster. This is often preferable to doing after the cluster has been started, since set commands used
to make configuration changes in a running cluster can require a rolling restart, and rolling restarts of
clusters having many nodes or large quantities of data (or both) may take a great deal of time to complete.
Note
When creating a cluster having more than one mysqld process on the same host
machine, MySQL Cluster Manager assigns the MySQL default port (3306) to each
of them. Therefore, you must assign a unique port for each mysqld process in the
cluster.
4.4.2 The delete cluster Command
delete cluster [--removedirs] cluster_name
This command deletes the cluster named cluster_name; that is, it removes the process from the listing
from this cluster, as well as any configuration and data files relating to this cluster.
delete cluster does not remove any MySQL Cluster binaries from hosts.
This example demonstrates how to delete a cluster named mycluster, along with its configuration and
data files:
mcm> delete cluster mycluster;
+------------------------------+
74
The list clusters Command
| Command result
|
+------------------------------+
| Cluster deleted successfully |
+------------------------------+
1 row in set (1.22 sec)
delete cluster fails if the cluster to be deleted is running, as shown here:
mcm> delete cluster mycluster;
ERROR 5010 (00MGR): All processes must be stopped to delete cluster mycluster
You must shut down the cluster first, using stop cluster.
4.4.3 The list clusters Command
list clusters site_name
This command lists all clusters defined for a given management site named site_name, together with the
package used by each cluster. For example, the command shown here displays a list of all clusters defined
for the site named mysite:
mcmc> list clusters mysite;
+------------------+----------+
| Cluster
| Package |
+------------------+----------+
| mycluster
| m-7.1.26 |
| yourcluster
| y-7.1.26 |
| someothercluster | s-7.2.9 |
+------------------+----------+
3 rows in set (2.07 sec)
If site_name is omitted, the command fails with an error, as shown here:
mcm> list packages;
ERROR 6 (00MGR): Illegal number of operands
4.4.4 The restart cluster Command
restart cluster cluster_name
This command performs a rolling restart (see Performing a Rolling Restart of a MySQL Cluster) of the
cluster named cluster_name. The cluster must already be running in order for this command to succeed.
(For information about how to determine the operation state of the cluster, see Section 4.4.5, “The show
status Command”.)
For example, the command shown here performs a rolling restart of the cluster named mycluster:
mcm> restart cluster mycluster;
+--------------------------------+
| Command result
|
+--------------------------------+
| Cluster restarted successfully |
+--------------------------------+
1 row in set (1 min 22.53 sec)
If the cluster is not already running, restart cluster fails with an error, as shown here:
75
The show status Command
mcm> show status --cluster mycluster;
+-----------+---------+
| Cluster
| Status |
+-----------+---------+
| mycluster | stopped |
+-----------+---------+
1 row in set (1.49 sec)
mcm> restart cluster mycluster;
ERROR 5009 (00MGR): Restart can not be performed as processes are
stopped in cluster mycluster
Note
Depending on the number of nodes and the amount of data stored in the cluster,
a rolling restart can take a considerable amount of time, up to several hours for a
cluster with a great many data nodes and a large amount of data. For this reason,
you may want to execute this command with the --background option (short form
-B) to allow it to run in the background, freeing the MySQL Cluster Manager client
for other tasks.
Currently, there is no mechanism in MySQL Cluster Manager for performing system initial restarts of a
cluster. This means that attributes that require an initial restart to be changed must be set before the
cluster is started for the first time.
4.4.5 The show status Command
show status --cluster|-c cluster_name
show status --operation|-o cluster_name
show status --process|-r cluster_name
This command is used to check the status of clusters, cluster processes, and commands issued in the
MySQL Cluster Manager client. The type of status returned depends on which of the three options -cluster (short form: -c), --operation (short form: -o), or --process (short form -r) is used with the
command. (If none of these is used, --cluster is assumed.) These options are described in more detail
in the next few paragraphs.
--cluster option.
When this option is used, show status reports on the status of the cluster named cluster_name, as
shown in this example:
mcm> show status --cluster mycluster;
+-----------+-------------------+
| Cluster
| Status
|
+-----------+-------------------+
| mycluster | fully operational |
+-----------+-------------------+
1 row in set (1.94 sec)
When used with the --cluster option (short form: -c), the output of this command consist of two
columns. The Cluster column contains the name of the cluster. The Status column contains a
description of the cluster's status; possible values and their meanings are shown in the following table:
Status Value
Meaning
fully operational
All cluster processes are running.
operational
All node groups are up and running, but at least one data node process
(ndbd or ndbmtd) is not running. The cluster is online, but you should
76
The show status Command
Status Value
Meaning
determine why any “missing” data nodes are not running and correct the
problem as soon as possible.
non-operational
The cluster is not operational, because at least one node group is offline.
You must investigate and fix the problem or problems, then restart the
cluster, before the cluster can be used for data storage and retrieval
operations.
stopped
The cluster is not running, because it has been stopped by the user. This
normally does not indicate any problem as such, but you must restart the
cluster before it can be used by any applications.
created
The cluster has been created successfully using the create cluster
command, but has never been started. You must start the cluster using
the start cluster command before you can make use of it.
unknown
The MySQL Cluster Manager was unable to determine the cluster's
status. This may or may not indicate a problem with the cluster; it is
possible that the problem lies with one or more MySQL Cluster Manager
agents or the MySQL Cluster Manager client. You should attempt to
determine the status of the cluster by other means, such as using show
status --process in the MySQL Cluster Manager client (described
later in this section), or employing one of the commands available in
the ndb_mgm client (see ndb_mgm — The MySQL Cluster Management
Client) such as SHOW or ALL STATUS.
--operation option.
When the --operation option (short form: -o) is used, it causes SHOW STATUS to display the status of
the latest command to be executed. This includes commands that were issued using the --background
option (short form -bg). An example of this command is shown here:
mcm> show status --operation mycluster;
+-----------------+-----------+--------------+
| Command
| Status
| Description |
+-----------------+-----------+--------------+
| restart cluster | executing | <no message> |
+-----------------+-----------+--------------+
1 row in set (1.60 sec)
The output contains 3 columns, described in the following list:
• Command.
The text of the command last issued (previous to the show status --operation
command), less any options or arguments.
• Status.
section.
The current state of the command. Possible values and their meanings are listed later in this
• Description.
In some cases, depending on the command and its status, this column may contain
additional information. Otherwise, <no message> is displayed here.
Possible values for the Status column, together with descriptions of these values, are shown in the
following table:
Status Value
Description
executing
MySQL Cluster Manager is executing the command, but has not yet
completed doing so.
finished
The command has executed (and completed) successfully.
77
The show status Command
Status Value
Description
failed
The command failed to execute. The Description column may contain
information about the reason for the failure.
unknown
MySQL Cluster Manager was unable to determine the status of this
command.
--process option.
When run with this option, show status returns information about each process in the cluster named
cluster_name, as shown in this example:
mcm> show status --process mycluster;
+------+----------+----------+---------+-----------+
| Id
| Process | Host
| Status | Nodegroup |
+------+----------+----------+---------+-----------+
| 1
| ndb_mgmd | tonfisk | running |
|
| 2
| ndbd
| flundra | running | 0
|
| 3
| ndbd
| grindval | running | 0
|
| 4
| mysqld
| lax
| running |
|
+------+----------+----------+---------+-----------+
4 rows in set (1.67 sec)
When the --process option (short form: -r) is used with show status, the output contains 5 columns,
described in the following list:
• Id.
This is the node ID of the process as a node in cluster cluster_name.
• Process.
The type of process, that is, the name of the corresponding MySQL Cluster executable.
Allowed values are ndb_mgmd, ndbd, ndbmtd, and mysqld.
• Host.
• Status.
section.
The hostname or IP address of the computer where the process is running.
The state or condition of this process. Possible values for this column are given later in this
• Nodegroup.
If the Process is ndbd or ndbmtd—that is, if the process is a data node process—
then this column shows the ID of the node group to which the process belongs. For any other value of
Process, this column is empty.
Possible values for the Status column are shown in the following table, together with a description of what
this value represents:
Status Value
Meaning
running
The process is running normally.
stopped
The process has been stopped by the user.
added
The process has been added to the cluster, but not yet started.
starting
The process has been started, but is not yet fully running. (For data
nodes, you can determine which start phase the node is currently in by
using the status command in the ndb_mgm client.)
stopping
The process has received a command to stop, and is now shutting down.
failed
The process has shut down unexpectedly (likely to have crashed). You
should determine the cause for this unplanned shutdown, fix the problem,
and restart the process as soon as possible.
unknown
MySQL Cluster Manager is unable to establish the current status of this
process. You should try to determine its status using other means.
78
The start cluster Command
You must supply the name of an existing cluster with this command, or else show status fails with an
error, as shown here:
mcm> show status;
ERROR 6 (00MGR): Illegal number of operands
mcm> show status -c nosuchcluster;
ERROR 5001 (00MGR): Cluster nosuchcluster not defined
Important
Do not confuse this command with the MySQL SHOW STATUS statement, which has
a different syntax, and which can be used only in the standard mysql client. The
MySQL Cluster Manager client command accepts only those options shown at the
beginning of this section, and does not accept a LIKE or WHERE clause.
4.4.6 The start cluster Command
start cluster [--initial|-i] cluster_name
This command starts the cluster named cluster_name, as shown in this example:
mcm> start cluster mycluster;
+------------------------------+
| Command result
|
+------------------------------+
| Cluster started successfully |
+------------------------------+
1 row in set (45.37 sec)
In order for the command to succeed, the cluster named in the command must already exist; otherwise the
command fails with the error Cluster cluster_name not defined, as shown here:
mcm> list sites;
+--------+------+-------+------------------------------+
| Site
| Port | Local | Hosts
|
+--------+------+-------+------------------------------+
| mysite | 1862 | Local | tonfisk,flundra,grindval,haj |
+--------+------+-------+------------------------------+
1 row in set (1.72 sec)
mcm> list clusters mysite;
+-----------+-----------+
| Cluster
| Package
|
+-----------+-----------+
| mycluster | mypackage |
+-----------+-----------+
1 row in set (1.70 sec)
mcm> start cluster yourcluster;
ERROR 5001 (00MGR): Cluster yourcluster not defined
In addition, the cluster must not already be running, as shown here:
mcm> show status --cluster mycluster;
+-----------+-------------------+
| Cluster
| Status
|
+-----------+-------------------+
| mycluster | fully operational |
+-----------+-------------------+
79
The stop cluster Command
1 row in set (0.92 sec)
mcm> start cluster mycluster;
ERROR 5005 (00MGR): Cluster mycluster is running
The --initial option (short form: -i) was added in MySQL Cluster Manager 1.2.1. This option causes
all cluster data node processes to be started as if start process --initial had been used, which
means that all data nodes wipe their data and start with clean data node file systems. NDB tables that were
previously stored in the cluster are lost.
Under normal circumstances, you should use this option to start a cluster only when either you do not
wish to preserve any of its data (and want to make a clean start), or you intend to restore the cluster from
backup to a known good state (see Section 4.7.4, “The restore cluster Command”). You should also
be aware that no special warnings are printed by the mcm client when --initial is used with start
cluster; the command is immediately executed.
For information about creating cluster backups, see Section 4.7.2, “The backup cluster Command”. If
you need to know which backups are available (if any), use list backups.
Using the --initial option with start cluster does not cause mysql_install_db to be executed,
or the mysql system database to be altered or removed, on any SQL nodes. This option also does
not remove MySQL Cluster Disk Data tablespace files; if their removal is needed, it must be performed
manually.
4.4.7 The stop cluster Command
stop cluster cluster_name
This command stops the cluster named cluster_name, if it is running, as shown in this example:
mcm> stop cluster mycluster;
+------------------------------+
| Command result
|
+------------------------------+
| Cluster stopped successfully |
+------------------------------+
1 row in set (21.31 sec)
stop cluster fails if the cluster is not in an operational state (see Section 4.4.5, “The show status
Command”, for information about obtaining the cluster's status):
mcm> show status --cluster mycluster;
+-----------+---------+
| Cluster
| Status |
+-----------+---------+
| mycluster | stopped |
+-----------+---------+
1 row in set (1.49 sec)
mcm> stop cluster mycluster;
ERROR 5006 (00MGR): Cluster mycluster is stopped
4.4.8 The upgrade cluster Command
upgrade cluster {--package=|-P }package_name cluster_name
This command upgrades the cluster named cluster_name to the software package package_name. It
accomplishes this by performing a rolling restart of the cluster.
80
The upgrade cluster Command
The new package must be registered using add package before you can use it for an upgrade;
otherwise, upgrade cluster fails with an error.
Suppose mycluster is using MySQL Cluster NDB 7.1.17, and the binaries are registered with a package
named 7.1.17, as shown by this list clusters command:
mcm> list clusters mysite;
+-----------+---------+
| Cluster
| Package |
+-----------+---------+
| mycluster | 7.1.17 |
+-----------+---------+
1 row in set (1.80 sec)
Now you wish to upgrade mycluster to MySQL Cluster NDB 7.1.19. Assuming that you have placed the
NDB 7.1.19 binaries in the same directory on each host, the add package command to create a new
package named 7.1.19 that contains these binaries might look something like this:
mcm> add package --basedir=/usr/local/ndb-7.1.19 7.1.19;
+----------------------------+
| Command result
|
+----------------------------+
| Package added successfully |
+----------------------------+
1 row in set (0.88 sec)
Note
On Windows, you must replace any backslash (\) characters in the path used
for the add package command's --basedir option with forward slashes (/).
See Section 4.3.1, “The add package Command”, for additional information and
examples.
Both packages should now be listed in the output of the command list packages mysite. To perform
the upgrade to the 7.1.19 package, use the upgrade cluster command as shown here:
mcm> upgrade cluster --package=7.1.19 mycluster;
+-------------------------------+
| Command result
|
+-------------------------------+
| Cluster upgraded successfully |
+-------------------------------+
1 row in set (3 min 17.00 sec)
Once the upgrade cluster command has been successfully executed, you can verify that mycluster
is now using the 7.1.19 package from the output of the appropriate list clusters command:
mcm> list clusters mysite;
+-----------+---------+
| Cluster
| Package |
+-----------+---------+
| mycluster | 7.1.19 |
+-----------+---------+
1 row in set (1.80 sec)
Despite the name of this command, upgrade cluster can also be used to perform MySQL Cluster
downgrades.
MySQL Cluster Manager does not allow cluster upgrades or downgrades not supported by MySQL Cluster.
Before attempting any upgrade or downgrade using the upgrade cluster command, be sure to consult
81
MySQL Cluster Manager Configuration Commands
Upgrading and Downgrading MySQL Cluster, to determine whether MySQL Cluster supports the upgrade
or downgrade in question, and for any known issues regarding the changes you intend to make.
4.5 MySQL Cluster Manager Configuration Commands
This section covers the commands used in the MySQL Cluster Manager for getting and setting values of
various types used in MySQL Cluster configuration. We begin with a discussion of what we mean by the
term “configuration attribute”, and how this relates to the manual configuration of a MySQL Cluster using
MySQL Cluster configuration parameters and MySQL Server options and variables that you may already
be familiar with.
Configuration attributes.
Traditionally, when administering MySQL Cluster, it has been necessary to distinguish between 3 types of
configuration data:
• Configuration parameters set in the MySQL Cluster global configuration file read by the management
server (or servers), by convention named config.ini
• Configuration variables set in a running MySQL server (SQL node) by using the SQL SET statement in
the mysql command-line client (or in another MySQL client application)
• Configuration options passed to MySQL Cluster executable programs when invoking them
Note
Configuration options passed to mysqld often have the effect of setting values
for configuration variables, many—but not all—of which can be overridden in a
running MySQL server using a MySQL client application such as mysql.
MySQL Cluster Manager simplifies this configuration scheme by treating all 3 types of configuration data
as attributes, where the term “attribute” refers to a MySQL Cluster configuration parameter, a MySQL
Server variable, or a command-line option used with one or more MySQL Cluster binary programs. It does
this transparently, handling all necessary changes in a unified interface.
Suppose that you wish to know how much data memory is allocated to the data nodes in a given MySQL
Cluster. Rather than having to determine that this is controlled using the DataMemory configuration
parameter that is written in the config.ini file and then reading that file to find the value, you merely
invoke the MySQL Cluster Manager get command, and MySQL Cluster Manager handles reading from
the file for you, and displays the value without the necessity of opening the file in a separate application
such as more or less. If you wish to change the amount of data memory allocated to the data nodes, you
can issue a MySQL Cluster Manager set (or reset) command; MySQL Cluster Manager then writes the
desired value to config.ini. If—as is the case with DataMemory—updating a configuration value in a
running MySQL Cluster requires a rolling restart to be performed, MySQL Cluster Manager can perform
this operation automatically so that the configuration change takes effect without further intervention
required on the part of the operator.
Configuration attribute levels.
A configuration attribute value applies at one of the three levels, described here:
• Default: This value is always used by any MySQL Cluster process of the type or types (such as ndbd or
mysqld) to which the attribute applies, unless this value is overridden by the user.
• Process: This value is used for all instances of a given type of MySQL Cluster process.
• Instance: This value is used for a specific instance of a MySQL Cluster process, the instance being
identified by its MySQL Cluster node ID.
82
MySQL Cluster Manager Configuration Commands
Default values are hard-coded into MySQL Cluster; you can override a default value for a given
configuration attribute (using the set command) or reset a given attribute value to its default (using the
reset command), but you cannot change a default value itself. You can set or reset an configuration
attribute's value on either the process level or the instance level using a single set or reset command.
Once you have set or reset the value of a configuration attribute, this value persists until it is changed by
executing another set or reset command.
Note
When setting or resetting a configuration attribute value, you must specify the level
at which the setting applies.
MySQL Cluster Manager determines what value to use for a configuration attribute relating to a given
process by following these steps for each MySQL Cluster process:
(For each configuration attribute:)
1. Is an attribute value defined for the node ID of this process?
Yes: Use the value that was defined for this node ID, and exit.
No: Proceed to the next step.
2. Is an attribute value specified on the process level, that is, for all processes of this type?
Yes: Use the value that was specified for all processes of this type, and exit.
No: Use the default value that applies to processes of this type, and exit.
(In the steps just shown, “exit” can be taken to mean “If there are more configuration attributes applicable
to this process that have not yet been set, proceed to the next attribute until there are no more attributes to
be set for this process”.)
Note
The most recently specified value takes precedence. This means that if you set
a configuration attribute for a specific process, then later specify a process-level
value for this attribute, the process-level value is used for all processes of that type,
including the instance for which you earlier set an instance-specific value.
Mandatory attributes.
Some attributes must be defined in the MySQL Cluster Manager at the process type or instance level
for all processes of the applicable type or types for the cluster configuration to be valid. Such mandatory
attributes may be changed, but not reset; in other words, the definition can be changed, but the definition
itself cannot be removed entirely. Another way of stating this is that a mandatory attribute has no default
value.
An example of a mandatory attribute is NodeId. If you try to reset a mandatory attribute, the attempt fails
with an error, as shown here:
mcm> reset
ERROR 6007
mcm> reset
ERROR 6007
mcm> reset
ERROR 6007
NodeId:ndb_mgmd:1 mycluster;
(00MGR): Config attribute NodeId is mandatory and cannot be reset
NodeId:ndbd:2 mycluster;
(00MGR): Config attribute NodeId is mandatory and cannot be reset
NodeId:mysqld:4 mycluster;
(00MGR): Config attribute NodeId is mandatory and cannot be reset
Read-only attributes.
83
The get Command
A read-only attribute is an attribute that must be defined by the MySQL Cluster Manager when a cluster is
created. A read-only attribute can be neither changed nor reset by the user. This means that a read-only
attribute is always a mandatory attribute.
One such attribute is HostName, which is read only for any type of MySQL Cluster process. Any attempt to
change or reset a read-only attribute fails, as shown here:
mcm> reset
ERROR 6008
mcm> reset
ERROR 6008
mcm> reset
ERROR 6008
HostName:ndb_mgmd mycluster;
(00MGR): Config attribute HostName is readonly and cannot be changed
HostName:ndbd mycluster;
(00MGR): Config attribute HostName is readonly and cannot be changed
HostName:mysqld mycluster;
(00MGR): Config attribute HostName is readonly and cannot be changed
mcm> set HostName:ndb_mgmd mycluster;
ERROR 6008 (00MGR): Config attribute HostName is readonly and cannot be changed
mcm> set HostName:ndbd mycluster;
ERROR 6008 (00MGR): Config attribute HostName is readonly and cannot be changed
mcm> set HostName:mysqld mycluster;
ERROR 6008 (00MGR): Config attribute HostName is readonly and cannot be changed
An attribute that is mandatory or read only is set when a cluster is created. Neither a mandatory attribute
nor a read-only attribute can be reset. (Neither type of attribute has a default value other than what is set
for it when the cluster is created.) A mandatory attribute can be changed at any time by the user; a readonly attribute cannot be changed once the cluster has been created. You can obtain a listing of mandatory
and read-only attributes using the get command.
A listing of attribute properties also can be found in the output of ndb_config --configinfo -xml (see ndb_config — Extract MySQL Cluster Configuration Information); for more more complete
information, see Configuration of MySQL Cluster.
MySQL Cluster Manager determines internally which attributes are considered read-only for reasons of
cluster stability and performance. You can use the get command to see which attributes are read only.
4.5.1 The get Command
get [--include-defaults|-d] [filter_specification_list] cluster_name
filter_specification_list:
filter_specification[,filter_specification][,...]
filter_specification:
[attribute_name][:process_specification][+process_specification]]
process_specification:
process_name[:process_id]
This command is used in the MySQL Cluster Manager client to obtain configuration attribute values from
a MySQL Cluster. (See Section 4.5, “MySQL Cluster Manager Configuration Commands”, for a definition
of the term “attribute” as it applies in the MySQL Cluster Manager.) The output includes the following
columns:
• Name: This column contains the name of the configuration attribute.
• Value: This column shows the attribute's current value.
• Process1: This column holds the process type to which the attribute applies. This is one of ndb_mgmd,
ndbd, ndbmtd (MySQL Cluster NDB 7.0 and later), or mysqld.
• Id1: This is the process ID of the process to which the attribute applies.
84
The get Command
• Process2: For attributes that require specifying two nodes, such as those relating to TCP/IP
connections, this column shows the process type of the second node.
• Id2: For attributes that require specifying two nodes, this column shows the process ID for the second
node.
• Level: This is the attribute process level. This value in this column can be Default, Process, or
empty; if this column is empty, it means that the attribute applies on the instance level.
• Comment: This column is used to show whether the attribute is Mandatory, Read only, Default
attribute, or user defined (in which case the Comment column is empty).
By default, get returns only those attributes that have been set explicitly, either by the MySQL Cluster
Manager itself, or by the user. In other words, it shows only attributes that are mandatory (including
read-only attributes), or that have been set by the user after the cluster was created. Hereafter in this
discussion, we refer to these as “non-default attributes”.
Thus, prior to setting any configuration attributes, you can obtain a list of all mandatory and read-only
attributes by running the simplest possible form of this command, as shown here:
mcm> get mycluster;
mcm> get mycluster\G
*************************** 1. row ***************************
Name: DataDir
Value: /home/jon/bin/mcm/mcm_data/clusters/mycluster/1/data
Process1: ndbmtd
NodeId1: 1
Process2:
NodeId2:
Level:
Comment:
*************************** 2. row ***************************
Name: HostName
Value: torsk
Process1: ndbmtd
NodeId1: 1
Process2:
NodeId2:
Level:
Comment: Read only
*************************** 3. row ***************************
Name: NodeId
Value: 1
Process1: ndbmtd
NodeId1: 1
Process2:
NodeId2:
Level:
Comment: Read only
*************************** 4. row ***************************
Name: DataDir
Value: /home/jon/bin/mcm/mcm_data/clusters/mycluster/2/data
Process1: ndbmtd
NodeId1: 2
Process2:
NodeId2:
Level:
Comment:
*************************** 5. row ***************************
Name: HostName
Value: torsk
Process1: ndbmtd
NodeId1: 2
Process2:
85
The get Command
NodeId2:
Level:
Comment: Read only
*************************** 6. row ***************************
Name: NodeId
Value: 2
Process1: ndbmtd
NodeId1: 2
Process2:
NodeId2:
Level:
Comment: Read only
*************************** 7. row ***************************
Name: DataDir
Value: /home/jon/bin/mcm/mcm_data/clusters/mycluster/49/data
Process1: ndb_mgmd
NodeId1: 49
Process2:
NodeId2:
Level:
Comment:
*************************** 8. row ***************************
Name: HostName
Value: torsk
Process1: ndb_mgmd
NodeId1: 49
Process2:
NodeId2:
Level:
Comment: Read only
*************************** 9. row ***************************
Name: NodeId
Value: 49
Process1: ndb_mgmd
NodeId1: 49
Process2:
NodeId2:
Level:
Comment: Read only
...
*************************** 24. row ***************************
Name: ndbcluster
Value:
Process1: mysqld
NodeId1: 51
Process2:
NodeId2:
Level:
Comment: Read only
*************************** 25. row ***************************
Name: NodeId
Value: 51
Process1: mysqld
NodeId1: 51
Process2:
NodeId2:
Level:
Comment: Read only
*************************** 26. row ***************************
Name: port
Value: 3307
Process1: mysqld
NodeId1: 51
Process2:
NodeId2:
86
The get Command
Level:
Comment:
*************************** 27. row ***************************
Name: socket
Value: /tmp/mysql.mycluster.51.sock
Process1: mysqld
NodeId1: 51
Process2:
NodeId2:
Level:
Comment:
*************************** 28. row ***************************
Name: tmpdir
Value: /home/jon/bin/mcm/mcm_data/clusters/mycluster/51/data/tmp
Process1: mysqld
NodeId1: 51
Process2:
NodeId2:
Level:
Comment:
*************************** 29. row ***************************
Name: NodeId
Value: 52
Process1: ndbapi
NodeId1: 52
Process2:
NodeId2:
Level:
Comment: Read only
29 rows in set (0.05 sec)
On Windows, no substitutions for backslashes or other characters used in values of paths reported by the
get command is performed. However, it is possible to see forward slashes used in such paths if the values
were set using the set command. See Setting Attributes Containing Paths on Windows [103], for more
information.
Although a socket attribute is shown for mysqld nodes in the get output from the previous example and
is not marked Read only, MySQL Cluster Manager does not support socket files on Windows. For this
reason; you should not attempt to set socket attributes for Windows mysqld processes using MySQL
Cluster Manager.
To include default values for attributes that have not (or not yet) been set explicitly, you can invoke this
command with the --include-defaults option (short form: -d), as shown here (in part):
mcm> get --include-defaults mycluster\G
*************************** 1. row ***************************
Name: __ndbmt_classic
Value: NULL
Process1: ndbmtd
NodeId1: 1
Process2:
NodeId2:
Level: Default
Comment:
*************************** 2. row ***************************
Name: __ndbmt_lqh_threads
Value: NULL
Process1: ndbmtd
NodeId1: 1
Process2:
NodeId2:
Level: Default
Comment:
87
The get Command
*************************** 3. row ***************************
Name: __ndbmt_lqh_workers
Value: NULL
Process1: ndbmtd
NodeId1: 1
Process2:
NodeId2:
Level: Default
Comment:
*************************** 4. row ***************************
Name: Arbitration
Value: Default
Process1: ndbmtd
NodeId1: 1
Process2:
NodeId2:
Level: Default
Comment:
*************************** 5. row ***************************
Name: ArbitrationTimeout
Value: 7500
Process1: ndbmtd
NodeId1: 1
Process2:
NodeId2:
Level: Default
Comment:
...
*************************** 1094. row ***************************
Name: DefaultOperationRedoProblemAction
Value: queue
Process1: ndbapi
NodeId1: 52
Process2:
NodeId2:
Level: Default
Comment:
*************************** 1095. row ***************************
Name: ExecuteOnComputer
Value: NULL
Process1: ndbapi
NodeId1: 52
Process2:
NodeId2:
Level: Default
Comment:
*************************** 1096. row ***************************
Name: HeartbeatThreadPriority
Value: NULL
Process1: ndbapi
NodeId1: 52
Process2:
NodeId2:
Level: Default
Comment:
*************************** 1097. row ***************************
Name: HostName
Value:
Process1: ndbapi
NodeId1: 52
Process2:
NodeId2:
Level: Default
Comment:
*************************** 1098. row ***************************
88
The get Command
Name: MaxScanBatchSize
Value: 262144
Process1: ndbapi
NodeId1: 52
Process2:
NodeId2:
Level: Default
Comment:
*************************** 1099. row ***************************
Name: NodeId
Value: 52
Process1: ndbapi
NodeId1: 52
Process2:
NodeId2:
Level:
Comment: Read only
*************************** 1100. row ***************************
Name: TotalSendBufferMemory
Value: 0
Process1: ndbapi
NodeId1: 52
Process2:
NodeId2:
Level: Default
Comment:
*************************** 1101. row ***************************
Name: wan
Value: false
Process1: ndbapi
NodeId1: 52
Process2:
NodeId2:
Level: Default
Comment:
1101 rows in set (0.09 sec)
As you can see, the output from this get command is quite long (and the number of rows generated
increases with the number of nodes in the cluster.) However, it is possible to filter the output so that you
can view only the attribute or attributes in which you are interested. This can be done by using a commaseparated list of one or more filter specifications. A filter specification is defined as shown here (condensed
from that given at the beginning of this section, but effectively the same):
[attribute_name][:process_name[:process_id]]
Filtering can be applied per attribute, per process type, and per process instance. We now provide some
examples illustrating the use of such filters.
To obtain the value of a given attribute for all processes to which it applies in the cluster, you need only use
the name of the attribute as a filter. For example, to obtain the HostName of all processes in the cluster
named mycluster, you can execute the command shown here:
mcm> get HostName mycluster;
+----------+----------+----------+---------+----------+---------+-------+-----------+
| Name
| Value
| Process1 | NodeId1 | Process2 | NodeId2 | Level | Comment
|
+----------+----------+----------+---------+----------+---------+-------+-----------+
| HostName | flundra | ndbd
| 1
|
|
|
| Read only |
| HostName | tonfisk | ndbd
| 2
|
|
|
| Read only |
| HostName | grindval | ndb_mgmd | 49
|
|
|
| Read only |
| HostName | haj
| mysqld
| 50
|
|
|
| Read only |
| HostName | torsk
| mysqld
| 51
|
|
|
| Read only |
+----------+----------+----------+---------+----------+---------+-------+-----------+
89
The get Command
5 rows in set (0.04 sec)
To obtain the value of a given attribute for all processes of a given type, you can specify a filter of the
form attribute_name:process-type. The following command retrieves the HostName of all ndbd
processes (only) in the cluster mycluster:
mcm> get HostName:ndbd mycluster;
+----------+---------+----------+------+----------+------+-------+----------+
| Name
| Value
| Process1 | Id1 | Process2 | Id2 | Level | Comment |
+----------+---------+----------+------+----------+------+-------+----------+
| HostName | flundra | ndbd
| 1
|
|
|
| Readonly |
| HostName | tonfisk | ndbd
| 2
|
|
|
| Readonly |
+----------+---------+----------+------+----------+------+-------+----------+
2 rows in set (0.12 sec)
To retrieve the value of a given attribute for a particular instance of a process, you can use a filter that
takes the form attribute_name:process-type:process_id. For example, you can use the following
command to obtain the hostname for the process having 2 as its process ID:
mcm> get HostName:ndbd:2 mycluster;
+----------+---------+----------+------+----------+------+-------+----------+
| Name
| Value
| Process1 | Id1 | Process2 | Id2 | Level | Comment |
+----------+---------+----------+------+----------+------+-------+----------+
| HostName | tonfisk | ndbd
| 2
|
|
|
| Readonly |
+----------+---------+----------+------+----------+------+-------+----------+
1 row in set (1.67 sec)
When filtering for a given attribute on the instance level, you must include the process type. Failure to do
so fails with an error, as shown here:
mcm> get HostName:3 mycluster;
ERROR 7002 (00MGR): Illegal process type 3 for cluster mycluster
You can obtain information about multiple attributes within a single get command by specifying a list of
filters, separated by commas. Each filter in the list must be a complete, valid filter. The command shown
here retrieves the HostName and DataDir for all processes in mycluster:
mcm> get HostName,DataDir mycluster;
+----------+--------------+----------+---------+----------+---------+-------+-----------+
| Name
| Value
| Process1 | NodeId1 | Process2 | NodeId2 | Level | Comment
|
+----------+--------------+----------+---------+----------+---------+-------+-----------+
| DataDir | /opt/c1data | ndbd
| 1
|
|
|
|
|
| HostName | flundra
| ndbd
| 1
|
|
|
| Read only |
| DataDir | /opt/c2data | ndbd
| 2
|
|
|
|
|
| HostName | tonfisk
| ndbd
| 2
|
|
|
| Read only |
| DataDir | /opt/c49data | ndb_mgmd | 49
|
|
|
|
|
| HostName | grindval
| ndb_mgmd | 49
|
|
|
| Read only |
| datadir | /opt/c50data | mysqld
| 50
|
|
|
|
|
| HostName | haj
| mysqld
| 50
|
|
|
| Read only |
| datadir | /opt/c51data | mysqld
| 51
|
|
|
|
|
| HostName | torsk
| mysqld
| 51
|
|
|
| Read only |
+----------+--------------+----------+---------+----------+---------+-------+-----------+
10 rows in set (0.05 sec)
To retrieve the values of HostName and DataDir for only the data nodes in mycluster, you can use the
get command shown here:
90
The get Command
mcm> get HostName:ndbd,DataDir:ndbd mycluster;
+----------+-------------+----------+-----+----------+-----+-------+-----------+
| Name
| Value
| Process1 | Id1 | Process2 | Id2 | Level | Comment
|
+----------+-------------+----------+-----+----------+-----+-------+-----------+
| DataDir | /opt/c2data | ndbd
| 1
|
|
|
|
|
| HostName | tonfisk
| ndbd
| 1
|
|
|
| Read only |
| DataDir | /opt/c3data | ndbd
| 2
|
|
|
|
|
| HostName | flundra
| ndbd
| 2
|
|
|
| Read only |
+----------+-------------+----------+-----+----------+-----+-------+-----------+
4 rows in set (1.36 sec)
In the example just shown, each filter includes a process type specifier. If you omit this specifier from one
of the filters, you obtain a result that you might not expect:
mcm> get HostName,DataDir:ndbd mycluster;
+----------+-------------+----------+-----+----------+-----+-------+-----------+
| Name
| Value
| Process1 | Id1 | Process2 | Id2 | Level | Comment
|
+----------+-------------+----------+-----+----------+-----+-------+-----------+
| HostName | grindval
| ndb_mgmd | 49 |
|
|
| Read only |
| DataDir | /opt/c2data | ndbd
| 1
|
|
|
|
|
| HostName | tonfisk
| ndbd
| 1
|
|
|
| Read only |
| DataDir | /opt/c3data | ndbd
| 2
|
|
|
|
|
| HostName | flundra
| ndbd
| 2
|
|
|
| Read only |
| HostName | haj
| mysqld
| 50 |
|
|
| Read only |
| HostName | torsk
| mysqld
| 51 |
|
|
| Read only |
+----------+-------------+----------+-----+----------+-----+-------+-----------+
6 rows in set (0.58 sec)
The filter list HostName,DataDir:ndbd is perfectly valid. However, it actually consists of the filters
HostName and DataDir:ndbd—in other words, it means “the HostName for all processes, and the
DataDir for ndbd processes”.
Suppose you wish to obtain the values for HostName for just the ndb_mgmd and mysqld processes in
mycluster. You might be tempted to try using something like HostName:ndb_mgmd,mysqld for the
filter list, but this does not work, as you can see here:
mcm> get HostName:ndb_mgmd,mysqld mycluster;
ERROR 6003 (00MGR): No such config variable mysqld for process
This is due to the fact that each filter in the filter list must be a valid filter, and must include an attribute
name. (In the filter list just shown, MySQL Cluster Manager tries to interpret the first string following the
comma as an attribute name.) The correct filter list to use in a get command for retrieving the HostName
for the ndb_mgmd and mysqld processes in mycluster is shown in this example:
mcm> get HostName:ndb_mgmd,HostName:mysqld mycluster;
+----------+----------+----------+------+----------+------+-------+-----------+
| Name
| Value
| Process1 | Id1 | Process2 | Id2 | Level | Comment
|
+----------+----------+----------+------+----------+------+-------+-----------+
| HostName | grindval | ndb_mgmd | 49
|
|
|
| Read only |
| HostName | haj
| mysqld
| 50
|
|
|
| Read only |
| HostName | torsk
| mysqld
| 51
|
|
|
| Read only |
+----------+----------+----------+------+----------+------+-------+-----------+
2 rows in set (0.21 sec)
It is also possible to obtain a list of attributes and their values for a given process type or instance of a
process. For a given process type, use a filter having the form :process_name. For example, to retrieve
all non-default attributes applying to ndbd processes in a cluster named mycluster, you can use the filter
:ndbd, as shown here:
91
The get Command
mcm> get :ndbd mycluster;
+--------------+-------------+----------+-----+----------+-----+-------+-----------+
| Name
| Value
| Process1 | Id1 | Process2 | Id2 | Level | Comment
|
+--------------+-------------+----------+-----+----------+-----+-------+-----------+
| DataDir
| /opt/c2data | ndbd
| 1
|
|
|
|
|
| HostName
| tonfisk
| ndbd
| 1
|
|
|
| Read only |
| NodeId
| 1
| ndbd
| 1
|
|
|
| Read only |
| DataDir
| /opt/c3data | ndbd
| 2
|
|
|
|
|
| HostName
| flundra
| ndbd
| 2
|
|
|
| Read only |
| NodeId
| 2
| ndbd
| 2
|
|
|
| Read only |
+--------------+-------------+----------+-----+----------+-----+-------+-----------+
6 rows in set (0.77 sec)
(The example just shown assumes that no attributes are set to non-default values.)
To get a list of all non-default attributes for a single instance of a process, use a filter having the form
:process_name:process_id, as shown in this example, which retrieves all non-default attributes for
the ndbd process having 2 as its process ID:
mcm> get :ndbd:2 mycluster;
+--------------+-------------+----------+-----+----------+-----+-------+-----------+
| Name
| Value
| Process1 | Id1 | Process2 | Id2 | Level | Comment
|
+--------------+-------------+----------+-----+----------+-----+-------+-----------+
| DataDir
| /opt/c2data | ndbd
| 2
|
|
|
|
|
| HostName
| flundra
| ndbd
| 2
|
|
|
| Read only |
| NodeId
| 2
| ndbd
| 2
|
|
|
| Read only |
+--------------+-------------+----------+-----+----------+-----+-------+-----------+
4 rows in set (0.32 sec)
As mentioned previously, you must specify the process type as well as the process ID. If you specify an
invalid combination of process type and process ID, the get command fails with an error, as shown here:
mcm> get :ndbd:4 mycluster;
ERROR 7004 (00MGR): Illegal process type ndbd for id 4
If you try to obtain values for an attribute which you know is supported by your MySQL Cluster version,
but the result is empty, this almost certainly means that it is a default attribute which either has not been
changed since the cluster was created or has been reset. In order to view default attributes using get, you
must execute the command using the --include-defaults option (short form: -d).
Suppose you want to see how much DataMemory is configured for the ndbd processes in the cluster
named mycluster, and you execute what appears to be the correct get command, but an empty result is
returned, as shown shown here:
mcm> get DataMemory:ndbd mycluster;
Empty set (1.19 sec)
This means that the DataMemory attribute has its default value for all data nodes in the cluster. If you do
not recall what this value is, you can determine it easily by repeating the same command with the addition
of the --include-defaults (-d) option:
mcm> get --include-defaults DataMemory:ndbd mycluster;
+------------+----------+----------+-----+----------+-----+---------+---------+
| Name
| Value
| Process1 | Id1 | Process2 | Id2 | Level
| Comment |
+------------+----------+----------+-----+----------+-----+---------+---------+
| DataMemory | 83886080 | ndbd
| 1
|
|
| Default |
|
| DataMemory | 83886080 | ndbd
| 2
|
|
| Default |
|
+------------+----------+----------+-----+----------+-----+---------+---------+
2 rows in set (0.62 sec)
92
The get Command
Now suppose that you increase the DataMemory to 500 megabytes per data node, then repeat the get
command to verify the new value:
mcm> set DataMemory:ndbd=500M mycluster;
+-----------------------------------+
| Command result
|
+-----------------------------------+
| Cluster reconfigured successfully |
+-----------------------------------+
1 row in set (7.77 sec)
mcm> get --include-defaults DataMemory:ndbd mycluster;
+------------+-------+----------+-----+----------+-----+---------+---------+
| Name
| Value | Process1 | Id1 | Process2 | Id2 | Level
| Comment |
+------------+-------+----------+-----+----------+-----+---------+---------+
| DataMemory | 500M | ndbd
| 1
|
|
| Process |
|
| DataMemory | 500M | ndbd
| 2
|
|
| Process |
|
+------------+-------+----------+-----+----------+-----+---------+---------+
2 rows in set (1.46 sec)
You can see that, not only has the Value column in the get command output been updated to the new
value, but the Level column has also been updated from Default to Process. This means that you no
longer need the --include-defaults option to view this attribute, as shown here:
mcm> get DataMemory:ndbd mycluster;
+------------+-------+----------+-----+----------+-----+---------+---------+
| Name
| Value | Process1 | Id1 | Process2 | Id2 | Level
| Comment |
+------------+-------+----------+-----+----------+-----+---------+---------+
| DataMemory | 500M | ndbd
| 1
|
|
| Process |
|
| DataMemory | 500M | ndbd
| 2
|
|
| Process |
|
+------------+-------+----------+-----+----------+-----+---------+---------+
2 rows in set (0.63 sec)
However, if you reset DataMemory (also on the process level), this is no longer the case. Then,
DataMemory once again assumes its default value, after which you must use the --include-defaults
option to retrieve it, as shown in this example:
mcm> reset DataMemory:ndbd mycluster;
+-----------------------------------+
| Command result
|
+-----------------------------------+
| Cluster reconfigured successfully |
+-----------------------------------+
1 row in set (7.65 sec)
mcm> get DataMemory:ndbd mycluster;
Empty set (1.76 sec)
mcm> get --include-defaults DataMemory:ndbd mycluster;
+------------+----------+----------+-----+----------+-----+---------+---------+
| Name
| Value
| Process1 | Id1 | Process2 | Id2 | Level
| Comment |
+------------+----------+----------+-----+----------+-----+---------+---------+
| DataMemory | 83886080 | ndbd
| 1
|
|
| Default |
|
| DataMemory | 83886080 | ndbd
| 2
|
|
| Default |
|
+------------+----------+----------+-----+----------+-----+---------+---------+
2 rows in set (1.01 sec)
For more information about these commands, see Section 4.5.3, “The set Command”, and Section 4.5.2,
“The reset Command”.
The get command does not normally display configuration attributes applying to TCP, SHM, or SCI
connections. However, such attributes can be set in the MySQL Cluster Manager client (using the set
93
The reset Command
command); and once they have been set, they are displayed by applicable get commands. See Setting
TCP Connection Attributes, which provides an example of this.
4.5.2 The reset Command
reset filter_specification_list cluster_name
filter_specification_list:
filter_specification[,filter_specification][,...]
filter_specification:
attribute_name[:process_specification][+process_specification]]
process_specification:
process_name[:process_id]
This command resets an attribute to its default value. Attributes can be set on either the process level
or instance level. To reset an attribute on the process level, use a filter specification having the form
attribute_name:process_name, where attribute_name is the name of the attribute to be reset,
and process_name is the name of a MySQL Cluster process. To reset a configuration attribute on the
instance level, use a filter specification of the form attribute_name:process_name:process_id,
where process_id is the process ID.
You cannot issue a reset command that resets all values for a given configuration attribute regardless of
process type; each reset command must specify a process type or instance of a process. Otherwise, the
command fails, as shown here:
mcm> reset DataMemory mycluster;
ERROR 3 (00MGR): Illegal syntax
You also cannot revert all configuration attributes for a given process type or instance of a process using
a single filter specification; you must always include the name of the attribute to be reset. Otherwise, the
reset command fails, as shown here:
mcm> reset :ndbd mycluster;
ERROR 3 (00MGR): Illegal syntax
mcm> reset :ndbd:3 mycluster;
ERROR 3 (00MGR): Illegal syntax
Suppose that the data memory for all ndbd processes in the cluster named mycluster has been set to
500 MB, as shown in the output of this get command:
mcm> get DataMemory mycluster;
+------------+-------+----------+-----+----------+-----+---------+---------+
| Name
| Value | Process1 | Id1 | Process2 | Id2 | Level
| Comment |
+------------+-------+----------+-----+----------+-----+---------+---------+
| DataMemory | 500M | ndbd
| 2
|
|
| Process |
|
| DataMemory | 500M | ndbd
| 3
|
|
| Process |
|
+------------+-------+----------+-----+----------+-----+---------+---------+
2 rows in set (1.91 sec)
We can see from the entries in the Level column that the DataMemory setting for both ndbd processes
applies on the process level. A process-level setting cannot be reset on the instance level, as shown here:
mcm> reset DataMemory:ndbd:2 mycluster;
94
The reset Command
ERROR 6010 (00MGR): No matching user defined setting was
found for config attribute DataMemory
mcm> reset DataMemory:ndbd:3 mycluster;
ERROR 6010 (00MGR): No matching user defined setting was
found for config attribute DataMemory
The following reset command also does not work, although you might think that it would do so, since it
attempts to reset the attribute's value for both ndbd processes:
mcm> reset DataMemory:ndbd:2,DataMemory:ndbd:3 mycluster;
ERROR 6010 (00MGR): No matching user defined setting was
found for config attribute DataMemory
The previous command fails because MySQL Cluster Manager regards this as an attempt to apply two
instance-level configuration changes. Because the DataMemory setting is a process-level setting, you
must instead reset DataMemory to its default value on the process level; you can do this by using the filter
specification DataMemory:ndbd in the reset command, as shown here:
mcm> reset DataMemory:ndbd mycluster;
+-----------------------------------+
| Command result
|
+-----------------------------------+
| Cluster reconfigured successfully |
+-----------------------------------+
1 row in set (6.16 sec)
If you execute the same get command as shown previously, the result is now empty:
mcm> get DataMemory mycluster;
Empty set (0.74 sec)
This is because the get command by default does not report default values. To retrieve the DataMemory
values after resetting them, you must invoke get using the --include-defaults (short form: -d)
option:
mcm> get --include-defaults DataMemory mycluster;
+------------+----------+----------+-----+----------+-----+---------+---------+
| Name
| Value
| Process1 | Id1 | Process2 | Id2 | Level
| Comment |
+------------+----------+----------+-----+----------+-----+---------+---------+
| DataMemory | 83886080 | ndbd
| 2
|
|
| Default |
|
| DataMemory | 83886080 | ndbd
| 3
|
|
| Default |
|
+------------+----------+----------+-----+----------+-----+---------+---------+
2 rows in set (1.21 sec)
The DataMemory values are now included in the output, and are marked with the word Default in the
Comments column.
Now suppose that the mysqld configuration attribute wait_timeout for the mysqld process having the
ID 4 in the cluster named mycluster has previously been set to the value 200 as shown here, and that
no other changes have been to this attribute:
mcm> set wait_timeout:mysqld:4=200 mycluster;
+-----------------------------------+
| Command result
|
+-----------------------------------+
| Cluster reconfigured successfully |
95
The reset Command
+-----------------------------------+
1 row in set (7.78 sec)
mcm> get -d wait_timeout:mysqld:4 mycluster;
+--------------+-------+----------+-----+----------+-----+-------+---------+
| Name
| Value | Process1 | Id1 | Process2 | Id2 | Level | Comment |
+--------------+-------+----------+-----+----------+-----+-------+---------+
| wait_timeout | 200
| mysqld
| 4
|
|
|
|
|
+--------------+-------+----------+-----+----------+-----+-------+---------+
1 row in set (0.98 sec)
Because the Level column is empty, we know that this setting applies on the instance level. If you try to
reset it on the process level, the attempt fails, as shown here:
mcm> reset wait_timeout:mysqld mycluster2;
ERROR 6010 (00MGR): No matching user defined setting was
found for config attribute wait_timeout
If you wish to reset this attribute to its default value, you must use the reset command with the instancelevel filter specification wait_timeout:mysqld:4, as shown here:
mcm> reset wait_timeout:mysqld:4 mycluster;
+-----------------------------------+
| Command result
|
+-----------------------------------+
| Cluster reconfigured successfully |
+-----------------------------------+
1 row in set (7.61 sec)
Once you have reset wait_timeout, it no longer appears in the output of the earlier get command:
mcm> get wait_timeout:mysqld mycluster;
Empty set (1.42 sec)
This is because the default behavior of the get command is to display only those values that have been
set either by the MySQL Cluster Manager or by the user. Since wait_timeout has been allowed to revert
to its default value, you must use the --include-defaults (short form: -d) option to retrieve it, as
shown here:
mcm> get -d wait_timeout:mysqld mycluster;
+--------------+-------+----------+-----+----------+-----+---------+---------+
| Name
| Value | Process1 | Id1 | Process2 | Id2 | Level
| Comment |
+--------------+-------+----------+-----+----------+-----+---------+---------+
| wait_timeout | 28800 | mysqld
| 4
|
|
| Default |
|
+--------------+-------+----------+-----+----------+-----+---------+---------+
1 row in set (1.66 sec)
Now consider a situation in which process-level and instance-level settings have been made to a
configuration attribute; in this example, we use IndexMemory. First, verify that IndexMemory is set to its
default value for all data node processes (in this case, there are two of them):
mcm> get -d IndexMemory mycluster;
+-------------+----------+----------+-----+----------+-----+---------+---------+
| Name
| Value
| Process1 | Id1 | Process2 | Id2 | Level
| Comment |
+-------------+----------+----------+-----+----------+-----+---------+---------+
| IndexMemory | 18874368 | ndbd
| 2
|
|
| Default |
|
| IndexMemory | 18874368 | ndbd
| 3
|
|
| Default |
|
+-------------+----------+----------+-----+----------+-----+---------+---------+
2 rows in set (1.24 sec)
96
The reset Command
Now apply both a process-level change and an instance-level change to this attribute. You can do this with
a single set command, as shown here:
mcm> set IndexMemory:ndbd=500M,IndexMemory:ndbd:3=750M mycluster;
+-----------------------------------+
| Command result
|
+-----------------------------------+
| Cluster reconfigured successfully |
+-----------------------------------+
1 row in set (7.29 sec)
Because the process-level change was specified first, it is overridden for the ndbd process by the
instance-level change specified second. The output from the following get command confirms that this is
the case:
mcm> get IndexMemory mycluster;
+-------------+-------+----------+-----+----------+-----+---------+---------+
| Name
| Value | Process1 | Id1 | Process2 | Id2 | Level
| Comment |
+-------------+-------+----------+-----+----------+-----+---------+---------+
| IndexMemory | 500M | ndbd
| 2
|
|
| Process |
|
| IndexMemory | 750M | ndbd
| 3
|
|
|
|
|
+-------------+-------+----------+-----+----------+-----+---------+---------+
2 rows in set (0.85 sec)
If the instance-level IndexMemory setting for the ndbd process with process ID 3 is reset, the process-level
setting still applies, as shown here:
mcm> reset IndexMemory:ndbd:3 mycluster;
+-----------------------------------+
| Command result
|
+-----------------------------------+
| Cluster reconfigured successfully |
+-----------------------------------+
1 row in set (6.41 sec)
mcm> get IndexMemory mycluster;
+-------------+-------+----------+-----+----------+-----+---------+---------+
| Name
| Value | Process1 | Id1 | Process2 | Id2 | Level
| Comment |
+-------------+-------+----------+-----+----------+-----+---------+---------+
| IndexMemory | 500M | ndbd
| 2
|
|
| Process |
|
| IndexMemory | 500M | ndbd
| 3
|
|
| Process |
|
+-------------+-------+----------+-----+----------+-----+---------+---------+
2 rows in set (1.09 sec)
Now, re-apply the instance-level IndexMemory setting, and verify using get that it has taken effect:
mcm> set IndexMemory:ndbd:3=750M mycluster;
+-----------------------------------+
| Command result
|
+-----------------------------------+
| Cluster reconfigured successfully |
+-----------------------------------+
1 row in set (6.79 sec)
mcm> get IndexMemory mycluster;
+-------------+-------+----------+-----+----------+-----+---------+---------+
| Name
| Value | Process1 | Id1 | Process2 | Id2 | Level
| Comment |
+-------------+-------+----------+-----+----------+-----+---------+---------+
| IndexMemory | 500M | ndbd
| 2
|
|
| Process |
|
| IndexMemory | 750M | ndbd
| 3
|
|
|
|
|
+-------------+-------+----------+-----+----------+-----+---------+---------+
97
The reset Command
2 rows in set (1.76 sec)
If you reset the process-level setting, the instance-level setting remains, and only the ndbd process having
process ID 2 has its IndexMemory reset to the default value; the instance-level setting remains in effect,
as you can see from the following sequence of commands:
mcm> reset IndexMemory:ndbd mycluster;
+-----------------------------------+
| Command result
|
+-----------------------------------+
| Cluster reconfigured successfully |
+-----------------------------------+
1 row in set (7.36 sec)
mcm> get -d IndexMemory mycluster;
+-------------+----------+----------+-----+----------+-----+---------+---------+
| Name
| Value
| Process1 | Id1 | Process2 | Id2 | Level
| Comment |
+-------------+----------+----------+-----+----------+-----+---------+---------+
| IndexMemory | 18874368 | ndbd
| 2
|
|
| Default |
|
| IndexMemory | 750M
| ndbd
| 3
|
|
|
|
|
+-------------+----------+----------+-----+----------+-----+---------+---------+
2 rows in set (0.10 sec)
Note
If the order of the specifiers in the original command that set IndexMemory had
been reversed as IndexMemory:ndbd:3=750M,IndexMemory:ndbd=500M,
the instance-level change would have been overridden by the process-level
change, and the resulting IndexMemory setting for both ndbd processes would
be 500M. As discussed elsewhere, a process-level setting made after an instancelevel setting that affects the same process completely removes the instance-level
setting; the instance-level setting is not preserved, and resetting the attribute on
the process level merely restores the default setting for all processes of that type.
See Section 4.5, “MySQL Cluster Manager Configuration Commands”, for more
information.
Resetting TCP Connection Attributes.
Certain configuration attributes, such as those relating to TCP
connections, apply to connections between processes rather than to individual processes or individual
process types. As shown elsewhere (see Setting TCP Connection Attributes), when you set such an
attribute on the process level using MySQL Cluster Manager, this means that the attribute applies to all
connections between the two types of processes specified when issuing the set command. It is also
possible to set such an attribute on the instance level, in which case it applies only to a single connection
between two process instances.
Similarly, it is possible to reset such an attribute on either the process or instance level, depending on the
level or levels at which it was set. In either case, an extended form of the process specifier is required,
just as it is when setting an attribute that applies to a connection between processes. Assume that
the SendBufferMemory attribute has previously been set for all connections between the two ndbd
processes and the two mysqld processes that are found in a MySQL Cluster named mycluster2, as
shown in the output of this get command:
mcm> get SendBufferMemory mycluster2;
+------------------+-------+----------+-----+----------+-----+---------+---------+
| Name
| Value | Process1 | Id1 | Process2 | Id2 | Level
| Comment |
+------------------+-------+----------+-----+----------+-----+---------+---------+
| SendBufferMemory | 4M
| ndbd
| 2
| mysqld
| 4
| Process |
|
| SendBufferMemory | 4M
| ndbd
| 2
| mysqld
| 5
| Process |
|
| SendBufferMemory | 4M
| ndbd
| 3
| mysqld
| 4
| Process |
|
98
The set Command
| SendBufferMemory | 8M
| ndbd
| 3
| mysqld
| 5
|
|
|
+------------------+-------+----------+-----+----------+-----+---------+---------+
4 rows in set (0.59 sec)
Suppose that you wish to reset SendBufferMemory only for the connection between the ndbd process
having process ID 3 and the mysqld process having process ID 5. The SendBufferMemory setting that
applies to this connection is specified on the instance level, as you can see because the Level column
value corresponding to this connection is empty; this means that it is possible to reset this value on the
instance level. You can do this using the reset command shown here:
mcm> reset SendBufferMemory:ndbd:3+mysqld:5 mycluster2;
+-----------------------------------+
| Command result
|
+-----------------------------------+
| Cluster reconfigured successfully |
+-----------------------------------+
1 row in set (7.03 sec)
You can verify that the attribute was reset using the get command. However, as noted previously, once
the instance-level setting has been removed, the process-level setting for this attribute again takes effect,
so that the same setting applies to all connections between ndbd and mysqld processes, as shown here:
mcm> get SendBufferMemory mycluster2;
+------------------+-------+----------+-----+----------+-----+---------+---------+
| Name
| Value | Process1 | Id1 | Process2 | Id2 | Level
| Comment |
+------------------+-------+----------+-----+----------+-----+---------+---------+
| SendBufferMemory | 4M
| ndbd
| 2
| mysqld
| 4
| Process |
|
| SendBufferMemory | 4M
| ndbd
| 2
| mysqld
| 5
| Process |
|
| SendBufferMemory | 4M
| ndbd
| 3
| mysqld
| 4
| Process |
|
| SendBufferMemory | 4M
| ndbd
| 3
| mysqld
| 5
| Process |
|
+------------------+-------+----------+-----+----------+-----+---------+---------+
4 rows in set (0.87 sec)
To reset this attribute on the process level, you can use the following reset command:
mcm> reset SendBufferMemory:ndbd+mysqld mycluster2;
+-----------------------------------+
| Command result
|
+-----------------------------------+
| Cluster reconfigured successfully |
+-----------------------------------+
1 row in set (8.01 sec)
You can verify that the attribute has been reset for all connection between ndbd processes and mysqld
processes, by using the get command, as shown here:
mcm> get -d SendBufferMemory mycluster2;
Empty set (1.39 sec)
As noted elsewhere in this manual (see Section 4.5.1, “The get Command”), the empty result set is to
be expected in this case, even when get is invoked using the --include-defaults (or -d) option,
because the MySQL Cluster Manager client does not display attributes that appear in the [tcp], [shm],
or [sci] sections of the config.ini configuration file if they have not been explicitly set by the user.
4.5.3 The set Command
set attribute_assignment_list cluster_name
99
The set Command
attribute_assignment_list:
attribute_assignment[,attribute_assignment][,...]
attribute_assignment:
attribute_name:process_specification[+process_specification][=value]
process_specification:
process_name[:process_id]
This command is used to set values for one or more configuration attributes. Attributes can be set on either
the process level or instance level.
set commands are executed whether or not the cluster has been started. In a cluster that is not running,
the MySQL Cluster Manager merely updates the configuration files. However, in a running cluster, the
MySQL Cluster Manager in addition automatically performs any node restarts or rolling restarts (see
Performing a Rolling Restart of a MySQL Cluster) that are required to cause the attribute changes to take
effect. However, since restart operations—particularly rolling restarts, where each process in the cluster
must be stopped and restarted in turn—can take a great deal of time, it is preferable to make configuration
changes before starting the cluster and putting it into use.
To set an attribute on the process level, use a set statement that contains an attribute assignment having
the form attribute_name:process_name=value.
For example, to set DataMemory to 500 MB on the ndbd process level, so that the new value applies
to all ndbd processes in the cluster, you can issue a set command containing the attribute assignment
DataMemory:ndbd=500M, as shown here:
mcm> set DataMemory:ndbd=500M mycluster;
+-----------------------------------+
| Command result
|
+-----------------------------------+
| Cluster reconfigured successfully |
+-----------------------------------+
1 row in set (5.68 sec)
To verify that the new setting is being used, you can issue the following get command:
mcm> get DataMemory mycluster;
+------------+-------+----------+------+----------+------+---------+---------+
| Name
| Value | Process1 | Id1 | Process2 | Id2 | Level
| Comment |
+------------+-------+----------+------+----------+------+---------+---------+
| DataMemory | 500M | ndbd
| 1
|
|
| Process |
|
| DataMemory | 500M | ndbd
| 2
|
|
| Process |
|
+------------+-------+----------+------+----------+------+---------+---------+
2 rows in set (0.79 sec)
Note
For more information about this command, see Section 4.5.1, “The get Command”.
To set an attribute for a specific process instance, include the process ID in the attribute assignment; the
form of such an attribute assignment is attribute_name:process_name:process_id=value. For
example, to set the wait_timeout attribute for the mysqld process that has process ID 50 to 200, you
would issue a set command that contains the attribute assignment wait_timeout:mysqld:51=200,
like this:
100
The set Command
mcm> set wait_timeout:mysqld:50=200 mycluster;
+-----------------------------------+
| Command result
|
+-----------------------------------+
| Cluster reconfigured successfully |
+-----------------------------------+
1 row in set (6.18 sec)
You can verify that the setting has taken effect using an applicable get command:
mcm> get wait_timeout mycluster;
+--------------+-------+----------+------+----------+------+-------+---------+
| Name
| Value | Process1 | Id1 | Process2 | Id2 | Level | Comment |
+--------------+-------+----------+------+----------+------+-------+---------+
| wait_timeout | 200
| mysqld
| 50
|
|
|
|
|
+--------------+-------+----------+------+----------+------+-------+---------+
1 row in set (0.50 sec)
Attributes which are marked Read only cannot be set. Attempting to do so fails with an error, as shown
here:
mcm> get :ndbd mycluster;
+--------------+-------------+----------+-----+----------+-----+-------+-----------+
| Name
| Value
| Process1 | Id1 | Process2 | Id2 | Level | Comment
|
+--------------+-------------+----------+-----+----------+-----+-------+-----------+
| DataDir
| /opt/c2data | ndbd
| 1
|
|
|
|
|
| HostName
| tonfisk
| ndbd
| 1
|
|
|
| Read only |
| NodeId
| 2
| ndbd
| 1
|
|
|
| Read only |
| DataDir
| /opt/c3data | ndbd
| 2
|
|
|
|
|
| HostName
| grindval
| ndbd
| 2
|
|
|
| Read only |
| NodeId
| 3
| ndbd
| 2
|
|
|
| Read only |
+--------------+-------------+----------+-----+----------+-----+-------+-----------+
6 rows in set (1.42 sec)
mcm> set HostName:ndbd:1=lax mycluster;
ERROR 6008 (00MGR): Config attribute HostName is read only and cannot be changed
However, you can set mandatory attributes, such as in the example shown previously in this section where
the DataDir configuration attribute was set to a user-defined value.
Warning
The mandatory NoOfReplicas attribute must be set on the process level only.
Attempting to set it on the instance level may leave the cluster, the MySQL Cluster
Manager, or both in an unusable configuration.
Unlike the case with the get command, you cannot issue a set acting on a “global” scope—that is, you
cannot, in a single attribute assignment, set a single value for an attribute such that the new attribute value
applies to all processes regardless of process type, even if the attribute having that name can be applied to
all process types. Nor can you specify multiple process types in a single attribute assignment. Attempting
to do either of these things causes an error, as shown here:
mcm> set DataDir=/var/cluster-data mycluster;
ERROR 3 (00MGR): Illegal syntax
mcm> set DataDir:ndb_mgmd,ndbd,mysqld=/var/cluster-data mycluster;
ERROR 3 (00MGR): Illegal syntax
Instead, you must use a process-level attribute assgnment for each process type. However, you are
not necessarily required to issue a separate set command for each process type. Instead, you can also
101
The set Command
make multiple attribute assignments in a single set command, supplying the assignments as a commaseparated list. This set command assigns /var/cdata as the data directory (DataDir) for all MySQL
Cluster processes in the cluster named mycluster:
mcm> set DataDir:ndb_mgmd=/var/cdata, \
DataDir:ndbd=/var/cdata, \
DataDir:mysqld=/var/cdata mycluster;
+-----------------------------------+
| Command result
|
+-----------------------------------+
| Cluster reconfigured successfully |
+-----------------------------------+
1 row in set (7.66 sec)
mcm> get DataDir mycluster;
mcm> get DataDir mycluster;
+---------+------------+----------+---------+----------+---------+-------+---------+
| Name
| Value
| Process1 | NodeId1 | Process2 | NodeId2 | Level | Comment |
+---------+------------+----------+---------+----------+---------+-------+---------+
| DataDir | /var/cdata | ndbmtd
| 1
|
|
|
|
|
| DataDir | /var/cdata | ndbmtd
| 2
|
|
|
|
|
| DataDir | /var/cdata | ndb_mgmd | 49
|
|
|
|
|
| datadir | /var/cdata | mysqld
| 50
|
|
|
|
|
| datadir | /var/cdata | mysqld
| 51
|
|
|
|
|
+---------+------------+----------+---------+----------+---------+-------+---------+
5 rows in set (0.08 sec)
As you can see from the get command just shown, the attribute assignments were successful, and took
effect on the process level.
Note
In MySQL Cluster Manager, configuration attribute names are not case-sensitive.
See Case Sensitivity in String Searches for more information about case-sensitivity
issues in MySQL Cluster Manager.
Similarly, you cannot reference multiple process IDs in a single attribute assignment, even if they are
processes of the same type; the following command does not work:
mcm> set DataMemory:ndbd:1,2=750M mycluster;
ERROR 3 (00MGR): Illegal syntax
Instead, you would need to use the following command:
mcm> set DataMemory:ndbd:1=750M,DataMemory:ndbd:2=750M mycluster;
+-----------------------------------+
| Command result
|
+-----------------------------------+
| Cluster reconfigured successfully |
+-----------------------------------+
1 row in set (7.70 sec)
(Of course, if these are the only two data nodes in mycluster, then the command set
DataMemory:ndbd=750M mycluster also accomplishes the same task.)
Note
A few configuration attributes apply to connections between processes and so
require you to refer to both processes in the course of setting them. In such cases,
102
The set Command
you must use a special process specification syntax; see Setting TCP Connection
Attributes, for information about how this is done.
You also cannot set values for multiple attributes in a single attribute assignment; this means that the
following commands do not work:
mcm> set UndoDataBuffer=32M,UndoIndexBuffer=8M:ndbd mycluster;
ERROR 3 (00MGR): Illegal syntax
mcm> set DataMemory,IndexMemory:ndbd=1G mycluster;
ERROR 3 (00MGR): Illegal syntax
However, if you write a complete and valid attribute assignment for each attribute whose value you wish to
update, you can rewrite these two commands so that they execute successfully, as shown here:
mcm> set UndoDataBuffer:ndbd=32M,UndoIndexBuffer:ndbd=8M mycluster;
+-----------------------------------+
| Command result
|
+-----------------------------------+
| Cluster reconfigured successfully |
+-----------------------------------+
1 row in set (6.62 sec)
mcm> set DataMemory:ndbd=1G,IndexMemory:ndbd=1G mycluster;
+-----------------------------------+
| Command result
|
+-----------------------------------+
| Cluster reconfigured successfully |
+-----------------------------------+
1 row in set (7.04 sec)
In fact, there is no reason that you cannot perform all four assignments in a single set command, using a
list of four attribute assignments, like this:
mcm> set UndoDataBuffer:ndbd=32M,UndoIndexBuffer:ndbd=8M, \
DataMemory:ndbd=1G, IndexMemory:ndbd=1G mycluster;
+-----------------------------------+
| Command result
|
+-----------------------------------+
| Cluster reconfigured successfully |
+-----------------------------------+
1 row in set (6.24 sec)
However, it a good idea not to perform too many attribute assignments in any single set command, since
this makes it more difficult to spot errors.
On Windows, when setting attributes whose values contain paths (such as DataDir) you must replace
any backslash characters in the path with forward slashes. Suppose that you want to use C:\temp
\node50 afor the tmpdir attribute of the mysqld process having node ID 50 in a MySQL Cluster named
mycluster which is running on Windows. The original value for this attribute can be seen using the
appropriate get command:
mcm> get tmpdir mycluster;
+--------+----------------+----------+-----+----------+-----+-------+---------+
| Name
| Value
| Process1 | Id1 | Process2 | Id2 | Level | Comment |
+--------+----------------+----------+-----+----------+-----+-------+---------+
| tmpdir | c:\c50data\tmp | mysqld
| 50 |
|
|
|
|
+--------+----------------+----------+-----+----------+-----+-------+---------+
103
The set Command
1 row in set (0.22 sec)
The correct set command to make the desired configuration change is shown here:
mcm> set tmpdir:mysqld:50=c:/temp/node50 mycluster;
+-----------------------------------+
| Command result
|
+-----------------------------------+
| Cluster reconfigured successfully |
+-----------------------------------+
1 row in set (2.62 sec)
When you check the value using get—even though it was originally shown using backslashes—the
forward slashes are used when displaying the new value:
mcm> get tmpdir mycluster;
+--------+----------------+----------+-----+----------+-----+-------+---------+
| Name
| Value
| Process1 | Id1 | Process2 | Id2 | Level | Comment |
+--------+----------------+----------+-----+----------+-----+-------+---------+
| tmpdir | c:/temp/node50 | mysqld
| 50 |
|
|
|
|
+--------+----------------+----------+-----+----------+-----+-------+---------+
1 row in set (0.22 sec)
However, if you try to use backslashes in the path when issuing the set command, the command fails:
mcm> set tmpdir:mysqld:4=c:\temp\4 mycluster;
Outfile disabled.
ERROR:
Unknown command '\4'.
ERROR 6014 (00MGR): Path name for parameter tmpdir must be absolute.
The value 'c:mp4' is illegal.
Setting TCP Connection Attributes.
For a few attributes that apply only when using TCP
connections (such as the SendBufferMemory and ReceiveBufferMemoryattributes), it is necessary
to use a modified syntax for attribute value assignments. In this case, the attribute assignment contains
two process specifications, one for each process type or instance to which the setting applies, joined with
a plus sign (+). For the following example, consider the cluster named mycluster2, consisting of the
processes shown here:
mcm> list processes mycluster2;
+------+----------+-------------+
| Id
| Name
| Host
|
+------+----------+-------------+
| 49
| ndb_mgmd | grindval
|
| 1
| ndbd
| tonfisk
|
| 2
| ndbd
| flundra
|
| 50
| mysqld
| haj
|
| 51
| mysqld
| torsk
|
+------+----------+-------------+
5 rows in set (0.16 sec)
(See Section 4.6.3, “The list processes Command”, for more information about this command.)
TCP connection attributes are not shown in the output from the get command unless they have been set.
This means that, prior to setting SendBufferMemory for the first time, you obtain an empty result if you try
to retrieve its value, as shown here:
mcm> get SendBufferMemory mycluster2;
Empty set (0.18 sec)
104
The set Command
mcm> get --include-defaults SendBufferMemory mycluster2;
Empty set (0.93 sec)
To set the SendBufferMemory to 4 MB for all TCP connections between data nodes and SQL nodes, you
can use the command shown here:
mcm> set SendBufferMemory:ndbd+mysqld=4M mycluster2;
+-----------------------------------+
| Command result
|
+-----------------------------------+
| Cluster reconfigured successfully |
+-----------------------------------+
1 row in set (6.44 sec)
If you check the attribute's value afterwards using get, you can see that the value is applied to all
possible connections between each of the two ndbd processes and each of the two mysqld processes in
mycluster2, thus there are four rows in the output:
mcm> get SendBufferMemory mycluster2;
+------------------+-------+----------+-----+----------+-----+---------+---------+
| Name
| Value | Process1 | Id1 | Process2 | Id2 | Level
| Comment |
+------------------+-------+----------+-----+----------+-----+---------+---------+
| SendBufferMemory | 4M
| ndbd
| 2
| mysqld
| 4
| Process |
|
| SendBufferMemory | 4M
| ndbd
| 2
| mysqld
| 5
| Process |
|
| SendBufferMemory | 4M
| ndbd
| 3
| mysqld
| 4
| Process |
|
| SendBufferMemory | 4M
| ndbd
| 3
| mysqld
| 5
| Process |
|
+------------------+-------+----------+-----+----------+-----+---------+---------+
4 rows in set (1.63 sec)
To override this setting for only the connection between the data node with process ID 2 and the
mysqld process (process ID 4), you can include the process ID in each of the two parts of the process
specification, as shown here:
mcm> set SendBufferMemory:ndbd:2+mysqld:4=8M mycluster2;
+-----------------------------------+
| Command result
|
+-----------------------------------+
| Cluster reconfigured successfully |
+-----------------------------------+
1 row in set (7.95 sec)
When you check the result using a get command, you can see that the new setting applies on the
instance level, and only to the connection between processes having IDs 2 and 4; the process-level setting
made previously still applies to the remaining 3 connections:
mcm> get SendBufferMemory mycluster2;
+------------------+-------+----------+-----+----------+-----+---------+---------+
| Name
| Value | Process1 | Id1 | Process2 | Id2 | Level
| Comment |
+------------------+-------+----------+-----+----------+-----+---------+---------+
| SendBufferMemory | 8M
| ndbd
| 2
| mysqld
| 50 |
|
|
| SendBufferMemory | 4M
| ndbd
| 2
| mysqld
| 51 | Process |
|
| SendBufferMemory | 4M
| ndbd
| 3
| mysqld
| 50 | Process |
|
| SendBufferMemory | 4M
| ndbd
| 3
| mysqld
| 51 | Process |
|
+------------------+-------+----------+-----+----------+-----+---------+---------+
4 rows in set (0.24 sec)
You cannot set a connection attribute on the process level in one part of the process specification (that is,
for one end of the connection) and on the instance level in the other. Attempting to do so fails with an error,
as shown here:
105
MySQL Cluster Manager Process Commands
mcm> set SendBufferMemory:ndbd+mysqld:4=2M mycluster2;
ERROR 3 (00MGR): Illegal syntax
mcm> set SendBufferMemory:ndbd:2+mysqld=2M mycluster2;
ERROR 3 (00MGR): Illegal syntax
Setup for mysqld connection pooling.
Enabling connection pooling for mysqld can be done by by
setting the ndb-cluster-connection-pool attribute to the desired number of connections, but also
requires an extra step in creating the cluster.
Because the mysqld process attempts to make multiple connections to the cluster when connection
pooling is enabled, the cluster must be configured with “spare” or “empty” connections. You can do this
by adding (otherwise) unused ndbapi entries in the process_host list used in the create cluster
command, as shown here:
mcm> create cluster -P mypackage
> -R [email protected],[email protected],[email protected], \
[email protected],[email protected], \
[email protected],[email protected]
> mycluster;
+------------------------------+
| Command result
|
+------------------------------+
| Cluster created successfully |
+------------------------------+
1 row in set (6.58 sec)
After this, you can use a set command like this one to set the size of the connection pool according to the
number of excess connections available in the config.ini file:
mcm> set ndb_cluster_connection_pool:mysqld=4;
user attribute not supported for mysqld.
Trying to set the user attribute for a mysqld process is not
currently supported, and results in a warning being written to the MySQL Cluster Manager log.
4.6 MySQL Cluster Manager Process Commands
This section contains information about MySQL Cluster Manager client commands used to start and stop
MySQL Cluster processes, and to determine which processes are currently running.
MySQL Cluster Manager, ndb_mgm, and starting or stopping processes.
For a MySQL Cluster
under MySQL Cluster Manager control, it is recommended not to use the ndb_mgm command-line client
that comes with the MySQL Cluster distribution to perform operations that involve starting or stopping
nodes. These include but are not limited to the following ndb_mgm client commands (Commands in the
MySQL Cluster Management Client):
• START
• STOP
• RESTART
• SHUTDOWN
4.6.1 The add process Command
106
The add process Command
add process --processhosts=process_host_list
[--set=attribute_assignment_list] cluster_name
process_host_list:
process_name@host[,process_name@host[,...]]
process_name:
{ndb_mgmd|ndbd|ndbmtd|mysqld|ndbapi}
attribute_assignment_list:
attribute_assignment[,attribute_assignment][,...]
attribute_assignment:
attribute_name:process_name[=value]
This command adds one or more processes to an existing cluster, these being specified using a
process_host_list whose format is the same as that used with the create cluster command. Any
hosts referenced in the list must be members of the site to which the cluster belongs. In MySQL Cluster
Manager 1.2.1 and later, all hosts must be resolvable (Bug #15870901).
Any new processes added by this command must be started explicitly using start process --added.
For example, the following add process command adds two mysqld processes on hosts torsk and
kolja to the cluster named mycluster:
mcm> add process --processhosts=mysqld@torsk,mysqld@kolja mycluster;
+------------------------------+
| Command result
|
+------------------------------+
| Processes added successfully |
+------------------------------+
1 row in set (2 min 10.39 sec)
Processes added before the cluster is started for the first time are started with the cluster. This makes
it possible to use this command to break down what would otherwise be very long create cluster
commands. Consider the following set of commands which creates and then starts a cluster named
mycluster:
create cluster --processhosts=ndb_mgmd@host1,ndbd@host1,ndbd@host2, \
mysqld@host3,mysqld@host4 mycluster;
start cluster mycluster;
The long create cluster command can be divided into a shorter (and more manageable) version
of itself, plus several add process commands. This set of commands performs the same task as the
previous set, creating mycluster with exactly the same processes and hosts as before, and then starting
it:
create cluster --processhosts=ndb_mgmd@host1 mycluster;
add process --processhosts=ndbd@host1,ndbd@host2 mycluster;
add process --processhosts=mysqld@host3,mysqld@host4 mycluster;
start cluster mycluster;
Because mycluster was never started before the ndbd and mysqld processes were added to it using
the add process commands shown, it is not necessary to use the --added option with the start
cluster command in this case; all 5 processes are started.
A newly added process inherits its configuration attribute settings from those in effect for its process type
on the parent cluster, or assume the default settings for that process type if none apply. Existing attribute
settings in the cluster must have process-level scope to be inherited by new processes added later;
107
The change process Command
instance-level settings set for existing process instances prior to adding any new ones do not apply to any
of the added processes. (See Configuration attributes, for more information about the scope of attribute
settings.)
Inherited attribute settings can be overridden when adding processes; to do this, use the add process
command's --set option. This option takes as its argument an attribute assignment list similar in format
to that used with the get and set commands. Suppose that the current ndbd process-level setting in the
cluster named mycluster for the DataDir attribute is /home/users/ndb/cluster-data, but you
wish to add two new ndbd processes that use /tmp/cluster/data instead. You can do this using the
following command:
mcm> add process --set=ndbd:DataDir=/tmp/cluster/data
> --processhosts=mysqld@torsk,mysqld@kolja
> mysite;
Note
The equals sign (=) immediately following the --set option is required.
When setting attributes in this way which contain paths for processes running on Windows, you must
replace any backslashes (\) used with forward slashes (/), just as with the set command. See Setting
Attributes Containing Paths on Windows [103], for more information.
After a process has been added using add process, you can also use the set command to modify its
configuration attribute settings (or specify additional ones) as you would with any other cluster process
being managed with MySQL Cluster Manager.
It is not currently possible to drop or delete cluster processes using MySQL Cluster Manager.
Note
When IPv6-enabled Windows systems are used as MySQL Cluster hosts under
MySQL Cluster Manager, you must reference these hosts using IPv4 addresses.
Otherwise, MySQL Cluster Manager will be unable to connect to the agent
processes on those hosts. See Section 5.1, “MySQL Cluster Manager Usage and
Design Limitations”.
4.6.2 The change process Command
change process old_proc_type[:proc-id]=new_proc_type cluster_name
old_proc_type | new_proc_type:
{ndbd|ndbmtd}
This command is used (MySQL Cluster NDB 7.0 and later) to change the process type for a given MySQL
Cluster process or group of MySQL Cluster processes from one process type (old-process-type) to
another process type (new-process-type).
Currently, the only two process types available for use with this command are ndbd and ndbmtd. This
means that change process can be used to change the data node process running on one or more
data nodes from the single-threaded data node daemon (ndbd) to the multi-threaded data node daemon
(ndbmtd) or vice versa.
By default, change process affects all data nodes running the old-process-type. By specifying an
optional process_id, its action can be restricted to the data node having that process ID.
108
The change process Command
Suppose you have a cluster which is named mycluster and which has two data nodes using ndbd
processes, as reflected in the output of the following show status command:
mcm> show status --process mycluster;
+--------+----------+----------+----------+-----------+
| NodeId | Process | Host
| Status
| Nodegroup |
+--------+----------+----------+----------+-----------+
| 49
| ndb_mgmd | flundra | running |
|
| 1
| ndbd
| tonfisk | running | n/a
|
| 2
| ndbd
| grindval | running | n/a
|
| 50
| mysqld
| haj
| running |
|
| 51
| mysqld
| torsk
| running |
|
| 52
| ndbapi
| *
| running |
|
+--------+----------+----------+----------+-----------+
6 rows in set (0.06 sec)
To change both data nodes to so that they use multi-threaded (ndbmtd) processes, issue the command
shown here, without any process_id specifier:
mcm> change process ndbd=ndbmtd mycluster;
+------------------------------+
| Command result
|
+------------------------------+
| Process changed successfully |
+------------------------------+
1 row in set (2 min 17.51 sec)
After the command has executed, you can verify that both data nodes are now using ndbmtd by checking
the output of the appropriate show status command, as shown here:
mcm> show status --process mycluster;
+--------+----------+----------+----------+-----------+
| NodeId | Process | Host
| Status
| Nodegroup |
+--------+----------+----------+----------+-----------+
| 49
| ndb_mgmd | flundra | running |
|
| 1
| ndbmtd
| tonfisk | running | n/a
|
| 2
| ndbmtd
| grindval | running | n/a
|
| 50
| mysqld
| haj
| running |
|
| 51
| mysqld
| torsk
| running |
|
| 52
| ndbapi
| *
| running |
|
+--------+----------+----------+----------+-----------+
6 rows in set (0.09 sec)
Note
The change process command can be used whether or not the cluster or the
data node or data nodes to be changed are running. However, the command
executes much more quickly if the data node or data nodes to be changed are not
running. The next set of examples illustrates this.
It is possible (and sometimes desirable) to use ndbd and ndbmtd data node processes concurrently;
thus, it is also possible using the change process command to change a single data node process from
single-threaded to multi-threaded, or from multi-threaded to single-threaded. To do this, you must specify
the data node process using its process ID.
First, we stop the cluster and verify that all processes are no longer running, as shown here:
mcm> stop cluster mycluster;
+------------------------------+
109
The change process Command
| Command result
|
+------------------------------+
| Cluster stopped successfully |
+------------------------------+
1 row in set (22.93 sec)
mcm> show status --process mycluster;
+--------+----------+----------+----------+-----------+
| NodeId | Process | Host
| Status
| Nodegroup |
+--------+----------+----------+----------+-----------+
| 49
| ndb_mgmd | flundra | stopped |
|
| 1
| ndbmtd
| tonfisk | stopped | n/a
|
| 2
| ndbmtd
| grindval | stopped | n/a
|
| 50
| mysqld
| haj
| stopped |
|
| 51
| mysqld
| torsk
| stopped |
|
| 52
| ndbapi
| *
| stopped |
|
+--------+----------+----------+----------+-----------+
6 rows in set (0.05 sec)
The following command changes only the node having the process ID 2 from using the multi-threaded data
node daemon to the single-threaded version:
mcm> change process ndbmtd:2=ndbd mycluster;
+------------------------------+
| Command result
|
+------------------------------+
| Process changed successfully |
+------------------------------+
1 row in set (6.52 sec)
As you can see, change process operates much more quickly when the process to be changed is not
running. As before, you can verify that the command succeeded using show status:
mcm> show status --process mycluster;
+--------+----------+----------+----------+-----------+
| NodeId | Process | Host
| Status
| Nodegroup |
+--------+----------+----------+----------+-----------+
| 49
| ndb_mgmd | flundra | stopped |
|
| 1
| ndbmtd
| tonfisk | stopped | n/a
|
| 2
| ndbd
| grindval | stopped | n/a
|
| 50
| mysqld
| haj
| stopped |
|
| 51
| mysqld
| torsk
| stopped |
|
| 52
| ndbapi
| *
| stopped |
|
+--------+----------+----------+----------+-----------+
6 rows in set (0.07 sec)
To complete the example, we start the cluster again, using start cluster, then change node number
2 back from ndbd (single-threaded) to ndbmtd (multi-threaded) using change process, then verify the
change using show status:
mcm> start cluster mycluster;
+------------------------------+
| Command result
|
+------------------------------+
| Cluster started successfully |
+------------------------------+
1 row in set (36.43 sec)
mcm> change process ndbd:2=ndbmtd mycluster;
+------------------------------+
| Command result
|
+------------------------------+
110
The list processes Command
| Process changed successfully |
+------------------------------+
1 row in set (2 min 10.41 sec)
mcm> show status --process mycluster;
+--------+----------+----------+----------+-----------+
| NodeId | Process | Host
| Status
| Nodegroup |
+--------+----------+----------+----------+-----------+
| 49
| ndb_mgmd | flundra | running |
|
| 1
| ndbmtd
| tonfisk | running | n/a
|
| 2
| ndbmtd
| grindval | running | n/a
|
| 50
| mysqld
| haj
| running |
|
| 51
| mysqld
| torsk
| running |
|
| 52
| ndbapi
| *
| running |
|
+--------+----------+----------+----------+-----------+
6 rows in set (0.11 sec)
You can see that it can require much less time to stop the cluster, change a data node process, and then
start the cluster again than it is to change the process while the cluster is running. However, if you do this,
the cluster is not available while it is stopped.
As noted previously, change process works only with ndbd and ndbmtd processes; attemtpting to use
any other process type causes the command to fail with an error, as shown here:
mcm> change process
ERROR 7009 (00MGR):
mcm> change process
ERROR 7009 (00MGR):
ndb_mgmd=mysqld mycluster;
Processes ndb_mgmd and mysqld are not interchangable in this package
ndbd=mysqld mycluster;
Processes ndbd and mysqld are not interchangable in this package
4.6.3 The list processes Command
list processes cluster_name
This command displays all processes making up a given cluster. The following example demonstrates how
to list all processes that are part of the cluster named mycluster:
mcm> list processes mycluster;
+--------+----------+----------+
| NodeId | Name
| Host
|
+--------+----------+----------+
| 49
| ndb_mgmd | flundra |
| 1
| ndbd
| tonfisk |
| 2
| ndbd
| grindval |
| 50
| mysqld
| haj
|
| 51
| mysqld
| torsk
|
| 52
| ndbapi
| *
|
+--------+----------+----------+
6 rows in set (0.03 sec)
The cluster_name argument is required. If this argument is omitted, the command fails with an error, as
shown here:
mcm> list processes;
ERROR 6 (00MGR): Illegal number of operands
4.6.4 The start process Command
start process {[--initial|-i] process_id | --added} cluster_name
111
The stop process Command
This command starts the MySQL Cluster process having the process ID process_id in the cluster named
cluster_name. The status of the process to be started, as shown by show status --process, must
be added or stopped.
This example demonstrates how to start the process having the process ID 1 belonging to the cluster
mycluster:
mcm> start process 1 mycluster;
+------------------------------+
| Command result
|
+------------------------------+
| Process started successfully |
+------------------------------+
1 row in set (13.93 sec)
When the --initial option (short form: -i) is used, MySQL Cluster Manager starts a data node process
with the --initial option, causing the data node to rebuild its file system.
Invoking this command with the --added option rather than with a process ID starts all nodes previously
added to the cluster using add process, but not yet started.
You can obtain process IDs for all processes in a given cluster using show status --process or list
processes. These are the same as the node IDs for these processes as shown in the output of other mcm
client commands such as get or in the output of ndb_mgm -e "show" (see ndb_mgm — The MySQL
Cluster Management Client).
Caution
You should not use this command to start a mysqld process in a cluster that is
stopped or otherwise unavailable.
4.6.5 The stop process Command
stop process process_id cluster_name
This command stops the running MySQL Cluster process with the process ID process_id in the cluster
named cluster_name. The status of the process as shown by show status --process must be
running.
Suppose that the process ID of a data node in the cluster named mycluster is 3. Then this data node
can be stopped as shown here:
mcm> stop process 3 mycluster;
+------------------------------+
| Command result
|
+------------------------------+
| Process stopped successfully |
+------------------------------+
1 row in set (33.07 sec)
You can use show status --process or list processes to obtain process IDs for all processes in
a given cluster.
In the event of a disk failure where MySQL Cluster Manager loses its manager directory (including its
repository), the agent is able to recover information from other agents, but it does not actually control
processes any longer, although it can detect them. This is due to the fact that the MySQL Cluster Manager
agent cannot access the PID files. In this case, stop process no longer works, and you must kill such
112
MySQL Cluster Manager Backup and Restore Commands
processes manually. Keep in mind that, if StopOnError is set to 0, the MySQL Cluster Manager agent
restarts the data node process automatically; if StopOnError is 1 (the default), then you must execute the
start process command manually.
4.7 MySQL Cluster Manager Backup and Restore Commands
This section contains information about MySQL Cluster Manager client commands relating to backing up
a MySQL Cluster and restoring it from backup. All of these command were introduced in MySQL Cluster
Manager 1.2.1.
4.7.1 The abort backup Command
abort backup --backupid=backup_id cluster_name
This command aborts a backup, having the specified backup_id, of cluster cluster_name. You can
obtain a list of backups and their IDs known to this MySQL Cluster Manager instance using the list
backups. If the backup is not actually in progress, the command has no effect.
The abort backup command was added in MySQL Cluster Manager 1.2.1.
4.7.2 The backup cluster Command
backup cluster
[--snapshotstart | --snapshotend]
[--waitstarted | --waitcompleted]
cluster_name
This command creates a backup of the MySQL Cluster named cluster_name. backup cluster takes
a backup of the cluster's NDB tables only; tables using other MySQL storage engines (such as InnoDB or
MyISAM) are ignored.
The --snapshotstart option causes the backup to match the state of the cluster when the backup
began; using --snapshotend causes the backup to reflect the state of the cluster when the backup was
finished. If neither option is specified, the MySQL Cluster Manager client acts as though --snapshotend
had been used.
When the --waitstarted option is used, the MySQL Cluster Manager client waits until the backup has
started before returning control to the user; using --waitcompleted causes the MySQL Cluster Manager
client to wait until the backup process is complete before returning control to the user. If neither of these
options is specified, the client behaves as if --waitcompleted had been used.
mcm> backup cluster mycluster;
+-------------------------------+
| Command result
|
+-------------------------------+
| Backup completed successfully |
+-------------------------------+
1 row in set (33.50 sec)
You can verify that the backup was performed by checking the output of list backups, as shown here:
mcm> list backups mycluster;
+----------+--------+---------+---------------------+---------+
| BackupId | NodeId | Host
| Timestamp
| Comment |
+----------+--------+---------+---------------------+---------+
113
The list backups Command
| 1
| 1
| tonfisk | 2012-12-01 12:03:52 |
|
| 1
| 2
| tonfisk | 2012-12-01 12:03:52 |
|
| 2
| 1
| tonfisk | 2012-12-04 12:05:15 |
|
| 2
| 2
| tonfisk | 2012-12-04 12:05:15 |
|
+----------+--------+---------+---------------------+---------+
4 rows in set (0.02 sec)
Each row in the output represents a backup image—that is, a set of backup files specific to a given
backup of a named cluster on a given data node. Timestamp values are UTC. By default, each image
is stored as a directory named /mcm_data/clusters/cluster_name/node_id/data/BACKUP/
BACKUP-backup_id/ in the MySQL Cluster Manager installation directory.
It is possible to remove an unwanted backup from a given node by deleting this image directory and its
contents. To remove a given backup completely, you must remove the corresponding image from each
data node's BACKUP directory. You can do this as long as a backup or restore operation is not in progress;
it is not necessary to stop the cluster or MySQL Cluster Manager agent prior to removing the images.
The BackupId is used with abort backup and restore cluster.
The backup cluster command was added in MySQL Cluster Manager 1.2.1.
4.7.3 The list backups Command
list backups cluster_name
This command lists all backups of the MySQL Cluster named cluster_name that are known to this
instance of MySQL Cluster Manager. The output includes the backup and node ID as well as a UTC
timestamp for each backup, as shown here:
mcm> list backups mycluster;
+----------+--------+---------+---------------------+---------+
| BackupId | NodeId | Host
| Timestamp
| Comment |
+----------+--------+---------+---------------------+---------+
| 1
| 1
| tonfisk | 2012-12-01 12:03:52 |
|
| 1
| 2
| tonfisk | 2012-12-01 12:03:52 |
|
| 2
| 1
| tonfisk | 2012-12-04 12:05:15 |
|
| 2
| 2
| tonfisk | 2012-12-04 12:05:15 |
|
+----------+--------+---------+---------------------+---------+
4 rows in set (0.02 sec)
The list backups command was added in MySQL Cluster Manager 1.2.1.
4.7.4 The restore cluster Command
restore cluster
{--backupid=|-I }backup_id
[--disable-indexes|-x]
[--disable-metadata|-M]
[--no-binlog|-l]
[[--parallelism=|-p ]#]
[--epoch|-e]
[[--skip-nodeid=|-s ]id_list]
cluster_name
This command restores a cluster from a backup having the specified backup ID (--backupid option;
short form: -I) to the MySQL Cluster named cluster_name. In its simplest form, it can be used as
shown here, to restore the cluster named mycluster to the state saved in the backup having backup ID 3:
114
The restore cluster Command
mcm> restore cluster --backupid=3 mycluster;
+--------------------------------+
| Command result
|
+--------------------------------+
| Restore completed successfully |
+--------------------------------+
1 row in set (18.60 sec)
If you are restoring an existing cluster to a known good state, you must wipe any existing first. Stop the
cluster using stop cluster, then restart it using start cluster with the --initial option, which
causes the data node file systems to be cleared. (Note that Disk Data files must be removed manually.)
Following this, you can restore the cluster from the desired backup using restore cluster.
Important
In order to restore a backup using restore cluster, the cluster must have an
unused slot for an ndbapi process in its configuration. Otherwise, the command
fails with the error Unable to perform restore - no vacant ndbapi
slots in config for cluster cluster_name. See Section 4.4.1, “The
create cluster Command”, for more information.
Additional options that can be employed with this command are described in the next few paragraphs.
--disable-indexes and --disable-metadata.
To cause indexes to be ignored when restoring
the table data, use the --disable-indexes option (short form: -x). Doing this can decrease the time
required to restore a large data set, particularly where many indexes were in use.
Similarly, you can cause metadata to be ignored during the restoration process by using the --disablemetadata option (short form: -M).
--no-binlog.
The --no-binlog option (short form: -l) stops any SQL nodes (mysqld processes)
in the cluster from writing data from the restore into their binary logs.
--parallelism.
The --parallelism option (short form: -p) sets the maximum number of
parallel transactions that the restore cluster command attempts to use. The default value is 128; the
maximum is 1024, and the minium is 1.
--epoch.
When the --epoch option (short form: -e) is used, epoch information is restored to the
cluster replication status table (mysql.ndb_apply_status), which can be useful for MySQL Cluster
replication slaves.
--privilege-tables.
Causes restoration of tables required for distributed grants (see Distributed
MySQL Privileges for MySQL Cluster). Added in MySQL Cluster Manager 1.2.4 (see Bug #16710567).
--skip-nodeid.
The --skip-nodeid option (short form: -s) takes a comma-separated list of data
node IDs. Nodes having these IDs are skipped by the restoration process. Beginning with MySQL Cluster
Manager 1.2.4, this option also supports SQL node IDs (Bug #16710567).
The restore backup command was added in MySQL Cluster Manager 1.2.1.
115
116
Chapter 5 MySQL Cluster Manager Limitations and Known
Issues
Table of Contents
5.1
5.2
5.3
5.4
MySQL Cluster Manager Usage and Design Limitations .............................................................
MySQL Cluster Manager 1.2.4 Limitations Relating to the MySQL Server ....................................
MySQL Cluster Manager Limitations Relating to MySQL Cluster .................................................
Syntax and Related Issues in MySQL Cluster Manager ..............................................................
117
118
119
119
In this chapter we discuss limitations of and known issues in MySQL Cluster Manager version 1.2.4.
5.1 MySQL Cluster Manager Usage and Design Limitations
The limitations discussed in this section occur by intention or design in MySQL Cluster Manager 1.2.4.
Some of these items may become obsolete in future versions; we will update this section accordingly if and
as those changes come about.
change process command.
Currently, the change process command can be used only to
exchange an ndbd process for an ndbmtd process, or the reverse. That is, in effect, it can be used only
to switch a data node between a single-threaded process and a multi-threaded process. It cannot be
used for changing a cluster node's type (for example, you cannot change a data node to an SQL node,
management node, or NDB API application node).
Because of this restriction, and due to the fact that multi-threaded data nodes are not supported in MySQL
Cluster NDB 6.3 and earlier, the change process command is useful only with clusters running MySQL
Cluster NDB 7.0 or newer.
License keys and operating platforms.
Manager 1.2.4.
License keys are not required to use MySQL Cluster
Concurrent client sessions unsupported.
Currently there is no negotation or arbitration between
multiple mcm clients. While it is possible to use the client from multiple locations, we do not support
concurrent client sessions. You should be careful always to allow a command issued in one mcm client
session to finish executing before issuing a new command in a different client session. This is true
especially when using the -B or --background option with mcm client commands; see Backgrounded
commands and error handling.
IPv6 and host names (Windows).
When IPv6 support is enabled on Windows systems, host names
other than localhost are resolved using IPv6. When an IPv6-enabled Windows system is used as
a MySQL Cluster host under MySQL Cluster Manager, you must reference it using its IPv4 address.
Otherwise, mcm will be unable to connect to the agent process on that host.
This applies to host names used with the MySQL Cluster Manager client commands create cluster,
create site, add hosts, add package, delete package, stop agents, and add process.
No removal of hosts, processes.
Once a host is added to a management site using the add hosts
command, it cannot be removed with MySQL Cluster Manager.
Once a process has been added to a cluster using the add process command, it cannot be removed
from the cluster using MySQL Cluster Manager.
117
MySQL Cluster Manager 1.2.4 Limitations Relating to the MySQL Server
5.2 MySQL Cluster Manager 1.2.4 Limitations Relating to the MySQL
Server
The limitations described in this section relate to functionality in the MySQL Server that is unsupported or
reduced, or otherwise differs when using it with MySQL Cluster Manager.
Replication.
Replication is currently not directly supported by MySQL Cluster Manager. See
Section 5.3, “MySQL Cluster Manager Limitations Relating to MySQL Cluster”, for more information.
Limited mysqld option modifier support.
MySQL Cluster Manager does not recognize the -loose, --maximum, --enable, and --disable prefixes for mysqld options used as MySQL Cluster
Manager configuration attributes (for a description of these modifiers, see Program Option Modifiers). For
example, the command set loose-skip-innodb:mysqld=true mycluster; fails with the error No
such config variable loose-skip-innodb for process mysqld.
The --skip option modifier is supported in some but not all cases, so that commands such as set
skip-innodb:mysqld=true mycluster; and set skip-grant-tables:mysqld=true
mycluster; can be used with MySQL Cluster Manager, while set skip-columnnames:mysqld=true mycluster; cannot. (Bug #48559, Bug #47779)
Visibility of MySQL Cluster Manager mysqld attributes and MySQL server variables.
Due in part
to issues with mappings between my.cnf option names, mysqld command-line option names, and names
of MySQL server variables, some MySQL server variables are not visible to MySQL Cluster Manager, or
have different names. For example, the storage_engine server variable shown in the output of SHOW
VARIABLES in the mysql client maps to the default-storage-engine configuration attribute used in
the MySQL Cluster Manager get and set commands.
Dashes and underscores in MySQL option and variable names.
When using the mysql client or
other MySQL client applications, many MySQL system options and variables can be named using either
dashes or underscores in their names. For example, you can use either ndb_batch_size or ndbbatch-size with the MySQL Server, and the variable is set correctly. This is not the case in MySQL
Cluster Manager, where only the forms using underscores are accepted as attribute names. For example,
assuming that mycluster is a viable cluster, the command set ndb_batch_size:mysqld=65536
mycluster; works to set the size of ndb_batch_size on all mysqld processes in the cluster, but set
ndb-batch-size:mysqld=65536 mycluster; fails.
Dependencies between MySQL Cluster Manager mysqld attributes and MySQL server variables.
MySQL Cluster Manager does not track dependencies between mysqld attributes (MySQL server options
and variables). For example, MySQL Server 5.1 and earlier require, when the binlog_format attribute
is set, that the log_bin attribute be used as well; if binlog_format is used without log_bin, mysqld
fails to start (MySQL Server Bug #42928, fixed in MySQL 5.5 and MySQL Cluster NDB 7.2). If you do this
using MySQL Cluster Manager, however, the MySQL Cluster Manager agent reports that the operation
was started successfully, and from MySQL Cluster Manager's point of view, this is correct—MySQL Cluster
Manager started the mysqld process with the indicated attribute settings, and it is up to the operator
to verify that the result was the one expected. In such cases, it is a good idea to check the status of the
mysqld process, perhaps using show status --operation, before continuing.
MySQL Cluster Manager mysqld attributes and MySQL user variables.
not accessible as MySQL Cluster Manager configuration attributes.
MySQL user variables are
Default MySQL data directory.
The default tmpdir for MySQL servers installed under MySQL Cluster
Manager was datadir/tmp, which caused issues with the mysql client. This issue was resolved in
MySQL Cluster Manager 1.2.3; MySQL Cluster Manager now uses tmp in the MySQL installation directory
for this purpose. (Bug #16010476)
118
MySQL Cluster Manager Limitations Relating to MySQL Cluster
5.3 MySQL Cluster Manager Limitations Relating to MySQL Cluster
This section describes limitations relating to MySQL Cluster functionality that is unsupported or curtailed by
MySQL Cluster Manager 1.2.4.
MySQL Cluster Manager and replication.
MySQL Cluster Manager currently does not provide any
explicit support for MySQL Cluster Replication. However, you should still be able to perform manual setup
of replication of a MySQL Cluster that is managed by MySQL Cluster Manager.
Backup and restore operations.
Starting with version 1.2.1, MySQL Cluster Manager provides
integrated backup and restore functionality. You can back up NDB databases and tables using the mcm
client backup cluster command, and restore them using the restore cluster client command.
Beginning with MySQL Cluster Manager 1.2.3, restoring distributed privileges is also supported.
You can also back up NDB databases and tables using the ndb_mgm client START BACKUP command, and
restore them using the ndb_restore program (see ndb_restore — Restore a MySQL Cluster Backup);
however MySQL Cluster Manager is not aware of backups that it was not employed to create. Both of
the programs just mentioned are supplied with the MySQL Cluster distribution; for more information, see
Online Backup of MySQL Cluster, and ndb_restore — Restore a MySQL Cluster Backup.
Note
Backups of tables using storage engines other than NDB, as well as of all other
database objects which are not tables, cannot be made using MySQL Cluster
Manager, and must be made using some other method, such as mysqldump. (See
mysqldump — A Database Backup Program.)
Rolling restarts.
Currently, all cluster nodes must be running in order to perform a rolling restart using
MySQL Cluster Manager. However, MySQL Cluster itself requires only that at least one management
server and all data nodes are running (in other words, any mysqld processes and any additional
ndb_mgmd processes can be stopped). In such cases, you can perform the rolling restart manually, after
stopping the MySQL Cluster Manager agent.
When making changes in configuration attributes only those nodes requiring a restart to make the change
take effect are actually restarted. ndbapi nodes are never restarted by MySQL Cluster Manager.
Cluster upgrades and downgrades.
Not all upgrades and downgrades between different versions of MySQL Cluster are supported. (This is
not an issue with MySQL Cluster Manager but rather a limitation in the MySQL Cluster software.) For
information on supported online upgrades and downgrades, see Upgrading and Downgrading MySQL
Cluster.
5.4 Syntax and Related Issues in MySQL Cluster Manager
This section covers MySQL Cluster Manager issues relating to limitations in SQL and other syntax.
Backgrounded commands and error handling.
MySQL Cluster Manager client commands which are run in the background (that is, when they are invoked
with the --background or -B option) do not issue any error messages in the client. If you run a command
in the background, you must check the agent log or use the show status command to verify whether the
backgrounded command was successful.
119
120
Appendix A Changes in MySQL Cluster Manager
MySQL Cluster Manager release notes are no longer published in the MySQL Cluster Manager User
Manual.
Release notes for the changes in each release of MySQL Cluster Manager are located at MySQL Cluster
Manager 1.2 Release Notes.
121
122
Appendix B Licenses for Third-Party Components Used in
MySQL Cluster Manager 1.2.4
Table of Contents
B.1
B.2
B.3
B.4
B.5
B.6
B.7
B.8
B.9
GLib License (for MySQL Cluster Manager) ..............................................................................
GNU Lesser General Public License Version 2.1, February 1999 ................................................
libevent License .......................................................................................................................
libintl License ...........................................................................................................................
LPeg Library License ...............................................................................................................
Lua (liblua) License ..................................................................................................................
LuaFileSystem Library License .................................................................................................
PCRE License .........................................................................................................................
SHA-1 in C License .................................................................................................................
123
124
132
134
134
135
135
136
137
Oracle acknowledges that certain third-party and Open Source software has been used to develop or is
incorporated in the MySQL Cluster Manager product. This appendix includes required third-party license
information.
MySQL Cluster Manager 1.2
• Section B.1, “GLib License (for MySQL Cluster Manager)”
• Section B.2, “GNU Lesser General Public License Version 2.1, February 1999”
• Section B.3, “libevent License”
• Section B.4, “libintl License”
• Section B.5, “LPeg Library License”
• Section B.6, “Lua (liblua) License”
• Section B.7, “LuaFileSystem Library License”
• Section B.8, “PCRE License”
• Section B.9, “SHA-1 in C License”
B.1 GLib License (for MySQL Cluster Manager)
The following software may be included in this product:
GLib
You are receiving a copy of the GLib library in both source
and object code in the following [mcm install dir]/lib/ and
[mcm install dir]/licenses/lgpl folders. The terms of the
Oracle license do NOT apply to the GLib library; it is licensed
under the following license, separately from the Oracle programs
you receive. If you do not wish to install this library, you
may create an "exclude" file and run tar with the X option, as
in the following example, but the Oracle program might not
operate properly or at all without the library:
tar -xvfX <package-tar-file> <exclude-file>
where the exclude-file contains, e.g.:
123
GNU Lesser General Public License Version 2.1, February 1999
<package-name>/lib/libglib-2.0.so.0.1600.6
<package-name>/lib/libglib-2.0.so.0
<package-name>/lib/libglib-2.0.so
Example:
tar -xvfX mysql-cluster-manager-1.2.1-solaris10-x86-32bit.tar Exclude
Exclude File:
mysql-cluster-manager-1.2.1-solaris10-x86-32bit/lib/libglib-2.0.so.0.1600.6
mysql-cluster-manager-1.2.1-solaris10-x86-32bit/lib/libglib-2.0.so.0
mysql-cluster-manager-1.2.1-solaris10-x86-32bit/lib/libglib-2.0.so
This component is licensed under Section B.2, “GNU Lesser General Public License Version 2.1, February
1999”.
B.2 GNU Lesser General Public License Version 2.1, February 1999
The following applies to all products licensed under the
GNU Lesser General Public License, Version 2.1: You may
not use the identified files except in compliance with
the GNU Lesser General Public License, Version 2.1 (the
"License"). You may obtain a copy of the License at
http://www.gnu.org/licenses/lgpl-2.1.html. A copy of the
license is also reproduced below. Unless required by
applicable law or agreed to in writing, software distributed
under the License is distributed on an "AS IS" BASIS,
WITHOUT WARRANTIES OR CONDITIONS OF ANY KIND, either express
or implied. See the License for the specific language governing
permissions and limitations under the License.
GNU LESSER GENERAL PUBLIC LICENSE
Version 2.1, February 1999
Copyright (C) 1991, 1999 Free Software Foundation, Inc.
51 Franklin Street, Fifth Floor, Boston, MA 02110-1301 USA
Everyone is permitted to copy and distribute verbatim copies
of this license document, but changing it is not allowed.
[This is the first released version of the Lesser GPL. It also counts
as the successor of the GNU Library Public License, version 2, hence
the version number 2.1.]
Preamble
The licenses for most software are designed to take away your
freedom to share and change it. By contrast, the GNU General Public
Licenses are intended to guarantee your freedom to share and change
free software--to make sure the software is free for all its users.
This license, the Lesser General Public License, applies to some
specially designated software packages--typically libraries--of the
Free Software Foundation and other authors who decide to use it. You
can use it too, but we suggest you first think carefully about whether
this license or the ordinary General Public License is the better
strategy to use in any particular case, based on the explanations below.
When we speak of free software, we are referring to freedom of use,
not price. Our General Public Licenses are designed to make sure that
you have the freedom to distribute copies of free software (and charge
for this service if you wish); that you receive source code or can get
it if you want it; that you can change the software and use pieces of
it in new free programs; and that you are informed that you can do
these things.
124
GNU Lesser General Public License Version 2.1, February 1999
To protect your rights, we need to make restrictions that forbid
distributors to deny you these rights or to ask you to surrender these
rights. These restrictions translate to certain responsibilities for
you if you distribute copies of the library or if you modify it.
For example, if you distribute copies of the library, whether gratis
or for a fee, you must give the recipients all the rights that we gave
you. You must make sure that they, too, receive or can get the source
code. If you link other code with the library, you must provide
complete object files to the recipients, so that they can relink them
with the library after making changes to the library and recompiling
it. And you must show them these terms so they know their rights.
We protect your rights with a two-step method: (1) we copyright the
library, and (2) we offer you this license, which gives you legal
permission to copy, distribute and/or modify the library.
To protect each distributor, we want to make it very clear that
there is no warranty for the free library. Also, if the library is
modified by someone else and passed on, the recipients should know
that what they have is not the original version, so that the original
author's reputation will not be affected by problems that might be
introduced by others.
Finally, software patents pose a constant threat to the existence of
any free program. We wish to make sure that a company cannot
effectively restrict the users of a free program by obtaining a
restrictive license from a patent holder. Therefore, we insist that
any patent license obtained for a version of the library must be
consistent with the full freedom of use specified in this license.
Most GNU software, including some libraries, is covered by the
ordinary GNU General Public License. This license, the GNU Lesser
General Public License, applies to certain designated libraries, and
is quite different from the ordinary General Public License. We use
this license for certain libraries in order to permit linking those
libraries into non-free programs.
When a program is linked with a library, whether statically or using
a shared library, the combination of the two is legally speaking a
combined work, a derivative of the original library. The ordinary
General Public License therefore permits such linking only if the
entire combination fits its criteria of freedom. The Lesser General
Public License permits more lax criteria for linking other code with
the library.
We call this license the "Lesser" General Public License because it
does Less to protect the user's freedom than the ordinary General
Public License. It also provides other free software developers Less
of an advantage over competing non-free programs. These disadvantages
are the reason we use the ordinary General Public License for many
libraries. However, the Lesser license provides advantages in certain
special circumstances.
For example, on rare occasions, there may be a special need to
encourage the widest possible use of a certain library, so that it
becomes a de-facto standard. To achieve this, non-free programs
must be allowed to use the library. A more frequent case is that
a free library does the same job as widely used non-free libraries.
In this case, there is little to gain by limiting the free library
to free software only, so we use the Lesser General Public License.
In other cases, permission to use a particular library in non-free
programs enables a greater number of people to use a large body of
free software. For example, permission to use the GNU C Library in
non-free programs enables many more people to use the whole GNU
operating system, as well as its variant, the GNU/Linux operating
125
GNU Lesser General Public License Version 2.1, February 1999
system.
Although the Lesser General Public License is Less protective of the
users' freedom, it does ensure that the user of a program that is
linked with the Library has the freedom and the wherewithal to run
that program using a modified version of the Library.
The precise terms and conditions for copying, distribution and
modification follow. Pay close attention to the difference between a
"work based on the library" and a "work that uses the library". The
former contains code derived from the library, whereas the latter must
be combined with the library in order to run.
GNU LESSER GENERAL PUBLIC LICENSE
TERMS AND CONDITIONS FOR COPYING, DISTRIBUTION AND MODIFICATION
0. This License Agreement applies to any software library or other
program which contains a notice placed by the copyright holder or
other authorized party saying it may be distributed under the terms of
this Lesser General Public License (also called "this License").
Each licensee is addressed as "you".
A "library" means a collection of software functions and/or data
prepared so as to be conveniently linked with application programs
(which use some of those functions and data) to form executables.
The "Library", below, refers to any such software library or work
which has been distributed under these terms. A "work based on the
Library" means either the Library or any derivative work under
copyright law: that is to say, a work containing the Library or a
portion of it, either verbatim or with modifications and/or translated
straightforwardly into another language. (Hereinafter, translation is
included without limitation in the term "modification".)
"Source code" for a work means the preferred form of the work for
making modifications to it. For a library, complete source code means
all the source code for all modules it contains, plus any associated
interface definition files, plus the scripts used to control
compilation and installation of the library.
Activities other than copying, distribution and modification are not
covered by this License; they are outside its scope. The act of
running a program using the Library is not restricted, and output from
such a program is covered only if its contents constitute a work based
on the Library (independent of the use of the Library in a tool for
writing it). Whether that is true depends on what the Library does
and what the program that uses the Library does.
1. You may copy and distribute verbatim copies of the Library's
complete source code as you receive it, in any medium, provided that
you conspicuously and appropriately publish on each copy an
appropriate copyright notice and disclaimer of warranty; keep intact
all the notices that refer to this License and to the absence of any
warranty; and distribute a copy of this License along with the
Library.
You may charge a fee for the physical act of transferring a copy,
and you may at your option offer warranty protection in exchange for a
fee.
2. You may modify your copy or copies of the Library or any portion
of it, thus forming a work based on the Library, and copy and
distribute such modifications or work under the terms of Section 1
above, provided that you also meet all of these conditions:
a) The modified work must itself be a software library.
126
GNU Lesser General Public License Version 2.1, February 1999
b) You must cause the files modified to carry prominent notices
stating that you changed the files and the date of any change.
c) You must cause the whole of the work to be licensed at no
charge to all third parties under the terms of this License.
d) If a facility in the modified Library refers to a function or a
table of data to be supplied by an application program that uses
the facility, other than as an argument passed when the facility
is invoked, then you must make a good faith effort to ensure that,
in the event an application does not supply such function or
table, the facility still operates, and performs whatever part of
its purpose remains meaningful.
(For example, a function in a library to compute square roots has
a purpose that is entirely well-defined independent of the
application. Therefore, Subsection 2d requires that any
application-supplied function or table used by this function must
be optional: if the application does not supply it, the square
root function must still compute square roots.)
These requirements apply to the modified work as a whole. If
identifiable sections of that work are not derived from the Library,
and can be reasonably considered independent and separate works in
themselves, then this License, and its terms, do not apply to those
sections when you distribute them as separate works. But when you
distribute the same sections as part of a whole which is a work based
on the Library, the distribution of the whole must be on the terms of
this License, whose permissions for other licensees extend to the
entire whole, and thus to each and every part regardless of who wrote
it.
Thus, it is not the intent of this section to claim rights or contest
your rights to work written entirely by you; rather, the intent is to
exercise the right to control the distribution of derivative or
collective works based on the Library.
In addition, mere aggregation of another work not based on the Library
with the Library (or with a work based on the Library) on a volume of
a storage or distribution medium does not bring the other work under
the scope of this License.
3. You may opt to apply the terms of the ordinary GNU General Public
License instead of this License to a given copy of the Library. To do
this, you must alter all the notices that refer to this License, so
that they refer to the ordinary GNU General Public License, version 2,
instead of to this License. (If a newer version than version 2 of the
ordinary GNU General Public License has appeared, then you can specify
that version instead if you wish.) Do not make any other change in
these notices.
Once this change is made in a given copy, it is irreversible for
that copy, so the ordinary GNU General Public License applies to all
subsequent copies and derivative works made from that copy.
This option is useful when you wish to copy part of the code of
the Library into a program that is not a library.
4. You may copy and distribute the Library (or a portion or
derivative of it, under Section 2) in object code or executable form
under the terms of Sections 1 and 2 above provided that you accompany
it with the complete corresponding machine-readable source code, which
must be distributed under the terms of Sections 1 and 2 above on a
medium customarily used for software interchange.
If distribution of object code is made by offering access to copy
from a designated place, then offering equivalent access to copy the
127
GNU Lesser General Public License Version 2.1, February 1999
source code from the same place satisfies the requirement to
distribute the source code, even though third parties are not
compelled to copy the source along with the object code.
5. A program that contains no derivative of any portion of the
Library, but is designed to work with the Library by being compiled or
linked with it, is called a "work that uses the Library". Such a
work, in isolation, is not a derivative work of the Library, and
therefore falls outside the scope of this License.
However, linking a "work that uses the Library" with the Library
creates an executable that is a derivative of the Library (because it
contains portions of the Library), rather than a "work that uses the
library". The executable is therefore covered by this License.
Section 6 states terms for distribution of such executables.
When a "work that uses the Library" uses material from a header file
that is part of the Library, the object code for the work may be a
derivative work of the Library even though the source code is not.
Whether this is true is especially significant if the work can be
linked without the Library, or if the work is itself a library. The
threshold for this to be true is not precisely defined by law.
If such an object file uses only numerical parameters, data
structure layouts and accessors, and small macros and small inline
functions (ten lines or less in length), then the use of the object
file is unrestricted, regardless of whether it is legally a derivative
work. (Executables containing this object code plus portions of the
Library will still fall under Section 6.)
Otherwise, if the work is a derivative of the Library, you may
distribute the object code for the work under the terms of Section 6.
Any executables containing that work also fall under Section 6,
whether or not they are linked directly with the Library itself.
6. As an exception to the Sections above, you may also combine or
link a "work that uses the Library" with the Library to produce a
work containing portions of the Library, and distribute that work
under terms of your choice, provided that the terms permit
modification of the work for the customer's own use and reverse
engineering for debugging such modifications.
You must give prominent notice with each copy of the work that the
Library is used in it and that the Library and its use are covered by
this License. You must supply a copy of this License. If the work
during execution displays copyright notices, you must include the
copyright notice for the Library among them, as well as a reference
directing the user to the copy of this License. Also, you must do one
of these things:
a) Accompany the work with the complete corresponding
machine-readable source code for the Library including whatever
changes were used in the work (which must be distributed under
Sections 1 and 2 above); and, if the work is an executable linked
with the Library, with the complete machine-readable "work that
uses the Library", as object code and/or source code, so that the
user can modify the Library and then relink to produce a modified
executable containing the modified Library. (It is understood
that the user who changes the contents of definitions files in the
Library will not necessarily be able to recompile the application
to use the modified definitions.)
b) Use a suitable shared library mechanism for linking with the
Library. A suitable mechanism is one that (1) uses at run time a
copy of the library already present on the user's computer system,
rather than copying library functions into the executable, and (2)
will operate properly with a modified version of the library, if
128
GNU Lesser General Public License Version 2.1, February 1999
the user installs one, as long as the modified version is
interface-compatible with the version that the work was made with.
c) Accompany the work with a written offer, valid for at
least three years, to give the same user the materials
specified in Subsection 6a, above, for a charge no more
than the cost of performing this distribution.
d) If distribution of the work is made by offering access to copy
from a designated place, offer equivalent access to copy the above
specified materials from the same place.
e) Verify that the user has already received a copy of these
materials or that you have already sent this user a copy.
For an executable, the required form of the "work that uses the
Library" must include any data and utility programs needed for
reproducing the executable from it. However, as a special exception,
the materials to be distributed need not include anything that is
normally distributed (in either source or binary form) with the major
components (compiler, kernel, and so on) of the operating system on
which the executable runs, unless that component itself accompanies
the executable.
It may happen that this requirement contradicts the license
restrictions of other proprietary libraries that do not normally
accompany the operating system. Such a contradiction means you cannot
use both them and the Library together in an executable that you
distribute.
7. You may place library facilities that are a work based on the
Library side-by-side in a single library together with other library
facilities not covered by this License, and distribute such a combined
library, provided that the separate distribution of the work based on
the Library and of the other library facilities is otherwise
permitted, and provided that you do these two things:
a) Accompany the combined library with a copy of the same work
based on the Library, uncombined with any other library
facilities. This must be distributed under the terms of the
Sections above.
b) Give prominent notice with the combined library of the fact
that part of it is a work based on the Library, and explaining
where to find the accompanying uncombined form of the same work.
8. You may not copy, modify, sublicense, link with, or distribute
the Library except as expressly provided under this License. Any
attempt otherwise to copy, modify, sublicense, link with, or
distribute the Library is void, and will automatically terminate your
rights under this License. However, parties who have received copies,
or rights, from you under this License will not have their licenses
terminated so long as such parties remain in full compliance.
9. You are not required to accept this License, since you have not
signed it. However, nothing else grants you permission to modify or
distribute the Library or its derivative works. These actions are
prohibited by law if you do not accept this License. Therefore, by
modifying or distributing the Library (or any work based on the
Library), you indicate your acceptance of this License to do so, and
all its terms and conditions for copying, distributing or modifying
the Library or works based on it.
10. Each time you redistribute the Library (or any work based on the
Library), the recipient automatically receives a license from the
original licensor to copy, distribute, link with or modify the Library
subject to these terms and conditions. You may not impose any further
129
GNU Lesser General Public License Version 2.1, February 1999
restrictions on the recipients' exercise of the rights granted herein.
You are not responsible for enforcing compliance by third parties with
this License.
11. If, as a consequence of a court judgment or allegation of patent
infringement or for any other reason (not limited to patent issues),
conditions are imposed on you (whether by court order, agreement or
otherwise) that contradict the conditions of this License, they do not
excuse you from the conditions of this License. If you cannot
distribute so as to satisfy simultaneously your obligations under this
License and any other pertinent obligations, then as a consequence you
may not distribute the Library at all. For example, if a patent
license would not permit royalty-free redistribution of the Library by
all those who receive copies directly or indirectly through you, then
the only way you could satisfy both it and this License would be to
refrain entirely from distribution of the Library.
If any portion of this section is held invalid or unenforceable under
any particular circumstance, the balance of the section is intended
to apply, and the section as a whole is intended to apply in other
circumstances.
It is not the purpose of this section to induce you to infringe any
patents or other property right claims or to contest validity of any
such claims; this section has the sole purpose of protecting the
integrity of the free software distribution system which is
implemented by public license practices. Many people have made
generous contributions to the wide range of software distributed
through that system in reliance on consistent application of that
system; it is up to the author/donor to decide if he or she is willing
to distribute software through any other system and a licensee cannot
impose that choice.
This section is intended to make thoroughly clear what is believed to
be a consequence of the rest of this License.
12. If the distribution and/or use of the Library is restricted in
certain countries either by patents or by copyrighted interfaces, the
original copyright holder who places the Library under this License
may add an explicit geographical distribution limitation excluding
those countries, so that distribution is permitted only in or among
countries not thus excluded. In such case, this License incorporates
the limitation as if written in the body of this License.
13. The Free Software Foundation may publish revised and/or new
versions of the Lesser General Public License from time to time.
Such new versions will be similar in spirit to the present version,
but may differ in detail to address new problems or concerns.
Each version is given a distinguishing version number. If the Library
specifies a version number of this License which applies to it and
"any later version", you have the option of following the terms and
conditions either of that version or of any later version published by
the Free Software Foundation. If the Library does not specify a
license version number, you may choose any version ever published by
the Free Software Foundation.
14. If you wish to incorporate parts of the Library into other free
programs whose distribution conditions are incompatible with these,
write to the author to ask for permission. For software which is
copyrighted by the Free Software Foundation, write to the Free
Software Foundation; we sometimes make exceptions for this. Our
decision will be guided by the two goals of preserving the free status
of all derivatives of our free software and of promoting the sharing
and reuse of software generally.
NO WARRANTY
130
GNU Lesser General Public License Version 2.1, February 1999
15. BECAUSE THE LIBRARY IS LICENSED FREE OF CHARGE, THERE IS NO
WARRANTY FOR THE LIBRARY, TO THE EXTENT PERMITTED BY APPLICABLE LAW.
EXCEPT WHEN OTHERWISE STATED IN WRITING THE COPYRIGHT HOLDERS AND/OR
OTHER PARTIES PROVIDE THE LIBRARY "AS IS" WITHOUT WARRANTY OF ANY
KIND, EITHER EXPRESSED OR IMPLIED, INCLUDING, BUT NOT LIMITED TO, THE
IMPLIED WARRANTIES OF MERCHANTABILITY AND FITNESS FOR A PARTICULAR
PURPOSE. THE ENTIRE RISK AS TO THE QUALITY AND PERFORMANCE OF THE
LIBRARY IS WITH YOU. SHOULD THE LIBRARY PROVE DEFECTIVE, YOU ASSUME
THE COST OF ALL NECESSARY SERVICING, REPAIR OR CORRECTION.
16. IN NO EVENT UNLESS REQUIRED BY APPLICABLE LAW OR AGREED TO IN
WRITING WILL ANY COPYRIGHT HOLDER, OR ANY OTHER PARTY WHO MAY MODIFY
AND/OR REDISTRIBUTE THE LIBRARY AS PERMITTED ABOVE, BE LIABLE TO YOU
FOR DAMAGES, INCLUDING ANY GENERAL, SPECIAL, INCIDENTAL OR
CONSEQUENTIAL DAMAGES ARISING OUT OF THE USE OR INABILITY TO USE THE
LIBRARY (INCLUDING BUT NOT LIMITED TO LOSS OF DATA OR DATA BEING
RENDERED INACCURATE OR LOSSES SUSTAINED BY YOU OR THIRD PARTIES OR A
FAILURE OF THE LIBRARY TO OPERATE WITH ANY OTHER SOFTWARE), EVEN IF
SUCH HOLDER OR OTHER PARTY HAS BEEN ADVISED OF THE POSSIBILITY OF SUCH
DAMAGES.
END OF TERMS AND CONDITIONS
How to Apply These Terms to Your New Libraries
If you develop a new library, and you want it to be of the greatest
possible use to the public, we recommend making it free software that
everyone can redistribute and change. You can do so by permitting
redistribution under these terms (or, alternatively, under the terms
of the ordinary General Public License).
To apply these terms, attach the following notices to the library.
It is safest to attach them to the start of each source file to most
effectively convey the exclusion of warranty; and each file should
have at least the "copyright" line and a pointer to where the full
notice is found.
<one line to give the library's name and a brief idea of what it does.>
Copyright (C) <year> <name of author>
This library is free software; you can redistribute it and/or
modify it under the terms of the GNU Lesser General Public
License as published by the Free Software Foundation; either
version 2.1 of the License, or (at your option) any later version.
This library is distributed in the hope that it will be useful,
but WITHOUT ANY WARRANTY; without even the implied warranty of
MERCHANTABILITY or FITNESS FOR A PARTICULAR PURPOSE. See the GNU
Lesser General Public License for more details.
You should have received a copy of the GNU Lesser General Public
License along with this library; if not, write to the Free Software
Foundation, Inc., 51 Franklin Street, Fifth Floor, Boston, MA
02110-1301 USA
Also add information on how to contact you by electronic and paper mail.
You should also get your employer (if you work as a programmer) or your
school, if any, to sign a "copyright disclaimer" for the library, if
necessary. Here is a sample; alter the names:
Yoyodyne, Inc., hereby disclaims all copyright interest in the
library `Frob' (a library for tweaking knobs) written by James
Random Hacker.
<signature of Ty Coon>, 1 April 1990
131
libevent License
Ty Coon, President of Vice
That's all there is to it!
B.3 libevent License
The following software may be included in this product:
libevent
Copyright (c) 2000-2007 Niels Provos <[email protected]>
All rights reserved.
Redistribution and use in source and binary forms, with or without
modification, are permitted provided that the following conditions
are met:
1. Redistributions of source code must retain the above copyright
notice, this list of conditions and the following disclaimer.
2. Redistributions in binary form must reproduce the above copyright
notice, this list of conditions and the following disclaimer in the
documentation and/or other materials provided with the distribution.
3. The name of the author may not be used to endorse or promote products
derived from this software without specific prior written permission.
THIS SOFTWARE IS PROVIDED BY THE AUTHOR ``AS IS'' AND ANY EXPRESS OR
IMPLIED WARRANTIES, INCLUDING, BUT NOT LIMITED TO, THE IMPLIED WARRANTIES
OF MERCHANTABILITY AND FITNESS FOR A PARTICULAR PURPOSE ARE DISCLAIMED.
IN NO EVENT SHALL THE AUTHOR BE LIABLE FOR ANY DIRECT, INDIRECT,
INCIDENTAL, SPECIAL, EXEMPLARY, OR CONSEQUENTIAL DAMAGES (INCLUDING, BUT
NOT LIMITED TO, PROCUREMENT OF SUBSTITUTE GOODS OR SERVICES; LOSS OF USE,
DATA, OR PROFITS; OR BUSINESS INTERRUPTION) HOWEVER CAUSED AND ON ANY
THEORY OF LIABILITY, WHETHER IN CONTRACT, STRICT LIABILITY, OR TORT
(INCLUDING NEGLIGENCE OR OTHERWISE) ARISING IN ANY WAY OUT OF THE USE OF
THIS SOFTWARE, EVEN IF ADVISED OF THE POSSIBILITY OF SUCH DAMAGE
==
Parts developed by Adam Langley
==
==
log.c
Based on err.c, which was adapted from OpenBSD libc *err*warncode.
Copyright (c) 2005 Nick Mathewson
Copyright (c) 2000 Dug Song
Copyright (c) 1993 The Regents of the University of California.
All rights reserved.
Redistribution and use in source and binary forms, with or without
modification, are permitted provided that the following conditions
are met:
1. Redistributions of source code must retain the above copyright
notice, this list of conditions and the following disclaimer.
2. Redistributions in binary form must reproduce the above copyright
notice, this list of conditions and the following disclaimer in
the documentation and/or other materials provided with the
distribution.
3. Neither the name of the University nor the names of its
contributors may be used to endorse or promote products derived
from this software without specific prior written permission.
THIS SOFTWARE IS PROVIDED BY THE REGENTS AND CONTRIBUTORS "AS IS"
AND ANY EXPRESS OR IMPLIED WARRANTIES, INCLUDING, BUT NOT LIMITED
TO, THE IMPLIED WARRANTIES OF MERCHANTABILITY AND FITNESS FOR A
PARTICULAR PURPOSE ARE DISCLAIMED. IN NO EVENT SHALL THE REGENTS
132
libevent License
OR CONTRIBUTORS BE LIABLE FOR ANY DIRECT, INDIRECT, INCIDENTAL,
SPECIAL, EXEMPLARY, OR CONSEQUENTIAL DAMAGES (INCLUDING, BUT NOT
LIMITED TO, PROCUREMENT OF SUBSTITUTE GOODS OR SERVICES; LOSS OF
USE, DATA, OR PROFITS; OR BUSINESS INTERRUPTION) HOWEVER CAUSED
AND ON ANY THEORY OF LIABILITY, WHETHER IN CONTRACT, STRICT
LIABILITY, OR TORT (INCLUDING NEGLIGENCE OR OTHERWISE) ARISING
IN ANY WAY OUT OF THE USE OF THIS SOFTWARE, EVEN IF ADVISED OF
THE POSSIBILITY OF SUCH DAMAGE.
==
==
min_heap.h
Copyright (c) 2006 Maxim Yegorushkin
All rights reserved.
Redistribution and use in source and binary forms, with or without
modification, are permitted provided that the following conditions
are met:
1. Redistributions of source code must retain the above copyright
notice, this list of conditions and the following disclaimer.
2. Redistributions in binary form must reproduce the above copyright
notice, this list of conditions and the following disclaimer in
the documentation and/or other materials provided with the
distribution.
3. The name of the author may not be used to endorse or promote
products derived from this software without specific prior
written permission.
THIS SOFTWARE IS PROVIDED BY THE AUTHOR "AS IS" AND ANY EXPRESS
OR IMPLIED WARRANTIES, INCLUDING, BUT NOT LIMITED TO, THE IMPLIED
WARRANTIES OF MERCHANTABILITY AND FITNESS FOR A PARTICULAR PURPOSE
ARE DISCLAIMED. IN NO EVENT SHALL THE AUTHOR BE LIABLE FOR ANY
DIRECT, INDIRECT, INCIDENTAL, SPECIAL, EXEMPLARY, OR CONSEQUENTIAL
DAMAGES (INCLUDING, BUT NOT LIMITED TO, PROCUREMENT OF SUBSTITUTE
GOODS OR SERVICES; LOSS OF USE, DATA, OR PROFITS; OR BUSINESS
INTERRUPTION) HOWEVER CAUSED AND ON ANY THEORY OF LIABILITY, WHETHER
IN CONTRACT, STRICT LIABILITY, OR TORT (INCLUDING NEGLIGENCE OR
OTHERWISE) ARISING IN ANY WAY OUT OF THE USE OF THIS SOFTWARE, EVEN
IF ADVISED OF THE POSSIBILITY OF SUCH DAMAGE.
==
==
win32.c
Copyright 2000-2002 Niels Provos
Copyright 2003 Michael A. Davis
All rights reserved.
Redistribution and use in source and binary forms, with or without
modification, are permitted provided that the following conditions
are met:
1. Redistributions of source code must retain the above copyright
notice, this list of conditions and the following disclaimer.
2. Redistributions in binary form must reproduce the above copyright
notice, this list of conditions and the following disclaimer in
the documentation and/or other materials provided with the
distribution.
3. The name of the author may not be used to endorse or promote
products derived from this software without specific prior
written permission.
THIS SOFTWARE IS PROVIDED BY THE AUTHOR "AS IS" AND ANY EXPRESS
OR IMPLIED WARRANTIES, INCLUDING, BUT NOT LIMITED TO, THE IMPLIED
WARRANTIES OF MERCHANTABILITY AND FITNESS FOR A PARTICULAR PURPOSE
ARE DISCLAIMED. IN NO EVENT SHALL THE AUTHOR BE LIABLE FOR ANY
DIRECT, INDIRECT, INCIDENTAL, SPECIAL, EXEMPLARY, OR CONSEQUENTIAL
133
libintl License
DAMAGES (INCLUDING, BUT NOT LIMITED TO, PROCUREMENT OF SUBSTITUTE
GOODS OR SERVICES; LOSS OF USE, DATA, OR PROFITS; OR BUSINESS
INTERRUPTION) HOWEVER CAUSED AND ON ANY THEORY OF LIABILITY, WHETHER
IN CONTRACT, STRICT LIABILITY, OR TORT (INCLUDING NEGLIGENCE OR
OTHERWISE) ARISING IN ANY WAY OUT OF THE USE OF THIS SOFTWARE, EVEN
IF ADVISED OF THE POSSIBILITY OF SUCH DAMAGE.
==
B.4 libintl License
The following software may be included in this product:
libintl
Copyright (C) 1994 X Consortium
Permission is hereby granted, free of charge, to any person obtaining a copy of
this software and associated documentation files (the "Software"), to deal in
the Software without restriction, including without limitation the rights to
use, copy, modify, merge, publish, distribute, sublicense, and/or sell copies of
the Software, and to permit persons to whom the Software is furnished to do so,
subject to the following conditions:
The above copyright notice and this permission notice shall be included in all
copies or substantial portions of the Software.
THE SOFTWARE IS PROVIDED "AS IS", WITHOUT WARRANTY OF ANY KIND, EXPRESS OR
IMPLIED, INCLUDING BUT NOT LIMITED TO THE WARRANTIES OF MERCHANTABILITY, FITNESS
FOR A PARTICULAR PURPOSE AND NONINFRINGEMENT. IN NO EVENT SHALL THE X CONSORTIUM
BE LIABLE FOR ANY CLAIM, DAMAGES OR OTHER LIABILITY, WHETHER IN AN ACTION OF
CONTRACT, TORT OR OTHERWISE, ARISING FROM, OUT OF OR IN CONNECTION WITH THE
SOFTWARE OR THE USE OR OTHER DEALINGS IN THE SOFTWARE.
Except as contained in this notice, the name of the X Consortium shall not be
used in advertising or otherwise to promote the sale, use or other dealings in
this Software without prior written authorization from the X Consortium.
FSF changes to this file are in the public domain.
.
Copyright 1996-2007 Free Software Foundation, Inc. Taken from GNU libtool, 2001
Originally by Gordon Matzigkeit <[email protected]>, 1996
This file is free software; the Free Software Foundation gives unlimited
permission to copy and/or distribute it, with or without modifications, as long
as this notice is preserved.
.
You are receiving a copy of the libintl library. The terms of the Oracle license
do NOT apply to the libintl library; it is licensed under the following license,
separately from the Oracle programs you receive. If you do not wish to install
this program, you may create an "exclude" file and run tar with the X option.
This component is licensed under Section B.2, “GNU Lesser General Public License Version 2.1, February
1999”.
B.5 LPeg Library License
The following software may be included in this product:
LPeg
Use of any of this software is governed by the terms of the license below:
134
Lua (liblua) License
Copyright © 2008 Lua.org, PUC-Rio.
Permission is hereby granted, free of charge, to any person obtaining a copy of
this software and associated documentation files (the "Software"), to deal in
the Software without restriction, including without limitation the rights to
use, copy, modify, merge, publish, distribute, sublicense, and/or sell copies of
the Software, and to permit persons to whom the Software is furnished to do so,
subject to the following conditions:
The above copyright notice and this permission notice shall be included in all
copies or substantial portions of the Software.
THE SOFTWARE IS PROVIDED "AS IS", WITHOUT WARRANTY OF ANY KIND, EXPRESS OR
IMPLIED, INCLUDING BUT NOT LIMITED TO THE WARRANTIES OF MERCHANTABILITY, FITNESS
FOR A PARTICULAR PURPOSE AND NONINFRINGEMENT. IN NO EVENT SHALL THE AUTHORS OR
COPYRIGHT HOLDERS BE LIABLE FOR ANY CLAIM, DAMAGES OR OTHER LIABILITY, WHETHER
IN AN ACTION OF CONTRACT, TORT OR OTHERWISE, ARISING FROM, OUT OF OR IN
CONNECTION WITH THE SOFTWARE OR THE USE OR OTHER DEALINGS IN THE SOFTWARE.
B.6 Lua (liblua) License
The following software may be included in this product:
Lua (liblua)
Copyright © 1994–2008 Lua.org, PUC-Rio.
Permission is hereby granted, free of charge, to any person obtaining
a copy of this software and associated documentation files (the
"Software"), to deal in the Software without restriction, including
without limitation the rights to use, copy, modify, merge, publish,
distribute, sublicense, and/or sell copies of the Software, and to
permit persons to whom the Software is furnished to do so, subject
to the following conditions:
The above copyright notice and this permission notice shall be
included in all copies or substantial portions of the Software.
THE SOFTWARE IS PROVIDED "AS IS", WITHOUT WARRANTY OF ANY KIND,
EXPRESS OR IMPLIED, INCLUDING BUT NOT LIMITED TO THE WARRANTIES
OF MERCHANTABILITY, FITNESS FOR A PARTICULAR PURPOSE AND
NONINFRINGEMENT. IN NO EVENT SHALL THE AUTHORS OR COPYRIGHT
HOLDERS BE LIABLE FOR ANY CLAIM, DAMAGES OR OTHER LIABILITY,
WHETHER IN AN ACTION OF CONTRACT, TORT OR OTHERWISE, ARISING
FROM, OUT OF OR IN CONNECTION WITH THE SOFTWARE OR THE USE OR
OTHER DEALINGS IN THE SOFTWARE.
B.7 LuaFileSystem Library License
The following software may be included in this product:
LuaFileSystem
Copyright © 2003 Kepler Project.
Permission is hereby granted, free of charge, to any person obtaining
a copy of this software and associated documentation files (the
"Software"), to deal in the Software without restriction, including
without limitation the rights to use, copy, modify, merge, publish,
distribute, sublicense, and/or sell copies of the Software, and to
permit persons to whom the Software is furnished to do so, subject
to the following conditions:
135
PCRE License
The above copyright notice and this permission notice shall be
included in all copies or substantial portions of the Software.
THE SOFTWARE IS PROVIDED "AS IS", WITHOUT WARRANTY OF ANY KIND,
EXPRESS OR IMPLIED, INCLUDING BUT NOT LIMITED TO THE WARRANTIES OF
MERCHANTABILITY, FITNESS FOR A PARTICULAR PURPOSE AND NONINFRINGEMENT.
IN NO EVENT SHALL THE AUTHORS OR COPYRIGHT HOLDERS BE LIABLE FOR
ANY CLAIM, DAMAGES OR OTHER LIABILITY, WHETHER IN AN ACTION OF
CONTRACT, TORT OR OTHERWISE, ARISING FROM, OUT OF OR IN CONNECTION
WITH THE SOFTWARE OR THE USE OR OTHER DEALINGS IN THE SOFTWARE.
B.8 PCRE License
The following software may be included in this product:
PCRE (Perl Compatible Regular Expressions) Library
PCRE LICENCE
PCRE is a library of functions to support regular expressions
whose syntax and semantics are as close as possible to those
of the Perl 5 language.
Release 7 of PCRE is distributed under the terms of the "BSD"
licence, as specified below. The documentation for PCRE,
supplied in the "doc" directory, is distributed under the same
terms as the software itself.
The basic library functions are written in C and are
freestanding. Also included in the distribution is a set
of C++ wrapper functions.
THE BASIC LIBRARY FUNCTIONS
--------------------------Written by:
Philip Hazel
Email local part: ph10
Email domain:
cam.ac.uk
University of Cambridge Computing Service,
Cambridge, England. Phone: +44 1223 334714.
Copyright (c) 1997-2006 University of Cambridge
All rights reserved.
THE C++ WRAPPER FUNCTIONS
------------------------Contributed by:
Google Inc.
Copyright (c) 2006, Google Inc.
All rights reserved.
THE "BSD" LICENCE
----------------Redistribution and use in source and binary forms,
with or without modification, are permitted provided
that the following conditions are met:
* Redistributions of source code must retain the above
copyright notice, this list of conditions and the
following disclaimer.
* Redistributions in binary form must reproduce the
above copyright notice, this list of conditions and
the following disclaimer in the documentation and/or
136
SHA-1 in C License
other materials provided with the distribution.
* Neither the name of the University of Cambridge nor
the name of Google Inc. nor the names of their contributors
may be used to endorse or promote products derived from
this software without specific prior written permission.
THIS SOFTWARE IS PROVIDED BY THE COPYRIGHT HOLDERS AND
CONTRIBUTORS "AS IS" AND ANY EXPRESS OR IMPLIED WARRANTIES,
INCLUDING, BUT NOT LIMITED TO, THE IMPLIED WARRANTIES OF
MERCHANTABILITY AND FITNESS FOR A PARTICULAR PURPOSE ARE
DISCLAIMED. IN NO EVENT SHALL THE COPYRIGHT OWNER OR CONTRIBUTORS
BE LIABLE FOR ANY DIRECT, INDIRECT, INCIDENTAL, SPECIAL, EXEMPLARY,
OR CONSEQUENTIAL DAMAGES (INCLUDING, BUT NOT LIMITED TO, PROCUREMENT
OF SUBSTITUTE GOODS OR SERVICES; LOSS OF USE, DATA, OR PROFITS;
OR BUSINESS INTERRUPTION) HOWEVER CAUSED AND ON ANY THEORY OF
LIABILITY, WHETHER IN CONTRACT, STRICT LIABILITY, OR TORT (INCLUDING
NEGLIGENCE OR OTHERWISE) ARISING IN ANY WAY OUT OF THE USE OF
THIS SOFTWARE, EVEN IF ADVISED OF THE POSSIBILITY OF SUCH DAMAGE.
End
B.9 SHA-1 in C License
The following software may be included in this product:
SHA-1 in C
SHA-1 in C
By Steve Reid <[email protected]>
100% Public Domain
137
138
Appendix C Attribute Summary Tables
Table of Contents
C.1
C.2
C.3
C.4
C.5
Management Node Configuration Parameters ...........................................................................
Data Node Configuration Parameters ........................................................................................
API Node Configuration Parameters .........................................................................................
Other Node Configuration Parameters ......................................................................................
MySQL Server Option and Variable Reference for MySQL Cluster ..............................................
139
141
156
159
163
This appendix provides tables of configuration attributes, grouped according to their process type or
by the section of the MySQL Cluster configuration file in which they appear. This information is current
for MySQL Cluster NDB 7.3. For information regarding MySQL Cluster NDB 7.2 and earlier versions of
MySQL Cluster, see Configuration of MySQL Cluster, and Configuration of MySQL Cluster NDB 6.1-7.1.
Each table provides the following information:
• Name: The name of the attribute. The name of the attribute is linked to the attribute's full description in
the online MySQL Cluster documentation.
• Type/Units: The data type or unit by which the attribute is measured.
• Range: The default value of the attribute if not set by the user, and the minimum and maximum values
which can be set for the attribute.
• Restart Type: The type of restart required for a change in value in this attribute to be applied in a running
MySQL Cluster. The restart type is indicated in this column by an N for a node restart, or an S for a
system restart. Data node attributes: The presence of an I in this column indicates that a data node must
be restarted using the --initial option for a change to take effect.
Attributes having restart type N can be changed using a rolling restart of the cluster, and thus can
be changed at any time, even if the cluster is running. Changing an attribute whose restart type is S
requires a complete shutdown of all cluster nodes, followed by a restart of the nodes once all of them
have been stopped. Currently, such attributes can be set only before starting a cluster for the first time.
C.1 Management Node Configuration Parameters
Table C.1 Management Node Configuration Parameters
Type or Units
Default Value
Minimum/
Maximum
or Permitted
Values
Parameter Name
Restart
Type
In
Version ...
(and later)
N
NDB 7.3.0
N
NDB 7.3.0
milliseconds
0
ArbitrationDelay
0 / 4294967039
(0xFFFFFEFF)
0-2
ArbitrationRank
1
139
Management Node Configuration Parameters
Type or Units
Default Value
Minimum/
Maximum
or Permitted
Values
Parameter Name
Restart
Type
In
Version ...
(and later)
N
NDB 7.3.0
S
NDB 7.3.0
N
NDB 7.3.3
S
NDB 7.3.0
N
NDB 7.3.0
IS
NDB 7.3.0
N
NDB 7.3.0
N
NDB 7.3.0
IS
NDB 7.3.0
S
NDB 7.3.0
0/2
path
.
DataDir
...
name
[none]
ExecuteOnComputer
...
milliseconds
1500
HeartbeatIntervalMgmdMgmd
100 /
4294967039
(0xFFFFFEFF)
string
[none]
HeartbeatThreadPriority
...
name or IP
address
HostName
[none]
...
unsigned
[none]
Id
1 / 255
{CONSOLE|
SYSLOG|FILE}
LogDestination
[see text]
...
unsigned
100
MaxNoOfSavedEvents
0 / 4294967039
(0xFFFFFEFF)
unsigned
[none]
NodeId
1 / 255
unsigned
PortNumber
1186
140
Data Node Configuration Parameters
Type or Units
Default Value
Minimum/
Maximum
or Permitted
Values
Parameter Name
Restart
Type
In
Version ...
(and later)
N
NDB 7.3.0
N
NDB 7.3.0
N
NDB 7.3.0
Restart
Type
In
Version ...
(and later)
N
NDB 7.3.0
N
NDB 7.3.0
N
NDB 7.3.0
IN
NDB 7.3.0
0 / 64K
unsigned
[none]
PortNumberStats
0 / 64K
bytes
0
TotalSendBufferMemory
256K /
4294967039
(0xFFFFFEFF)
boolean
false
wan
true, false
C.2 Data Node Configuration Parameters
Table C.2 Data Node Configuration Parameters
Type or Units
Default Value
Minimum/
Maximum
or Permitted
Values
Parameter Name
enumeration
Default
Arbitration
Default,
Disabled,
WaitExternal
milliseconds
7500
ArbitrationTimeout
10 /
4294967039
(0xFFFFFEFF)
bytes
16M
BackupDataBufferSize
0 / 4294967039
(0xFFFFFEFF)
path
BackupDataDir
141
Data Node Configuration Parameters
Type or Units
Default Value
Minimum/
Maximum
or Permitted
Values
Parameter Name
Restart
Type
In
Version ...
(and later)
N
NDB 7.4.8
N
NDB 7.3.0
N
NDB 7.3.0
N
NDB 7.3.0
N
NDB 7.3.0
N
NDB 7.3.0
N
NDB 7.3.0
S
NDB 7.3.0
N
NDB 7.3.0
FileSystemPath
...
percent
50
BackupDiskWriteSpeedPct
0 / 90
bytes
16M
BackupLogBufferSize
0 / 4294967039
(0xFFFFFEFF)
bytes
1M
BackupMaxWriteSize
2K /
4294967039
(0xFFFFFEFF)
bytes
32M
BackupMemory
0 / 4294967039
(0xFFFFFEFF)
seconds
0
BackupReportFrequency
0 / 4294967039
(0xFFFFFEFF)
bytes
256K
BackupWriteSize
2K /
4294967039
(0xFFFFFEFF)
integer
256
BatchSizePerLocalScan
1 / 992
numeric
0
BuildIndexThreads
0 / 128
boolean
false
CompressedBackup
true, false
142
Data Node Configuration Parameters
Type or Units
Default Value
Minimum/
Maximum
or Permitted
Values
Parameter Name
Restart
Type
In
Version ...
(and later)
N
NDB 7.3.0
N
NDB 7.3.0
S
NDB 7.3.0
IN
NDB 7.3.0
N
NDB 7.3.0
N
NDB 7.3.0
N
NDB 7.3.0
N
NDB 7.3.0
N
NDB 7.3.0
N
NDB 7.3.0
boolean
false
CompressedLCP
true, false
milliseconds
0
ConnectCheckIntervalDelay
0 / 4294967039
(0xFFFFFEFF)
boolean
true
CrashOnCorruptedTuple
true, false
path
.
DataDir
...
bytes
80M
DataMemory
1M / 1024G
LDM threads
3840
DefaultHashMapSize
0 / 3840
bytes
undefined
DictTrace
0 / 100
bytes
10M
DiskCheckpointSpeed
1M /
4294967039
(0xFFFFFEFF)
bytes
100M
DiskCheckpointSpeedInRestart
1M /
4294967039
(0xFFFFFEFF)
threads
DiskIOThreadPool
2
143
Data Node Configuration Parameters
Type or Units
Default Value
Minimum/
Maximum
or Permitted
Values
Parameter Name
Restart
Type
In
Version ...
(and later)
IS
NDB 7.3.0
N
NDB 7.4.3
N
NDB 7.3.0
N
NDB 7.3.0
S
NDB 7.3.0
N
NDB 7.3.0
IN
NDB 7.3.0
IN
NDB 7.3.0
IN
NDB 7.3.0
IN
NDB 7.3.0
0 / 4294967039
(0xFFFFFEFF)
true|false (1|0)
false
Diskless
true, false
32K pages
10
DiskPageBufferEntries
1 / 1000
bytes
64M
DiskPageBufferMemory
4M / 1T
bytes
4M
DiskSyncSize
32K /
4294967039
(0xFFFFFEFF)
name
[none]
ExecuteOnComputer
...
bytes
0
ExtraSendBufferMemory
0 / 32G
path
DataDir
FileSystemPath
...
filename
[see text]
FileSystemPathDataFiles
...
filename
FileSystemPath
FileSystemPathDD
...
filename
[see text]
FileSystemPathUndoFiles
...
144
Data Node Configuration Parameters
Type or Units
Default Value
Minimum/
Maximum
or Permitted
Values
Parameter Name
Restart
Type
In
Version ...
(and later)
IN
NDB 7.3.0
N
NDB 7.3.0
N
NDB 7.3.0
S
NDB 7.3.0
N
NDB 7.3.0
IS
NDB 7.3.0
N
NDB 7.3.0
S
NDB 7.3.0
S
NDB 7.3.0
IN
NDB 7.3.0
bytes
16M
FragmentLogFileSize
4M / 1G
milliseconds
1500
HeartbeatIntervalDbApi
100 /
4294967039
(0xFFFFFEFF)
milliseconds
5000
HeartbeatIntervalDbDb
10 /
4294967039
(0xFFFFFEFF)
numeric
0
HeartbeatOrder
0 / 65535
name or IP
address
HostName
localhost
...
unsigned
[none]
Id
1 / 48
bytes
18M
IndexMemory
1M / 1T
boolean
false
IndexStatAutoCreate
false, true
boolean
false
IndexStatAutoUpdate
false, true
percentage
IndexStatSaveScale
100
145
Data Node Configuration Parameters
Type or Units
Default Value
Minimum/
Maximum
or Permitted
Values
Parameter Name
Restart
Type
In
Version ...
(and later)
IN
NDB 7.3.0
IN
NDB 7.3.0
IN
NDB 7.3.0
IN
NDB 7.3.0
IN
NDB 7.3.0
S
NDB 7.3.0
N
NDB 7.3.0
S
NDB 7.3.0
N
NDB 7.3.0
N
NDB 7.3.3
0 / 4294967039
(0xFFFFFEFF)
bytes
32768
IndexStatSaveSize
0 / 4294967039
(0xFFFFFEFF)
percentage
100
IndexStatTriggerPct
0 / 4294967039
(0xFFFFFEFF)
percentage
100
IndexStatTriggerScale
0 / 4294967039
(0xFFFFFEFF)
seconds
60
IndexStatUpdateDelay
0 / 4294967039
(0xFFFFFEFF)
[see values]
SPARSE
InitFragmentLogFiles
SPARSE, FULL
string
[see text]
InitialLogFileGroup
...
files
27
InitialNoOfOpenFiles
20 /
4294967039
(0xFFFFFEFF)
string
[see text]
InitialTablespace
...
numeric
1
LateAlloc
0/1
second
LcpScanProgressTimeout
146
Data Node Configuration Parameters
Type or Units
Default Value
Minimum/
Maximum
or Permitted
Values
Parameter Name
Restart
Type
In
Version ...
(and later)
N
NDB 7.3.0
N
NDB 7.3.0
N
NDB 7.3.0
N
NDB 7.3.0
N
NDB 7.3.0
N
NDB 7.3.0
N
NDB 7.3.0
N
NDB 7.3.0
N
NDB 7.3.0
N
NDB 7.3.0
N
NDB 7.3.0
60
0 / 4294967039
(0xFFFFFEFF)
CPU ID
64K
LockExecuteThreadToCPU
0 / 64K
CPU ID
[none]
LockMaintThreadsToCPU
0 / 64K
numeric
0
LockPagesInMainMemory
0/2
log level
0
LogLevelCheckpoint
0 / 15
levelr
0
LogLevelCongestion
0 / 15
integer
0
LogLevelConnection
0 / 15
integer
0
LogLevelError
0 / 15
integer
0
LogLevelInfo
0 / 15
integer
0
LogLevelNodeRestart
0 / 15
integer
0
LogLevelShutdown
0 / 15
integer
LogLevelStartup
147
Data Node Configuration Parameters
Type or Units
Default Value
Minimum/
Maximum
or Permitted
Values
Parameter Name
Restart
Type
In
Version ...
(and later)
N
NDB 7.3.0
N
NDB 7.3.5
N
NDB 7.3.0
N
NDB 7.3.0
N
NDB 7.3.0
S
NDB 7.4.1
S
NDB 7.4.1
S
NDB 7.4.1
N
NDB 7.3.0
1
0 / 15
integer
0
LogLevelStatistic
0 / 15
bytes
64M
LongMessageBuffer
512K /
4294967039
(0xFFFFFEFF)
unsigned
32M
MaxAllocate
1M / 1G
epochs
100
MaxBufferedEpochs
0 / 100000
bytes
26214400
26214400
(0x01900000) /
4294967039
(0xFFFFFEFF)
MaxBufferedEpochBytes
numeric
20M
MaxDiskWriteSpeed
1M / 1024G
numeric
50M
MaxDiskWriteSpeedOtherNodeRestart
1M / 1024G
numeric
200M
MaxDiskWriteSpeedOwnRestart
1M / 1024G
operations
(DML)
4294967295
MaxDMLOperationsPerTransaction
32 /
4294967295
148
Data Node Configuration Parameters
Type or Units
Default Value
Minimum/
Maximum
or Permitted
Values
Parameter Name
Restart
Type
In
Version ...
(and later)
N
NDB 7.3.0
N
NDB 7.3.0
N
NDB 7.3.0
N
NDB 7.3.0
N
NDB 7.3.0
N
NDB 7.3.0
N
NDB 7.3.0
N
NDB 7.3.0
N
NDB 7.3.0
seconds
0
MaxLCPStartDelay
0 / 600
integer
1000
MaxNoOfAttributes
32 /
4294967039
(0xFFFFFEFF)
integer
8K
MaxNoOfConcurrentIndexOperations
0 / 4294967039
(0xFFFFFEFF)
integer
32K
MaxNoOfConcurrentOperations
32 /
4294967039
(0xFFFFFEFF)
integer
256
MaxNoOfConcurrentScans
2 / 500
unsigned
256
MaxNoOfConcurrentSubOperations
0 / 4294967039
(0xFFFFFEFF)
integer
4096
MaxNoOfConcurrentTransactions
32 /
4294967039
(0xFFFFFEFF)
integer
4000
MaxNoOfFiredTriggers
0 / 4294967039
(0xFFFFFEFF)
integer
MaxNoOfLocalOperations
UNDEFINED
149
Data Node Configuration Parameters
Type or Units
Default Value
Minimum/
Maximum
or Permitted
Values
Parameter Name
Restart
Type
In
Version ...
(and later)
N
NDB 7.3.0
N
NDB 7.3.0
N
NDB 7.3.0
N
NDB 7.3.0
N
NDB 7.3.0
N
NDB 7.3.0
N
NDB 7.3.0
N
NDB 7.3.0
N
NDB 7.3.0
32 /
4294967039
(0xFFFFFEFF)
integer
[see text]
MaxNoOfLocalScans
32 /
4294967039
(0xFFFFFEFF)
unsigned
0
MaxNoOfOpenFiles
20 /
4294967039
(0xFFFFFEFF)
integer
128
MaxNoOfOrderedIndexes
0 / 4294967039
(0xFFFFFEFF)
integer
25
MaxNoOfSavedMessages
0 / 4294967039
(0xFFFFFEFF)
unsigned
0
MaxNoOfSubscribers
0 / 4294967039
(0xFFFFFEFF)
unsigned
0
MaxNoOfSubscriptions
0 / 4294967039
(0xFFFFFEFF)
integer
128
MaxNoOfTables
8 / 20320
integer
768
MaxNoOfTriggers
0 / 4294967039
(0xFFFFFEFF)
integer
MaxNoOfUniqueHashIndexes
150
Data Node Configuration Parameters
Type or Units
Default Value
Minimum/
Maximum
or Permitted
Values
Parameter Name
Restart
Type
In
Version ...
(and later)
S
NDB 7.4.3
N
NDB 7.3.0
N
NDB 7.3.0
N
NDB 7.3.0
S
NDB 7.4.1
N
NDB 7.3.0
IS
NDB 7.3.0
IS
NDB 7.3.0
IN
NDB 7.3.0
IS
NDB 7.3.0
64
0 / 4294967039
(0xFFFFFEFF)
integer
0
MaxParallelCopyInstances
0 / 64
bytes
256
MaxParallelScansPerFragment
1 / 4294967039
(0xFFFFFEFF)
unsigned
3
MaxStartFailRetries
0 / 4294967039
(0xFFFFFEFF)
unsigned
0
MemReportFrequency
0 / 4294967039
(0xFFFFFEFF)
numeric
10M
MinDiskWriteSpeed
1M / 1024G
unsigned
5
MinFreePct
0 / 100
[none]
NodeGroup
0 / 65536
unsigned
[none]
NodeId
1 / 48
integer
16
NoOfFragmentLogFiles
3 / 4294967039
(0xFFFFFEFF)
integer
NoOfReplicas
151
Data Node Configuration Parameters
Type or Units
Default Value
Minimum/
Maximum
or Permitted
Values
Parameter Name
Restart
Type
In
Version ...
(and later)
N
NDB 7.3.0
N
NDB 7.3.0
N
NDB 7.3.0
N
NDB 7.3.0
N
NDB 7.3.0
N
NDB 7.3.0
N
NDB 7.3.0
N
NDB 7.3.0
N
NDB 7.3.0
N
NDB 7.3.0
2
1/4
boolean
1
Numa
...
boolean
false
ODirect
true, false
boolean
false
RealtimeScheduler
true, false
bytes
32M
RedoBuffer
1M /
4294967039
(0xFFFFFEFF)
numeric
3
RedoOverCommitCounter
0 / 4294967039
(0xFFFFFEFF)
seconds
20
RedoOverCommitLimit
0 / 4294967039
(0xFFFFFEFF)
bytes
256K
ReservedSendBufferMemory
0 / 4294967039
(0xFFFFFEFF)
error code
2
RestartOnErrorInsert
0/4
µsec
50
SchedulerExecutionTimer
0 / 11000
µsec
SchedulerSpinTimer
152
Data Node Configuration Parameters
Type or Units
Default Value
Minimum/
Maximum
or Permitted
Values
Parameter Name
Restart
Type
In
Version ...
(and later)
S
NDB 7.3.0
N
NDB 7.3.0
N
NDB 7.3.0
N
NDB 7.3.0
N
NDB 7.3.0
N
NDB 7.3.0
N
NDB 7.3.0
N
NDB 7.3.0
N
NDB 7.3.0
0
0 / 500
unsigned
[none]
ServerPort
1 / 64K
bytes
128M
SharedGlobalMemory
0 / 64T
unsigned
0
StartFailRetryDelay
0 / 4294967039
(0xFFFFFEFF)
milliseconds
0
StartFailureTimeout
0 / 4294967039
(0xFFFFFEFF)
milliseconds
15000
StartNoNodeGroupTimeout
0 / 4294967039
(0xFFFFFEFF)
milliseconds
30000
StartPartialTimeout
0 / 4294967039
(0xFFFFFEFF)
milliseconds
60000
StartPartitionedTimeout
0 / 4294967039
(0xFFFFFEFF)
seconds
0
StartupStatusReportFrequency
0 / 4294967039
(0xFFFFFEFF)
boolean
1
StopOnError
0, 1
153
Data Node Configuration Parameters
Type or Units
Default Value
Minimum/
Maximum
or Permitted
Values
Parameter Name
Restart
Type
In
Version ...
(and later)
S
NDB 7.3.0
N
NDB 7.3.0
N
NDB 7.3.0
N
NDB 7.3.0
N
NDB 7.3.0
N
NDB 7.3.9
N
NDB 7.3.0
N
NDB 7.3.0
N
NDB 7.3.0
% or bytes
25
StringMemory
0 / 4294967039
(0xFFFFFEFF)
boolean
false
TcpBind_INADDR_ANY
true, false
milliseconds
100
TimeBetweenEpochs
0 / 32000
milliseconds
0
TimeBetweenEpochsTimeout
0 / 256000
milliseconds
2000
TimeBetweenGlobalCheckpoints
20 / 32000
milliseconds
120000
TimeBetweenGlobalCheckpointsTimeout
10 /
4294967039
(0xFFFFFEFF)
milliseconds
1000
TimeBetweenInactiveTransactionAbortCheck
1000 /
4294967039
(0xFFFFFEFF)
number of 4byte words,
as a base-2
logarithm
TimeBetweenLocalCheckpoints
20
0 / 31
milliseconds
TimeBetweenWatchDogCheck
6000
154
Data Node Configuration Parameters
Type or Units
Default Value
Minimum/
Maximum
or Permitted
Values
Parameter Name
Restart
Type
In
Version ...
(and later)
N
NDB 7.3.0
N
NDB 7.3.0
N
NDB 7.3.0
N
NDB 7.3.0
N
NDB 7.3.0
N
NDB 7.3.0
N
NDB 7.3.0
N
NDB 7.3.0
70 /
4294967039
(0xFFFFFEFF)
milliseconds
6000
TimeBetweenWatchDogCheckInitial
70 /
4294967039
(0xFFFFFEFF)
bytes
0
TotalSendBufferMemory
256K /
4294967039
(0xFFFFFEFF)
bytes
1M
TransactionBufferMemory
1K /
4294967039
(0xFFFFFEFF)
milliseconds
1200
TransactionDeadlockDetectionTimeout
50 /
4294967039
(0xFFFFFEFF)
milliseconds
[see text]
TransactionInactiveTimeout
0 / 4294967039
(0xFFFFFEFF)
boolean
false
TwoPassInitialNodeRestartCopy
true, false
unsigned
16M
UndoDataBuffer
1M /
4294967039
(0xFFFFFEFF)
unsigned
UndoIndexBuffer
2M
155
API Node Configuration Parameters
Type or Units
Default Value
Minimum/
Maximum
or Permitted
Values
Parameter Name
Restart
Type
In
Version ...
(and later)
Restart
Type
In
Version ...
(and later)
IS
NDB 7.3.3
IN
NDB 7.3.3
IS
NDB 7.3.0
Restart
Type
In
Version ...
(and later)
N
NDB 7.3.0
N
NDB 7.3.0
1M /
4294967039
(0xFFFFFEFF)
Table C.3 Multi-Threaded Data Node Configuration Parameters
Type or Units
Default Value
Minimum/
Maximum
or Permitted
Values
Parameter Name
integer
2
MaxNoOfExecutionThreads
2 / 72
numeric
4
NoOfFragmentLogParts
4, 8, 12, 16, 24,
32
string
''
ThreadConfig
...
C.3 API Node Configuration Parameters
Table C.4 SQL Node / API Node Configuration Parameters
Type or Units
Default Value
Minimum/
Maximum
or Permitted
Values
Parameter Name
milliseconds
0
ArbitrationDelay
0 / 4294967039
(0xFFFFFEFF)
0-2
0
ArbitrationRank
0/2
156
API Node Configuration Parameters
Type or Units
Default Value
Minimum/
Maximum
or Permitted
Values
Parameter Name
Restart
Type
In
Version ...
(and later)
N
NDB 7.3.0
N
NDB 7.3.0
N
NDB 7.3.0
N
NDB 7.4.2
N
NDB 7.3.0
N
NDB 7.3.0
S
NDB 7.3.0
S
NDB 7.3.0
S
NDB 7.3.0
N
NDB 7.3.0
S
NDB 7.3.0
boolean
false
AutoReconnect
true, false
bytes
16K
BatchByteSize
1024 / 1M
records
256
BatchSize
1 / 992
integer
0
ConnectBackoffMaxTime
0 / 4294967039
(0xFFFFFEFF)
string
[none]
ConnectionMap
...
buckets
3840
DefaultHashMapSize
0 / 3840
enumeration
QUEUE
DefaultOperationRedoProblemAction
ABORT,
QUEUE
bytes
8192
EventLogBufferSize
0 / 64K
name
[none]
ExecuteOnComputer
...
bytes
0
ExtraSendBufferMemory
0 / 4294967039
(0xFFFFFEFF)
string
HeartbeatThreadPriority
157
API Node Configuration Parameters
Type or Units
Default Value
Minimum/
Maximum
or Permitted
Values
Parameter Name
Restart
Type
In
Version ...
(and later)
N
NDB 7.3.0
IS
NDB 7.3.0
N
NDB 7.3.0
IS
NDB 7.3.0
N
NDB 7.4.2
N
NDB 7.3.0
N
NDB 7.3.0
[none]
...
name or IP
address
HostName
[none]
...
unsigned
[none]
Id
1 / 255
bytes
256K
MaxScanBatchSize
32K / 16M
unsigned
[none]
NodeId
1 / 255
integer
0
StartConnectBackoffMaxTime
0 / 4294967039
(0xFFFFFEFF)
bytes
0
TotalSendBufferMemory
256K /
4294967039
(0xFFFFFEFF)
boolean
false
wan
true, false
158
Other Node Configuration Parameters
C.4 Other Node Configuration Parameters
Table C.5 Computer Configuration Parameters
Type or Units
Default Value
Minimum/
Maximum
or Permitted
Values
Parameter Name
Restart
Type
In
Version ...
(and later)
N
NDB 7.3.0
IS
NDB 7.3.0
Restart
Type
In
Version ...
(and later)
N
NDB 7.3.0
N
NDB 7.3.0
N
NDB 7.3.0
N
NDB 7.3.0
N
NDB 7.3.0
N
NDB 7.3.0
name or IP
address
HostName
[none]
...
string
[none]
Id
...
Table C.6 TCP Configuration Parameters
Type or Units
Default Value
Minimum/
Maximum
or Permitted
Values
Parameter Name
boolean
false
Checksum
true, false
unsigned
55
Group
0 / 200
numeric
[none]
NodeId1
...
numeric
[none]
NodeId2
...
numeric
[none]
NodeIdServer
...
bytes
OverloadLimit
0
159
Other Node Configuration Parameters
Type or Units
Default Value
Minimum/
Maximum
or Permitted
Values
Parameter Name
Restart
Type
In
Version ...
(and later)
S
NDB 7.3.0
N
NDB 7.3.0
N
NDB 7.3.0
N
NDB 7.3.0
N
NDB 7.3.0
N
NDB 7.3.0
N
NDB 7.3.1
N
NDB 7.3.1
N
NDB 7.3.0
0 / 4294967039
(0xFFFFFEFF)
unsigned
[none]
PortNumber
0 / 64K
string
[none]
Proxy
...
bytes
2M
ReceiveBufferMemory
16K /
4294967039
(0xFFFFFEFF)
unsigned
2M
SendBufferMemory
256K /
4294967039
(0xFFFFFEFF)
boolean
[see text]
SendSignalId
true, false
unsigned
0
TCP_MAXSEG_SIZE
0 / 2G
unsigned
0
TCP_RCV_BUF_SIZE
0 / 2G
unsigned
0
TCP_SND_BUF_SIZE
0 / 2G
boolean
false
TcpBind_INADDR_ANY
true, false
160
Other Node Configuration Parameters
Table C.7 Shared Memory Configuration Parameters
Type or Units
Default Value
Minimum/
Maximum
or Permitted
Values
Parameter Name
Restart
Type
In
Version ...
(and later)
N
NDB 7.3.0
N
NDB 7.3.0
N
NDB 7.3.0
N
NDB 7.3.0
N
NDB 7.3.0
N
NDB 7.3.0
S
NDB 7.3.0
N
NDB 7.3.0
N
NDB 7.3.0
N
NDB 7.3.0
boolean
true
Checksum
true, false
unsigned
35
Group
0 / 200
numeric
[none]
NodeId1
...
numeric
[none]
NodeId2
...
numeric
[none]
NodeIdServer
...
bytes
0
OverloadLimit
0 / 4294967039
(0xFFFFFEFF)
unsigned
[none]
PortNumber
0 / 64K
boolean
false
SendSignalId
true, false
unsigned
[none]
ShmKey
0 / 4294967039
(0xFFFFFEFF)
bytes
1M
ShmSize
64K /
4294967039
(0xFFFFFEFF)
161
Other Node Configuration Parameters
Type or Units
Default Value
Minimum/
Maximum
or Permitted
Values
Parameter Name
Restart
Type
In
Version ...
(and later)
N
NDB 7.3.0
Restart
Type
In
Version ...
(and later)
N
NDB 7.3.0
N
NDB 7.3.0
N
NDB 7.3.0
N
NDB 7.3.0
N
NDB 7.3.0
N
NDB 7.3.0
N
NDB 7.3.0
unsigned
[none]
Signum
0 / 4294967039
(0xFFFFFEFF)
Table C.8 SCI Configuration Parameters
Type or Units
Default Value
Minimum/
Maximum
or Permitted
Values
Parameter Name
boolean
false
Checksum
true, false
unsigned
15
Group
0 / 200
unsigned
[none]
Host1SciId0
0 / 4294967039
(0xFFFFFEFF)
unsigned
0
Host1SciId1
0 / 4294967039
(0xFFFFFEFF)
unsigned
[none]
Host2SciId0
0 / 4294967039
(0xFFFFFEFF)
unsigned
0
Host2SciId1
0 / 4294967039
(0xFFFFFEFF)
numeric
[none]
NodeId1
...
162
MySQL Server Option and Variable Reference for MySQL Cluster
Type or Units
Default Value
Minimum/
Maximum
or Permitted
Values
Parameter Name
Restart
Type
In
Version ...
(and later)
N
NDB 7.3.0
N
NDB 7.3.0
N
NDB 7.3.0
S
NDB 7.3.0
N
NDB 7.3.0
N
NDB 7.3.0
N
NDB 7.3.0
numeric
[none]
NodeId2
...
numeric
[none]
NodeIdServer
...
bytes
0
OverloadLimit
0 / 4294967039
(0xFFFFFEFF)
unsigned
[none]
PortNumber
0 / 64K
unsigned
8K
SendLimit
128 / 32K
boolean
true
SendSignalId
true, false
unsigned
10M
SharedBufferSize
64K /
4294967039
(0xFFFFFEFF)
C.5 MySQL Server Option and Variable Reference for MySQL Cluster
Table C.9 MySQL Server Options and Variables for MySQL Cluster: MySQL Cluster NDB 7.3-7.4
Option or Variable Name
Command Line
System Variable
Status Variable
Option File
Scope
Dynamic
Notes
Com_show_ndb_status
No
No
Yes
No
Both
No
DESCRIPTION: Count of SHOW NDB STATUS statements
163
MySQL Server Option and Variable Reference for MySQL Cluster
Option or Variable Name
Command Line
System Variable
Status Variable
Option File
Scope
Dynamic
Notes
create_old_temporals
Yes
Yes
No
Yes
Global
No
DESCRIPTION: Use pre-5.6.4 storage format for temporal types when creating tables. Intended for use
in replication and upgrades/downgrades between NDB 7.2 and NDB 7.3/7.4.
Handler_discover
No
No
Yes
No
Both
No
DESCRIPTION: Number of times that tables have been discovered
have_ndbcluster
No
Yes
No
No
Global
No
DESCRIPTION: Whether mysqld supports NDB Cluster tables (set by --ndbcluster option)
ndb-batch-size
Yes
Yes
No
Yes
Global
No
DESCRIPTION: Size (in bytes) to use for NDB transaction batches
ndb-blob-read-batch-bytes
Yes
Yes
No
Yes
Both
Yes
DESCRIPTION: Specifies size in bytes that large BLOB reads should be batched into. 0 = no limit.
ndb-blob-write-batch-bytes
Yes
Yes
No
Yes
Both
Yes
DESCRIPTION: Specifies size in bytes that large BLOB writes should be batched into. 0 = no limit.
ndb-cluster-connection-pool
Yes
Yes
Yes
Yes
Global
No
DESCRIPTION: Number of connections to the cluster used by MySQL
ndb-connectstring
Yes
No
No
Yes
No
DESCRIPTION: Point to the management server that distributes the cluster configuration
ndb-deferred-constraints
Yes
Yes
No
164
MySQL Server Option and Variable Reference for MySQL Cluster
Option or Variable Name
Command Line
System Variable
Status Variable
Option File
Scope
Dynamic
Both
Yes
Notes
Yes
DESCRIPTION: Specifies that constraint checks on unique indexes (where these are supported) should
be deferred until commit time. Not normally needed or used; for testing purposes only.
ndb-distribution
Yes
Yes
No
Yes
Global
Yes
DESCRIPTION: Default distribution for new tables in NDBCLUSTER (KEYHASH or LINHASH, default is
KEYHASH)
ndb-log-apply-status
Yes
Yes
No
Yes
Global
No
DESCRIPTION: Cause a MySQL server acting as a slave to log mysql.ndb_apply_status updates
received from its immediate master in its own binary log, using its own server ID. Effective only if the
server is started with the --ndbcluster option.
ndb-log-empty-epochs
Yes
Yes
No
Yes
Global
Yes
DESCRIPTION: When enabled, causes epochs in which there were no changes to be written to the
ndb_apply_status and ndb_binlog_index tables, even when --log-slave-updates is enabled.
ndb-log-exclusive-reads
Yes
Yes
No
Yes
Both
Yes
DESCRIPTION: Log primary key reads with exclusive locks; allow conflict resolution based on read
conflicts.
ndb-log-orig
Yes
Yes
No
Yes
Global
No
DESCRIPTION: Log originating server id and epoch in mysql.ndb_binlog_index table.
ndb-log-transaction-id
Yes
Yes
No
Yes
Global
No
DESCRIPTION: Write NDB transaction IDs in the binary log. Requires --log-bin-v1-events=OFF.
ndb-log-update-as-write
Yes
Yes
No
Yes
Global
Yes
DESCRIPTION: Toggles logging of updates on the master between updates (OFF) and writes (ON)
ndb-mgmd-host
165
MySQL Server Option and Variable Reference for MySQL Cluster
Option or Variable Name
Command Line
System Variable
Status Variable
Option File
Scope
Dynamic
No
No
Notes
Yes
Yes
No
DESCRIPTION: Set the host (and port, if desired) for connecting to management server
ndb-nodeid
Yes
No
Yes
Yes
Global
No
DESCRIPTION: MySQL Cluster node ID for this MySQL server
ndb-recv-thread-activation-threshold
Yes
No
No
Yes
No
DESCRIPTION: Activation threshold when receive thread takes over the polling of the cluster connection
(measured in concurrently active threads)
ndb-recv-thread-cpu-mask
Yes
No
No
Yes
No
DESCRIPTION: CPU mask for locking receiver threads to specific CPUs; specified as hexadecimal. See
documentation for details.
ndb-transid-mysql-connection-map
Yes
No
No
No
No
DESCRIPTION: Enable or disable the ndb_transid_mysql_connection_map plugin; that is, enable or
disable the INFORMATION_SCHEMA table having that name.
ndb-wait-connected
Yes
Yes
No
Yes
Global
No
DESCRIPTION: Time (in seconds) for the MySQL server to wait for connection to cluster management
and data nodes before accepting MySQL client connections.
ndb-wait-setup
Yes
Yes
No
Yes
Global
No
DESCRIPTION: Time (in seconds) for the MySQL server to wait for NDB engine setup to complete.
Ndb_api_bytes_received_count
No
No
Yes
No
Global
No
DESCRIPTION: Amount of data (in bytes) received from the data nodes by this MySQL Server (SQL
node).
166
MySQL Server Option and Variable Reference for MySQL Cluster
Option or Variable Name
Command Line
System Variable
Status Variable
Option File
Scope
Dynamic
Notes
Ndb_api_bytes_received_count_session
No
No
Yes
No
Session
No
DESCRIPTION: Amount of data (in bytes) received from the data nodes in this client session.
Ndb_api_bytes_received_count_slave
No
No
Yes
No
Global
No
DESCRIPTION: Amount of data (in bytes) received from the data nodes by this slave.
Ndb_api_bytes_sent_count
No
No
Yes
No
Global
No
DESCRIPTION: Amount of data (in bytes) sent to the data nodes by this MySQL Server (SQL node).
Ndb_api_bytes_sent_count_session
No
No
Yes
No
Session
No
DESCRIPTION: Amount of data (in bytes) sent to the data nodes in this client session.
Ndb_api_bytes_sent_count_slave
No
No
Yes
No
Global
No
DESCRIPTION: Amount of data (in bytes) sent to the data nodes by this slave.
Ndb_api_event_bytes_count
No
No
Yes
No
Global
No
DESCRIPTION: Number of bytes of events received by this MySQL Server (SQL node).
Ndb_api_event_bytes_count_injector
No
No
Yes
No
Global
No
DESCRIPTION: Number of bytes of events received by the NDB binary log injector thread.
Ndb_api_event_data_count
No
No
Yes
No
Global
No
DESCRIPTION: Number of row change events received by this MySQL Server (SQL node).
Ndb_api_event_data_count_injector
No
No
Yes
No
Global
No
167
MySQL Server Option and Variable Reference for MySQL Cluster
Option or Variable Name
Command Line
System Variable
Status Variable
Option File
Scope
Dynamic
Notes
DESCRIPTION: Number of row change events received by the NDB binary log injector thread.
Ndb_api_event_nondata_count
No
No
Yes
No
Global
No
DESCRIPTION: Number of events received, other than row change events, by this MySQL Server (SQL
node).
Ndb_api_event_nondata_count_injector
No
No
Yes
No
Global
No
DESCRIPTION: Number of events received, other than row change events, by the NDB binary log
injector thread.
Ndb_api_pk_op_count
No
No
Yes
No
Global
No
DESCRIPTION: Number of operations based on or using primary keys by this MySQL Server (SQL
node).
Ndb_api_pk_op_count_session
No
No
Yes
No
Session
No
DESCRIPTION: Number of operations based on or using primary keys in this client session.
Ndb_api_pk_op_count_slave
No
No
Yes
No
Global
No
DESCRIPTION: Number of operations based on or using primary keys by this slave.
Ndb_api_pruned_scan_count
No
No
Yes
No
Global
No
DESCRIPTION: Number of scans that have been pruned to a single partition by this MySQL Server
(SQL node).
Ndb_api_pruned_scan_count_session
No
No
Yes
No
Session
No
DESCRIPTION: Number of scans that have been pruned to a single partition in this client session.
Ndb_api_pruned_scan_count_slave
No
No
Yes
No
Global
No
168
MySQL Server Option and Variable Reference for MySQL Cluster
Option or Variable Name
Command Line
System Variable
Status Variable
Option File
Scope
Dynamic
Notes
DESCRIPTION: Number of scans that have been pruned to a single partition by this slave.
Ndb_api_range_scan_count
No
No
Yes
No
Global
No
DESCRIPTION: Number of range scans that have been started by this MySQL Server (SQL node).
Ndb_api_range_scan_count_session
No
No
Yes
No
Session
No
DESCRIPTION: Number of range scans that have been started in this client session.
Ndb_api_range_scan_count_slave
No
No
Yes
No
Global
No
DESCRIPTION: Number of range scans that have been started by this slave.
Ndb_api_read_row_count
No
No
Yes
No
Global
No
DESCRIPTION: Total number of rows that have been read by this MySQL Server (SQL node).
Ndb_api_read_row_count_session
No
No
Yes
No
Session
No
DESCRIPTION: Total number of rows that have been read in this client session.
Ndb_api_read_row_count_slave
No
No
Yes
No
Global
No
DESCRIPTION: Total number of rows that have been read by this slave.
Ndb_api_scan_batch_count
No
No
Yes
No
Global
No
DESCRIPTION: Number of batches of rows received by this MySQL Server (SQL node).
Ndb_api_scan_batch_count_session
No
No
Yes
No
Session
No
DESCRIPTION: Number of batches of rows received in this client session.
Ndb_api_scan_batch_count_slave
No
No
Yes
169
MySQL Server Option and Variable Reference for MySQL Cluster
Option or Variable Name
Command Line
System Variable
Status Variable
Option File
Scope
Dynamic
Global
No
Notes
No
DESCRIPTION: Number of batches of rows received by this slave.
Ndb_api_table_scan_count
No
No
Yes
No
Global
No
DESCRIPTION: Number of table scans that have been started, including scans of internal tables, by this
MySQL Server (SQL node).
Ndb_api_table_scan_count_session
No
No
Yes
No
Session
No
DESCRIPTION: Number of table scans that have been started, including scans of internal tables, in this
client session.
Ndb_api_table_scan_count_slave
No
No
Yes
No
Global
No
DESCRIPTION: Number of table scans that have been started, including scans of internal tables, by this
slave.
Ndb_api_trans_abort_count
No
No
Yes
No
Global
No
DESCRIPTION: Number of transactions aborted by this MySQL Server (SQL node).
Ndb_api_trans_abort_count_session
No
No
Yes
No
Session
No
DESCRIPTION: Number of transactions aborted in this client session.
Ndb_api_trans_abort_count_slave
No
No
Yes
No
Global
No
DESCRIPTION: Number of transactions aborted by this slave.
Ndb_api_trans_close_count
No
No
Yes
No
Global
No
DESCRIPTION: Number of transactions aborted (may be greater than the sum of TransCommitCount
and TransAbortCount) by this MySQL Server (SQL node).
Ndb_api_trans_close_count_session
No
No
Yes
170
MySQL Server Option and Variable Reference for MySQL Cluster
Option or Variable Name
Command Line
System Variable
Status Variable
Option File
Scope
Dynamic
Session
No
Notes
No
DESCRIPTION: Number of transactions aborted (may be greater than the sum of TransCommitCount
and TransAbortCount) in this client session.
Ndb_api_trans_close_count_slave
No
No
Yes
No
Global
No
DESCRIPTION: Number of transactions aborted (may be greater than the sum of TransCommitCount
and TransAbortCount) by this slave.
Ndb_api_trans_commit_count
No
No
Yes
No
Global
No
DESCRIPTION: Number of transactions committed by this MySQL Server (SQL node).
Ndb_api_trans_commit_count_session
No
No
Yes
No
Session
No
DESCRIPTION: Number of transactions committed in this client session.
Ndb_api_trans_commit_count_slave
No
No
Yes
No
Global
No
DESCRIPTION: Number of transactions committed by this slave.
Ndb_api_trans_local_read_row_count
No
No
Yes
No
Global
No
DESCRIPTION: Total number of rows that have been read by this MySQL Server (SQL node).
Ndb_api_trans_local_read_row_count_session
No
No
Yes
No
Session
No
DESCRIPTION: Total number of rows that have been read in this client session.
Ndb_api_trans_local_read_row_count_slave
No
No
Yes
No
Global
No
DESCRIPTION: Total number of rows that have been read by this slave.
Ndb_api_trans_start_count
No
No
Yes
No
Global
No
DESCRIPTION: Number of transactions started by this MySQL Server (SQL node).
171
MySQL Server Option and Variable Reference for MySQL Cluster
Option or Variable Name
Command Line
System Variable
Status Variable
Option File
Scope
Dynamic
Notes
Ndb_api_trans_start_count_session
No
No
Yes
No
Session
No
DESCRIPTION: Number of transactions started in this client session.
Ndb_api_trans_start_count_slave
No
No
Yes
No
Global
No
DESCRIPTION: Number of transactions started by this slave.
Ndb_api_uk_op_count
No
No
Yes
No
Global
No
DESCRIPTION: Number of operations based on or using unique keys by this MySQL Server (SQL
node).
Ndb_api_uk_op_count_session
No
No
Yes
No
Session
No
DESCRIPTION: Number of operations based on or using unique keys in this client session.
Ndb_api_uk_op_count_slave
No
No
Yes
No
Global
No
DESCRIPTION: Number of operations based on or using unique keys by this slave.
Ndb_api_wait_exec_complete_count
No
No
Yes
No
Global
No
DESCRIPTION: Number of times thread has been blocked while waiting for execution of an operation to
complete by this MySQL Server (SQL node).
Ndb_api_wait_exec_complete_count_session
No
No
Yes
No
Session
No
DESCRIPTION: Number of times thread has been blocked while waiting for execution of an operation to
complete in this client session.
Ndb_api_wait_exec_complete_count_slave
No
No
Yes
No
Global
No
DESCRIPTION: Number of times thread has been blocked while waiting for execution of an operation to
complete by this slave.
172
MySQL Server Option and Variable Reference for MySQL Cluster
Option or Variable Name
Command Line
System Variable
Status Variable
Option File
Scope
Dynamic
Notes
Ndb_api_wait_meta_request_count
No
No
Yes
No
Global
No
DESCRIPTION: Number of times thread has been blocked waiting for a metadata-based signal by this
MySQL Server (SQL node).
Ndb_api_wait_meta_request_count_session
No
No
Yes
No
Session
No
DESCRIPTION: Number of times thread has been blocked waiting for a metadata-based signal in this
client session.
Ndb_api_wait_meta_request_count_slave
No
No
Yes
No
Global
No
DESCRIPTION: Number of times thread has been blocked waiting for a metadata-based signal by this
slave.
Ndb_api_wait_nanos_count
No
No
Yes
No
Global
No
DESCRIPTION: Total time (in nanoseconds) spent waiting for some type of signal from the data nodes
by this MySQL Server (SQL node).
Ndb_api_wait_nanos_count_session
No
No
Yes
No
Session
No
DESCRIPTION: Total time (in nanoseconds) spent waiting for some type of signal from the data nodes in
this client session.
Ndb_api_wait_nanos_count_slave
No
No
Yes
No
Global
No
DESCRIPTION: Total time (in nanoseconds) spent waiting for some type of signal from the data nodes
by this slave.
Ndb_api_wait_scan_result_count
No
No
Yes
No
Global
No
DESCRIPTION: Number of times thread has been blocked while waiting for a scan-based signal by this
MySQL Server (SQL node).
Ndb_api_wait_scan_result_count_session
No
No
Yes
173
MySQL Server Option and Variable Reference for MySQL Cluster
Option or Variable Name
Command Line
System Variable
Status Variable
Option File
Scope
Dynamic
Session
No
Notes
No
DESCRIPTION: Number of times thread has been blocked while waiting for a scan-based signal in this
client session.
Ndb_api_wait_scan_result_count_slave
No
No
Yes
No
Global
No
DESCRIPTION: Number of times thread has been blocked while waiting for a scan-based signal by this
slave.
ndb_autoincrement_prefetch_sz
Yes
Yes
No
Yes
Both
Yes
DESCRIPTION: NDB auto-increment prefetch size
ndb_cache_check_time
Yes
Yes
No
Yes
Global
Yes
DESCRIPTION: Number of milliseconds between checks of cluster SQL nodes made by the MySQL
query cache
ndb_clear_apply_status
Yes
Yes
No
No
Global
Yes
DESCRIPTION: Causes RESET SLAVE to clear all rows from the ndb_apply_status table. ON by
default.
Ndb_cluster_node_id
No
No
Yes
No
Both
No
DESCRIPTION: If the server is acting as a MySQL Cluster node, then the value of this variable its node
ID in the cluster
Ndb_config_from_host
No
No
Yes
No
Both
No
DESCRIPTION: The host name or IP address of the Cluster management server. Formerly
Ndb_connected_host
Ndb_config_from_port
No
No
Yes
No
Both
No
DESCRIPTION: The port for connecting to Cluster management server. Formerly Ndb_connected_port
Ndb_conflict_fn_epoch
174
MySQL Server Option and Variable Reference for MySQL Cluster
Option or Variable Name
Command Line
System Variable
Status Variable
Option File
Scope
Dynamic
No
No
Yes
No
Global
No
Notes
DESCRIPTION: Number of rows that have been found in conflict by the NDB$EPOCH() conflict detection
function
Ndb_conflict_fn_epoch2
No
No
Yes
No
Global
No
DESCRIPTION: Number of rows that have been found in conflict by the NDB$EPOCH2() conflict
detection function
Ndb_conflict_fn_epoch2_trans
No
No
Yes
No
Global
No
DESCRIPTION: Number of rows that have been found in conflict by the NDB$EPOCH2_TRANS()
conflict detection function
Ndb_conflict_fn_epoch_trans
No
No
Yes
No
Global
No
DESCRIPTION: Number of rows that have been found in conflict by the NDB$EPOCH_TRANS() conflict
detection function
Ndb_conflict_fn_max
No
No
Yes
No
Global
No
DESCRIPTION: If the server is part of a MySQL Cluster involved in cluster replication, the value of this
variable indicates the number of times that conflict resolution based on "greater timestamp wins" has
been applied
Ndb_conflict_fn_max_del_win
No
No
Yes
No
Global
No
DESCRIPTION: Number of times that conflict resolution based on outcome of NDB
$MAX_DELETE_WIN() has been applied.
Ndb_conflict_fn_old
No
No
Yes
No
Global
No
DESCRIPTION: If the server is part of a MySQL Cluster involved in cluster replication, the value of this
variable indicates the number of times that "same timestamp wins" conflict resolution has been applied
Ndb_conflict_last_conflict_epoch
No
Yes
No
175
MySQL Server Option and Variable Reference for MySQL Cluster
Option or Variable Name
Command Line
System Variable
Status Variable
Option File
Scope
Dynamic
Global
No
Notes
No
DESCRIPTION: Most recent NDB epoch on this slave in which a conflict was detected.
Ndb_conflict_last_stable_epoch
No
No
Yes
No
Global
No
DESCRIPTION: Number of rows found to be in conflict by a transactional conflict function
Ndb_conflict_reflected_op_discard_count
No
No
Yes
No
Global
No
DESCRIPTION: Number of reflected operations that were not applied due an error during execution.
Ndb_conflict_reflected_op_prepare_count
No
No
Yes
No
Global
No
DESCRIPTION: Number of reflected operations received that have been prepared for execution.
Ndb_conflict_refresh_op_count
No
No
Yes
No
Global
No
DESCRIPTION: Number of refresh operations that have been prepared.
Ndb_conflict_trans_conflict_commit_count
No
No
Yes
No
Global
No
DESCRIPTION: Number of epoch transactions committed after requiring transactional conflict handling.
Ndb_conflict_trans_detect_iter_count
No
No
Yes
No
Global
No
DESCRIPTION: Number of internal iterations required to commit an epoch transaction. Should be
(slightly) greater than or equal to Ndb_conflict_trans_conflict_commit_count.
Ndb_conflict_trans_reject_count
No
No
Yes
No
Global
No
DESCRIPTION: Number of transactions rejected after being found in conflict by a transactional conflict
function.
Ndb_conflict_trans_row_conflict_count
No
No
Yes
No
Global
No
176
MySQL Server Option and Variable Reference for MySQL Cluster
Option or Variable Name
Command Line
System Variable
Status Variable
Option File
Scope
Dynamic
Notes
DESCRIPTION: Number of rows found in conflict by a transactional conflict function. Includes any rows
included in or dependent on conflicting transactions.
Ndb_conflict_trans_row_reject_count
No
No
Yes
No
Global
No
DESCRIPTION: Total number of rows realigned after being found in conflict by a transactional conflict
function. Includes Ndb_conflict_trans_row_conflict_count and any rows included in or dependent on
conflicting transactions.
ndb_deferred_constraints
Yes
Yes
No
Yes
Both
Yes
DESCRIPTION: Specifies that constraint checks should be deferred (where these are supported). Not
normally needed or used; for testing purposes only.
ndb_distribution
Yes
Yes
No
Yes
Global
Yes
DESCRIPTION: Default distribution for new tables in NDBCLUSTER (KEYHASH or LINHASH, default is
KEYHASH)
Ndb_conflict_delete_delete_count
No
No
Yes
No
Global
No
DESCRIPTION: Number of delete-delete conflicts detected (delete operation is applied, but row does not
exist)
ndb_eventbuffer_free_percent
Yes
Yes
No
Yes
Global
Yes
DESCRIPTION: Percentage of free memory that should be available in event buffer before resumption of
buffering, after reaching limit set by ndb_eventbuffer_max_alloc.
ndb_eventbuffer_max_alloc
Yes
Yes
No
Yes
Global
Yes
DESCRIPTION: Maximum memory that can be allocated for buffering events by the NDB API. Defaults
to 0 (no limit).
Ndb_execute_count
No
No
Yes
No
Global
No
DESCRIPTION: Provides the number of round trips to the NDB kernel made by operations
177
MySQL Server Option and Variable Reference for MySQL Cluster
Option or Variable Name
Command Line
System Variable
Status Variable
Option File
Scope
Dynamic
Notes
ndb_extra_logging
Yes
Yes
No
Yes
Global
Yes
DESCRIPTION: Controls logging of MySQL Cluster schema, connection, and data distribution events in
the MySQL error log
ndb_force_send
Yes
Yes
No
Yes
Both
Yes
DESCRIPTION: Forces sending of buffers to NDB immediately, without waiting for other threads
ndb_index_stat_cache_entries
Yes
Yes
No
Yes
Both
Yes
DESCRIPTION: Sets the granularity of the statistics by determining the number of starting and ending
keys
ndb_index_stat_enable
Yes
Yes
No
Yes
Both
Yes
DESCRIPTION: Use NDB index statistics in query optimization
ndb_index_stat_option
Yes
Yes
No
Yes
Both
Yes
DESCRIPTION: Comma-separated list of tunable options for NDB index statistics; the list should contain
no spaces
ndb_index_stat_update_freq
Yes
Yes
No
Yes
Both
Yes
DESCRIPTION: How often to query data nodes instead of the statistics cache
ndb_join_pushdown
No
Yes
No
No
Both
Yes
DESCRIPTION: Enables pushing down of joins to data nodes
ndb_log_apply_status
Yes
Yes
No
Yes
Global
No
DESCRIPTION: Whether or not a MySQL server acting as a slave logs mysql.ndb_apply_status updates
received from its immediate master in its own binary log, using its own server ID.
178
MySQL Server Option and Variable Reference for MySQL Cluster
Option or Variable Name
Command Line
System Variable
Status Variable
Option File
Scope
Dynamic
Notes
ndb_log_bin
Yes
Yes
No
No
Both
Yes
DESCRIPTION: Write updates to NDB tables in the binary log. Effective only if binary logging is enabled
with --log-bin.
ndb_log_binlog_index
Yes
Yes
No
No
Global
Yes
DESCRIPTION: Insert mapping between epochs and binary log positions into the ndb_binlog_index
table. Defaults to ON. Effective only if binary logging is enabled on the server.
ndb_log_empty_epochs
Yes
Yes
No
Yes
Global
Yes
DESCRIPTION: When enabled, epochs in which there were no changes are written to the
ndb_apply_status and ndb_binlog_index tables, even when log_slave_updates is enabled.
ndb_log_exclusive_reads
Yes
Yes
No
Yes
Both
Yes
DESCRIPTION: Log primary key reads with exclusive locks; allow conflict resolution based on read
conflicts.
ndb_log_orig
Yes
Yes
No
Yes
Global
No
DESCRIPTION: Whether the id and epoch of the originating server are recorded in the
mysql.ndb_binlog_index table. Set using the --ndb-log-orig option when starting mysqld.
ndb_log_transaction_id
No
Yes
No
No
Global
No
DESCRIPTION: Whether NDB transaction IDs are written into the binary log. (Read-only.)
ndb_log_updated_only
Yes
Yes
No
Yes
Global
Yes
DESCRIPTION: Log complete rows (ON) or updates only (OFF)
Ndb_number_of_data_nodes
No
No
Yes
No
Global
No
179
MySQL Server Option and Variable Reference for MySQL Cluster
Option or Variable Name
Command Line
System Variable
Status Variable
Option File
Scope
Dynamic
Notes
DESCRIPTION: If the server is part of a MySQL Cluster, the value of this variable is the number of data
nodes in the cluster
ndb_optimization_delay
No
Yes
No
No
Global
Yes
DESCRIPTION: Sets the number of milliseconds to wait between processing sets of rows by OPTIMIZE
TABLE on NDB tables.
ndb_optimized_node_selection
Yes
Yes
No
Yes
Global
No
DESCRIPTION: Determines how an SQL node chooses a cluster data node to use as transaction
coordinator
Ndb_pruned_scan_count
No
No
Yes
No
Global
No
DESCRIPTION: Number of scans executed by NDB since the cluster was last started where partition
pruning could be used
Ndb_pushed_queries_defined
No
No
Yes
No
Global
No
DESCRIPTION: Number of joins that API nodes have attempted to push down to the data nodes
Ndb_pushed_queries_dropped
No
No
Yes
No
Global
No
DESCRIPTION: Number of joins that API nodes have tried to push down, but failed
Ndb_pushed_queries_executed
No
No
Yes
No
Global
No
DESCRIPTION: Number of joins successfully pushed down and executed on the data nodes
Ndb_pushed_reads
No
No
Yes
No
Global
No
DESCRIPTION: Number of reads executed on the data nodes by pushed-down joins
ndb_recv_thread_activation_threshold
No
No
No
No
No
180
MySQL Server Option and Variable Reference for MySQL Cluster
Option or Variable Name
Command Line
System Variable
Status Variable
Option File
Scope
Dynamic
Notes
DESCRIPTION: Activation threshold when receive thread takes over the polling of the cluster connection
(measured in concurrently active threads)
ndb_recv_thread_cpu_mask
No
Yes
No
No
Global
Yes
DESCRIPTION: CPU mask for locking receiver threads to specific CPUs; specified as hexadecimal. See
documentation for details.
ndb_report_thresh_binlog_epoch_slip
Yes
No
No
Yes
No
DESCRIPTION: This is a threshold on the number of epochs to be behind before reporting binary log
status
ndb_report_thresh_binlog_mem_usage
Yes
No
No
Yes
No
DESCRIPTION: This is a threshold on the percentage of free memory remaining before reporting binary
log status
Ndb_scan_count
No
No
Yes
No
Global
No
DESCRIPTION: The total number of scans executed by NDB since the cluster was last started
ndb_show_foreign_key_mock_tables
Yes
Yes
No
Yes
Global
Yes
DESCRIPTION: Show the mock tables used to support foreign_key_checks=0.
ndb_slave_conflict_role
Yes
Yes
No
Yes
Global
Yes
DESCRIPTION: Role for slave to play in conflict detection and resolution. Value is one of PRIMARY,
SECONDARY, PASS, or NONE (default). Can be changed only when slave SQL thread is stopped. See
documentation for further information.
Ndb_slave_max_replicated_epoch
No
Yes
No
No
Global
No
DESCRIPTION: The most recently committed NDB epoch on this slave. When this value is greater than
or equal to Ndb_conflict_last_conflict_epoch, no conflicts have yet been detected.
ndb_table_no_logging
181
MySQL Server Option and Variable Reference for MySQL Cluster
Option or Variable Name
Command Line
System Variable
Status Variable
Option File
Scope
Dynamic
No
Yes
No
No
Session
Yes
Notes
DESCRIPTION: NDB tables created when this setting is enabled are not checkpointed to disk (although
table schema files are created). The setting in effect when the table is created with or altered to use
NDBCLUSTER persists for the lifetime of the table.
ndb_table_temporary
No
Yes
No
No
Session
Yes
DESCRIPTION: NDB tables are not persistent on disk: no schema files are created and the tables are
not logged
ndb_use_exact_count
No
Yes
No
No
Both
Yes
DESCRIPTION: Use exact row count when planning queries
ndb_use_transactions
Yes
Yes
No
Yes
Both
Yes
DESCRIPTION: Forces NDB to use a count of records during SELECT COUNT(*) query planning to
speed up this type of query
ndb_version
No
Yes
No
No
Global
No
DESCRIPTION: Shows build and NDB engine version as an integer.
ndb_version_string
No
Yes
No
No
Global
No
DESCRIPTION: Shows build information including NDB engine version in ndb-x.y.z format.
ndbcluster
Yes
No
No
Yes
No
DESCRIPTION: Enable NDB Cluster (if this version of MySQL supports it)
Disabled by --skip-ndbcluster
ndbinfo_database
No
Yes
No
No
Global
No
DESCRIPTION: The name used for the NDB information database; read only.
182
MySQL Server Option and Variable Reference for MySQL Cluster
Option or Variable Name
Command Line
System Variable
Status Variable
Option File
Scope
Dynamic
Notes
ndbinfo_max_bytes
Yes
Yes
No
No
Both
Yes
DESCRIPTION: Used for debugging only.
ndbinfo_max_rows
Yes
Yes
No
No
Both
Yes
DESCRIPTION: Used for debugging only.
ndbinfo_offline
No
Yes
No
No
Global
Yes
DESCRIPTION: Put the ndbinfo database into offline mode, in which no rows are returned from tables or
views.
ndbinfo_show_hidden
Yes
Yes
No
No
Both
Yes
DESCRIPTION: Whether to show ndbinfo internal base tables in the mysql client. The default is OFF.
ndbinfo_table_prefix
Yes
Yes
No
No
Both
Yes
DESCRIPTION: The prefix to use for naming ndbinfo internal base tables
ndbinfo_version
No
Yes
No
No
Global
No
DESCRIPTION: The version of the ndbinfo engine; read only.
server-id-bits
Yes
Yes
No
Yes
Global
No
DESCRIPTION: Sets the number of least significant bits in the server_id actually used for identifying the
server, permitting NDB API applications to store application data in the most significant bits. server_id
must be less than 2 to the power of this value.
server_id_bits
Yes
Yes
No
Yes
Global
No
DESCRIPTION: The effective value of server_id if the server was started with the --server-id-bits option
set to a nondefault value.
183
MySQL Server Option and Variable Reference for MySQL Cluster
Option or Variable Name
Command Line
System Variable
Status Variable
Option File
Scope
Dynamic
Notes
slave_allow_batching
Yes
Yes
No
Yes
Global
Yes
DESCRIPTION: Turns update batching on and off for a replication slave
transaction_allow_batching
No
Yes
No
No
Session
Yes
DESCRIPTION: Allows batching of statements within a transaction. Disable AUTOCOMMIT to use.
184
Index
A
abort backup command, 113
backupid option, 113
add hosts command, 62
add package command, 67, 70
basedir option, 68
add process command, 106
agent
configuration, 19
defined, 2, 2
distribution, 7, 7
distribution layout, 8
installing, 7
starting, 32
starting (Linux), 32
starting (Windows), 33
stopping (Linux), 33
stopping (Windows), 36
agent-uuid option
mcmd, 25
architecture, 1, 2
attributes
case-sensitivity, 51
summary table, 139
B
background option
limitations, 119
backgrounding of commands, 119
backup
commands, 113
backup cluster command, 113
snapshoted option, 113
snapshotstart option, 113
waitcompleted option, 113
waitstarted option, 113
backup images, 114
backupid option (abort backup), 113
backupid option (restore cluster), 114
backups
creating, 113
removing, 114
basedir option
mcmd, 25
basedir option (add package command), 68
bootstrap option
mcmd, 25
C
change log-level command, 62
change process command, 108
limitations, 117
changing data node processess, 108
client
commands in, 49
defined, 2, 3
executing scripts with, 57
mysql client commands in, 56
starting, 36
client commands, 49
abort backup, 113
add hosts, 62
add package, 67, 70
add process, 106
backup, 113
backup cluster, 113
case-sensitivity in, 51
change log-level, 62
change process, 108
command-specific, 56
configuration, 82
create cluster, 72
create site, 63
delete cluster, 74
delete package, 69
delete site, 64
get, 84
help, 61
identifiers in, 51
information, 55
list backups, 114
list clusters, 75
list hosts, 65
list processes, 111
list sites, 65
online help, 55
options, 50, 53, 54
package, 67
process, 106
reset, 94
restart cluster, 75
restore, 113
restore cluster, 114
results returned by, 54
set, 99
show status, 76
site, 61
start cluster, 79
start process, 111
status of, 77
stop agents, 66
stop cluster, 80
stop process, 112
syntax, 49
185
upgrade cluster, 80
version, 66
cluster
defined, 1
cluster backups
aborting, 113
listing, 114
restoring from, 114
cluster option (show status command), 76
cluster processes
adding, 106
cluster status, 76
clusters
creating, 39, 39, 72
importing, 40, 41, 41, 42
listing, 75
migrating to MySQL Cluster Manager, 40
(see also importing clusters)
removing, 74
restarting, 75
starting, 79
stopping, 80
upgrading, 80
command status, 77
common terms, 1
concurrent client sessions unsupported, 117
configuration
derivation of attributes, 82
configuration attributes, 82
defined, 2
for TCP connections, 104
getting, 84
how determined by MySQL Cluster Manager, 83
levels applying, 82
mandatory, 83
read-only, 84
resetting, 94
setting, 99
configuration commands, 82
configuration file, 19
configuration parameters (see configuration attributes)
configuration variables (see configuration attributes)
connecting to agent
with mcm client, 36
with mysql client, 37
create cluster command, 72
assignment of node IDs in, 73
create site command, 63
hosts option, 64
D
daemon option
mcmd, 25
DataDir, 42
defaults-file option
mcmd, 25
delete cluster command, 74
delete package command, 69
delete site command, 64
deployment (example), 3
disable-indexes option (restore cluster), 115
disable-metadata option (restore cluster), 115
downgrades
MySQL Cluster, 119
E
epoch option (restore cluster), 115
event-threads option
mcmd, 25
G
get command, 84
filtering output, 89
include-defaults option, 87
with multiple attributes, 90
H
help command, 61
help for commands, 56
help option, 56
mcmd, 26
help-all option
mcmd, 26
help-manager option
mcmd, 27
HostName, 42
hosts
defined, 1
hosts option (create site), 64
I
Id (node ID), 42
identifiers, 51
case-sensitivity, 51
spaces in, 52
importing clusters, 40
and configuration, 41
and data directories, 42
and host names, 42
and Node IDs, 41
and node IDs, 42
restarting under MySQL Cluster Manager, 42
include-defaults option (get command), 87
initial option (start cluster), 80
installation, 5
IPv6
186
and hostnames (Windows), 117
K
keepalive option
mcmd, 27
L
license keys
and operating platform, 117
license keys (obsolete), 7
limitations, 117
background option, 119
backup, 119, 119
change process command, 117
client, 118, 118, 118, 118
cluster upgrades and downgrades, 119
concurrent usage, 117
IPv6, 117
license keys, 117
MySQL server variables, 118, 118
MySQL user variables, 118
operating systems, 117
relating to MySQL Server, 118
replication, 119
restarts, 119
syntax, 119
Windows, 117
list backups command, 114
list clusters command, 75
list commands command, 55
list hosts command, 65
list processes command, 111
list sites command, 65
log-backtrace-on-crash option
mcmd, 28
log-file option
mcmd, 28
log-level option
mcmd, 28
log-use-syslog option
mcmd, 28
logging
configuring, 62
M
management site
defined, 1
management sites
adding hosts, 62
creating, 63
deleting, 64
listing, 65
listing hosts, 65
manager-directory option
mcmd, 29
manager-password option
mcmd, 29
manager-port option
mcmd, 29
manager-username option
mcmd, 30
max-open-files option
mcmd, 30
mcm client
and mysql client, 36
mcmd, 32
agent-uuid option, 25
basedir option, 25
bootstrap option, 25
daemon option, 25
defaults-file option, 25
event-threads option, 25
help option, 26
help-all option, 26
help-manager option, 27
keepalive option, 27
log-backtrace-on-crash option, 28
log-file option, 28
log-level option, 28
log-use-syslog option, 28
manager-directory option, 29
manager-password option, 29
manager-port option, 29
manager-username option, 30
max-open-files option, 30
pid-file option, 30
plugin-dir option, 31
plugins option, 31
verbose-shutdown option, 31
version option, 31
xcom-port option, 31
mcmd.exe, 33
migrating clusters to MySQL Cluster Manager, 40
(see also importing clusters)
multiple client sessions, 117
mysql client commands, 56
mysql-cluster-manager (OBSOLETE, see mcmd), 32
mysqld options, 118
N
ndb_mgm (MySQL Cluster command-line client)
using with MySQL Cluster Manager, 106
no-binlog option (restore cluster), 115
node IDs
and create cluster command, 73
187
O
obtaining MySQL Cluster Manager, 5
operation option (show status command), 77
P
packages
defined, 2
listing, 67, 70
registering, 67
removing, 69
parallelism option (restore cluster), 115
pid-file option
mcmd, 30
plugin-dir option
mcmd, 31
plugins option
mcmd, 31
process option (show status command), 78
process status, 78
processes
changing, 108
commands, 106
defined, 1
listing, 111
starting, 111
status, 78
stopping, 112
R
ReceiveBufferMemory, 99, 104
replication, 119
reset command, 94
and attribute name, 94
and TCP connections, 99
order of operands, 98
process level, 95
scope, 94
restart cluster command, 75
restore (from backup)
commands, 113
restore cluster command, 114
backupid option, 114
disable-indexes option, 115
disable-metadata option, 115
epoch option, 115
no-binlog option, 115
parallelism option, 115
skip-nodeid option, 115
rolling restarts, 119
S
scripts (MySQL Cluster Manager client), 57
SendBufferMemory, 99, 104
set command, 99
and TCP connection attributes, 104
instance level, 100
paths used with (Windows), 103
scope, 100, 101
undoing effects of, 95
verifying effects, 101
with multiple attributes, 103
with multiple processes, 102
show status command, 76
cluster option, 76
operation option, 77
process option, 78
skip-nodeid option (restore cluster), 115
slient commands
cluster, 71
snapshotend option (backup cluster), 113
snapshotstart option (backup cluster), 113
start cluster command, 79
initial option, 80
start process command, 111
starting and stopping nodes
and ndb_mgm (MySQL Cluster command-line client),
106
stop agents command, 66
stop cluster command, 80
stop process command, 112
syntax issues, 119
T
terminology, 1
U
upgrade cluster command, 80
upgrades
MySQL Cluster, 119
V
verbose-shutdown option
mcmd, 31
version command, 66
version option
mcmd, 31
W
waitcompleted option (backup cluster), 113
waitstarted option (backup cluster), 113
X
xcom-port option
mcmd, 31
188