1
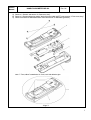
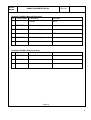
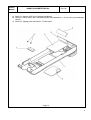
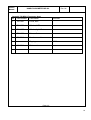
SP-100
Service Manual
2004. Aug. 02
Service
Manual
HANDY PACHYMETER SP-100
Doc. No
1. Caution for maintenance and Service.
Please take care below points when you do Service and Maintenance.
(1) Service and Maintenance should be done under safety condition.
Before you do any Service and Maintenance, you must check power and unit condition to take.
You must do any Service and Maintenance following this manual with proper tool.
(2) Service and Maintenance must be done correctly.
We use some tube and insulating tape to hold some connector and harness in order to avoid falling down and
short circuit. So you have to put back as same as initial condition.
When you ask repair to TOMEY, please inform detail condition and symptoms. And if you change some setting,
please put back it as same as initial condition.
(3) After you finish Service and Maintenance, you must check safety and function.
Please check all screws and connectors are put back as same as initial condition. And check some scrap iron
does not remain inside of board.
After you finish repair, please check function.
<Page >
1
Service
Manual
HANDY PACHYMETER SP-100
Doc. No
2.Trouble shooting
No.
Symptoms
Page
(1)
LCD does not illuminated, when power switch turns ON.
3
(2)
Nothing is displayed on LCD.
3
(3)
Cannot measure with human eye and model eye.
4
(4)
Measurement data is not printed out.
4
<Page2>
2
Service
Manual
HANDY PACHYMETER SP-100
Doc. No
3. Countermeasure.
(1) LCD does not illuminated, when power switch turns ON.
Cause1: Low power of Lithium-ion buttery.
[Countermeasure]>>Check the power of buttery. If it is low, connect AC adopter.
Cause2: Incorrect connection
[Countermeasure]>> Check the connection of all harness that is connected to Main board (792-010A) .
Cause3: Defective Main board.
[Countermeasure]>>Replace Main board (792-010A).
Cause4: Defective LCD.
[Countermeasure]>>Replace LCD (E20-0026).
(2) Nothing is displayed on monitor.
Cause1: Brightness control volume is turn to minimum.
[Countermeasure]>>Adjust this volume.
Cause2: Incorrect connection of LCD.
[Countermeasure]>>Check the connection between LCD (E02-0022) and Min board (792-010A),
Cause3: Defective LCD.
[Countermeasure]>>Replace LCD (E02-0022).
<Page 3>
3
Service
Manual
HANDY PACHYMETER SP-100
Doc. No
(3) Cannot measure with human eye and model eye.
Cause1: Machine does not go measurement mode.
[Countermeasure]>>Select measurement mode, and then start measurement.
Cause2: Broken Pachy probe.
[Countermeasure]>> Check the condition of Pachy probe.
If problem still remain, replace Pachy probe.
Cause3: Incorrect connections of Pachy probe.
[Countermeasure]>> Check the connection of Pachy probe.
Cause4: Probe angle.
[Countermeasure]>> When you measure human eye or model eye, you have to keep vertical
against for eyeball or test piece.
Cause6: Defective Main board.
[Countermeasure]>>Check the Main board (792-010A) and if there is a problem, replace Main board.
(4) Measurement data is not printed out.
Cause1: Paper jamming.
[Countermeasure]>> Check the condition of paper. If it is jamming, remove jamming paper from outlet side
and set paper in correct position.
Cause2: Defective Membrane switch.
[Countermeasure]>>Check the Membrane switch (792-021A). If it is broken, replace Membrane switch.
Cause3: Defective Printer.
[Countermeasure]>>Check the Thermal printer (E20-0026). If it is broken, replace Thermal printer.
<Page 4>
4
Service
Manual
HANDY PACHYMETER SP-100
Doc. No
3. Parts, Parts list and How to disassemble.
A) Open “1. Cover, printer” and remove “2. Printer, Paper”.
Note: When you remove printer paper, it should not be pulled from inlet part.
It will hart printer and be cause of defection of printer.
You should cut printer paper from inlet part and, pull remains from outlet side.
B)
C)
D)
E)
F)
Remove “1. Cover, printer” with pushing support part toward to inside.
Remove “3. Stand, rear” with pushing support part toward to out side.
Remove “4. Self-binding screw” and remove “5. Battery cover, Assy”.
Remove “6. Lithium-ion battery” with pulling connector part. (Don’t pull harness).
Remove “7. Dust cap”.
<Page 5>
5
Service
Manual
HANDY PACHYMETER SP-100
Doc. No
Assembly 792-M001 (Assy, SP-100)
No
Parts number
Parts Name
1
792-1003
Cover, printer
2
C70-0004
Printer paper
3
792-1004
Stand, rear
4
---
Self-binding screw
5
792-M601
Battery cover, Assy
6
FA0-0003
Lithium-ion battery.
7
C77-0012
Dust cap
Remarks
M3*6
Hirose: DE-9S-DC1
<Page 6>
6
Service
Manual
HANDY PACHYMETER SP-100
Doc. No
A) Remove “1. Screws” and remove “2. Rear cover, Assy”.
B) Remove “4. Screws with spring washer” that hold ground cable (ALPET) connected to “3. Front cover, Assy”
C) Remove connector of “Membrane switch” from connector of “5. Main base (process3)”.
Note: “7. Foot, rubber” is attached to “6. Cover, rear” with adhesive glue.
<Page 7>
7
Service
Manual
HANDY PACHYMETER SP-100
Doc. No
Assembly 792-M011 (Main unit, Sub-Assy)
No
Parts number
Parts Name
Remarks
1
---
Screws
M3*8
2
792-M201
Rear cover, Assy
3
792-M101
Front cover, Assy
4
---
Screws with spring washer
5
792-M301
Main unit base (process 4)
M3*6
Assembly 792-M201 (Rear cover, Assy)
No
Parts number
Parts Name
6
792-1002
Cover, Rear
7
792-1009
Foot, rubber
Remarks
<Page 8>
8
Service
Manual
HANDY PACHYMETER SP-100
Doc. No
A) Remove “2. Window, LCD” and “3. Window, light diffusion”
B) Remove “4. Mirror, reflect” and “5. Membrane switch” that is attached on “1. Cover, front” by two-sided tape
carefully
C) Remove “6. Tapping screw” and remove “7. Printer cutter”
<Page 9>
9
Service
Manual
HANDY PACHYMETER SP-100
Doc. No
Assembly 792-M101 (Front cover, Assy)
No
Parts number
Parts Name
1
792-1001
Cover, front
2
792-1008
Window, LCD
3
792-1005
Window, light diffusion
4
792-1006
Mirror, reflect
5
792-021A
Membrane switch
6
---
Tapping screw
7
248-6014
Printer cutter
Remarks
M2*3
<Page 10>
10
Service
Manual
HANDY PACHYMETER SP-100
Doc. No
A) Remove “3. Screws with spring washer” and remove “1. LCD, Assy”.
Note: You have to take care when you remove Flexible Printed Circuit of LCD.
B) Remove “5. Screw with spring washer” and remove “4. Spacer”.
<Page 11>
11
Service
Manual
HANDY PACHYMETER SP-100
Doc. No
Assembly 792-M301 (Main unit base (Process4))
No
Parts number
Parts Name
1
792-M401
LCD, Assy
2
792-M311
Main unit base (process3)
3
---
Screw with spring washer
Remarks
M3*6
Assembly 792-M311 (Main unit base (Process3))
No
Parts number
Parts Name
4
C81-0058
Spacer (brass)
5
---
Screw with spring washer
6
792-M321
Main unit base (process2)
Remarks
M3*6
<Page 12>
12
Service
Manual
HANDY PACHYMETER SP-100
Doc. No
A) Remove “2. Tapping screw” and remove “1. Thermal printer”.
B) Remove “2. Screw with spring washer”
C) Melt soldering part between “4. Connector, Assy” and “6. Main board” and remove “4. Connector Assy”.
<Page 13>
13
Service
Manual
HANDY PACHYMETER SP-100
Doc. No
Assembly 792-M321 (Main unit base (Process2))
No
Parts number
Parts Name
Remarks
1
E20-0026
Thermal printer
MTP102-16B
2
----
Tapping screw
M2.3*4
3
792-M331
Main unit base (process1)
Assembly 792-M331 (Main unit base (Process1))
No
Parts number
Parts Name
4
792-M501
Connector, Assy
5
---
Screw with spring washer
6
792-010A
Main board
Remarks
M3*6
<Page 14>
14
Service
Manual
HANDY PACHYMETER SP-100
Doc. No
A) Remove “4. Screws” from “2. Bracket, LCD”.
B) Remove “1. Frame, LCD” and “3. LCD”
<Page 15>
15
Service
Manual
HANDY PACHYMETER SP-100
Doc. No
Assembly 792-M401 (LCD, Assy)
No
Parts number
Parts Name
1
792-2004
Frame, LCD
2
792-2005
Bracket, LCD
3
E02-0022
LCD
4
---
Screws
5
---
Spring washer
Remarks
ETMG240160D-05
<Page 16>
16
Service
Manual
HANDY PACHYMETER SP-100
Doc. No
<Page 17>
17
Service
Manual
HANDY PACHYMETER SP-100
Doc. No
Assembly 792-M501 (Connector, Assy)
No
Parts number
Parts Name
1
792-2003
Bracket, probe connector
2
F22-0023
Ferrite core
3
792-040A
Probe harness
Remarks
<Page 18>
18
Service
Manual
HANDY PACHYMETER SP-100
Doc. No
4. Wiring Diagram
<Page 19>
19
Service
Manual
HANDY PACHYMETER SP-100
Doc. No
5. Voltage in connector
Main board (792-010A)
Connector No Pin No.
CN7
1
2
3
CN8
1
2
Cord Color.
------Red
Black
Output
+7V
GND
GND
+3.7V
GND
Note
Lithium ion battery
Lithium ion battery
<Page 22>
20