1
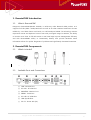
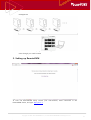
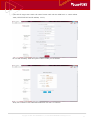
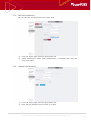
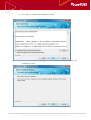
RemoteKVM User Guide Copyright © 2001~2011 RSUPPORT Co., Ltd. ALL RIGHTS RESERVED. www.rsupport.com 1 Notice Document Version : 1.0.0 Date : 2012.03. 06 RemoteKVM Model : KV0101 Copyright ⓒ 2012 RSUPPORT Co., Ltd. All Rights Reserved The information contained in this manual and future improvements are subject to change without notice. Rsupport does not take any responsibility for any marketability nor compatibility apart from the usage described in the manual. Under no circumstances will Rsupport be liable to direct, indirect, incidental nor accidental damages due to errors in the manual. This manual is the intellectual property of Rsupport Inc. and is protected under international copyright laws. Reproducing or copying all or part of this document without the prior written consent of Rsupport Inc. is a violation of international copyright law. (Windows 95 / 98 / ME / NT / 2000 / 2000 Server / XP / Server 2003 / Vista / Server 2008 / 7 are registered trademarks of Microsoft Corp., Android is registered trademarks of Google Inc. They are protected under international copyright laws. Any third party registered trademarks mentioned in this manual are used for reference and descriptive purposes only and are still the intellectual property of the third party in question). Copyright © 2001~2011 RSUPPORT Co., Ltd. ALL RIGHTS RESERVED. www.rsupport.com 2 Table of Contents 1. RemoteKVM Introduction........................................................................................................ 6 1.1. 2. What is RemoteKVM? .................................................................................................................................. 6 RemoteKVM Components ....................................................................................................... 6 2.1. What’s included? ............................................................................................................................................ 6 2.2. Available Ports and Connections ............................................................................................................ 6 2.3. Safety Precautions ......................................................................................................................................... 7 3. Connecting Peripheral Devices ............................................................................................... 7 4. RemoteKVM Appliance Connection ...................................................................................... 7 5. Setting up RemoteKVM ........................................................................................................... 8 6. Using RemoteKVM .................................................................................................................. 10 6.1. Sign-in / Sign-out ....................................................................................................................................... 10 6.2. RemoteKVM Menu ..................................................................................................................................... 11 6.3. Remote Access ............................................................................................................................................. 11 6.4. 6.5. 6.3.1. Plug-in Installation ......................................................................................................................... 11 6.3.2. Real-time Monitoring & Remote Control ........................................................................... 12 6.3.3. More Actions .................................................................................................................................... 12 Recordings...................................................................................................................................................... 14 6.4.1. Download Recorded Sessions .................................................................................................. 14 6.4.2. Recording Information ................................................................................................................. 14 6.4.3. Find Session Recordings by Date ........................................................................................... 15 Session Logs .................................................................................................................................................. 16 6.5.1. 6.6. 6.7. Find Logs by Date.......................................................................................................................... 17 Device Settings............................................................................................................................................. 17 6.6.1. Add a Device .................................................................................................................................... 17 6.6.2. Remove a Device ............................................................................................................................ 18 Users ................................................................................................................................................................. 18 6.7.1. Add a User ........................................................................................................................................ 18 6.7.2. Remote a User ................................................................................................................................. 19 6.7.3. Edit User Permissions ................................................................................................................... 20 6.7.4. Change User Password ................................................................................................................ 20 6.8. Language Settings ...................................................................................................................................... 21 6.9. Updating Firmware..................................................................................................................................... 21 6.9.1. What is Firmware? ......................................................................................................................... 21 Copyright © 2001~2011 RSUPPORT Co., Ltd. ALL RIGHTS RESERVED. www.rsupport.com 3 6.9.2. Check for the Latest Firmware Update ................................................................................ 22 6.9.3. Upload Firmware ............................................................................................................................ 22 6.10. Database Backup / Restore .................................................................................................................... 23 6.10.1. Backing up the Database ........................................................................................................... 23 6.10.2. Restoring the Database ............................................................................................................... 23 6.11. Remote Access Plug-in Setup ............................................................................................................... 24 6.11.1. Downloading the Remote Access Plug-in .......................................................................... 24 6.11.2. Installing the Remote Access Plug-in ................................................................................... 25 6.11.3. Updating the Remote Access Plug-in................................................................................... 27 7. Remote Access Controls ........................................................................................................ 27 7.1. Using Remote Control .............................................................................................................................. 27 7.2. RemoteViewer Resolution ....................................................................................................................... 27 7.3. Using RemoteViewer ................................................................................................................................. 28 7.3.1. RemoteViewer Features ............................................................................................................... 28 7.3.2. RemoteViewer > Main ................................................................................................................. 29 7.3.3. 7.3.4. 7.3.5. 7.3.2.1. Control Settings ........................................................................................................... 29 7.3.2.2. Remote PC Screen Lock ........................................................................................... 29 7.3.2.3. Always on Top............................................................................................................... 29 7.3.2.4. Exit...................................................................................................................................... 29 RemoteViewer > Keyboard and Mouse Menu ................................................................. 29 7.3.3.1. Keyboard and Mouse Control ............................................................................... 30 7.3.3.2. Ctrl+Alt+Del Transfer................................................................................................. 30 RemoteViewer > Screen.............................................................................................................. 30 7.3.4.1. Customization ............................................................................................................... 30 7.3.4.2. Autofit ............................................................................................................................... 30 7.3.4.3. Actual Size ...................................................................................................................... 30 7.3.4.4. Full Screen ...................................................................................................................... 30 7.3.4.5. Refresh.............................................................................................................................. 31 RemoteViewer > Tools ................................................................................................................. 31 7.3.5.1. Screen Capture ............................................................................................................. 31 Copyright © 2001~2011 RSUPPORT Co., Ltd. ALL RIGHTS RESERVED. www.rsupport.com 4 7.3.6. RemoteViewer > Virtual Drives ............................................................................................... 31 7.3.6.1. Virtual USB Drive ......................................................................................................... 31 7.3.6.2. Virtual CD-ROM ........................................................................................................... 31 7.3.6.3. Virtual Image................................................................................................................. 31 7.3.6.4. Virtual Connection Cancel ...................................................................................... 32 8. About......................................................................................................................................... 32 9. Help ........................................................................................................................................... 32 10. Customer Support................................................................................................................... 32 Copyright © 2001~2011 RSUPPORT Co., Ltd. ALL RIGHTS RESERVED. www.rsupport.com 5 1. RemoteKVM Introduction 1.1. What is RemoteKVM? Rsupport’s RemoteKVM (Model: KV0101) is unlike any other Network KVM product as it supports Full HD (1920 x 1080) Resolution as well as 20 other standard resolutions. Proven reliable by over 5000 clients world-wide, our self-developed VRVD 5.0 technology ensures responsive mouse and keyboard control even with prolonged usage. In addition, the ability to monitor more than 10 full HD screens in real time helps improve management efficiency and with RemoteKVM’s ability to immediately identify and provide hardware status information allows for quicker diagnoses of problems and significantly decreased downtime. 2. RemoteKVM Components 2.1. What’s included? KVM Appliance (KV0101) – VGA Cable – USB Cable – Power Cord – Ethernet Cord 2.2. Available Ports and Connections ① LAN : Ethernet Port ② PC VGA : PC VGA Port ③ MONITOR : Monitor Port ④ SERIAL : Serial Port ⑤ PC USB : PC USB Slots ⑥ USB: (2)USB Slots ⑦ DC-5V : Power Jack (5V) Copyright © 2001~2011 RSUPPORT Co., Ltd. ALL RIGHTS RESERVED. www.rsupport.com 6 2.3. Safety Precautions Always refer to the user manual when installing this device. Double-check your network environment prior to setting up the device. Connect the VGA Monitor cable and USB cables to their appropriate ports on the RemoteKVM appliance. If the screen does not display properly, verify that the cables have been connected correctly. For inquiries involving technical support or installation, please contact your local technical support desk. 3. Connecting Peripheral Devices ① Connect your LAN port to an external internet connection. ② Connect the RemoteKVM PC VGA port to the PC’s VGA-Out port. ③ Connect the RemoteKVM Monitor port to a local monitor. ④ Connect the RemoteKVM “PC USB” port to the PC to enable mouse and keyboard control. 4. RemoteKVM Appliance Connection RemoteKVM’s central management system allows for easy scalability Copyright © 2001~2011 RSUPPORT Co., Ltd. ALL RIGHTS RESERVED. www.rsupport.com and 7 management. In addition to the already registered devices, you can add additional RemoteKVM units through your web browser. 5. Setting up RemoteKVM To start the RemoteKVM setup, launch your web-browser, while connected to the RemoteKVM device, and type: http://1.1.1.1. Copyright © 2001~2011 RSUPPORT Co., Ltd. ALL RIGHTS RESERVED. www.rsupport.com 8 (The PCs IP range must match the same format used with the KVM unit. i.e. same subnet mask, 255.255.255.255 and IP address, 1.1.1.2) Fill out the necessary fields and press ‘Submit’ when you’ve finished. Verify the contents of the submitted fields and click ‘Yes’ to continue. Copyright © 2001~2011 RSUPPORT Co., Ltd. ALL RIGHTS RESERVED. www.rsupport.com 9 RemoteKVM will configure the new settings automatically. Click ‘Finish Setup’ to reboot and apply the new configuration. 6. Using RemoteKVM 6.1. Sign-in / Sign-out After completing the initial configuration and setup, you will be able to access the RemoteKVM Sign-in screen by typing your designated IP address. Copyright © 2001~2011 RSUPPORT Co., Ltd. ALL RIGHTS RESERVED. www.rsupport.com 10 To exit RemoteKVM, click the ‘Sign-out’ button towards the top or exit your web browser. 6.2. RemoteKVM Menu Menu Item Description Remote Access Monitor and remote control registered PCs in real-time. Recordings View and download all previously recorded session videos. Session Logs View all actions performed within the RemoteKVM web interface. Device Settings Manage or add new devices to your RemoteKVM network. Users Create, delete, or modify RemoteKVM users. System Settings Modify RemoteKVM settings and preferences Downloads Download plug-in used for remote control. About Check RemoteKVM version and view additional information. 6.3. Remote Access 6.3.1. Plug-in Installation For real-time monitoring and remote access, you must have the necessary plug-ins installed. If they are not installed, go to the ‘Downloads’ and install the plug-ins. Copyright © 2001~2011 RSUPPORT Co., Ltd. ALL RIGHTS RESERVED. www.rsupport.com 11 6.3.2. Real-time Monitoring & Remote Control Upon logging into RemoteKVM, you will be able to monitor your devices in real-time and initiate remote control when necessary. In order to initiate remote control, click on the ‘Play’ button or select ‘Remote Access’ from the drop-down menu to launch RemoteViewer. Remote control is only possible if the proper plug-ins are installed. For more information, refer to [6.11. Remote Access Plug-in Installation] 6.3.3. More Actions You can execute additional commands through this drop-down menu. Copyright © 2001~2011 RSUPPORT Co., Ltd. ALL RIGHTS RESERVED. www.rsupport.com 12 Menu Item Description Remote Access Enables Remote Control View Recordings Brings you to the ‘Recordings’ page. You may view previously recorded support sessions from this page. View Session Logs Brings you to the Session Logs Page. Device Settings Brings you to the ‘Device Settings’ page. You may add, remove, or modify devices from this page. (Must have access to administrator privileges) Reboot Device Reboots the selected device. (Must have access to administrator privileges) Turn on PC Turns on the selected device. (Must have access to administrator privileges) Copyright © 2001~2011 RSUPPORT Co., Ltd. ALL RIGHTS RESERVED. www.rsupport.com 13 6.4. Recordings 6.4.1. Download Recorded Sessions All recorded videos of support session can be stored on the RemoteKVM server. To download and view these videos, click on the date of the corresponding video, then click the ‘Download’ button that is displayed on the video preview screen. 6.4.2. Recording Information From the Recording page, click on the desired recording to view details: Copyright © 2001~2011 RSUPPORT Co., Ltd. ALL RIGHTS RESERVED. www.rsupport.com 14 Menu Item Description Recording Start/End Time Displays the start and end time of this session recording. (Follows DD-MM-YYYY HH:MM:SS format) Length Displays the length of the recorded session. The maximum permitted length is 30 minutes. Resolution Displays the video resolution of the recorded session. File Size Displays the size of the recorded session. File sizes are expressed in MB (Megabytes) or KB (Kilobytes). File size may vary depending on recording resolution. Status Displays the conditions under which the session was recorded. Sessions with remote control are in red. Sessions without remote control remain unmarked. 6.4.3. Find Session Recordings by Date To sort and view session recordings by date, click on the ‘Calender’ icon and select the desired date. Copyright © 2001~2011 RSUPPORT Co., Ltd. ALL RIGHTS RESERVED. www.rsupport.com 15 6.5. Session Logs Menu Item Log Date Description This is the date this log was created. (Follows MM.DD HH:MM format) Access Information Displays information about the access location such as: IP, operating system, web browser & version. Action Displays the action performed. Status Displays the type of action performed. Device Displays which device the action was performed on. User Displays which user performed the action. Copyright © 2001~2011 RSUPPORT Co., Ltd. ALL RIGHTS RESERVED. www.rsupport.com 16 6.5.1. Find Logs by Date To sort and view session logs by date, click on the ‘Calender’ icon and select the desired date. 6.6. Device Settings You must have access to administrator privileges to manage devices. 6.6.1. Add a Device ① From the ‘Device Settings’ page, click ‘Add a Device’. ② Input the IP in ‘Device IP’ Copyright © 2001~2011 RSUPPORT Co., Ltd. ALL RIGHTS RESERVED. www.rsupport.com 17 ③ Once the IP has been determined to be valid, the other information will be filled-in automatically. ④ Input which port to use when connecting. (80 is the default port) ⑤ Click ‘Create’ once you’ve finished. 6.6.2. Remove a Device ① From the ‘Device Settings’ page, select the device you wish to remove. ② Click ‘Delete’ and it will ask if you are sure. ③ Click ‘OK’ to remove the device. 6.7. Users 6.7.1. Add a User You may create users with or without administrative privileges. Copyright © 2001~2011 RSUPPORT Co., Ltd. ALL RIGHTS RESERVED. www.rsupport.com 18 ① From the ‘Users’ page, click ‘Create User.’ ② Input a user ID and password. ③ Select the level of access for the new user. ④ Click ‘Create’ once you’ve finished. 6.7.2. Remote a User ① From the ‘Users’ page, select the user you wish to remove. ② Click ‘Delete’ and it will ask if you are sure. ③ Click ‘OK’ to remove the user. Copyright © 2001~2011 RSUPPORT Co., Ltd. ALL RIGHTS RESERVED. www.rsupport.com 19 6.7.3. Edit User Permissions You can edit user permissions from the ‘Users’ page. ① From the ‘Users’ page, select the appropriate user. ② Under ‘Permissions’, select either Administrator, or Standard User from the drop-down menu. 6.7.4. Change User Password ① From the ‘Users’ page, select the appropriate user. ② Input the new password, then re-enter to confirm. Copyright © 2001~2011 RSUPPORT Co., Ltd. ALL RIGHTS RESERVED. www.rsupport.com 20 ③ Click ‘Save’ once you’ve finished. 6.8. Language Settings ① Go to System Settings > General > Language Settings and select your desired display language. ② English, Korean, and Chinese are currently supported. ③ Click ‘Apply’ once you’ve finished. 6.9. Updating Firmware 6.9.1. What is Firmware? Firmware is preinstalled software contained in electronic and computing device, such as RemoteKVM. Firmware is held in non-volatile memory devices such as ROM, or EPROM. Firmware can be updated to easily address bug fixes and add additional features later on without having to modify the device itself. Copyright © 2001~2011 RSUPPORT Co., Ltd. ALL RIGHTS RESERVED. www.rsupport.com 21 6.9.2. Check for the Latest Firmware Update ① Go to System Settings > Firmware ② The current version is displayed, click on ‘Go to the homepage to check for the latest firmware’ to verify if your RemoteKVM is up to date. 6.9.3. Upload Firmware ① Go to System Settings > Firmware ② To manually update firmware, click ‘Select Firmware File…’ ③ Select the downloaded firmware file and click ‘Apply’. Copyright © 2001~2011 RSUPPORT Co., Ltd. ALL RIGHTS RESERVED. www.rsupport.com 22 6.10. Database Backup / Restore 6.10.1. Backing up the Database ① Go to System Settings > Backup/Restore ② Select the database you wish to backup. ③ Download the ‘DB Backup File’ onto a local device. 6.10.2. Restoring the Database ① Go to System Settings > Backup/Restore ② Click ‘Select DB Backup File…’ under Restore Database. Copyright © 2001~2011 RSUPPORT Co., Ltd. ALL RIGHTS RESERVED. www.rsupport.com 23 ③ Select the database you wish to restore. ④ Click ‘Apply’ once you’ve finished. 6.11. Remote Access Plug-in Setup 6.11.1. Downloading the Remote Access Plug-in Go to the ‘Downloads’ page and download the plug-in onto your computer. Copyright © 2001~2011 RSUPPORT Co., Ltd. ALL RIGHTS RESERVED. www.rsupport.com 24 6.11.2. Installing the Remote Access Plug-in ① Double click and run the plug-in file (kvm_setup.exe) downloaded from [6.11.1 Downloading the Remote Access Plug-in] Copyright © 2001~2011 RSUPPORT Co., Ltd. ALL RIGHTS RESERVED. www.rsupport.com 25 ② Click ‘Next’ to continue the installation process. ③ Read and Accept the User Agreement, then click ‘Next’ to continue the installation process. Copyright © 2001~2011 RSUPPORT Co., Ltd. ALL RIGHTS RESERVED. www.rsupport.com 26 ④ Click ‘Install’ to continue the installation process. ⑤ Once the installation has completed, click ‘Finish’ 6.11.3. Updating the Remote Access Plug-in RemoteKVM will prompt you to update the plug-in if your plug-in is outdated. Proceed with the update to download the latest Remote Access Plug-in. 7. Remote Access Controls 7.1. Using Remote Control Refer to [6.3.2. Real-time Monitoring & Remote Control] to utilize remote control. For additional information on RemoteViewer, refer to [Using RemoteViewer]. 7.2. RemoteViewer Resolution Resolution Refresh Rate (Hz) 640 * 480 60, 75 800 * 600 60, 75 960 * 600 60 1024 * 768 60, 75 1088 * 612 60 Copyright © 2001~2011 RSUPPORT Co., Ltd. ALL RIGHTS RESERVED. www.rsupport.com 27 1152 * 864 60 1280 * 720 60 1280 * 768 60, 75 1280 * 800 60 1280 * 960 60, 75 1280 * 1024 60 1360 * 768 60 1360 * 1024 60 1400 * 1050 60 1440 * 900 60 1600 * 900 60 1600 * 1024 60 1600 * 1200 60 1680 * 1050 60 1920 * 1080 60 7.3. Using RemoteViewer 7.3.1. RemoteViewer Features Control Settings Remote Access settings Remote PC Screen Turns OFF the remote PC’s display Lock Main Always on Top Always keeps the RemoteViewer application on top Lock Viewer Turns OFF the local PC’s display Exit Ends remote control Mouse & Keyboard Controls the remote PC with local keyboard and mouse Control Mouse & Keyboard Screen Single Mouse Displays pointer on the remote PC screen only Ctrl+Alt+Del Input Sends ‘Ctrl+Alt+Del’ command to the remote PC Customization Adjusts the screen size of the remote PC (25%-200%) Autofit Automatically adjusts the remote PC’s screen size to fit Actual Size Displays the actual resolution of the remote PC Full Screen Displays the full screen of the remote PC Refresh Refreshes the RemoteViewer screen Screen Capture Takes a screenshot of the remote PC screen (Saved as Copyright © 2001~2011 RSUPPORT Co., Ltd. ALL RIGHTS RESERVED. www.rsupport.com 28 Tools Extra *.png) Virtual USB Drive Emulate your local USB drive on the remote PC Virtual CD-ROM Emulate your local CD-ROM drive on the remote PC Virtual Image Mount an image file (*.iso) on your local PC to be used on the remote PC Features Virtual Connection Disconnect the virtual drive. Cancel 7.3.2. RemoteViewer > Main 7.3.2.1. Control Settings Apply additional remote control settings. It is possible to apply these settings while remote controlling a PC. Remote Screen Quality Screen Set the RemoteViewer screen quality Set to: Low – Medium – High Auto Scroll Check to enable ‘Auto Scroll’ Functionality Auto Scroll allows you to scroll by moving your mouse to the corners of your RemoteViewer screen when the remote PC screen is larger than your local display. Screen Scroll Panning Check to enable ‘Panning’ Functionality Panning allows you to click and drag the screen to move it in the desired direction. 7.3.2.2. Remote PC Screen Lock Turns the Remote PC’s display off. The remote PC’s display won’t be viewable until ‘Remote PC Screen Lock’ has been deselected. 7.3.2.3. Always on Top Always keeps the RemoteViewer application on top. 7.3.2.4. Exit Ends remote control. Click ‘Yes’ when asked if you wish to close Remote Access. 7.3.3. RemoteViewer > Keyboard and Mouse Menu Copyright © 2001~2011 RSUPPORT Co., Ltd. ALL RIGHTS RESERVED. www.rsupport.com 29 7.3.3.1. Keyboard and Mouse Control Upon connection, keyboard and mouse controls are enabled by default. Click the ‘Keyboard and Mouse’ icon to toggle remote control on and off. Single Mouse Synchronizes your local mouse movement with the pointer displayed on the RemoteViewer screen. 7.3.3.2. Ctrl+Alt+Del Transfer Sends ‘Ctrl+Alt+Del’ command to the remote PC 7.3.4. RemoteViewer > Screen Choose between various screen settings to fit your remote viewing environment. Click the ‘Screen’ icon to sequentially decrease the screen size of the remote PC. 7.3.4.1. Customization Manually adjust the remote PC’s screen size. 25% to 200% Zoom is capable. 7.3.4.2. Autofit Automatically adjust the remote PC’s screen size to fit within the RemoteViewer. 7.3.4.3. Actual Size Sets the remote PC’s screen size to its designated resolution. (Depending on your viewing environment, the screen size may exceed the size of your RemoteViewer.) 7.3.4.4. Full Screen Shows the full screen of the remote PC on your local RemoteViewer. To exist ‘Full Screen’ mode, click on the icon in the RemoteViewer Toolbar and select ‘Restore Screen’. Or, click the ‘Screen Restore’ icon on the right-hand side of the toolbar to exit ‘Full Screen’ mode. The ‘Pin’ feature prevents the tool bar from hiding automatically once you take Tip! your pointer off of it. Utilize the ‘Pin’ feature for added convenience while in ‘Full Screen’ mode. Copyright © 2001~2011 RSUPPORT Co., Ltd. ALL RIGHTS RESERVED. www.rsupport.com 30 [Pin feature disabled – Default] [Pin feature enabled] 7.3.4.5. Refresh Refreshes the RemoteViewer screen. 7.3.5. RemoteViewer > Tools 7.3.5.1. Screen Capture Capture and store the remote PC’s screen. (Saved as a *.png file) - Screen Capture Image Default Storage Directory (Windows 7) : C:\Users\Public\Documents\Rsupport\RemoteKVM\Capture 7.3.6. RemoteViewer > Virtual Drives 7.3.6.1. Virtual USB Drive Insert a USB Drive into the USB port on your local PC. Then, click ‘Virtual USB Drive’ to use your local USB drive as a virtual USB drive for your remote PC. 7.3.6.2. Virtual CD-ROM Insert a CD into the CD-ROM drive on your local PC. Then, click ‘Virtual CDROM’ to use your local CD-ROM drive as a virtual CD-ROM drive for your remote PC. 7.3.6.3. Virtual Image Mount an image file (*.iso) onto your local PC. Then, click ‘Virtual Image’ to use your mounted image on your remote PC. Copyright © 2001~2011 RSUPPORT Co., Ltd. ALL RIGHTS RESERVED. www.rsupport.com 31 7.3.6.4. Virtual Connection Cancel connected unconnected Upon selecting a virtual device, the icon will activate. Click ‘Virtual Connection Cancel’ to end the connection. 8. About Your RemoteKVM’s version information and serial number are shown here. In addition, customer support contact information for RemoteKVM customers will be available here. 9. Help Provides the same helpful information that are available online and in this manual. 10. Customer Support This manual was created to help even first-time users understand how to use RemoteView. If you are still unsure on how to use RemoteView, please refer to the section below for additional support. Rsupport Homepage Additional information, tips, or tech-related questions in regards to RemoteView can be found on our website. For matters that are not listed on our website; please leave an Online Inquiry and we will be sure to reply as soon as possible. Thank you. Copyright © 2001~2011 RSUPPORT Co., Ltd. ALL RIGHTS RESERVED. www.rsupport.com 32 For more information about RSUPPORT, please visit http://www.rsupport.com Korea : Japan : (138-724) 서울시 송파구 방이동 45 번지 한미타워 〒100-0013 東京都千代田区霞ヶ関 3-3-2 新霞ヶ関ビル 18 階 15 층, 16 층 전 화 : +82-70-7011-3900 팩 스 : +82-2-479-4429 기술문의 : [email protected] 구매문의 : [email protected] 기타문의 : [email protected] TEL : +81-3-3539-5761 FAX : +81-3-3539-5762 お問い合わせ : [email protected] Sales : [email protected] Info : [email protected] USA : China : 333 Sylvan Avenue, Suite 110 北京市朝阳区霄云路 38 号现代汽车大厦 2203 Englewood Cliffs, NJ 07632 室 I-101 Phone : +1-888-348-6330 联系电话 +86-10-8256-1810 Fax : +1-888-348-6340 传真号码 +86-10-8256-2978 Tech : [email protected] 技术咨询 [email protected] Sales : [email protected] 销售咨询 [email protected] Info : [email protected] 其他咨询 [email protected] Copyright © 2001~2011 RSUPPORT Co., Ltd. ALL RIGHTS RESERVED. www.rsupport.com 33