1
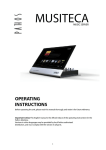
1
Congratulations
Congratulations on your purchase of the Pathos CONVERTO digital to analog audio converter.
Inspired by the art technological evolution of the older brother In Transfer, with whom it shares the same
DNA. This jewel is dedicated to music lovers who demand to extract the best out of digital.
Despite its compact dimensions Converto circuit adopts a fully balanced Class A and is generous when it
comes to inputs:
- Coaxial S / PDIF
- Optical S / PDIF
- USB type B
- RCA line
Inside is equipped with an amplifier home pathos created to satisfy those who like to listen with
headphones.
Two knobs on the back, allow to modify your gain and balance, leaving the listener a chance to find the
best balance for all types of headphones.
Don’t skip the BS*, please
Sure, you know how to connect and operate an amplifier.
You are clearly an audio expert or you won’t have this manual in your hands!
Nevertheless, there are precautions and safety instructions that you should be aware of.
Before connecting, operating or adjusting this product, please read the instruction booklet carefully and
completely. Retain it for future reference.
* Boring Stuff
Serial number is indicated on the box and on the rear panel. Record the serial number in the space provided
below. Refer it whenever you call upon your Pathos dealer regarding this product.
SERIAL No. _________________________
2
Important Safety Instructions
Any changes or modifications not expressly approved in this anual voids the warranty and your authority to operate
this equipment.
Always disconnect the unit from the AC outlet before connecting or disconnecting any cables
Service should only be performed by authorized Pathos personnel.Users are not allowed to perform any service to
this appliance.
Do not modifify safety device and do not remove ground of power plug.
Make sure that power cord is protected from being bent, or stepped, especially close to the wall plug and on the rear
panel inlet.
AC extension cords are not recommended for use with this product.
Do not place the unit in a confined space, such as a bookcase or built-in cabinet. Do not place the unit on a rug or
other soft surface. Always make sure the ventilation of the apparatus is not covered at any time.
Do not expose the unit to rain, moisture, extremely high or low temperatures.
Also avoid locations subject to vibration and excessive dust.
Avoid placing it in direct sunlight or close to a source of heat.
Do not place bottles, vases, or other objects containing liquids, open flame sources such as lighted candles on the
unit.
Should any solid object or liquid fall into the cabinet, unplug the unit and have it checked by qualified personnel
before operating it any further.
Always keep any electrical equipment out of the reach of children.
Always unplug this unit during lightning storms or when unused for long periods of time.
Do not throw away the battery with general house waste, dispose of it correctly as chemical waste.
Marking by “CE” symbol indicates compliance of this device with the EMC (Electromagnetic
Compatibility) and LVD (Low Voltage Directive) standards of the European Comunity.
Limited Warranty
The reference for the warranty is always national distributor where the machine was sold for the first time.
Pathos warrants this product to be free from defects in materials and workmanship (subject to the terms set forth
below). Pathos will repair or replace (at Pathos’s option) this product or any defective parts in this product. Warranty
periods may vary from country to country. If in doubt consult your dealer and ensure that you retain proof of
purchase.
To obtain warranty service, please contact the Pathos authorized dealer from which you purchased this product. If
your dealer is not equipped to perform the repair of your Pathos product, it can be returned by your dealer to Pathos
or an authorized Pathos service agent. You will need to ship this product in either its original packaging or packaging
affording an equal degree of protection.
This warranty is void if:
- the factory-applied serial number has been altered or removed from this product; or
- this product was not purchased from a Pathos authorized dealer.
You may call Pathos or your local Pathos distributor to confirm that you have an unaltered serial number and/or you
made a purchase from Pathos authorized dealer.
This warranty does not cover cosmetics damage or damage due to acts of God, accident, misuse, abuse, negligence,
commercial use, or modification of, or to any part of, product.
This warranty does not cover damage due to improper operation, maintenance or installation, or attempted repair by
anyone other than Pathos or Pathos dealer, or authorized service agent which is authorized to do Pathos work.
Any unauthorized repais will void this warranty.
This warranty does not cover products sold AS IS or WITH ALL FAULTS.
REPAIR OR REPLACEMENTS AS PROVIDED UNDER THIS WARRANTY ARE THE EXCLUSIVE REMEDY
OF THE CONSUMER. PATHOS SHALL NOT BE LIABLE FOR ANY INCIDENTAL OR CONSEQUENTIAL
DAMAGES FOR BREACH OF ANY EXPRESS OR IMPLIED WARRANTY IN THIS PRODUCT. EXCEPT TO
THE EXTENT PROHIBITED BY LAW, THIS WARRANTY EXCLUSIVE AND IN LIEU OF ALL OTHER
EXPRESS AND IMPLIED WARRANTIES WHATSOEVER INCLUDING, BUT NOT LIMITED TO, THE
WARRANTY OF MERCHANTABILITY AND FITNESS FOR A PARTICULAR PURPOSE.
Some countries and US states do not allow the exclusion or limitation of incidental or consequential damages or
implied warranties so the above exclusions may have other statutory rights, which vary from state to state or country
to country.
For any service, in or out of warranty, please contact your dealer.
3
About your unit
Content
Package includes following articles:
Converto, power supply, power cord, USB key,
user manual.
In case any of the above items is not included,
please contact shop or authorized Pathos dealer.
Packaging
When unpacking your Converto, always handle it with care. Store all packaging materials in a dry place for
future shipments. In case of transport or shipment, the original packaging will properly prevent transit
damages.
Placement
Choose the installation location carefully.
Converto should generally be placed close to your amplifier, thus keeping interconnecting cables short.
Do not place in a sealed area such as a bookcase or in a cabinet. Do not place the unit on an unstable
surface or shelf. The unit may fall, causing serious injury to a child or adults as well as serious damage to
the product.
Cleaning
Before cleaning, be sure to turn off and unplug the unit.
Clean the cabinet, panel, and controls with a soft cloth slightly moistened with clean water. Do not use any
type of detergent, abrasive pad, scouring powder, thinner, or solvent such as alcohol or benzine.
Service
In the unlikely event your Converto should require service, always refer to your Authorized Pathos Dealer
or to the Authorized Pathos Distributor of your country.
Before you get started
Turn off the power to all components before making any connections.
Do not connect the AC power cord until all of the connections are completed.
Be sure to make firm connections.
4
Dimensions
5
Connections & Controls
CAUTION:
When connecting your Converto to other components, make sure all units are off.
NOTE: Pathos Acoustics recommends to use only high quality interconnecting cables. Not using
appropriate cables prevents your amplifier, your sources, and your loudspeakers from delivering their full
potential. The wiring to and from the amplifier should be arranged in a neat way. It is advisable to separate
AC cords from signal and speakers cables, to avoid hums and noise from being introduced into your
system.
Serial number.
Serial number is indicated on the box and on the rear panel (1). Refer it whenever you call upon your
Pathos dealer regarding this product.
6
Power Supply & Swith ON.
Connect the power supply output (B) into the socket on the rear
panel of the unit (12).
Connect the power plug of the power supply input (A) to the
power cord that came with the box and plug the cable into the
socket on the wall.
When Converto is properly powered the power LED (16) will
turn red, indicating that Converto is on standby mode (standby
consumption is less than 1W).
To turn on Converto simply press the power button (15) on the
front panel, the power LED (16) goes from red to green and
starts flashing after about 10 seconds and remain ON, one of the
LEDs will light up to indicate the selected input (20 21 22 or
23).
From now CONVERTO is on and ready to work.
To turn off Converto just hold down the power button (15) for 2 seconds, the LED indicates the selected
input turns off and the power LED (16) goes from green to red.
Converto is in standby mode.
Each time it is turned on again Converto stores the last input selected, but if power is removed the next
time the selected input will be the number one (20)
Inputs
Converto has 4 inputs, 3 digital and one analog for headphone listening.
To select the input just press the input selector button (17)
Input 1. USB:
Connect this input (11) a USB cable type "B" from a PC.
Before connecting to a computer, you must install it on the proper drivers that
came with the USB stick included in the package.
The LED (20) on the front panel indicates that this input has been selected.
Input 2. SPDIF optic or RCA:
Connected to this input a digital source via optical cable (10A) or RCA (10B).
Through the switch (9), you can decide whether to use input 2 in one way or another.
The LED (21) on the front panel indicates that this input has been selected.
Input 3. SPDIF RCA:
Connected to this input (8) a digital source via RCA cable.
The LED (22) on the front panel indicates that this input has been selected.
Input 4. Line IN (only for headphone listening)
Connected to this input (7) a line source through RCA stereo cable.
This input can only be used for headphone listening.
The LED (23) on the front panel indicates that this input has been selected.
Output
Converto has two line outputs, balanced and unbalanced.
Balanced output:
it is a stereo line where you can connect a pair of balanced XLR cables (4.5).
Unbalanced output:
it is a stereo line where you can connect a pair of unbalanced RCA cables (6).
7
Headphone
On the front panel (19), you can connect a headset with a 6.3 mm jack connection.
Inside Converto installed a solid state amplifier of high quality to be able to listen to through headphones or
digital sources, selecting the input 4 dedicated analog source.
The headphone amplifier is equipped with three sound adjustment: Volume, Gain and Balance.
Volume:
Through the knob on the front panel (18) you can adjust the volume from the
minimum (mute) to the maximum.
The adjustment is made through the 270° rotation of the knob.
The adjustment is made through the rotation of 270° of the knob
Gain:
Through the knob on the rear panel (2) you can select the output gain in the
headphone.
Given the large difference in impedance and sensitivity of the headphones on the
market (from 16 to 1000 ohms) you need to adjust the gain to decrease if you use a
low-impedance headphones, or increase it if you use a headset at high impedance.
For the correct adjustment Volume / Gain Pathos recommend the following
procedure:
- Lower the gain to a minimum before connecting a headset
- Set the master volume at half scale
- Increase the gain in order to perceive a good listening volume.
By doing so you will have the perfect flexibility of using the volume knob on the front panel, preventing
excessive volume
Balance:
using the knob on the rear panel (3) it is possible to balance the output left / right to adapt to all possible
needs.
Remote ON/OFF
Converto is provided with two connectors for switching on/off via remote.
Remote ON/OFF IN: unit switches on when reaching 12VDC on the connector.
When at 0 the unit will switch off.
Remote ON/OFF OUT: when unit is on, 12VDC are on the connector to turn on other machines provided
with compatible remote.
8
How to use USB digital input
Following are the information relevant to the installation and the use of USB input through computer.
Obtaining the driver
The drivers for HiPort USB to I2S interface are available in the USB key supplied with your Ethos.
Windows drivers are contained in zip files, Mac drivers are contained in
dmg files.
Installing the driver on a Windows-based PC
Create a temporary folder in the hard disk of your computer (you can even create it on the desktop). Then,
double-click on the zip file to open it.
Select and drag all files in the temporary folder: this automatically unzips all files.
We advise to install the driver manually.
The installation package offers two installation utilities, “setup32.exe” and “setup64.exe”.
The former is for 32 bits operating systems, while the latter is for 64 bits operating systems.
Without connecting Ethos to the PC, double-click on either “setup64.exe” or “setup32.exe”, depending on
your operating system: the driver will be installed in your PC.
Installing the driver on a Mac
Double-click on the dmg file to open it. It only contains a pkg file. Double click on it to start the driver
installation.
Click on the Continue button. The installation process will start, if necessary select “Install for all users”,
then click on Continue button. Another window will appear and you’ll be asked to type in the administrator
password.
After doing that, the installation process will continue and you’ll be asked for a confirmation to continue
the process up to the computer restart. Click on Continue Installation button.
The installation will continue until the final window appears, announcing the successful installation of the
driver.
Connection to the host
After having installed the drivers, connect the “B” plug of a 2.0 USB A-B cable to the USB connector (see
“connections” on page 6) of Ethos.
Connect the “A” plug of the cable to a 2.0 USB port of your computer Mac or Windows.
Connect HiPort USB to I2S interface to the computer after manually installing the driver.
9
Configuring for Direct Sound with Windows XP
Connect HiPort USB to I2S interface to your PC.
Then, go to the Control Panel and launch the Sound and
Audio Peripherals utility. Select the Audio tab. In the
Predefined Peripheral drop-down menu of the Playback area,
select “Pathos HiPort to I2S Interface”
From now on, unless HiPort USB to I2S interface is
disconnected or settings are changed again, Pathos HiPort is
the audio peripheral all audio programs will use when
operating.
Configuring for Direct Sound with Windows Vista or
Windows 7
Open Control Panel and select Hardware and Sounds. Under
Audio, click on Manage Audio Devices. The following
windows will appear, in which hiFace is listed. Set “PATHOS
HiPort USB” as predefined device. Then, click on OK.
Configuring a Mac
Go to System Preferences and select Sounds.
The following windows will appear. Select “PATHOS
HiPort USB”
for output as indicated in Figure 6.
10
Tecnical specification:
Converter
D/A Conversion:
Differential 24bit 192KHz delta sigma DAC
Analog stage:
Fully balanced, class A, zero feedback
Conversion rate:
up to 192KHz
Dynamic range:
120dB
S/N Ratio:
-110dB
THD:
<0,01%
Analog output:
one Balanced XLR, one Unbalanced RCA line
Output impedance:
<30 Ohm
Max output level:
Unbalanced RCA 3,2 V RMS
Balanced XLR 1,6+1,6 V RMS
Inputs:
one USB type “B” connector for computer
two digital SPDIF RCA
one digital SPDIF optic toslink
one analog stereo line RCA (only for headphone)
Headphone
Output Power:
1W @ 16 Ohm
Output impedance:
<0,2 Ohm
Output level:
7 VRMS
Frequency response:
10Hz – 100 KHz
THD:
< 0,02%
Main voltage:
Power consumtion:
Size:
Weight:
90-250V 50/60Hz
10W
200x226x75mm
2Kg
11
Pathos Acoustics srl
Via Palù 50/52
36040 Grumolo delle Abbadesse
Vicenza
ITALIA
www.pathosacoustics.com
12