1
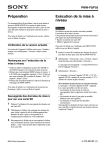
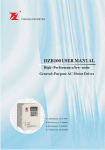
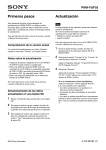
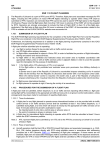
4-466-489-11(1)
Portable Memory Recorder
Interface Unit
Operating Guide
HXR-IFR5
Overview
By connecting this unit to the AXS-R5 portable recorder, signals output from an NEX-FS700
series camcorder can be converted and recorded in the NEX-FS700 series’s RAW image
format to the AXS-R5.
You can also view video recorded in the AXS-R5 using simple playback functionality of this
unit.
Played back movies are output from the AUX-OUT connector of the AXS-R5.
• This unit is designed for use only with the AXS-R5 portable recorder attached.
• The software version of the NEX-FS700 series and the AXS-R5 that can be used with this unit are as
follows.
– NEX-FS700 series: Ver. 3.00 or later
– AXS-R5: Ver. 1.20 or later
About this manual
Operations of the unit with an NEX-FS700 series camcorder, AXS-R5, BNC cable, etc,
connected are described in this manual.
NEX-FS700 series camcorder, AXS-R5, BNC cable, battery pack, DC power cable and AXS
memory card are sold separately.
On trademarks
Product names mentioned herein may be the trademarks or registered trademarks of their
respective companies. Furthermore, ™ and “®” are not mentioned in each case in this manual.
2
Identifying parts and controls
A LCD monitor
B MENU button
Press the MENU button to display the menu
screen.
To end the menu screen, press the MENU
button again.
Press and hold the MENU button to turn the
backlight on/off.
C ./V button
Press the ./V button to display the
previous clip. Press and hold the ./V
button during playback to rewind the current
clip.
Press the ./V button to move the cursor
while the menu screen is displayed.
D x/STOP button
Stop recording or playing clips.
While the menu screen is displayed, pressing
the x/STOP button executes the selected
menu or returns to the previous screen,
depending on the menu.
E POWER ON/OFF switch
Set the POWER ON/OFF switch to turn the
power on/off.
F CAUTION lamp
Press the N/PLAY/EXEC button while the
menu screen is displayed to execute the
selected menu item.
H >/v button
Press the >/v button to view a next clip.
Press and hold the >/v button during
playback to play the current clip at variable
speed.
Press the >/v button to move the cursor
while the menu screen in displayed.
I REC button
Press the two REC buttons simultaneously to
start recording.
J HOLD switch
When you set the HOLD switch toward the
right, no functions other than the POWER
ON/OFF switch can be used.
K Connector
Connect the AXS-R5.
L Handle
The screw holes of the handle are specified
for 1/4-20UNC screws.
M SDI IN(RAW) connector
Connect to the 3G/HD/SD SDI OUT jack on
the NEX-FS700 series by a BNC cable.
G N/PLAY/EXEC button
Press the N/PLAY/EXEC button to play a
recorded file.
Continued ,
3
Identifying parts and controls (Continued)
N Mounting screw hole
Use a tripod with a screw shorter than 5.5 mm
(7/32 in.).
4
Screen indicators
The numbers in ( ) are reference pages.
A SYNC REC (15)
L Power state
The REC TRIGGER setting is displayed.
B KEY HOLD
The icon appears on the screen when the
HOLD switch is set to on.
Power state is displayed in five levels.
The icon flashes when the battery charge is
low.
C Warning Indications (17)
D Media
E Remaining space on media.
Remaining space on the recording media is
displayed in minutes.
F Clip name
A clip name consisting of Camera ID, Reel
Number and Shot Number (eight characters in
total) is displayed for the clip being recorded
or to be recorded.
The first 17 characters of the clip name are
displayed for the clip being played or to be
played.
G Frame rate
H Time code
A time code appears during record standby or
while recording.
I Status
The recorder status is displayed.
J REC FORMAT
4K appears on the screen when you set the
image size to 4096 × 2160 and 2K appears
when you set it to 2048 × 1080.
K Encode
The compression method is displayed.
5
Table of Contents
Overview .................................................................................................. 2
Identifying parts and controls ................................................................... 3
Screen indicators ..................................................................................... 5
Getting Started
Step 1: Checking bundled items .............................................................. 7
Step 2: Connecting the unit to the AXS-R5 and NEX-FS700 series ........ 8
Basic Operation
Recording ............................................................................................... 12
Playing a recorded video ....................................................................... 13
Using the Menu
Setting the setup menus ........................................................................ 14
Menu List ............................................................................................... 15
Troubleshooting
Troubleshooting ..................................................................................... 16
Notes and Warning indicators ................................................................ 17
Additional Information
Recording formats and AUX-OUT outputs ............................................. 18
Clip Naming System .............................................................................. 19
Recording time of movies ...................................................................... 20
About handling of your unit .................................................................... 21
Specifications ......................................................................................... 22
Index ...................................................................................................... 23
6
Getting Started
Step 1: Checking bundled items
Make sure that you have following items
supplied with your unit.
The number in the parentheses indicates the
number of that item supplied.
Portable Memory Recorder Interface Unit
(HXR-IFR5) (1)
CD-ROM (Manuals for Portable Memory
Recorder Interface Unit) (1)
Operating Guide (1)
Warranty (1)
7
Step 2: Connecting the unit to the AXS-R5 and
NEX-FS700 series
NEX-FS700 series
HXR-IFR5 (this unit)
Battery pack
BNC cable
AXS-R5
1 Press the release button (1) of
the AXS-R5 to pop up the ejection
lever, then raise the ejection lever
(2).
2 Insert the projection of the AXSR5 into the slot on the rear of the
unit (1), then lower the ejection
lever (2).
The unit connects to the AXS-R5.
• Before you connect the unit or the AXS-R5 to
another device, or remove it from another
device, make sure that the battery pack and the
DC power cable of the DC IN connector are
disconnected from the AXS-R5.
8
3 Attach a battery pack to the AXSR5 or connect a DC power cable
to the DC IN connector of the
AXS-R5.
5 Set the POWER ON/OFF switch of
the unit to ON.
The power of the unit is turned on.
Insert the battery pack into the battery
pack attaching part of the AXS-R5, then
slide the battery pack down to lock it in
place.
• For safety, use only the battery pack and AC
adaptor specified for the AXS-R5, listed below:
Battery pack: BP-FL75/BP-L80S
AC adaptor: AC-DN2B/AC-DN10
4 Connect the unit to an NEX-FS700
series camcorder by a BNC cable.
b Notes
• Make sure that the DC power cable is correctly
connected to the DC IN connector, or the battery
pack is correctly attached, before turning the
power of the unit on.
• Charge the battery pack using a battery charger
before attaching it to the AXS-R5.
• The battery pack may not charge correctly if its
temperature is high after use.
Continued ,
9
Step 2: Connecting the unit to the AXS-R5 and NEX-FS700 series
(Continued)
Removing the unit
Inserting an AXS memory card
b Notes
• Remove the battery pack and the DC power
cable from the DC IN of the AXS-R5 before
removing the AXS-R5 from the unit.
1 Press the release button of the AXS-R5
and raise the ejection lever to disengage,
then remove the AXS-R5 by pulling it
out while sliding upward.
1 Open the cover by sliding the
memory slot cover open/close
button on the top of the AXS-R5.
2 Insert the AXS memory card into
the card slot with the label facing
as indicated below.
2 Remove the BNC cable from the unit.
Label
b Notes
• Remove the AXS-R5 while supporting the unit
by hand.
10
3 Close the cover.
Removing an AXS memory card
Open the cover of the AXS-R5, press the
EJECT button and remove the AXS
memory card.
b Notes
• Data integrity is not guaranteed if the power is
turned off or a memory card is removed while it
is being accessed. Data on the card may be
destroyed. Be sure that its ACCESS lamp is lit
in green or off when you turn off the power or
remove a memory card.
Formatting an AXS memory card
When you use an AXS memory card with
the AXS-R5 that is attached to the unit, it
must be formatted using the format function
of this unit.
1 Press the MENU button on the
unit, select [FORMAT MEDIA] by
pressing the ./V button or
>/v button, then press the N/
PLAY/EXEC button.
2 Select [OK] by pressing ./V
button or >/v button, then
press N/PLAY/EXEC button.
When formatting is complete,
[COMPLETED] is displayed. Press
MENU button to hide the message.
b Notes
• When formatting, all data in an AXS memory
card are erased and cannot be restored.
11
Basic Operation
Recording
After connecting the NEX-FS700 series,
you are ready to record on this unit.
Stop recording by operating the NEXFS700 series
Press the START/STOP button again.
1 Make sure that the necessary
devices (NEX-FS700 series, etc.)
are connected, and that power is
supplied to them.
For details about connecting the
devices, see page 8.
2 Load a memory card into the
AXS-R5.
• You can start/stop recording by pressing the
START/STOP button when the [REC
TRIGGER] is set to [SDI RMT] (default
setting) (p. 15).
Stop recording by operating this unit
Press the x/STOP button.
• When you stop recording, video, audio and
subsidiary data from the start to end of the
recording are recorded as a single clip on the
memory card.
Recording in 4K-120p or 4K-100p
3 Change the setting of the
NEX-FS700 series as follows.
1 Press the MENU button on the
NEX-FS700 series.
2 Turn the SEL/PUSH EXEC dial on the
NEX-FS700 series and select
(REC/OUT SET) t [REC SET]
t[
/
/
SET] t [
].
4 Set the POWER ON/OFF switch of
the unit to ON.
The power of the unit is turned on.
5 Perform recording movies.
Record by operating the NEX-FS700
series
Press the START/STOP button on the
NEX-FS700 series.
Record by operating the unit
Press the two REC buttons
simultaneously on the unit.
12
Set [REC TRIGGER] to [SDI RMT], then
press the START/STOP button on the
NEX-FS700 series to start recording.
b Notes
• The recorded clip is divided by the amount set
in [CHUNK]. However the divided clips are
identified as the same single clip.
• If the signal from the NEX-FS700 series is
interrupted, recorded data will be corrupted. Do
not remove the BNC cable, turn the NEX-FS700
series off or change the recording mode while
recording.
• If the battery pack or AC adaptor connector is
removed from the AXS-R5 during recording,
the recorded data at the time the power is turned
off may not be recorded correctly.
• When [TC RUN] is set to [REC RUN] on the
NEX-FS700 series and recording is started by
the REC button on this unit, even if the AXS-R5
and NEX-FS700 series start recording at the
same time, the time code may be different in a
clip recorded to the AXS-R5 and the clip
recorded in the NEX-FS700 series.
z Tips
• The maximum clip length is 24 hours.
• For details on other settings, see the operating
guide of the NEX-FS700 series camcorder.
Playing a recorded video
You can play the clip that is recorded on the
AXS memory card in the AXS-R5 by
developing simply.
The playback signal is output from the
AUX-OUT connector of the AXS-R5.
z Tips
• You can play the clips without pressing the
SELECT button of the AXS-R5.
1 Make sure that the unit is
connected to the AXS-R5, and
that power is supplied to them.
2 Connect the AXS-R5 to an SDI
monitor by a BNC cable.
3 Set the POWER ON/OFF switch of
the unit to ON.
The power of the unit is turned on.
4 Select the clip you want to play
using the ./> button, then
press the N button to play that
clip.
Button action during playback
x
Stop playback.
>
Go to the next clip.
Press and hold this button to
fast forward playback.
.
Go back to the beginning of
the current clip. When
playing the beginning of a
clip, go to the previous clip.
Press and hold this button to
rewind playback.
13
Using the Menu
Setting the setup menus
You can change various settings or make
detailed adjustments using the menu items
displayed on the LCD screen.
MENU button
N/PLAY/
EXEC button
2 Select the desired menu item by
pressing the ./V button or >/
v button, then press the N/
PLAY/EXEC button to enter the
selected item.
./V
button
x/STOP
button
>/v button
3 Select the desired setting by
pressing the ./V button or >/
v button, then press the N/
PLAY/EXEC button to execute
that setting.
1 Press the MENU button.
The menu screen appears.
b Notes
• On the menu screen, playback is not available.
You cannot make menu settings during
recording or playback.
z Tips
• To return to the previous screen, press the x/
STOP button on each screen where you can
select an item or a setting.
14
Menu List
The function, setting value and content of each menu item
are as follows. The default settings are marked with B.
Menu items
Setting values
Contents
CAMERA ID
A~Z (BA)
Sets the camera ID.
REEL NUMBER
001~999 (B001)
DELETE CLIP
Sets the Reel Number.
Deletes all content of a single clip recorded
in the recording media.
FORMAT MEDIA
Formats the recording media.
REC TRIGGER
BSDI RMT, OFF
Sets whether or not to synchronize start/stop
of recording on the camera with the AXS-R5.
SDI RMT: Synchronizes start/stop of
recording on the camera with the AXS-R5.
OFF: Does not synchronize start/stop of
recording on the camera with the AXS-R5.
FAN CONTROL
BAUTO, MINIMUM,
OFF IN REC
Sets the fan control mode of the AXS-R5.
AUTO: Automatic control
MINIMUM: Runs the fan at low speed
OFF IN REC: Stops the fan at the time of
recording.
CHUNK
BOFF, 16GB, 8GB,
4GB
This setting is for dividing the clip to the
specified size while recording on the AXS
memory card.
BATTERY TYPE
BFL SERIES, L
SERIES
Sets the remaining battery level indication
method to suit the type of battery pack used.
MEDIA STATUS
Displays the media status.
If the media’s service life information cannot
be obtained, LIFE is not displayed.
HOURS METER
Displays the accumulated time of use for the
AXS-R5.
SOFT VERSION
Displays the current software version of the
camera and the AXS-R5.
ALL RESET
Resets the unit to the factory status.
• For safety, use only the battery pack and AC adaptor specified for the AXS-R5, listed below:
Battery pack: BP-FL75/BP-L80S
AC adaptor: AC-DN2B/AC-DN10
15
Troubleshooting
Troubleshooting
If you run into any problems using your unit, follow the flow chart below.
1 Check your unit, referring to the items on pages 16, 17.
2 Disconnect the power source, reconnect the power source after about 1 minute and turn
on your unit.
3 Reset the unit by setting [ALL RESET] (p. 15).
4 Consult your Sony dealer or local authorized Sony service facility.
Power sources
The unit gets warm.
• The unit may get warmer while you use it. This is not a malfunction.
The remaining battery time indicator does not indicate the correct figure.
• Ambient temperature is too high or too low, or the battery pack has not been charged enough.
This is not a malfunction.
• Fully charge the battery pack again. If the problem persists, the battery pack may be wornout. Replace it with a new one.
• The indicated figure may not be correct in certain circumstances.
The battery pack discharges too quickly.
• Ambient temperature is too high or low, or the battery pack has not been charged enough.
This is not a malfunction.
• Fully charge the battery pack again. If the problem persists, the battery pack may be wornout. Replace it with a new one.
Recording
The recording does not start when you press the REC button.
• There is no empty space on the recording media. Replace the recording media with a new
one, delete unnecessary clips (p. 15) or format the recording media (p. 15).
The access lamp remains lit even after recording was stopped.
• Your unit is recording the scene you have just shot on the memory card.
16
Notes and Warning indicators
When an error occurs, a warning indicator
appears on the LCD screen.
You can fix some problems associated with
the symptoms yourself. If the problem
persists even after you have tried a couple
of times, contact your Sony dealer or local
authorized Sony service facility.
E (Battery level warning)
Slow flashing
• The battery pack is nearly used up.
• Depending on the operation,
environment, or battery conditions, E
may flash, even if around 10% is
displayed as the battery remaining
figure.
Fast flashing
• The DC voltage is incorrect.
• The battery pack is discharged (Battery
End).
(Warning indicator pertaining to
memory cards)
Slow flashing
• Free spaces for recording clips are
running out.
• No memory card is inserted (p. 10).
Fast flashing
• There are not enough free spaces for
recording clips. Delete unnecessary
clips (p. 15), or format the memory
card (p. 15) after storing the clips on
other media.
• The clip database file may be damaged.
(Warning indicator pertaining to
memory card formatting)
• The memory card is damaged.
• The memory card is not formatted
correctly (p. 15).
• The image database file is damaged.
Repair the file.
(Warning indicator pertaining to
incompatible memory cards)
• Incompatible memory card is inserted.
- (Warning indicator pertaining
to the write-protect of the memory
card)
• The write-protect switch is set to lock
position on the memory card.
• Access to the memory card was
restricted on another device.
(Warning indicator pertaining to
the AXS-R5 temperature)
• The temperature of the AXS-R5 is
extremely high.
Stop recording and leave the AXS-R5
in a cool place.
(Warning indicator pertaining to
system error)
• This problem can occur as a result of
AXS-R5 error or connecting the unit to
equipment other than an AXS-R5.
Check the connection. If the error still
occurs after you check the connection,
there may be a malfunction in the unit
or the AXS-R5.
(Warning indicator pertaining to
a fan of the AXS-R5)
• There is a fan problem and the AXS-R5
has stopped functioning.
(Notes pertaining to the AXSR5’s fan)
• The fan stops while recording when
[FAN CONTROL] is set to [OFF IN
REC].
17
Additional Information
Recording formats and AUX-OUT outputs
AUX-OUT output format
Recording
format
Recording
Image
Playback
Audio
Time code
Image
Audio
4K-60p
1920 × 1080 60i
-
-
1920 × 1080 60i
4K-30p
1920 × 1080 60i
-
-
1920 × 1080 30p
4K-24p
1920 × 1080 24p
-
-
1920 × 1080 24p
4K-50p
1920 × 1080 50i
-
-
1920 × 1080 50i
4K-25p
1920 × 1080 50i
-
-
1920 × 1080 25p
4K-120p
1920 × 1080 60i
-
-
1920 × 1080
60i/30p/24p*2
-
4K-100p
1920 × 1080 50i
-
-
1920 × 1080
50i/25p*2
-
2K-60p
-*1
-
-
1920 × 1080 60i
2K-30p
-*1
-
-
1920 × 1080 30p
2K-24p
-*1
-
-
1920 × 1080 24p
2K-50p
-*1
-
-
1920 × 1080 50i
2K-25p
-*1
-
-
1920 × 1080 25p
2K-120p
-*1
-
-
1920 × 1080
60i/30p/24p*2
-
2K-240p
-*1
-
-
1920 × 1080
60i/30p/24p*2
-
2K-100p
-*1
-
-
1920 × 1080
50i/25p*2
-
2K-200p
-*1
-
-
1920 × 1080
50i/25p*2
-
Time code
*1 Noise is output.
*2 You can set 24p/30p/60p or 25p/50p.
When a recording setting is 24p at 2K-120 image, it is played at 24p, 1/5 slow speed.
b Notes
• Images are recorded in 17:9 in a memory card, however images output from the AUX-OUT connector are
in 16:9 (Edge Crop).
18
Clip Naming System
In Separate mode, each clip recorded with
this unit is given a clip name different from
the one set in the NEX-FS700 series.
Example:
A Camera ID
The camera ID set in [CAMERA ID] of the
menu.
B Reel Number
The reel number set in [REEL NUMBER] of
the menu.
If you change only the camera ID setting, the
reel number will be changed to “001.”
C Shot Number
A sequentially assigned shot number starting
with “001.” If the shot number reaches “999,”
the letter at the front of the number changes to
the next letter in the alphabet. For example,
“C999” will be followed by “D001.”
D Date
The shooting date (year, month, day) of the
clip.
E Random characters
A random pair of characters (0 to 9, A to Z).
z Tips
• If a recorded clip exists in an AXS memory
card, subsequent clip names will run
sequentially after the name of the last clip on the
card.
Example: If the “B002C003_××××××××” exists
on the AXS memory card
The next clip that is created will be named
“B002C004_××××××××.” In this case, the
camera ID setting for the menu will change to
“B” and the reel number setting will change to
“002.”
“(NEXT) clip name” also blinks in the
operation status and warning indicator if the
camera ID and reel number differ from those
of the menu.
• If a blank AXS memory card is inserted, the reel
number will increase by one from the last
recorded clip.
Example: If recording is performed on a blank
card after recording up to
“D001C×××_××××××××” on the previously
inserted card
The next recorded clip will be named
“D002C001_××××××××.”
• If you change the menu settings, those settings
will be applied.
Example: If you change the camera ID and reel
number settings from the menu for an AXS
memory card containing clips up to
“E003C×××_××××××××”
If you change the camera ID to “F” and the
reel number to “001,” the next recorded clip
will be named “F001C×××_××××××××.” If
you change only the camera ID setting, the
reel number will change to “001.”
19
Recording time of movies
Approximate recording/playback
time of each battery connected to
an AXS-R5
Approximate time available when using a
BP-FL75.
Estimated recording time of
movies
When using memory card AXS512S24
(unit: minute)
Continuous recording time
(unit: minute)
240
2048 × 1080/60p
96
Battery pack
60p
50p
4096 × 2160/24p
60
BP-FL75
150
150
4096 × 2160/60p
24
b Notes
b Notes
• Recording format
When selecting [60p]: 4096 × 2160/60p
When selecting [50p]: 4096 × 2160/50p
• Times measured when using the unit at 25 °C
(77 °F).
• Both recording and playback time will be
shorter when you use your unit in low
temperatures. It is recommended that you use
the unit from 10 °C to 30 °C (50 °F to 86 °F).
• The recording and playback time will be shorter
depending on the conditions under which you
use your unit.
• The remaining charge of the FL battery is not
displayed correctly on the unit.
The time from the initial display until it blinks
slowly may not be the same as the actual
operating time. Use the check button of the FL
battery to confirm the correct time.
• The recordable time may vary depending on the
recording conditions, subjects, and settings of
the NEX-FS700 series.
Playing time
(unit: minute)
20
2048 × 1080/24p
Battery pack
60p
50p
BP-FL75
165
165
z Tips
• The maximum clip length is 24 hours.
• Your unit uses the VBR (Variable Bit Rate)
format to automatically adjust clip quality to
suit the recording scene. This technology causes
fluctuations in the recording time of the media.
Movies containing quickly moving and complex
clips are recorded at a higher bit-rate, and this
reduces the overall recording time.
About handling of your unit
On use and care
The unit is not dustproof, dripproof or
waterproof.
• Do not use or store the unit and accessories in
the following locations.
– Anywhere extremely hot or cold. Never leave
them exposed to temperatures above 60 °C
(140 °F), such as under direct sunlight, near
heaters or in a car parked in the sun. They
may malfunction or become deformed.
– Near strong magnetic fields or mechanical
vibration. The unit may malfunction.
– Near strong radio waves or radiation. The unit
may not be able to record properly.
– Near AM receivers and video equipment.
Noise may occur.
– On a sandy beach or anywhere dusty. If sand
or dust gets in your unit, the unit may
malfunction. Sometimes this malfunction
cannot be repaired.
– Near windows or outdoors, where the LCD
screen may be exposed to direct sunlight. This
damages the LCD screen.
– Anywhere very humid.
• For DC or AC operation, use the accessories
recommended in these operating instructions.
• Do not let your unit get wet, for example, from
rain or sea water. If your unit gets wet, it may
malfunction. Sometimes this malfunction
cannot be repaired.
• If any solid object or liquid gets inside the
casing, unplug your unit and have it checked by
a Sony dealer before operating it any further.
• Avoid rough handling, disassembling,
modifying, physical shock, or impact such as
hammering, dropping or stepping on the
product. Be particularly careful of the lens.
• Do not use a deformed or damaged battery pack.
• Keep the POWER ON/OFF switch set to OFF
when you are not using your unit.
• Do not wrap your unit with a towel, for
example, and operate it. Doing so might cause
heat to build up inside.
• When disconnecting the power cord (mains
lead), pull it by the plug and not the lead.
• Do not damage the power cord (mains lead)
such as by placing anything heavy on it.
• Keep metal contacts clean.
• If the battery electrolytic liquid has leaked,
– consult your local authorized Sony service
facility.
– wash off any liquid that may have contacted
your skin.
– if any liquid gets in your eyes, wash with
plenty of water and consult a doctor.
x When not using your unit for a long
time
• Remove the battery pack before storing the unit
for a long time.
LCD screen
• If your unit is used in a cold place, a residual
clip may appear on the LCD screen. This is not a
malfunction.
Casing
• If the casing is soiled, clean the unit body with a
soft cloth lightly moistened with water, and then
wipe the casing with a dry soft cloth.
• Avoid the following to prevent damage to the
finish.
– Using chemicals such as thinner, benzine,
alcohol, chemical cloths, repellent, insecticide
and sunscreen.
– Handling with above substances on your
hands.
– Leaving the casing in contact with rubber or
vinyl objects for a long period of time.
21
Specifications
Input/output connectors
SDI IN(RAW) connector
Expansion unit connector
General
Power requirements
DC 11V-DC 17V
Average power consumption (HXR-IFR5
only, via AXS-R5 DC IN 16.8V)
5.0W SDI IN(RAW) when inputting
4K/60p
4.9W SDI IN(RAW) when inputting
4K/50p
Operating temperature
0 °C to 40 °C (32 °F to 104 °F)
Storage temperature
-20 °C to +60 °C (-4 °F to +140 °F)
Dimensions (approx.)
Unit body only:
115 mm × 189 mm × 127.5 mm
(4 5/8 in. × 7 1/2 in. × 5 1/8 in.) (w/h/d)
(including the projecting parts)
When recording:
119 mm × 189 mm × 207 mm
(4 3/4 in. × 7 1/2 in. × 8 1/4 in.) (w/h/d)
(including the projecting parts, the
AXS-R5 and the battery pack (BPFL75))
22
Mass (approx.)
Unit body only:
910 g (2 lb) (main unit only)
When recording:
2 600 g (5 lb 11 oz)
(including the AXS-R5, an AXS
memory card and the battery pack (BPFL75))
Index
B
Battery pack ............................8
Bundled items .........................7
C
Clip name..............................19
Connecting ..............................8
G
Getting started.........................7
M
Memory card.........................10
Format ...........................11
Remove..........................11
Menu .....................................14
Menu List..............................15
N
Notes and Warning indicators
..............................................17
P
Playback................................13
R
Recording..............................12
Recording time .....................20
S
Screen indicators.....................5
Setting the menus..................14
Specifications........................22
T
Troubleshooting....................16
23
http://www.sony.net/
© 2013 Sony Corporation