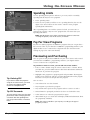
1
Using On-Screen Menus
Setting the Profile Name
The first step when creating a new profile is to set a name. This will be the
name that appears when repeatedly pressing the WHO•INPUT button.
To set the profile name:
1. In the Profiles menu, press the 1 button to select Name.
2. Use the remote controls arrow and OK buttons to highlight and select the
different letters of the profile name.
Copying Profile Settings
To make creating or editing a profile easier, your digital satellite receiver gives
you the ability to use the settings of a previously set profile.
To copy the settings of an existing profile:
1. In the Profiles menu, press the 2 button to select Copy Settings.
2. Use the remote control’s arrow buttons to select the proper profile to copy
settings from.
3. Press the remote control’s OK button to select the desired profile.
4. Use the remote control’s arrow and OK buttons to highlight and select the
COPY button at the bottom of the screen.
Creating a Profile Channel List
1. Select Edit Channels.
2. Use the arrow buttons to highlight a channel, and press OK to remove (or
replace) the check mark. Checkmarked items appear in the channel list.
Add or Delete All Channels
You might be able to save time when creating a channel list by using the Add
All Channels option or the Delete All Channels option before removing or
adding individual channels.
Also, program providers may make additional channels available. To prevent
new channels from appearing in a profile channel list, choose Delete All
Channels and checkmark only the channels you want to appear in the list.
Subscriptions
Selecting the Subscriptions button will allow you to uncheck and remove from
the channel list all channels that you do not subscribe to. Use the remote
control’s arrow and OK buttons to select the desired on-screen menu buttons.
Note: This step may take several minutes to complete.
52
Chapter 4