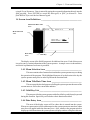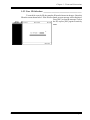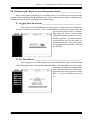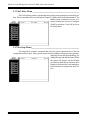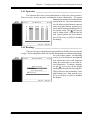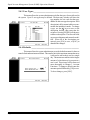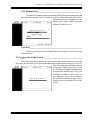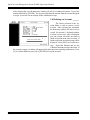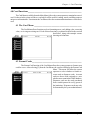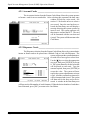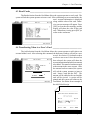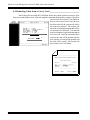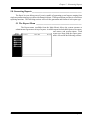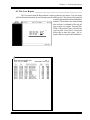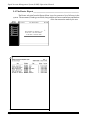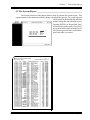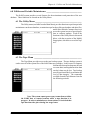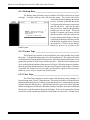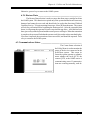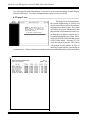
1
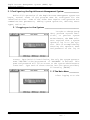
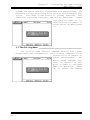
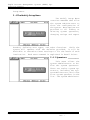
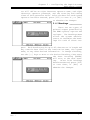
RAPID ACCOUNT
MANAGEMENT SYSTEM
(Host)
User's Manual
Table of Contents
Table Of Contents
1.0 Terms and Conventions .................................................................................................................. 1
1.1 Definition of Terms ............................................................................................................. 1
1.2 Key Definitions ................................................................................................................... 2
1.3 Data Entry Conventions ...................................................................................................... 2
1.4 Screen Area Definitions ...................................................................................................... 3
1.4.1 Menu Selection Area ........................................................................................... 3
1.4.2 Menu Title/Date Time Area ................................................................................. 3
1.4.3 Valid Key List ...................................................................................................... 3
1.4.4 Data Entry Area ................................................................................................... 3
1.5 Selecting a User Record From the Database ...................................................................... 4
1.5.1 Name Search Selection ........................................................................................ 4
1.5.2 User Name Pick List ............................................................................................ 4
1.5.3 User ID Selection................................................................................................ 5
2.0 Configuring the Rapid Account Management System .................................................................... 7
2.1 Logging In to the System .................................................................................................... 7
2.2 The Main Menu .................................................................................................................. 7
2.3 The Utility Menu ................................................................................................................. 8
2.4 The Setup Menu ................................................................................................................. 8
2.4.1 Operators ............................................................................................................. 9
2.4.2 Headings .............................................................................................................. 9
2.4.3 User Types ......................................................................................................... 10
2.4.4 Defaults .............................................................................................................. 10
2.4.5 Modem Data ...................................................................................................... 11
2.4.6 Exit .................................................................................................................... 11
2.5 Logging Out of the System ............................................................................................... 11
3.0 Account Functions ........................................................................................................................ 13
3.1 The Account Menu ........................................................................................................... 13
3.2 Creating an Account ......................................................................................................... 13
3.3 Editing an Account ........................................................................................................... 14
3.4 Viewing an Account ......................................................................................................... 14
3.5 Depositing Funds .............................................................................................................. 15
3.6 Withdrawal of Funds ......................................................................................................... 15
3.6 Deleting an Account ......................................................................................................... 16
4.0 Card Functions .............................................................................................................................. 17
4.1 The Card Menu ................................................................................................................. 17
4.2 Format Cards .................................................................................................................... 17
4.2.1 Account Cards ................................................................................................... 18
4.2.2 Dispenser Cards ................................................................................................. 18
4.3 Read Cards ........................................................................................................................ 19
4.4 Transferring Value to a User's Card ................................................................................. 19
4.5 Deducting Value from a User's Card ................................................................................ 20
Debitek DOC-970066 Rev -
Page - i
Rapid Account Management System (RAMS) Operations Manual
5.0 Generating Reports ....................................................................................................................... 21
5.1 The Report Menu .............................................................................................................. 21
5.2 The Shift Report ............................................................................................................... 22
5.3 The User Report ............................................................................................................... 23
5.4 The Roster Report ............................................................................................................ 24
5.5 The System Report ........................................................................................................... 25
6.0 Utilities and Periodic Maintainence .............................................................................................. 27
6.1 The Utility Menu ............................................................................................................... 27
6.2 The Tape Menu ................................................................................................................. 27
6.2.1 Backup Data ...................................................................................................... 28
6.2.2 Format Tape ...................................................................................................... 28
6.2.3 Clear Tape.......................................................................................................... 28
6.2.4 Restore Data ...................................................................................................... 29
6.3 Communications Status .................................................................................................... 29
6.4 Purge Users ....................................................................................................................... 30
6.5 Modify Setup .................................................................................................................... 31
6.6 Index Build........................................................................................................................ 31
6.7 Host Mode ........................................................................................................................ 31
Index ........................................................................................................................................ Index - A
Page - ii
Debitek DOC-970066 Rev -
Chapter 1 - Terms and Conventions
1.0 Terms and Conventions_____________________________________________
This chapter will explain the various technical terms, notation styles, and screen definitions used
throughout the manual.
1.1 Definition of Terms ___________________________________________
The following terms are used throughout the manual.
RAMS
- Rapid Account Management System
Pick List
- A list of items that the operator may choose from.
System Administrator ___ - The person in charge of operating the RAMS software.
Only the system administrator may perform certain functions within the system.
System Operator
- The person who is currently using the RAMS software.
User
- A person who has an account in the RAMS system.
Database
- The collection of information that includes all of the data
for every account holder contained in the RAMS system.
Record
- The collection of information that includes the data for a
single account holder in the RAMS system.
Field
- A single piece of information contained in a record.
Numeric Data
- Data composed solely of numbers.
Text Data
- Data that can contain both letters and numbers, as well as
punctuation.
Window
- An area of the screen containing information or requesting
data entry. This area is usually of a different color than
the surrounding screen.
Menu
- A list of commands that are available to the system operator.
DCT
- Debit Card Terminal. This device is used by the system
operator to read and write cards used in the RAMS system.
QVTS
- Quick Value Transfer Station. This device is used by the
user to add value to a card at a remote location.
Debitek DOC-970066 Rev -
Page - 1
Rapid Account Management System (RAMS) Operations Manual
1.2 Key Definitions ______________________________________________
Certain keys on the computer keyboard have a special function within the Rapid Account
Management System. When this manual directs the system operator to press one of these keys,
the key name will be displayed enclosed inside of square brackets, ie. [ and ]. The keys most often
used are listed below.
[ENTER]
- This key is used to enter data into the system.
[
- This is another form of notation for the [ENTER] key.
]
[ESC]
- This is the Escape key. It is used to exit the current operation without saving any changes.
[F1] .. [F10]
- There are ten 'Function Keys' located along the top row of
the system keyboard. The most commonly used of these is
the [F10] key, which is used to save modifications to data.
[y/N] and [Y/n]
- This indicates a yes or no choice is to be made. Press [Y]
for yes, [N] for no, or press [ENTER] and the choice that
is capitalized will be selected automatically.
[ ]
- The Up and Down arrow keys are used in a pick list. Use
the keys marked with the Up and Down arrows to move
the highlight bar to the desired entry, then press [ENTER]
to accept it.
[BACKSPACE]
- This key is used to remove the last character that was
typed by the system operator.
[PAGE UP]
- This key causes the system to display the previous page of
data.
[PAGE DOWN]
- This key causes the system to display the next page of data.
1.3 Data Entry Conventions _______________________________________
There will be times during the operation of the Rapid Account Management System that
the system operator will be called upon to enter data. This data could be numerical, text, or even
Page - 2
Debitek DOC-970066 Rev -
Chapter 1 - Terms and Conventions
a simple Yes or No answer. Data is entered by typing the requested information directly into the
field provided. Press [ENTER] to accept the data typed, or [ESC] to discard it. Press
[BACKSPACE] to erase the last character typed.
1.4 Screen Area Definitions _______________________________________
Menu Title/Date Time
Area
Menu Selection
Area
Data Entry
Area
Valid Key
The display screen of the RAMS program is divided into four areas. Each of these areas
is used to convey certain information to the system operator. A sample screen is shown below,
and a brief explanation of each area is provided.
1.4.1 Menu Selection Area ___________________________________
This area contains a list of menu selections that the system operator may use during
the operation of the program. The highlighted character of each selection is the key the
system operator must press in order to perform the function listed.
1.4.2 Menu Title/Date Time Area _____________________________
This area provides the dual purpose of telling the system operator the name of the
current menu as well as the current date and time.
1.4.3 Valid Key List _________________________________________
This area provides the system operator with a list of the keys which may be pressed
during this function. Special keys will also have their function described.
1.4.4 Data Entry Area _______________________________________
This area of the display screen will be where data is entered into the system.
Whenever a menu option is selected that requires the system operator to enter data, a data
entry box will appear inside the data entry area. Also, whenever the program needs to
display special information to the system operator, a display window will apear in this area.
Debitek DOC-970066 Rev -
Page - 3
Rapid Account Management System (RAMS) Operations Manual
1.5 Selecting a User Record From the Database ______________________
Several functions of the RAMS system require the system operator to select a user record
from the database. Selecting a user record can be accomplished in one of two ways. The first is
by supplying the program with the first few letters of the user's last name. The program will then
find all of the users whose names are close to the letters given and present them in a list. The system
operator then chooses the correct name from the list. The second method of selecting a user record
from the database is by providing the complete user ID. In this case the user is uniquely identified
by the ID and there is no need to select the record from a list. Both of these methods are shown
in the following sections.
1.5.1 Name Search Selection _________________________________
When a function is selected that requires a user record from the database, the
system operator is presented with a window that asks for the user's last name. Up to 9
characters of the last name may be entered
as user name search characters, although
fewer may be entered if desired. The entry
field will automatically contain the first 9
characters of the last user name that was
used by the system. If this user is not
acceptable, a new name may be entered. If
the user ID is known, the system operator
may press [F8] to enter this data. See
section 1.5.3 for details.
1.5.2 User Name Pick List ___________________________________
After entering the user name search characters, the system will search for the
closest matches and show them in a list in the data entry area. The closest match will be
highlighted in a different color than the
rest. If this is the correct user, press
[ENTER] and the system will use this
record. If not, the [ ] keys may be used to
move the highlight bar to other users. If
the correct user record is not shown, the
[PAGE UP] and [PAGE DOWN] keys
may be used to list more users. [PAGE
UP] will list users who fall before the
current list alphabetically, while [PAGE
DOWN] will list users who come after. If
the user requested is not in the database,
press [ESC] to abort the search.
Page - 4
Debitek DOC-970066 Rev -
Chapter 1 - Terms and Conventions
1.5.3 User ID Selection _____________________________________
To search for a user by ID, the complete ID must be known in advance. Enter this
ID on the screen shown below. If the ID is not found, an error message will be displayed.
Press [ESC] to clear the message. Correct
the ID, or press [ESC] again to search by
name.
Debitek DOC-970066 Rev -
Page - 5
Rapid Account Management System (RAMS) Operations Manual
(This page intentionally left blank)
Page - 6
Debitek DOC-970066 Rev -
Chapter 2 - Configuring the Rapid Account Management System
2.0 Configuring the Rapid Account Management System ____________________
Before full operation of the Rapid Account Management System can begin, several areas of the
program must be configured for the installation site. Some of the items that require configuration are
communications parameters, system operators and user types.
2.1 Logging In to the System ______________________________________
Before any access to the RAMS system can be made, a system operator or administrator
is required to log in to the system. This is accomplished by entering the operator name and
password at the log in screen. At installation, only the system operator name
'DEBITEK' with the password of 'PASSWORD' is defined. This name and password will allow access to the system administrator functions. Type each of these
entries into the space provided, followed
by [ENTER].
2.2 The Main Menu ______________________________________________
After logging in, the system operator is presented with the main menu. The main menu
will be the starting point for most of the chapters that follow. This menu allows access to account
functions, card functions, reporting functions, and utility functions. System configuration items are located in the Utility
Menu. To access the Utility Menu, press
[U].
Debitek DOC-970066 Rev -
Page - 7
Rapid Account Management System (RAMS) Operations Manual
2.3 The Utility Menu _____________________________________________
The Utitlity Menu contains commands dealing with system maintainence and configuration. These commands will be covered fully in Chapter 6, Utilities and Periodic Maintainence. The
Modify Setup command, however, is required at this point in order to configure
RAMS for operation. Press [M] to access
the Setup Menu.
2.4 The Setup Menu ______________________________________________
The Setup Menu contains commands that allow the system administrator to alter the
configuration of the system. Menu options are provided for adding or deleting system operators,
changing receipt and report headings, defining user types, and other functions. While
the system will operate with the defaults
provided, it is desirable to customize these
settings to fit the needs of each institution.
Each command is explained in detail below.
Page - 8
Debitek DOC-970066 Rev -
Chapter 2 - Configuring the Rapid Account Management System
2.4.1 Operators ____________________________________________
This function allows the system administrator to define the system operators.
There are twelve system operators, including the system administrator. The system
administrator must be entered into the first
position in the list. The system administrator will define an eight character operator
name, and eight character operator password, and the starting and ending times of
the operator's shift. The [ ] keys may be
used to change fields. After the data for
each system operator has been entered,
press [F10] to save, or [ESC] to abandon
the changes.
2.4.2 Headings _____________________________________________
There are two types of printed output generated by the RAMS system; reports and
receipts. The Headings Menu allows the system administrator to customize the headings
for each of these outputs. Each heading
may be up to 40 characters in length and
may contain data such as the institution
name, the system name, or any other desired information. To change a heading,
use the [ ] keys to move to the desired
heading, then enter the data. Pressing [ENTER] will move to the next heading. After
both headings have been entered, press
[F10] to save them, or [ESC] to abandon
the changes.
Debitek DOC-970066 Rev -
Page - 9
Rapid Account Management System (RAMS) Operations Manual
2.4.3 User Types____________________________________________
This menu allows the system administrator to define the types of users allowed in
the system. Up to 12 user types may be defined. The data entry window will show the
type number, the site code for that type,
and the 20 character type description. Each
description is fully customizable to accommodate the institution's needs. To change
a type, use the [ ] keys to move to the
description desired, then enter that description. Pressing [ENTER] will advance
to the next description. The sitecode fields
are preset at shipment and cannot be modified. When all of the descriptions are
entered, press [F10] to save, or [ESC] to
abandon the changes.
2.4.4 Defaults ______________________________________________
This menu allows the system administrator to set the default amounts for the user
transfer limit and maximum card limit. The transfer limit is the maximum amout that a user
is allowed to add to their card in a single
day. The maximum card limit is the largest
amount of value that may be present on a
user's card. These items will be discussed
more thoroughly in Chapter 3, Account
Functions. To change a default, enter the
amount required followed by [F10] to save.
To abort changes, press [ESC].
Page - 10
Debitek DOC-970066 Rev -
Chapter 2 - Configuring the Rapid Account Management System
2.4.5 Modem Data __________________________________________
This menu selection allows the programming of the modem initialization string and
the modem answer string. These selections are specific to the modem used and are preset
by Debitek at the time of shipment. Do not
change these settings without consulting
Debitek Customer Service.
2.4.6 Exit __________________________________________________
The menu selection will exit the Modify Setup menu and the system will return to
the Utility Menu.
2.5 Logging Out of the System _____________________________________
When the system administrator or a system operator has completed their activities with
the system, they should log out to prevent unauthorized personnel from having access. Press [X]
to exit from each menu until the main menu
is displayed. At this point, select [L] to log
out. A window will appear in the data entry
area asking to confirm logout. Press [Y] or
[ENTER] to confirm, or press [N] to remain logged in. If Log out is confirmed,
the system will return to the log in screen,
waiting for the next operator to access the
system.
Debitek DOC-970066 Rev -
Page - 11
Rapid Account Management System (RAMS) Operations Manual
(This page intentionally left blank)
Page - 12
Debitek DOC-970066 Rev -
Rapid Account Management System (RAMS) Operations Manual
2.0 Configuring the Rapid Account Management System ____________
Before full operation of the Rapid Account Management system can
begin, several areas of the program must be configured for the
installation site. Some of the items that require configuration are
communications parameters, adding system operators, defining users
types, and so on.
2.1 Logging on to the System ____________________________
In order to change setup
data, perform account functions, or perform system
maintainence, the RAMS software requires that a system
operator log in to the system. This is accomplished by
entering the operator name
and password at the log on
screen. Upon intitial installation, the only the system operator
name 'DEBITEK' with the password of 'PASSWORD' is defined. This
name and password will allow access to the system administrator
functions. Type each of these entries into the space provided,
followed by [ENTER].
2.2 The Main Menu ________
After logging on to the
Page - 4
Debitek DOC-9700xx
Rev -
Chapter 2 - Configuring the Rapid Account
Management System
system, the system operator is presented with the main menu. The
main menu will be the starting point for most of the chapters that
follow.
This menu allows access to account functions, card
functions, reporting functions, and utility functions. System
configuration items are located in the Utility Menu. To
access the Utility Menu, press
[U].
2.3 The Utility Menu ___________________________________
The Utitlity Menu contains commands dealing with system
maintainence and configuration. Most of these commands will be
covered fully in Chapter X,
System Maintainence.
The
Modify Setup Command, however, is required at this
point in order to configure
RAMS for operation.
Press
[M] to access the Modify
Debitek DOC-9700xx
Rev -
Page - 5
Rapid Account Management System (RAMS) Operations Manual
Setup Menu.
2.4 The Modify Setup Menu
The Modify Setup Menu
contains commands that allow
the system administrator to
alter the configuration of
the system. Menu options are
provided to all adding or
deleting system operators,
changing reciept and report
headers, defining user types, and other functions. While the
system will operate with the defaults provided, it will be
desirable to customize these settings to fit the needs of each
institution. Each menu command is explained in detail below.
2.4.1 Operators _________
This menu allows the
system administrator to define the system operators.
There are twelve system operators, including the system administrator, who is the
first system operator in the
list. The system administra-
Page - 6
Debitek DOC-9700xx
Rev -
Chapter 2 - Configuring the Rapid Account
Management System
tor will define an eight character operator name, and eight
character operator password, and the starting and ending
times of this operators shift. After the data for each system
operator has been entered, press [F10] to save it, or [ESC]
to abandon the changes.
2.4.2 Headings __________
There are two types of
printed output generated by
the RAMS system; reports and
reciepts. The Headings Menu
allows the system administrator to customize the headings for each of these out-
puts. Each heading may be up to 40 characters in length and
may contain data such as the institution name, the system
name, or any other desired information. To change a heading,
use the [||] keys to move to the desired heading, then enter
the data. Pressing [ENTER]
will move to the next heading.
After both headings
have been entered, press [F10]
to save them, or [ESC] to
abandon the changes.
Debitek DOC-9700xx
Rev -
Page - 7
Rapid Account Management System (RAMS) Operations Manual
2.4.3 User Types___________________________________
This menu allows the system administrator to define the
types of users allowed in the system. Up to 12 user types
may be defined.
The data
entry window will show the
type number, the site code
for that type, and the 20
character type description for each user type.
Each
description is fully customizable to accommodate the
institution's needs. To change a type, use the [||] keys to
move to the description desired, then enter that description.
Pressing [ENTER] will advance to the next description. When
all of the descriptions are entered, press [F10] to save them,
or [ESC] to abandon the changes.
2.4.4 Defaults ____________________________________
This menu allows the system administrator to set the
default amounts for the user transfer limit and maximum card
value. The daily transfer limit is the maximum amout that
a user is allowed to add to their card in a single day. The
maximum card value is the largest amount of value that may
be present on a user's card. These items will be discussed
more thoroughly in Chapter X, User Account Functions.
2.4.5 Modem Data___________________________________
This menu selection allows the programming of the modem
initialization string and the modem answer string. These
selections are specific to the modem used and will be preset
by Debitek at shipment. Do not changed these settings without
consulting Debitek Customer Service.
2.4.6 Exit ________________________________________
The menu selection will exit the Modify Setup menu and
the system will return to the Utility Menu.
2.5 Logging Out of the System ___________________________
Page - 8
Debitekoperator
DOC-9700xx
When the system administrator or a system
has
Rev
completed their activities with thr system, they should log out
Chapter 3 - Account Functions
3.0 Account Functions _________________________________________________
The Account Menu (available from the Main Menu) allows the manipulation of user account data.
New accounts may be created, old accounts deleted or modified. Each function of the Account Menu is
explained below using a sample account
3.1 The Account Menu ___________________________________________
The screen shown below is the Account Menu. Each of the operations shown allow a user's
account to be manipulated. To access the function required, press the highlighted letter shown
on the menu selection bar. The menu
selections will disappear and the appropriate window will appear in the Data Entry
area. After the data has been entered or the
function performed, the data entry window will be cleared and the menu selections will reappear. When all accounting
functions have been completed, press [X]
to return to the Main Menu.
3.2 Creating an Account __________________________________________
The Create function of the Account Menu is used to create a new user account. After
selecting Create, the system operator will see two windows appear in the data entry area of the
screen. The highlighted cursor will be in
the lower window, which is a list of the
available user types. Use the [ ] keys to
move the cursor to the required user type
and press [ENTER]. The lower window
will now disappear, and the upper window
will show the selected type. The highlighted cursor will now be on the User
Name field. Enter the user name (up to 25
characters) in last name first format and
press [ENTER]. The cursor will now
move to the User ID field. Enter the user's
ID (up to 9 characters) and press [ENTER]. The [ ] keys may be used to move from one field to another if any information needs to
be changed. When the system operator presses [ENTER] on the User ID field, the system will
save the record automatically. To abort this operation, press [ESC] and all data will be discarded
and the system will return to the Account Menu.
Debitek DOC-970066 Rev -
Page - 13
Rapid Account Management System (RAMS) Operations Manual
3.3 Editing an Account ___________________________________________
The Edit function of the Account Menu allows an existing account to be modified. After
selecting this command, the data entry window will ask for a user record. See section 1.5 for
details on how to select a user record.
After the user record has been selected, the
system will show the user's Lost Card
Code, Transfer Limit and Maximum Card
Limit. Use the [ ] keys to select the field
to edit, then type the appropriate data.
When all fields are correct, press [F10] to
save the record. If no changes are required, press [ESC] to return to the Ac-
count Menu.
3.4 Viewing an Account ___________________________________________
The View selection of the Account
Menu allows the system operator to view
the account data of a selected user. After
selecting this command, the data entry
window will ask for a user record. See
section 1.5 for details on how to select a
user record. The data shown includes the
following; User Type, User Name, User
ID, Account Balance, Transfer Limit,
Page - 14
Debitek DOC-970066 Rev -
Chapter 3 - Account Functions
Maximum Card Limit, Card Number, Lost Card Code, and the date of the last transaction using
the account. After viewing the data, press [ESC] to return to the Account Menu.
3.5 Depositing Funds ____________________________________________
The Deposit selection of the Account Menu is used to add funds to the
user's account. After selecting this command, the data entry window will ask for a
user record. See section 1.5 for details on
how to select a user record. The data entry window will ask for a deposit amount. Type in the
amount followed by [ENTER]. The system will add the amount to the account and print a receipt.
See below for an example of the deposit receipt.
3.6 Withdrawal of Funds _____
The Withdrawal selection of the
Account Menu is used to deduct funds
from the user's account. After selecting
this command, the data entry window will
ask for a user record. See section 1.5 for
details on how to select a user record.
Debitek DOC-970066 Rev -
Page - 15
Rapid Account Management System (RAMS) Operations Manual
After selecting the user, the data entry window will ask for a withdrawal amount. Type in the
amount followed by [ENTER]. The system will deduct the amount from the account and print
a receipt. See below for an example of the withdrawal receipt.
3.6 Deleting an Account ______
The Delete selection of the Account Menu is used to remove a user's
account. After selecting this command,
the data entry window will ask for a user
record. See section 1.5 for details on how
to select a user record. After selecting the
user, the system will make sure that no
funds are present in the user's account. If
funds are present, an error message will be
displayed. Press [ESC] to clear the message. Abort this function and use the
withdraw function to remove the funds. If
the account is empty, a window will appear in the data entry area requiring confirmation. Press
[Y] to confirm deletion; press [N] or [ENTER] to keep the account.
Page - 16
Debitek DOC-970066 Rev -
Chapter 4 - Card Functions
4.0 Card Functions____________________________________________________
The Card Menu (available from the Main Menu) allows the system operator to manipulate a user's
card. Each user in the system will have a card which will be used for vending, meals, and other purposes
unique to each institution. Functions in the Card Menu allow the creation and maintainence of each user's
card.
4.1 The Card Menu ______________________________________________
The Card Menu allows functions such as formatting a new card, adding value, removing
value, or viewing an existing card. Each of these functions is explained in detail in the sections
that follow, along with example screens
showing each function.
4.2 Format Cards ________________________________________________
The Format Card function of the Card Menu allows the system operator to format a new
card for a user. After selecting [F] from the Card Menu, the system will display the Format Card
Menu. This menu will allow the system
operator to select whether to format account cards or dispenser cards. Account
cards are those cards assigned to a user
who has an account in the RAMS database.
Dispenser cards are the cards purchased
from a card dispenser for use by guests of
the institution. Dispenser cards may only
be formatted by the system administrator.
Debitek DOC-970066 Rev -
Page - 17
Rapid Account Management System (RAMS) Operations Manual
4.2.1 Account Cards ________________________________________
The Account selection from the Format Cards Menu allows the system operator
to format a card for an account holder. After selecting this command, the data entry
window will ask for a user record. See
section 1.5 for details on how to select a
user record. Once the user has been selected, the Data Entry area will display a
message directing the system operator to
insert a card. The system operator will
then insert a card into the DCT. The card
will be formatted with the user data and
ejected. The system will then return to the
Card Menu.
4.2.2 Dispenser Cards _______________________________________
The Dispenser selection from the Format Cards Menu allows the system administrator to format cards to be placed into a Debitek Cash to Card with Dispenser. The
system will present the system administrator with a list of user types to select from.
Use the [ ] keys to select the appropriate
user type, then press [ENTER] to accept
it. The system then asks for the value that
will be placed on each card. Type the
amount required, then press [ENTER] to
accept the value. The system will now
request the system administrator to insert
a card. After the card has been inserted, it
will be formatted and ejected. The system
will then ask for the next card to be inserted. A window in the Data Entry area
will keep track of the number of cards formatted. When the desired number of cards have
been formatted, press [ESC] to return to the Card Menu.
Page - 18
Debitek DOC-970066 Rev -
Chapter 4 - Card Functions
4.3 Read Cards __________________________________________________
The Read selection from the Card Menu allows the system operator to read a card. The
system will ask the system operator to insert a card. If the card belongs to an account holder, the
user's account information is displayed
along with the value of the card. Otherwise, an error message will appear. Press
[ESC] to clear the error message, and the
display will show the value of the card
only. When done viewing, press [ESC] to
return to the card menu.
4.4 Transferring Value to a User's Card ____________________________
The Add selection from the Card Menu allows the system operator to add value to an
account holder's card. After selecting this command, the data entry window will ask for a user
record. See section 1.5 for details on how
to select a user record. Once the user has
been selected, the system will show the
account information and ask for an amount
to be added. This must be less than or equal
to the amount in the users account. After
the amount has been entered, the system
will ask the system operator to insert a
card. Insert a card into the DCT. The
amount will be added to the card and the
card will be ejected. A receipt will be
printed and the system will return to the
Card Menu. See below for an example of
the Add Value Receipt.
Debitek DOC-970066 Rev -
Page - 19
Rapid Account Management System (RAMS) Operations Manual
4.5 Deducting Value from a User's Card ____________________________
The Deduct selection from the Card Menu allows the system operator to remove value
from an account holder's card. After selecting this command, the data entry window will ask for
a user record. See section 1.5 for details on
how to select a user record. Once the user
has been selected, the system will ask for
the card to be inserted. The system will
show the account information and ask for
an amount to be deducted. This amount
must be less than or equal to the amount on
the user's card. After the amount has been
entered, the card will be written with the
new amount, a receipt will be printed, and
the card will be ejected. The system will
then return to the Card Menu.
Page - 20
Debitek DOC-970066 Rev -
Chapter 5 - Generating Reports
5.0 Generating Reports ________________________________________________
The Rapid Account Management System is capable of generating several reports, ranging from
single user transaction logs to system wide financial reports. The Reports Menu provides access to these
reporting functions. The following sections will cover the generation and format of each report type.
5.1 The Report Menu ____________________________________________
The Report menu (available from the Main Menu) allows the system operator or
administrator to generate a variety of reports. Available reports include shift reports, user reports,
user rosters, and system reports. Each
report type along with the report generated is covered in the following sections.
Debitek DOC-970066 Rev -
Page - 21
Rapid Account Management System (RAMS) Operations Manual
5.2 The Shift Report _____________________________________________
The Shift option from the Report Menu will generate a shift report of all transactions
performed during a shift. The system will prompt for the shift starting date and time, and the shift
ending date and time. The default values
of these fields are the starting and ending
times of the current system operator's shift.
Pressing [ENTER] at "Report End Time"
will cause the report to print. Press [ESC]
at any point before this to abort the report.
The report will list all transactions that
have occurred between the times entered,
along with shift totals. A signature line is
provided for the system operator who
prepared the report to sign, verifying that
the report totals match the funds taken in
during that shift.
Page - 22
Debitek DOC-970066 Rev -
Chapter 5 - Generating Reports
5.3 The User Report _____________________________________________
The User option from the Report Menu is used to generate a user report. The user report
will list all transactions made by a user during a specified time period. The system will prompt for
a starting date and time and an ending date
and time. The default value of the starting
date and time is midnight of the day the
user account was created. Pressing [ENTER] at "Report End Time" will cause the
report to print. Press [ESC] at any point
before this to abort the report. An example of the user report is included below.
Debitek DOC-970066 Rev -
Page - 23
Rapid Account Management System (RAMS) Operations Manual
5.4 The Roster Report ____________________________________________
The Roster selection from the Report Menu is used to generate a list of all users in the
system. The user name, ID and type are listed, along with the current account balance and the date
of the last transaction made by the user.
Page - 24
Debitek DOC-970066 Rev -
Chapter 5 - Generating Reports
5.5 The System Report ___________________________________________
The System selection of the Report Menu is used to generate the system report. This
report consists of all transactions made by during a specified time period. The system operator
will be asked for the starting date and time
and the ending date and time of the report.
Pressing [ENTER] at "Report End Time"
will cause the report to print. Press [ESC]
at any point before this to abort the report.
The system report will show each transaction in the order it occurred.
Debitek DOC-970066 Rev -
Page - 25
Rapid Account Management System (RAMS) Operations Manual
(This page intentionally left blank)
Page - 26
Debitek DOC-970066 Rev -
Chapter 6 - Utilities and Periodic Maintainence
6.0 Utilities and Periodic Maintainence __________________________________
The RAMS system provides several features for the maintainence and protection of the user
database. These functions are located on the Utility Menu.
6.1 The Utility Menu _____________________________________________
The Utility menu (available from the Main Menu) provides functions to perform periodic
maintainence on the user database, to maintain a tape backup of the user database and other files,
and to allow Debitek Customer Service to
access the system in cases of special problems or software updates. Each of the
functions of the Utility Menu is discussed
below, with the exception of the Modify
Setup option, which was covered in Chapter 2.
6.2 The Tape Menu ______________________________________________
The Tape Menu provides access to the tape backup system. The tape backup system is
used to store all of the system files of the RAMS onto tape cartridges. In the event of a computer
malfunction, the tape backups may be used
to restore data, insuring that not more than
one day's data may be lost. Tape backup
must be performed daily to maintain this
level of data integrity. The commands
available from the Tape Menu are listed in
the following sections.
Note: The system cannot process any transactions at either
the RAMS host or remote locations while a tape function is in
progress. In order to minimize user inconvenience, it is advised that
tape functions take place during low usage hours.
Debitek DOC-970066 Rev -
Page - 27
Rapid Account Management System (RAMS) Operations Manual
6.2.1 Backup Data __________________________________________
The Backup Data selection is used to transfer all RAMS system files to a tape
cartridge. To begin a backup, select [B] from the menu. The system will ask for
verification before beginning the format
process. After the system has shut down,
it will prompt the operator to insert a tape
into the tape drive. After this has been
done, press a key on the keyboard and the
backup process will begin. When the
backup is complete, the system will ask
that the operator verify the results of the
backup as shown on the display. If an error
is reported, the backup was not successful,
and should be repeated with a clear tape
(see section 6.2.3 Clear Tape for details).
Otherwise, press a key to return to the
RAMS system.
6.2.2 Format Tape __________________________________________
The Format Tape selection is used to initialize a new tape cartridge for use with
the system. To begin formatting a tape, select [F] from the menu. The system will ask for
verification before beginning the format process. After the system has shut down, it will
prompt the operator to insert a tape into the tape drive. After this has been done, press
a key on the keyboard and the format process will begin. When the format is complete,
the system will ask that the operator verify the results as shown on the display. If an error
is reported, the format was not successful, and should be repeated with a new tape.
Otherwise, press a key to return to the RAMS system.
6.2.3 Clear Tape ____________________________________________
The Clear Tape selection is used to remove old data from a tape cartridge. To
begin clearing a tape, select [C] from the menu. The system will ask for verification before
beginning the format process. After the system has shut down, it will prompt the operator
to insert a tape into the tape drive. After this has been done, press a key on the keyboard
and the clearing process will begin. When the clearing is complete, the system will ask that
the operator verify the results as shown on the display. If an error is reported, the clearing
was not successful, and the tape should be reformatted (see section 6.2.2, Format Tape).
Page - 28
Debitek DOC-970066 Rev -
Chapter 6 - Utilities and Periodic Maintainence
Otherwise, press a key to return to the RAMS system.
6.2.4 Restore Data __________________________________________
The Restore Data selection is used to restore data from a tape cartridge back into
the RAMS system. This function is required only if the system data has been in some way
damaged and cannot be recovered and should only be used at the direction of Debitek
Customer Service. To begin restoring from a tape, select [R] from the menu. The system
will ask for verification before beginning the format process. After the system has shut
down, it will prompt the operator to insert a tape into the tape drive. After this has been
done, press a key on the keyboard and the restore process will begin. When the restoration
is complete, the system will ask that the operator verify the results as shown on the display.
If an error is reported, the restoration was not successful, and should be repeated. Press
a key to return to the RAMS system.
6.3 Communications Status _______________________________________
The Comm Status selection of
the Utility Menu is used to monitor the
status of the devices connected to the
RAMS host system. This screen informs the system operator or administrator whether the local QVTS, the
remote QVTS, or the RAMS remote is
communicating or not. If communications are occurring normally, each de-
Debitek DOC-970066 Rev -
Page - 29
Rapid Account Management System (RAMS) Operations Manual
vice will report Up in the status display. If any device is not communicationg, its status display
field will read Down. To exit the communications status screen, press [ESC].
6.4 Purge Users _________________________________________________
The Purge Users command allows
the system administrator to quickly and
easily remove all users whose accounts are
no longer active in the system. The system
will notify the system administrator that
this function will permanently remove users from the user database and ask for [y/
N] confirmation before proceding. Pressing [N] or [ENTER] will return the system
to the Utility Menu. Pressing [Y] will
cause the system to proceed. The system
will prompt for the number of days of
inactivity required before considering an
account inactive. All users who have not made a transaction within this number of days and whose
Page - 30
Debitek DOC-970066 Rev -
Chapter 6 - Utilities and Periodic Maintainence
account balance is empty will be removed from the database. A printed report will be generated
listing those users removed. Users with an account balance but no transaction within the specified
time period will be marked for reviw. An example of this report is shown below.
6.5 Modify Setup ________________________________________________
The Modify Setup Menu is covered in Chapter 2, Configuring the Rapid Account
Management System.
6.6 Index Build __________________________________________________
The Index Build function is included as a utility to attempt to recover a corrupted database.
It should only be used if so directed by Debitek Customer Service.
6.7 Host Mode __________________________________________________
The Host Mode selection is used to provide a means for Debitek customer service to
diagnose and correct problems with the RAMS system via the modem included in the system. This
allows quicker response to problems and avoids costly service calls. Host mode should not be used
except when directed by Debitek customer service.
Debitek DOC-970066 Rev -
Page - 31
Rapid Account Management System (RAMS) Operations Manual
(This page intentionally left blank)
Page - 32
Debitek DOC-970066 Rev -
Index
Index
Symbols
[BACKSPACE] 2
[ENTER] 2
[ESC] 2
[F10] 2
[F8] 4
[PAGE DOWN] 2
[PAGE UP] 2
A
Account
Account
Balance 14
cards 17
C
Card
Number
14
D
Data Entry Area
Database 1
DCT 1
Debitek Cash to
Dispenser cards
Down Arrow 2
3
Card
17
with
Dispenser
18
F
Field 1
Format 17
H
Host
mode
31
Card
Code
L
Lost
14
M
Max Card Limit 10, 14
Menu Selection Area 3
Menu Title/Date Time Area
Modem 31
3
N
Numeric
Data
1
P
Pick
List
1
Debitek DOC-97066
Rev -
Index - A
Rapid Account Management System (RAMS) Operations Manual
Q
QVTS
1, 29
R
RAMS
Receipt 8, 15, 19, 20
Record 1
Report 22, 23, 30
Report headings 8
S
System
System
Administrator
Operator 1
1
T
Tape backup 27
Tape cartridges 27
Text Data 1
Transfer Limit 10, 14
U
Up Arrow 2
User 1
User ID 14
User Name 14
User Type 8, 14
V
Valid
Key
List
3
W
Window
Index - B
1
Debitek DOC-97066
Rev -