1
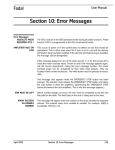
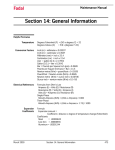
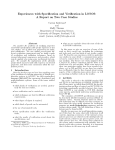
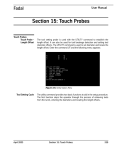
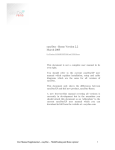
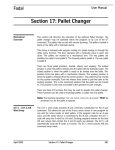
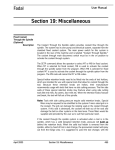
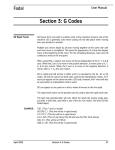
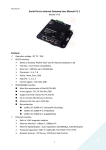
Fadal
User Manual
Section 16: Command Menus
Quick Keys Menu
There are three separate prompting menus within the machine control. They
are the Quick Keys Menu, the Edit Menu, and the Function Menu. These menus
prompt the operator for input to perform machine commands. The Quick Keys
menu is used for quick setup functions. Program editing is accomplished with
the Edit Menu. The Function Menu is used to perform machine tasks. These
menus are activated or deactivated within the machine parameters. Use the
SETP command and the CMD MENU parameter to turn the menus on or off.
When the menus are off, the machine is operated by commands (See Section
Eight, Commands). The Quick Keys Menu is selected by pressing the space bar
from ENTER NEXT COMMAND.
When the power on cold start has been completed the following screen is
displayed when the menus are turned on within machine parameters:
Figure 16-1 Quick Keys Menu
1-DRY RUN
Quick key #1 places the control in auto inside the run time menu. The operator
now may choose a dry run option. After a dry run mode is selected, press the
MANUAL key and then the AUTO key to start the dry run.
2-NEXT TOOL
Quick key #2 calls the next tool with an M6 T# command. Press the START
button to load the next tool.
April 2003
Section 16: Command Menus
379
Fadal
User Manual
3-ZERO RETURN
Quick key #3 returns all axes to the HOME position. Press 3-ZERO RETURN then
the START button.
4-SET FIXTURE
Quick key #4, places the control in the FIXTURE OFFSET UTILITIES MENU.
5-SET LENGTH
Quick key #5 sets the length of the current tool in the spindle at its current Z
location.
a. Jog the current tool down to the desired part Z0
b. Press 5-SET LENGTH from the quick key menu.
6-OFFSETS
7-AXIS ZERO
This Quick key #6 places the control into the OFFSET tables. By pressing the
space bar, the operator may toggle between TOOL LENGTH OFFSET TABLE,
FIXTURE OFFSET TABLE, TOOL TIME TABLE, and MACRO VARIABLE TABLE.
Quick key # 7 is used to set an axis HOME position.
1) Jog the desired axis to the desired position to be called zero.
2) Press 7-AXIS ZERO from the Quick Keys Menu.
3) Choose the desired axis from the SETUP / AXIS ZERO menu.
This has now set that axis to zero. For example, if you choose X the current
position is now X0. This position does not have to be the same place as cold
start X0. And it is not a fixture offset location.
8-READ
Quick Key #8 has two options:
1- BEGIN
By pressing quick key # 8,then # 1, the control will begin receiving from the RS232 port.
2- OPTIONS
Options to the quick key READ allows the operator to customize the input
parameters.
MEMORY/INPUT/OPTIONS:
0- NORMAL ERROR CHECKING2- IGNORE ERRORS
1- IGNORE PARITY ERRORS3- OTHER FORMAT
9-PUNCH
380
Quick Key #9 will output programs and offsets through the RS-232 port.
Section 16: Command Menus
April 2003
Fadal
User Manual
There are 4 options as follows:
0-PROGRAM AND TOOLING
2-PROGRAM ONLY
1-TOOLING ONLY 3- ALL PROGRAMS
0- PROGRAM AND TOOLING ONLY will output the program any values in the
tool offset table and any values in the fixture table. The operator is then
prompted for the data format.
0-ASCII: 7 DATA BITS, EVEN PARITY, 1 STOP BITS
1-EIA : 8 DATA BITS, ODD PARITY, 1 STOP BIT
Normal output is 0-ASCII
0-COMPUTER, NO LEADER OR NULLS
1-TTY, LEADER AND NULLS
2-PROGRAM ONLY will output program data only. No tooling fixture offset data
will be sent. The operator is then prompted for the data format.
0-ASCII: 7 DATA BITS, EVEN PARITY, 1 STOP BITS
1-EIA : 8 DATA BITS, ODD PARITY, 1 STOP BIT
Normal output is 0-ASCII
0-COMPUTER, NO LEADER OR NULLS
1-TTY, LEADER AND NULLS
3-ALL PROGRAMS will output all programs in the program library. They will be
sent as a single file, no offset data will be included. The operator is then
prompted for the data format.
0-ASCII: 7 DATA BITS, EVEN PARITY, 1 STOP BITS
1-EIA : 8 DATA BITS, ODD PARITY, 1 STOP BIT
Normal output is 0-ASCII
0-COMPUTER, NO LEADER OR NULLS
April 2003
Section 16: Command Menus
381
Fadal
User Manual
1-TTY, LEADER AND NULLS
0-CUSTOM MACRO
Quick Key #0 will run program number 9999 without having to switch the
currently active program in memory. This feature allows the user to
conveniently run this program.
Any program maybe defined as O9999 or a factory installed sample macro
program may be loaded into memory. The factory example program can be
loaded by typing TA,6 from the command mode. The example macro program
is an example of a menu. This program can be modified and stored on disk for
future use.
When the 0 key is pressed and program number 9999 is not found, the control
will display the program library menu. The user may then choose to start a new
program with a program number 9999, for a user-defined custom macro
program.
See the PR command Section Eight, Commands.
EXAMPLE:
1) Program O1 is a production part. This is the currently active program in
memory.
2) Program O9999 is a warm up program written by the programmer which is
performed every morning.
a.
b.
c.
d.
e.
Edit Menu
382
Press the space bar until the Quick Key menu is displayed.
Press the 0 button to run the custom macro to warm machine up.
Press AUTO to begin. (Program O9999 will now be run in auto.)
After the warm up program is complete, press MANUAL to exit AUTO.
Press AUTO to run production part. (Program O1 will now be run in
auto.)
The Edit Menu is selected by pressing the space bar twice from ENTER NEXT
COMMAND, and allows editing or viewing the currently active program. This
Section 16: Command Menus
April 2003
Fadal
User Manual
menu functions the same as the PA command editor (see Section 8, PA
Command). When the Edit Menu is entered the following screen is displayed.
Figure 16-2 Edit Menu
Edit Menu Options
The menu options displayed function in the following manner.
U-UP Press U to move the cursor up one line
D-DOWN Press D to move the cursor down one line
F-FUNCTIONS Press F to enter the graphics menu (See section 20 for
CNC88HS graphics use)
C-CHANGE Press C to change the line that the cursor is on
I-INSERT Press I to insert a line after the line that the cursor is on
S-SEARCH Press S to search for data within the program. The cursor will
move to the first line that the data is in
R-REPLACE Press R to search and replace data within the program
N-NUMBER Press N to renumber the program
O-COPY Press O to copy program blocks
ENTER-PAGE DOWN Press the ENTER key to move the cursor one page
forward in the program
BACKSPACE-PAGE UP Press the BACKSPACE key to move the cursor one page
backward in the program
DEL-DELETE Press the DEL key to delete the program line that the cursor is on
P-PROGRAM Press P to switch to another program
The following key commands NOT displayed on the menu are also available:
T-TOP Press T to move the cursor to the first line of the program
B-BOTTOM Press B to move the cursor to the last line of the program
April 2003
Section 16: Command Menus
383
Fadal
Function Menu
User Manual
The Function Menu is selected by pressing the space bar three times from
ENTER NEXT COMMAND. The first twelve (12) lines display the currently active
program. The bottom four (4) lines display the Function Menu options. These
menu options are selected by number input. The operator may switch between
the Function Menu, the Quick Keys Menu, and the Edit Menu by pressing the
Space bar.
Selection of menu options may display additional menu options. The top line of
the subsequent menus displays the previous menus selected. Press the
MANUAL key at any menu to abort the process and return to the MAIN menu.
The following pages explain the complete menu structure and the options
available.
Figure 16-3 Function Menu
1- Setup Function
To perform machine Setup functions select option 1 from the main menu. This
function allows for the following options.
Select the option below for the indicated desired results:
1. Tool - This selection is used to set tooling information. It may be used to set
tool length or diameter offsets. These offsets may be input or changed. The
following options are available when Tool is selected:
1. Single - This option is used to set a single tool. The options requiring
input will affect the tool in the spindle. The following options are
available when Single is selected:
1. Get Tool - This option is used to change to a desired tool.
Enter
the tool number to change to. The machine will perform a tool change
to the tool number.
384
Section 16: Command Menus
April 2003
Fadal
User Manual
2. Enter Diameter - This option is used to input a tool diameter. The
input value will be an absolute change to the tool table. Enter the
diameter value. The entered value is placed into the tool table.
3. Store Length - This option is used to input the tool length into the
tool table. The machine will input the current Z axis location into the
tool table. The control performs the SL command.
4. Modify Length - This option is used to change a tool length offset.
The offset will be incrementally changed. Enter the amount to
change the tool offset. The machine will perform the SL command
to change the offset.
5. Jog Key - This option allows the operator the ability to Jog the tool to
the gauge point before setting the length. The machine enters the
Jog mode. Press the manual key to return to the previous menu.
2. Multiple - This option should be selected when setting tool data for more
than one tool. When this option is selected, the machine performs the
UT command (See the Setting Tool Offsets, Using the UT command).
3. Offset Table - This option is used to view the tool table. The control
performs the DT command.
4. Turret Location - This option is used to set the current tool turret
location as number 1.
1. Reset Current Tool Location As 1 - This selection performs the
SETTO command.
2. Abort - This options aborts the procedure and returns to the main
menu.
2. Fixture - This selection is used to set fixture offset information. The following
options are available:
1. Offset Table - This option is used to view the fixture offset table. This
selection performs the DF command.
2. Read From Jog - This option is used to set fixture offsets using the UT
command. This selection initiates the UT command for Fixture Offset
setting.
3. Zero Axes - This option is used to set the machine axes home positions.
The current axis location is set as the axis home position.
April 2003
Section 16: Command Menus
385
Fadal
User Manual
1. Press Keys: X, Y, Z, A, B, (H FOR ALL) OR JOG - The JOG key may be
pressed to enter the Jog mode. Press MANUAL to return to this
option. The selection of an axis will set the current location as the
axis home position.
2 - Memory
Function
This selection from the main menu may be used to perform machine memory
tasks. The following options may be selected to perform the desired operation:
1. Run Program - This option begins execution of the current program.
1. Automatic - This option begins program execution.
1. Begin - This selection begins program execution from the beginning.
2. Select Options - This option allows the operator to select the AU
command options individually. Program execution will be performed
according to the AU parameters selected.
2. DNC - This option begins DNC execution of the program.
1. Begin - This selection begins DNC program execution from the
beginning.
2. Select Options - This option allows the operator to select the DNC
command options individually. Program execution will be performed
according to the DNC parameters selected.
3. Summary - This option is used to perform the SUM command. This
command is used to debug the program in memory.
1. Begin - This option performs the SU command with all parameters =
zero.
2. Select Options - This option allows the operator to select the SUM
command options individually. Program execution will be performed
according to the SUM parameters selected.
2. Program Library - This command performs program library maintenance.
The PR command is performed when this option is selected.
3. Input/Output - This option is used for program transferring and verification.
1. Input - This option is used to transmit a file to the machine.
1. Begin - This option performs a TA,1 command.
386
Section 16: Command Menus
April 2003
Fadal
User Manual
2. Options - This option allows the operator to select the TA command
options individually. The TA command is performed with the selected
parameters.
2. Output - This option transmits a file from the machine to an external
device.
1. Begin - This option performs a PU command.
2. Options - This option allows the operator to select the PU command
options individually. The PU command is performed with the selected
parameters.
3. Verify - This option is used to verify the tape that was punched. The
command VT,1 is performed when this option is selected.
4. Baud Rate - This option is used to set the machine baud rate.
1. Select Baud Rate - Enter the selection number to select the
machine baud rate.
4. Learn Mode - This option is used to enter the learn mode. Selection of this
option performs the LE command.
5. Clear - This option is used to clear data from the machine memory.
1. Current Program - This option is used to clear the current program from
memory. The NE command is performed when this option is selected.
2. Offsets and All Memory - This option is used to completely clear tool
and fixture offsets and machine memory. The RI command is
performed when this option is selected.
3. Display Free Memory - This option is used to display the percentage of
free memory in the machine. The ME command is performed when this
option is selected.
6. Settings - This option is used to view or change parameter and backlash
settings.
1. Backlash - This option is used to view or change the machine backlash
settings.
1. Display - This option displays the current machine backlash
settings. The BL command is performed when this option is
selected.
April 2003
Section 16: Command Menus
387
Fadal
User Manual
2. Change - This option is used to change the machine backlash
settings. The axes and desired settings are input at the required
prompts.
2. Parameters - This option is used to view or change the machine
parameters. The SETP command is performed when this option is
selected.
3 - MDI Function
4 - Home Axes
Function
This function performs the MD command, putting the control in Manual Data
Input mode. Pressing the MANUAL key will return to the main menu.
This function is used to send the machine to the home position.
1) Return To Home - This option is used to return the machine to the axes
home position. The HO command is performed when this option is
selected.
2) Return For Power Off - This option is used to return the machine to the
cold start position for power off. The SETCS and HO commands are
performed when this option is selected.
5 - Reset Function
This function is used to reset the machine’s modal codes. The HO command is
performed when this option is selected.
6- Command Mode
Function
This function is used to enter the command mode. The machine operates in
the same format as when the Menu Mode is turned off. Press the MANUAL key
to return to the menu mode.
7- Diagnostics
Function
This function is used to perform probe and diagnostic tests.
A. Touch Probe - This option is used to test the TS20 or 27 touch probe. The
touch probe test begins when this option is selected.
B. MP Probe - This option is used to test the MP probe. The MP test begins
when this option is selected.
C. Controller - This option is used for maintenance diagnostics. This option
should be used by trained maintenance personnel ONLY.
1) Continue - This option performs the DI command. This is for maintenance
personnel ONLY.
2) Abort - This option returns to the main menu. This option is for non
maintenance personnel.
388
Section 16: Command Menus
April 2003
Fadal
User Manual
8- Last Screen
Function
This function is used to display the previous screen. Warning or error
messages that were cleared can be displayed with the use of this function.
Only the last message is displayed.
9- Cold Start
Function
This function is used to perform the machine cold start procedure. This
function should be the first function used after power on. After this function is
used, the option is no longer displayed on the main menu. If the option is
displayed it should be selected to perform the cold start.
A. Continue - This option should ONLY be used when the axes are aligned with
the cold start indicators. If they are not, use option 2.
B. Align Axes - This option is selected with the JOG key. When the axes cold
start indicators are not aligned, press the JOG key to align them. Press the
MANUAL key to return to the cold start menu. After this option has been
completed select option 1 to complete the cold start procedure.
April 2003
Section 16: Command Menus
389
Fadal
User Manual
This page intentionally left blank.
390
Section 16: Command Menus
April 2003