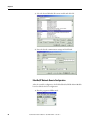
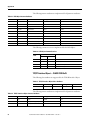
1
User Manual
Bulletin 193 E1 Plus EtherNet/IP Side Mount Module
Catalog Number 193-ETN
Important User Information
Solid-state equipment has operational characteristics differing from those of electromechanical equipment. Safety
Guidelines for the Application, Installation and Maintenance of Solid State Controls (publication SGI-1.1 available from
your local Rockwell Automation sales office or online at http://www.rockwellautomation.com/literature/) describes some
important differences between solid-state equipment and hard-wired electromechanical devices. Because of this difference,
and also because of the wide variety of uses for solid-state equipment, all persons responsible for applying this equipment
must satisfy themselves that each intended application of this equipment is acceptable.
In no event will Rockwell Automation, Inc. be responsible or liable for indirect or consequential damages resulting from
the use or application of this equipment.
The examples and diagrams in this manual are included solely for illustrative purposes. Because of the many variables and
requirements associated with any particular installation, Rockwell Automation, Inc. cannot assume responsibility or
liability for actual use based on the examples and diagrams.
No patent liability is assumed by Rockwell Automation, Inc. with respect to use of information, circuits, equipment, or
software described in this manual.
Reproduction of the contents of this manual, in whole or in part, without written permission of Rockwell Automation,
Inc., is prohibited.
Throughout this manual, when necessary, we use notes to make you aware of safety considerations.
WARNING: Identifies information about practices or circumstances that can cause an explosion in a hazardous
environment, which may lead to personal injury or death, property damage, or economic loss.
ATTENTION: Identifies information about practices or circumstances that can lead to personal injury or death,
property damage, or economic loss. Attentions help you identify a hazard, avoid a hazard, and recognize the
consequence
SHOCK HAZARD: Labels may be on or inside the equipment, for example, a drive or motor, to alert people that
dangerous voltage may be present.
BURN HAZARD: Labels may be on or inside the equipment, for example, a drive or motor, to alert people that
surfaces may reach dangerous temperatures.
IMPORTANT
Identifies information that is critical for successful application and understanding of the product.
Allen-Bradley, Rockwell Software, Rockwell Automation, and TechConnect are trademarks of Rockwell Automation, Inc.
Trademarks not belonging to Rockwell Automation are property of their respective companies.
Table of Contents
Installation and Wiring
Introduction . . . . . . . . . . . . . . . . . . . . . . . . . . . . . . . . . . . . . . . . . . . . . . . . . . . . . . 7
Features . . . . . . . . . . . . . . . . . . . . . . . . . . . . . . . . . . . . . . . . . . . . . . . . . . . . . . . . . . 8
Installation . . . . . . . . . . . . . . . . . . . . . . . . . . . . . . . . . . . . . . . . . . . . . . . . . . . . . . . 9
Wiring . . . . . . . . . . . . . . . . . . . . . . . . . . . . . . . . . . . . . . . . . . . . . . . . . . . . . . . . . . 10
Dimensions . . . . . . . . . . . . . . . . . . . . . . . . . . . . . . . . . . . . . . . . . . . . . . . . . . . . . . 11
Network Design. . . . . . . . . . . . . . . . . . . . . . . . . . . . . . . . . . . . . . . . . . . . . . . . . . 11
Protection Functions
Introduction . . . . . . . . . . . . . . . . . . . . . . . . . . . . . . . . . . . . . . . . . . . . . . . . . . . . .
Trip Status / Identification. . . . . . . . . . . . . . . . . . . . . . . . . . . . . . . . . . . . . . . .
Trip Resetting . . . . . . . . . . . . . . . . . . . . . . . . . . . . . . . . . . . . . . . . . . . . . . . . . . .
Trip and Warning Enable . . . . . . . . . . . . . . . . . . . . . . . . . . . . . . . . . . . . . . . . .
Overload and Phase Loss Protection . . . . . . . . . . . . . . . . . . . . . . . . . . . . . . .
Overload Warning. . . . . . . . . . . . . . . . . . . . . . . . . . . . . . . . . . . . . . . . . . . .
Jam Protection . . . . . . . . . . . . . . . . . . . . . . . . . . . . . . . . . . . . . . . . . . . . . . . . . . .
Jam Trip . . . . . . . . . . . . . . . . . . . . . . . . . . . . . . . . . . . . . . . . . . . . . . . . . . . . .
Jam Warning . . . . . . . . . . . . . . . . . . . . . . . . . . . . . . . . . . . . . . . . . . . . . . . . .
Underload Protection . . . . . . . . . . . . . . . . . . . . . . . . . . . . . . . . . . . . . . . . . . . .
Underload Warning . . . . . . . . . . . . . . . . . . . . . . . . . . . . . . . . . . . . . . . . . .
Communication Fault Protection . . . . . . . . . . . . . . . . . . . . . . . . . . . . . . . . .
Comm Fault Warning . . . . . . . . . . . . . . . . . . . . . . . . . . . . . . . . . . . . . . . .
Communication Idle Protection . . . . . . . . . . . . . . . . . . . . . . . . . . . . . . . . . . .
Comm Idle Warning. . . . . . . . . . . . . . . . . . . . . . . . . . . . . . . . . . . . . . . . . .
13
13
13
13
14
14
15
15
16
16
16
17
17
17
17
Configure an E1 Plus EtherNet/
IP Module To Operate on the
Network
Introduction . . . . . . . . . . . . . . . . . . . . . . . . . . . . . . . . . . . . . . . . . . . . . . . . . . . . .
Determining Network Parameters . . . . . . . . . . . . . . . . . . . . . . . . . . . . . . . . .
Setting the IP Network Address . . . . . . . . . . . . . . . . . . . . . . . . . . . . . . . . . . .
Assign Network Parameters via the BOOTP/DHCP Utility. . . . . . . . .
Assign Network Parameters Via a Web Browser and MAC Scanner
Software . . . . . . . . . . . . . . . . . . . . . . . . . . . . . . . . . . . . . . . . . . . . . . . . . . . . . . . . .
Other Factors to Consider When Assigning Network Parameters . . . .
Duplicate IP Address Detection . . . . . . . . . . . . . . . . . . . . . . . . . . . . . . . . . . .
Behavior of Modules With Duplicate IP Addresses . . . . . . . . . . . . . .
DNS Addressing . . . . . . . . . . . . . . . . . . . . . . . . . . . . . . . . . . . . . . . . . . . . . . . . .
Install EDS File . . . . . . . . . . . . . . . . . . . . . . . . . . . . . . . . . . . . . . . . . . . . . . . . . .
Download EDS File Embedded in the Module . . . . . . . . . . . . . . . . . .
Download EDS File from Allen-Bradley EDS File Download Site
Register the EDS File . . . . . . . . . . . . . . . . . . . . . . . . . . . . . . . . . . . . . . . . .
19
19
20
20
Introduction . . . . . . . . . . . . . . . . . . . . . . . . . . . . . . . . . . . . . . . . . . . . . . . . . . . . .
I/O Messaging . . . . . . . . . . . . . . . . . . . . . . . . . . . . . . . . . . . . . . . . . . . . . . . . . . .
ControlLogix Configuration with Add-On Profiles . . . . . . . . . . . . .
EtherNet/IP Network Configuration with Add-On Profiles . . . . .
Accessing Module Data with Add-On Profiles . . . . . . . . . . . . . . . . . .
ControlLogix Generic Configuration . . . . . . . . . . . . . . . . . . . . . . . . . .
EtherNet/IP Network Generic Configuration . . . . . . . . . . . . . . . . . .
Downloading the Generic Configuration to the PLC . . . . . . . . . . . .
33
33
33
35
37
38
40
43
Automation Controller and
Software Communications
Rockwell Automation Publication 193-UM012B-EN-P - June 2011
22
24
25
25
26
26
26
27
28
3
Accessing Generic Module Data . . . . . . . . . . . . . . . . . . . . . . . . . . . . . . .
Logix Explicit Messaging . . . . . . . . . . . . . . . . . . . . . . . . . . . . . . . . . . . . . . . . . .
MicroLogix 1100 and 1400 Explicit Messaging . . . . . . . . . . . . . . . . . . . . .
FactoryTalk View with Predefined Tags . . . . . . . . . . . . . . . . . . . . . . . . . . . .
44
45
48
51
Email Notifications
Introduction . . . . . . . . . . . . . . . . . . . . . . . . . . . . . . . . . . . . . . . . . . . . . . . . . . . . .
Notification Events. . . . . . . . . . . . . . . . . . . . . . . . . . . . . . . . . . . . . . . . . . . . . . .
Email Contents . . . . . . . . . . . . . . . . . . . . . . . . . . . . . . . . . . . . . . . . . . . . . . . . . .
Email Configuration. . . . . . . . . . . . . . . . . . . . . . . . . . . . . . . . . . . . . . . . . . . . . .
Configure Device Identity . . . . . . . . . . . . . . . . . . . . . . . . . . . . . . . . . . . .
Limitations . . . . . . . . . . . . . . . . . . . . . . . . . . . . . . . . . . . . . . . . . . . . . . . . . . . . . .
57
57
57
58
59
61
Device Parameters and Tags
Introduction . . . . . . . . . . . . . . . . . . . . . . . . . . . . . . . . . . . . . . . . . . . . . . . . . . . . .
Parameter and Tag Programming . . . . . . . . . . . . . . . . . . . . . . . . . . . . . . . . . .
Program Lock . . . . . . . . . . . . . . . . . . . . . . . . . . . . . . . . . . . . . . . . . . . . . . . .
Resetting to the Factory Default Values. . . . . . . . . . . . . . . . . . . . . . . . .
Parameter Group Listing . . . . . . . . . . . . . . . . . . . . . . . . . . . . . . . . . . . . . .
Monitor Group. . . . . . . . . . . . . . . . . . . . . . . . . . . . . . . . . . . . . . . . . . . . . . .
Advanced Setup Group . . . . . . . . . . . . . . . . . . . . . . . . . . . . . . . . . . . . . . .
Reset/Lock Group . . . . . . . . . . . . . . . . . . . . . . . . . . . . . . . . . . . . . . . . . . . .
I/O Setup Group . . . . . . . . . . . . . . . . . . . . . . . . . . . . . . . . . . . . . . . . . . . . .
Trip History Group. . . . . . . . . . . . . . . . . . . . . . . . . . . . . . . . . . . . . . . . . . .
63
63
63
63
64
64
65
68
69
71
Troubleshooting
Introduction . . . . . . . . . . . . . . . . . . . . . . . . . . . . . . . . . . . . . . . . . . . . . . . . . . . . .
EtherNet/IP Modes of Operation . . . . . . . . . . . . . . . . . . . . . . . . . . . . . . . . .
Power-Up Reset Mode . . . . . . . . . . . . . . . . . . . . . . . . . . . . . . . . . . . . . . . .
Run Mode . . . . . . . . . . . . . . . . . . . . . . . . . . . . . . . . . . . . . . . . . . . . . . . . . . .
Recoverable Error Mode . . . . . . . . . . . . . . . . . . . . . . . . . . . . . . . . . . . . . .
Unrecoverable Error Mode . . . . . . . . . . . . . . . . . . . . . . . . . . . . . . . . . . . .
EtherNet/IP Troubleshooting Procedures . . . . . . . . . . . . . . . . . . . . . . . . . .
Input and Output Troubleshooting Procedures . . . . . . . . . . . . . . . . . . . . .
73
73
73
74
74
75
75
75
Specifications
Specifications . . . . . . . . . . . . . . . . . . . . . . . . . . . . . . . . . . . . . . . . . . . . . . . . . . . . 77
EtherNet/IP Information
Electronic Data Sheets . . . . . . . . . . . . . . . . . . . . . . . . . . . . . . . . . . . . . . . . . . . .
EtherNet/IP Objects . . . . . . . . . . . . . . . . . . . . . . . . . . . . . . . . . . . . . . . . . . . . .
Identity Object — CLASS CODE 0x01 . . . . . . . . . . . . . . . . . . . . . . . .
Message Router Object — CLASS CODE 0x02. . . . . . . . . . . . . . . . .
Assembly Object — CLASS CODE 0x04 . . . . . . . . . . . . . . . . . . . . . .
Connection Manager Object — CLASS CODE 0x06 . . . . . . . . . . .
Discrete Input Point Object — CLASS CODE 0x08 . . . . . . . . . . . .
Discrete Output Point Object — CLASS CODE 0x09 . . . . . . . . . .
Parameter Object — CLASS CODE 0x0F. . . . . . . . . . . . . . . . . . . . . .
Parameter Group Object — CLASS CODE 0x10 . . . . . . . . . . . . . . .
4
Rockwell Automation Publication 193-UM012B-EN-P - June 2011
81
81
81
82
83
85
85
86
87
88
Control Supervisor Object — CLASS CODE 0x29 . . . . . . . . . . . . .
Overload Object — CLASS CODE 0x2C . . . . . . . . . . . . . . . . . . . . . .
PCP Object — CLASS CODE 0xC2 . . . . . . . . . . . . . . . . . . . . . . . . . .
TCP/IP Interface Object — CLASS CODE 0xF5 . . . . . . . . . . . . . .
Ethernet Link Object — CLASS CODE 0xF6 . . . . . . . . . . . . . . . . . .
Rockwell Automation Support . . . . . . . . . . . . . . . . . . . . . . . . . . . . . . . . . . . .
Installation Assistance . . . . . . . . . . . . . . . . . . . . . . . . . . . . . . . . . . . . . . . .
New Product Satisfaction Return . . . . . . . . . . . . . . . . . . . . . . . . . . . . . .
Rockwell Automation Publication 193-UM012B-EN-P - June 2011
89
91
91
92
93
95
95
95
5
6
Rockwell Automation Publication 193-UM012B-EN-P - June 2011
Chapter
1
Installation and Wiring
Introduction
The purpose of this chapter is to provide the necessary instructions to successfully
install an E1 Plus EtherNet/IP Module to an E1 Plus Overload Relay and
properly connect to a EtherNet/IP network.
ATTENTION: To prevent electrical shock, disconnect from power
source before installing or servicing. Install in suitable enclosure.
Keep free from contaminants.
ATTENTION: The side mount module contains ESD (electrostatic
discharge) sensitive parts and assemblies. Static control
precautions are required when installing, testing, servicing, or
repairing this assembly. Component damage may result if ESD
control procedures are not followed. If you are not familiar with
static control procedures, refer to Rockwell Automation publication
8000-4.5.2, “Guarding Against Electrostatic Damage”, or any other
applicable ESD protection handbook.
ATTENTION: The purpose of this document is to serve as a guide
for proper installation. The National Electrical Code and any other
governing regional or local code will take precedence. Rockwell
Automation cannot assume responsibility for the compliance or
proper installation of the side mount module or associated
equipment. A hazard of personal injury and/or equipment damage
exists if codes are ignored during installation.
ATTENTION: An incorrectly applied or installed side mount
module can result in damage to the components or reduction in
product life. Wiring or application errors such as supplying
incorrect or inadequate supply voltage, or operating/storing in
excessive ambient temperatures may result in malfunction of the
product.
ATTENTION: Only personnel familiar with the side mount module
and associated machinery should plan to install, set up, and
maintain the system. Failure to comply may result in personal
injury and/or equipment damage.
ATTENTION: This is a Class A product. In a domestic environment,
this product may cause radio interference, in which case, the user
may be required to take adequate measures.
Rockwell Automation Publication 193-UM012B-EN-P - June 2011
7
Chapter 1
ATTENTION: To remain compliant with UL/CSA Certifications, the
EtherNet/IP power supply must meet NEC Class 2 requirements.
Features
Figure 1 - Features
Output Status LED
Ethernet Connector
Input Status LED
Module Status LED
Link/Activity LED
Network Status LED
Power Connector
I/O Connector
Output Status LED
Link/Activity LED
Network Status LED
8
Rockwell Automation Publication 193-UM012B-EN-P - June 2011
Input Status LED
Module Status LED
Chapter 1
Installation
Figure 2 - Installation [1]
Figure 3 - Installation [2]
#2 Driver
0.7…1.1 N•m
(6…10 lb.-in)
Figure 4 - Installation [3]
0.6 mm X 3.5 mm Blade
(0.02 in X 0.14 in Blade)
7 mm
(0.28 in)
0.5…0.6 N•m
(4.4…5.3 lb.-in)
Rockwell Automation Publication 193-UM012B-EN-P - June 2011
9
Chapter 1
Wiring
Table 1 - Wire and Size Torque Specifications
1X
2X
24…12 AWG
24…16 AWG
5 lb.-in
1X
2X
0.2…2.5 mm2
0.25…1 mm2
0.56 N•m
1X
2X
0.2…2.5 mm2
0.2…1 mm2
0.56 N•m
Figure 5 - Wiring Diagram
GND
A2 (-)
10
3
SSV
IN2
13 14 1
OUTA
(B300)
(20.4…26.4V DC)
2
A1 (+)
Rockwell Automation Publication 193-UM012B-EN-P - June 2011
IN1
Chapter 1
Dimensions
J
Figure 6 - Dimension Diagram
H
A
F
G
E
K
B
D
L
C
Table 2 - Dimension Specifications
Contactor Cat. E1 Plus
A
B
No.
Cat. No.
100-C09, -C12, 193*-EE_B 67,3 mm 148 mm
-C16, -C23
(2.65 in)
(4.83 in)
67,3
mm
148
mm
100-C30, -C37
(2.65 in)
(5.83 in)
193*EE_D
71.8 mm 148 mm
100-C43
(2.83 in)
(5.83 in)
100-C60, -C72, 193*-EE_E 94,3 mm 191.6 mm
-C85
(3.71 in)
(7.54 in)
Network Design
C
85.2 mm
(3.35 in)
101.2 mm
(3.98 in)
101.2 mm
(3.98 in)
120.4 mm
(4.74 in)
D
24.5 mm
(0.96 in)
24.5 mm
(0.96 in)
24.5 mm
(0.96 in)
29 mm
(1.14 in)
E
F
13.9 mm
(0.55 in)
13.9 mm
(0.56 in)
18.4 mm
(0.74 in)
23.8 mm
(0.94 in)
35 mm
(1.38 in)
35 mm
(0.55 in)
45 mm
(1.77 in)
55 mm
(2.16 in)
G
H
J
K
L
60 mm
(2.36 in)
60 mm
(2.36 in)
60 mm
(2.36 in)
100 mm
(3.94 in)
86.5 mm
(3.40 in)
104 mm
(4.09 in)
104 mm
(4.09 in)
126 mm
(4.94 in)
2 mm
(0.08 in)
2 mm
(0.08 in)
2 mm
(0.08 in)
2 mm
(0.08 in)
4.5 mm
(0.17 in)
4.5 mm
(0.17 in)
4.5 mm
(0.17 in)
5.4 mm
(0.21 in)
22,3 mm
(0.88 in)
22,3 mm
(0.88 in)
22,3 mm
(0.88 in)
22,3 mm
(0.88 in)
The E1 Plus EtherNet/IP module has one RJ45 port to connect a CAT5 type or
better Ethernet cable. Rockwell Automation offers a wide variety of
Allen-Bradley Ethernet patch cables with its Bulletin 1585 line of Ethernet cables
(http://www.ab.com/sensors/ethernet/incabinet.html).
The E1 Plus supports a Star Ethernet topology in which all Ethernet nodes wire
back to a central Ethernet switch, hub, or router as shown below:
Rockwell Automation Publication 193-UM012B-EN-P - June 2011
11
Chapter 1
Rockwell Automation offers a line of Allen-Bradley managed and unmanaged
Ethernet Switches with its Stratix family of Ethernet Switches (http://
www.ab.com/networks/switches/).
12
Rockwell Automation Publication 193-UM012B-EN-P - June 2011
Chapter
2
Protection Functions
Introduction
The purpose of this chapter is to provide detailed information regarding the
protective trip and warning functions that the E1 Plus EtherNet/IP Module adds
to the E1 Plus Overload Relay. In this chapter, you will find considerable mention
given to parameters as they relate to these functions. For complete descriptions of
the programming parameters, refer to Chapter 6- Device Parameters and Tags.
Trip Status / Identification
The E1 Plus EtherNet/IP Module determines trip status and identification
through monitoring of reference signals inside the E1 Plus Overload Relay. On
power-up, it assumes that the E1 Plus Overload Relay is in a non-tripped
condition. For definitive feedback on trip status of the E1 Plus Overload Relay,
one of the E1 Plus EtherNet/IP module inputs may be wired to the N.O. auxiliary
contact (terminals 97 and 98) of the E1 Plus Overload Relay. Parameters 40 and
41 are used to configure the assignment of the inputs. For this function, use the
“OL Contact” configuration.
Trip Resetting
The following options are available for resetting a tripped E1 Plus Overload Relay
with an E1 Plus EtherNet/IP module:
• Blue mechanical reset button located on the front of the E1 Plus Overload
Relay
• Setting Parameter 14, Trip Reset, to “Reset trip”
• Setting the trip reset bit in an output assembly from a logic controller
• Using a push button (N.O. contact configuration) wired to one of the
EtherNet/IP module inputs, programming the corresponding input
assignment parameter (40 or 41) to “Trip Reset”
• Setting the CIP Tag, Trip_Reset, to 1
IMPORTANT
Trip and Warning Enable
Setting parameter 16, Reset Mode, to “Automatic” does not result in
other reset commands being ignored.
Parameter 12, Trip Enable, allows the installer to enable or disable the jam trip
protective function.
Rockwell Automation Publication 193-UM012B-EN-P - June 2011
13
Chapter 2
Parameter 13, Warning Enable, allows the installer to enable or disable the
overload, jam, underload, and communication warning protective functions.
ATTENTION: The Trip Enable settings should not be altered during
machine operation, as unexpected behavior could occur. This may
result in an unintended actuation of controlled industrial
equipment, with the potential for machine damage or serious
injury to personnel.
Overload and Phase Loss
Protection
Thermal overload and phase loss trip protection is provided exclusively by the E1
Plus Overload Relay. The E1 Plus Overload Relay provides uninterrupted
protection to the motor, even in the event of an E1 Plus EtherNet/IP Module
failure. Settings for FLA and trip class are found directly on the E1 Plus Overload
Relay.
IMPORTANT
The reset mode DIP switch adjustment is overridden by the E1 Plus
EtherNet/IP module parameter 16, OL Reset Mode, while the E1 Plus
EtherNet/IP module is powered.
Overload Warning
The E1 Plus EtherNet/IP Module continuously monitors the E1 Plus Overload
Relay's percentage of thermal utilization signal. Parameter 2,%Therm Utilized,
provides this value.
Parameter 17, OL Warn Level, is used to adjust the setpoint to alert for an
impending overload trip and is adjustable from 0…100% TCU.
The E1 Plus EtherNet/IP Module will indicate an overload warning if all the
following conditions are met:
• No warning currently exists
• Overload warning is enabled
• %Therm Utilized is equal to or greater than OL Warn Level
When the overload warning conditions are satisfied, the following will occur:
• Bit 0 in Parameter 4, Warning Status, will go to “1”
• Bit 1 of Parameter 10, Device Status, will go to “1”
IMPORTANT
14
%Therm Utilized will stabilize at a value of approximately 88% with
the motor operating continuously at rated current.
Rockwell Automation Publication 193-UM012B-EN-P - June 2011
Chapter 2
Jam Protection
Motor current greater than the motor's nameplate rating can indicate a high
overload or stall condition, such as an overloaded conveyor or jammed gear.
These conditions can result in overheating of the motor, and equipment damage.
Rapid jam fault detection helps to minimize damage and loss of production.
By continuously monitoring the motor current level signal as a percentage of the
E1 Plus Overload Relay's dial FLA setting, the E1 Plus EtherNet/IP module
allows jam trip and warning capability.
Jam Trip
The following parameters are available for configuring the E1 Plus EtherNet/IP
Module's jam trip performance:
• Parameter 18, Jam Inhibit Time, allows the installer to inhibit a jam trip
from occurring during the motor starting sequence. It is adjustable from
0…250 seconds.
• Parameter 19, Jam Trip Delay, allows the installer to define the time period
a jam condition must be present before a trip occurs. It is adjustable from
5…250 seconds.
• Parameter 20, Jam Trip Level, allows the installer to define the current at
which the E1 Plus Overload Relay will trip on a jam. It is user-adjustable
from 150…600% of the FLA dial setting.
The E1 Plus EtherNet/IP Module will command the E1 Plus Overload Relay to
trip if all the following conditions are met:
• No trip currently exists
• Jam Protection is enabled
• Jam Inhibit Time has expired
• The motor current is greater than the Jam Trip Level for a time period
greater than the Jam Trip Delay
When the conditions for a jam trip are satisfied, the following will occur:
• Bit 2 in Parameter 3, Trip Status, will go to “1”
• Bit 0 in Parameter 10, Device Status, will go to “1”
• The E1 Plus Overload Relay's trip relay contacts (95 and 96) will open
• Out A will be placed in their Protection Fault State (if so programmed)
IMPORTANT
The Protection Fault State of OUT A is defined by parameter 34 (OUTA
Pr FltState) and parameter 35 (OUTA Pr FltValue).
IMPORTANT
The jam inhibit timer starts after the load current transitions from 0 A
to 30% FLA. The E1 Plus EtherNet/IP Module does not begin
monitoring for a jam condition until the Jam Inhibit Time expires.
Rockwell Automation Publication 193-UM012B-EN-P - June 2011
15
Chapter 2
Jam Warning
Parameter 21, Jam Warn Level, allows the installer to define the current at which
the EtherNet Module will indicate a warning. It is user-adjustable from
100…600% FLA.
The E1 Plus EtherNet/IP Module will indicate a Jam warning if:
• No warning currently exists
• Jam Warning is enabled
• Jam Inhibit Time has expired
• The motor current is equal to or greater than the Jam Warn Level
When the Jam Warning conditions are satisfied, the following will occur:
• Bit 2 in Parameter 4, Warning Status, will go to “1”
• Bit 1 in Parameter 10, Device Status, will go to “1”
IMPORTANT
Underload Protection
The Jam Warning function does not include a time delay feature.
Once the Jam Inhibit Time has expired, the Jam Warning indication is
instantaneous.
Motor current less than a specific level may indicate a mechanical malfunction in
the installation, such as a torn conveyor belt, damaged fan blade, broken shaft, or
worn tool. Such conditions may not harm the motor, however, rapid detection
may help to minimize equipment damage and loss of production.
Underload Warning
The following parameters are available for configuring the E1 Plus EtherNet/IP
Module's underload warning performance:
• Parameter 22, UL Inhibit Time, allows the installer to inhibit an underload
indication from occurring during the motor starting sequence. It is
adjustable from 0…250 seconds.
• Parameter 23, UL Warn Level, allows the installer to define the current at
which the E1 Plus EtherNet/IP Module will indicate a warning. It is useradjustable from 30…100% of the FLA dial setting.
The E1 Plus EtherNet/IP Module will immediately indicate an Underload
warning if:
• No warning currently exists
• Underload Warning is enabled
• UL Inhibit Time has expired
• The motor current is less than the UL Warn Level
16
Rockwell Automation Publication 193-UM012B-EN-P - June 2011
Chapter 2
When the Underload Warning conditions are satisfied, the following will occur:
• Bit 3 in Parameter 4, Warning Status, will go to “1”
• Bit 1 of Parameter 10, Device Status, will go to “1”
IMPORTANT
Communication Fault
Protection
The Underload Warning function does not include a time delay
feature. Once the UL Inhibit Time has expired, the Underload warning
indication is instantaneous.
A disruption of the communication link between the E1 Plus EtherNet/IP
Module and a EtherNet/IP network can result in the loss of application control
and/or critical process diagnostic data. Rapid communication fault detection
helps minimize potential damage due to uncontrolled or unmonitored
applications.
Comm Fault Warning
The E1 Plus EtherNet/IP Module will indicate a Comm Fault warning if:
• No warning currently exists
• Comm Fault Warning is enabled
• The EtherNet/IP Module experiences a loss of communication
When the Comm Fault warning conditions are satisfied, the following will occur:
• The Network Status LED will blink red or become solid red
• Bit 5 in Parameter 4, Warning Status, will go to “1”
• Bit 1 of Parameter 10, Device Status, will go to “1”
IMPORTANT
Communication Idle
Protection
The Comm Fault State of OUT A is defined by Parameter 36 (OUTA En
FltState) and parameter 37 (OUTA En FltValue).
When a programmable controller is placed into the program mode, the execution
of its ladder program is suspended, and any connected networks go to an idle
state. If inadvertent, this can result in the loss of application control and/or
critical process diagnostic data. Rapid communication idle detection helps
minimize the potential damage due to uncontrolled or unmonitored
applications.
Comm Idle Warning
The E1 Plus EtherNet/IP Module will indicate a Comm Idle warning if:
Rockwell Automation Publication 193-UM012B-EN-P - June 2011
17
Chapter 2
• No warning currently exists
• Comm Idle Warning is enabled
• The network controller that is communicating to the E1 Plus EtherNet/IP
Module is placed in idle mode
When the Comm Idle warning conditions are satisfied, the following will occur:
• Bit 6 in Parameter 4, Warning Status, will go to “1”
• Bit 1 in Parameter 10, Device Status, will go to “1”
IMPORTANT
18
The Comm Idle State of OUT A is defined by Parameter 38 (OUTA En
IdlState) and parameter 39 (OUTA En IdlValue).
Rockwell Automation Publication 193-UM012B-EN-P - June 2011
Chapter
3
Configure an E1 Plus EtherNet/IP Module To
Operate on the Network
Introduction
This chapter describes how to configure an E1 Plus EtherNet/IP module to
operate on an EtherNet/IP network.
When you first install an E1 Plus EtherNet/IP module, the module is Dynamic
Host Configuration Protocol (DHCP) enabled.
Determining Network
Parameters
To operate an EtherNet/IP network, you must define these parameters.
Table 3 - EtherNet/IP Network Parameters
EtherNet/IP Network Parameter
Description
IP address
The IP address uniquely identifies the module. The IP address is in the form xxx.xxx.xxx.xxx where
each xxx is a number from 0...255. These are reserved values you cannot use:
• 0.0.0.1...0.255.255.255
• 127.0.0.0...127.255.255.255
• 224.255.255.255...255.255.255.255
Subnet mask
Subnet addressing is an extension of the IP address scheme that allows a site to use a single
network ID for multiple physical networks. Routing outside of the site continues by dividing the IP
address into a net ID and a host ID via the class. Inside a site, the subnet mask is used to redivide
the IP address into a custom network ID portion and host ID portion.
If you change the subnet mask of an already-configured module, you must cycle power to
the module for the change to take effect.
Gateway
A gateway connects individual physical networks into a system of networks. When a node needs to
communicate with a node on another network, a gateway transfers the data between the two
networks.
If you use DNS addressing, or reference the module via a host name in an MSG
instruction, then define these parameters.
Table 4 - EtherNet/IP Network Parameters for DNS Addressing
EtherNet/IP Network Parameter
Description
Host name
A host name is part of a text address that identifies the module. The full text address of a module is
host_name.domain_name.
Domain name
A domain name is part of a text address that identifies the domain in which the module resides. The
full text address of a module is host_name.domain_name. The domain name has a 48-character
limit.
Primary DNS server address
This identifies any DNS servers used in the network. You must have a DNS server configured if you
specify an SMTP server with a name. The DNS server converts the domain name or host name to an
IP address that can be used by the network.
For more information on DNS addressing, see page 26.
Secondary DNS server address
Rockwell Automation Publication 193-UM012B-EN-P - June 2011
19
Chapter 3
Check with your Ethernet network administrator to determine if you need to
specify these parameters.
Setting the IP Network
Address
E1 Plus EtherNet/IP modules ship with DHCP enabled. You can set the network
Internet Protocol (IP) address by:
• Using a Bootstrap Protocol (BOOTP)/Dynamic Host Configuration
Protocol (DHCP) server, such as the Rockwell Automation BOOTPDHCP Server Utility, which is included with Rockwell Software’s
RSLinx™ Classic software
• Using a web browser and MAC Scanner software
Assign Network
Parameters via the BOOTP/
DHCP Utility
By default, the E1 Plus EtherNet/IP module is DHCP enabled. The BOOTP/
DHCP utility is a standalone program that is located in the:
• BOOTP-DHCP Server folder accessed from the Start menu.
IMPORTANT
Before you start the BOOTP/DHCP utility, make sure you have the
hardware MAC ID of the module, which is printed on the side of the
E1 Plus EtherNet/IP module. The MAC ID has a format similar to: 000b-db-14-55-35.
This utility recognizes DHCP-enabled devices and provides an interface to
configure a static IP address for each device.
To assign network parameters via the BOOTP/DHCP utility, perform this
procedure.
1. Start the BOOTP/DHCP software.
2. Select Tool → Network Settings.
3. If appropriate for the network, enter the subnet mask, gateway address,
primary/secondary server addresses, and domain name.
4. Click OK.
The Request History panel displays the hardware addresses of modules
issuing BOOTP or DHCP requests.
20
Rockwell Automation Publication 193-UM012B-EN-P - June 2011
Chapter 3
5. Double-click the MAC address of the module to be configured.
The MAC address is printed on the side of the E1 Plus EtherNet/IP
module. The format of the hardware address resembles
00-0b-db-14-55-35.
The New Entry window appears with the module’s Ethernet Address
(MAC).
6. Enter the IP address, host name, and a module description.
7. Click OK.
8. Re-cycle power to the module. To recycle power, remove and reapply the
control power terminals A1 and A2.
9. To permanently assign this configuration to the module, highlight the
module in the Relation List panel and click the Disable BOOTP/DHCP
button.
When module power is recycled, it uses the assigned configuration and
does not issue a DHCP request.
If you do not select the Disable BOOTP/DHCP button, on a power cycle,
the module clears the current IP configuration and will again begin
sending DHCP requests.
Rockwell Automation Publication 193-UM012B-EN-P - June 2011
21
Chapter 3
Assign Network
Parameters Via a Web
Browser and MAC Scanner
Software
In the event that a user does not have access to a DHCP software utility, a user
can assign network parameters via a web browser, such as Microsoft’s Internet
Explorer, and Media Access Control (MAC) scanner software, such as MAC
Scanner from Colasoft - http://www.colasoft.com/. Follow these steps to
configure the module using this method.
1. Locate and identify the MAC ID printed on the label of the E1 Plus
EtherNet/IP Side Mount Module. This address has a format that is similar
to: 00-0b-db-14-55-35
2. Connect the E1 Plus EtherNet/IP Side Mount Module to the same Wide
Area Network (WAN) as your personal computer.
3. Start the MAC scanner software
4. Select the appropriate subnet to scan for available MAC addresses.
5. Scan the Subnet for all available MAC addresses.
6. Identify the IP address assigned to the MAC ID of the E1 Plus EtherNet/
IP Side Mount Module. The IP address will have a format that is similar to
192.168.0.100.
22
Rockwell Automation Publication 193-UM012B-EN-P - June 2011
Chapter 3
7. Open a web browser and type the IP address on the address line to view the
internal web server of the E1 Plus EtherNet/IP Side Mount Module.
8. Select Administration Settings->Network Configuration to change the
IP address of the E1 Plus EtherNet/IP Side Mount Module to a static IP
address.
9. The module will prompt the user for a User Name and Password. Use
“Administrator” for the user name, leave the password field blank, and
select OK.
Rockwell Automation Publication 193-UM012B-EN-P - June 2011
23
Chapter 3
10. Assign the appropriate network settings per the recommendation of the
network administrator for the network that this module will be
communicating on and select Apply.
11. Recycle the power on the E1 Plus EtherNet/IP module for the
communications changes to take affect. To recycle power, remove and
reapply the control power terminals A1 and A2.
Other Factors to Consider
When Assigning Network
Parameters
There are other factors to consider when assigning networks parameters, which
include:
• Network isolation from or integration into the plant/enterprise network
• Network size
For large networks, even isolated networks, it might be more convenient
and safer to use a BOOTP/DHCP server rather than RSLinx software.
The BOOTP/DHCP server also limits the possibility of assigning
duplicate IP addresses.
• Company policies and procedures dealing with plant floor network
installation and maintenance
• Level of involvement by IT personnel in plant floor network installation
and maintenance
• Type of training offered to control engineers and maintenance personnel
If you use the Rockwell Automation BOOTP or DHCP server in an uplinked
subnet where an enterprise DHCP server exists, a module may get an address
from the enterprise server before the Rockwell Automation utility even sees the
24
Rockwell Automation Publication 193-UM012B-EN-P - June 2011
Chapter 3
module. You might have to disconnect from the uplink to set the address and
configure the module to retain its static address before reconnecting to the
uplink. This is not a problem if you have node names configured in the module
and leave DHCP enabled.
ATTENTION: The E1 Plus EtherNet/IP module must be assigned a
fixed network address. The IP address of this module must not be
dynamically provided.
Failure to observe this precaution may result in unintended
machine motion or loss of process control.
Duplicate IP Address
Detection
When you change the IP address or connect the module to an EtherNet/IP
network, the module checks to make sure that the IP address assigned to this
module does not match the address of any other network device. If the module
determines that another device on the network with a matching IP address, the
EtherNet/IP port of the module goes into conflict mode.
• NETWORK STATUS LED indicator is solid red.
To resolve this conflict, use the instructions in this chapter to change the IP
address of the module. Then cycle power to the module or reset the modules by
disconnecting and then reconnecting the EtherNet cable.
Two modules could possibly detect a conflict simultaneously. If this occurs,
perform this procedure.
1. Remove the module with the incorrect IP address and correct its conflict.
2. Cycle power or disconnect the EtherNet cable from the second module
and reconnect it.
Behavior of Modules With Duplicate IP Addresses
Devices in conflict over an IP address behave differently depending on whether
connections have been established to either of the modules and whether both
modules support duplicate IP address detection.
Table 5 - Device Conflict Over Duplicate IP Addresses
If
Then
Both modules support duplicate IP address detection
The first started module uses and retains its IP address.
The other module will detect a conflict, give up the IP address and enter conflict mode.
Both modules support duplicate IP address detection
and are started at roughly the same time
One of them surrenders the IP address and enters conflict mode.
One module supports duplicate IP address detection
and a second module does not
The second module generally keeps its IP address, regardless of which module first obtains the
IP address.
The module that supports duplicate IP address detection will detect the conflict and give up the
IP address.
Rockwell Automation Publication 193-UM012B-EN-P - June 2011
25
Chapter 3
DNS Addressing
To further qualify a module’s address, use DNS addressing to specify a host name
for a module, which also includes specifying a domain name and DNS servers.
DNS addressing makes it possible to set up similar network structures and IP
address sequences under different domains.
DNS addressing is only necessary if you refer to the module by host name, such as
in path descriptions in MSG instructions.
To use DNS addressing, perform this procedure.
1. Assign a host name to the module.
A network administrator should be able to assign a host name. Valid host
names should be IEC-1131-3 compliant.
2. Configure the module's parameters.
3. In addition to the IP address, subnet mask, and gateway address, configure
a host name for the module, domain name, and primary/secondary DNS
server addresses.
Install EDS File
Before the E1 Plus EtherNet/IP Side Mount Module is configured to
communicate on an EtherNet/IP network, it must be registered to the software
that configures the network such as Rockwell Software’s RSLinx Classic and
RSNetWorx for EtherNet/IP software. A user registers the module by installing
an Electronic Data Sheet (EDS file). The EDS file for the E1 Plus EtherNet/IP
Side Mount Module can be obtained from one of two locations:
• Embedded in the module
• Allen-Bradley EDS file download website
Download EDS File Embedded in the Module
The EDS file for the E1 Plus EtherNet/IP Side Mount Module is embedded
within the module. After the IP address for the module has been configured,
connect the module to same Ethernet network as a personal computer. Using a
web browser on the personal computer, a user can download the EDS file using a
web browser by following these steps:
26
Rockwell Automation Publication 193-UM012B-EN-P - June 2011
Chapter 3
1. Type the IP address of the E1 Plus EtherNet/IP Side Mount Module on
the address line of the web browser.
2. Right click on the EDS File link
3. Select Save to save the EDS file to the personal computer.
Download EDS File from Allen-Bradley EDS File Download Site
The EDS file for the E1 Plus EtherNet/IP Side Mount Module can also be
downloaded from the Allen-Bradley EDS File download site. Using a web
browser on the personal computer that is connected to the Internet, a user can
download the EDS file by following these steps:
1. Type http://www.ab.com/networks/eds on the address line of the web
browser.
Rockwell Automation Publication 193-UM012B-EN-P - June 2011
27
Chapter 3
2. Select the network type as EtherNet/IP and select Search.
3. Locate the EDS file for the E1 Plus EtherNet/IP Side Mount Module and
download it to the personal computer.
Register the EDS File
After the EDS file has been downloaded, a user will need to register the EDS file
with the software that configures the EtherNet/IP network. The following
example lists the steps needed to register an EDS file with Rockwell Software’s
RSLinx Classic software.
1. Start the EDS Hardware Installation Tool, located at Start->Programs>Rockwell Software->RSLinx Tools.
2. Select Add to register a new device.
28
Rockwell Automation Publication 193-UM012B-EN-P - June 2011
Chapter 3
3. Register a single file, browse to the location where the EDS file is located,
and select Next.
4. Select Next to accept the installation test results.
Rockwell Automation Publication 193-UM012B-EN-P - June 2011
29
Chapter 3
5. Accept the Graphic Image by selecting Next.
6. Select Next to register the device.
30
Rockwell Automation Publication 193-UM012B-EN-P - June 2011
Chapter 3
7. Select Finish to successfully register the module.
Rockwell Automation Publication 193-UM012B-EN-P - June 2011
31
Chapter 3
32
Rockwell Automation Publication 193-UM012B-EN-P - June 2011
Chapter
4
Automation Controller and Software
Communications
Introduction
The E1 Plus EtherNet/IP Side Mount Module supports three types of EtherNet/
IP messaging:
• I/O Messaging — Used for deterministic Ethernet communications with
ControlLogix™, CompactLogix™, SoftLogix™, and EtherNet/IP scanners.
Its primary use is to read and write I/O data for control purposes.
• Explicit Messaging — Used for non-deterministic communications in
which the data is not critical for control. Explicit messages have a lower
priority compared to I/O messages, and they are used to read and write
non-critical data. Logix controllers, MicroLogix 1100 and 1400 controllers
support Explicit Messaging using a MSG instruction.
• ControlLogix Style Tags — Used for non-deterministic communications
in which the data will is used in an HMI, SCADA, or historical data
logging software system. Software packages can read and write data
directly from the device.
This chapter describes and shows examples of how each type of messaging is used.
I/O Messaging
RSLogix 5000™ software is used to configure I/O messaging between an
automation controller and an E1 Plus EtherNet/IP Side Mount Module on an
EtherNet/IP Network. This example will show the steps necessary to configure a
ControlLogix controller for this type of messaging.
ControlLogix Configuration with Add-On Profiles
Note: If you are not using Add-on
profiles, please turn to page 38.
If you have RSLogix 5000 v. 20.0, the E1 Plus add-on profile (AOP) is included.
Proceed with the following instructions. If you do have v. 19 or earlier, download
the AOP before proceeding.
An existing project can be used or a new project can be created to configure
EtherNet/IP I/O messaging. To create a new configuration in RSLogix 5000,
select File → New.
Rockwell Automation Publication 193-UM012B-EN-P - June 2011
33
Chapter 4
1. Select the controller type, chassis type, slot number, and project path.
Enter a name for the controller and click OK.
2. Right-click on I/O Configuration and select New Module to open the
Select Module Type window.
34
Rockwell Automation Publication 193-UM012B-EN-P - June 2011
Chapter 4
3. Select the desired EtherNet/IP scanner module and click OK.
4. Enter the desired communication settings and click Finish.
EtherNet/IP Network Configuration with Add-On Profiles
After the controller configuration, the E1 Plus EtherNet/IP Side Mount Module
has to be added to the I/O configuration.
1. Place the program in Offline mode.
Rockwell Automation Publication 193-UM012B-EN-P - June 2011
35
Chapter 4
2. Right-click on the Ethernet/IP scanner in I/O Configuration and select
New Module to open the Select Module Type window.
3. Select E1 Plus Ethernet Module and click OK.
4. Enter a name for the E1 Plus EtherNet/IP Side Mount Module. The name
will create a tag in RSLogix 5000 that can be used to read and write data
from the E1 Plus EtherNet/IP Side Mount Module.
36
Rockwell Automation Publication 193-UM012B-EN-P - June 2011
Chapter 4
5. Enter the IP address of the E1 Plus EtherNet/IP Side Mount Module.
6. Click Next.
7. The E1 Plus EtherNet/IP Side Mount Module is now shown as a module
in the I/O configuration.
Accessing Module Data with Add-On Profiles
With both the controller and EtherNet/IP network configured, the
ControlLogix controller can exchange data with the E1 Plus EtherNet/IP Side
Mount Module.
Rockwell Automation Publication 193-UM012B-EN-P - June 2011
37
Chapter 4
1. Open the Controller Tags window.
2. Select the Monitor Tags tab.
Three tags, "E1Plus:C", "E1Plus:I" and "E1Plus:O", have been added to
represent the three I/O Instances: Configuration, input and output. The
Configuration Instance was created even though its size was configured as
zero. The E1Plus:I tag represents input data, which is data coming from
the E1Plus into the controller (%FLA, %TCU, Trip Status, Warning
Status, etc.). The E1 Plus:O tag represents output data, which is data going
from the controller out to the E1 Plus (Enable Output A, Trip Reset, etc.).
ControlLogix Generic Configuration
An existing project can be used or a new project can be created to configure
EtherNet/IP I/O messaging. To create a new configuration in RSLogix 5000,
select File → New.
38
Rockwell Automation Publication 193-UM012B-EN-P - June 2011
Chapter 4
1. Select the controller type, chassis type, slot number, and project path.
Enter a name for the controller and click OK.
2. Right-click on I/O Configuration and select New Module to open the
Select Module Type window.
Rockwell Automation Publication 193-UM012B-EN-P - June 2011
39
Chapter 4
3. Select the desired EtherNet/IP scanner module and click OK.
4. Enter the desired communication settings and click Finish.
EtherNet/IP Network Generic Configuration
After the controller configuration, the E1 Plus EtherNet/IP Side Mount Module
has to be added to the I/O configuration.
1. Place the program in Offline mode.
40
Rockwell Automation Publication 193-UM012B-EN-P - June 2011
Chapter 4
2. Right-click on the Ethernet/IP scanner in I/O Configuration and select
New Module to open the Select Module Type window.
3. Select Generic Ethernet Module and click OK.
4. Enter a name for the E1 Plus EtherNet/IP Side Mount Module. The name
will create a tag in RSLogix 5000 that can be used to read and write data
from the E1 Plus EtherNet/IP Side Mount Module.
5. Select Data-SINT for the Comm Format. The Comm Format tells
RSLogix 5000 the format of the data. The Data-SINT format will
represent the data from the E1 Plus EtherNet/IP Side Mount Module as a
field of 8-bit values.
Rockwell Automation Publication 193-UM012B-EN-P - June 2011
41
Chapter 4
6. Set the Connection Parameters. I/O data is accessed using Input Instances
50, 51, 106, 110 or 111 and Output Instances 2, 101 or 103. The size of
the input connection and the output connection shall correspond to the
size of the chosen instance. The E1 Plus configuration assembly instance is
120. In this example configuration data is not used, so the data size is set to
0.
7. Enter the IP address of the E1 Plus EtherNet/IP Side Mount Module.
8. Click Next.
9. Enter a value for the time between each scan of the module. Make sure
Inhibit Module is not checked.
10. Click Finish to add the E1 Plus to the I/O Configuration in
RSLogix 5000.
42
Rockwell Automation Publication 193-UM012B-EN-P - June 2011
Chapter 4
Downloading the Generic Configuration to the PLC
1. In the RSLogix 5000 program, select Communications → Who Active.
2. Select the desired communication path and click Set Project Path.
3. Select Communications → Go Online.
Rockwell Automation Publication 193-UM012B-EN-P - June 2011
43
Chapter 4
4. In the Connected To Go Online window, click Download.
5. In the Download confirmation window, click Download to download the
configuration to the PLC.
If there are any errors, a warning triangle will be present on the E1 Plus in
the I/O configuration listing.
Double-click the module to view any error that is reported.
Accessing Generic Module Data
With both the controller and EtherNet/IP network configured, the
ControlLogix controller can exchange data with the E1 Plus EtherNet/IP Side
Mount Module.
1. Go online and switch the controller to Remote Run mode.
44
Rockwell Automation Publication 193-UM012B-EN-P - June 2011
Chapter 4
2. Open the Controller Tags window.
3. Select the Monitor Tags tab.
Three tags, "E1Plus:C", "E1Plus:I" and "E1Plus:O", have been added to
represent the three I/O Instances: Configuration, input and output. The
Configuration Instance was created even though its size was configured as
zero. The E1Plus:I tag represents input data, which is data coming from
the E1Plus into the controller (%FLA, %TCU, Trip Status, Warning
Status, etc.). The E1 Plus:O tag represents output data, which is data going
from the controller out to the E1 Plus (Enable Output A, Trip Reset, etc.).
Logix Explicit Messaging
CompactLogix, ControlLogix, and SoftLogix controllers can read and write
specific information to and from the E1 Plus EtherNet/IP Side Mount Module
using Explicit Messaging and the Parameter Object. An example of configuring a
ControlLogix explicit message using the MSG instruction to read the Device
Status parameter data from the E1 Plus EtherNet/IP Side Mount Module is
shown below.
Rockwell Automation Publication 193-UM012B-EN-P - June 2011
45
Chapter 4
1. Configure the configuration tab for the message instruction with the
follow settings:
• Message type: CIP Generic
• Service type: Parameter Read
• Instance: 10: The parameter you want to read back (e.g., 10 represents
device status)
• Destination: The controller tag to write the data to.
2. Configure the path field in the communications tab to point to the E1 Plus
EtherNet/IP Side Mount Module.
Path: 1, 2, 2, 192.168.0.100
For this example, 1 represents the processor slot, 2 represents the
EtherNet/IP scanner slot, 2 represents the EtherNet/IP port, and
192.168.0.100 represents the IP address of the E1 Plus EtherNet/IP Side
Mount Module.
46
Rockwell Automation Publication 193-UM012B-EN-P - June 2011
Chapter 4
Users can read all of the motor diagnostic data back in one MSG instruction by
using Assembly Instance 111. An example of configuring a ControlLogix explicit
message using the MSG instruction to read all of the motor diagnostic data from
the E1 Plus EtherNet/IP Side Mount Module is shown below.
1. Configure the configuration tab for the message instruction with the
follow settings:
• Message type: CIP Generic
• Service type: Get Attribute Single
• Class: 4 – the Assembly Object
• Instance: 111 - the Complete Motor Starter assembly
• Destination: The controller tag to write the data to.
• Attribute: 3 – get/set data instance attribute
2. Configure the path field in the communications tab to point to the E1 Plus
EtherNet/IP Side Mount Module.
Path: 1, 2, 2, 192.168.0.100
For this example, 1 represents the processor slot, 2 represents the
EtherNet/IP scanner slot, 2 represents the EtherNet/IP port, and
192.168.0.100 represents the IP address of the E1 Plus EtherNet/IP Side
Mount Module.
Rockwell Automation Publication 193-UM012B-EN-P - June 2011
47
Chapter 4
MicroLogix 1100 and 1400
Explicit Messaging
MicroLogix 1100 and 1400 controllers can read and write information to and
from the E1 Plus EtherNet/IP Side Mount Module using Explicit Messaging and
the Assembly Object. RSLogix 500 Version 8.10 or higher is required to
configure EtherNet/IP explicit messaging with these controllers.
An example of a MicroLogix 1100 using the MSG instruction to read all of the
motor diagnostic data from the E1 Plus EtherNet/IP Side Mount Module is
shown below.
1. Write the appropriate ladder logic to periodically execute a MSG
instruction for the MicroLogix controller.
2. Configure General tab in the MSG instruction with the following
parameters:
• Channel: 1 (Integral) - the Ethernet port on the processor
• Communication Command: CIP Generic
• Data Table Address: the location to store the information
• Size in Bytes: 22 – assembly 111 consists of 22 bytes of information
• MultiHop: Yes
• Service: Read Assembly – to read an input assembly
48
Rockwell Automation Publication 193-UM012B-EN-P - June 2011
Chapter 4
• Class: 4 – the Assembly Object
• Instance: 111 – the Complete Motor Starter assembly
• Attribute: 3 – get/set data instance attribute
3. Configure MultiHop tab in the MSG instruction with the following
parameters:
To Address: the IP address of the E1 Plus EtherNet/IP Side Mount
Module.
An example of a MicroLogix 1100 using the MSG instruction to write data to
energize an output relay on the E1 Plus EtherNet/IP Side Mount Module is
shown below.
Rockwell Automation Publication 193-UM012B-EN-P - June 2011
49
Chapter 4
1. Write the appropriate ladder logic to execute a MSG instruction for the
MicroLogix controller (an EEM instruction for the SLC-5/05) to control
the E1 Plus EtherNet/IP Side Mount Module.
2. Configure General tab in the MSG instruction with the following
parameters:
• Channel: 1 (Integral) - the Ethernet port on the processor
• Communication Command: CIP Generic
• Data Table Address: the location to write the information from
• Size in Bytes: 1 – assembly 101 consists of 1 byte of information
• MultiHop: Yes
• Service: Write Assembly – to write an output assembly
• Class: 4 – the Assembly Object
• Instance: 101 – the Basic Contact output assembly
• Attribute: 3 – get/set data instance attribute
50
Rockwell Automation Publication 193-UM012B-EN-P - June 2011
Chapter 4
3. Configure the MultiHop tab in the MSG instruction with the following
parameters:
To Address: the IP address of the E1 Plus EtherNet/IP Side Mount
Module.
FactoryTalk View with
Predefined Tags
The E1 Plus EtherNet/IP Side Mount Module embedded predefined CIP tags
within the module. This allows software packages, such as FactoryTalk View
Supervisory Edition (SE), to read and write data directly from the E1 Plus
EtherNet/IP Side Mount Module. An example of using RSLinx Classic as an
OPC (OLE for Process Control) server to serve data to FactoryTalk View SE is
show below. Follow these steps to read data directly from the E1 Plus EtherNet/
IP Side Mount Module using its predefined tags.
Rockwell Automation Publication 193-UM012B-EN-P - June 2011
51
Chapter 4
1. Configure an OPC topic within RSLinx Classic to communicate to the E1
Plus EtherNet/IP Side Mount Module. In the Data Source tab, select New
to create a new OPC topic name, high light the device to establish
communications with, and press Apply.
2. In the Data Collection tab, select the process type Logix5000 and select
Apply
52
Rockwell Automation Publication 193-UM012B-EN-P - June 2011
Chapter 4
3. Start FactoryTalk View Studio and create a new application. Draw a
numeric display. Right click on the display and select Connections.
4. Select the Tag selector tool
to select a tag from the E1 Plus
EtherNet/IP Side Mount Module.
5. Right click on the project name and select Refresh All Folders to get an
updated list of topics to read data from.
Rockwell Automation Publication 193-UM012B-EN-P - June 2011
53
Chapter 4
6. Expand the OPC topic name that you created in RSLinx Classic, select the
Online folder, choose the tag you would like to display in the numeric
display, and press OK.
7. Select OK to select the tag to display in the numeric display.
54
Rockwell Automation Publication 193-UM012B-EN-P - June 2011
Chapter 4
8. Test the display by pressing the Test Run button
to view data directly
from the E1 Plus EtherNet/IP Side Mount Module on the display.
Rockwell Automation Publication 193-UM012B-EN-P - June 2011
55
Chapter 4
56
Rockwell Automation Publication 193-UM012B-EN-P - June 2011
Chapter
5
Email Notifications
Introduction
This chapter describes email notifications and how to configure an E1 Plus
EtherNet/IP module to send email notifications for different events.
Notification Events
There are several events that can trigger an email notification; the events are listed
below.
• Overload trip
• Phase loss trip
• Jam trip
• Trip clear
• Overload warning
• Jam warning
• Underload warning
• Communication fault warning
• Communication idle warning
• EEPROM fault warning
• Warning clear
IMPORTANT
Email Contents
If an event has been disabled within the Control Supervisor Attribute
108 or 109 (see page 90), it is not possible to override this and have
emails generated.
The subject and body contents in the email message will be created from the type
of trip or warning that is detected, the Device Name, Device Description, Device
Location and Contact Info. Sample email messages are shown here:
Email Subject
E1Plus module has detected a trip
Email Body
Trip status:
Overload
Device Name:
E1 Plus EtherNet/IP Side Mount Module
Device Description:
Module under development
Device Location:
The Location
Contact Info:
Contact Person
[email protected]
Rockwell Automation Publication 193-UM012B-EN-P - June 2011
57
Chapter 5
The first word in the subject is the Device Name. If a Device Name is not
configured, then the product name attribute from the identity object will be used.
Email Configuration
To be able to send an email, the IP address or the hostname of a Simple Mail
Transfer Protocol (SMTP) server must be configured and notifications must be
selected. Follow these steps to configure an email notification.
1. In a web browser, enter the IP address of the E1 Plus EtherNet/IP module
in the address bar and press Enter.
2. Select Administrative Settings → email Configuration, and a login
window will appear.
3. Log in with the username "Administrator" and no password. If desired, a
password can be set within the Administrative Settings tab
Password Configuration.
58
Rockwell Automation Publication 193-UM012B-EN-P - June 2011
Chapter 5
4. Enter the information into the email notification fields as described below.
Email Recipient
The email address of the person who will receive the notifications.
Email Sender
The email address from which the notification will be sent.
SMTP Server
The SMTP server address. Ask your network administration what address
to use.
SMTP Username
The username for the SMTP server. Ask your network administration what
username to use.
SMTP Password
The password for the SMTP server. Ask your network administration what
password to use.
SMTP Port
The SMTP Server Port. Ask your network administration what port number
to use (Port 25 is a common SMTP port).
5. Select the specific fault and warning notifications to send to the email
recipient. These can be changed after the initial configuration.
6. Click "Apply Changes" to save the configuration.
Configure Device Identity
The Device Identity properties populate the notification email subject and body.
To configure the Device Identity, perform these steps:
Rockwell Automation Publication 193-UM012B-EN-P - June 2011
59
Chapter 5
1. In a web browser, enter the IP address of the E1 Plus EtherNet/IP module
in the address bar and press Enter.
2. Select Administrative Settings → Device Identity and a login window will
appear.
3. Log in with the username "Administrator" and no password. If desired, a
password can be set within the Administrative Settings tab
Password Configuration.
60
Rockwell Automation Publication 193-UM012B-EN-P - June 2011
Chapter 5
4. Enter the Device Identity information into the fields as described below.
Device Name
The name of the E1 Plus EtherNet/IP module.
Device Description
The description of the E1 Plus EtherNet/IP module.
Device Location
The location of the E1 Plus EtherNet/IP module.
Contact Info
Contact information for the E1 Plus EtherNet/IP module.
5. Click "Apply Changes" to save the configuration.
Limitations
Based on the functionality of the E1 Plus EtherNet/IP module there are some
limitations on when emails can be triggered.
• If two events occur at the same time, an email will only be sent for the most
significant event.
• If the module has been configured to send an email for a lower prioritized
event and this event occurs at the same time as a higher prioritized event
for which the module has not been programmed to send an email, no email
will be sent for either event.
• The Clear email will only be sent when all events have been cleared and an
event email has previously been sent. For example: if the module is
configured to send an email when a jam trip is detected and it detects an
overload trip for which no email notification is configured, no email will be
sent when the overload event is cleared.
Rockwell Automation Publication 193-UM012B-EN-P - June 2011
61
Chapter 5
62
Rockwell Automation Publication 193-UM012B-EN-P - June 2011
Chapter
6
Device Parameters and Tags
Introduction
The E1 Plus EtherNet/IP Side Mount Module allows the Parameter Object to
respond to explicit messages using the MSG instruction from Logix Controllers
and SLC-500/MicroLogix controllers. The module also supports the Symbolic
Object, which allows software packages such FactoryTalk View to communicate
directly to the E1 Plus EtherNet/IP Side Mount Module as if it were a Logix
Controller with predefined tags. This chapter describes each parameter and tag.
Parameter and Tag
Programming
Refer to Chapter 3, Configure an E1 Plus EtherNet/IP Module To Operate on the
Network, for instructions to modify EtherNet/IP parameter settings.
IMPORTANT
Parameter setting changes to the E1 Plus EtherNet/IP Module take
effect immediately even during a “running” status.
Program Lock
Parameter 24, Program Lock, provides a degree of security from having parameter
settings unintentionally altered when programmed to the “locked” setting.
Resetting to the Factory Default Values
Parameter 25, Set to Default, allows the installer to reset all parameter settings
(including trip logs) to the factory default values.
IMPORTANT
Resetting to factory default values also resets the E1 Plus EtherNet/IP
Module’s IP and DHCP settings.
Rockwell Automation Publication 193-UM012B-EN-P - June 2011
63
Chapter 6
Parameter Group Listing
The E1 Plus EtherNet/IP Module contains five parameter groups
Table 6 - Parameter Groups
Monitor parameters
Advanced Setup
Reset/Lock
I/O Setup
Trip History
1 Average %FLA
12 Trip Enable
14 Trip Reset
34 OutA Pr FltState
5 Trip Log 0
2%Therm Utilized
13 Warning Enable
24 Program Lock
35 OutA Pr FltValue
6 Trip Log 1
3 Trip Status
15 Single/Three Ph
25 Set to Default
36 OutA En FltState
7 Trip Log 2
4 Warning Status
16 OL Reset Mode
37 OutA En FltValue
8 Trip Log 3
10 Device Status
17 OL Warning Level
38 OutA En IdlState
9 Trip Log 4
18 Jam Inhibit Time
39 OutA En IdlValue
19 Jam Trip Delay
40 IN1 Assignment
20 Jam Trip Level
41 IN2 Assignment
21 Jam Warn Level
22 UL Inhibit Time
23 UL Warn Level
Monitor Group
64
Average %FLA
Parameter No.
1
This parameter reports the average motor current.
The value is reported as a percentage of motor
rated current (dial setting on the E1 Plus Overload
Relay), and is reported in increments of 5.
Access Rule
Get
Data Type
UINT
Units
%
Min. Value
0
Max. Value
1275
Default Value
0
Tag Name
Average_%FLA
% Therm Utilized
Parameter No.
2
This parameter reports the percent thermal
utilization of the connected motor.
Access Rule
Get
Data Type
USINT
Units
%
Min. Value
0
Max. Value
100
Default Value
None
Tag Name
%_Therm_Utilized
Rockwell Automation Publication 193-UM012B-EN-P - June 2011
Chapter 6
Trip Status
Parameter No.
3
This parameter provides trip identification.
1 = Trip
0 = No Trip
Access Rule
Get
Data Type
WORD
Units
—
Min. Value
0x0000
Max. Value
0x0007
Default Value
0x0000
Bit 0: Overload — Tag Name: Trip_Status: Overload
Bit 1: Phase Loss — Tag Name: Trip_Status: Phase_Loss
Bit 2: Jam — Tag Name: Trip_Status: Jam
Warning Status
Parameter
No.
4
This parameter provides warning identification
1 = Warning
0 = No Warning
Access Rule
Get
Data Type
WORD
Units
—
Min. Value
0x0000
Max. Value
0x00FF
Default Value
0x0000
Bit 0: Overload — Tag Name: Warning_Status: Overload
Bit 2: Jam — Tag Name: Warning_Status: Jam
Bit 3: Underload — Tag Name: Warning_Status: Underload
Bit 5: Comm Fault — Tag Name: Warning_Status: Comm_Fault
Bit 6: Comm Idle — Tag Name: Warning_Status: Comm_Idle
Bit 7: Non Vol Mem Fault — Tag Name: NV_Mem_Fault
Device Status
Parameter
No.
10
This parameter provides status information related to the E1 Plus
Overload Relay and the SMM.
1 = On or Present
0 = Off or Not Present
Bit 0: Trip — Tag Name: Device_Status: Trip
Bit 1: Warning — Tag Name: Device_Status: Warning
Bit 2: Output A — Tag Name: Device_Status: Out_A
Bit 3: Input #1 — Tag Name: Device_Status: In_1
Bit 4: Input #2 — Tag Name: Device_Status: In_2
Bit 5: Motor Current — Tag Name: Device_Status: Motor_Current
Access Rule
Get
Data Type
WORD
Units
—
Min. Value
0x0000
Max. Value
0x003F
Default
Value
0x0000
Advanced Setup Group
Trip Enable
Parameter No.
12
This parameter allows the installer to enable or
disable the Jam Trip function
1 = Enabled
0 = Disabled
Bit 2: Jam— Tag Name: Trip_Enable: Jam
Access Rule
Get/Set
Data Type
WORD
Units
—
Min. Value
0x0000
Max. Value
0x0007
Default Value
0x0000
Rockwell Automation Publication 193-UM012B-EN-P - June 2011
65
Chapter 6
66
Warning Enable
Parameter
No.
13
This parameter allows the installer to enable or disable the warning
functions separately. All warning functions are disabled from the
factory.
1 = Enabled
0 = Disabled
Bit 0: Overload — Tag Name: Warning_Status: Overload
Bit 2: Jam — Tag Name: Warning_Status: Jam
Bit 3: Underload — Tag Name: Warning_Status: Underload
Bit 5: Comm Fault — Tag Name: Warning_Status: Comm_Fault
Bit 6: Comm Idle — Tag Name: Warning_Status: Comm_Idle
Access Rule
Get/Set
Data Type
WORD
Units
—
Min. Value
0x0000
Max. Value
0x007F
Default Value
0x0000
Single/Three Ph
Parameter No.
15
This parameter configures the EtherNet/IP
Module for single- or three-phase application.
This parameter should be set to “Single Phase"
when Bulletin 193S or 592S devices are
employed.
0 = Single Phase
1 = Three Phase
Access Rule
Get/Set
Data Type
BOOL
Units
—
Min. Value
0
Max. Value
1
Default Value
1
Tag Name
Single_Three_Ph
OL Reset Mode
Parameter No.
16
This parameter defines whether a trip can be
automatically or manually reset. This setting
overrides the E1 Plus DIP switch adjustment while
the SMM is powered. Note, however, that the E1
Plus manual reset button, accessible at the front,
is always active.
0 = Manual
1 = Automatic
Access Rule
Get/Set
Data Type
BOOL
Units
—
Min. Value
0
Max. Value
1
Default Value
0
Tag Name
OL_Reset_Mode
OL Warning Level
Parameter No.
17
This parameter sets the overload warning level.
Access Rule
Get/Set
Data Type
USINT
Units
% TCU
Min. Value
0
Max. Value
100
Default Value
90
Tag Name
OL_Warning_Level
Rockwell Automation Publication 193-UM012B-EN-P - June 2011
Chapter 6
Jam Inhibit Time
Parameter No.
18
This parameter defines the amount of time for
which jam detection is inhibited during a motor
starting sequence.
Access Rule
Get/Set
Data Type
USINT
Units
Seconds
Min. Value
0
Max. Value
250
Default Value
10
Tag Name
Jam_Inhibit_Time
Jam Trip Delay
Parameter No.
19
This parameter allows the installer to program a
time duration for which a jam condition must exist
at the programmed level prior to the device
tripping.
Access Rule
Get/Set
Data Type
USINT
Units
Seconds
Min. Value
5
Max. Value
250
Default Value
50
Tag Name
Jam_Trip_Delay
Jam Trip Level
Parameter No.
20
This parameter sets the jam trip level.
Access Rule
Get/Set
Data Type
UINT
Units
% FLA
Min. Value
150
Max. Value
600
Default Value
250
Tag Name
Jam_Trip_Level
Jam Warn Level
Parameter No.
21
This parameter sets the jam warning level.
Access Rule
Get/Set
Data Type
UINT
Units
% FLA
Min. Value
100
Max. Value
600
Default Value
150
Tag Name
Jam_Warn_Level
Rockwell Automation Publication 193-UM012B-EN-P - June 2011
67
Chapter 6
UL Inhibit Time
Parameter No.
22
This parameter defines the amount of time for
which underload detection is inhibited during a
motor starting sequence.
Access Rule
Get/Set
Data Type
USINT
Units
Seconds
Min. Value
0
Max. Value
250
Default Value
10
Tag Name
UL_Inhibit_Time
UL Warn Level
Parameter No.
23
This parameter sets the underload warning level.
Access Rule
Get/Set
Data Type
USINT
Units
% FLA
Min. Value
30
Max. Value
100
Default Value
70
Tag Name
UL_Warn_Level
Trip Reset
Parameter No.
14
This parameter provides the user with the
capability of resetting a trip over the EtherNet/IP
network. After a trip is reset, the parameter
automatically returns to a “Ready” state.
0 = Ready
1 = Reset Trip
Note: A transition from 0 to 1 is necessary to
trigger a trip reset when mapped on the cyclic
data.
Access Rule
Get/Set
Data Type
BOOL
Units
—
Min. Value
0
Max. Value
1
Default Value
0
Tag Name
Trip_Reset
Program Lock
Parameter No.
24
This parameter prohibits the device parameters
from being altered when set to “Locked”. It must
be set to “Unlocked” to allow parameter
modification.
It doesn’t affect parameters when they’re
accessed through the assembly object.
0 = Unlocked
1 = Locked
Access Rule
Get/Set
Data Type
BOOL
Units
—
Min. Value
0
Max. Value
1
Default Value
0
Tag Name
Program_Lock
Reset/Lock Group
68
Rockwell Automation Publication 193-UM012B-EN-P - June 2011
Chapter 6
Set To Defaults
Parameter No.
25
This parameter allows the user to reset the
parameter settings to the factory default values.
After parameter values have been reset to the
factory default settings, the parameter
automatically returns to a “Ready” state.
0 = Ready
1 = Reset Defaults
Note: A transition from 0 to 1 is necessary to
trigger a set to default when mapped on the cyclic
data.
Access Rule
Get/Set
Data Type
BOOL
Units
—
Min. Value
0
Max. Value
1
Default Value
0
Tag Name
Set_To_Default
OutA Pr FltState
Parameter No.
34
This parameter, in conjunction with the Pr
FltValue, defines how Output A will respond when
a trip occurs. When set to “1”, Output A will
continue to operate as commanded via the
network. When set to “0”, Output A will open or
close as determined by the setting of the Pr
FltValue.
0 = Go to FltValue
1 = Ignore Fault
Access Rule
Get/Set
Data Type
BOOL
Units
—
Min. Value
0
Max. Value
1
Default Value
0
Tag Name
OutA_Pr_FLTState
OutA Pr FltValue
Parameter No.
35
This parameter determines the state that Output A
assumes when a trip occurs and the Pr FltState is
set to “0”.
0 = Open
1 = Closed
Access Rule
Get/Set
Data Type
BOOL
Units
—
Min. Value
0
Max. Value
1
Default Value
0
Tag Name
OutA_Pr_FLTValue
OutA En FltState
Parameter No.
36
This parameter, in conjunction with the FltValue,
defines how Output A will respond when a
EtherNet/IP network fault occurs. When set to
“1”, Output A will hold the state prior to trip
occurrence. When set to “0”, Output A will open
or close as determined by the setting of the
FltValue.
0 = Go to FltValue
1 = Hold Last State
Access Rule
Get/Set
Data Type
BOOL
Units
—
Min. Value
0
Max. Value
1
Default Value
0
Tag Name
OutA_En_FLTState
I/O Setup Group
Rockwell Automation Publication 193-UM012B-EN-P - June 2011
69
Chapter 6
70
OutA En FltValue
Parameter No.
37
This parameter determines the state that Output A
assumes when a EtherNet/IP network fault occurs
and the FltState is set to “0”.
0 = Open
1 = Closed
Access Rule
Get/Set
Data Type
BOOL
Units
—
Min. Value
0
Max. Value
1
Default Value
0
Tag Name
OutA_En_FLTValue
OutA En IdlState
Parameter No.
38
This parameter, in conjunction with the IdlState,
defines how Output A will respond when the
EtherNet/IP network is idle (clear mode). When
set to “1”, Output A will hold the state prior to trip
occurrence. When set to “0”, Output A will open
or close. The En Flt parameters supersede the En
Idl parameters.
0 = Go to IdlValue
1 = Hold Last State
Access Rule
Get/Set
Data Type
BOOL
Units
—
Min. Value
0
Max. Value
1
Default Value
0
Tag Name
OutA_En_IdlState
OutA En IdlValue
Parameter No.
39
This parameter determines the state that Output A
assumes when the network is idle and instructed
by the IdlState parameter.
0 = Open
1 = Closed
Access Rule
Get/Set
Data Type
BOOL
Units
—
Min. Value
0
Max. Value
1
Default Value
0
Tag Name
OutA_En_IdlValue
IN1 Assignment
Parameter No.
40
This parameter allows the user to assign a
specific function to the discrete IN1 input.
0 = Normal
1 = Trip Reset
2 = OL Contact
Access Rule
Get/Set
Data Type
USINT
Units
—
Min. Value
0
Max. Value
2
Default Value
0
Tag Name
IN1_Assignment
Rockwell Automation Publication 193-UM012B-EN-P - June 2011
Chapter 6
IN2 Assignment
Parameter No.
41
This parameter allows the user to assign a
specific function to the discrete IN2 input.
0 = Normal
1 = Trip Reset
2 = OL Contact
Access Rule
Get/Set
Data Type
USINT
Units
—
Min. Value
0
Max. Value
2
Default Value
0
Tag Name
IN2_Assignment
Trip Log 0
Parameter No.
5
This parameter records the latest trip.
Access Rule
Get
Data Type
WORD
Units
—
Min. Value
0x0000
Max. Value
0x0007
Default Value
0x0000
Tag Name
Trip_Log_0
Trip Log 1
Parameter No.
6
This parameter records the trip previous to Trip
Log 0.
Access Rule
Get
Data Type
WORD
Units
—
Min. Value
0x0000
Max. Value
0x0007
Default Value
0x0000
Tag Name
Trip_Log_1
Trip Log 2
Parameter No.
7
This parameter records the trip previous to Trip
Log 1.
Access Rule
Get
Data Type
WORD
Units
—
Min. Value
0x0000
Max. Value
0x0007
Default Value
0x0000
Tag Name
Trip_Log_2
Trip History Group
Rockwell Automation Publication 193-UM012B-EN-P - June 2011
71
Chapter 6
72
Trip Log 3
Parameter No.
8
This parameter records the trip previous to Trip
Log 2.
Access Rule
Get
Data Type
WORD
Units
—
Min. Value
0x0000
Max. Value
0x0007
Default Value
0x0000
Tag Name
Trip_Log_3
Trip Log 4
Parameter No.
9
This parameter records the trip previous to Trip
Log 3.
Access Rule
Get
Data Type
WORD
Units
—
Min. Value
0x0000
Max. Value
0x0007
Default Value
0x0000
Tag Name
Trip_Log_4
Rockwell Automation Publication 193-UM012B-EN-P - June 2011
Chapter
7
Troubleshooting
Introduction
The purpose of this chapter is to assist in troubleshooting the E1 Plus EtherNet/
IP module.
ATTENTION: Servicing energized industrial control equipment can
be hazardous. Electrical shock, burns, or unintentional actuation of
controlled industrial equipment may cause death or serious injury.
For safety of maintenance personnel, as well as other who may be
exposed to electrical hazards associated with the maintenance
activities, follow the local safety-related work practices (for
example, the NFPS 70W, Part II, Electrical Safety for Employee
Workplaces, in the United States) when working on or near
energized equipment. maintenance personnel must be trained in
the safety practices, procedures, and requirements that pertain to
their respective job assignments. Do not work alone on energized
equipment.
ATTENTION: Do not attempt to defeat or override fault circuits.
The cause of a fault indication must be determined and corrected
before attempting operation. Failure to correct a control system or
mechanical malfunction may result in personal injury and/or
equipment damage due to uncontrolled machine system operation.
EtherNet/IP Modes of
Operation
The E1 Plus EtherNet/IP Module has four EtherNet/IP modes of operation:
Power-Up Reset Mode, Run Mode, Recoverable Error Mode, and Unrecoverable
Error Mode.
Power-Up Reset Mode
During Power-Up Reset Mode, the following occurs:
Rockwell Automation Publication 193-UM012B-EN-P - June 2011
73
Chapter 7
1. The MODULE STATUS LED should flash green for approximately 1/4
second, then red for 1/4 second. The MODULE STATUS LED will then
stay lit green and the NETWORK STATUS LED should flash green for
approximately 1/4 second, then red for 1/4 second before turning off. The
NETWORK STATUS LED and the MODULE STATUS LED will now
return to their standard indication.
IMPORTANT
The E1 Plus EtherNet/IP Module protection functions are still
operational even without an established network connection.
2. The E1 Plus EtherNet/IP Module performs a duplicate IP address check to
verify another module is not assigned to the same IP address. If a duplicate
IP address is detected on the network, the NETWORK STATUS LED
turns solid red, the MODULE STATUS LED turns flashing red, and the
E1 Plus EtherNet/IP Module enters the Recoverable Error Mode.
If the power-up or reset is successful, the overload relay will enter Run Mode.
Run Mode
In Run Mode, the E1 Plus EtherNet/IP Module will operate as a slave device to a
master device. The NETWORK STATUS LED will blink green if there are no
network connections established with a network master. When one or more
connections are in the “established” state, the NETWORK STATUS LED will
turn solid green. When one or more connections are in the “timed-out” state, the
NETWORK STATUS LED will blink red. In the Run Mode, the E1 Plus
EtherNet/IP Module will:
• Accept messages from a master on the EtherNet/IP network.
• Send response messages, COS messages, or CYCLIC messages to a master.
If a communication error is detected, the E1 Plus EtherNet/IP Module will either
enter the Recoverable Error or Unrecoverable Error Mode.
Recoverable Error Mode
In Recoverable Error Mode, the E1 Plus EtherNet/IP Module’s MODULE
STATUS LED turns flashing red. The overload relays will respond to messages
that are specified in offline node recovery message protocol.
74
Error Type
Description
LED State
Recoverable
Duplicate IP address detected
Flashing Red
Rockwell Automation Publication 193-UM012B-EN-P - June 2011
Chapter 7
Unrecoverable Error Mode
In Unrecoverable Error Mode, the E1 Plus EtherNet/IP Module’s MODULE
STATUS LED turns solid red. The overload relay continues in this state as long as
the device is powered.
Error Type
Description
LED State
Unrecoverable
Power-up initialization failure
Solid Red
Fatal communication error
EtherNet/IP
Troubleshooting
Procedures
The following table identifies possible causes and corrective actions when
troubleshooting EtherNet/IP-related failures using the NETWORK STATUS
LED.
Table 7 - EtherNet/IP Troubleshooting Procedures
Color
State
None
Possible Cause
Corrective Action
The E1 Plus EtherNet/IP Module is not receiving power
at the EtherNet/IP connector.
Check EtherNet/IP power and cable connections and the
power connection on the EtherNet/IP connector.
Green
Red
Off
Flashing (once)
Normal
The Network Status LED flashes green, red, and off once
during a normal power-up sequence.
Green
Flashing
E1 Plus EtherNet/IP Module is online but with no
connections established.
Check EtherNet/IP master and its scan list for correct
scanner configuration.
Green
Solid
Normal operating state, and the E1 Plus EtherNet/IP
Module is allocated to a master.
No action required.
Red
Flashing
One or more connections timed-out.
Reset EtherNet/IP master device.
Red
Solid
1. Diagnostics test failed on power-up/reset. Internal
fault exists.
2. Duplicate EtherNet/IP module address exists (two
EtherNet/IP modules cannot have the same address).
3. A fatal communication error occurred.
1. Cycle power to the unit and network. If the fault still
exists, replace unit.
2. Change the IP address to a valid setting and reset the
device.
3. Check EtherNet/IP media for proper installation.
Input and Output
Troubleshooting
Procedures
ATTENTION: If the outputs are to be commanded via an explicit
message, ensure that there can never be an established I/O
connection that can actively control them, and that the explicit
message connection has a non-zero expected packet rate (EPR)
setting.
Rockwell Automation Publication 193-UM012B-EN-P - June 2011
75
Chapter 7
Table 8 - Input and Output Troubleshooting Procedures
Failure Type
Failure Description
Corrective Action
Input 1, 2
Input 1 or 2 does not appear
to recognize a contact
closure
1. Check the supply voltage on the power connector.
2. If the applicable contact closed but the E1 Plus EtherNet/IP Module Input does not
recognize the closure, check the continuity and wiring to the connected contact.
3. Check the IN 1 and 2 status LEDs. If the appropriate LED does not illuminate, measure the voltage
across and current through the applicable input. Verify they are within the ratings of the E1 Plus
EtherNet/IP Module (See Appendix A).
4. If the appropriate Input LED does illuminate, but the input status is not reported properly over the
EtherNet/IP network, check the programmable controller ladder logic and I/O mapping.
Input 1, 2
Trip reset operation
Check the programming of Parameter 40, IN1 Assignment or Parameter 41, IN2 Assignment.
OUT A
Output A does not appear to
turn on (close) when
commanded to do so.
1. Check the supply voltage on the power connector.
2. Check the OUTA status LED. If the appropriate LED does not illuminate, check the programmable
controller ladder logic and I/O mapping.
3. If the appropriate Output LED is illuminated, remove the control circuit power and check for
continuity across the appropriate output terminals (13/14). If the continuity test indicates the
output is open, replace the E1 Plus EtherNet/IP Module. Check the supply voltage against
the ratings of the contactor and the relay output before installing a new unit.
4. Remove control circuit power and check the control circuit fuse and the control wiring to the E1
Plus EtherNet/IP Module output terminals.
5. Check the control circuit power supply. Verify the voltage is within the contactor and overload
relay ratings.
6. Check the DEVICE STATUS and TRIP STATUS parameters. If a Protection Fault exists, refer to the
TRIP STATUS parameters. If a EtherNet/IP-related fault exists, refer to the EtherNet/IP
troubleshooting procedure.
7. Check the OUTA Pr FltState, Pr FltValue, En FltState, En FltValue, En IdlState, and En IdlValue
programmable parameters. The Pr FltState and Pr FltValue parameter supersede the En Flt or En
Idle parameters.
OUT A
Output A does not appear to
turn off (open) when
commanded to do so.
1. Check the OUTA status LED. If the appropriate LED remains illuminated, check the programmable
controller ladder logic and I/O mapping.
2. If the appropriate Output LED is not illuminated, remove the control circuit power and check for
continuity across the appropriate output terminals (13/14). If the continuity test indicates the
output is closed, replace the E1 Plus EtherNet/IP Module. Check the supply voltage against
ratings of the contactor and the relay output before installing a new unit.
3. Remove control circuit power and check the control circuit fuse and the control wiring to the E1
Plus EtherNet/IP Module output terminals.
4. Check the OUTA Pr FltState, Pr FltValue, En FltState, En FltValue, En IdlState, and En IdlValue
programmable parameters. Then check the DEVICE STATUS and TRIP STATUS parameters. If a
Protection Fault exists, refer to the TRIP STATUS parameters. If a EtherNet/IP-related fault
exists, refer to the EtherNet troubleshooting procedure.
OUT A
The contactor connected to
Output A appears to
“chatter”
1. Verify the OUT A LED remains in the appropriate On or Off state. If the LED is flickering, check the
programmable controller’s ladder logic program.
2. Check the control circuit supply voltage. Verify it is within the ratings of the contactor coil and the
overload relay’s outputs.
3. Remove the control circuit power. Verify all control wiring is properly secured.
76
Rockwell Automation Publication 193-UM012B-EN-P - June 2011
Appendix
A
Specifications
Specifications
Terminal Ratings:
Terminal Screw
M3
Wire Cross Section
See wiring diagram section
Torque
0.56…0.79 N•m (5…7 lb.-in)
Degree of Protection
IP20
Power Supply Ratings:
Rated Supply Voltage
Us
24V DC
Rated Operating Range
Ue
24V -15%, +10% DC
Rated Supply Current
Ie
110 mA at 24V DC
Maximum Surge Current at Power-Up
2.5 A
Maximum Power Consumption
2.7 W
Output Relay Ratings:
Terminals
OUT A:
13/14
Type of Contacts
Form A
SPST - NO
Rated Thermal Current
Ithe
5A
Rated Insulation Voltage
Ui
300V AC
Rated Operating Voltage
Ue
240V AC
Rated Operating Current
Ie
3 A (at 120V AC), 1.5 A (at 240V AC)
0.25 A (at 110V DC), 0.1 A (at 220V DC)
Minimum Operating Current
10 mA at 5V DC
Rating Designation
B300
Utilization Category
AC-15
Resistive Load Rating
(p.f.=1.0)
5 A, 250V DC
5 A, 30V DC
Inductive Load Rating
(p.f.=0.4), (L/R=7 ms)
2 A, 250V AC
2 A, 30V DC
Short Circuit Current Rating
1,000 A
Recommended Control Circuit Fuse
KTK-R-6
(6 A, 600V)
Rated Number of Operations
Out A:
W/100-C-09…100-C43
W/100-C-60…100-C85
W/NEMA Size 0…2
W/NEMA Size 3
5,000,000
2,500,000
1,000,000
300,000
Input Ratings:
Rockwell Automation Publication 193-UM012B-EN-P - June 2011
77
Appendix A
Terminals
IN 1:
IN 2:
SSV (Sensor Supply Voltage)
1
2
3
Supply Voltage (provided by module)
24V DC±10%
Type of Inputs
Current Sinking
ON-State Voltage
15V DC
On-State Current (turn-on)
2 mA
Steady State Current
5 mA
Off-State Voltage
5V DC
Off-State Current
0.5 mA
Transition Voltage
5…15V DC
Transition Current
0.5…2.0 mA
Environmental Ratings:
Ambient Temperature
Storage
Operating
(Open)
(Enclosed)
Tamb
-40…+85°C (-40…+185°F)
-20…+60°C (-4…+140°F)
-20…+40°C (-4…+104°F)
Humidity
Operating
Damp Heat - Steady State
Damp Heat - Cyclic
5…95% non-condensing
per IEC 68-2-3
per IEC 68-2-30
Cooling Method
Natural Convection
Vibration (per IEC 68-2-6)
3G
Shock (per IEC 68-2-27)
30 G
Maximum Altitude
2000 m
Pollution Environment
Pollution Degree 2
Terminal Marking
EN 50012
Degree of Protection
IP20
Electromagnetic Compatibility
Electrostatic Discharge Immunity
Test Level
Performance Criteria
8 kV Air Discharge; 4 kV Contact Discharge
1➊➋
RF Immunity
Test Level
Performance Criteria
10V/m
1➊➋
Electrical Fast Transient/Burst Immunity
Test Level
Performance Criteria
2 kV (Power); 1 kV (control)
1➊➋
Surge Immunity
Test Level
Performance Criteria
2 kV L-E; 1 kV L-L
1➊➋
Radiated Emissions
Class A
Conducted Emissions
Not tested
➊ Performance Criteria 1 requires the DUT (device under test) not to experience degradation or loss of
performance.
➋ Environment 2 - Heavy Industrial.
78
Rockwell Automation Publication 193-UM012B-EN-P - June 2011
Appendix A
WARNING: This is a class A product. In domestic environment, this product may
cause radio interference, in which case the user may be required to take adequate
measures.
EtherNet/IP Communications:
Connections
TCP
CIP
150
48
CIP Unconnected Messages
128
Packet Rates (packets/second)
I/O
HIM/MSG
500
500
Media Support
Twisted Pair
Fiber
Yes
No
Speed Duplex (Half/Full)
10/100
Duplicate IP Detection
Yes
Jam Protection:
Trip Level
150…600% FLA
Trip Delay
0.1…25.0 sec.
Inhibit
0…250 sec.
Standards and Certifications
UL 508
CSA 22.2, No. 14
EN 60947-4-1
Rockwell Automation Publication 193-UM012B-EN-P - June 2011
79
Appendix A
80
Rockwell Automation Publication 193-UM012B-EN-P - June 2011
Appendix
B
EtherNet/IP Information
Electronic Data Sheets
Electronic Data Sheet (EDS) files are specially formatted ASCII files that provide
all of the information necessary for a configuration tool (e.g., RSNetWorx for
EtherNet/IP) to access and alter the parameters of a device. The EDS file
contains all the parameter information of a device: number of parameters,
groupings, parameter name, min., max, and default values, units, data format and
scaling. The EDS file for the E1 Plus EtherNet/IP Module is available from the
Internet at www.ab.com/networks/eds/index/html. It can also be built
automatically by some configuration tools since all of the information necessary
for an EDS file may be extracted from the E1 Plus EtherNet/IP Module.
EtherNet/IP Objects
The following object classes are supported.
Table 9 - EtherNet object Classes
Class
Object
0x01
Identity
0x02
Message Router
0x04
Assembly
0x06
Connection Manager
0x08
Discrete Input Point
0x09
Discrete Output Point
0x0F
Parameter
0x10
Parameter Group
0x29
Control Supervisor
0x2C
Overload
0xC2
PCP
0xF5
TCP/IP Interface
0xF6
Ethernet Link
Identity Object — CLASS CODE 0x01
The following class attributes are supported for the Identity Object:
Table 10 - Identity Object Class Attributes
Attribute ID
Access Rule
Name
Data Type
Value
1
Get
Revision
UINT
0x0001
Rockwell Automation Publication 193-UM012B-EN-P - June 2011
81
Appendix B
Identity Object instances contain the following instance attributes:
Table 11 - Identity Object Instance Attributes
Attribute ID
Access Rule
Name
Data Type
Value
1
Get
Vendor ID
UINT
Programmable via test object
2
Get
Device Type
UINT
0x0003
3
Get
Product Code
UINT
300
4
Get
Revision
Structure of:
Major Revision
USINT
1
Minor Revision
USINT
N/A
5
Get
Status
WORD
Bit 0: Owned, shall be set when at least one connection i
configured
Bit 1: Reserved, set to 0
Bit 2: Configured
Bit 3: Reserved, set to 0
Bit 4-7: See extended device status
Bit 8: Minor Recoverable fault
BIt 9: Minor Unrecoverable fault
Bit 10: Major Recoverable fault
Bit 11: Major Unrecoverable fault
Bit 12-15: Reserved, set to 0
Extended device status (Bit 4-7)
0000=Unknown
0001=Firmware updated in progress
0010=Faulted I/O connection
0011=No I/O connection established
0100=Non volatile configuration bad
0101=Major fault
0110=Connection in run mode
0111=Connection in idle mode
6
Get
Serial Number
UDINT
Unique number assigned for each device
7
Get
Product Name
SHORT_STRING
Product name
8
Get
State
USINT
3=Operational
The following common services are implemented for the Identity Object:
Table 12 - Identity Object Common Services
Service Code
Implemented for:
Service Name
Class
Instance
0x01
No
Yes
Get Attribute All
0x0E
Yes
Yes
Get Attribute Single
0x05
No
Yes
Reset
Message Router Object — CLASS CODE 0x02
No class or instance attributes are supported. The message router object exists
only to rout explicit messages to other objects.
82
Rockwell Automation Publication 193-UM012B-EN-P - June 2011
Appendix B
Assembly Object — CLASS CODE 0x04
The following class attributes are supported for the Assembly Object:
Table 13 - Assembly Object Class Attributes
Attribute ID
Access Rule
Name
Data Type
Value
1
Get
Revision
UINT
0x0002
2
Get
Max Instance
UINT
120
Instance Attributes
Instances/Connection points implements the following data attributes:
Table 14 - Instance Attributes
#
Access
Name
Type
Value
Description
1
Get
Number of members in
list
UINT
N/A
No. of members to follow in the list in attribute #2
2
Get
Member list
Array of
N/A
Array of CIP paths
3
Get/Set
Data
Array of UINT
—
Data produced/consumed by the module
4
Get
Size
UINT
N/A
No. of USINTs in attribute #3
100
Get
Name
SHORT_STRING
N/A
Name of the assembly instance
Output Assemblies
The following output assembly instances are implemented:
Table 15 - Instance 2 — Basic Overload Output Assembly from ODVA Profile
Byte
Bit 7
Bit 6
Bit 5
Bit 4
Bit 3
0
Bit 2
Bit 1
Bit 0
Trip Reset
Table 16 - Instance 101 — Similar to Basic Contact Output Assembly from ODVA
Contact Profile
Byte
Bit 7
Bit 6
Bit 5
Bit 4
Bit 3
Bit 2
Bit 1
0
Bit 0
Output A
Table 17 - Instance 103 — Similar to Basic Starter Output Assembly from ODVA
Starter Profile
Byte
Bit 7
Bit 6
Bit 5
Bit 4
Bit 3
0
Rockwell Automation Publication 193-UM012B-EN-P - June 2011
Bit 2
Trip Reset
Bit 1
Bit 0
Output A
83
Appendix B
Input Assemblies
Table 18 - Instance 50 — Trip Status Input Assembly from ODVA Overload Profile
Byte
Bit 7
Bit 6
Bit 5
Bit 4
Bit 3
Bit 2
Bit 1
0
Bit 0
Tripped
Table 19 - Instance 51 —Basic Status Input Assembly from ODVA Overload Profile
Byte
Bit 7
Bit 6
Bit 5
Bit 4
Bit 3
Bit 2
0
Bit 1
Bit 0
Warning
Tripped
Bit 1
Bit 0
Table 20 - Instance 106 —Motor Starter Input Assembly
Byte
Bit 7
0
Motor
Current
Bit 6
Bit 5
Bit 4
Input 2
Input 1
Bit 3
Bit 2
Out A Stat Warning
Tripped
Table 21 - Instance 110 —Extended Motor Starter Input Assembly
Byte
Bit 7
Bit 6
Bit 5
Bit 4
0
Motor
Current
Input 2
Input 1
1
Unused
2
Average % FLA (low byte)
3
Average % FLA (high byte)
4
%Therm Utilized (low byte)
5
%Therm Utilized (high byte)
Bit 3
Bit 2
Bit 1
Out A Stat Warning
Bit 0
Tripped
Table 22 - Instance 111 —Complete Motor Starter Input Assembly
84
Byte
Bit 7
Bit 6
Bit 5
Bit 4
0
Motor
Current
Input 2
Input 1
1
Unused
2
Average % FLA (low byte)
3
Average % FLA (high byte)
4
%Therm Utilized (low byte)
5
%Therm Utilized (high byte)
6
Trip Status (low byte)
7
Trip Status (high byte)
8
Warning Status (low byte)
9
Warning Status (high byte)
10
Device Status (low byte)
11
Device Status (high byte)
12
Trip Log 0 (low byte)
13
Trip Log 0 (high byte)
14
Trip Log 1 (low byte)
15
Trip Log 1 (high byte)
Bit 3
Rockwell Automation Publication 193-UM012B-EN-P - June 2011
Bit 2
Bit 1
Out A Stat Warning
Bit 0
Tripped
Appendix B
Table 22 - Instance 111 —Complete Motor Starter Input Assembly
Byte
Bit 7
Bit 6
Bit 5
16
Trip Log 2 (low byte)
17
Trip Log 2 (high byte)
18
Trip Log 3 (low byte)
19
Trip Log 3 (high byte)
20
Trip Log 4 (low byte)
21
Trip Log 4 (high byte)
Bit 4
Bit 3
Bit 2
Bit 1
Bit 0
The following services are implemented for the Assembly Object:
Table 23 - EtherNet Object Common Services
Service
Code
Implemented for:
Service Name
Class
Instance
Consuming
Instance
Producing
0x0E
Yes
Yes
Yes
Get Attribute Single
0x10
No
Yes
No
Set Attribute Single
Connection Manager Object — CLASS CODE 0x06
No class or instance attributes are supported.
The following common service are implemented for the Connection Manager
Object:
Table 24 - Connection Manager Object Common Services
Service Code
Implemented for:
Service Name
Class
Instance
0x54
No
Yes
Forward Open
0x4E
No
Yes
Forward Close
Discrete Input Point Object — CLASS CODE 0x08
The following class attributes are supported for the Discrete Input Point Object:
Table 25 - Discrete Input Point Object Class Attributes
Attribute ID
Access Rule
Name
Data Type
Value
1
Get
Revision
UINT
0x0002
2
Get
Max Instance
UINT
0x0002
Rockwell Automation Publication 193-UM012B-EN-P - June 2011
85
Appendix B
Two instances of the Discrete Input Point Object are supported as follows:
Table 26 - Discrete Input Point Object Instances
Attribute ID
Access Rule
Name
Data Type
Value
3
Get
Value
BOOL
0=OFF
1=ON
The following common services are implemented for the Discrete Input Point
Object:
Table 27 - Discrete Input Object Common Services
Service
Code
Implemented for:
Class
Instance
0x0E
Yes
Yes
Service Name
Get Attribute Single
Discrete Output Point Object — CLASS CODE 0x09
The following class attributes are supported for the Discrete Output point
Object:
Table 28 - Discrete Output Point Object Class Attributes
Attribute ID
Access Rule
Name
Data Type
Value
1
Get
Revision
UINT
0x0001
2
Get
Max Instance
UINT
0x0001
A single instance is implemented and contains the following attributes:
Table 29 - Discrete Output Point Object Instance 1 - Output A
86
Attribute ID
Access Rule
Name
Data Type
Value
3
Get
Value
BOOL
0=OFF
1=ON
5
Get/Set
Fault Action
BOOL
0=Fault Value
Attribute
1=Hold Last State
6
Get/Set
Fault Value
BOOL
0=OFF
1=ON
7
Get/Set
Idle Action
BOOL
0=Fault Value
Attribute
1=Hold Last State
8
Get/Set
Idle Value
BOOL
0=OFF
1=ON
113
Get/Set
Pr Fault Action
BOOL
0=Pr Fault Value
Attribute
1=Ignore
114
Get/Set
Pr Fault Value
BOOL
0=OFF
1=ON
Rockwell Automation Publication 193-UM012B-EN-P - June 2011
Appendix B
The following common services are implemented for the Discrete Output Point
Object:
Table 30 - Discrete Output Object Common Services
Service
Code
Implemented for:
Service Name
Class
Instance
0x0E
Yes
Yes
Get Attribute Single
0x10
No
Yes
Set Attribute Single
Parameter Object — CLASS CODE 0x0F
The following class attributes are supported for the Parameter Object:
Table 31 - Parameter Object Class Attributes
Attribute ID
Access Rule
Name
Data Type
Value
1
Get
Revision
UINT
0x0001
2
Get
Max Instance
UINT
0x0029
8
Get
Parameter Class Descriptor
WORD
0x000B
9
Get
Configuration Assembly Instance
UINT
0x0078
10
Get
Native Language
UINT
0x01=English
The following instance attributes are implemented for all parameter attributes:
Table 32 - Parameter Object Instance Attributes
Attribute ID
Access Rule
Name
Data Type
Value
1
Get/Set
Value
Specified in Descriptor
N/A
2
Get
Link Path Size
USINT
N/A
3
Get
Link Path
Packed EPATH:
Path to specified object attribute
4
Get
Descriptor
WORD
Parameter Dependent
5
Get
Data Type
EPATH
Parameter Dependent
6
Get
Data Size
USINT
Parameter Dependent
7
Get
Parameter Name String
SHORT_STRING
Parameter Dependent
8
Get
Units String
SHORT_STRING
Parameter Dependent
9
Get
Help String
SHORT_STRING
Parameter Dependent
10
Get
Minimum Value
Specified in Descriptor
Parameter Dependent
11
Get
Maximum Value
Specified in Descriptor
Parameter Dependent
12
Get
Default Value
Specified in Descriptor
Parameter Dependent
13
Get
Scaling Multiplier
UINT
1
14
Get
Scaling Divisor
UINT
1
15
Get
Scaling Base
UINT
1
16
Get
Scaling Offset
INT
0
Rockwell Automation Publication 193-UM012B-EN-P - June 2011
87
Appendix B
Table 32 - Parameter Object Instance Attributes
Attribute ID
Access Rule
Name
Data Type
Value
17
Get
Multiplier Link
UINT
0
18
Get
Divisor Link
UINT
0
19
Get
Base Link
UINT
0
20
Get
Offset Link
UINT
0
21
Get
Decimal Precision
USINT
Parameter Dependent
The following commons services are implemented for the Parameter Object:
Table 33 - Parameter Object Common Services
Service
Code
Implemented for:
Service Name
Class
Instance
0x01
No
Yes
Get Attribute All
0x0E
Yes
Yes
Get Attribute Single
0x10
No
Yes
Set Attribute Single
0x4B
No
Yes
Get Enum String
Parameter Group Object — CLASS CODE 0x10
The following class attributes are supported for the Parameter Group Object:
Table 34 - Parameter Group Object Class Attributes
Attribute ID
Access Rule
Name
Data Type
Value
1
Get
Revision
UINT
0x0001
2
Get
Max Instance
UINT
0x0005
8
Get
Native Language
USINT
0x01=English
The following parameter group objects are supported:
• Instance 1 = Monitor Parameters
• Instance 2 = Trip History
• Instance 3 = Reset/Lock
• Instance 4 = Advanced Setup
• Instance 5 = I/O Setup
88
Rockwell Automation Publication 193-UM012B-EN-P - June 2011
Appendix B
The following instance attributes are supported for all parameter group instances:
Table 35 - Parameter Group Object Instance Attributes
Attribute ID
Access Rule
Name
Data Type
Value
1
Get
Group Name String
SHORT_STRING
N/A
2
Get
Number of Members
UINT
N/A
3
Get
1st Parameter
UINT
N/A
4
Get
2nd parameter
UINT
N/A
n
Get
Nth Parameter
UINT
N/A
The following common services are implemented for the Parameter Group
Object:
Table 36 - Parameter Group Object Common Services
Service
Code
Implemented for:
Class
Instance
0x0E
Yes
Yes
Service Name
Get Attribute Single
Control Supervisor Object — CLASS CODE 0x29
No class attributes are supported for the Control Supervisor Object. A single
instance (instance 1) of the Control Supervisor Object is supported. The
following instance attributes are supported.
Table 37 - Control Supervisor Object Instance 1 Attributes
Attribute ID
Access Rule
Name
Data Type
Value
10
Get
Faulted
BOOL
0=No Fault present
1= Fault Latched
11
Get
Warning
BOOL
0=No Warnings present
1=Warning present (not latched)
12
Get/Set
Fault Rst
BOOL
0=No action
0->1=Fault reset
13
Get
FaultCode
UINT
If in Faulted state, FaultCode indicates the fault that caused the transition to
Faulted state. If not in Faulted state, FaultCode indicates the fault that
caused the last transition to the Faulted state.
14
Get
Warning Code
UINT
Code word indicating warning present. If multiple warnings are present, the
lowest code value is displayed.
100
Get
Trip Status
WORD
Bit 0=Overload
Bit 1=Phase Loss
Bit 2=Jam
Bit 3-Bit 15=Not used
Rockwell Automation Publication 193-UM012B-EN-P - June 2011
89
Appendix B
Table 37 - Control Supervisor Object Instance 1 Attributes
Attribute ID
Access Rule
Name
Data Type
Value
101
Get
Warning Status
WORD
Bit 0=Overload
Bit 1=Not Used
Bit 2=Jam
Bit 3=Underload
Bit 4=Not Used
BIt 5=Comm Fault
Bit 6=Comm Idle
Bit 7=Non Vol Mem Fault
Bit 8-Bit 15=Not used
102
Get
Trip Log 0
WORD
Last trip condition. Bit definitions of the value are the same as attribute 101
103
Get
Trip Log 1
WORD
Last trip condition. Bit definitions of the value are the same as attribute 101
104
Get
Trip Log 2
WORD
Last trip condition. Bit definitions of the value are the same as attribute 101
105
Get
Trip Log 3
WORD
Last trip condition. Bit definitions of the value are the same as attribute 101
106
Get
Trip Log 4
WORD
Last trip condition. Bit definitions of the value are the same as attribute 101
107
Get
Device Status
WORD
Bit 0=Trip
Bit 1=Warning
Bit 2=OutputA
Bit 3=Input 1
Bit 4=Input 2
Bit 5=Motor Current
Bit 6-Bit 15=Not used
108
Get/Set
Trip Enable
WORD
Bit 0=Not Used
Bit 1=Not Used
Bit 2=Jam
Bit 3-Bit 15=Not Used
109
Get/Set
Warning Enable
WORD
Bit 0=Overload
Bit 1=Not Used
Bit 2=Jam
Bit 3=Underload
Bit 4=Not Used
BIt 5=Comm Fault
Bit 6=Comm Idle
Bit 7-Bit 15=Not Used
110
Get/Set
OL Reset Mode
BOOL
0=Manual
1=Automatic
111
Get/Set
IN1 Assignment
USINT
0=Normal
1=Trip Reset
2=OL Contact
112
Get/Set
IN2 Assignment
USINT
0=Normal
1=Trip Reset
2=OL Contact
The following common services are implemented for the Control Supervisor
Object:
Table 38 - Control Supervisor Object Common Services
90
Service
Code
Implemented for:
Service Name
Class
Instance
0x0E
No
Yes
Get Attribute Single
0x10
No
Yes
Set Attribute Single
0x05
No
Yes
Reset
Rockwell Automation Publication 193-UM012B-EN-P - June 2011
Appendix B
Overload Object — CLASS CODE 0x2C
No class attributes are supported for the Overload Object. A single instance
(instance 1) of the Overload Object is supported:
Table 39 - Overload Object Instance Attributes
Attribute ID
Access Rule
Name
Data Type
Value
7
Get
% Thermal Utilized
USINT
xxx% FLA
108
Get
Average % FLA
UINT
0…1000%FLA
109
Get
% Thermal Utilized
USINT
0…100%
127
Get/Set
Single/Three Phase
BOOL
0=Single Phase
1=Three Phase
132
Get/Set
OL Warn Level
USINT
0…100% TCU
141
Get/Set
Jam Inhibit Time
USINT
0…250 s
142
Get/Set
Jam Trip Delay
USINT
0.5…25.0 s
143
Get/Set
Jam Trip Level
UINT
150…600%FLA
144
Get/Set
Jam Warn Level
UINT
100…600%FLA
145
Get/Set
UL Inhibit Time
USINT
0…250 s
148
Get/Set
UL Warn Level
USINT
30…100%FLA
The following common services are implemented for the Overload Object:
Table 40 - Overload Object Common Services
Service
Code
Implemented for:
Service Name
Class
Instance
0x0E
No
Yes
Get Attribute Single
0x10
No
Yes
Set Attribute Single
PCP Object — CLASS CODE 0xC2
The following class attributes are supported for the PCP Object:
Table B.1 PCP Object Class Attributes
Attribute ID
Access Rule
Name
Data Type
Value
1
Get
Revision
UINT
1
Rockwell Automation Publication 193-UM012B-EN-P - June 2011
91
Appendix B
The following instance attributes are implemented for all parameter attributes:
Table 41 - PCP Object Instance Attributes
Attribute ID
Access Rule
Name
Data Type
Value
1
Get/Set
MCC Number
USINT
0-255
2
Get/Set
Vertical Section Number
USINT
0-255
3
Get/Set
Starting Section Letter
USINT
0-255
4
Get/Set
Space Factors
USINT
0-0x3F
5
Get/Set
Cabinet Width
USINT
0-255
6
Get/Set
Controlled Device
USINT
0-255
7
Get
Number of Device Inputs
USINT
2
8
Get/Set
Devices Connected at Inputs
Array of USINT
9
Get
Number of Device Outputs
USINT
10
Get/Set
Devices Connected at Outputs
Array of USINT
1
The following common services are implemented for the PCP Object:
Table 42 - PCP Object Common Services
Service
Code
Implemented for:
Service Name
Class
Instance
0x01
No
Yes
Get Attribute All
0x02
No
Yes
Set Attribute All
0x0E
Yes
Yes
Get Attribute Single
0x10
No
Yes
Set Attribute Single
TCP/IP Interface Object — CLASS CODE 0xF5
The following class attributes are supported for the TCP/IP Interface Object:
Table 43 - TCP/IP Interface Object Class Attributes
Attribute ID
Access Rule
Name
Data Type
Value
1
Get
Revision
UINT
1
The following instance attributes are implemented for all parameter attributes:
Table 44 - TCP/IP Interface Object Instance Attributes
Attribute ID
Access Rule
Name
Data Type
Value
1
Get
Status
DWORD
N/A
2
Get
Configuration capability
DWORD
0x00000014
3
Get/Set
Configuration control
DWORD
N/A
92
Rockwell Automation Publication 193-UM012B-EN-P - June 2011
Appendix B
Table 44 - TCP/IP Interface Object Instance Attributes
Attribute ID
Access Rule
Name
Data Type
4
Get
Physical Link Object
Struct of:
Path size
UINT
0x0002
Path
Padded EPATH
20 F6 24 01
Interface configuration
Structure of:
IP Address
UDINT
Network Mask
UDINT
Gateway Address
UDINT
Name Server
UDINT
Name Server 2
UDINT
Domain Name
STRING
5
Get/Set
6
Get/Set
Host Name
STRING
8
Get/Set
TTL Value
USINT
9
Get/Set
Mcast Config
Structure of:
Alloc Control
USINT
Reserved
USINT
Num Mcast
UINT
Mcast Start Addr
UDINT
Value
1
0
4
The following common services are implemented for the TCP/IP Interface
Object:
Table 45 - TCP/IP Interface Common Services
Service
Code
Implemented for:
Service Name
Class
Instance
0x01
No
Yes
Get Attribute All
0x0E
Yes
Yes
Get Attribute Single
0x10
No
Yes
Set Attribute Single
Ethernet Link Object — CLASS CODE 0xF6
The following class attributes are supported for the Ethernet Link Object:
Table 46 - Ethernet Link Object Class Attributes
Attribute ID
Access Rule
Name
Data Type
Value
1
Get
Revision
UINT
3
Rockwell Automation Publication 193-UM012B-EN-P - June 2011
93
Appendix B
The following instance attributes are implemented for all parameter attributes:
Table 47 - Ethernet Link Object Instance Attributes
Attribute ID
Access Rule
Name
Data Type
Value
1
Get
Interface Speed
UDINT
10 or 100
2
Get
Interface Flags
DWORD
3
Get
Physical Address
ARRAY of 6 USINTs
4
Get
Interface Counters
Structure of:
In Octets
UDINT
N/A
In Ucast Packets
UDINT
N/A
In NUcast Packets
UDINT
N/A
In Discards
UDINT
N/A
In Errors
UDINT
N/A
In Unknown Protos
UDINT
N/A
Out Octets
UDINT
N/A
Out Ucast Packets
UDINT
N/A
Out NUcast Packets
UDINT
N/A
Out Discards
UDINT
N/A
Out Errors
UDINT
N/A
Media Counters
Structure of:
Alignment Errors
UDINT
N/A
FCS Errors
UDINT
N/A
Single Collisions
UDINT
N/A
Multiple Collisions
UDINT
N/A
SQE Test Errors
UDINT
0
Deferred Transmission
UDINT
N/A
Late Collisions
UDINT
N/A
Excessive Collisions
UDINT
N/A
MAC Transmit Errors
UDINT
N/A
Carrier Sense Errors
UDINT
N/A
Frame Too Long
UDINT
N/A
MAC Receive Errors
UDINT
N/A
Interface Control
Structure of:
Control Bits
WORD
N/A
Forces Interface Speed
UINT
N/A
5
6
94
Get
Get/Set
Rockwell Automation Publication 193-UM012B-EN-P - June 2011
MAC Address
Appendix B
The following common services are implemented for the Ethernet Link Object:
Table 48 - Ethernet Link Common Services
Rockwell Automation
Support
Service
Code
Implemented for:
Service Name
Class
Instance
0x01
Yes
Yes
Get Attribute All
0x0E
No
Yes
Get Attribute Single
0x10
No
Yes
Set Attribute Single
0x4C
No
Yes
Get And Clear
Rockwell Automation provides technical information on the web to assist you in
using its products. At http://support.rockwellautomation.com, you can find
technical manuals, a knowledge base of FAQs, technical and application notes,
sample code and links to software service packs, and a MySupport feature that
you can customize to make the best use of these tools.
For an additional level of technical phone support for installation, configuration
and troubleshooting, we offer TechConnect Support programs. For more
information, contact your local distributor or Rockwell Automation
representative, or visit http://support.rockwellautomation.com.
Installation Assistance
If you experience a problem with a hardware module within the first 24 hours of
installation, please review the information that's contained in this manual. You
can also contact a special Customer Support number for initial help in getting
your module up and running:
United States
1.440.646.3223
Monday – Friday, 8am – 5pm EST
Outside United
States
Please contact your local Rockwell Automation representative for any
technical support issues.
New Product Satisfaction Return
Rockwell tests all of its products to ensure that they are fully operational when
shipped from the manufacturing facility. However, if your product is not
functioning and needs to be returned:
United States
Contact your distributor. You must provide a Customer Support case number
(see phone number above to obtain one) to your distributor in order to
complete the return process.
Outside United
States
Please contact your local Rockwell Automation representative for return
procedure.
Rockwell Automation Publication 193-UM012B-EN-P - June 2011
95
Appendix B
96
Rockwell Automation Publication 193-UM012B-EN-P - June 2011
Rockwell Automation Support
Rockwell Automation provides technical information on the Web to assist you in using its products.
At http://www.rockwellautomation.com/support/, you can find technical manuals, a knowledge base of FAQs, technical and
application notes, sample code and links to software service packs, and a MySupport feature that you can customize to make the
best use of these tools.
For an additional level of technical phone support for installation, configuration, and troubleshooting, we offer TechConnect
support programs. For more information, contact your local distributor or Rockwell Automation representative,
or visit http://www.rockwellautomation.com/support/.
Installation Assistance
If you experience a problem within the first 24 hours of installation, review the information that is contained in this manual.
You can contact Customer Support for initial help in getting your product up and running.
United States or Canada
1.440.646.3434
Outside United States or
Canada
Use the Worldwide Locator at http://www.rockwellautomation.com/support/americas/phone_en.html, or contact
your local Rockwell Automation representative.
New Product Satisfaction Return
Rockwell Automation tests all of its products to ensure that they are fully operational when shipped from the manufacturing facility.
However, if your product is not functioning and needs to be returned, follow these procedures.
United States
Contact your distributor. You must provide a Customer Support case number (call the phone number above to obtain
one) to your distributor to complete the return process.
Outside United States
Please contact your local Rockwell Automation representative for the return procedure.
Documentation Feedback
Your comments will help us serve your documentation needs better. If you have any suggestions on how to improve this document,
complete this form, publication RA-DU002, available at http://www.rockwellautomation.com/literature/.
Rockwell Otomasyon Ticaret A.Ş., Kar Plaza İş Merkezi E Blok Kat:6 34752 İçerenköy, İstanbul, Tel: +90 (216) 5698400
Rockwell Automation Publication 193-UM012B-EN-P - June 2011 98
Supersedes Publication 193-UM012A-EN-P - March 2009
Copyright © 2011 Rockwell Automation, Inc. All rights reserved. Printed in the U.S.A.