1
Section 3 : Cable Jointing
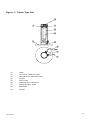
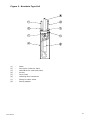
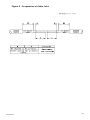
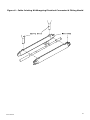
Refer to figures 5 and 6.
It is desirable to minimise cable joints, but where they are unavoidable a joint kit may be
supplied. The effectiveness of this joint largely depends on the care with which the jointing
operation is carried out.
(a)
Thoroughly scrape all wax and dirt from cable end for approximately 150mm. Prepare the
cable ends as shown. Stagger the individual conductor connections.
(b)
Use the crimped connectors to join the conductors. Ensure electrical continuity of outer
armoured screen is re-established across joint. Use the electrical insulation tape to wrap
the connectors. Stretch the tape to half its original width and apply one layer half lapped
over connector area only. Do not wrap the tape beyond the pencilled area.
(c)
Trim the ends of the mould with a sharp knife to suit the diameter of the cable. Hold the
mould halves in place centred over the splice. Snap both halves together and fit the
pouring spouts in the holds. Ensure that both seams are completely snapped together.
Tape the ends of the mould body to form a seal.
(d)
Mix the resin thoroughly and maintaining the mould in a level position, spouts uppermost,
pour the resin through one spout until both spouts are completely filled. When the resin has
solidified and cooled remove the spouts.
NOTE:
User Manual
In cold weather (below 15 degrees C) the resin becomes very viscous. It is
therefore advisable to keep the resin in a warm place prior to mixing. Mix the
compound until its temperature starts to rise, this decreases the viscosity.
10