1
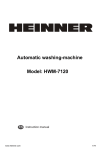
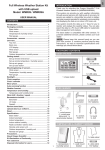
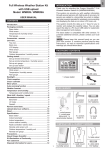
BeerGun
tm
Operation, Assembly & Maintenance Manual
Congratulations on your purchase, and thank you for selecting the BeerGunTM bottle filler from
Blichmann Engineering. We are confident that it will provide you years of service and many bottles of
outstanding beer. This manual will familiarize you with the assembly and use of the BeerGunTM bottle
filler.
**** PLEASE READ THOROUGHLY PRIOR TO USE FOR IMPORTANT SAFETY INFORMATION ****
IMPORTANT !!
Caution:
Sections labeled “Caution” can lead to equipment damage or unsatisfactory performance
of the equipment. Please read these sections thoroughly. If you have any questions,
contact your retailer or Blichmann Engineering (www.BlichmannEngineering.com) before
use.
Warning:
Sections labeled “Warning” can lead to serious injury or death if not followed. Please
read these thoroughly and understand them completely before use. If you do not
understand them or have any questions, contact your retailer or Blichmann Engineering
(www.BlichmannEngineering.com) before use.
Assembly & Installation:
Prior to Assembly / Disassembly
Ensure you have all the parts included in Fig. 1. Please contact your Retailer if any parts are missing.
The optional accessory kit is shown in Fig 2, and includes everything you need to get your filler
connected to a standard ball-lock keg. The hose clamp provided can be easily installed and tightened
with a wire cutter. If you do not already have one, you will need to add a “T” or a “Y” (shown in Fig 11
on page 4) into your gas line with a shut-off valve to connect the gas hose to the BeerGun and also to
the keg. The T/Y adapter is not included in the kit, but is available through your Retailer.
Fig. 1
Fig. 2
The BeerGunTM has been shipped pre-assembled so you can visualize how it goes together. But it does
need to be cleaned and sanitized prior to the first use. The assembly steps follow, but disassembly is
simply the reverse of these steps.
Caution:
Do not disassemble until you have read the assembly procedure! The filler may be
permanently damaged if not disassembled correctly.
Do not use excessive force on any of the parts during assembly or disassembly or they may be
permanently damaged. The sheet metal valve clip and the beer trigger are made of heat-treated
stainless steel, but can still be deformed and the tube grooves can be permanently damaged or
bent. It is also not necessary to firmly tighten the flare nut onto the elbow – a snug fit is all that
is needed.
Do NOT use any cleaner or sanitizer containing chlorine such as bleach. Over time, this will pit
and erode stainless steel. It will also damage the brass parts of the filler. Any other nonchlorine sanitizer is acceptable to use. IodophorTM or StarSanTM both work very well and do not
require rinsing. In any case, a few minute soak is all that is recommended to prevent any
damage to the brass fittings. Extended soaking can lead to galvanic corrosion of the filler parts.
Prior to assembly, completely disassemble the filler and wash with a mild detergent. The included tube
brush makes it easy to clean the interior of the 2 tubes. Rinse all parts well and soak in your preferred
non-chlorine no-rinse sanitizer, including all the hoses and keg connectors.
2
Assembly Procedure
(1) Thread the brass push valve onto the brass elbow and orient it as
shown in Fig 3. Note that there is an arrow cast into the valve showing
the direction of flow – it should face toward the elbow. It is not
necessary to use thread tape at this joint.
Arrow
Fig. 3
(2) Install the 3/8” diameter stainless CO2 tube onto the brass elbow
using the flare nut as shown in Fig.4. Tighten the nut loosely at this
point. It will be fully tightened in the next step.
Fig. 4
(3) Slide the smaller diameter (1/4”) beer tube inside the CO2 tube and
through the hole in the brass elbow as shown in Fig. 5. If it does not
move in and out smoothly, check for a bend in the tube (see
troubleshooting section). Tighten the nut snugly with a wrench, but do
not over tighten. Check to see that the CO2 tube is not on at an angle
and be sure that the beer tube moves freely. If it does not move freely,
ensure that the CO2 tube is on straight, not causing the beer tube to
bind. If this does not resolve the trouble, refer to the troubleshooting
section.
Fig. 5
(4) Slide the spring onto the CO2 tube and then slide the stainless beer
trigger onto the tube. Do not install the trigger onto the beer tube just
yet. Proceed to step 5 first.
Fig. 6
(5) Install the small black silicone valve seat onto the “U” shaped
stainless clip as shown in Fig. 7. Then install the clip onto the groove on
the end of the CO2 tube.
Caution: The rubber valve seat can be torn and permanently damaged if
incorrectly removed from the valve clip. Please carefully pull it straight
off the valve clip, not at an angle or twisting motion.
Fig. 7
3
(6) With the filler on a flat hard surface, place the clip end of the trigger
over the groove in the beer tube, oriented as shown in Fig. 8. Pressing
on BOTH sides of the tube (to prevent bending) push it into the groove
until it clicks into place. To remove it, invert the filler and again push
down on both sides of the tube until it snaps out of the trigger clip.
Fig. 8
(7) Slip the 10ft length of 3/16 ID beer hose onto the end of the beer tube
about 3/8” as shown in Fig. 9. Installing it deeper than this makes
removal more difficult. Using a shorter length of hose, or a hose with a
larger ID, will increase the likelihood of foaming. Connect the other end
of the hose to the beer out on the keg using a liquid ball lock connector
(included in the accessory kit).
3/8”
Fig. 9
(8) Connect the CO2 hose to the brass valve as shown in Fig. 10. The
fittings shown are included with the optional accessory kit.
(9) Connect the beer hose and CO2 hose to your regulator as
shown in Fig. 11.
Fig. 10
Fig. 11
To Keg
That’s it! After a few uses, it will take less than a minute to assemble the filler.
4
To CO2
Valve
Use of the BeerGunTM
The BeerGunTM is used mainly for filling beer bottles and growlers from previously kegged and
carbonated beer. It can, however, be used to fill bottles from a bottling bucket, or even be used to fill
wine bottles, provided there is a source of CO2 available. In this case, little pressure is available to push
the beer through the hose, so a shorter length of hose is recommended to increase flow rate. Since the
beer in this application is not carbonated, foaming is not an issue.
Warning: The use of pressurized CO2 equipment can create hazardous pressures. DO NOT AT ANY
TIME exceed 15 PSI on the filler. Ensure that your regulator is in good working order and the pressure
is initially set below 5 PSI and the outlet valve of the regulator is turned off prior to connecting it to the
BeerGunTM.
Key factors to reduce foaming
•
•
•
•
Chill bottles to the same temperature as the beer
Always use a 10ft length of 3/16” ID hose to reduce the pressure of the beer as it flows to the filler
Use the minimum dispensing pressure possible to fill the bottle at an acceptable rate – ½ of the
dispensing pressure is a good starting point.
QUICKLY open and close the beer valve (trigger) to prevent throttling of the beer.
Bottle Preparation
There are numerous methods to satisfactorily sanitize bottles for filling. Our preferred method is to
start with a well-scrubbed bottle (a faucet mounted “bottle blaster” makes this easy). Then run through
a wash cycle (neck down) in your dishwasher WITHOUT any detergent or rinse aid. Be sure to use
“heated dry” cycle. Detergents and rinse aids will destroy the head retention and impart a soapy flavor
to the beer.
While the bottles are washing, tear an adequate amount of 3” X 3” aluminum foil squares and soak
them in a no-rinse sanitizer. After the heated dry cycle your bottles will be quite sterile. Remove them
and immediately cover with a foil square, sealing it tightly on the lip of the bottle, then store the bottles
in a case or container for later use.
If you have notably hard water and no softener, this might not be a suitable method for you due to
calcium deposits, so we would recommend soaking the bottles in a picnic cooler of no-rinse sanitizer in
lieu of the dishwasher.
About an hour before you are going to fill the bottles, place them in the refrigerator with your beer to let
them come to the same temperature as the beer.
Bottle Filling
You noticed how easy the BeerGun is to assemble and sanitize – not you’ll experience how intuitive and
fast it is to use!
We find it handy to have a sanitized heavy beer pitcher to hold the filler upright between bottles.
Arrange your workspace in an efficient manner with everything in an easy to reach location.
Prior to installing the ball lock connectors on the keg posts, spray the post with a bit of no-rinse
sanitizer. After letting it sit for a couple minutes, install the connectors. Set the regulator to ½ of the
normal dispensing pressure and open the pop-off valve on the keg to equalize the pressure to this new
setting.
5
Clear the CO2 line of air by depressing the brass push valve for a few seconds. Purge the beer line by
pulling the beer trigger quickly open until the beer flows through it and all foam is out of the line.
Important: Always QUICKLY OPEN AND CLOSE the beer valve to reduce foaming.
Take a bottle and remove the foil cap. Insert the stem of the filler all the way to
the bottom of the bottle as shown in Fig. 12. Depress the CO2 valve for 3-5
seconds to purge the bottle of air.
Fig. 12
Note: it is normal to get a small leakage of CO2 at the gap where the beer tube
passes through the hole in the brass elbow. This small clearance is needed to
ensure smooth operation of the beer tube.
Holding the bottle at an angle with the stem of the filler in the bottom corner of
the bottle (Fig 13), QUICKLY pull the beer trigger and flood the tip of the filler as
quickly as possible to reduce foaming. When the tip has been immersed in beer,
you can return the bottle to an upright position.
Fig. 13
Fill the bottle until any foam has spilled out of the neck and is completely full of
beer and QUICKLY release the trigger to stop the flow of beer. Remove the stem
and the volume displaced by the stem will form an ideal and consistent fill level.
For bottles larger than 22oz and growlers, the stem may not reach to the bottom
of the bottle. Keep the bottle at an angle, letting the beer run down the side of
the bottle until the tip of the filler is immersed, then proceed as follows.
Place the tip of the filler into the head space as shown in Fig. 14, and
give it a quick shot of CO2 to displace any air that has been drawn back
into the bottle.
Fig. 14
Cap and move to the next bottle! With practice, it takes about 20-30 sec to fill and cap a 12oz bottle. If
you have minimal foaming and wish to dispense at a faster rate, increase the CO2 pressure. If foaming
is excessive, reduce the pressure.
6
Trouble-shooting
Excessive foaming
a) QUICKLY open and close the beer trigger
b) Ensure bottles are at the same temperature as the beer
c) Ensure all hoses, clamps and fittings on the beer side are tight and not letting air into the system
d) Reduce the dispensing pressure until foaming reaches an acceptable level
e) Highly carbonated or high protein beers (like wheat, oats etc) are difficult to fill so patience is needed
f) Ensure that 10 ft of 3/16” ID hose is used to reduce the beer pressure on the way to the filler
If you are still experiencing foaming, we have found that nearly always it is a result of over-carbonated
beer. Over-carbonated beer contains more CO2 in solution than is stable at the given pressure and
temperature. Any change in pressure or increase in temperature will cause this excess CO2 to come out
of solution causing excessive foaming and gas bubbles in the beer line. Therefore, when carbonating
your beer, DO NOT “speed gas” it by applying more than the dispensing pressure. There is no way to
control the amount of CO2 entering the beer using this method! Apply the correct amount of pressure
(typically 8-12 PSI) and let it sit for a week or so to carbonate. If you do want to speed it along, you can
roll/shake the keg, but DO NOT exceed the recommended pressure for your desired carbonation level.
Most Homebrewing books contain carbonation charts. If you believe you have over-carbonated your
beer, you will need to vent the excess gas over several days by removing the CO2 and pulling the
pressure relief valve on the top of the keg. Do this several times per day until you have vented the
excess carbonation.
Mechanical
Beer tube is sticking – the hole in the brass elbow is sized for a tight running fit to minimize CO2
leakage during bottle purge, and is checked at the factory for satisfactory movement. Check to see that
the CO2 tube is installed square to the brass elbow. If this does not eliminate the sticking, check to see
if the beer tube is bent by rolling it on a very flat surface such as a machined table saw or granite
counter. A slight bend can be carefully removed. If this does not resolve the problem, contact
Blichmann Engineering through our web page: www.BlichmannEngineering.com
Beer/CO2 clips come off tube in use. The clips are made of a heat-treated stainless steel, but can still
be permanently deformed. If this has happened – very gently bend them back together with a pliers, a
little bit at a time until it snaps on firmly by hand. To prevent this, do not pull unnecessarily hard on
the trigger, and do not force the clips aggressively onto the grooves.
Warranty
The BeerGunTM is warranted to be free of defects in materials and workmanship for a period of 1yr from
the date of purchase (proof of purchase required).
Specifically EXCLUDED from this warranty are normal wear and tear, damage from abuse and misuse,
thread galling or breakage from over tightening.
Blichmann Engineering is not responsible for incidental or consequential damages or injury arising
from use or misuse of this product.
Replacement parts are available through your Retailer.
7
BeerGun Owners Manual – V5
©Blichmann Engineering, LLC 2006
8