1
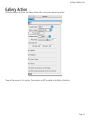
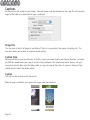
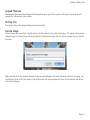
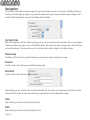
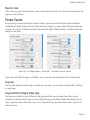
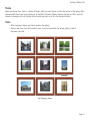
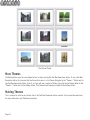
Gallery
and Gallery Lite
User’s manual
Covers 1.1
www.actionsworld.com
Page 2
Gallery & Gallery Lite
Contents
Introduction . . . . . . . . . . . . . . . . . . . . . . . . . . . . . . . . . . . . . . . . . . . . . . . . . . . . . . . . . . 5
Acknowledgements . . . . . . . . . . . . . . . . . . . . . . . . . . . . . . . . . . . . . . . . . . . . . . . . . . . . . . 5
Copyright. . . . . . . . . . . . . . . . . . . . . . . . . . . . . . . . . . . . . . . . . . . . . . . . . . . . . . . . . . . . . 5
About the Actions . . . . . . . . . . . . . . . . . . . . . . . . . . . . . . . . . . . . . . . . . . . . . . . . . . . . . . 6
What they do . . . . . . . . . . . . . . . . . . . . . . . . . . . . . . . . . . . . . . . . . . . . . . . . . . . . . . . . . . 6
Gallery Lite . . . . . . . . . . . . . . . . . . . . . . . . . . . . . . . . . . . . . . . . . . . . . . . . . . . . . . . . . . . 6
Gallery . . . . . . . . . . . . . . . . . . . . . . . . . . . . . . . . . . . . . . . . . . . . . . . . . . . . . . . . . . . . . . 6
Graphic Engines . . . . . . . . . . . . . . . . . . . . . . . . . . . . . . . . . . . . . . . . . . . . . . . . . . . . . . . . 7
iMagine . . . . . . . . . . . . . . . . . . . . . . . . . . . . . . . . . . . . . . . . . . . . . . . . . . . . . . . . . . . . . . 7
Graphic Converter . . . . . . . . . . . . . . . . . . . . . . . . . . . . . . . . . . . . . . . . . . . . . . . . . . . . . . . 7
Selecting the Graphics Engine . . . . . . . . . . . . . . . . . . . . . . . . . . . . . . . . . . . . . . . . . . . . . . 8
Using the Actions . . . . . . . . . . . . . . . . . . . . . . . . . . . . . . . . . . . . . . . . . . . . . . . . . . . . . . . 9
Installing the Gallery Lite Action. . . . . . . . . . . . . . . . . . . . . . . . . . . . . . . . . . . . . . . . . . . . 9
Installing the Gallery Action . . . . . . . . . . . . . . . . . . . . . . . . . . . . . . . . . . . . . . . . . . . . . . . 9
Upgrading from Gallery Lite to Gallery . . . . . . . . . . . . . . . . . . . . . . . . . . . . . . . . . . . . . . . . 9
Set up AppleScript . . . . . . . . . . . . . . . . . . . . . . . . . . . . . . . . . . . . . . . . . . . . . . . . . . . . . . 9
Preparing Your Images . . . . . . . . . . . . . . . . . . . . . . . . . . . . . . . . . . . . . . . . . . . . . . . . . . 10
Working in Freeway . . . . . . . . . . . . . . . . . . . . . . . . . . . . . . . . . . . . . . . . . . . . . . . . . . . . 12
Working with Tables . . . . . . . . . . . . . . . . . . . . . . . . . . . . . . . . . . . . . . . . . . . . . . . . . . . . 12
Selecting a Graphics Engine. . . . . . . . . . . . . . . . . . . . . . . . . . . . . . . . . . . . . . . . . . . . . . . 12
Selecting the Images Folder . . . . . . . . . . . . . . . . . . . . . . . . . . . . . . . . . . . . . . . . . . . . . . 13
Gallery Lite Options . . . . . . . . . . . . . . . . . . . . . . . . . . . . . . . . . . . . . . . . . . . . . . . . . . . . 14
Thumbnail Colour . . . . . . . . . . . . . . . . . . . . . . . . . . . . . . . . . . . . . . . . . . . . . . . . . . . . . . . . . 14
JPEG Quality. . . . . . . . . . . . . . . . . . . . . . . . . . . . . . . . . . . . . . . . . . . . . . . . . . . . . . . . . . . . . 14
Max Long and Max Height. . . . . . . . . . . . . . . . . . . . . . . . . . . . . . . . . . . . . . . . . . . . . . . . . . . . 14
When to Process the Gallery . . . . . . . . . . . . . . . . . . . . . . . . . . . . . . . . . . . . . . . . . . . . . . 14
Gallery Action . . . . . . . . . . . . . . . . . . . . . . . . . . . . . . . . . . . . . . . . . . . . . . . . . . . . . . . . 15
Captions . . . . . . . . . . . . . . . . . . . . . . . . . . . . . . . . . . . . . . . . . . . . . . . . . . . . . . . . . . . . 16
Image File . . . . . . . . . . . . . . . . . . . . . . . . . . . . . . . . . . . . . . . . . . . . . . . . . . . . . . . . . . . . . .
Caption Style . . . . . . . . . . . . . . . . . . . . . . . . . . . . . . . . . . . . . . . . . . . . . . . . . . . . . . . . . . . .
Caption . . . . . . . . . . . . . . . . . . . . . . . . . . . . . . . . . . . . . . . . . . . . . . . . . . . . . . . . . . . . . . . .
Append Filename. . . . . . . . . . . . . . . . . . . . . . . . . . . . . . . . . . . . . . . . . . . . . . . . . . . . . . . . . .
On New Line . . . . . . . . . . . . . . . . . . . . . . . . . . . . . . . . . . . . . . . . . . . . . . . . . . . . . . . . . . . . .
Preview Image . . . . . . . . . . . . . . . . . . . . . . . . . . . . . . . . . . . . . . . . . . . . . . . . . . . . . . . . . . .
16
16
16
17
17
17
Navigation . . . . . . . . . . . . . . . . . . . . . . . . . . . . . . . . . . . . . . . . . . . . . . . . . . . . . . . . . . . 18
Use Text Links . . . . . . . . . . . . . . . . . . . . . . . . . . . . . . . . . . . . . . . . . . . . . . . . . . . . . . . . . . . 18
Page 3
Slave Group . . . . . . . . . . . . . . . . . . . . . . . . . . . . . . . . . . . . . . . . . . . . . . . . . . . . . . . . . . . . .
Forward . . . . . . . . . . . . . . . . . . . . . . . . . . . . . . . . . . . . . . . . . . . . . . . . . . . . . . . . . . . . . . . .
Backward . . . . . . . . . . . . . . . . . . . . . . . . . . . . . . . . . . . . . . . . . . . . . . . . . . . . . . . . . . . . . . .
Next . . . . . . . . . . . . . . . . . . . . . . . . . . . . . . . . . . . . . . . . . . . . . . . . . . . . . . . . . . . . . . . . . .
Back . . . . . . . . . . . . . . . . . . . . . . . . . . . . . . . . . . . . . . . . . . . . . . . . . . . . . . . . . . . . . . . . . .
Style for Links . . . . . . . . . . . . . . . . . . . . . . . . . . . . . . . . . . . . . . . . . . . . . . . . . . . . . . . . . . .
18
18
18
18
18
19
Grayscale . . . . . . . . . . . . . . . . . . . . . . . . . . . . . . . . . . . . . . . . . . . . . . . . . . . . . . . . . . . . . . .
Grayscale Effect (iMagine Video only) . . . . . . . . . . . . . . . . . . . . . . . . . . . . . . . . . . . . . . . . . . . .
Brightness/Contrast. . . . . . . . . . . . . . . . . . . . . . . . . . . . . . . . . . . . . . . . . . . . . . . . . . . . . . . .
Brightness . . . . . . . . . . . . . . . . . . . . . . . . . . . . . . . . . . . . . . . . . . . . . . . . . . . . . . . . . . . . . .
Contrast. . . . . . . . . . . . . . . . . . . . . . . . . . . . . . . . . . . . . . . . . . . . . . . . . . . . . . . . . . . . . . . .
Sharpen (iMagine). . . . . . . . . . . . . . . . . . . . . . . . . . . . . . . . . . . . . . . . . . . . . . . . . . . . . . . . .
Unsharp Mask (Graphic Converter) . . . . . . . . . . . . . . . . . . . . . . . . . . . . . . . . . . . . . . . . . . . . . .
Negative . . . . . . . . . . . . . . . . . . . . . . . . . . . . . . . . . . . . . . . . . . . . . . . . . . . . . . . . . . . . . . .
Notes . . . . . . . . . . . . . . . . . . . . . . . . . . . . . . . . . . . . . . . . . . . . . . . . . . . . . . . . . . . . . . . . .
19
19
20
20
20
20
20
20
20
Picture Tweaks . . . . . . . . . . . . . . . . . . . . . . . . . . . . . . . . . . . . . . . . . . . . . . . . . . . . . . . . 19
Themes . . . . . . . . . . . . . . . . . . . . . . . . . . . . . . . . . . . . . . . . . . . . . . . . . . . . . . . . . . . . . 20
Use Theme . . . . . . . . . . . . . . . . . . . . . . . . . . . . . . . . . . . . . . . . . . . . . . . . . . . . . . . . . . . . . . 20
Theme . . . . . . . . . . . . . . . . . . . . . . . . . . . . . . . . . . . . . . . . . . . . . . . . . . . . . . . . . . . . . . . . . 21
Notes . . . . . . . . . . . . . . . . . . . . . . . . . . . . . . . . . . . . . . . . . . . . . . . . . . . . . . . . . . . . . . . . . 21
More Themes . . . . . . . . . . . . . . . . . . . . . . . . . . . . . . . . . . . . . . . . . . . . . . . . . . . . . . . . . 22
Making Themes . . . . . . . . . . . . . . . . . . . . . . . . . . . . . . . . . . . . . . . . . . . . . . . . . . . . . . . 22
Page 4
Gallery & Gallery Lite
Introduction
A frequent question the pops up on Freeway Talk is this: “How do I make a
Gallery in Freeway?”. This is becoming a fairly fundamental question for most
Freeway users - a lot of applications create them: iPhoto does (via a .Mac
account), Photoshop (and Elements) offer a gallery type function. Whilst you
can build a gallery in Freeway (and there is a Knowledge Base article to tell you
how), it’s not automated. You have to build each image and its associated popup manually. Which is fine if you have a few images to show, but what is you
have a larger number?
The Gallery Action and Gallery Lite Actions allow you to build interactive
galleries in Freeway – all without having a lift a finger to write code. You just
tell the Action where your images are, hit a button in Freeway and make some tea (or coffee) whilst your bank of
images are processed.
These Action make creating galleries in Freeway really, simple, and they keep to the ethos of Freeway – making
something complex incredibly simple.
Acknowledgements
At this point, I’d like to thank Softpress for their support and encouragement with the development of these Actions
– I’ve been given access to the testing folk on the team. Big thanks to Richard, Anna, James and Dan for testing,
Kevin for making iMagine available to Action writers, and thanks to Alan for his advice on making Actions and for
helping me think around some of the pithier issues that this particular Action raised.
Copyright
This manual, the Gallery and Gallery Lite Actions and associated images are Copyright © Paul Dunning 2005.
Softpress, Freeway, Actions are trademarks of Softpress – www.softpress.com. All other trademarks are acknowledged.
Page 5
About the Actions
What they do
The Actions allow you to create galleries of images on a page. You will draw out a table, apply the Action to it and
then assign a folder of images to the Action. When ready, the Action will process the images using Graphic Converter
and produce a page of thumbnails which, when clicked, on will open a larger image in a new window.
There are two Actions in the Gallery Suite. One is free, and the other requires a purchase. Hopefully you are reading
this because you have purchased a copy of the Action. If so, thank you for your custom, and I hope you enjoy
creating Galleries with it. If you have not purchased the Action, you can still download Gallery Lite that gives you
the facility to create limited galleries with Freeway. Hopefully, you will decide that the full Gallery Action is a musthave.
Gallery Lite
This Action allows you to create a gallery with up to 20 images per gallery. You can only have one Gallery of images
per Freeway page.
Gallery
This Action offers the same basic functionality of the Gallery Lite Action, but with the following additions:
• You can have 250 images per page (blink and read that again - 250 images)
• A gallery page can contain more than one page worth of images. A simple text link, or a Slave
Chain can be used to navigate between pages
• Images can be adjusted using Graphic Converter whilst the Gallery is processed
• Captions can be applied to images
• Themes - you can put graphical borders around the thumbnails.
Page 6
Gallery & Gallery Lite
Graphic Engines
The Action relies heavily on other applications for the image processing. There are two it can use, one being a Mac
OS X only application (and the recommended one to use). Please ensure that you have one of these applications on
your machine before using the Gallery Action. Both Gallery Actions allow you to select which application you use for
graphic processing.
iMagine
A special version of this application from Yarra Valley Software has been made available
free to Freeway users. The limitation of this application is that it will only work with
calls from a Freeway Action. To use the application for other tasks.
iMagine Video is a Mac OS X only application. It will run in Jaguar (10.2.8) and Panther
(10.3.x). This is a much faster application, and so galleries will be processed much
faster. It is recommended that you use this application for gallery processing. It has
been developed by Kevin Meaney, one of the Softpress engineers. iMagine is much faster
than Graphic Converter, and so your galleries will be processed in a fraction of the time.
It is recommended that you use this software if you can.
You can download iMagine from here: http://www.yvs.eu.com/downloads2/iMagine.app.sit
Yarra Valley Software’s web site is here: www.yvs.eu.com
Graphic Converter
You must have at least version 5.2.3 for this Action to work. This is mostly due to
improvements in stability in Graphic Converter when saving images using AppleScript.
However, some of the other enhancements offered by the Action may not be available
in earlier versions of this excellent application. Note that support for this application is
provided for Mac OS 9 compatability purposes only.
Graphic Converter is shareware. I strongly recommend that you pay the license fee. This
manual assumes that you have done so.
You can download the latest version of GraphicConverter from www.lemkesoft.de
Page 7
Selecting the Graphics Engine
At the top of the Gallery Action’s interface in the Action Palette is a dropdown - select either iMagine or Graphic
Converter. iMagine is the default setting.
Page 8
Gallery & Gallery Lite
Using the Actions
This section of the manual will tell you how to create a gallery using the Gallery Lite Action. These instructions cover
both Actions, though Gallery users will notice that their interface has a few more options available to them. These
will be covered later on in the manual.
Installing the Gallery Lite Action
When you have downloaded the .sit file, you will have a folder with two items in it. One will be an Action – Gallery
Lite - the other will be an AppleScript droplet called Gallery Correct File Type. Put the Gallery Lite Action in your
Freeway Actions folder, and the droplet somewhere safe on your Hard Disk.
Installing the Gallery Action
When you have downloaded the .sit file, you will have a folder with two items in it. The folder will contain the
Action – Gallery - and it’s Themes ~ folder. The other will be an AppleScript droplet called Gallery Correct File Type.
Put the Gallery Folder in your Freeway Actions folder, and the droplet somewhere safe on your Hard Disk.
Upgrading from Gallery Lite to Gallery
If you are upgrading from Gallery Lite to Gallery, follow these simple steps:
1 - Save any open documents and Quit Freeway
2 - Remove the Gallery Lite Action from your Freeway Actions Folder
3 - Put the Galley FOLDER into your Freeway Actions Folder
4 - Restart Freeway. All your sites with the Gallery Lite Action should now be upgraded to work with the Gallery
Action. You can now use the extra features that the Gallery Action offers.
Set up AppleScript
Before you can start to use this Action, you need to ensure that AppleScript is enabled for Actions. To do this, go to
the Freeway preferences, and make sure that the AppleScript check box is on.
Page 9
Preparing Your Images
Before diving into Freeway, you need to gather your images that you wish to use in your gallery. The Action supports
JPEG, GIF, PNG images, as well as TIFF and Photoshop (PSD). Create a new folder in Finder, and give it a name the
reflects your gallery’s contents. This will not be used by the action, but it will help you locate it later.
Collect your images together, and put them into your new folder. It is possible that some of the images have come
from a digital camera, or from iPhoto. These files may not have a filetype set, something that Freeway needs to
be able to locate the images. Drag any JPEG or TIFF images (these are the two formats that are most likely to be
affected) onto the Gallery Correct File Type droplet that came with the Action. This will set the file types correctly.
Page 10
Gallery & Gallery Lite
Page 11
Working in Freeway
Launch Freeway, and create a new document (or load an existing one). Move to a page where the Gallery is to be
put.
Working with Tables
Draw out a table onto the page. Make sure that all the cells are the same size. The Action uses this table to hold
the thumbnails, and it requires that each cell is equally sized. The cell padding and spacing options, as well as the
border of the table will be preserved. These can help space your thumbnails on the page.
Apply the Gallery Lite Action to the table.
The cell padding and cell spacing of the table will be preserved when the page is published. Note that the cells are
all evenly sized. Do not merge cells or make them different sizes - the gallery layout will break apart if you do. Note
that the size of the thumbnail is governed by the first cell in the table.
Selecting a Graphics Engine
The top most drop down in the Actioons Palette allows you to choose from either iMagine or Graphic Converter to
process the Gallery images. I recommend iMagine, partly because it is free for use with Freeway, but also because it
offers more flexibility with drawing and image manipulation. If you are using Mac OS 9, you should select Graphic
Converter as iMagineis a Mac OS X only application.
Page 12
Gallery & Gallery Lite
Selecting the Images Folder
You now have to point the Gallery Lite Action to your folder of images. Using the Select and Image Drop Down,
navigate to an image in your folder and select it.
When you have selected the images, click on the Process Gallery button. The Action will start up Graphic Converter,
and the images and thumbnails will be created. There will be two new folders created within the folder containing
the original images - these contain the thumbnails and full size images that Freeway references when it publishes
the site.
• If you are using Imagine, there will be little visual feedback that the processing is running.,
iMagine is a background application, and as such all its workings are hidden. Sadly, there is no
direct way to provide feedback on the process in Freeway, so it can look as if Freeway has hung.
Every 20 images, a dialog window will open up for 1 second giving progress reports. When the
gallery has been processed, a dialog window will open to tell you that it is complete.
• If you are running Graphic Converter in demo mode, or have just installed it on your Mac, a
number of windows will open before it is ready to run. This usually causes the Action to hang, and
you may have to force quit Freeway. This happens because Freeway is expecting Graphic Converter
to be instantly ready. In such cases, you should start Graphic Converter manually, and clear all
such windows before running this aspect of the Action.
Page 13
Gallery Lite Options
There are a number of options available to you in the Actions Palette.
Thumbnail Colour
The Action creates thumbnails the exact size of the table cell to which the Action has been applied (in order to be
Internet Explorer friendly). The background of the thumbnail has to have a colour - and by default white is selected.
However, if your page colour is different, you can choose it from this drop down and the Gallery action will use this
as the background colour of the thumbnails.
JPEG Quality
This slider controls the JPEG Quality of the saved images. Note that this is value is sent to Graphic Converter value,
so it may give differing settings to Freeway.
Max Long and Max Height
This controls the over all size of the main image when it appears. By default, and image that fits into a space of
640x480 pixels will be created. Tall images will be no larger than 480x640.
When to Process the Gallery
Gallery Process is not automatic, this is because processing can take a while, and a number of Galleries can add
significantly to publishing time. Also, several changes that the Action can not detect may require the Gallery to be
reprocessed.
You should process the gallery when any of these changes occur:
• You add or remove images from the gallery image folder
• You edit images in the gallery image folder
• You change the size of the table to which the Action is applied
• You change any of the options in the Gallery Actions Palette.
Page 14
Gallery & Gallery Lite
Gallery Action
Unlike the Gallery Lite Action, the Gallery Action offers a many more processing options
These will be covered in this section. These options are NOT available in the Gallery Lite Action.
Page 15
Captions
You may wish to add captions to your images. These will appear under the thumbnail on the page. This will cause the
height of the table to increase when the page is published.
Image File
This drop down is the list of images in your Gallery. If the list is unpopulated, then process the gallery first. This
drop down allows you to select an image for caption editing.
Caption Style
You may well want to style your Captions. To do this, create a permanent style in your Freeway document, and create
an HTML box somewhere on your page (it can be on the pasteboard). Add some dummy text to the box, and apply
the style to the text. Now, select the Gallery table, and type the name of the style as it appears in Freeway’s Style
palette into this field in the Action palette.
Caption
This field can also be used to edit the caption.
When the page is published, your caption will appear under the thumbnail:
Page 16
Gallery & Gallery Lite
Append Filename
Some people like to have the filename of the original image as part of the caption. Setting this option to on will
append this informaiton to the caption.
On New Line
This option will put the image’s filename under the caption.
Preview Image
If your images have come from a digital camera, the file names will be pretty meaningless. This button will open the
selected image in Preview (if you are using iMagine) or Graphic Converter, and will display a prompt for you to enter
a caption.
When you click OK in this window, Preview (if you are using iMagine) or Graphic Converter will close the image, and
the Caption will be set for that image. If you click Cancel, the image window will close, but the caption will not be
sent back to Freeway.
Page 17
Navigation
You will more than likely have more images than you have allowed space for on the page. The Gallery Action can
handle up to 250 images per gallery, so you need to create some way of moving between pages of images. This is
handled with the Navigation section of the Gallery Actions Palette.
Use Text Links
When this check box is off (the default setting), you can set up navigation using any Action that can send regular
Freeway slave Chain messages, such as the RollOver Action. Set up two such items on your page - one for forward
and one for backward. The slave chain set in this Action should reflect settings in the Gallery Action.
Slave Group
The Action will listen for the specified Slave Group message to navigate through the images.
Forward
Use the number set in the Forward controlling Actions here.
Backward
Use the number set in the Forward controlling Actions here.
Alternatively, you can switch the Use Text Links check box ON. The Action will append text to the bottom of the
table with links applied to them These will let you page back and forward through the images.
Next
Enter the text you want to use for the Forward link.
Back
Enter the text you want to use for the Backward link.
Page 18
Gallery & Gallery Lite
Style for Links
In the same way as you did for the captions, enter a named style in this field. This style must be somewhere on the
page for it to be published.
Picture Tweaks
As we are using an external application to process the files, we can use some of the other features available to
the AppleScript. Note that these add time to the processing of images, so a large number of files may take longer
to process than normal. As iMagine and Graphic Converter offer slightly different functions, the Action Palette will
change in a few places.
Above Left - the iMagine options; Above Right - the Graphic Converter options
These options will affect all images in the Gallery - you can not select processing options for individual images.
Grayscale
This drop down determines which image is converted to a grey scale - you can choose from None, Both, Thumbnail
or Large Image.
Grayscale Effect (iMagine Video only)
This allows you to select the kind of effect that the grayscale will be - you can choose from either a simple
conversion to a black and white image, or use one of the other gray scale effects available from iMagine. You can
apply a sepia tone, cobalt (deep blue) x-ray or a tint. If you select Tint, you should select a colour using the Tint
colour drop-down.
Page 19
Brightness/Contrast
Again, this determines which images are affected by the Brightness and Contrast sliders: None, Both, Thumbnail or
Large Image.
Brightness
Use this slider to adjust the brightness of the image.
Contrast
Use this slider to adjust the contrast of the image.
Sharpen (iMagine)
When images are scaled, detail can be lost. JPEG compression can also introduce some fuzziness into the image. The
Sharpen function can help compensate for this. Use the amount slider to select one of seven levels of sharpening.
Unsharp Mask (Graphic Converter)
When images are scaled, detail can be lost. This can help recover such damage, as well as correct for the fuzziness
that JPEG compression can give. Use the Radius, amount and Threshold to set the unsharp settings for Graphic
Converter. You may want to check your Graphic Converter documentation for a full explanation of these settings.
Note that Unsharp Mask has the largest impact on image processing time of all the Graphic Converter Tweaks.
Negative
This will invert the colour space of the image, giving a negative.
Notes
* After changing any of these settings, you should reprocess the gallery.
Themes
The Gallery Action uses themes to create borders around the thumbnails. The Action ships with a selection of themes
to get you started.
Use Theme
When this check box is on, the Action will add a theme to the Gallery.
Page 20
Gallery & Gallery Lite
Theme
Select your theme here. There is a choice of themes, offering various frames and film-like borders to the gallery. Most
themes benefit from a cell spacing being set in the Table’s Inspector Palette. However, the Film and Film (portrait)
themes are designed with cell spacing and cell padding options set to 0 in the Inspector Palette.
Notes
• After changing a theme, you should reprocess the gallery.
• Themes take space from the thumbnail space, so try to increase the size of your gallery’s table if
they seem too small.
The Mahogany Theme
Page 21
The Chrome Theme
More Themes
The Gallery Action uses the same theme format as those used by the Text Box Decoration Action. To use a Text Box
Decoration Action, first ensure that the theme to be uses is a 3x3 theme. Navigate to the “Themes ~” folder next to
the Text Box Decoration Action. Open it, and you will see a number of folders. Copy the desired theme folder to the
“Themes ~” folder next to the Gallery Action. That theme should now be available to the Gallery Action.
Making Themes
This is covered in detail on my Actions site in the Text Box Decoration Action section. Visit www.actionsworld.com
for more information and Photoshop templates.
Page 22
Gallery & Gallery Lite
Page 23