1
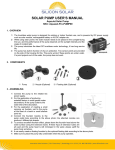
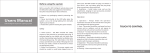
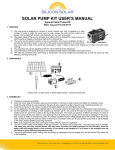
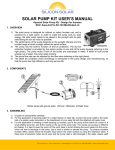
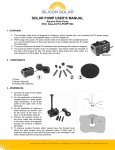
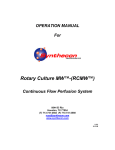
SOLAR OXYGENATOR USER’S MANUAL SKU: aquajet-solar-oxygenator 1. OVERVIEW 1) 2) 3) 4) The system is designed for oxygenating the water to create a healthy environment in any outdoor water body that keeps fish, such as garden pond, garden water feature and outdoor aquarium. The air pump is powered by a solar panel. In order to make the pump work by solar energy, the solar panel needs to be placed in the sunlight with its solar cells facing the sun as much as possible. The performance of the pump depends on the sunlight intensity and the incident angle at which sunlight strikes the panel surface. There is no on or off switch available to start and stop the pump. Whenever the pump and the solar module are connected to each other, the pump operates if there is enough sunshine. 2. COMPONENTS 1) Solar panel 2) Air pump 3) Air hose 4) Spring stone 3. ASSEMBLING 1) 2) Roll out the air hose as well as the connection cable on the pump. Fit the hose to the connector of the spring stone. Silicon Solar Inc | 2917 State Hwy 7, Bainbridge, N.Y. 13733 | Ph: 800.786.0329 | www.SiliconSolar.com 3) 4) Connect the other end of the hose to the air outlet of the pump. Place the pump on a dry and safe place near the pond. The place to hold the air pump should be higher than the water level to prevent the water from flowing back into the pump through the hose when it is not in operation. Put the two pieces of the ground spike together and mount it on the back side of the solar module with the gland nut. Mount the solar module in a sunny place by the ground spike and face the solar panel towards the sun. Insert the plug of the pump to the socket of the solar module and screw the cap tightly. 5) 6) 7) Note: Don’t dip the pump in water, it is not waterproof. Note: The pump sucks in the air from the four rectangle orifices on the bottom shown in the right photo. Please make sure the air passage is not blocked. 4. CAUTIONS 1) Any altering of the product itself or changing of the components voids warranty. 2) Don’t expose small components, such as spring stone, to little kids since they may swallow the small components and therefore be suffocated. 3) Please lay the connection cable properly so that it will not trip people. 4) Please mount the solar module firmly so that it will not fall down easily. 5) Do not strike the solar panel. 5. CLEANING AND MAINTENANCE 1) Keep the surface of the solar module clean and wipe it with soft and moist cloth when necessary. 2) Check the spring stone from time to time and replace it with a new one if the spring stone is blocked. 6. TECHNICAL DATA Solar module: Capacity: 1.5 Wp Nominal voltage: 7.68 V Nominal current: 195 mA Safety class: IP 65 Air pump: Operating voltage: 6 to 9 V DC Flow rate: max. 2 l/h Max. air pressure: >450 mmHg Safety class: IP 44 Cable length: 3 m Hose length: 2 m Silicon Solar Inc | 2917 State Hwy 7, Bainbridge, N.Y. 13733 | Ph: 800.786.0329 | www.SiliconSolar.com