1
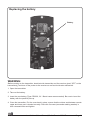
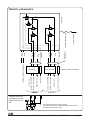
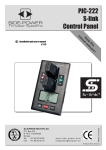
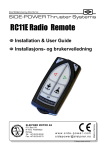
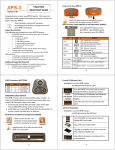
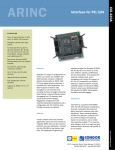
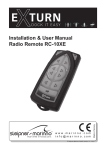
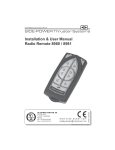
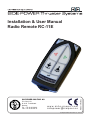
SLEIPNER MOTOR AS P.O. Box 519 N-1612 Fredrikstad Norway Tel: +47 69 30 00 60 Fax: +47 69 30 00 70 w w w. s i d e - p o w e r. c o m s i d e p o w e r @ s l e i p n e r. n o Made in Norway Installation & User Manual Radio Remote RC-11E © Sleipner Motor AS version 1.0 - 2012 Contents Model range................................................................................................................................ 2 Technical specifications............................................................................................................... 3 Important precautions.................................................................................................................. 4 Receiver installation.................................................................................................................... 6 “Visual” wiring diagram................................................................................................................. 6 Programming additional transmitters............................................................................................ 7 Replacing the batteries................................................................................................................ 8 User precautions......................................................................................................................... 9 How to use Sidepower thrusters................................................................................................ 10 Service Partners ....................................................................................................................... 12 Model range The radio remote control can control a single bow thruster or a bow and stern thruster combined. The receiver can receive the signals of up to four transmitters. Remote control kit (RC-11E) consists of: - Receiver: Part# RCR-10E - Transmitter (incl. battery): Part# RCS-11E - Holding bracket for transmitter unit: Part# 8927A Additional transmitters can be ordered separatly: Part# RCS-11E • Part# RC-11E The transmitter and the receiver have the same factory preset code so no programmng is necessary. The battery is already inserted in the transmitter. • Additional transmitter(s) Part#RCS-10E When additional transmitters are to be used, the receiver must be programmed again for all transmitters (please see programming section on page 7). We Sleipner Motor AS declare that this device complies with health and safety requirements according to the Directives EN301 489-3 V1.4.1:2002 EN301 489-1 V1.4.1:2008 IEC 60533:1999 EN300 220-1 V2.3.1:2010 EN300 220-2 V2.3.1:2010 Installation & User Manual, Radio Remote RC11E Page 2 Technical specifications Transmitter ModelRCS-11E Power feed 1 x 3V battery (type: CR2032) Frequency (MHz) 433,2 Adress range 65.000 Operation temp. -10°C / +55°C TechnologyS.M.T. HxWxD (mm) 95x48x25 Weight (g) 60 Receiver RCR-10E From thruster 433,2 65.000 -15°C / +55°C S.M.T. 89x68x33 135 Voltage: Load, max Load, resting 8-30V 4A 35mA Operating range: 15m under normal operating conditions Important precautions • You must always install at least one original Side-Power panel. • With the boat on land, only run the thruster for a fraction of a second, as without resistance it will accelerate very fast to a damaging rpm. • This manual is intended to support educated / experienced staff and is therefore not sufficient in all details for the correct installation. • When installed in boats approved or classified according to international or special national rules, the installer is responsible for following the demands in accordance with these regulations / classification rules. The instructions in this guide can not be guaranteed to comply with all different regulations / classification rules. • The transmitter and the receiver have the same factory preset code so no programmng is necessary. When additional transmitters are to be used, the receiver must be programmed again for all transmitters (please see programming section on page 7). • If a Exturn automatic main switch is fitted, the “OFF” button on your transmitter will shut off the main switch providing no other control panels are “ON”. Installation & User Manual, Radio Remote RC11E Page 3 Receiver installation Prior to installation, it is important that the responsible installer reads this guide to ensure necessary acquaintance with this product. Warning! • Remote receiver power supply negative lead must be connected to the thrusters`s negative lead. Caution! • Install the receiver minimum 1 meter (3ft) from high power cables and NMEA cables or other sources of electrical interference, i.e. navigation instruments, radio communication devices, electro motors and generators. • Install the receiver outside of shielded areas for radio signals, i.e. boxes made of steel or other material with shielding properties. • Install the receiver in a dry environment, with cables pointing downwards. (The receiver assembly is not waterproof.) • When additional transmitters are to be used, the receiver must be programmed again for all transmitters (please see programming section on page 7). • The receiver must have a separate power supply fitted with a 5 Amp fuse in the positive lead that has either a separate power switch or is shut of by the thrusters system main power switch. The receiver can not be powered by the thrusters`s control looms even if you find positive and negative lead there. • Mount the receiver using the two screw holes (please see picture on page 6). If the receiver is mounted against a wall, use spacers between the receiver and the wall to avoid moisture in the receiver. Optimised installation (Fig. 1 - 3) • The receiver antenna must be placed in a vertical position minimum 1 meter (3ft) above sea level. • The receiver has antenna with SMA connector. If there is a problem with signal transferring, try to move the unit to a more optimised position or buy antenna with cable (#xxxx). - Above sea level - Away from sources of electrical interference. Note! Faulty installation will render all warranty given by Sleipner Motor AS void. Installation & User Manual, Radio Remote RC11E Page 4 Installation & User Manual, Radio Remote RC11E Page 5 Receiver installation If the receiver is mounted against a wall, us spacers between the receiver and the wall to avoid moisture in the receiver. Mount the receiver by using the 2 screwholes. 5A 5A 5A To Tobow bowthruster thruster To bow thruster To Tobow bowthruster thrustercontrol controlpanel panel To bow thruster control panel Yellow: Yellow: Sidepower Sidepower automatic automatic Yellow: Automatic main main mainswitch switch (optional) (optional) switch (optional) Black: Black:12/24V 12/24VBatt. Batt.- Black: 12/24V Batt. Red: Red:12/24V 12/24VBatt. Batt.++(5A (5Afuse!) fuse!) Red: 12/24V Batt. + (5A fuse!) Fused Fusedpower powersupply supplyfrom fromaa Fused power supplyswitch! from a circuit circuitwith withON/OFF ON/OFF switch! circuit with ON/OFF switch! signal windlass up blue/black 2 blue/black signal to windlass up down To stern thruster signal w.lass grey/black 4 red (B+) windlass control windlass ctrl. power To stern control panel red (B+) thruster power (B+) 3 grey/black Yellow: Automatic signalmain to windYellow: Not in use switchlass (optional) down windlass windlass WLASS WLAS STERN Receiver Receiver Part# 8932A ReceiverPatr# Part#RCR-10 8932 BOW BOW BOW Visual wiring diagram Sleipner Motor AS •• Norway Norway Motor AS SleipnerSleipner Motor AS • www.side-power.com www.side-power.com www.side-power.com Installation & User Manual, Radio Remote RC11E Page 6 Programming additional receivers Push the Pair Button with a plastic stick The original transmitter and receiver have the same factory preset code so that no programming is necessary. When additional transmitters are to be used, the receiver must be programmed again for all transmitters. 1. Deactivate the receiver and all transmitters (press “OFF” on all transmitters). Turn off the main power switch for the thruster(s). 2. Turn on the power to the receiver. 3. Push the Pair Button on the receiver with a plastic stick (as shown above).The LED below the button will start to blink. 4. The receiver and transmitter are programmed by pressing both “ON” buttons on the transmitter. Within 5 seconds the LED will change from blinking to continous light when the programming signal is received. The transmitter is then ready to use. 5. Additional transmitters must be programmed according to step 3-4 when the receiver is in “Program mode”. You can pair up to 4 transmitters. 6. To clear all transmitters, hold Pair Button until LED blinks slow, continue to hold button pressed until LED blinks quick indictaing that a reset process is started. When LED is turned off, the reset process is completed, and the Pair button can be released. The LED will come on when the receiver has completed the reset process and is ready to be paired (Step 3-4) Installation & User Manual, Radio Remote RC11E Page 7 Replacing the battery Battery WARNING: Before working on the transmitter, deactivate the transmitter and the receiver (push “OFF” on the transmitter(s)) and turn off the power to the receiver as well as the thruster mainswitch. 1. Open the transmitter. 2. Take out the battery. 3. Insert the new battery (Type CR2032, 3V - Brand name recommended). Be sure to insert the battery with the positive pole up. 4. Close the transmitter. Put the cover back in place, ensure that the rubber seal between remote upper and lower part is located correctly. Place the 3 screws (remember sealing washer) in their recessed holes and tighten. Installation & User Manual, Radio Remote RC11E Page 8 Important user precautions • Ensure that you know the location of the main battery switch that disonnects the thruster from all power sources (batteries) so that the thruster can be turned off in case of a malfunction. • If a Side-Power automatic main switch is fitted, the “OFF” button on your transmitter will shut off the main switch providing no other control panels are “ON”. • How to activate the system: Turn on the main power source for the thruster system. Turn on the power to the receiver. The thruster system is then activated by pushing the two “ON” buttons on the transmitter (see page 10). To turn of the radio remote control press the “OFF” button on the transmitter for 2 sec. The LED below the Pair Button on the receiver will blink when a command signal is received. • Alarms: If transmitter/receiver is out of range, the transmitter will give a alarm sound. If the voltage of the battery supplying the thruster gets below 8V, the alarm will sound. If other alarm situations are detected by the receiver, the transmitter will give an alarm sound. • The transmitter will automatically turn off after approx. 4 minutes of inactivity for safety reasons When using a single transmitter The system turns off automatically approx. 4 minutes after the last usage. When using more than one transmitter or additional ‘radio-link’ control panels The system turns off automatically approx. 4 minutes after the last usage of the control unit that initially activated the system even if other control units have been operated in the meantime. The system is off even if these other control units still show the blinking LED on the transmitter. To use these transmitters, the system must be activated again by pushing the two “ON” buttons. • Remember to turn off the radio remote control by pushing the “OFF” button on the transmitter for 2 seconds and to turn off the power switch for the receiver when you have finished your maneuvering. • The maximum continues usage time of the electrical thruster is approx. 3 minutes. The electro motor has a built in thermal cut-off switch that will shut it off when overheating and re-engage it when it has cooled down some. This should be considered when planning your manouvering. • Never use a thruster close to somebody in the water, as the thruster will draw objects close by into the tunnel and contact with the rotating propellers will cause serious injuries. • Never run a thruster for more that one second when the boat is not in the water, as this can damage the electromotor seriously. • If the thruster stops giving thrust while the electromotor is running, chances are that there is a problem in the drive-system. You must then immediately stop trying to run it, and turn it off, as running the electromotor for more than a few seconds without resistance from the propeller, can cause serious damage to the electromotor. • When leaving the boat always turn off the main power switch for the thruster and turn off the power to the receiver. • We advice to always keep the main engine(s) running while using a thruster. This will keep the batteries in a good charge condition. This will also give better performance to the thruster, as a higher voltage at the thruster results in a higher torque (power) in the electromotor. • Make sure that only one control is used at the same time, if two panels are operated in opposite directions at the same time the thruster will not run at all. If they are operated in the same direction the thruster will run in this direction. Installation & User Manual, Radio Remote RC11E Page 9 Remote control “ON” Turn boat to Port Windlass Down Remote control “OFF” Turn boat to Starboard Auto-OFF appr. 4 min. Hold for 2 seconds Up How to use a bowthruster 1. Turn the main power switch for the bow thruster on. Turn on the power to the receiver. 2. Turn on the transmitter by pushing the transmitter’s two “ON” buttons. The remote system is now activated and then turns off automatically appr. 4 min. after the last usage (see page 9). 3. Please take some time to exercise thruster usage in open water to avoid damages to your boat. 4. Turn the bow in the desired direction. By pushing the red button for port movement or the green button for starboard movement. How to use the windlass Please consult your windlass manual for use and precautions. NB: Max. load on the windlass signal output is 4A! If the windlass requires more than 4A, use extra control relay (ref. llustration next page) Remote Control Deactivation Push the transmitter’s “OFF” button for two seconds (the remote control deactivates automatically after approx. 4 minutes after the last usage). Turn off the power switch for the receiver. • If in doubt, try in open water first! Installation & User Manual, Radio Remote RC11E Page 10 Electric schematics Receiver Insulation Optional Auto main switch +12/24V supply NOT IN USE +12/24V supply Max. load 3A +12/24V supply for receiver Page 11 Installation & User Manual, Radio Remote RC11E Active antenna 2m antenna extension (Yellow) Red Blue Grey (Yellow) Red Blue Grey Red Black Coil voltage depend of voltage supply. Output current of relay depend of load form winch last. At least 3 time normal current. External relays for windlass requiring signal output over 4A Channel A Channel B 4-lead & 1-lead connector Bow Thruster Windlass SIDE-POWER SERVICE CENTRES Argentina Trimer SA Buenos Aires Tel:+54 11 4580 0444 Fax:+54 11 4580 0440 www.trimer.com.ar [email protected] Estonia/Latvia/Lithuania Miltec Systems OÜ Tallin Tel: +372 5013997 Fax: +372 6442211 www.miltec.ee [email protected] Japan Turtle Marine Inc. Nagasaki Tel:+81 95 840 7977 Fax:+81 95 840 7978 www.turtle-marine.com [email protected] Spain Imnasa Marine Products Girona Tel:+34 902 300 214 Fax:+34 902 300 215 www.imnasa.com [email protected] Australia AMI Sales Freemantle, WA Tel:+61 89 331 0000 Fax:+61 89 314 2929 [email protected] Finland Nautikulma OY Turku Tel:+358 2 2503 444 Fax:+358 2 2518 470 www.nautikulma.fi nautikulma@ nautikulma.fi Malta S & D Yachts Ltd. Cali Tel:+356 21 339 908 Fax:+356 21 332 259 www.sdyachts.com [email protected] Sweden Sleipner AB Strömstad Tel:+46 526 629 50 Fax:+46 526 152 95 www.sleipnerab.se [email protected] France Kent Marine Equipment Nantes Tel:+33 240 921 584 Fax:+33 240 921 316 www.kent-marine.com [email protected] NewZealand Advance Trident Ltd. Auckland Tel:+64 9 845 5347 Fax:+64 9 415 5348 www.advancetrident.com [email protected] Switzerland Senero AG Winterthur Tel:+41 52 203 66 55 Fax:+41 52 203 66 56 www.senero.ch [email protected] Germany Jabsco GmbH Norderstedt Tel:+49 40 535 373-0 Fax:+49 40 535 373-11 www.xylemflowcontrol.com [email protected] Norway Sleipner Motor AS Fredrikstad Tel:+47 69 30 00 60 Fax:+47 69 30 00 70 www.sleipner.no [email protected] Greece Amaltheia Marine Athens Tel:+30 210 2588 985 Fax:+30 210 2588 986 www.amaltheiamarine.com [email protected] Poland Taurus Sea Power SP. Z.O.O Gdansk Tel:+48 58 344 30 50 Fax:+48 58 341 67 62 www.taurus.gda.pl Singapore/Malaysia/Indonesia/ Vietnam/Phillipines Island Marine Services Pte Ltd Singapore Tel:+65 6795 2250 Fax:+65 6795 2230 www.island-marine.com [email protected] Austria G. Ascherl GmbH Hard, Bregenz Tel:+43 5574 899000 Fax:+43 5574 89900-10 www.ascherl.at [email protected] Benelux ASA Boot Electro Watergang Tel:+31 20 436 9100 Fax:+31 20 436 9109 www.asabootelectro.nl [email protected] Brazil Electra Service Ltda. Guaruja Tel:+55 13 3354 3599 Fax:+55 13 3354 3471 www.electraservice.com.br [email protected] Bulgaria Yachting BG Burgas tel: +359 56 919090 fax: +359 56 919091 www.yachting.bg [email protected] China/Hong Kong Storm Force Marine Ltd. Wanchai, Hong Kong Tel:+852 2866 0114 Fax:+852 2866 9260 www.stormforcemarine.com [email protected] Croatia Yacht Supplier Icici Tel:+385 51 704 500 Fax:+385 51 704 600 [email protected] Cyprus Ocean Marine Equipment Ltd Limassol Tel: +357 253 69731 Fax: +357 253 52976 [email protected] Denmark Gertsen & Olufsen AS Hørsholm Tel:+45 4576 3600 Fax:+45 4576 1772 www.gertsen-olufsen.dk [email protected] Iceland Maras EHF Reykjavik Tel:+354 555 6444 Fax:+354 565 7230 www.maras.is [email protected] India Indo Marine Engineering Co. Pvt. Ltd Pune, Maharashtra Tel:+91 20 2712 3003 Fax:+91 20 2712 2295 [email protected] Israel Atlantis Marine Ltd. Tel Aviv Tel:+972 3 522 7978 Fax:+972 3 523 5150 www.atlantis-marine.com [email protected] Italy Saim S.P.A. Assago-Milan Tel:+39 02 488 531 Fax:+39 02 488 254 5 www.saim-group.com Portugal Krautli Portugal Lda. Lisboa Tel:+351 21 953 56 00 Fax:+351 21 953 56 01 www.krautli.com [email protected] Russia Standarte Starbeyevo Tel:+7 495 575 67 23 Fax:+7 4 95 575 39 77 www.standarte.ru [email protected] South Africa PowerSol Cape Town Tel: +27 21 552 1187 Fax: +27 21 555 2503 [email protected] South Korea D-I Iindustrial Co Ltd Jinju-si, Kyungnam-do Tel: +82 55 755 9928 Fax: +82 55 755 9188 www.d-i.co.kr [email protected] Sleipner Motor AS • P.O. Box 591, N1612 Fredrikstad • Norway Tel: +47 69 30 00 60 • Fax: +47 69 30 00 70 [email protected] • www.side-power.com Taiwan Mercury Marine Supply Kaohsiung Tel:+886 7 3317 293 Fax:+886 7 3314 232 Turkey Denpar Ltd. Istanbul Tel:+90 212 346 1332 Fax:+90 212 346 1329 [email protected] UK/Ireland Sleipner Motor Ltd. South Brent Tel:+44 1364 649 400 Fax:+44 1364 649 399 [email protected] Ukraine Yachtglanz Marine Equipment Tel:+49 231 474 09 599 Fax:+49 231 474 11 594 www.yachtglanz.com [email protected] UnitedArabEmirates Teignbridge Propellers & Marine Equipment Co. Ltd. Dubai Tel:+971 4 324 0084 Fax:+971 4 324 0153 [email protected] USA/Canada/Carribean Imtra Corporation New Bedford, MA Tel:+1 508 995 7000 Fax:+1 508 998 5359 www.imtra.com [email protected]