1
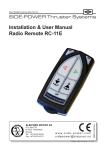
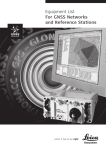
APS-3
HowtoUseYourAPS-3
Important
QuickStartGuide
Revision1.06
CongratulationsonyournewAPS-3System.ThisImportant
QuickStartGuidecontainsinformationyouneedtosetupand
beginusingyourAPS-3.
YourController,withSurvCE,hasbeen
preconfiguredforwirelesscommunicationwith
yourAPS-3 receiver(s).
TypicalBoxContents
ThefollowingareprovidedwithyourAPS-3System:
9
9
9
9
EachAPS-3GNSSReceivertypicallycomeswiththefollowing
preinstalleditems:
9 2xLithiumIonBattery
9 1x1GBSDCard
9 1xGSMSIMCardholder
9 1xInternalGSMWirelessModem
9 1xInternalUHFWirelessRadio
9 1xBluetooth
1xAPS-3BatteryChargerwithACAdapterPowerSupply
1xLEMO4pinPowerCable(10031)
1xLEMO5pintoFemaleDB9RS232ControllerCable(10029)
Press ON/OFFbuttontoturn
ONAPS-3.HoldON/OFFswitch
for5secondstoturnOFFAPS-3.
LED
ICON
BLUE
RED
RED
DataLogging
SoftReboot
GSM/GPRSCellularModemSIMCardperAPS-3
PCwithWindowsOS&SDCardReader
ON:EstablishedCommunication
OFF:Idlefordevicebonding
ON:RTKcorrectionsareavailable
OFF:NoRTKCorrections
ON:ReceiverisPowered
RapidFlash:BootUp
IntervalFlashing:TrackingSatellites
ON:ActiveDataLogging
OFF:InactiveDataLogging
Press twotimes<1sec.apart,andDataLoggingLED
turnsON/OFF
Press threetimes<1sec.apart,andSoftReboot
occurs
Press fourtimes<1sec.apart,andHardReboot
occurs
GREEN
Thefollowingadditionalequipmentisneededforbasicsetup:
STATUS
ORANGE
1xLEMO8pintoMaleDB9RS232SerialCable(10028)
1xControllerw/ACAdapterandSerialCable
1xCarlsonSurvCESoftware(preinstalledinController)
HardReboot
1
2
LEMOConnectors(BOTTOM)
FormatSDMemoryCard
PORT
PWR
SER1
SER2
#PINS
4
5
8
WARNING:TurnOFFAPS-3 when
Installing/removingtheSDCard.
FUNCTION
Ext.power
Controller/PC
Ext.Radio
GSM/GPRSCellularModem
TheAPS-3comeswithaninternalGSMcellularmodem.In
orderfortheGSMModemtotransmitandreceivedata,you
needaSIMCardwithadataserviceplan.
1. PurchaseandactivateSIMcardwithadataserviceplan
fromaGSM/GPRScellularcarrierofyourchoice.
2. InstallSIMcardinyourAPS-3andchecktheparametersto
ensureitworkscorrectlypriortofielduse.
SDMemoryandSIMCardCompartment(REAR)
TurnOFFAPS-3.PushSDCardtorelease
lockingmechanismandpulloutofslot
FAT32
UseSDMemoryCardReaderandWindows
FileSystem PCtoformatSDCardusingFAT32File
Format
System
SlideSDCardintheslotuntilitlocksinto
place
SIMCardInstallation
WARNING:TurnOFFAPS-3 when
installing/removingtheSIMCard
InstallUHFRadioAntenna,formattedSDCardand
activatedSIMcardbeforeturningONAPS-3.
AdditionalEquipmentRequired
x
x
REAR
APS-3PowerSwitchON/OFF&LEDInformation(FRONT)
OptionalItems:
9
9
9
FRONT
LOCK
Placecoinontheslot.Turn
clockwisetolockcompartment
&counterclockwisetounlock.
TurnOFFAPS-3.Pushyellowbuttonto
releaseSIMCardholder
UNLOCK
PlaceSIMCardinSIMHolder
Install/removeSDor SIMcardonlywhile
APS-3isturnedOFF.
FlipSIMCardHolderovertoinsertintothe
APS3SIMCardHolderslot.
SlideSIMCardHolderintheslotuntilitis
mountedflush.
3
4
APS-3BatteryRemoval,ChargeandInstallation
Completethefollowingstepsforremoval,chargeand
installationofAPS-3batteries.
Onefullychargedbatterycanbeusedupto5
hours.
Checkwhichbatteryis“inuse”beforeremoval.Seebattery
statusinSurvCEtoreplaceidlebattery.Instructionslocatedin
PowerorBatteryStatusIndicatorsectionofthismanuscript.
Pressreleasebuttontoopenbattery
compartmentdoor(FRONT)
CommunicatingwithAPS-3
ForWirelessBluetooth®communicationswiththeAPS3follow
thestepsbelowwithaController(Allegro,Archer,etc.).Refer
toAPS3UserManualforvariationsincontrollers.
YourController,withSurvCE,hasbeenpreconfigured
forwirelesscommunicationwiththeAPS-3
receiver(s).
1. TurnONtheAPS-3.TheREDLEDwillturnONandthe
GREENLEDGNSSSatellitestartstoblink.
2. TurnONtheControllerandRunSurvCEsoftware.
ToReplacebattery.Pullthebatteryoutor
pushtoreleasethebatterytoslideoutand
closethecompartmentdoor
Tochargebattery.PlugtheACwallbattery
chargerintothewallsocketandpowerLED
turnsON
PlaceAPS-3batteryinchargerfor2hours
oruntilLEDturnsGREENforfullcharge.RED
LEDindicatesbatterynotfullycharged.
ToloadbatteryinAPS-3.Slidethebatteries
intheslotandclosecompartmentdoor.
CheckbatterystatusinSurvCE.
Serialcablecommunicationtakesprecedenceover
Bluetooth®.RemovetheserialcablefromSER1port
forBluetoothtoresume.
RegisterSurvCEathttp://www.carlsonsw.com/
3. GototheEquiptabandselectGPSRover.
4. IntheCurrentTab,selectManufacturer:AltusandModel:
APS-3
5. IntheCommsTab,selecttheproperAPS-3unitfor
connection.APS-3_####,where####isproductserial
numberlocatedunderneaththereceiver.Clickon
Bluetooth®buttoninupperrighthandcornerofscreento
bondwithyourAPS-3.
6. IftheAPS3nameisnotlistedselectConfigure.
7. ThenselectFindReceiver,andaBluetooth®Devicesearch
occurs.HighlighttheAPS3namethenselectthe
Bluetooth®buttontobond.
5
6
SIMCard
FollowthestepsbelowtoverifythattheGSM/GPRSModem
workscorrectlywithyouractivatedSIMCard.
1. EstablishcommunicationwithAPS-3usingSurvCE
2. SelectEquiptabandthenGPSRover
3. GPSRoverwindowcomesupandselectRTKtab
x SelectDevice:InternalGSMandConfigurebuttonfor
InternalGSM.SelectaProviderandInputAPNServer
forconnection.
PowerorBatteryStatusIndicator
UseSurvCEtocheckAPS-3batterystatus.InEquipTab,select
GPSRoverorGPSBaseStationbutton.
x
x
x
x
x
ConfigureSIMcardforInternalGSMmodem
onlyonceperserviceprovider.
SelectproperNetworkconnectionandConfigure.
o TCP/IPDirect|UDP/IPDirect|NTRIP|
SpiderNet|DirectDial
SelectMessageType:
o CMR|CMR+|RTCMV2.3|RTCMV3.0
SelectBaseIDandcheckboxtoSendRoverPositionto
NetworkforVRSNetwork.
SelectCheckbuttononupperrighthandcorner
FlashingorangeRTKLEDindicatesAPS3isreceiving
corrections
Clickon
button
forAPS-3GNSS
Firmware&Battery
Statusdetails.
Batteryinformationis
notavailablewhen
usingexternalpower.
QuestionsorComments
PleasecontactALTUSPositioningSystems:
Email: [email protected]
Web: http://www.altusps.com/
Phone: 310.541.8139
WARNING:IncorrectProviderandAPNServerwill
resultinerror.
7
8