1
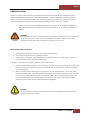
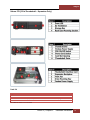
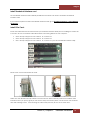
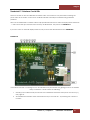
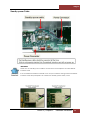
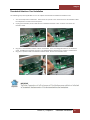
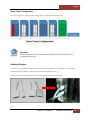
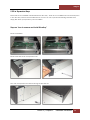
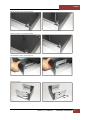
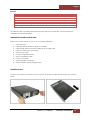
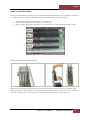
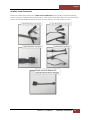
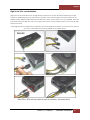
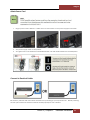
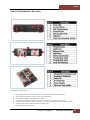
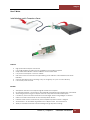
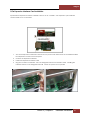
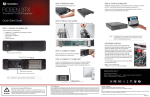
Roben-3
User Manual
Thunderbolt™ to PCIe Expansion & PCIe to PCIe Expansion
ROBEN-3
Magma
Table of Contents
Preface ..................................................................................................................................5
Advisories ............................................................................................................................ 5
Safety Instructions ................................................................................................................ 6
Protecting Against Electrostatic Discharge ................................................................................ 7
Chapter 1
Introduction ......................................................................................................8
Roben-3 Thunderbolt ............................................................................................................. 8
Add a Mac mini ..................................................................................................................... 8
3 Variants of Roben 3 - Thunderbolt ........................................................................................ 8
Expansion Board and Backplane .............................................................................................. 9
PCI Express Features ............................................................................................................. 9
Thunderbolt Features............................................................................................................. 9
24 Lanes Available for 3 PCIE slots .......................................................................................... 9
Roben 3 – Thunderbolt Specifications .................................................................................... 10
Pre-Installation Information .................................................................................................. 11
Tools Required for Installation .............................................................................................. 11
Chapter 2
Hardware Installation......................................................................................11
Roben-3TX (3 Slot Thunderbolt – Expansion Only) .................................................................. 12
Parts List ........................................................................................................................ 12
Installation-Procedures Overview ....................................................................................... 13
Open Enclosure ............................................................................................................... 13
Install Thunderbolt Interface card ...................................................................................... 14
Install PCIe Cards ............................................................................................................ 14
Auxiliary Power Connectors ............................................................................................... 15
High Power PCIe card installation ....................................................................................... 16
Attach Power Cord ........................................................................................................... 17
Connect to Electrical Outlets ............................................................................................. 17
Connect Thunderbolt Cable ............................................................................................... 18
Powering On and Off the Expansion Unit ............................................................................. 18
Verify Hardware Connection .............................................................................................. 19
Thunderbolt™ 1 Interface Card & LEDs ............................................................................... 19
Thunderbolt™ 2 Interface Card & LEDs .............................................................................. 21
Backplane & LEDs ............................................................................................................ 24
Link and Activity LEDs ...................................................................................................... 24
PCIE SLOT Link up LEDS ................................................................................................... 25
Activity LEDs ................................................................................................................... 25
Roben 3 | 2
Magma
Standby-power Cable .......................................................................................................... 26
Thunderbolt Interface Card Installation .................................................................................. 27
Internal Front Fan (Control Settings) ..................................................................................... 28
Daisy Chain Configuration .................................................................................................... 29
Attaching Displays ............................................................................................................... 29
5.25-in Expansion Bays........................................................................................................ 30
Steps on “how to remove and install Drive Bay” .................................................................. 30
Roben-3TS (3 Slot Thunderbolt – Storage) ............................................................................. 34
Installation-Procedures Overview ....................................................................................... 35
Open Enclosure ............................................................................................................... 35
Install Thunderbolt Interface card ...................................................................................... 36
Storage Drive Installation ................................................................................................. 36
Controller Card Installation ............................................................................................... 38
Install PCIe Cards ............................................................................................................ 39
Auxiliary Power Connectors ............................................................................................... 40
High Power PCIe card installation ....................................................................................... 41
Attach Power Cord ........................................................................................................... 42
Connect to Electrical Outlets ............................................................................................. 42
Connect Thunderbolt Cable ............................................................................................... 43
Power On Computer ......................................................................................................... 43
Verify Hardware Connection .............................................................................................. 43
3TM (3 Slot Thunderbolt – Mac mini) ..................................................................................... 44
Parts List ........................................................................................................................ 45
Installation of Mac mini .................................................................................................... 45
Connect Cable ................................................................................................................. 46
Attach Power Cord ........................................................................................................... 47
Power On Computer ......................................................................................................... 47
Verify Connection ............................................................................................................ 47
Lockable ILok ..................................................................................................................... 47
Installation of ILok Security Lock ....................................................................................... 48
PCIe Expansion and Host Interface Cards ............................................................................... 49
How it Works................................................................................................................... 50
PCIe Expansion Interface Card Installation .......................................................................... 51
PCIe Host Interface card Installation .................................................................................. 52
To Disconnect Ipass Cable ................................................................................................ 54
Plug-in Power Cord .......................................................................................................... 54
Powering on and powering off the unit ................................................................................ 54
Roben 3 | 3
Magma
To Turn ON ..................................................................................................................... 54
To Turn Off ..................................................................................................................... 55
Verify Connection ................................................................................................................ 55
Rack-Ears Installation .......................................................................................................... 56
Rackmount and Storage Kits................................................................................................. 57
Securing the Top Cover........................................................................................................ 58
Chapter 3
Verify Installation............................................................................................59
Hardware ........................................................................................................................... 59
Verify Link Status on Models: 3TX, 3TS and 3TM ................................................................. 59
Thunderbolt™ 1 ............................................................................................................... 59
Thunderbolt™ 2 ............................................................................................................... 60
Software ............................................................................................................................ 61
How to check Magma device - Mac OS X ............................................................................. 61
How To Check PCIe cards - Mac OS X ................................................................................. 63
Thunderbolt Aware Driver is required for PCIe cards............................................................. 64
How to Check Magma Device - Windows 7 and 8 ................................................................. 66
How To Check PCIe cards - Windows7 and 8 ....................................................................... 67
How to Configure SAS / SATA Raid .................................................................................... 69
Disk Utility on Mac OS X ................................................................................................... 76
Start Disk Utility .............................................................................................................. 77
Disk Management on Windows OS ..................................................................................... 79
What is Disk Management? ............................................................................................... 79
How To Access Disk Management ...................................................................................... 79
Chapter 4
Troubleshooting ..............................................................................................83
Chapter 5
How to Get More Help ......................................................................................88
Contacting Technical Support ............................................................................................... 88
Shipping or Transporting of Expansion Unit with PCI / PCIe cards.............................................. 88
Returning Merchandise to MAGMA ......................................................................................... 88
Roben 3 | 4
Magma
Preface
Advisories
Five types of advisories are used throughout this manual to provide helpful information, or to alert you to
the potential for hardware damage or personal injury.
NOTE
Used to amplify or explain a comment related to procedural steps or text.
IMPORTANT
Used to indicate an important piece of information or special “tip” to help you
CAUTION
Used to indicate and prevent the following procedure or step from causing damage to the
equipment.
WARNING
Used to indicate and prevent the following step from causing injury.
DANGER or STOP
Used to indicate and prevent the following step from causing serious injury or significant
data loss
Disclaimer: We have attempted to identify most situations that may pose a danger, warning, or caution
condition in this manual. However, Magma does not claim to have covered all situations that might require
the use of a Caution, Warning, or Danger indicator.
Roben 3 | Preface 5
Magma
Safety Instructions
Always use caution when servicing any electrical component. Before handling the Magma Expansion
chassis, read the following instructions and safety guidelines to prevent damage to the product and to
ensure your own personal safety. Refer to the “Advisories” section for advisory conventions used in this
manual, including the distinction between Danger, Warning, Caution, Important, and Note.
§
Always use caution when handling/operating the computer. Only qualified, experienced,
authorized electronics personnel should access the interior of the computer and expansion
chassis.
WARNING
Never modify or remove the radio frequency interference shielding from your workstation or
expansion unit. To do so may cause your installation to produce emissions that could
interfere with other electronic equipment in the area of your system.
When Working Inside a Computer
1.
2.
3.
Before taking covers off a computer, perform the following steps:
Turn off the computer and any peripheral devices.
Disconnect the computer and peripheral power cords from their AC outlets or inlets in order to
prevent electric shock or system board damage.
In addition, take note of these safety guidelines when appropriate:
§
§
To help avoid possible damage to systems boards, wait five seconds after turning off the computer
before removing a component, removing a system board, or disconnecting a peripheral device
from the computer.
When you disconnect a cable, pull on its connector or on its strain-relief loop, not on the cable
itself. Some cables have a connector with locking tabs. If you are disconnecting this type of cable,
press in on the locking tabs before disconnecting the cable. As you pull connectors apart, keep
them evenly aligned to avoid bending any connector pins. Also, before connecting a cable,
make sure both connectors are correctly oriented and aligned.
CAUTION
Do not attempt to service the system yourself except as explained in this manual. Follow
installation instructions closely.
Roben 3 | Preface 6
Magma
Protecting Against Electrostatic Discharge
Electrostatic Discharge (ESD) Warning
Electrostatic Discharge (ESD) is the enemy of semiconductor devices. You should always
take precautions to eliminate any electrostatic charge from your body and clothing before
touching any semiconductor device or card by using an electrostatic wrist strap and/or
rubber mat.
Static electricity can harm system boards. Perform service at an ESD workstation and follow proper ESD
procedures to reduce the risk of damage to components. Magma strongly encourages you to follow
proper ESD procedures, which can include wrist straps and smocks, when servicing equipment.
You can also take the following steps to prevent damage from electrostatic discharge (ESD):
•
When unpacking a static-sensitive component from its shipping carton, do not remove the
component’s anti-static packaging material until you are ready to install the component in a
computer. Just before unwrapping the anti-static packaging, be sure you are at an ESD
workstation or are grounded.
•
When transporting a sensitive component, first place it in an anti-static container or packaging.
•
Handle all sensitive components at an ESD workstation. If possible, use anti-static floor pads and
workbench pads.
•
Handle components and boards with care. Don’t touch the components or contacts on a board.
Hold a board by its edges or by its metal mounting bracket.
Roben 3 | Preface 7
Magma
Chapter 1
Introduction
Roben-3 Thunderbolt
The ROBEN-3 is available in THREE model configurations offering unique features for full customization. The
ROBEN-3
3 basic model offers the potential of (2) 5.25
5.25-in expansion bays, while the ROBEN-3 storage model
offers (8) 2.5-inch
inch hot swappable bays, and finally the ROBEN
ROBEN-3
3 Mac Mini version allows for a direct
integration of an Apple Mac Mini, making it the most versatile Thunderbolt™ product ever offered by
Magma.
The ROBEN-3 has a rack-mountable aluminum
luminum chassis designed for integrated removable storage
expansion, with room for up to 8 hot pluggable 2.5” SSD, SAS or SATA hard drives. This added power can be
channeled through lightning fast Thunderbolt technology at 10Gbps, with the option of 20Gbps bandwidth
with the roll-out
out of Thunderbolt 2 capable devices like the new Mac Pro. With 3
3-Slot
Slot PCIe and internal
storage expansion, ROBEN-3
3 enables the serious audio professional to transform their computer into a
powerful workstation - a sidekick for the creative hero.
Add a Mac mini
ROBEN-3
3 will also allow you the option to host a Mac mini within the chassis creating an integrated
rackmount server with direct Thunderbolt connection to 3
3-slot PCIe expansion slots. Mac mini external
connectivity is provided through the front and rear panels, including a secure II-Lok
Lok housing allowing you to
lock your valuable application or plug-in
in licenses right to the chassis.
3 Variants of Roben-3 Thunderbolt
Description
Product Name
3TX
3 Slot Thunderbolt (Exp
(Expansion Only)
3TS
3 Slot Thunderbolt (Storage)
3TM
3 Slot Thunderbolt (Mac mini)
Roben 3 | Chapter 1
Introduction 8
Magma
Expansion Board and Backplane
PCI Express Features
•
•
•
Supports three full-length cards
Physical connectors are x16
Each slot is x8 Gen 2 (or Gen 3)
Thunderbolt Features
•
•
•
•
High-speed Thunderbolt connection – Thunderbolt™ 1: 10Gbps , Thunderbolt™ 2: 20Gbps
Dual channel, with support for PCIe and DisplayPort protocols
Automatic power-up control by computer
Daisy-chain or end-point device
24 Lanes Available for 3 PCIE slots
Roben 3 | Chapter 1
Introduction 9
Magma
Roben-3 Thunderbolt Specifications
Item
Technology
Backplane
Thunderbolt™ 1, Interconnect Bandwidth
Thunderbolt™ 2, Interconnect Bandwidth
Host Connection
Cable
Enclosure
System Cooling
Power Supply for Roben-3TS & 3TX
Power Supply for Roben-3TM
Environmental
MTBF
Regulatory Compliance
Thunderbolt™ 1, Supported OS
Thunderbolt™ 2, Supported OS
Warranty
Description
PCI Express Bus Specification Revision 2.0
PCI Local Bus Specification Revision 2.3
PCI Bridge Architecture Revision 1.2
(3) available full length/full height expansion slots, X8 PCIe Gen 2.0
Electrical - x8 PCIe
Physical – x16 PCIe
10Gbps (1.25 GB/s) Bi-directional
20Gb/s (2.25 GB/s) Bi-directional
Host Side: Any Thunderbolt equipped computer with one or more
Thunderbolt ports
Expansion side: Two Thunderbolt connectors supporting one host
connection and one daisy chain out port / display port.
Thunderbolt cable sold separately
2U Aluminum Desktop – Black
14.25” Wide x 3.48” High x 17” Deep (363mm x 88.4mm x 432mm)
8.5 lbs or 3.6Kg
Tool-less cover removal. White power-on indicator front panel light
One 80mm 33.4 CFM Expansion Cards/Backplane Fan
Variable speed thermistor control option (or full speed)
520 W standard, 100-240V, 50-60Hz Power Input
Four 4-pin Molex Connector
Two 6-pin + PCIe connector
Input Frequency: 50-60HZ
DC Output: 540 Watts Max
+12V
43A
-12V
.5A
+5V
20A
+3.3V
20A
+5Vsb
2.5A
Total on +3.3V and 5V must not exceed 100W
250-Watt power Supply
AC Input: 100-240VAC
Input Frequency: 50-60HZ
Input Current: 8.0A Max
DC Output: 540 Watts Max
+12V 43.0A maximum
-12V .5A maximum
+5V 20.0A maximum
+3.3V 20.0A maximum
+5Vsb 2.5A maximum
Total power on +3.3V and 5V must not exceed 100W max
Ambient Temperature 0° to 50° C**Storage Temperature -55° to 125°
C
Relative Humidity 5% to 85% non-condensing
35k hours
FCC Class A Verified
CE
RoHS Compliant
Windows 7, 8, Server and Mac 10.6.8 or higher
Windows 7, 8, Server and Mac 10.9.8 or higher (10.8 below not
supported)
30 day money back guarantee. 1 Year Return to factory
Roben 3 | Chapter 1
Introduction 10
Magma
Pre-Installation Information
Before using the Magma Expansion chassis you should perform the following steps:
•
•
•
Inventory the shipping carton contents for all of the required parts
Gather all of the necessary tools required for installation
Read this manual
Tools Required for Installation
To complete the installation of the Magma product you will need a Phillips-head screwdriver and ESD wrist
strap to prevent electrostatic discharge.
Chapter 2
Hardware Installation
The following steps will guide you through the installation of your Magma Expansion System.
Roben 3 | Chapter 2
Hardware Installation 11
Magma
Roben-3TX (3 Slot Thunderbolt – Expansion Only)
Parts List
Qty
1
1
1 set
Item
Power Cord
Thunderbolt Interface Card (Installed)
Rackmount Kit (Optional). For Roben-3 Rackmount model, see page 53
Thunderbolt cable is not included
Roben 3 | Chapter 2
Hardware Installation 12
Magma
Installation-Procedures Overview
Below is the concise version on how to set up the Roben-3TX
1.
2.
3.
4.
5.
6.
7.
8.
9.
Open Enclosure
Install Thunderbolt Interface card(if not installed)
Install PCIe cards (see notes below)
Attach Power Cord
Connect to Electrical Outlet
Plug in Thunderbolt Cable
Power on Computer
Hardware Check
Verify Installation (via Operating System)
NOTE
It is highly recommended to install 3rd party PCI-E cards / High Power PCIe cards after you
have verified and tested that the Magma expansion chassis is functional and free of
hardware failures.
When installing 3rd Party PCIe card, start with one card first just to see if there are any software and/or
hardware issues or incompatibility problems that may occur. This way you can troubleshoot the problem
more easily and efficiently. If everything works well and there are no configuration issues, you can proceed
with the installation of the remaining 3rd party PCIe cards.
Always refer to or read “3rd party manufacturer installation guide” for further instructions
Open Enclosure
Loosen the thumbscrew that retains the top cover of the chassis and slide the lid towards you as shown
below:
Roben 3 | Chapter 2
Hardware Installation 13
Magma
Install Thunderbolt Interface card
The thunderbolt Interface card is already installed for this model. No need to install the Thunderbolt
Interface card.
If you need to replace or install a Thunderbolt Interface card, go to Thunderbolt Interface card Installation
on page 27.
Install PCIe Cards
Some card manufacturers recommend that you install their software driver prior to installing the card. If this
is the case, be sure to install the card driver before connecting Roben-3to the computer.
•
•
•
Slot 3 accepts all types of PCIe cards x1, x2, x4, x8 or x16
Slot 2 accepts all types of PCIe cards x1, x2, x4, x8 or x16
Slot 1 accepts all types of PCIe cards x1, x2, x4, x8 or x16 (next to Thunderbolt interface card)
Remove slot covers and install PCIe cards.
Make sure that all cards are fully seated in their connectors. When correctly seated, there will be a firm
resistance when you pull up gently on the card. To keep the cards in place, secure them in the enclosure
with their retaining screws. After securing the cards verify that they do not touch each other.
Roben 3 | Chapter 2
Hardware Installation 14
Magma
Auxiliary Power Connectors
Some PCIe cards require extra power. Roben-3TX and Roben-3TS power supplies provide the following
power connectors / adapters (see pictures below). There are five 4-pin Molex AUX power connectors that
can be used for providing extra power to cards. And two (6+2 pin) PCIe connectors for GPUs.
Roben 3 | Chapter 2
Hardware Installation 15
Magma
High Power PCIe card installation
High Power PCIe cards also known as High End PCIe cards such as GPUs and other similar type of card
requires an additional power (or AUX Power) to operate. Most of these High power PCIe cards have an
auxiliary power adapter cables that are included with it when you buy them. If it is not available, there are
6-pin PCIE connectors built in to the power supply that can be used to provide power to your GPUs or High
Power PCIe cards.
Other High power PCIe cards may use different Aux power adapter connectors. You can connect them to
any of the 4-pin Molex connectors available on the power supply.
Roben 3 | Chapter 2
Hardware Installation 16
Magma
Attach Power Cord
1.
Plug in power cord to Roben-3. Make sure the Power Switch on the power supply is turned OFF.
2.
3.
Turn power supply switch to ON position.
Two green LED on the Interface card are illuminated. No LEDs are illuminated on the backplane.
Connect to Electrical Outlets
Be cautious, practice safe and correct methods when powering up your expansion unit. Before powering
ON the system make sure all PCIe cards are seated properly into the card slots.
Roben 3 | Chapter 2
Hardware Installation 17
Magma
Connect Thunderbolt Cable
Attach Thunderbolt cable into either top or bottom port on the Roben-3. Plug in Display Monitor, DVI/HDMI,
or Display. If no display will be used, you can daisy chain other Thunderbolt devices. Plug in the other end
of the Thunderbolt cable to the Thunderbolt port on the computer.
Connect the Thunderbolt cable to one of the ports on the back of Roben-3 and connect the other end of
the cable to the Thunderbolt port on the computer. You can use the available Thunderbolt port for
attaching a Thunderbolt device or an external display monitor.
Powering On and Off the Expansion Unit
Roben-3 will automatically turns ON when the computer is turned ON. A White light located on the front
panel will shine when the expansion chassis is ON. Roben-3 will automatically turn OFF when the computer
is turned OFF or goes into Standby mode. If either end of the Thunderbolt cable is removed while the
system is ON, the expansion chassis will automatically power down.
Roben 3 | Chapter 2
Hardware Installation 18
Magma
The White light on the front of Roben-3 is not an ON (On-off push button), it simply indicates whether the
chassis is on or off. If either end of the Thunderbolt cable is disconnected, Roben-3 will automatically turn
off.
Verify Hardware Connection
Check the status of the LEDs on the Interface cards and backplane to verify good connection or link
between your host computer and expansion unit
1.
2.
Thunderbolt™ 1 interface card: 5 solid green LEDS are illuminated and three solid green LEDs on
the backplane. For more details see “Thunderbolt™ 1 Interface Card” below.
Thunderbolt™ 2 Interface Card: 7 solid green LEDs are illuminated and 3 solid green LEDs on the
backplane. For more details go to “Thunderbolt™ 2 Interface Card on page 21”.
Thunderbolt™ 1 Interface Card & LEDs
When the Thunderbolt™ 1 Interface card is fully operational and with an external Display device
attached, 5 green LEDs are illuminated (solid green), see FIGURE T1-A .
IMPORTANT
If you are only seeing Two Green LEDs that are illuminated on the Thunderbolt Interface
card after the Magma Roben-3 is turned on, this indicates that there a hardware failure
within your expansion unit. Check your Thunderbolt cable, make sure it is connected firmly
and the Thunderbolt Interface card is seated in the PCIE slot properly.
FIGURE T1-A
Roben 3 | Chapter 2
Hardware Installation 19
Magma
FIGURE T1-B
FIGURE T1-C
Roben 3 | Chapter 2
Hardware Installation 20
Magma
Thunderbolt™ 2 Interface Card & LEDs
There are 10 LEDs on the Thunderbolt™ 2 Interface card. These LEDs are very essential in checking the
power status of the board. It also serves as failure indicators and helps in troubleshooting hardware
problems.
When the Thunderbolt™ 2 Interface card is fully operational and with an external Display device attached
, 7 solid Green LEDs (D1,D3,D4,D5,D6,D7 and D9) are illuminated. See picture on FIGURE T2-A.
If you don’t have an external display attached, only 5 Green LEDs are illuminated. See FIGURE T2-B.
FIGURE T2-A
If the above LEDs are not coming ON, it is an indication that your board is not getting power or the board is
faulty or defective. Please check the following:
1.
2.
Standby-power cable is firmly connected to Thunderbolt™ 2 Interface card power connector (J7).
See page 25.
Thunderbolt™ 2 Interface card is seated all the way in the PCIe slot. Try reseating the card in the
PCIE slot.
Roben 3 | Chapter 2
Hardware Installation 21
Magma
If there is no Display Monitor attached to Thunderbolt™ 2 Interface card it would only show 5 illuminated
solid GREEN LEDs (D3, D4,D6,D7 and D9), this is normal. See FIGURE T2-B below.
If you reconnected an external Display device, LEDs D1 and D5 should come on immediately. Otherwise,
the Thunderbolt™ 2 Interface card is not properly working or the monitor DisplayPort cable is faulty.
FIGURE T2-B
Thunderbolt™ 2 Interface Card LEDs: Functional Mode - without external display device attached
Roben 3 | Chapter 2
Hardware Installation 22
Magma
LEDs D6 and D8 are illuminated when power cord is attached to expansion unit. This means the expansion
unit is on standby-mode. The magma device is” switched off” on the electronic interface (but it draws
some power). On standby mode the Magma is not performing its primary function; it is waiting to be
activated by a remote power or remote controller. See picture below.
FIGURE T2-C
If the above LEDs are not coming ON, please check the power standby cable make sure it is firmly
connected to Thunderbolt Interface card power connector (J7). See page 25.
Thunderbolt™ 2 Interface Card LEDs: Standby-Mode
Roben 3 | Chapter 2
Hardware Installation 23
Magma
Backplane & LEDs
A functional / operational backplane will illuminate three solid green LEDs.
Link and Activity LEDs
Roben 3 | Chapter 2
Hardware Installation 24
Magma
PCIE SLOT Link up LEDS
Each PCIe slots have designated LED indicators. SLOT Link up LED illuminates when a PCIe card is installed.
Or when all of the PCIe slots are populated with PCIe cards all SLOT Link up LED should come on as shown
from the picture below.
Activity LEDs
Each PCIe slots have their own Activity LEDs indicator. When this LED comes on it signifies that the PCIe
card is executing a command or being used / accessed by the application. It comes on as “solid green”
and / or sometimes it blinks or flickers.
Roben 3 | Chapter 2
Hardware Installation 25
Magma
Standby-power Cable
IMPORTANT
Make sure the standby-power cable is connected to the backplane and Thunderbolt
Interface card.
If the Thunderbolt Interface card fails to turn ON you could be having a bad Thunderbolt
Interface card, faulty backplane or a defective standby-power cable / wires.
Roben 3 | Chapter 2
Hardware Installation 26
Magma
Thunderbolt Interface Card Installation
The following steps are applicable on how to replace and install a Thunderbolt Interface card.
1.
2.
3.
4.
Turn off the Expansion chassis first. Disconnect the power cord. Disconnect the Thunderbolt cable
from Expansion chassis or from computer.
Unplug the Interface power cable from Thunderbolt Interface card. Unscrew to remove the
interface card.
Plug-in the Thunderbolt Interface card in PCIE slot#0. This is the designated slot for the interface
card. Installing the Interface card in a non-designated slot will cause the system to malfunction.
Plug-in the power cable Thunderbolt Interface card. Secure the interface card.
Roben 3 | Chapter 2
Hardware Installation 27
Magma
Internal Front Fan (Control Settings)
Some PCI Express cards produce substantial heat and must be cooled properly to eliminate over heating
problem. One Fan is located in the front of the enclosure to provide cooling required for the hottest PCI
Express Cards. Some graphics cards GPU's require these fans to be at full capacity to prevent overheating.
As safety measure, Magma provides ROBEN-3 with the fan functioning at full speed (MAX). However, noise
is a concern for many applications. For noise sensitive applications, we have provided this Thermistor
setting (THERM) to help alleviate fan noise in situations when a low heat producing card is installed in
Magma Roben-3.
By default, the fan will run at maximum speed when the DIP Switch is to MAX that control fan speed. When
setting to Thermistor (THERM), the fan speed is controlled by the temperature inside the enclosure. Thermally
controlled fans will run at maximum speed when the Thermistor senses temperature at or above an upper
limit. Fans will run at minimum speed if the temperature is at or below lower limit.
To set the FAN (speed) locate the red DIP switch SW500 on the expansion board. MAX = Fan runs at fast
mode. THERM = Fan is set to Thermistor controlled.
The DIP switch SW500 controls the front fan of the Roben-3 expansion unit.
Roben 3 | Chapter 2
Hardware Installation 28
Magma
Daisy Chain Configuration
Here’s an example of a Daisy Chain Configuration of 6 Roben-3TX Expansion units
Attaching Displays
You can use an appropriate Display Port connector to add a Display Port, HDMI, DVI, or VGA Display.
The Display Port connector can plug into the other Thunderbolt port on -3
Make sure your display is plugged in and the appropriate adapter is connected.
Roben 3 | Chapter 2
Hardware Installation 29
Magma
5.25-in Expansion Bays
Roben-3TS has an available standard-sized 5.25" drive bay. There are two available area of reserved space
in the drive bay where removal media devices such as CD, DVD, optical and including hard disks and
floppy disk drives (or tape drives) can be installed.
Steps on “how to remove and install Drive Bay”
Remove Metal Bar
Remove left side ear of the expansion unit
Turn over the expansion unit after removing the left-side ear
Roben 3 | Chapter 2
Hardware Installation 30
Magma
Remove screws, see pictures below
Remove screws, see pictures below
Lift the drive carrier / mounting bay
Remove screws
Roben 3 | Chapter 2
Hardware Installation 31
Magma
Remove front plate cover
Once you have removed the front plate cover you can now install the 5.25” drive carrier, see pictures
below.
Install the drive carriers into the drive bays and secure it.
Put the drive bay back into the chassis
Secure the drive bay on the left side of the chassis.
Roben 3 | Chapter 2
Hardware Installation 32
Magma
Secure the drive bay on the bottom side of the chassis.
Roben 3 | Chapter 2
Hardware Installation 33
Magma
Roben-3TS (3 Slot Thunderbolt – Storage)
Chassis Features
1.
2.
Eight (8) 2.5” hot swap drive bays
Supports up to eight (8) SATA/SAS HDD or SSD drives.
Roben 3 | Chapter 2
Hardware Installation 34
Magma
Parts List
Qty
1
1
8
2
32
1 set
Item
Thunderbolt Interface card (Installed)
Power Cord
Drive Trays (Installed)
SAS Cable (Installed)
3mm Centering Screws for Drives (32 quantities)
Rackmount Kit (Optional). For Roben-3 Rackmount model, see page 53
Thunderbolt Cable, Controller card and Drives (SATA/ SSD) are not included. We recommend the
standard 2.5 in SSD or SATA drives.
Installation-Procedures Overview
Below is the concise version on how to set up the ExpressBox 2200.
1.
2.
3.
4.
5.
6.
7.
8.
9.
10.
Open Enclosure
Install Thunderbolt Interface card(if not installed)
Install Storage Drives (see drives installation) & Controller card
Install PCIe cards (see notes below)
Attach Power Cord
Connect to Electrical Outlet
Plug in Thunderbolt Cable
Power on Computer
Verify Hardware Connection
Verify Installation (via Operating System)
Open Enclosure
Loosen the thumbscrew that retains the top cover of the chassis and slide the lid towards you as shown
below:
Roben 3 | Chapter 2
Hardware Installation 35
Magma
Install Thunderbolt Interface card
The thunderbolt Interface card is already installed for this model. No need to install the Thunderbolt
Interface card
If you need to replace or install a Thunderbolt Interface card, go to Thunderbolt Interface card Installation
on page 27.
Storage Drive Installation
Install the disk drives first. Remove drive tray from the storage bay.
Roben 3 | Chapter 2
Hardware Installation 36
Magma
Roben 3 | Chapter 2
Hardware Installation 37
Magma
Disk Drive Controller Card Installation
Use a disk controller card that can support 8 drives. We recommend using Areca Controller card or a PCIe
controller card that is supported by Windows Operating system and Apple Mac OS X. And has an Apple
Thunderbolt compatible driver. Below are pictures of two Arecas PCIe Controller cards.
1.
2.
8-port Controller card support 8 drives.
4-port Controller card support 4 drives.
1.
Connect the SAS / SATA Cable to controller card.
a) If you have four drives installed you have to connect one SAS / SATA Cable to
controller card.
b) If you have 8 drives, connect two SAS / SATA cable.
NOTE: When installing four drives make sure to place them in one-bay location. The storage bays are
divided into two or four drives per bay.
2.
Plug-in controller card in any available PCIe slots and secure it.
3.
See Chapter for Hardware and Software Configuration
Roben 3 | Chapter 2
Hardware Installation 38
Magma
Install 3rd Party PCIe Cards
Some card manufacturers recommend that you install their software driver prior to installing the card. If this
is the case, be sure to install the card driver before connecting Roben-3to the computer.
•
•
•
Slot 3 accepts all types of PCIe cards x1, x2, x4, x8 or x16
Slot 2 accepts all types of PCIe cards x1, x2, x4, x8 or x16
Slot 1 accepts all types of PCIe cards x1, x2, x4, x8 or x16 (next to Thunderbolt interface card)
Remove slot covers and install PCIe cards.
Make sure that all cards are fully seated in their connectors. When correctly seated, there will be a firm
resistance when you pull up gently on the card. To keep the cards in place, secure them in the enclosure
with their retaining screws. After securing the cards verify that they do not touch each other.
Roben 3 | Chapter 2
Hardware Installation 39
Magma
Auxiliary Power Connectors
Some PCIe cards require extra power. Roben-3TX and Roben-3TS power supplies provide the following
power connectors / adapters (see pictures below). There are five 4-pin Molex AUX power connectors that
can be used for providing extra power to cards. And two (6+2 pin) PCIe connectors for GPUs.
Roben 3 | Chapter 2
Hardware Installation 40
Magma
High Power PCIe card installation
High Power PCIe cards also known as High End PCIe cards such as GPUs and other similar type of card
requires an additional power (or AUX Power) to operate. Most of these High power PCIe cards have an
auxiliary power adapter cables that are included with it when you buy them. If it is not available, there are
6-pin PCIE connectors built in to the power supply that can be used to provide power to your GPUs or High
Power PCIe cards.
Other High power PCIe cards may use different Aux power adapter connectors. You can connect them to
any of the 4-pin Molex connectors available on the power supply.
Roben 3 | Chapter 2
Hardware Installation 41
Magma
Attach Power Cord
1.
Plug in power cord to Roben-3. Make sure the Power Switch on the power supply is turned OFF.
2.
3.
Turn power supply switch to ON position.
Two green LED on the Interface card are illuminated. No LEDs are illuminated on the backplane.
Connect to Electrical Outlets
Be cautious, practice safe and correct methods when powering up your expansion unit. Before powering
ON the system make sure all PCIe cards are seated properly into the card slots.
Roben 3 | Chapter 2
Hardware Installation 42
Magma
Connect Thunderbolt Cable
Attach Thunderbolt cable into either top or bottom port on the Roben-3. Plug in Display Monitor, DVI/HDMI,
or Display. If no display will be used, you can daisy chain other Thunderbolt devices. Plug in the other end
of the Thunderbolt cable to the Thunderbolt port on the computer.
Connect the Thunderbolt cable to one of the ports on the back of Roben-3 and connect the other end of
the cable to the Thunderbolt port on the computer. You can use the available Thunderbolt port for
attaching a Thunderbolt device or an external display monitor.
Powering "On" the Computer
Roben-3 will automatically turns ON when the computer is turned ON. A White light located on the front
panel will shine when the expansion chassis is ON. Roben-3 will automatically turn OFF when the computer
is turned OFF or goes into Standby mode. If either end of the Thunderbolt cable is removed while the
system is ON, the expansion chassis will automatically power down.
The White light on the front of Roben-3 is not an ON (On-off push button), it simply indicates whether the
chassis is on or off. If either end of the Thunderbolt cable is disconnected, Roben-3 will automatically turn
off.
Verify Hardware Connection
You should see four (or Five) Green LEDS illuminated on the interface card and three on the backplane.
For more information on LEDs go to pages 18 to 25.
Roben 3 | Chapter 2
Hardware Installation 43
Magma
3TM (3 Slot Thunderbolt – Mac mini)
Additional Chassis Features
1.
2.
3.
4.
5.
6.
7.
Mounting bracket for internal housing of Mac mini (Mac mini sold separately).
Mac mini connectivity provide to front and rear panels.
Rear panel: 2 USB 3.0, 1 Gb Ethernet, 1 HDMI.
Front panel: 2 USB 3.0, 1 Firewire, 1 Audio in, 1 Audio out, power on/off button.
Lockable iLok secure location using one of the front panel USB ports (lock sold separately.
Single power cord for expansion slots and Mac mini.
Thunderbolt cable included
Roben 3 | Chapter 2
Hardware Installation 44
Magma
Parts List
Qty
Item
1
Thunderbolt Interface card (Installed)
1
Power Cord
1
Thunderbolt Cable (Installed)
1 set
Rackmount Kit (Optional). For Roben-3 Rackmount model, see page 53
Mac mini not included.
Installation of Mac mini
1.
Remove Top bracket
2.
Connect all Audio Cable, 4 USB Cables, HDMI cable, and Firewire cable, Ethernet Cable,
Thunderbolt Cable and Power to Mac mini.
3.
Place the Mac mini inside the chassis as shown from the picture below. Position the Mac mini
where all cables are facing towards the front end.
Roben 3 | Chapter 2
Hardware Installation 45
Magma
4.
Put the bracket to secure Mac mini.
Connect Thunderbolt Cable
1.
2.
Connect the thunderbolt cable to thunderbolt port on the back of the unit.
Connect the other end of the Thunderbolt cable to Mac mini thunderbolt port.
Roben 3 | Chapter 2
Hardware Installation 46
Magma
Attach Power Cord
Connect the power cord to the power receptacle on the back of the unit. The Mac mini does not have a
Rocker On/Off switch on the back of the unit.
Power On Computer
Roben-3 will automatically turns ON when the computer is turned ON. A White light located on the front
panel will shine when the expansion chassis is ON.
Roben-3 will automatically turn OFF when the computer is turned OFF or goes into Standby mode.
A. Two green LEDs on the Interface card are illuminated.
B. No LEDs are illuminated on the backplane.
Verify Connection
1. You should see four (or Five) Green LEDs illuminated on the interface card and three on the
backplane. For more information on LEDs go to pages 18 to 25.
Lockable ILok
This is another feature of Roben-3 Mac mini that allows you to lock your valuable application or plug-in
licenses right to the chassis. The Ilk security housing is located on the front panel USB port as shown from
the picture below.
IMPORTANT
The ILok security lock is sold separately and it comes with an installation guide.
Roben 3 | Chapter 2
Hardware Installation 47
Magma
Installation of ILok Security Lock
1.
Using a flat screwdriver, push the metal tab to remove from the notch as shown from the picture
below.
2.
Install or insert ILok into USB Port as shown from pictures below.
3.
Mount ILok Security lock
4.
Push the key and rotate counter clockwise until it stops as shown from the pictures below.
5.
Pull the Key out.
Roben 3 | Chapter 2
Hardware Installation 48
Magma
PCIe Expansion and Host Interface Cards
You can also use Expansion and Host Interface cards with your Roben-3 chassis. Ideal connection for small,
local networks that require high-speed PCIe connectivity.
•
•
•
•
Connect PCI Express Host to Expansion over cable
Support speeds up to 40Gbps
Use same PCIe interface card for both sides of the connection
Industry standard iPass cable
Use Magma’s PCI Express Expansion to create a super-fast PCIe connection outside the computer
The Roben-3 PCIe x8 Gen 2 Expansion is the perfect solution for creating a super-fast local PCIe connection
from a host computer to a target PCI Express device. The Magma 01-04978-03 interface card installs into
any x8 or x16 PCIe slot in the host computer motherboard and the other Magma 01-04978-03 interface
card can be inserted into a designated upstream PCIe slot. A high-speed iPass cable allows data transfers
to and from the host computer at 40Gbps.
Onboard Visual Diagnostic Features
Multiple LEDs and dip switches make debugging and troubleshooting easy. Visible LEDs show the PCIe link
width that each PCIe interface card is operating. Other LEDs for “Loss of Lock,” “Reset ON” and “Clock
Good” are useful visual indicators for troubleshooting and verifying the connection without expensive
software diagnostic tools.
Roben 3 | Chapter 2
Hardware Installation 49
Magma
How it Works
Features:
•
•
•
•
•
•
•
High-speed x8 PCI Express connection
Low profile bracket provides for easy installation in low profile computers
Easily visible LEDs indicate correct installation and PCIe link width
Low power consumption - less than 4 Watts
LEDs show status of connection for quick debug- reset indicator, clock indicator, link width
indicator
Supports Spread Spectrum Clocking, LOS (Loss of Signal), LOL (Loss of Lock Indicator)
Low Latency and Low Jitter
Benefits:
•
•
•
•
•
•
•
•
Transparent extension of PCI Express signals outside the computer
No software required - connection is automatically recognized and configured by system BIOS
Attach large power hungry PCI Express cards to computer with limited card space
Low latency PCIe connection between host and target without using bridges or switches
Same PCIe card used for both the host and expansion device
Interface Card can be used with any PCIe compliant expansion chassis - Magma
Automated x1, x4 and x8 link negotiation for PCI Express Gen1, Gen2 and Gen 3
Ability to override automatic PCIe link training through dip-switch settings
Roben 3 | Chapter 2
Hardware Installation 50
Magma
PCIe Expansion Interface Card Installation
By default the Expansion Interface card SW1 switch is set to “ON=EXP.” The expansion system will NOT
function if SW1 is set to OFF=HOST.
1.
2.
3.
4.
Turn off the Expansion chassis first. Disconnect the power cord. Disconnect the Thunderbolt cable
from Expansion chassis or from computer
Unscrew the Expansion Interface
Install new Expansion Interface card
Plug-in the card in PCIE slot#0. This is the designated slot for the interface card. Installing the
Interface card in a non-designated slot will cause the system to not operate
Roben 3 | Chapter 2
Hardware Installation 51
Magma
PCIe Host Interface card Installation
Begin the installation of your PCI Express (PCIe) host card by first powering down your computer.
The PCIe host card is a “half-height,” x8-capable PCIe card mounted to a “full-height” bracket as shown
below.
For low profile case applications, you may need to change the mounting bracket to the low profile bracket
that shipped with your system. This is done by removing the screws that hold the card to the bracket. Be
sure
you are using proper ESD procedures when completing this action.
WARNING
YOU MUST ONLY INSTALL THE PCIe HOST CARD INTO A PCI EXPRESS SLOT.
Only use Interface card WITH bracket. This will ensure that your PCIe host card can only be
inserted into a PCIe slot. Although PCI Express cards without brackets may fit into
conventional PCI slots, you run the risk of damaging the PCI Express host card if you insert it
into a PCI slot.
1.
2.
Once the host computer is off and all power cords are disconnected from the AC outlet, remove
the cover.
Check the red DIP switch (SW1) on the interface card, this should be set to OFF= HOST.
Roben 3 | Chapter 2
Hardware Installation 52
Magma
3.
Insert the PCI Express host card into a vacant x8 (or x16) PCIe slot by gently pushing the card until it
is firmly seated. Then secure the card to the slot with a mounting screw.
Connect Ipass Cable
Proper way of connecting the Ipass cable to Interface card, see pictures below.
1.
Connect the Ipass cable to Expansion port on the back of the unit.
Roben 3 | Chapter 2
Hardware Installation 53
Magma
2.
Connect the other end of the cable to host computer via Host Interface card.
To Disconnect Ipass Cable
1.
2.
Pull the green tab while slowly pulling out the cable from the interface card.
Failure to do so can break the connector inside the interface card, which can cause the system to
malfunction.
Plug-in Power Cord
1.
2.
Connect the power cord to the power receptacle on the back of the unit.
Before connecting the power cord make sure to turn off the switch.
Powering ON and powering OFF the unit
To Turn ON
1.
2.
Press the power supply Rocker switch to On position. The (I) symbol should be pressed down.
When the chassis power is on the unit is set to stand-by mode
Roben-3 will automatically turns ON when the computer is turned ON
Roben 3 | Chapter 2
Hardware Installation 54
Magma
To Turn Off (Always power down the Host computer first before the chassis.)
1.
Press Off or shutdown computer, Roben-3 will automatically turns OFF.
Verify Connection
Once you have installed the Interface cards correctly and both computer and expansion are running, the
next thing to do is to check the LED Link up status. Verify the following LEDs on the expansion and host
interface cards. Host Card and Expansion card with proper link established should show up with FIVE solid
green LEDs. The Interface card is plugged into X8 PCIe slot.
1.
You should see the following LEDs are illuminated:
a. Three green LEDs on the backplane
b. Four to Five green LEDs on the Expansion card
c. Four to Five green LEDs on the HOST card, which is installed inside the host computer
Roben 3 | Chapter 2
Hardware Installation 55
Magma
Rack-Ears Installation
1.
Remove the left and right metal brackets as shown from the pictures below.
2.
Mount Left and right rack ears. Use the existing screws on the unit to secure the rack ears.
3.
Mount the left and right extender rails to rear panel of the unit as shown from the pictures
below.
Roben 3 | Chapter 2
Hardware Installation 56
Magma
Rackmount and Storage Kits
Rackmount kit is composed of the following items (or sees pictures below)
1.
2.
3.
2 Front Rack Ears
2 Rear Inner Ears with SCREW M4
2 Rear Long Ears (7 inch extender) with 4 SCREWS 10
10-32
The Rackmount kit is available and included for the following Roben-3 Rackmount models.
1.
2.
3.
ROBEN-3TX Rackmount
ROBEN-3TM Rackmount
ROBEN-3TS Rackmount
Front Ear, QTY 2
Rear Inner Ear, QTY 2
Rear Ear Long (4 inch extender), QTY 2
Roben 3 | Chapter 2
Hardware Installation 57
Magma
Storage Kit comes with 32 screws for mounting the disk drives. This is only available for ROBEN-3TS
Rackmount Rackmount.
For disk drive installations go to page 26 or page 46.
Note: You can buy the Rackmount kit for standard Roben-3 Desktop model. Visit www.magma.com or
contact our Sales Team for pricing and availability.
Securing the Top Cover
It is best to secure the top cover with the three thumb screws on the back of the unit when carrying,
transporting or shipping the expansion unit. If required, additional retention of the cover may be achieved
using the four mounting holes under the enclosure.
NOTE: All Roben 3 models come with the 4 mounting screws (enclosed in a small plastic bag) for the option
of securing the bottom part of the cover to the chassis.
1.
Turn over the expansion chassis to expose the bottom part where the mounting holes are located as
shown for the pictures below.
2.
Install the screws to their designated mounting holes to secure the bottom part of the cover as shown
from the pictures below.
Roben 3 | Chapter 2
Hardware Installation 58
Magma
Chapter 3
Verify Installation
Hardware
Verify Link Status on Models: 3TX, 3TS and 3TM
Thunderbolt™ 1
When the Roben-3 unit is fully operational the following GREEN LEDs are illuminated (Solid Green).
•
•
•
•
Four Solid Green LEDs on Interface card are illuminated.
Five Solid Green LEDs are on, if an external display device is attached to Thunderbolt port of the
expansion unit.
Three Green LEDs on backplane.
SLOT 0 Link UP Led is illuminated. You would only see one SOLID Green LED if there are no PCIE
cards in the PCIE slots.
Roben 3 | Chapter 3
Verify Installation 59
Magma
Thunderbolt™ 2
When the Roben-3 unit is fully operational the following GREEN LEDs are illuminated (Solid Green).
•
•
•
•
•
7 Solid Green LEDs on Interface card are illuminated, with an external display device attached.
See Figure T2-D.
Five Solid Green LEDs are on, without an external display device is attached. See Figure T2-E
Three Green LEDs on backplane. See Figure T2-F.
SLOT 0 Link UP Led is illuminated if there are no PCIE cards in the PCIE slots. See Figure T2-G.
If all PCIe slots are populated with PCIe cards 4 LEDs are illuminated solid green. See Figure T2-H.
FIGURE T2-F
Roben 3 | Chapter 3
Verify Installation 60
Magma
Software
How to check Magma device - Mac OS X
To verify a successful installation of Magma Roben
Roben-3
3 on Mac select “About This Mac” under the Apple
Icon.
1.
Your first step will vary depending on which version of Mac OS X you are using:
Mac OS X 10.6.8 Snow Leopard
ard or earlier:
•
Open Apple System Profiler by choosing About this Mac from the Apple ( ) menu. Then, click
More Info.
OS X Lion 10.7 or later:
•
2.
Open System Information by choosing About this Mac from the Apple ( ) menu. Then, click
System Report
Click Thunderbolt.. This picture below applies to Thunderbolt™ 1 device.
Roben 3 | Chapter 3
Verify Installation 61
Magma
The picture below applies for Thunderbolt™ 2. “Tbolt2 Series” is the new device name for Thunderbolt™ 2.
IMPORTANT
Thunderbolt™ 2 requires Mac OS 10.9 and above. It is highly recommend to update your
Mac to the latest Operating system before using the Thunderbolt™ 2 hardware.
Roben 3 | Chapter 3
Verify Installation 62
Magma
How To Check PCIe cards - Mac OS X
IMPORTANT
For Mac OS, a driver modification is required from the PCIe card provider. A Mac OS driver
that is “Thunderbolt Aware” is required so the PCIe hardware will be recognized by Mac OS
through Thunderbolt™ Technology
1.
Your first step will vary depending on which version of Mac OS X you are using:
Mac OS X 10.6.8 Snow Leopard or earlier:
•
Open Apple System Profiler by choosing About this Mac from the Apple ( ) menu. Then, click
More Info.
OS X Lion 10.7 or later:
•
2.
Open System Information by choosing About this Mac from the Apple ( ) menu. Then, click
System Report
Click PCI cards
Roben 3 | Chapter 3
Verify Installation 63
Magma
Thunderbolt Aware Driver is required for PCIe cards
For Mac OS, a Thunderbolt Aware (Compatible) driver is required because it allows PCIe cards to be
detected in Roben-3. Ensure you have a “Thunderbolt Aware or Thunderbolt Compatible” driver from the
PCIe card manufacturer otherwise the PCIe card will not be functional.
If the driver is installed, make sure it supports Thunderbolt. If the driver does not support Thunderbolt you will
see a message “Driver Installed: No
Click on the specific PCIe card in question to see if it’s Thunderbolt Compatible. If it shows “Yes” then it’s
compatible, if it shows “No”, the PCIe card will not be visible in Roben-3.
System Profiler showing two PCIE cards with thunderbolt
compatible drivers installed
NOTE
Magma does not provide nor supply any third party PCIe drivers. If you need driver you
must contact the vendor or manufacturer of the PCIE card. If you would like to determine
whether the 3rd party PCIE card has a Thunderbolt Compatible driver or not you must also
contact the vendor or manufacturer of the PCIe card.
Roben 3 | Chapter 3
Verify Installation 64
Magma
System Profiler showing two PCIE cards with One PCIe card with
a non-thunderbolt driver installed
System Profiler showing no PCIe cards being detected or
recognized.
Roben 3 | Chapter 3
Verify Installation 65
Magma
How to Check Magma Device - Windows 7 and 8
Open ACPI (BIOS) à Open PCI BusàClick the ‘+’ sign several times until your reach a PCI Express Root Port
with a PCI Standard PCI-to-PCI Bridge beneath it.
If the verification is successful, you can install 3rd Party cards as well as auxiliary peripherals, such as hard
drives into the chassis.
If, however, the installation was unsuccessful, you may not see the PCI to PCI Bridge, or it will have a small
yellow symbol in front of it as shown below.
IMPORTANT
Magma requires no driver in Windows Operating System, Unix OS, Linux and other flavor of
Operating Systems.
Screenshot of Windows Device Manager showing Magma Thunderbolt
Expansion device is being recognized / detected (No PICe cards installed).
Roben 3 | Chapter 3
Verify Installation 66
Magma
How To Check PCIe cards - Windows7 and 8
No special drivers have been required for Thunderbolt compatibility with Windows 7. As a general rule, if
the PCIe card works in a workstation using Windows, it will most likely work with ExpressBox 3T, using
Windows.
Screenshot of Windows Device Manager showing Magma Thunderbolt
Expansion device is being recognized / detected with third party PCIe
card with driver installed and configured correctly
Roben 3 | Chapter 3
Verify Installation 67
Magma
IMPORTANT
Third party driver can be obtained from the manufacturer / vendor of the PCIe card.
Magma does not supply the driver for 3rd party PCIe card / hardware.
Screenshot of Windows Device Manager showing Magma Thunderbolt
Expansion device is being recognized / detected with third party PCIe
card with Error. This error indicates either the driver is not installed,
missing or corrupted.
Roben 3 | Chapter 3
Verify Installation 68
Magma
How to Configure SAS / SATA Raid
IMPORTANT
This chapter describes how to configure the disk controller card. This software configuration
is specific only to vendor Areca. Different vendors (i.e. ATTO, Intel, LSI and etc.) of disk
controller cards have their own software utility for RAID configuration and management. If
you are using a non-Areca card make sure to check with the vendor or manufacturer of
the card for further instructions.
Areca has its own Graphical User Interface for RAID configuration and management. You need to install
Archttp first, follow the instructions below
1.
2.
3.
4.
5.
6.
7.
8.
Go to http://www.areca.com.tw
Click Support & Downloads
Go to Driver / Utility, select Windows
Under "Windows-ArcHTTP" click, Version V2.3.4 to download
Save File "winhttp_V2.3.4_130325.zip"
Extract the File
Click Install.exe to install Archttp
After Installation, reboot Computer
NOTE: These steps are applicable to Windows 7, Windows 8 and Mac OSx. Use Firefox / Mozilla as your
Browser to launch the ARCHTTP.
Roben 3 | Chapter 3
Verify Installation 69
Magma
Roben 3 | Chapter 3
Verify Installation 70
Magma
Roben 3 | Chapter 3
Verify Installation 71
Magma
Roben 3 | Chapter 3
Verify Installation 72
Magma
Roben 3 | Chapter 3
Verify Installation 73
Magma
Roben 3 | Chapter 3
Verify Installation 74
Magma
Roben 3 | Chapter 3
Verify Installation 75
Magma
After completing the Raid setup you must activate the drive and create partition. Different Operating
Systems have their own utility for creating partitions. On Mac OS you have to use the Disk Utility. On
Windows you have to use Disk Management.
IMPORTANT
“The Disk Utility on Mac OSx and Disk Management on Windows OS” are applicable to all
disk controller cards / vendors.
Disk Utility on Mac OS X
What is Disk Utility?
Disk Utility is a free application that’s built into OS X that can perform lots of useful actions, is a multipurpose,
easy-to-use tool for working with hard drives and drive images. Disk Utility can erase, format, repair, and
partition hard drives, as well as create RAID arrays.
Where is Disk Utility?
Open up your Applications folder and open the Utilities folder.
The version and features of Disk Utility depend on the version of Mac OS X. The following image
demonstrates Disk Utility in Mac OS X.
The left pane shows the "disks" currently connected to your Mac. You'll see the hard drive that has the
Roben 3 | Chapter 3
Verify Installation 76
Magma
"Macintosh HD" partition. If you have additional internal hard drives or external hard drives connected to
your Mac, they too will be visible.
Start Disk Utility
Once you find Disk Utility, launch it and you should see a window something like the one below. Any drive
connected to your machine, internal or external, should appear in the menu on the left.
Roben 3 | Chapter 3
Verify Installation 77
Magma
Roben 3 | Chapter 3
Verify Installation 78
Magma
Disk Management on Windows OS
What is Disk Management?
Disk Management is an extension of the Microsoft Management Console that allows full management of
the disk-based hardware recognized by Windows. It is used to manage the drives installed in a computer like hard disk drives (internal and external), optical disk drives, and flash drives. Disk Management can be
used to partition drives, format drives, assign drive letters, and much more
How To Access Disk Management:
The most common way to access Disk Management is via Computer Management, see image below.
Roben 3 | Chapter 3
Verify Installation 79
Magma
Roben 3 | Chapter 3
Verify Installation 80
Magma
Roben 3 | Chapter 3
Verify Installation 81
Magma
Roben 3 | Chapter 3
Verify Installation 82
Magma
Chapter 4
Troubleshooting
Q: If the Thunderbolt card fails to power up, what should I check?
A: Check the power / stand-by cable; make sure it is firmly connected to the power receptacle of the
Thunderbolt Interface card.
Q: How do I know if Roben-3power supply is working?
A: If the Thunderbolt card is properly seated and connected, there should be 4 green LEDs lit on the
Interface card, 3 green LEDs lit on the backplane, and 1 green LINK LED is turned ON as shown below. This
picture below applies to Thunderbolt™ 1 expansion unit.
Roben 3 | Chapter 4
Troubleshooting 83
Magma
Q: How can I determine if the driver for my PCIe card is Thunderbolt Compatible?
A: Thunderbolt Tunneling is required for MacOS. In Apple System Profile, click on the specific PCIe card in
question to see if it’s Thunderbolt Tunnel Compatible. If it shows “Yes” then Thunderbolt tunneling has been
enabled and it is compatible. If it shows “No”, then the driver does not work through Thunderbolt and it is
not compatible. Even if the driver is not thunderbolt compatible the 3rd party PCIE card is still visible (as
shown from the picture below).
Q. My PCIe card is not getting detected when installed in 1st PCIE slot, what should I do?
Roben 3 | Chapter 4
Troubleshooting 84
Magma
A. Turn off the Laptop computer. Disconnect the Magma thunderbolt expansion unit form Laptop by
disconnecting the thunderbolt cable. Remove power cord from Magma. Remove and reseat PCIe card.
Reconnect the thunderbolt cable to Laptop. Plug-in power cord to Magma. Turn on the Laptop. This should
automatically turn on the Magma thunderbolt expansion unit. Check Apple System profiler or Windows
Device Manager to see if the PCIe card is detected or not.
Q: Can I daisy chain Roben-3with another Roben-3?
A: Yes, but realize that aggregate bandwidth is limited to 10Gbps through the Thunderbolt port and PCI
address and IO space can be limited so the type of cards installed in the chassis may limit the number that
can be daisy chained successfully.
If a daisy chain device doesn’t work; check to see if the Thunderbolt Cable is connected firmly into the
thunderbolt port (on the Magma Thunderbolt Card of Roben-3) and the power supply is also turned ON.
Also make sure each Thunderbolt Roben-3 is working and functional before attempting to daisy chain them
together.
Q: Will Roben-3show up in Apple System Profiler or Windows Device Manager without any PCIe cards
installed?
Yes.
In Apple System Profiler à Thunderbolt à Status: Connected à Roben-3. Picture below applies to
Thunderbolt™ 1.
In Apple System Profiler à Thunderbolt à Status: Connected à Roben-3. Picture below applies to
Thunderbolt™ 1
Roben 3 | Chapter 4
Troubleshooting 85
Magma
In Windowsà Control Panel à Device Manager à View by connection
You should see these three PCI-to-PCI bridges. Right click on it and select “Properties”, select Hardware Ids
from dropdown list, you should see PCI\Ven_111D
Q: My host computer is having problem linking up with the expansion chassis. I have both interface cards
installed and seated firmly in their corresponding slot; one is installed in the host computer PCIe slot and the
other one in the expansion PCIE slot. Is there something wrong with the Interface card?
Roben 3 | Chapter 4
Troubleshooting 86
Magma
A: When using the 01-04973-03, in which comes in pair, one should be set to OFF-host and the other is set to
ON-Exp.
1.
2.
3.
4.
There's a Red Dip switch on the interface card that must be set correctly in order to work. The
Red Dip switch is labeled SW1.
01-04973-03, SW1 when set to ON=EXP should be installed only inside the Magma Expansion
unit.
01-04973-03, SW1 when set to OFF=HOST should be installed inside the host computer.
If the 01-04973-03 cards are not set properly your computer won't link up with the Magma
expansion.
See photos below:
Roben 3 | Chapter 4
Troubleshooting 87
Magma
Chapter 5
How to Get More Help
You can visit the Magma Technical Support FAQ pages on the Internet at: www.magma.com/support/
Contacting Technical Support
Our support department can be reached by fax at (858) 530-2733 or by phone at (858) 530-2511. Support is
available Monday through Friday, 8:00 AM to 5:00 PM PT. When contacting MAGMA Technical Support
make sure to include the following information:
1. Exact and correct Magma Serial #
2. Service Ticket or Case # (if you already submitted an online request)
3. Computer Type & Model: Operating System
4. Make & Model of PCI/PCIe cards: Application
5. Problem description
When submitting an online technical support request always provide a valid working e-mail address, phone
number, shipping address and proper contact name. Check your e-mail for an automated response
containing the case # and updates. You can also visit our web site at: www.magma.com/support. For a
quick response, use the Technical Support and RMA Request Form available in the Support Section of the
website. Simply complete the form with all required information. Please make sure that your problem
description is sufficiently detailed to help us understand your problem.
Shipping or Transporting of Expansion Unit with PCI / PCIe cards
Any PCIe cards in should be removed (or not to be installed) prior to shipment to avoid or prevent possible
damage. Note: Expansion board and PCIe / PCI cards that arrive damaged in shipment will not be
covered under warranty.
Returning Merchandise to MAGMA
If factory service is required, a Service Representative will give you a Return Merchandise Authorization (RMA) number.
Put this number and your return address on the shipping label when you return the item(s) for service. Magma will return
any product that is not accompanied by an RMA number. Please note that Magma WILL NOT accept COD packages,
so be sure to return the product freight and duties-paid.
Ship the well-packaged product to the address below:
Attention:RMA # ________, MAGMA
9918 Via Pasar
San Diego, CA 92126
USA
It is not required, though highly recommended, that you keep the packaging from the original shipment of your Magma
product. However, if you return a product to Magma for warranty repair/ replacement or take advantage of the 30-day
money back guarantee, you will need to package the product in a manner similar to the manner in which it was
received from our plant. Magma cannot be responsible for any physical damage to the product or component pieces
of the product (such as the host or expansion interfaces for the expansion chassis) that are damaged due to
inadequate packing. Physical damage sustained in such a situation will be repaired at the owner’s expense in
accordance with Out of Warranty Procedures. Please, protect your investment, a bit more padding in a good box will
go a long way to insuring the device is returned to use in the same condition you shipped it in. Please call for an RMA
number first.
Roben 3 | Chapter 5
How to Get More Help 88
Magma
Appendix A
Compliance
FCC
NOTE: This equipment has been tested and found to comply with the limits for a Class A digital device,
pursuant to part 15 of the FCC Rules. These limits are designed to provide reasonable protection against
harmful interference when the equipment is operated in a commercial environment. This equipment
generates, uses, and can radiate radio frequency energy and, if not installed and used in accordance with
the instruction manual, may cause harmful interference to radio communications. Operation of this
equipment in a residential area is likely to cause harmful interference in which case the user will be required
to correct the interference at his/her own expense.
This device complies with Part 15 of the FCC Rules. Operation is subject to the following two conditions: (1)
this device may not cause harmful interference, and (2) this device must accept any interference received
including interference that may cause undesired operation.
Changes or modifications not expressly approved by the party responsible for compliance could void the
user‘s authority to operate the equipment.
NOTE
The assembler of a personal computer system may be required to test the system and/or
make necessary modifications if a system is found to cause harmful interferences or to be
noncompliant with the appropriate standards for its intended use.
Industry Canada
This Class A digital apparatus complies with Canadian ICES-003.
Cetappareilnumériqué de la classe A estconformé à la norme NMB-003 du Canada
CE
The product(s) described in this manual complies with all applicable European Union (CE) directives.
Magma will not retest or recertify systems or components that have been reconfigured by customers
Roben 3 | Chapter 5
How to Get More Help 89
Manual P/N 09-09993-06 Rev D