1
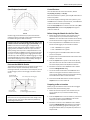
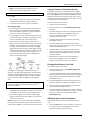
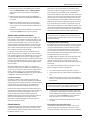
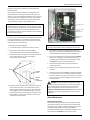
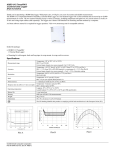
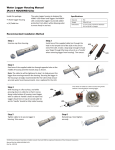
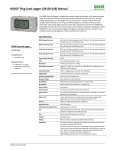
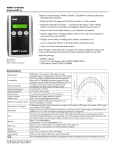
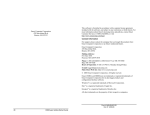
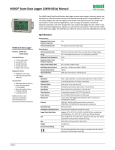
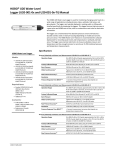
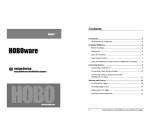
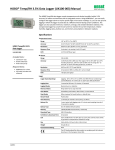
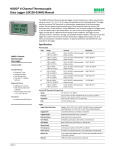
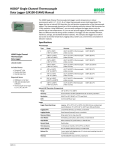
HOBO® U-Shuttle (U-DT-x) Manual
The U-DT-1 is compatible with all U-Series loggers (except the HOBO U30 Station), all UX-Series
loggers, HOBO Weather Stations and Micro Stations (H21), and the HOBO Energy Logger (H22).
The U-DT-2 is compatible with the HOBO U30 Station, HOBO Weather Stations and Micro
Stations (H21), and HOBO Energy Logger (H22).
The HOBO U-Shuttle performs the following major functions:
•
Reads out data from loggers in the field for transfer to a host computer
•
Optionally relaunches the logger—synchronizes the logger’s clock with the shuttle’s
clock and (in most cases) sets logging to begin at the next interval
•
Preserves data in nonvolatile memory, even if batteries are depleted
•
Displays logger status, including memory, battery level, and sensor readings for some
sensors (on some models)
•
Displays its own status, including clock, memory, and battery level
•
Lets you change the batteries in the field without resetting the clock
•
Allows you to test individual smart sensors (does not support the TRMSA-D)
Specifications
HOBO U-Shuttle
Models: U-DT-1
U-DT-2
Compatibility
U-DT-1: All U-Series loggers, all UX-Series loggers, HOBO Weather Stations
and Micro Stations (H21), and HOBO Energy Logger (H22)
U-DT-2: HOBO U30 Station, HOBO Weather Stations and Micro Stations
(H21), and HOBO Energy Logger (H22)
Firmware Upgrades
Available on the Onset website as needed to provide compatibility with
future supported logger models
Operating Temperature
0° to 50°C (32° to 122°F)
Storage Temperature
-10° to 50°C (14° to 122°F)
Time Accuracy
±1 minute per month at 25°C (77°F); see Plot A
Logger-to-Shuttle Transfer
Speed
USB/optic: 64K in approximately 30 seconds
Serial: 512K in approximately 60 seconds
Shuttle-to-Host-Transfer
Speed
Full shuttle offload (4 MB) to host computer in 3 to 5 minutes, depending
on computer
Data Capacity (Full
Loggers)
4 MB (minus 64 KB for shuttle information): enough for 504 readouts of 8K
loggers, 63 readouts of 64K loggers, or 7 readouts of 512K loggers
Idle Timeout
Shuttle powers down after two minutes of idle time, except when actively
communicating with HOBOware (see HOBOware User’s Guide for details)
or changing logger batteries (10 minutes)
Ports
RJ-12 jack for communicating with smart sensors; mini-B full speed USB
port for communicating with host computer; full speed USB port for
communicating with U-Series loggers and base stations; high speed serial
port for communicating with serial loggers. Shuttle communicates with
only one device at a time.
Batteries
Main: 2 AA alkaline batteries / Clock backup: 1 CR1225 lithium battery (3 V)
Battery Life
Main: 2 AA alkaline batteries / Clock backup: 1 CR1225 lithium battery (3 V)
Weight
153 g (5.4 oz)
Dimensions
11.0 x 6.9 x 2.7 cm (4.35 x 2.70 x 1.05 inches)
Case Materials
ABS case with urethane rubber grips, polycarbonate label
Included Items:
• 30 cm (12 inch) serial
logger cable
• USB cable
Required Items:
• HOBOware 2.2 or later for
U-DT-1
• HOBOware 2.6 or later for
U-DT-2
• Compatible logger with
appropriate cable and/or
base station
The CE Marking identifies this product as complying with all relevant
directives in the European Union (EU). To maintain CE compliance, this
product must be used with the supplied USB cable or equivalent (less than
3 m long).
13401-F MAN-UDTx
HOBO U-Shuttle (U-DT-x) Manual
Specifications (continued)
Control Buttons
The U-Shuttle has three dual-function buttons, labeled
esc (on/off), yes (next), and no (alt).
When the shuttle asks a question, press the yes or no button to
answer the question.
If the shuttle displays something other than a question, press
the next button to advance to the next screen, or the alt button
to view an alternative screen (if available).
Press the esc (on/off) button to return to the main menu (Find
Device/Shuttle Info). Press the esc (on/off) button again to
power the shuttle off.
Before Using the Shuttle for the First Time
Plot A
1. Make sure the host computer’s clock and time zone are
correct. If they are not, correct them before starting
HOBOware. This information will be loaded into the shuttle,
and will be the basis for all logger relaunches in the field.
Onset strongly recommends that you spend a few minutes
reading this manual and trying out the procedures described
here before taking the shuttle into the field.
Important note when using the HOBO U-Shuttle (U-DT-1) with
a HOBO 4-Channel Thermocouple logger (UX120-014M): If the
HOBO 4-Channel Thermocouple logger is configured to log
multiple channels with several statistics selected or with burst
logging enabled, the HOBO U-Shuttle can report erroneous
battery readings and may result in unexpected behavior. Only
use the shuttle with the HOBO 4-Channel Thermocouple logger
if you plan on minimal logging (such as logging thermocouple
channels only or two channels plus statistics logging). It is highly
recommended that you test your logger configuration with the
shuttle before deploying it to be sure the battery readings are
as expected and the offload works properly.
2. Use a compatible version of HOBOware to launch the UShuttle and each logger you will use with the shuttle.
• U-DT-1: HOBOware 2.2 or greater
• U-DT-2: HOBOware 2.6 or greater
3. Plug the large end of the USB interface cable into a USB
port on the computer.
4. Plug the small end of the USB interface cable into the small
USB port in the shuttle.
5. Press the on/off button to power on the shuttle. (It may
take a few seconds for the new hardware to be detected.)
The shuttle display should read “PC/Host Connected.”
Ports on the HOBO U-Shuttle
The shuttle communicates with only one device at a time. It can
detect the host computer automatically. When actively
searching for devices, it first looks for a host computer, then for
a U-Series logger, then for a serial logger, and last for a smart
sensor.
First: Mini-B USB
(from host computer)
6. Follow the instructions in the HOBOware User’s Guide to
access the Manage Shuttle dialog.
7. Launch the shuttle as described in the HOBOware User’s
Guide. Launching synchronizes the shuttle’s clock to the
host computer, deletes all data from the shuttle’s memory,
and initializes the shuttle’s control information.
Third: Serial port (to serial loggers)
8. Disconnect the USB cable from the shuttle and press the
on/off button to turn the shuttle off.
Preparing to Go on Location
Before you go into the field to read out and relaunch loggers
with the shuttle, take the following steps:
Last: RJ-12 jack
(to smart sensors)
1. Make sure the host computer’s clock and time zone are
correct. If they are not, correct them before starting
HOBOware.
Second: USB port
(to U-Series loggers & base stations)
Important: Never use these ports to attach the shuttle to
devices that are not supported by the U-Shuttle. Doing so may
void the warranty, drain the shuttle’s batteries prematurely,
and damage the electronics.
2. Press the on/off button to turn the shuttle on, and connect
it to a host computer running HOBOware. The shuttle
display should read “PC/Host Connected.”
3. Follow the instructions in the HOBOware User’s Guide to
access the Manage Shuttle dialog. Make sure the battery
level is good (the battery gauges should be green), and
change the batteries after you complete this procedure if
they are weak.
1-800-LOGGERS
2
www.onsetcomp.com
HOBO U-Shuttle (U-DT-x) Manual
4. Synchronize the shuttle’s clock to the host computer. If
there are datafiles on the shuttle, offload them and
relaunch the shuttle to make sure there is enough memory
to accommodate the loggers you plan to read out.
(Launching the shuttle synchronizes the clock and deletes
all the datafiles in one step.)
The display cycles through the list of sensors, identifying each
sensor and giving its reading. Sensor readings are shown in the
units that were preferred in HOBOware when the logger was
launched. Press next to continue to the next sensor, or press
esc to end communication with the logger.
After the shuttle has displayed all sensors, it will ask if you want
to repeat the readings. Press yes to repeat them, or no to end
this step.
5. Disconnect the USB cable from the shuttle and press the
on/off button to turn the shuttle off.
6. Be sure to bring the necessary cables, base stations, and
couplers to communicate with your loggers.
Reading out the logger
1. The shuttle asks if you want to read out the logger. Press
yes to read out the logger. (If the logger contains data that
has not been read out, the shuttle will not allow you to
proceed beyond this step until the logger has been read
out.)
Using the U-Shuttle in the Field
After you have ensured that there is sufficient memory
available and the shuttle’s clock is synchronized, you are ready
to take the U-Shuttle into the field.
2. While the shuttle reads out the logger, the shuttle display
will read “Offloading...” to let you know that the readout is
in progress.
The shuttle allows you to check the logger’s status and read it
out while the logger is still logging. You can then stop the logger
and change its batteries, if necessary, and relaunch the logger.
Not all of these steps are required (i.e. you do not have to
change the batteries every time), but the shuttle will give you
an opportunity to perform each step before it proceeds to the
next.
Important: If you read out a logger that is still waiting for a
delayed or triggered (button or coupler) start, the resulting
datafile will not open in HOBOware (because it has no data).
Stopping the logger
When the readout is finished, the shuttle asks if you want to
restart the logger, and if you are sure. (The shuttle will not offer
to relaunch a logger that contains data that has not been read
out.)
In most cases, you should be able to easily read out and
relaunch a logger simply by following the prompts on the
shuttle’s display. The following steps provide more detailed
information.
Checking the logger’s status
1. If the shuttle is still connected to the host computer,
disconnect it.
• To let the logger continue logging without relaunching,
press no. This will end the shuttle’s communication with
the logger. Disconnect the logger from the shuttle.
2. Use the shuttle’s large USB port or serial port to attach the
correct cable or base station for the logger, then connect
the logger.
• To stop the logger without relaunching, press yes to
answer the question and the “are you sure” prompt. The
shuttle stops the logger, displays the logger’s battery
status, and asks if you want to change the battery.
Disconnect the logger from the shuttle. This will end the
shuttle’s communication with the logger.
3. Turn the shuttle on by pressing the on/off button.
4. From the shuttle’s main menu (Find Device/Shuttle Info),
press yes.
• For U-Series loggers only, the shuttle displays the
message “HOBO Is Stopped” when you disconnect the
logger at this point. Press next to return to the main
menu (Find Device/Shuttle Info), or on/off to turn the
shuttle off.
5. When the shuttle detects a supported logger, it displays the
logger’s status, including whether it is stopped, logging, or
waiting for a triggered/delayed start; the amount of logger
memory that has been used for the datafile (DF: XX%); and
battery level (Bat: XX%). Press next to continue.
• To relaunch the logger, press yes to answer the question
and the “are you sure” prompt. The shuttle stops the
logger (if it is still logging), displays the logger’s battery
status, and asks if you want to change the battery.
Continue to the next step.
6. For all serial loggers and some U-Series loggers with certain
sensors, the shuttle displays the number of sensors and
asks whether you want to see the sensor details. Press no
to skip this step, or yes to view the sensor details.
Important: If a serial logger is communicating with a U-Shuttle
for the first time, the shuttle may display a message “WS needs
upgrade to show sensors” (press next); “Readout&Relaunch
installs upgrade” instead of displaying the sensors. When you
relaunch the logger, the U-Shuttle will upgrade the logger’s
firmware so that sensors can be displayed the next time you
check the logger’s status with the shuttle.
Replacing logger batteries in the field
1. To change the logger’s batteries, answer yes to the “Change
Battery?” prompt.
2. At the “Change Battery Now” prompt, disconnect the logger
from the shuttle.
3. Change the logger’s batteries.
4. Reconnect the logger to the shuttle.
1-800-LOGGERS
3
www.onsetcomp.com
HOBO U-Shuttle (U-DT-x) Manual
NOTE: The shuttle will power itself off if you do not
complete the battery change within ten minutes.
Using the Shuttle to Check Smart Sensors
In addition to reading out and checking the status of loggers,
the U-Shuttle can communicate directly with smart sensors via
its RJ-12 jack (NOTE: does not support the TRMSA-D FlexSmart
Module). Use this feature to get spot readings, confirm sensor
operations, identify unlabeled sensors that are tied in a bundle,
or troubleshoot sensor malfunctions.
Important: Make sure you reconnect the same logger!
5. Press yes.
The shuttle displays the power level of the new batteries
and again asks if you want to change the batteries.
To check the status of a smart sensor:
6. To continue with the relaunch sequence, answer no.
1. Plug the sensor into the shuttle.
Relaunching the logger
1. For serial loggers communicating with a U-Shuttle for the
first time, the shuttle may display a message “Upgrading
WS.” The U-Shuttle is upgrading the logger’s firmware so
that sensor readings can be displayed.
2. From the shuttle’s main menu (Find Device/Shuttle Info),
press yes.
3. The shuttle asks you to confirm the units type (US or metric,
based on the preferred units in HOBOware when you
launched the shuttle). Press yes to use the current
selection, or no to switch units.
2. For serial loggers only, the shuttle asks if you would like to
see the sensors again. Press yes to cycle through the list of
sensors as described earlier, or no to skip this step.
4. The shuttle displays the sensor description and reading.
Press next to continue.
3. The shuttle relaunches the logger. It synchronizes the
logger’s clock to the shuttle’s internal clock and relaunches
the logger, using the description, channels to log, logging
interval, and other settings that are already in the logger.
(Loggers that were launched with multiple logging intervals
will be relaunched with the last defined interval.) The logger
is launched with a delay that causes its readings to be
synchronized with those of the previous deployment, as
shown in the following diagram.
5. The shuttle displays the sensor’s approximate dormant
current drain. If it is higher than 0.05 mA, the sensor may be
defective. Press next to continue.
6. The shuttle begins the sequence for the next attached
sensor; if no other sensor is attached, it offers to repeat
from the beginning. Press next to continue, or esc to exit
the sensor program.
7. Remove the sensor when you are finished checking it.
Leaving a sensor plugged in can drain the shuttle’s
batteries, even when the shuttle is not powered on.
Checking Shuttle Status in the Field
The shuttle can report its own status.
1. From the shuttle’s main menu (Find Device/Shuttle Info),
press no for Shuttle Info.
If the logger is still waiting for a delayed start when you
relaunch it, the logger begins logging at the next interval that
matches the intended deployment. For example, if a logger is
scheduled to begin logging at 6:00 with a 15-minute interval,
and you relaunch it at 4:16, the logger will begin logging at
4:30.
2. The shuttle displays the time and date. To toggle between
local time (the time zone of the computer that launched the
shuttle) and UTC (Coordinated Universal Time), press alt.
Press next to continue.
3. The shuttle displays the amount of memory used and the
number of datafiles in its memory. Press next to continue.
Important: If the logger was launched with multiple logging
intervals or a triggered (coupler/button) start, there is no
synchronizing delay.
4. The shuttle displays the main batteries’ and clock backup
battery’s levels. Press next to continue.
4. When the relaunch has completed, the shuttle displays a
“HOBO Launched” confirmation message. If you do not see
this message, use the shuttle to check the logger’s status.
5. The shuttle displays its firmware version number and asks if
you want to repeat the shuttle status information. Press yes
to repeat, or no to return to the main menu (Find
Device/Shuttle Info).
5. Disconnect the logger from the shuttle. Leaving a logger
plugged in will drain the shuttle’s batteries, even when the
shuttle is not powered on.
Offloading Data to the Host Computer
To offload the data stored in the shuttle, take the following
steps:
NOTE: Although you can use the U-Shuttle with a HOBO U30
that supports remote communication, be aware that when the
U30 connects to HOBOlink® it will automatically be re-launched.
1-800-LOGGERS
1. Press the on/off button to turn the shuttle on, and connect
it to a host computer running HOBOware. The shuttle
display should read “PC/Host Connected.”
4
www.onsetcomp.com
HOBO U-Shuttle (U-DT-x) Manual
2. Follow the instructions in the HOBOware User’s Guide to
access the Manage Shuttle dialog. The Manage Shuttle
dialog shows you how many datafiles are available for
offload.
When you are not using the shuttle, disconnect it from the
computer and detach any loggers and sensors. Leaving these
items attached will put additional strain on the batteries.
Leave the main batteries in the shuttle, even when it will not be
used for some time. As long as the batteries have some power
(even if they are running low), they can power the clock. The
clock backup battery is not intended to power the clock alone
(without the main batteries installed) for long periods of time.
3. Offload and save the datafiles. Refer to the HOBOware
User’s Guide for details on saving datafiles offloaded from
the shuttle.
4. Make sure the battery levels are good, and change the
batteries now if they are weak. Synchronize the shuttle’s
clock, if necessary, or relaunch to delete the datafiles from
the shuttle.
If you will be storing the shuttle for many months and do not
want to leave the batteries in it, first offload the datafiles, then
remove ALL the batteries (including the clock backup battery).
When you are ready to use the shuttle again, reinstall all of the
batteries and launch the shuttle to synchronize the clock.
5. When finished, disconnect the USB cable from the shuttle
and press the on/off button to turn the shuttle off.
Important: Once the main batteries are dead, you should
remove them as soon as possible to ensure that they do not
leak and damage the shuttle. Replace them soon to protect the
clock backup battery.
Shuttle clock and time zone offsets
When you use HOBOware to launch a shuttle or logger, the
host computer’s time and time zone offset from UTC are used
to set the device’s clock. (UTC, or Coordinated Universal Time,
is similar to Greenwich Mean Time.) The time zone offset
makes it possible to determine objective, non-local time. This
prevents conflicts and confusion when you relaunch a logger
with a shuttle that may have been launched in a different time
zone, or before a Spring or Fall time change.
Replacing the Shuttle’s Main Batteries
If the shuttle’s main batteries run low (2.4 to 2.2 V), the shuttle
will display a warning (“Low Shut Battery”) when you power it
up, but you will still be able to use the shuttle for a limited
amount of time. If the batteries become too weak (less than
2.2 V) to power the shuttle, the shuttle will display another
warning (“Main Bat Too Low”) advising that the batteries must
be replaced before you can use it again.
For example, if the shuttle reports a time of 2:00 at UTC -8
(Pacific Standard Time) and a logger reports a time of 5:00 at
UTC -5 (Eastern Standard Time), both devices are correct—both
are reporting 10:00 UTC. If you launch and deploy a logger in
Massachusetts, but relaunch it with a shuttle that was launched
in Oregon, the shuttle will still synchronize the logger’s clock to
the correct time, without interfering with the logger’s original
time zone offset.
Any logger data that is already in the shuttle will remain safe,
and the clock backup battery will continue to keep time.
However, the shuttle will not communicate until its main
batteries are replaced, and the clock backup battery may drain
prematurely.
Because the logger’s time zone offset is not changed by a
shuttle relaunch, the time zone offset in the datafile may be off
by one hour if you use the shuttle to relaunch a logger after a
Spring or Fall time change. You can manually adjust the time
zone offset in the Plot Setup dialog when you open the datafile
in HOBOware. The time stamps will be correct.
The shuttle’s main batteries are easy to change, even in the
field. To change the shuttle’s main batteries:
Keep the clock running
Normally, the shuttle’s clock is powered by the main (AA
alkaline) batteries. The clock backup (CR1225 lithium) battery
temporarily powers the shuttle’s clock when the main batteries
are removed or dead. This enables you to change the main
batteries in the field without stopping the shuttle’s clock.
3. Remove the old batteries and install two new AA alkaline
batteries in the correct orientation, as shown in the battery
compartment.
1. Turn off the shuttle and remove any cables or sensors.
2. On the back of the case, slide the battery compartment lid
free.
Important: Do not use lithium batteries to power the shuttle.
The shuttle cannot measure the voltage of AA lithium batteries,
and will not be able to report its battery level accurately.
If both the main batteries and the clock backup battery die or
are removed, the shuttle’s clock will stop. If the clock stops, the
shuttle will not communicate with loggers until you have
powered it with fresh batteries and relaunched it with
HOBOware. Relaunching synchronizes the shuttle’s clock and
deletes all of the datafiles from the shuttle’s memory.
(Remember to offload the datafiles on the host computer
before relaunching the shuttle.)
4. Turn the shuttle over and look at the display. The shuttle
should power up automatically and display a “Main Power
Reset” message, and ask if you want it to look for a device.
If it does not, press the on/off button. If the shuttle still
does not power up, try a new pair of batteries.
5. Slide the lid onto the battery compartment until it snaps
into place.
Shuttle Batteries
Replacing the shuttle clock backup battery
The clock backup battery keeps the shuttle’s clock running
while you change the main batteries in the field. It cannot
support the U-Shuttle’s other functions, and it is not intended
To avoid battery problems, always check the shuttle’s batteries
in HOBOware before going into the field, and make sure you
have another pair of fresh AA alkaline batteries with you when
the batteries start to run low.
1-800-LOGGERS
5
www.onsetcomp.com
HOBO U-Shuttle (U-DT-x) Manual
to power the shuttle’s clock without the main batteries for
extended periods.
If the shuttle’s clock backup battery runs low (2.66 V), the
shuttle will display a warning (“Low Shut Clk Bat”) when you
power it up. You should replace the battery as soon as you can.
This will enable you to change the main batteries in the field
whenever you need to, without stopping the shuttle’s clock.
The clock battery is “dead” at approximately 2.5 V.
Important: If the shuttle’s clock stops (main and clock backup
batteries die or are removed), you must: 1) power the shuttle
with fresh batteries, 2) offload any unsaved datafiles from the
shuttle, and 3) relaunch the shuttle with HOBOware, which
synchronizes the shuttle’s clock and deletes all of the datafiles
from the shuttle’s memory.
Contrast control
Wires to alkaline
battery
compartment
Although it is possible to change the clock backup battery in the
field, this is not recommended. If you inadvertently disconnect
the wires that attach the main batteries to the circuit board,
the shuttle’s clock will stop. You could also drop and lose the
screws, or get the circuit board wet.
Clock backup
battery
To change the clock backup battery:
Important: The shuttle can be damaged by electrostatic
discharge. Take precautions when handling the circuit board.
1. Turn off the shuttle and remove any cables or sensors.
5. Lift out the circuit board and carefully push out the old
battery with a small blunt, nonmetallic instrument. Install a
new 3V CR1225 lithium battery, positive side facing up.
2. On the back of the shuttle case, slide the battery
compartment lid free. Do not remove the AA batteries.
3. Remove the screws in the upper corners of the back of the
case, and the lower corners in the main battery
compartment. Set them aside.
6. Turn the circuit board over and press the leftmost (on/off)
button under the display. The shuttle should power up
normally and ask if you want it to look for a device. Press
the on/off button again to turn the shuttle off.
7. Put the board back into the case. Close the case and
re-fasten the screws.
8. Slide the lid onto the battery compartment until it snaps
into place.
Screws
-
+
+
Contrast
control
-
Alkaline
battery
compartment
9. Check the shuttle’s clock in HOBOware. If the clock stopped
or is off by an hour or more, offload the datafiles from the
shuttle and relaunch it to synchronize the clock. The shuttle
will not read out and relaunch loggers if the shuttle needs
to be relaunched.
WARNING: Do not install batteries backwards, recharge,
put in fire, expose to extreme heat, or mix with other battery
types, as the batteries may explode or leak. Contents of an
open or leaking battery can cause chemical burn injuries.
Replace all used batteries at the same time. Recycle or dispose
of batteries according to applicable federal, state, and local
regulations.
4. Carefully pull the case apart. The circuit board may stay in
the front half of the case, but it is attached to the main
battery compartment by a pair of wires. If you leave these
wires plugged in, the main batteries (if they are in good
condition) will power the clock while you change the clock
backup battery, so that you do not have to relaunch the
shuttle when you are finished.
Other Maintenance
Adjusting the LCD contrast
The shuttle’s LCD contrast is factory-set for optimal viewing
under most conditions. The contrast control is located inside
the shuttle’s case. To adjust it without opening the case, open
the battery compartment and insert a small flathead
screwdriver through the hole to the right of the batteries. Use
the screwdriver to carefully turn the contrast control.
1-800-LOGGERS
6
www.onsetcomp.com
HOBO U-Shuttle (U-DT-x) Manual
In very hot or cold conditions (outside the recommended
operating range of 0°C/32°F to 50°C/122°F), the LCD screen
may become inoperable, regardless of the contrast setting.
System reset
It may be necessary to reset the shuttle because of a crash or
unexpected communications failure. Resetting the shuttle does
not reset the clock or cause data to be lost. To reset the UShuttle, turn the shuttle on, then briefly press all three buttons
simultaneously. Do not reset the shuttle while it is
communicating with (or attached to) a logger, sensor, or the
host computer.
Troubleshooting
If you encounter an error, refer to the list below for an
explanation.
Bad HOBO Battery
The shuttle cannot communicate with the U-Series logger,
because the logger’s battery is dead.
Comm Failure or
Contact Lost
Button to Reset
The PC or logger was disconnected from the shuttle (or the
logger slipped out of its base station/coupler) while the shuttle
was communicating with it. To recover from this error, the
shuttle may need to reset itself. Press any button.
HOBO Is Stopped
The U-Series logger was disconnected from the shuttle before it
could be relaunched. If you intended to remove the logger
without relaunching, no further action is necessary.
Optic Base Found
The shuttle detects a base station, but not a logger. The logger
or coupler may not be aligned or seated properly, or the logger
may have failed.
Shuttle Requires PC/Host Relaunch
The shuttle’s clock stopped because both the main batteries
and the clock backup battery were too low to keep it running.
The shuttle cannot be used again in the field until you relaunch
it. Ensure that the bad batteries have been replaced, then use
HOBOware to offload the data and relaunch the shuttle.
Unsupported HOBO
The connected device is an Onset logger, but the model is not
supported by the U-Shuttle. If this is a new logger model, the UShuttle may simply need a firmware update. Refer to the Onset
website for details:
http://www.onsetcomp.com/Support/support.html
Bad HOBO Err XXX
The shuttle cannot process the logger’s data. Try to read out
the logger directly with HOBOware, then relaunch the logger. If
HOBOware cannot read out the logger, refer to the HOBOware
User’s Guide for information about corrupted logger headers. If
the error persists after you have relaunched the logger, make a
note of the error number and contact Onset for support.
System Error XXX
If you receive a System Error, turn off the shuttle and
disconnect any devices. Then reconnect a device, check all
connections, and power the shuttle on again. If the error
persists, make a note of the error number and contact Onset
for support.
Low Shut Battery
The shuttle’s main (AA alkaline) batteries are running low. The
shuttle will still function, but you should replace these batteries
soon.
Low Shut Clk Bat
The shuttle’s clock backup battery (CR1225) is running low. The
shuttle will still function as long as the main batteries have
power, but if the clock backup battery runs down further, the
shuttle’s clock may stop the next time you change the main
batteries.
Main Bat Too Low
The shuttle’s main (AA alkaline) batteries are too weak to
communicate reliably. You must replace the batteries before
you can continue working with the shuttle.
No Shuttle Info
The connected U-Series logger is compatible with the shuttle,
but cannot communicate with the shuttle until it has been
launched with HOBOware 2.2 or greater.
Not Enough Room
The shuttle’s memory is too full to accommodate the data from
this logger. Use HOBOware to offload the shuttle, then
relaunch the shuttle to delete the datafiles.
1-800-LOGGERS (564-4377) • 508-759-9500
www.onsetcomp.com • [email protected]
© 2009–2013 Onset Computer Corporation. All rights reserved. Onset, HOBO, HOBOware, and
HOBOlink are trademarks or registered trademarks of Onset Computer Corporation. All other
trademarks are the property of their respective companies.
13401-F MAN-UDTx