1
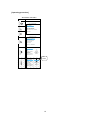
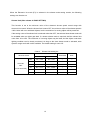
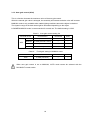
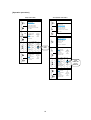
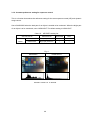
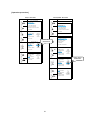
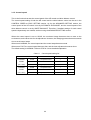
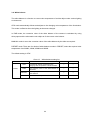
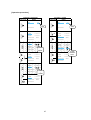
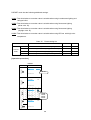
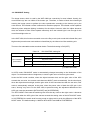
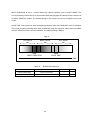
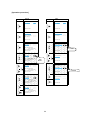
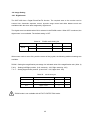
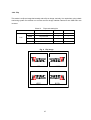
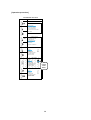
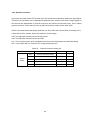
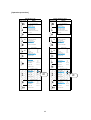
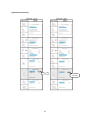
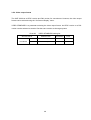
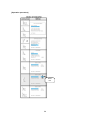
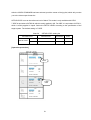
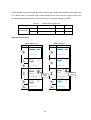
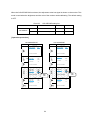
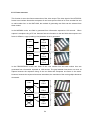
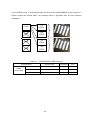
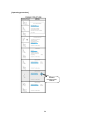
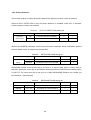
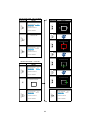
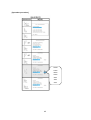
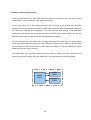
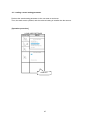
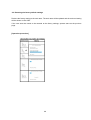
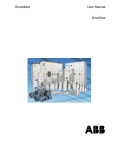
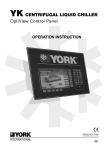
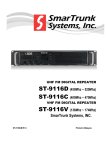
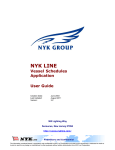
WAT-1000
USER MANUAL
Rev. 1.00
September 16, 2008
Watec Co., Ltd
0. Change History
Rev. No.
Date
Changes
Remarks
1.00
2008.09.16
-
First edition
2
Contents
1.
Introduction
4
2.
Example of screen menu configuration and basic operation
5
2.1. Screen menu configuration example
5
2.2. Jog dial basic operation
7
2.3. Example of the operation menu
8
Functions and Adjustment method
9
3.1. Automatic Exposure
9
3.
3.1.1. Wide dynamic range
9
3.1.2. Electronic shutter
11
3.1.3. Auto gain control (AGC)
18
3.1.4. Contrast preference setting for exposure control
20
3.1.5. Control speed
22
3.2. White Balance
24
3.3. Day/Night Setting
30
3.4. Image Setting
35
3.4.1. Digital zoom
35
3.4.2. Flip
37
3.4.3. BW mode
39
3.4.4. Gamma correction
40
3.4.5. Sharpness
42
3.4.6. Chroma
46
3.5. Functions
4.
48
3.5.1. Focus adjustment
48
3.5.2. Video output format
49
3.5.3. Frame structure
54
3.5.4. Camera ID
57
3.5.5. Activity detection
60
3.5.6. Baudrate
64
Saving, Loading and Restoring
66
4.1. Loading a saved setting parameter
67
4.2. Saving a setting parameter
68
4.3. Restoring the factory default settings
69
3
1. Introduction
・The WAT-1000 user manual describes the functions and the adjustment method using the On
Screen Display (OSD)
・When the settings of the WAT-1000 is changed according to the WAT-1000 user manual, check to
see that the operation and the effects of the changes made to the camera are acceptable.
・The WAT-1000 user manual is subject to change by design and the specifications of the product
without notice.
・The copyright of the WAT-1000 user manual shall belong to Watec Co, Ltd. Copying in whole or in
part without the authorization of the holders permission is prohibited.
4
2. Example of screen menu configuration and basic operation
2.1 Screen menu configuration example
The basic screen menu configuration is as follows.
Fig. 1 Screen menu configuration 1
Title of menu
Selected field
Item name
>
Selected item
Cursor key
Title of menu
The title of the menu page for AUTOMATIC EXPOSURE
Item name
・Selectable items are shown on the indicated page.
・The cursor position is highlighted in gray.
・When ”..” is added to the end of an item name, it means it is continued on to the next page.
List of item
The indicated item next to item name is the current setting.
5
Fig. 2 Menu screen configuration 2
Slider
Slider
The slider is used to set the required value of an item.
Increase or decrease the parameter value using the slider
6
2.2 Jog dial basic operation
Chart 1. Jog dial basic operation
Operation and Name
Result
Push the center of the jog-dial for
LONGPUSH
a few seconds
ON / OFF for menu screen
Push the center
Select / Exit
Roll up
Cursor or item UP
Roll down
Cursor or item DOWN
PUSH
UP
DOWN
Camera ID
See the “CAMERA ID SETTING” section for the operation method of the CAMERA ID
Zone setting
See the “ACTIVITY DETECTION SETTING” section for the ACTIVITY DET. ZONE operation
method.
7
2.3 Example of the operation menu
How to Displayed/Nondisplayed the MENU
WAT-1 0 0 0 MAIN MENU
EASY SETTIN G..
ADVA NCE D SETTIN G..
LOAD USER SETTIN GS..
SAVE USE R SETTIN GS..
RESTORE FACTORY SETTI NGS ..
LONGPUSH
Displayed
LONGPUSH
Nondisplayed
EXIT MENU
How to Select/Cancel
WAT-1 0 0 0 MAIN MENU
EASY SETTIN G(1 / 2)
EASY SETTIN G..
ADVA NCE D SETTIN G..
LOAD USER SETTIN GS..
SAVE USE R SETTIN GS..
RESTORE FACTORY SETTI NGS ..
PUSH
DYNAMI C RAN GE
AE PREFs
SLOW SHUTTER
AGC
CONTROL SPEED
EASY SETTIN G(1 / 2 )
MEDIUM
HIGHLIG HTs
ON
LOW
NORMAL
PUSH
NEXT PAGE. .
EXIT MENU
Next page
Item selection
WAT- 1 0 0 0 MAIN MENU
UP
EASY SETTIN G..
ADVA NCE D SETTIN G..
LOAD USER SETTIN GS..
SAVE USE R SETTIN GS..
RESTO RE FACTORY SETTI NGS ..
EXIT MENU
How to item change
EASY SETTIN G( 1 / 2)
UP
DOWN
DYNAMI C RAN GE
AE PREFs
SLOW SHUTTER
AGC
CONTRO L SPEED
MEDIUM
HIGHLIG HTs
ON
LOW
NORMAL
MEDIUM
HIGHLIG HTs
ON
LOW
NORMAL
EASY SETTIN G( 1/ 2 )
PUSH
NEXT PAGE. .
How to move the cursor up and down
DOWN
DYNAMI C RAN GE
AE PREFs
SLOW SHUTTER
AGC
CONTROL SPEED
LOW
MEDIUM
HIGH
NEXT PAGE. .
8
DYNAMI C RAN GE
AE PREFs
SLOW SHUTTER
AGC
CONTROL SPEED
NEXT PAGE. .
Exit
MEDIUM
HIGHLIG HTs
ON
LOW
NORMAL
3. Functions and Adjustment method
3.1. Automatic Exposure
3.1.1. Wide dynamic range
“Dynamic range” is to describe the intensity ratio between maximum and minimum illumination in an
image. Standard cameras have narrow dynamic range; therefore, white out and/or silhouetting
phenomenon occurs when a subject contains any objects with excessive difference in illumination
intensity, for example, backlight circumstances. The WAT-1000 is able to provide a natural image to
the human eye by greatly reducing white out and silhouetting occurring.
The wider the dynamic range, the more the camera is able to cope with high contrast situations and
present a clear picture of the contrasting areas; however, if the dynamic range is too wide, a blur
image with low contrast will be evident. The WAT-1000 prevents contrast degradation by
automatically controlling its dynamic range according to the illuminance ratio of a subject. In addition,
the maximum value of the WAT-1000 dynamic range can be fixed on the OSD menu, “DYNAMIC
RANGE”.
To take an image with excessively varied intensity of illiminations and the desire to have a clear
picture in both bright and dark areas at the same time, select “HI” on the DYNAMIC RANGE setting.
Meanwhile, to take an image with less varied intensity of illumination or paying attention to either the
bright area or the dark area, select “MEDIUM” or “LOW”. The default setting is MEDIUM.
Chart 2. Dynamic range setting list
SETTING VALUE
DESCRIPTION
ADVANCED
EASY
LOW
=Standard camera
○
○
MEDIUM
Typical
○
○
HIGH
Max
○
○
DYNAMIC
RANGE
Fig. 3
Example of Dynamic Range Configuration
DYNAMIC RANGE
LOW
MEDIUM
HIGH
AE PREFs: HIGHLIGHTS
9
・ The setting of the dynamic range is only available when the shutter mode is set to E.I.
・ When using the slow shutter mode (ESS), the wide dynamic range will not be available.
・ As for information and setting of the shutter mode, see “section 3.1.2. (p.11)”
[Operating procedure]
EASY SETTING
MENU
ADVANCED SETTING
MENU
OPERATION
OPERATION
W AT-1000 MAIN MENU
LO N G PUS H
EASY SETTING..
ADVANCED SETT ING..
W AT-1000 MAIN MENU
LO N G PUS H
EASY SETTING..
ADVANCED SETT ING..
LOAD USER SETTINGS..
SAVE US ER S ETTINGS ..
R ESTORE FACTORY SETT INGS ..
PU S H
EXIT MENU
LOAD USER SETTINGS..
SAVE US ER S ETTINGS ..
R ESTOR E FACTORY SETT INGS ..
DO WN
EASY S ETTING( 1/2)
PUSH
DYNAM IC R ANGE
AE PR EFs
SLOW SHUTTE R
AGC
CONTROL SPE ED
NEXT PAGE ..
EASY SETT ING(1/2)
UP
DO WN
DYNAMIC R ANGE
AE P REFs
SLOW S HUTT ER
AGC
CONT ROL SPEED
EXIT MENU
MEDIUM
HIGHLIGHT s
ON
LOW
NORM AL
PU S H
ADVANCED SETTING
LOW
MEDIUM
HIGH
AUT OM ATIC EXPOSUR E..
WHITE BALANCE..
DAY /NIGHT SET TING..
IMAGE SE TTING..
FUNCT IONS..
PUSH
M EDIUM
HIGHLIGHTs
ON
LOW
NORMAL
R ETUR N TO MAIN MENU
AUTOMATIC EX POSURE
NEXT PAGE..
DO WN
DO WN
EASY S ETTING( 1/2)
PU S H
DYNAM IC R ANGE
AE PR EFs
SLOW SHUTTE R
AGC
CONTROL SPE ED
MEDIUM
HIGHLIGHT s
ON
LOW
NORM AL
SHUTTER M ODE
AGC
DYNAM IC R ANGE
AE PREFs
BACKLIGHT
CONTR OL SPE ED
PR EVIOUS PAGE..
E.I..
LOW
M EDIUM
HIGHLIGHTS
OFF
NORM AL
PU S H
AUTOMATIC EX POSURE
NEXT PAGE ..
UP
LO N G PUS H
DO WN
SHUTTER M ODE
AGC
DYNAM IC R ANGE
AE PREFs
BACKLIGHT
CONTR OL SPE ED
PR EVIOUS PAGE..
E.I..
LOW
M EDIUM
HIGHLIGHTS
OFF
NORM AL
AUTOMATIC EX POSURE
PU S H
LO N G PUS H
10
SHUTTER M ODE
AGC
DYNAM IC R ANGE
AE PREFs
BACKLIGHT
CONTR OL SPE ED
PR EVIOUS PAGE..
E.I..
LOW
M EDIUM
HIGHLIGHTS
OFF
NORM AL
LOW
MEDIUM
HIGH
3.1.2. Electronic shutter
The WAT-1000 has an electronic shutter function with changeable exposure times. There are two
kinds of shutter mode, electronic iris mode(E.I) and slow shutter mode(ESS). The electronic iris
mode automatically controls the shutter speed according to the illumination of the object. Each pixel
adjusts itself individually to give the best available picture regarding light and dark in a single image.
(This is the wide dynamic range mode).
In the slow shutter mode, all the pixels adjust to the slow shutter speed regardless of the lighting
condition of the object. When an auto iris lens is used, the aperture of the lens is fully opened
regardless of the lighting condition of the object. Because the electronic shutter speed is not
controlled independently for each pixel, the wide dynamic range will not be available. The slow
shutter mode can be used only when an object is very dark, and a stable lighting condition is
present. The default setting is set to E.I.
Chart 3. Shutter mode setting list
SETTING VALUE
DESCRIPTION
ADVANCED
EASY
SHUTTER
E.I
Electronic shutter
○
×
MODE
ESS
Slow shutter
○
×
11
[Operating procedure]
ADVANCED SETTING
MENU
OPERATION
W AT-1000 MAIN MENU
LO N G PUS H
EASY SETTING..
ADVANCED SETT ING..
DO WN
LOAD USER SETTINGS..
SAVE US ER S ETTINGS ..
R ESTOR E FACTORY SETT INGS ..
EXIT MENU
PU S H
ADVANCED SETTING
PU S H
AUT OM ATIC EXPOSURE..
WHITE BALANCE..
DAY /NIGHT SET TING..
IMAGE SE TTING..
FUNCT IONS..
R ETUR N TO MAIN MENU
AUTOMATIC EX POSURE
PU S H
SHUTTER M ODE
AGC
DYNAM IC R ANGE
AE PREFs
BACKLIGHT
CONTR OL SPE ED
PR EVIOUS PAGE..
E.I..
LOW
M EDIUM
HIGHLIGHTS
OFF
NORM AL
AUTOMATIC EX POSURE
UP
DO WN
SHUTTER M ODE
AGC
DYNAM IC R ANGE
AE PREFs
BACKLIGHT
CONTR OL SPE ED
PR EVIOUS PAGE..
E.I
ESS
E.I..
LOW
M EDIUM
HIGHLIGHTS
OFF
NORM AL
12
When the Electronic iris mode (E.I) is selected in the shutter mode setting section, the following
settings can be also set.
Shutter limit (Slow shutter in EASY SETTING)
This function is set to the minimum value of the electronic shutter speed control range with
electronic iris control. When the shutter limit is set to OFF, the minimum value of the shutter speed is
1/60s. Noise will occur with dark objects, but the resolution of a moving object will be preserved.
If the setting value of the shutter limit is selected other than OFF, the selected slow shutter mode will
be available when an object gets dark. If a slower shutter mode is required, shift the shutter limit
value from X2 to X32. The resolution of a moving object may be lower, but the object under dark
lighting condition can be clearly monitored. As long as the slow shutter mode is activated, wide
dynamic range mode will not be available. The default setting is set to X2.
Chart 4. Shutter limit setting list
DESCRIPTION
SETTING VALUE
ADVANCED
EASY
Min.: 1/50s
○
○
Min.: 1/30s
Min.: 1/25s
○
○
X4
Min.: 1/15s
Min.: 1/12.5s
○
×
X8
Min.: 1/7.5s
Min.: 1/6.25s
○
×
X16
Min.: 1/3.75s
Min.: 1/3.125s
○
×
X32
Min.: 1/1.875s
Min.: 1/1.5625s
○
×
NTSC
PAL
OFF
Min.: 1/60s
X2
SHUTTER
LIMIT
[SLOW SHUTTER]
13
[Operation procedure]
ADVANCED SETTING
MENU
OPERATION
AUT OM ATIC EXPOSUR E
PU S H
SHUT TER M ODE
AGC
DYNAM IC R ANGE
AE PR EFs
BACKLIGHT
CONTROL SPEE D
PR EVIOUS PAGE ..
E.I
E .I..
LOW
ME DIUM
HIGHLIGHTS
OFF
NOR M AL
E.I SETTING
SHUT TER LIMNIT
LOWLIGHT SCENE
FLICKERLESS MODE
X2
S HUT PR I
OFF
PU S H
PR EVIOUS PAGE ..
E.I SETTING
UP
SHUT TER LIMNIT
LOWLIGHT SCENE
FLICKERLESS MODE
X2
S HUT PR I
OFF
DO WN
PR EVIOUS PAGE ..
OFF
X2
X4
X8
X16
X32
E.I SETTING
PU S H
SHUT TER LIMNIT
LOWLIGHT SCENE
FLICKERLESS MODE
X2
S HUT PR I
OFF
PR EVIOUS PAGE ..
LO N G PUS H
14
Lowlight scene
This function is used to set the operation order mode, which will operate by priority in slow shutter
mode, when the SHUTTER LIMIT mode is set to any other than OFF
If SHUT PRI is selected, slow shutter mode operates first, and then gain up mode operates. The
resolution of a moving object will become decreased, but noise will be inconspicuous.
If GAIN PRI is selected, gain up mode operates first, and then the slow shutter mode operates.
Noise will be present compared with the SHUT PRI mode, but doesn’t decrease the resolution of a
moving object. The default setting is set to SHUT PRI.
Chart 5.
Lowlight scene setting list
SETTING VALUE
DESCRIPTION
ADVANCED
EASY
LOWLIGHT
SHUT PRI
Slow shutter priority
○
×
SCENE
GAIN PRI
Gain up priority
○
×
[Operation procedure]
ADVANCED SETTING
OPERATION
MENU
E.I
AUT OM A TIC EXPOSUR E
PU S H
SHUT TER M ODE
A GC
DYNA M IC RANGE
A E PREFs
B ACKLIGHT
CONTROL SPEE D
PR EV IOUS PA GE ..
E .I..
LOW
ME DIUM
HIGHLIGHTS
OFF
NORM AL
E.I SETTING
DO WN
SHUT TER LIMNIT
LOWLIGHT SCENE
FLICKERLESS MODE
X2
S HUT PRI
OFF
PR EV IOUS PA GE ..
PU S H
E.I SETTING
UP
SHUT TER LIMNIT
LOWLIGHT SCENE
FLICKERLESS MODE
X2
S HUT PRI
OFF
SHUT PRI
GAIN PRI
DO WN
PR EV IOUS PA GE ..
E.I SETTING
PU S H
SHUT TER LIMNIT
LOWLIGHT SCENE
FLICKERLESS MODE
X2
S HUT PRI
OFF
PR EV IOUS PA GE ..
LON G PUS H
15
Flickerless mode
This function reduces the flicker occurring on the screen when an NTSC system camera is used
under fluorescent lighting conditions at 50Hz power supply frequency. When flickerless mode is set
to ON, flicker mitigation mode becomes available. Flickerless mode is only available with NTSC
mode. This mode is not selectable with PAL. The default setting is OFF.
Chart 6. Flickerless mode setting list
SETTING VALUE
DESCRIPTION
ADVANCED
EASY
FLICKER
OFF
Flicker mitigation OFF
○
○
LESS MODE
ON
Flicker mitigation ON
○
○
[Operation procedure]
ADVANCED SETTING
MENU
OPERATION
AUT OM A TIC EXPOSUR E
SHUT TER M ODE
A GC
DYNA M IC RANGE
A E PREFs
B ACKLIGHT
CONTROL SPEE D
PR EV IOUS PA GE ..
PU S H
E.I
E .I..
LOW
ME DIUM
HIGHLIGHTS
OFF
NORM AL
E.I SETTING
DOWN
DO WN
SHUT TER LIMNIT
LOWLIGHT SCENE
FLICKERLESS MODE
X2
S HUT PRI
OFF
PR EV IOUS PA GE ..
PU S H
E.I SETTING
UP
SHUT TER LIMNIT
LOWLIGHT SCENE
FLICKERLESS MODE
X2
S HUT PRI
OFF
OFF
ON
DO WN
PR EV IOUS PA GE ..
E.I SETTING
PU S H
SHUT TER LIMNIT
LOWLIGHT SCENE
FLICKERLESS MODE
X2
S HUT PRI
OFF
PR EV IOUS PA GE ..
LON G PUS H
16
When slow shutter (ESS) is selected in the shutter mode setting section, the following settings can
also be set if required
Shutter speed
This is the function that selects the exposure time for a slow shutter speed. The default setting is X2.
Chart 7. Slow shutter mode setting list
SETTING VALUE
DESCRIPTION
ADVANCED
EASY
NTSC
PAL
X2
1/30s
1/25s
○
×
X4
1/15s
1/12.5s
○
×
X8
1/7.5s
1/6.25s
○
×
X16
1/3.75s
1/3.125s
○
×
X32
1/1.875s
1/1.5625s
○
×
SHUTTER
SPEED
[Operation procedure]
ADVANCED SETTING
OPERATION
MENU
ESS
AUTOMATIC E XPOSUR E
PU S H
SHUTTER M ODE
A GC
DYNAM IC RANGE
A E PREFs
B ACKLIGHT
CONTROL SPE ED
PR EV IOUS PA GE..
E SS..
LOW
M EDIUM
HIGHLIGHTS
OF F
NOR MA L
EXT ENDE D SLOW SHUT TER
SHUTTER S PEED
X2
PU S H
PR EV IOUS PA GE..
EXT ENDE D SLOW SHUT TER
SHUTTER S PEED
X2
UP
DO WN
PR EV IOUS PA GE..
X2
X4
X8
X16
X32
EXT ENDE D SLOW SHUT TER
SHUTTER S PEED
X2
PU S H
PR EV IOUS PA GE..
LON G PUS H
17
3.1.3. Auto gain control (AGC)
This is a function that sets the maximum value of the auto gain control.
When the manual gain value is enlarged, the sensitivity will increase and also noise will increase.
MANUAL mode is only available when stable lighting conditions around the object is obtained.
The dynamic range of the dark area might be decreased depending on the object.
LOW/MEDIUM/HIGH mode is recommended for normal use. The default setting is LOW.
Chart 8. Auto gain control setting list
SETTING VALUE
AGC
DESCRIPTION
ADVANCED
EASY
LOW
0~22dB (Automatic control)
○
○
MEDIUM
0~32dB (Automatic control)
○
×
HIGH
0~40dB (Automatic control)
○
○
MANUAL
Fixed gain
○
×
Chart 9.
Fixed gain setting in MANUAL mode
SETTING VALUE
DESCRIPTION
ADVANCED
EASY
GAIN
0~40dB (1dB STEP)
○
×
When auto gain control is set to MANUAL, AUTO mode cannot be selected with the
DAY/NIGHT control section
18
[Operation procedure]
EASY SETTING
MENU
ADVANCED SETTING
MENU
OPERATION
OPERATION
W AT-1000 MAIN MENU
LON G PUS H
EASY SETTING..
ADVANCED SETT ING..
W AT-1000 MAIN MENU
LON G PUS H
EASY SETTING..
ADVANCED SETT ING..
LOAD USER SETTINGS..
SAVE US ER S ETTINGS ..
RESTOR E FACTORY SETT INGS ..
EXIT MENU
PU S H
DOWN
E AS Y SE TTING( 1/2)
x3
DO WN
DYNAM IC RANGE
AE PR EFs
SLOW SHUTTER
AGC
CONTR OL SPEE D
EXIT MENU
MEDIUM
HIGHLIGHTs
ON
LOW
NOR M AL
PU S H
ADVANCED SETTING
NEXT PAGE..
PUSH
EASY SET TING( 1/2)
UP
DO WN
DYNAMIC RANGE
AE PREFs
SLOW S HUT TER
AGC
CONT ROL S PEED
MEDIUM
HIGHLIGHTs
ON
LOW
NORMAL
PUSH
LOW
HIGH
AUTOMATIC EXPOSUR E
DOWN
E AS Y SE TTING( 1/2)
DYNAM IC RANGE
AE PR EFs
SLOW SHUTTER
AGC
CONTR OL SPEE D
AUT OM ATIC EXPOSURE..
WHITE BALANCE..
DAY /NIGHT SET TING..
IMAGE SE TTING..
FUNCT IONS..
R ETURN TO MAIN MENU
NEXT PAGE..
PU S H
LOAD USER SETTINGS..
SAVE US ER S ETTINGS ..
R ESTOR E FACTORY SETT INGS ..
MEDIUM
HIGHLIGHTs
ON
LOW
NOR M AL
SHUT TER MODE
AGC
DY NAMIC R ANGE
AE PREF s
BACKLIGHT
CONTROL SPEED
PREVIOUS P AGE..
E.I..
LOW
MEDIUM
HIGHLIGHTS
OF F
NOR MAL
PU S H
AUTOMATIC EXPOSUR E
NEXT PAGE..
UP
LO N G PUS H
DO WN
SHUT TER MODE
AGC
DY NAMIC R ANGE
AE PREF s
BACKLIGHT
CONTROL SPEED
PREVIOUS P AGE..
E.I..
LOW
MEDIUM
HIGHLIGHTS
OF F
NOR MAL
AUTOMATIC EXPOSUR E
PU S H
LO N G PUS H
19
SHUT TER MODE
AGC
DY NAMIC R ANGE
AE PREF s
BACKLIGHT
CONTROL SPEED
PREVIOUS P AGE..
E.I..
LOW
MEDIUM
HIGHLIGHTS
OF F
NOR MAL
LOW
MEDIUM
HIGH
MANUAL
3.1.4. Contrast preference setting for exposure control
This is a function that selects the reference setting for the auto exposure control (AE) and dynamic
range control.
Set to SHADOWS when the dark part of an object is needed to be monitored. When the bright part
of an object is to be monitored, set to HIGHLIGHT. The default setting is HIGHLIGHT.
Chart 10. AE PREFs setting list
SETTING VALUE
DESCRIPTION
ADVANCED
EASY
AE
SHADOWS
Dark part preference
○
○
PREFs
HIGHLIGHTS
Bright part preference
○
○
Fig. 4
SHADOWS
HIGHLIGHTS
DYNAMIC RANGE set to MEDIUM
20
[Operation procedure]
EASY SETTING
MENU
ADVANCED SETTING
MENU
OPERATION
OPERATION
WAT-1000 MAIN MENU
LONGPUSH
EASY SETTING..
ADVANCED SETTING..
WAT-1000 MAIN MENU
LONGPUSH
EASY SETTING..
ADVANCED SETTING..
LOAD USER SETTINGS..
SAVE USER SETTINGS..
RESTORE FACTORY SETTINGS..
PUSH
EXIT MENU
LOAD USER SETTINGS..
SAVE USER SETTINGS..
RESTORE FACTORY SETTINGS..
DOWN
EASY SETTING(1/2)
DOWN
DYNAMIC RANGE
AE PREFs
SLOW SHUTTER
AGC
CONTROL SPEED
EXIT MENU
MEDIUM
HIGHLIGHTs
ON
LOW
NORMAL
NEXT PAGE..
PUSH
ADVANCED SETTING
EASY SETTING(1/2)
UP
DOWN
DYNAMIC RANGE
AE PREFs
SLOW SHUTTER
AGC
CONTROL SPEED
AUTOMATIC EXPOSURE..
WHITE BALANCE..
DAY/NIGHT SETTING..
IMAGE SETTING..
FUNCTIONS..
HIGHLIGHTS
SHADOWS
PUSH
PUSH
MEDIUM
HIGHLIGHTs
ON
LOW
NORMAL
RETURN TO MAIN MENU
AUTOMATIC EXPOSURE
x3
NEXT PAGE..
DOWN
EASY SETTING(1/2)
PUSH
DYNAMIC RANGE
AE PREFs
SLOW SHUTTER
AGC
CONTROL SPEED
MEDIUM
HIGHLIGHTs
ON
LOW
NORMAL
SHUTTER MODE
AGC
DYNAMIC RANGE
AE PREFs
BACKLIGHT
CONTROL SPEED
PREVIOUS PAGE..
E.I..
LOW
MEDIUM
HIGHLIGHTS
OFF
NORMAL
PUSH
AUTOMATIC EXPOSURE
NEXT PAGE..
UP
LONGPUSH
DOWN
SHUTTER MODE
AGC
DYNAMIC RANGE
AE PREFs
BACKLIGHT
CONTROL SPEED
PREVIOUS PAGE..
E.I..
LOW
MEDIUM
HIGHLIGHTS
OFF
NORMAL
AUTOMATIC EXPOSURE
PUSH
LONGPUSH
21
SHUTTER MODE
AGC
DYNAMIC RANGE
AE PREFs
BACKLIGHT
CONTROL SPEED
PREVIOUS PAGE..
E.I..
LOW
MEDIUM
HIGHLIGHTS
OFF
NORMAL
HIGHLIGHTS
SHADOWS
3.1.5. Control speed
This is the function that sets the control speed of the AE control and white balance control.
The control speed setting of both the AE control and the white balance control can be set in the
CONTROL SPEED at EASY SETTING section. As for the ADVANCED SETTING section, the
control speed of the AE control is set by AUTOMATIC EXPOSURE, and the control speed of the
white balance control is set by WHITE BALANCE. Therefore, if detailed settings of each control
speed independently are needed, set them using the ADVANCED SETTING section.
When the control speed is set to SLOW, the monitored image becomes slow to react to the
environment, and it takes time for the adjustment. However, the changing process becomes smooth
due to small control steps.
When set to NORMAL, the control speed and the control steps become normal.
When set to FAST, the control speed becomes fast, and the time adjustment becomes short.
The default setting is NORMAL. Refer to ATW for a more detailed explanation.
Chart 11. Control speed setting list
SETTING VALUE
DESCRIPTION
ADVANCED
EASY
CONTROL
SLOW
Low speed control
○
×
SPEED
NORMAL
Normal
○
×
(AE / ATW)
FAST
High speed control
○
×
CONTROL
SLOW
Low speed control
×
○
SPEED
NORMAL
Normal
×
○
(AE & ATW)
FAST
High speed control
×
○
22
[Operation procedure]
EASY SETTING
MENU
ADVANCED SETTING
MENU
OPERATION
OPERATION
W A T-1000 MAIN MENU
LO N G PUS H
EASY SETTING..
ADVANCED SETT IN G..
W AT-1000 MAIN MENU
LO N G PUS H
EASY SETTING..
ADVAN CED SETT ING..
LOAD USER SETTINGS..
SAVE US ER S ETTINGS ..
RESTORE FACTORY SETT INGS ..
PU S H
EXIT MENU
LOAD USER SETTINGS..
SAVE US ER S ETTINGS ..
RESTOR E FACTORY SETT INGS ..
DO WN
E AS Y SE TTING( 1/2)
x4
DO WN
DYNAM IC RANGE
AE PREFs
SLOW SHUTTER
AGC
CONTROL SPEE D
EXIT MENU
MEDIUM
HIGH LIGHTs
ON
LOW
NORM AL
PU S H
ADVANCED SETTING
AUT OM ATIC EXPOSURE..
WHITE BALA NCE..
DAY /NIGHT SET TING..
IMAGE SE TTING..
FUNCT IONS..
NEXT P AGE..
PUSH
EASY SET TING( 1/2)
UP
DO WN
DYNAMIC RANGE
AE P REFs
SLOW S HUT TER
AGC
CONT ROL S PEED
NEXT PAGE..
E AS Y SE TTING( 1/2)
PU S H
DYNAM IC RANGE
AE PREFs
SLOW SHUTTER
AGC
CONTROL SPEE D
PUSH
MEDIUM
HIGHLIGH Ts
ON
LOW
NORMAL
RETURN TO MAIN MENU
A UTOMATIC EXPOSUR E
SLOW
NORMAL
FAST
MEDIUM
HIGH LIGHTs
ON
LOW
NORM AL
x5
DO WN
SHUT TER MODE
AGC
DY NAMIC RANGE
AE PREF s
BACKLIGHT
CONTR OL SPEED
PREVIOUS P AGE..
E.I..
LOW
MEDIUM
HIGHLIGH TS
OF F
NORMAL
PU S H
A UTOMATIC EXPOSUR E
NEXT P AGE..
UP
LO N G PUS H
DO WN
SHUT TER MODE
AGC
DY NAMIC RANGE
AE PREF s
BACKLIGHT
CONTR OL SPEED
PREVIOUS P AGE..
E.I..
LOW
MEDIUM
HIGHLIGH TS
OF F
NORMAL
A UTOMATIC EXPOSUR E
PU S H
LO N G PUS H
23
SHUT TER MODE
AGC
DY NAMIC RANGE
AE PREF s
BACKLIGHT
CONTR OL SPEED
PREVIOUS P AGE..
E.I..
LOW
MEDIUM
HIGHLIGH TS
OF F
NORMAL
SLOW
NORMAL
FAST
3.2. White balance
The white balance is a function to correct color temperature of a white object under various lighting
environments.
ATW mode automatically follows and adjusts to the changing color temperature of the illumination.
This mode is effective when the lighting environment changes.
In PWB mode, the correction value of the white balance of the camera is calculated by using
white paper and the achromatic color object to fix the correct color balance.
MANUAL mode is set to the correction value of the white balance by the slider as required.
PRESET mode: There are four kinds of white balance modes in PRESET, select the required color
temperature from 3200K, 4300K, 6500K and 9300K.
The default setting is ATW.
Chart 12. White balance setting list
SETTING VALUE
MODE
DESCRIPTION
ADVANCED
EASY
ATW
Automatically follows and adjusts to the
changing color temperature of the illumination
○
○
PWB
The correction value of the white balance is
calculated.
○
○
MANUAL
Manually adjust for the correction value of the
white balance.
○
○
PRESET
Select the color temperature in the Preset
○
○
24
[Operation procedure]
EASY SETTING
MENU
ADVANCED SETTING
MENU
OPERATION
OPERATION
WAT-1000 MAIN MENU
LONGPUSH
EASY SETTING..
ADVANCED SETTING..
WAT-1000 MAIN MENU
LONGPUSH
EASY SETTING..
ADVANCED SETTING..
LOAD USER SETTINGS..
SAVE USER SETTINGS..
RESTORE FACTORY SETTINGS..
PUSH
UP
EXIT MENU
DO WN
EASY SETTING(1/2)
DYNAMIC RANGE
AE PREFs
SLOW SHUTTER
AGC
CONTROL SPEED
EXIT MENU
MEDIUM
HIGHLIGHTs
ON
LOW
NORMAL
PUSH
ADVANCED SETTING
NEXT PAGE..
PUSH
DO WN
EASY SETTING(2/2)
WHITE BALANCE
DAY/NIGHT
BACKLIGHT
FLICKERLESS MODE
LOAD USER SETTINGS..
SAVE USER SETTINGS..
RESTORE FACTORY SETTINGS..
AUTOMATIC EXPOSURE..
WHITE BALANCE..
DAY/NIGHT SETTING..
IMAGE SETTING..
FUNCTIONS..
RETURN TO MAIN MENU
ATW
OFF
OFF
OFF
PUSH
WHITE BALANCE
PUSH
PREVIOUS PAGE..
RETURN TO MAIN MENU
MODE
EASY SETTING(2/2)
UP
WHITE BALANCE
DAY/NIGHT
BACKLIGHT
ATW
OFF
OFF
FLICKERLESS MODE
OFF
DOWN
PREVIOUS PAGE..
RETURN TO MAIN MENU
EASY SETTING( 2/2)
PUSH
LONGPUSH
WHITE BALANCE
DAY/NIGHT
BACKLIGHT
FLICKERLESS MODE
ATW
PUSH
PREVIOUS PAGE..
ATW
PWB
3200K
4300K
6500K
9300K
WHITE BALANCE
MODE
ATW
UP
ATW
PWB
MANUAL
PRESET
DOWN
PREVIOUS PAGE..
ATW
OFF
OFF
OFF
WHITE BALANCE
PREVIOUS PAGE..
RETURN TO MAIN MENU
MODE
PUSH
PREVIOUS PAGE..
LONGPUSH
25
ATW
The ATW has the following additional settings.
LOWLIGHT is a parameter that is set to the minimum value of the control range when controlling the
color temperature using ATW.
HIGHLIGHT is a parameter that is set to the maximum value of the control range when controlling
the color temperature using ATW.
The CONTROL SPEED is a parameter setting the ATW adjustment speed.
There are three settings, slow, normal and fast. With slow and Normal settings, the adjustment
changes smoothly. In fast mode, the speed of the adjustment is fast, but it will not be as smooth as
normal and slow. The adjustment will be in short steps.
Chart 13.
SETTING
2000K
LOWLIMIT
~
ATW setting list
DESCRIPTION
ADVANCED
EASY
The setting for the minimum correction value of
the correction range of the ATW
○
×
The setting for the maximum correction value
of the correction range of the ATW
○
×
The control speed of the ATW set to slow
○
×
The control speed of the ATW set to normal
○
×
The control speed of the ATW set to fast
○
×
5500K
5500K
HIGHLIMIT
~
11000K
SLOW
CONTROL
SPEED
NORMAL
FAST
26
[Operation procedure]
LOWLIMIT/HIGHLIMIT
MENU
CONTROL SPEED
MENU
OPERATION
OPERATION
WHITE BALANCE
MODE
WHITE BALANCE
AT W
MODE
ATW
PU S H
ATW
PU S H
PREVIOUS P AGE ..
PREVIOUS PAGE ..
ATW
ATW
LOW LIM IT
┗ ┷┻┷┻ ┻┛
HIGHLIMIT
┗┷ ┻┷┻ ┻┛
x2
DOWN
PU S H
CONT ROL SPEED
LOW LIM IT
┗ ┷┻┷┻ ┻┛
HIGHLIMIT
┗┷ ┻┷┻ ┻┛
CONT ROL SPEED
NORM AL
PU S H
ATW
ATW
LOW LIM IT
┗ ┷┻┷┻ ┻┛
HIGHLIMIT
┗┷ ┻┷┻ ┻┛
NORM AL
PREVIOUS PAGE..
LOW LIM IT
┗ ┷┻┷┻ ┻┛
HIGHLIMIT
┗┷ ┻┷┻ ┻┛
UP
2000K
~
5500K
CONT ROL SPEED
DOWN
DOWN
CONT ROL SPEED
NORM AL
PREVIOUS PAGE..
LOW LIM IT
SLOW
NORMAL
FAST
┗ ┷┻┷┻ ┻┛
HIGHLIMIT
┗┷ ┻┷┻ ┻┛
ATW
LOW LIM IT
NORM AL
PREVIOUS PAGE..
PREVIOUS PAGE..
UP
AT W
ATW
┗ ┷┻┷┻ ┻┛
PU S H
PU S H
HIGHLIMIT
DOWN
PU S H
┗┷ ┻┷┻ ┻┛
CONT ROL SPEED
NORM AL
CONT ROL SPEED
PREVIOUS PAGE..
LON G PUS H
ATW
LOW LIM IT
┗ ┷┻┷┻ ┻┛
HIGHLIMIT
┗┷ ┻┷┻ ┻┛
UP
DOWN
CONT ROL SPEED
NORM AL
PREVIOUS PAGE..
ATW
5500K
~
11000K
LOW LIM IT
┗ ┷┻┷┻ ┻┛
HIGHLIMIT
┗┷ ┻┷┻ ┻┛
PU S H
CONT ROL SPEED
LON G PUS H
NORM AL
PREVIOUS PAGE..
27
PREVIOUS PAGE..
NORM AL
MANUAL mode has the following additional settings.
KELVIN sets the required correction value of the white balance using the slider
The range of color temperature can be set from 2500K to 11000K
Chart 14. Manual white balance setting list
SETTING
KELVIN
2.5K~11K
DESCRIPTION
ADVANCED
EASY
Manually adjusts the correction value of the
white balance
○
×
[Operation procedure]
MANUAL KELVIN
MENU
OPERATION
W HIT E BALANCE
MODE
MA NUAL
MANUAL
PU S H
PREVIOUS PAGE..
MANUAL WHITE BALANCE
KELVIN
┗┷┻┷ ┻┻┛
PU S H
PREVIOUS PAGE..
MANUAL WHITE BALANCE
KELVIN
┗┷┻┷ ┻┻┛
UP
2500K
~
11000K
DO WN
PREVIOUS PAGE..
MANUAL WHITE BALANCE
KELVIN
┗┷┻┷ ┻┻┛
PU S H
PREVIOUS PAGE..
LO N G PUS H
28
PRESET mode has the following additional settings.
3200K: This white balance correction value is suitable when using incandescent lighting and
iiihalogen bulbs.
4300K: This white balance correction value is suitable when using fluorescent lighting
(white color: W).
5600K: This white balance correction value is suitable when using fluorescent lighting
(daylight color: D).
9300K: This white balance correction value is suitable when using LED etc. with high color
iitemperature.
Chart 15. Preset setting list
SETTING VALUE
DESCRIPTION
ADVANCED
EASY
3200K
When using incandescent lighting
○
○
COLOR
4300K
When using fluorescent lighting (white color: W)
○
○
TEMP.
6500K
When using fluorescent lighting (daylight color: D)
○
○
9300K
When using LED etc. with high color temperature
○
○
[Operation procedure]
OPERATION
PRESET
MENU
WHITE BALANCE
MODE
PR ES ET
PRESET
PU S H
PREVIOUS PAGE ..
MANUAL WHITE BALANCE
COLOR T EMP.
3200K
PU S H
PREVIOUS PAGE..
MANUAL WHITE BALANCE
COLOR T EMP.
3200K
UP
3200K
4300K
6500K
9300K
DOWN
PREVIOUS PAGE..
MANUAL WHITE BALANCE
COLOR T EMP.
3200K
PU S H
PREVIOUS PAGE..
LO N GPUS H
29
3.3. DAY/NIGHT Setting
The image sensor, which is used by the WAT-1000 has a sensitivity for near infrared. Usually, the
near-infrared rays are not visible to the human eye. Therefore, it needs to block the infrared light
entering the image sensor to perform the color reproduction according to the human eye by the
color camera. The infrared cut filter is effective for the above purpose. The infrared cut filer operates
effectively when adequate lighting is obtained for the object. However, when the object becomes
dark, the infrared cut filter cannot operate effectively since the incident light is not enough for the
near-infrared light to be cut.
In the WAT-1000, this function can switch over to the Day mode (color mode with infrared filter) and
Night mode (monochrome mode without infrared filter) by the infrared cut filter switching unit.
There are four selectable modes as shown below. The default setting is DAY(OFF).
Chart 16.
SETTING VALUE
D/N CONTROL setting list
DESCRIPTION
ADVANCED
EASY
AUTO
Mode changing according to the lighting condition
○
○
D/N CONTROL
DAY (OFF)
Day mode / Color
○
○
(DAY/NIGHT)
NIGHT
Night mode / Monochrome
○
×
EXT
Mode changing from external signal
○
×
(): EASY SETTING
In AUTO mode, DAY/NIGHT mode is automatically changed according to the illumination of the
object. For the determination of brightness, it uses the gain value of the auto gain control.
Under the DAY mode condition, when the object becomes dark, and the gain value of the AGC
exceeds the set value, the camera mode becomes NIGHT mode automatically. On the other hand,
when the object becomes bright, and the gain value of AGC becomes less than the set value, DAY
mode is automatically selected. At this time, when the preset value of both the AGC gain is the
same, “hunting” may occur. For the WAT-1000, to prevent hunting, the adjustment difference of the
AGC gain uses the parameters [INTO NIGHT] and [HYSTERESIS].
The INTO NIGHT mode sets the switching level from the day mode to the night mode. It becomes
night mode when the AGC gain of the camera exceeds the setting value of the INTO NIGHT mode.
In HYSTERESIS, the switch level from day mode to night mode is set by the difference of the INTO
NIGHT mode. The default setting is 19dB for INTO NIGHT and 6dB for HYSTERESIS.
30
AGC GAIN
[INTO NIGHT]
[HYSTERESIS]
Dark
Bright
■Adjustment method
The adjustment procedure of INTO NIGHT and HYSTERESIS are as follows.
① Set the INTO NIGHT to 19dB and set the HYSTERESIS to 6dB.
② Adjust the aperture of the lens and/or the illumination while watching the monitor to duplicate
the light level of the night mode.
③ Until switching to night mode, keep increasing the level of the INTO NIGHT mode slowly.
④ If hunting does not occur, go on to step ⑥
⑤ When hunting is generated, keep rising the value of HYSTERESIS step by step until the
hunting stops. If hunting does not stop with the maximum value of the HYSTERESIS mode,
AUTO mode may not be available. Therefore, please change the object or the illumination, or
use EXT mode.
⑥ Confirm the switching of Day/Night mode operates properly without any problems by
adjusting the aperture of a lens and/or the illumination. Save the above mentioned setting by
"Save user setting" if there is no problem.
⑦ The set value of HYSTERESIS may be too large if it is not switching into the DAY mode.
Please readjust from ①. If it still does not switch normally, use another object or change the
illumination condition, or use EXT mode
Chart 17.
SETTING VALUE
AUTO mode setting list
DESCRIPTION
The switch level to monochrome
INTO NIGHT
1 ~ (AGC MAX-1)
ADVANCED
EASY
○
×
○
×
from color
HYSTERESIS
1 ~ (INTO NIGHT-1)
The blind sector of the switching level
31
[Operation procedure]
EASY SETTING
MENU
ADVANCED SETTING
MENU
OPERATION
OPERATION
W AT-1000 MAIN MENU
LON G PUS H
EASY SETTING..
ADVANCED SETT ING..
W AT-1000 MAIN MENU
LON G PUS H
EASY SETTING..
ADVANCED SETT ING..
LOAD USER SETTINGS..
SAVE US ER S ETTINGS ..
RESTOR E FACTORY SETT INGS ..
PU S H
UP
EXIT MENU
LOAD USER SETTINGS..
SAVE US ER S ETTINGS ..
R ESTOR E FACTORY SETT INGS ..
DOWN
EASY S ETTING(1/2)
DYNAM IC RANGE
AE PR EFs
SLOW SHUTTE R
AGC
CONTR OL SPE ED
EXIT MENU
ME DIUM
HIGHLIGHTs
ON
LOW
NORMAL
PU S H
ADVANCED SE TTING
x2
NEXT PAGE ..
PUSH
D OWN
EASY SE TTING(2/2)
DO WN
PU S H
WHITE BALANCE
DAY/NIGHT
BACKLIGHT
FLICKERLESS M ODE
R ETURN T O MAIN ME NU
AT W
OFF
OFF
OFF
PUSH
DAY/NIGHT SETTING
PREVIOUS PAGE ..
RETURN TO M AIN MENU
D/N CONTROL
EASY SE TTING(2/2)
UP
WHITE BALANCE
DAY/NIGHT
BACKLIGHT
FLICKERLESS M ODE
PREVIOUS PAGE..
DAY/NIGHT SETTING
AUTO
PREVIOUS PAGE ..
RETURN TO M AIN MENU
OFF
EASY SE TTING(2/2)
PU S H
LO N G PUS H
AUTO
PU S H
AT W
OFF
OFF
OFF
DOWN
WHITE BALANCE
DAY/NIGHT
BACKLIGHT
FLICKERLESS M ODE
AUT OMATIC EXPOSURE ..
WHITE BALANCE..
DAY /NIGHT SE TTING..
IMAGE S ETTING..
FUNCTIONS..
D/N CONTROL
AUTO
UP
AUTO
DO WN
EXT
PREVIOUS PAGE..
AT W
OFF
OFF
OFF
DAY/NIGHT SETTING
PREVIOUS PAGE ..
RETURN TO M AIN MENU
D/N CONTROL
PU S H
PREVIOUS PAGE..
LO N G PUS H
32
AUTO
DAY
NIGHT
INPUT DURATION is set to 1 second before the camera switches over to NIGHT MODE. This
one-second delay means that in an environment with changing light the camera doesn’t switch over
to NIGHT MODE by mistake. The default setting is one second, but can be changed to suite your
needs.
HOLD TIME, sets a period to stop the switching behavior after the DAY/NIGHT mode is switched.
This mode prevents switching back again accidentally until the exposure control becomes stable
after the infrared cut filter has been switched. The default setting is 800ms.
Fig. 5
DAY MODE
NIGHT MODE
INPUT DURATION
DAY MODE
HOLD TIME
TIME
Chart 18.
DURATION setting list
SETTING VALUE
DESCRIPTION
ADVANCED
EASY
INPUT DURATION[s]
Switch level duration
○
×
HOLD TIME[ms]
Hold time after switched
○
×
33
[Operation procedure]
OPERATION
AUTO
MENU
EXT
OPERATION
DAY/NIGHT S ETTING
D/N CONTROL
MENU
DAY/NIGHT S ETTING
AUT O
D/N CONTR OL
PU S H
E XT
PU S H
PREVIOUS PAGE..
PREVIOUS PAGE..
DAY/NIGHT AUTO SETTING
D/N T HR ESHOLD..
INPUT DURATION[s]
HOLD TIM E[m s]
DAY/NIGHT EXT SETTING
└┴┴ ┴┘
PREVIOUS PAGE..
DAY/NIGHT THRESHOL S ETTING
DAY/NIGHT EXT SETTING
└┴┴┴┘
└ ┴┴┴┘
UP
SET [INTO NIGHT ] GAIN
LESS THAN AGC MAX.
THE P RE SENT AGC MAX is
22
PREVIOUS PAGE..
UP
DO WN
PU S H
D OWN
└┴┴ ┴┘
0~255
DAY/NIGHT EXT SETTING
INP UT DUR ATION[s]
└ ┴┴┴┘
HOLD TIM E[m s]
└┴┴ ┴┘
PU S H
1~
AGC
MAX-1
D OWN
PU S H
DAY/NIGHT THRESHOL S ETTING
INT O NIGHT 19
HYSTER ES IS 6
└ ┴┴┴┘
HOLD TIM E[m s]
PREVIOUS PAGE..
└┴┴┴┘
└ ┴┴┴┘
SET [INTO NIGHT ] GAIN
LESS THAN AGC MAX.
THE P RE SENT AGC MAX is
22
PREVIOUS PAGE..
INP UT DUR ATION[s]
DOWN
DAY/NIGHT THRESHOL S ETTING
INT O NIGHT 19
HYSTER ES IS 6
└┴┴ ┴┘
PUSH
PREVIOUS PAGE..
PU S H
└ ┴┴┴┘
HOLD TIM E[m s]
└ ┴┴┴┘
PU S H
INT O NIGHT 19
HYSTER ES IS 6
INP UT DUR ATION[s]
PREVIOUS PAGE..
DAY/NIGHT EXT SETTING
└┴┴┴┘
└ ┴┴┴┘
UP
SET [INTO NIGHT ] GAIN
LESS THAN AGC MAX.
THE P RE SENT AGC MAX is
22
PREVIOUS PAGE..
INP UT DUR ATION[s]
└ ┴┴┴┘
HOLD TIM E[m s]
└┴┴ ┴┘
DOWN
0~65200
PREVIOUS PAGE..
PU S H
DAY/NIGHT THR ESHOL S ETTING
UP
DO WN
INT O NIGHT 19
HYSTERES IS 6
DAY/NIGHT EXT SETTING
└┴┴┴┘
└ ┴┴┴┘
HOLD TIM E[m s]
└┴┴ ┴┘
PREVIOUS PAGE..
LO N G PUS H
DAY/NIGHT THR ESHOL S ETTING
PU S H
└ ┴┴┴┘
PU S H
SET [INTO NIGHT ] GAIN
LESS THAN AGC MAX.
THE PRE SENT AGC MAX is
22
PR EVIOUS PAGE..
INT O NIGHT 19
HYSTERES IS 6
INP UT DUR ATION[s]
└┴┴┴┘
└ ┴┴┴┘
SET [INTO NIGHT ] GAIN
LESS THAN AGC MAX.
THE PRE SENT AGC MAX is
22
PR EVIOUS PAGE..
LON G PUS H
34
3.4. Image Setting
3.4.1. Digital zoom
The WAT-1000 has a Digital Zoom/Pan/Tilt function. The required area on the monitor can be
zoomed into. Automatic exposure control, dynamic range control and white balance mode are
available within the zoom area assigned by digital zoom
The digital zoom is available when ON is selected in the ZOOM section. When OFF is selected, the
digital zoom is not available. The default setting is OFF.
Chart 19. ZOOM mode setting list
SETTING VALUE
DESCRIPTION
ADVANCED
EASY
ON
Zoom is available
○
×
OFF
Zoom is not available
○
×
ZOOM
When zoom mode is set to ON, push the center of the jog-dial, the following additional settings are
available.
ZOOM:Setting the magnification percentage. An indicated value of the magnification ratio. (Max: 4)
P A N :Setting Left/Right position. (Left: extremity: -100, Right extremity: 100)
T I L T:Setting Upper/Lower position. (Lower limit: -100, Upper limit: 100)
Chart 20. ZOOM setting list
SETTING VALUE
DESCRIPTION
ADVANCED
EASY
ZOOM
Magnification percentage
○
×
PAN
Left / Right
○
×
TILT
Upper / Lower
○
×
ZOOM mode is not available with ACTIVITY DETECTION mode.
35
[Operation procedure]
ZOOM
MENU
OPERATION
MENU
OPERATION
IM AGE SET TING
ZOOM
FLIP
BW M ODE
GAM MA M ODE
SHARPNE SS S ETTING..
CHROMA SETTING..
PR EVIOUS PAGE..
WAT-1000 MAIN ME NU
LON G PUS H
EASY SE TTING..
ADVANCED S ETTING..
]
DO WN
PU S H
LOAD USER SET TINGS..
SAVE USER SETT INGS..
RE STORE F ACTOR Y SE TTINGS..
ZOOM
EXIT M ENU
ZOOM
PAN
TILT
PU S H
ADVANCED SETT ING
x3
D OWN
ON..
OFF
OFF
AUT O
┗┻ ┻┻┻┻┛
┗┻┻┻┻ ┻┛
┗┻ ┻┻┻┻┛
0
0
PUSH
AUT OM ATIC EXPOSUR E..
WHITE BALANCE..
DAY /NIGHT SET TING..
IMAGE SE TTING..
FUNCT IONS..
PR EVIOUS PAGE..
ZOOM
R ETURN TO MAIN MENU
ZOOM
PAN
TILT
UP
PUSH
┗┻ ┻┻┻┻┛
┗┻┻┻┻ ┻┛
┗┻ ┻┻┻┻┛
0
0
IM AGE SET TING
DO WN
PUSH
ZOOM
FLIP
BW M ODE
GAM MA M ODE
SHARP NE SS S ETTING..
CHR OMA SETTING..
PREVIOUS PAGE..
OFF
OFF
OFF
AUT O
PR EVIOUS PAGE..
PUS H
DOW N
PUS H
IM AGE SET TING
UP
DOWN
ZOOM
FLIP
BW M ODE
GAM MA M ODE
SHARP NE SS S ETTING..
CHR OMA SETTING..
PREVIOUS PAGE..
ZOOM
OFF
OFF
OFF
AUT O
ZOOM
PAN
TILT
UP
ON
OFF
┗┻ ┻┻┻┻┛
┗┻┻┻┻ ┻┛
┗┻ ┻┻┻┻┛
0
0
DO WN
PR EVIOUS PAGE..
IM AGE SET TING
PU S H
ZOOM
FLIP
BW M ODE
GAM MA M ODE
SHARP NE SS S ETTING..
CHR OMA SETTING..
PREVIOUS PAGE..
OFF
OFF
OFF
AUT O
PUS H
DOW N
PUS H
ZOOM
UP
LONGPUSH
ZOOM
PAN
TILT
┗┻ ┻┻┻┻┛
┗┻┻┻┻ ┻┛
┗┻ ┻┻┻┻┛
0
0
DO WN
PR EVIOUS PAGE..
ZOOM
PU S H
ZOOM
PAN
TILT
0
0
PR EVIOUS PAGE..
LONGPUSH
36
┗┻ ┻┻┻┻┛
┗┻┻┻┻ ┻┛
┗┻ ┻┻┻┻┛
3.4.2. Flip
This mode is to flip an image horizontally and to flip an image vertically. It is used when using a back
monitoring system for vehicles or to monitor a mirror image. Neither Camera ID nor OSD menu are
inverted.
Chart 21. Flip mode setting list
SETTING VALUE
DESCRIPTION
ADVANCED
EASY
OFF
Normal image
○
×
HORIZ
Flip horizontal
○
×
VERT
Flip vertical
○
×
BOTH
Flip horizontal/vertical
○
×
FLIP
Fig. 6
Flip image
OFF
HORIZ
VERT
BOTH
37
[Operation procedure]
ADVANCED SETTING
MENU
OPERATION
W A T-1000 MA IN MENU
LON G PUS H
EA SY SETTING..
A DVANCED SETT ING..
LOA D USER SETTINGS..
SA VE US ER S ETTINGS ..
R ESTOR E FACTORY SETT INGS ..
DO WN
EXIT MENU
PU S H
A DVANCED SETT ING
x3
D OWN
PUSH
A UT OM A TIC EXPOSURE..
WHITE BA LA NCE..
DAY /NIGHT SET TING..
IMA GE SE TTING..
FUNCT IONS..
R ETURN TO MAIN MENU
IM A GE SET TING
D OWN
ZOOM
FLIP
BW M ODE
GAM MA M ODE
SHARP NE SS S ETTING..
CHROMA SETTING..
PR EVIOUS PA GE..
OFF
OFF
OFF
A UT O
PU S H
IM A GE SET TING
UP
DO WN
ZOOM
FLIP
BW M ODE
GAM MA M ODE
SHARP NE SS S ETTING..
CHROMA SETTING..
PR EVIOUS PA GE..
OFF
OFF
OFF
A UT O
OFF
HORIZ
VERT
BOTH
IM A GE SET TING
PU S H
ZOOM
FLIP
BW M ODE
GAM MA M ODE
SHARP NE SS S ETTING..
CHROMA SETTING..
PR EVIOUS PA GE..
OFF
OFF
OFF
A UT O
LO N G PUS H
38
3.4.3. BW mode
This function is used to set the color output format of the video signal output mode. The default
setting is OFF.
When OFF is selected, the BW mode output is color.
When B/W is selected, the BW mode output is monochrome.
When B/W w/Burst is selected, BW mode output is monochrome and the color burst signal is added.
B/W w/Burst mode is used for a monitor which needs color burst to indicate an image.
Chart 22. BW mode setting list
SETTING VALUE
DESCRIPTION
ADVANCED
EASY
OFF
Color output
○
×
B/W
Monochrome output
○
×
B/W w/Burst
Monochrome output with burst
○
×
BW MODE
[Operation procedure]
ADVANCED SETTING
MENU
OPERATION
W A T-1000 MA IN MENU
LO N G PUS H
EASY SETTING..
A DV ANCED SETT ING..
LOAD USER SETTINGS..
SAV E US ER S ETTINGS ..
R ESTOR E FA CTORY SETT INGS ..
DO WN
EXIT MENU
PU S H
A DVANCED SETT ING
x3
DO WN
PUSH
A UT OM A TIC EXPOSUR E..
WHITE BA LA NCE..
DAY /NIGHT SET TING..
IMAGE SE TTING..
FUNCT IONS..
R ETUR N TO MAIN MENU
IM A GE SET TING
x2 .
DO WN
ZOOM
FLIP
BW M ODE
GAM MA M ODE
SHA RP NE SS S ETTING..
CHR OMA SETTING..
PREV IOUS PA GE..
OFF
OFF
OFF
AUT O
PU S H
IM A GE SET TING
UP
DO WN
ZOOM
FLIP
BW M ODE
GAM MA M ODE
SHA RP NE SS S ETTING..
CHR OMA SETTING..
PREV IOUS PA GE..
OFF
OFF
OFF
AUT O
OFF
B/W
B/W w/Burst
IM A GE SET TING
PU S H
ZOOM
FLIP
BW M ODE
GAM MA M ODE
SHA RP NE SS S ETTING..
CHR OMA SETTING..
PREV IOUS PA GE..
OFF
OFF
OFF
AUT O
LO N G PUS H
39
3.4.4. Gamma correction
In general, the output of the CRT monitor and LCD monitor has nonlinearity against the input signal.
Therefore, the correction of the characteristic opposite to the monitor is put on the output signal on
the camera side beforehand so that the output by the monitor will become linear. This is called
gamma correction. There are five kinds of gamma correction modes for the WAT-1000.
AUTO is the mode that automatically switches to 0.45 for PAL and 0.36 for NTSC according to the
output format of the camera. Select this mode for normal usage.
0.36: The standard correction factor for PAL format
0.45: The standard correction factor for NTSC
0.6 : The correction factor which emphasizes the tone of the bright part of the standard setting
OFF: Linier output with no correction (For image processing use)
Chart 23. Gamma correction setting list
SETTING VALUE
DESCRIPTION
ADVANCED
EASY
AUTO
0.36/0.45 (Automatic switch)
○
×
0.36
PAL (Standard setting)
○
×
0.45
NTSC (Standard setting)
○
×
0.6
Emphasized bright area
○
×
OFF
Linier output
○
×
GAMMA
MODE
40
[Operation procedure]
ADVANCED SETTING
MENU
OPERATION
W A T-1000 MA IN MENU
LO N G PUS H
EA SY SETTING..
A DV ANCED SETT ING..
LOA D USER SETTINGS..
SA V E US ER S ETTINGS ..
R ESTOR E FA CTORY SETT INGS ..
DO WN
EXIT MENU
PU S H
A DV ANCED SETT ING
x3
DO WN
A UT OM A TIC EXPOSUR E..
WHITE BA LA NCE..
DAY /NIGHT SET TING..
IMA GE SE TTING..
FUNCT IONS..
R ETURN TO MAIN MENU
PUSH
IM A GE SET TING
x3
DO WN
ZOOM
FLIP
BW M ODE
GAM MA M ODE
SHA RP NE SS S ETTING..
CHR OMA SETTING..
PR EVIOUS PAGE..
OFF
OFF
OFF
A UT O
PU S H
IM A GE SET TING
UP
DO WN
ZOOM
FLIP
BW M ODE
GAM MA M ODE
SHA RP NE SS S ETTING..
CHR OMA SETTING..
PR EVIOUS PAGE..
OFF
OFF
OFF
A UT O
IM A GE SET TING
PU S H
ZOOM
FLIP
BW M ODE
GAM MA M ODE
SHA RP NE SS S ETTING..
CHR OMA SETTING..
PR EVIOUS PAGE..
AUTO
0.36
0.45
0.6
OFF
OFF
OFF
OFF
A UT O
LO N G PUS H
41
3.4.5. Sharpness
This function is used to correct the sharpness of the picture.
When DETAIL BOOST ON is selected, the edge enhancement processing is increased when an
object has enough lighting. The image becomes sharp, but noise may increase around the dark part.
When DETAIL BOOST OFF is selected, the edge enhancement mode is not available.
Chart 24.
SETTING VALUE
DETAIL
DETAIL BOOST setting list
DESCRIPTION
ON
BOOST
OFF
ADVANCED
EASY
○
×
○
×
Edge enhancement is available in
bright conditions
Edge enhancement is not available
When NOISE REDUCTION ON is selected, noise is reduced and a soft image can be obtained.
When OFF is selected, noise is visible, but a sharper image is obtained.
Chart 25.
SETTING VALUE
NOISE REDUCTION setting list
DESCRIPTION
ADVANCED
EASY
NOISE
ON
The noise control ON
○
×
REDUCTION
OFF
The noise control OFF
○
×
42
[Operation procedure]
DETAIL BOOST
MENU
NOISE REDUCTION
MENU
OPERATION
OPERATION
W AT-1000 MAIN MENU
W AT-1000 MAIN MENU
LO N G PUS H
LO N GPUS H
EASY SETTING..
ADVANCED SETT ING..
EASY SETTING..
ADVANCED SETT ING..
LOAD USER SETTINGS..
SAVE US ER S ETTINGS ..
R ESTORE FACTORY SETT INGS ..
DO WN
LOAD USER SETTINGS..
SAVE US ER S ETTINGS ..
RESTORE FACTORY SETT INGS ..
DO WN
EXIT MENU
EXIT MENU
PU S H
PU S H
ADVANCED SETT ING
x3
DO WN
ADVANCED SETT ING
x3
AUT OM ATIC EXPOSURE..
WHITE BALANCE..
DAY /NIGHT SET TING..
IMAGE SE TTING..
FUNCT IONS..
DO WN
R ETURN TO MAIN MENU
PUSH
RETUR N TO MAIN MENU
PUSH
IM AGE SET TING
x4
DO WN
ZOOM
FLIP
BW M ODE
GAM MA M ODE
SHARP NE SS S ETTING..
CHR OMA SETTING..
PREVIOUS PAGE..
IM AGE SET TING
x4
OFF
OFF
OFF
AUT O
DO WN
PU S H
ZOOM
FLIP
BW M ODE
GAM MA M ODE
SHARPNE SS S ETTING..
CHROMA SETTING..
PREVIOUS PAGE..
OFF
OFF
OFF
AUT O
PU S H
SHAR PNESS SET TING
PU S H
AUT OM ATIC EXPOSUR E..
WHITE BALANCE..
DAY /NIGHT SET TING..
IMAGE SE TTING..
FUNCT IONS..
DETAIL BOOST
NOIS E REDUCTION
SHARPNESS
ON
ON
┗┷ ┻┷┛
APERTTURE
┗┷┻┷ ┛
SHARPNESS SET TING
DO WN
PREVIOUS PAGE..
DETAIL BOOST
NOIS E REDUCTION
SHAR PNESS
ON
ON
┗┷ ┻┷┛
APERTTURE
┗┷┻┷ ┛
PREVIOUS PAGE..
PU S H
SHAR PNESS SET TING
UP
DOWN
DETAIL BOOST
NOIS E REDUCTION
SHARPNESS
ON
ON
┗┷ ┻┷┛
APERTTURE
┗┷┻┷ ┛
SHARPNESS SET TING
UP
ON
OFF
DO WN
PREVIOUS PAGE..
ON
ON
┗┷ ┻┷┛
APERTTURE
┗┷┻┷ ┛
PREVIOUS PAGE..
SHAR PNESS SET TING
PU S H
DETAIL BOOST
NOIS E REDUCTION
SHAR PNESS
DETAIL BOOST
NOIS E REDUCTION
SHARPNESS
ON
ON
┗┷ ┻┷┛
APERTTURE
┗┷┻┷ ┛
SHARPNESS SET TING
PU S H
PREVIOUS PAGE..
DETAIL BOOST
NOIS E REDUCTION
SHAR PNESS
ON
ON
┗┷ ┻┷┛
APERTTURE
┗┷┻┷ ┛
PREVIOUS PAGE..
LO N G PUS H
LON G PUS H
43
ON
OFF
When the SHARPNESS setting value is raised, the level of edge enhancement of the whole screen
goes up and becomes sharper, but noise is highly visible.
Chart 26.
SETTING VALUE
SHARPNESS
-7~7
SHARPNESS setting list
DESCRIPTION
The level of edge enhancement on the
ADVANCED
EASY
○
×
whole screen
When the APRETURE setting value is raised, the level of the horizontal edge enhancement goes up
and becomes a sharper image
Chart 27.
SETTING VALUE
APERTURE
-7~7
APERTURE setting list
DESCRIPTION
The level of horizontal edge object
enhancement
44
ADVANCED
EASY
○
×
[Operation procedure]
SHARPNESS
MENU
OPERATION
OPERATION
W AT-1000 MAIN MENU
W AT-1000 MAIN MENU
LON G PUS H
LON GPUS H
EASY SETTING..
ADVANCED SETT ING..
EASY SETTING..
ADVANCED SETT ING..
LOAD USER SETTINGS..
SAVE USER S ETTINGS..
R ESTORE FACTORY SETT INGS ..
DOWN
APERTURE
MENU
LOAD USER SETTINGS..
SAVE USER SETTINGS ..
RESTOR E FACTORY SETT INGS ..
DOWN
EXIT MENU
EXIT MENU
PU S H
PU S H
ADVANCED SETT ING
x3
DOWN
ADVANCED SETT ING
x3
AUT OM ATIC EXPOSUR E..
WHITE BALANCE..
DAY /NIGHT SET TING..
IMAGE SE TTING..
FUNCT IONS..
DOWN
R ETUR N TO MAIN MENU
AUT OM ATIC EXPOSUR E..
WHITE BALANCE..
DAY /NIGHT SET TING..
IMAGE SE TTING..
FUNCT IONS..
RETURN TO MAIN MENU
PUSH
PUSH
IM AGE SET TING
x4
DOWN
ZOOM
FLIP
BW M ODE
GAM MA M ODE
SHARPNE SS S ETTING..
CHROMA SETTING..
PR EVIOUS PAGE..
IM AGE SET TING
x4
OFF
OFF
OFF
AUT O
DOWN
PU S H
DOWN
DETAIL BOOST
NOISE REDUCT ION
SHARPNESS
ON
ON
┗┷┻┷ ┛
APER TURE
┗┷┻┷ ┛
S HARPNES S SE TTING
x3
DOWN
PR EVIOUS PAGE..
ON
ON
┗┷┻┷ ┛
APERTURE
┗┷┻┷ ┛
PU S H
SHAR PNESS SE TTING
DOWN
DETAIL BOOST
NOISE R EDUCT ION
SHARPNESS
PREVIOUS PAGE..
PU S H
UP
OFF
OFF
OFF
AUT O
PU S H
SHAR PNESS SE TTING
x2
ZOOM
FLIP
BW M ODE
GAM MA M ODE
SHARP NE SS S ETTING..
CHR OMA SETTING..
PREVIOUS PAGE..
DETAIL BOOST
NOISE REDUCT ION
SHARPNESS
ON
ON
┗┷┻┷ ┛
APER TURE
┗┷┻┷ ┛
S HARPNES S SE TTING
UP
-7~7
DOWN
PR EVIOUS PAGE..
DETAIL BOOST
NOISE R EDUCT ION
SHARPNESS
ON
ON
┗┷┻┷ ┛
APERTURE
┗┷┻┷ ┛
PREVIOUS PAGE..
-7~7
SHAR PNESS SE TTING
PU S H
DETAIL BOOST
NOISE REDUCT ION
SHARPNESS
ON
ON
┗┷┻┷ ┛
APER TURE
┗┷┻┷ ┛
S HARPNES S SE TTING
PU S H
PR EVIOUS PAGE..
DETAIL BOOST
NOISE R EDUCT ION
SHARPNESS
ON
ON
┗┷┻┷ ┛
APERTURE
┗┷┻┷ ┛
PREVIOUS PAGE..
LON G PUS H
LON G PUS H
45
3.4.6. Chroma
CHROMA LEVEL is the parameter adjusting the vividness of the color of the video signal
When the chroma level is increased, the color of the video signal becomes more vivid.
The default setting is 0.
CHROMA LIMIT is the parameter for setting the maximum value of color saturation degree. When
the setting value of the chroma limit is increase, it can reduce the color fade around high luminance
in extreme backlight conditions. However, with a standard object, the color may change slightly in
some areas due to the high luminance area on the screen.
Chart 28. Color setting list
SETTING VALUE
CHOROMA
DESCRIPTION
Setting the vividness of the color of
-7~7
LEVEL
ADVANCED
EASY
○
×
○
×
the video signal
CHROMA
100~130
Setting the color saturation degree
LIMIT
Fig. 7
CHROMA LIMIT:100
CHROMA LIMIT:130
46
[Operation procedure]
-7~7
100~130
47
3.5. Functions
3.5.1. Focus adjustment
When the back focus and the focus of the lens is adjusted, the meter displays the focus condition.
The large meter value of the focus display means a better focus. When the lighting conditions
change, the meter value of the focus will also change. Therefore, please adjust the focus under
stable lighting conditions if possible.
[Operation procedure]
48
3.5.2. Video output format
The WAT-1000 has a NTSC version and PAL version for convenience. However, the video output
format can be selected using the “On Screen Display” menu.
VIDEO STANDARD is a parameter selecting the video output format. An NTSC version or a PAL
version can be selected as needed. Set the same version as the target system.
Chart 29.
SETTING VALUE
VIDEO STANDARD setting list
DESCRIPTION
ADVANCED
EASY
VIDEO
NTSC
NTSC output
○
×
STANDARD
PAL
PAL output
○
×
49
[Operation procedure]
NTSC
PAL
50
After the VIDEO STANDARD has been selected, push the center of the jog dial, which will you take
you to the video output format list.
SETUP LEVEL is set to the reference level of black. This mode is only available with NTSC.
7.5IRE is equivalent of NTSC-M, which is mainly applied in US. For 0IRE, it is equivalent of NTSC-J,
which is mainly applied in Japan. Select the SETUP LEVEL according to the specification of the
target system. The default setting is 7.5IRE.
Chart 30.
SETTING VALUE
SETUP LEVEL setting list
DESCRIPTION
ADVANCED
EASY
7.5IRE
NTSC-M worth
○
×
0IRE
NTSC-J worth
○
×
SETUP LEVEL
[Operation procedure]
NTSC
7.5IRE
0IRE
51
VIDEO LEVEL is set to a standard level of the video output. 75IRE is the standard video output level.
For 100IRE, when it is selected, high contrast images can be seen, but over exposure may occur
with bright parts depending on the connected devices. The default setting is 100IRE
Chart 31.
VIDEO LEVEL setting list
SETTING VALUE
DESCRIPTION
ADVANCED
EASY
75IRE
Normal output
○
×
100IRE
High contrast output
○
×
VIDEO LEVEL
[Operation procedure]
VIDEO LEVEL(NTSC)
MENU
VIDEO LEVEL(PAL)
MENU
OPERATION
OPERATION
VIDEO OUTPUT
VIDE O STANDARD
FRAME STRUCTURE
VIDEO OUTPUT
NTSC..
NORMAL
VIDE O STANDARD
FRAME STRUCTURE
PUSH
PUSH
RETURN TO MAIN MENU
RETURN TO MAIN ME NU
NTSC
DOWN
NTSC..
NORMAL
SETUP LEVEL
VIDE O LEVEL
PAL
7.5IRE
100IRE
COLOR BAR
VIDE O LEVEL
100IRE
COLOR BAR
OFF
OFF
PUSH
RETURN TO MAIN MENU
RETURN TO MAIN MENU
PUSH
NTSC
UP
SETUP LEVEL
VIDE O LEVEL
PAL
7.5IRE
100IRE
COLOR BAR
OFF
DOWN
RETURN TO MAIN MENU
VIDE O LEVEL
100IRE
COLOR BAR
OFF
UP
100IRE
75IRE
DOWN
RETURN TO MAIN MENU
PAL
NTSC
PUSH
SETUP LEVEL
VIDE O LEVEL
COLOR BAR
7.5IRE
100IRE
PUSH
VIDE O LEVEL
100IRE
COLOR BAR
OFF
OFF
RETURN TO MAIN MENU
RETURN TO MAIN MENU
LON GPUS H
LONGPUS H
52
100IRE
75IRE
When the COLOR BAR ON is selected, the adjustment color bar signal is shown on the monitor. This
mode is used when the brightness and the color of the monitor needs calibrating. The default setting
is OFF.
Chart 32.
SETTING VALUE
COLOR BAR setting list
DESCRIPTION
ADVANCED
EASY
OFF
Normal video output
○
×
ON
Color bar output
○
×
COLOR BAR
[Operation procedure]
COLOR BAR(NTSC)
MENU
COLOR BAR(PAL)
MENU
OPERATION
OPERATION
VIDEO OUTPUT
VIDEO STANDARD
FRAME STRUCTURE
VIDEO OUTPUT
NTSC..
NORMAL
VIDE O STANDARD
FRAME STRUCTURE
PUSH
PUSH
RETURN TO MAIN ME NU
RETURN TO MAIN ME NU
NTSC
x2
DOWN
SETUP LEVEL
VIDEO LEVEL
PAL
7.5IRE
100IRE
COLOR BAR
DOWN
VIDE O LEVEL
100IRE
COLOR BAR
OFF
OFF
RETURN TO MAIN MENU
RETURN TO MAIN MENU
PUSH
PUSH
NTSC
UP
SETUP LEVEL
VIDEO LEVEL
PAL
7.5IRE
100IRE
COLOR BAR
VIDEO LEVEL
100IRE
COLOR BAR
OFF
UP
OFF
DOWN
OFF
ON
DOWN
OFF
ON
RETURN TO MAIN MENU
RETURN TO MAIN MENU
NTSC
PUSH
NTSC..
NORMAL
SETUP LEVEL
VIDEO LEVEL
COLOR BAR
PAL
7.5IRE
100IRE
VIDE O LEVEL
100IRE
COLOR BAR
OFF
PUSH
OFF
RETURN TO MAIN MENU
RETURN TO MAIN MENU
LON GPUS H
LON GPUS H
53
3.5.3. Frame structure
This function is set to the frame construction of the video output. The video signal of the NTSC/PAL
format is an interlace format that composes of one frame per two fields of an even number line and
an odd number line. In the WAT-1000, the method of generating two fields can be selected from
three modes.
In the NORMAL mode, one field is generated from information exposed at 1/60 second. When
capture is complete using a PC etc. because former information on the two fields that compose one
frame is different, a gap (combing noise) between lines is generated.
1/60s
1st
FIELD
1/60s
2nd
FIELD
1/60s
1st
FIELD
1/60s
2nd
FIELD
In the PROGRESSIVE mode, two fields of the even number line and odd number lines are
generated from information exposed at 1/60 second. The gap between lines does not occur at
capture because the exposure timing of the two fields that composes one frame is the same.
However, because the exposure becomes intermittent, the resolution of the moving object becomes
decreased.
1/60s
1st
FIELD
1/60s
2nd
FIELD
1/60s
1st
FIELD
1/60s
2nd
FIELD
54
In the FREEZE mode, it generates the field the same as the PROGRESSIVE mode. However, it
doesn’t expose the second frame, the following frame is generated from the first exposure
information.
1/60s
1st
FIELD
1/60s
2nd
FIELD
1/60s
1st
FIELD
1/60s
2nd
FIELD
Chart 33.
SETTING VALUE
FRAME STRUCTURE setting list
DESCRIPTION
ADVANCED
EASY
NORMAL
Normal output
○
×
PROGRESSIVE
Progressive output
○
×
FREEZE
Still image output
○
×
FRAME
STRUCTURE
55
[Operating procedure]
NORMAL
PROGRESSIVE
FREEZE
56
3.5.4. Camera ID
CAMERA ID function is to display the arbitrary characters on the screen. When several cameras are
used with different parameter settings, it is effective to identify a camera on the screen.
ID DISPLAY is set to ON/OFF for the camera ID. ON is for the display, and OFF is for nondisplay.
Chart 34.
SETTING VALUE
ID DISPLAY setting list
DESCRIPTION
ADVANCED
EASY
ID
ON
Camera ID display
○
×
DISPLAY
OFF
Camera ID nondisplay
○
×
The CAMERA ID can use various characters for the camera ID. The available character numbers
are up to 8 characters for the camera ID, and the available characters are alphabet (capital letters),
numerals and symbols (“ “, ”+”, ”-”, ”_”, ”&”, ”#”, ”@”). The operation method of the CAMERA ID
setting is a little different to the basic operation; therefore, please refer to the operation procedure as
shown on the next page.
Chart 35.
SETTING VALUE
CAMERA ID setting list
DESCRIPTION
The setting for character string of the
CAMERA ID
ADVANCED
EASY
○
×
camera ID
ID POSITION is to set the display position of camera ID on the OSD.
Chart 36.
SETTING VALUE
ID POSITION setting list
DESCRIPTION
ADVANCED
EASY
UP-LEFT
Upper left portion of the screen
○
×
UP-CENTER
Upper center of the screen
○
×
UP-RIGHT
Upper right portion of the screen
○
×
DOWN-LEFT
Lower left portion of the screen
○
×
DOWN-RIGHT
Lower right of the screen
○
×
ID
POSITION
57
[Operation procedure]
ID DISPLAY
MENU
ID POSITION
MENU
OPERATION
OPERATION
WAT-1000 MAIN MENU
WAT-1000 MAIN MENU
LONGPUSH
LONGPUSH
EASY SETTING..
ADVANCED SETTING..
EASY SETTING..
ADVANCED SETTING..
LOAD USER SETTINGS..
SAVE USER SETTINGS..
RESTORE FACTORY SETTINGS..
DO WN
LOAD USER SETTINGS..
SAVE USER SETTINGS..
RESTORE FACTORY SETTINGS..
DOWN
EXIT MENU
EXIT MENU
PUSH
PUSH
ADVANCED SETTING
UP
x2
ADVANCED SETTING
UP
x2
AUTOMATIC EXPOSURE..
WHITE BALANCE..
DAY/NIGHT SETTING..
IMAGE SETTING..
FUNCTIONS..
PUSH
AUTOMATIC EXPOSURE..
WHITE BALANCE..
DAY/NIGHT SETTING..
IMAGE SETTING..
FUNCTIONS..
RETURN TO MAIN MENU
PUSH
FUNCTIONS
RETURN TO MAIN MENU
FUNCTIONS
UP
UP
x2
FOCUS..
VIDEO OUTPUT..
CAMERA ID SETTING..
ACTIVITY DETECTION..
BAUDRATE
x2
38400
RETURN TO MAIN MENU
FOCUS..
VIDEO OUTPUT..
CAMERA ID SETTING..
ACTIVITY DETECTION..
BAUDRATE
38400
RETURN TO MAIN MENU
PUSH
PUSH
CAMERA ID SETTING
ID DISPLAY
CAMERA ID:
ID POSITION
CAMERA ID SETTING
x2
OFF
CAMERA1
UP -LEFT
DOWN
ID DISPLAY
CAMERA ID:
ID POSITION
OFF
CAMERA1
UP -LEFT
PUSH
RETURN TO MAIN MENU
RETURN TO MAIN MENU
PUSH
CAMERA ID SETTING
UP
ID DISPLAY
CAMERA ID:
ID POSITION
CAMERA ID SETTING
OFF
CAMERA1
UP -LEFT
UP
DOWN
OFF
CAMERA1
UP -LEFT
DOWN
RETURN TO MAIN MENU
RETURN TO MAIN MENU
CAMERA ID SETTING
PUSH
ID DISPLAY
CAMERA ID:
ID POSITION
ID DISPLAY
CAMERA ID:
ID POSITION
CAMERA ID SETTING
OFF
CAMERA1
UP -LEFT
PUSH
RETURN TO MAIN MENU
ID DISPLAY
CAMERA ID:
ID POSITION
RETURN TO MAIN MENU
LONGPUSH
LONGPUSH
58
OFF
CAMERA1
UP -LEFT
CAMERA ID
MENU
OPERATION
WAT-1000 MAIN MENU
LONGPUSH
EASY SETTING..
ADVANCED SETTING..
LOAD USER SETTINGS..
SAVE USER SETTINGS..
RESTORE FACTORY SETTINGS..
DO WN
EXIT MENU
PUSH
CAMERA ID SETTING
ADVANCED SETTING
UP
x2
AUTOMATIC EXPOSURE..
WHITE BALANCE..
DAY/NIGHT SETTING..
OFF
CAMERA1
ID POSITION
UP -LEFT
PUSH
IMAGE SETTING..
FUNCTIONS..
PUSH
ID DISPLAY
CAMERA ID:
RETURN TO MAIN MENU
RETURN TO MAIN MENU
FUNCTIONS
CAMERA ID SETTING
UP
x2
FOCUS..
VIDEO OUTPUT..
CAMERA ID SETTING..
ACTIVITY DETECTION..
BAUDRATE
UP
ID DISPLAY
CAMERA ID:
ID POSITION
OFF
BAMERA1
UP -LEFT
38400
RETURN TO MAIN MENU
RETURN TO MAIN MENU
PUSH
CAMERA ID SETTING
ID DISPLAY
CAMERA ID:
ID POSITION
CAMERA ID SETTING
OFF
CAMERA1
UP -LEFT
ID DISPLAY
CAMERA ID:
ID POSITION
PUSH
OFF
DAMERA1
UP -LEFT
RETURN TO MAIN MENU
DO WN
RETURN TO MAIN MENU
CAMERA ID SETTING
ID DISPLAY
CAMERA ID:
ID POSITION
OFF
CAMERA1
UP -LEFT
CAMERA ID SETTING
ID DISPLAY
CAMERA ID:
ID POSITION
RETURN TO MAIN MENU
LONGPUSH
CAMERA ID SETTING
RETURN TO MAIN MENU
ID DISPLAY
CAMERA ID:
ID POSITION
OFF
CAMERA1
UP -LEFT
RETURN TO MAIN MENU
LONGPUSH
59
OFF
CAMERA1
UP -LEFT
3.5.5. Activity detection
This function outputs an alarm signal and operates the digital zoom when motion is detected.
When ACTIVITY DETECTION is ON, the motion detection is available. When OFF is selected,
motion detection mode is not available.
Chart 37.
ACTIVITY DETECTION setting list
SETTING VALUE
DESCRIPTION
ADVANCED
EASY
ACTIVITY
ON
The motion detection is available
○
×
DETECTION
OFF
The motion detection is not available
○
×
When FULL SCREEN is selected, motion on the full screen is detected. When CUSTOM is selected,
the area where motion is detected can be specified.
Chart 38.
SETTING VALUE
DETECTION ZONE setting list
DESCRIPTION
ADVANCED
EASY
DETECTION
FULLSCREEN
The detection area is set to full screen.
○
×
ZONE
CUSTOM
The detection area can be specified
○
×
RESPONSE ZOOM is the function that is to zoom to a required area when a moving body is
detected. Specify the zoom ratio in DIG.ZOOM, horizontal position in DIG.PAN and vertical position
in DIG.TILT. The zoom ratio can be set up to X4. When RESPONSE ZOOM is not needed, set
DIG.ZOOM to 1 (left extremity)
Chart 39.
SETTING VALUE
RESPONSE ZOOM setting list
DESCRIPTION
ADVANCED
EASY
DIG.ZOOM
X1 ~ X4
The settings for zoom ratio
○
×
DIG.PAN
-100 ~ 100
The settings for horizontal position
○
×
DIG.TILT
-100 ~ 100
The settings for vertical position
○
×
60
THRESHOLD & DURATION is used to set the duration of the sensitivity of the motion detection and
alarm signal.
ACTIVITY THR is used to set the sensitivity of the motion detection. The sensitivity become high
when the set value is low, and it can detect a moving body with a slight change. The default setting
is 25.
The DURATION sets the operation period of the alarm signal output and the digital zoom after the
motion detection. The default setting is 5 seconds. (Unit: second)
Chart 40. Motion detection setting list
SETTING VALUE
DESCRIPTION
ADVANCED
ACTIVITY THR.
0 ~ 255
The sensitivity setting of detection
○
DURATION
3 ~ 60
Alarm output period[s]
○
61
EASY
[Operation procedure]
ACTIVITY DETECTION
MENU
OPERATION
WAT-1000 MAIN MENU
LONGPUSH
EASY SETTING..
ADVANCED SETTING..
LOAD USER SETTINGS..
SAVE USER SETTINGS..
RESTORE FACTORY SETTINGS..
DO WN
EXIT MENU
PUSH
ADVANCED SETTING
UP
x2
AUTOMATIC EXPOSURE..
WHITE BALANCE..
DAY/NIGHT SETTING..
IMAGE SETTING..
FUNCTIONS..
PUSH
RETURN TO MAIN MENU
FUNCTIONS
UP
x2
FOCUS..
VIDEO OUTPUT..
CAMERA ID SETTING..
ACTIVITY DETECTION..
BAUDRATE
38400
RETURN TO MAIN MENU
PUSH
ACTIVITY DETECTION SETTING
ACTIVITY DETECTION
OFF
DETECTION ZONE FULLSCREEN..
RESPONSE ZOOM..
THRESHOLD & DURATIO N..
PUSH
RETURN TO MAIN MENU
ACTIVITY DETECTION SETTING
UP
ACTIVITY DETECTION
OFF
DETECTION ZONE FULLSCREEN..
RESPONSE ZOOM..
THRESHOLD & DURATIO N..
ON
OFF
DOWN
RETURN TO MAIN MENU
ACTIVITY DETECTION SETTING
ACTIVITY DETECTION
OFF
DETECTION ZONE FULLSCREEN..
RESPONSE ZOOM..
THRESHOLD & DURATIO N..
LONGPUSH
RETURN TO MAIN MENU
62
DETECTION ZONE : FULLSCREEN
OPERATION
MENU
OPERATION
MENU
ACTIVITY DETECTION SETTING
CUSTOM DETECTION ZONE
ACTIVITY DETECTION
OFF
DETECTION ZONE FULLSCREEN..
RESPONSE ZOOM..
THRESHOLD & DURATIO N..
UP
PUSH
DOWN
RETURN TO MAIN MENU
ACTIVITY DET ZONE
PUSH
LONGPUSH
CUSTOM DETECTION ZONE
UP
ACTIVITY DETECTION SETTING
DOWN
ACTIVITY DETECTION
OFF
DETECTION ZONE FULLSCREEN..
RESPONSE ZOOM..
THRESHOLD & DURATIO N..
LONGPUSH
RETURN TO MAIN MENU
PUSH
CUSTOM DETECTION ZONE
UP
DETECTION ZONE : CUSTOM
OPERATION
MENU
DOWN
ACTIVITY DETECTION SETTING
ACTIVITY DETECTION
OFF
DETECTION ZONE
CUSTOM..
RESPONSE ZOOM..
THRESHOLD & DURATIO N..
PUSH
PUSH
RETURN TO MAIN MENU
CUSTOM DETECTION ZONE
UP
CUSTOM DETECTION ZONE
※
DOWN
ACTIVITY DETECTION SETTING
ACTIVITY DETECTION SETTING
ACTIVITY DETECTION
OFF
DETECTION ZONE
CUSTOM..
RESPONSE ZOOM..
ACTIVITY DETECTION
OFF
DETECTION ZONE
CUSTOM..
RESPONSE ZOOM..
THRESHOLD & DURATIO N..
THRESHOLD & DURATION..
LONGPUSH
LONGPUSH
RETURN TO MAIN MENU
RETURN TO MAIN MENU
63
3.5.6. Baudrate
This function is used to set the communication speed of the serial communication (Unit: bps).
Set the BAUDRATE according to the host side.
Chart 41. Communication speed setting list
SETTING VALUE
BAUD
RATE
DESCRIPTION
ADVANCED
EASY
115200
115,200bps
○
×
57600
57,600bps
○
×
38400
38,400bps
○
×
19200
19,200bps
○
×
9600
9,600bps
○
×
4800
4,800bps
○
×
2400
2,400bps
○
×
64
[Operation procedure]
115200
57600
38400
19200
9600
4800
2400
65
4. Saving, Loading and Restoring
There are three areas in the WAT-1000, which are called the “work area”, the “user area” and the
“default area”. The explanation of each area is as follows.
For the work area, this is the setting parameter that is running at the present and has been
changed. This area is synchronized with the OSD menu, therefore, when the parameter setting on
the OSD menu changes, the parameters in the work area will also change. If the work area
parameter is changed but not saved and the camera is turned off the settings will be lost and the
camera, when turned on again will return to the parameter set before.
For the user area, this is the area to save a setting parameter of the work area. The setting saved
to the user area is retrieved to the work area at the time of startup. Also, a setting of the user area
can be retrieved using the OSD menu at times other than startup. The factory setting, the default
parameter is saved to the user area.
The default area, this is the area where the factory setting is saved. The factory setting can be
retrieved to the work area by using the OSD menu. The default area is a read-only setting.
USER
AREA
WORK
AREA
DEFAULT
AREA
66
4.1. Loading a saved setting parameter
Retrieve the saved setting parameter in the user area to work area.
Then, the work area is updated, and the retrieved setting is installed into the camera.
[Operation procedure]
OSD OFF
67
4.2. Saving a setting parameter
Save a current work area setting to the user area.
[Operation procedure]
68
4.3. Restoring the factory default settings
Retrieve the factory setting to the work area. The work area will be updated and the retrieved setting
will be shown on the OSD.
If the user area also needs to be restored to the factory settings, operate same as the previous
page.
[Operation procedure]
69