1
Replacing Button Labels
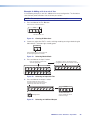
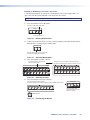
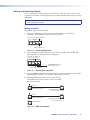
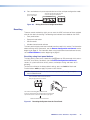
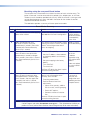
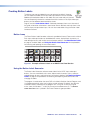
The button assembly consists of a clear lens cap, the button label, and a white diffuser.
Remove the button assembly from the HDXP as follows:
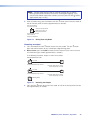
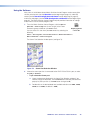
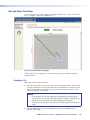
1. Remove the button assembly by inserting a small, flat-bladed screwdriver, such as
an Extron Tweeker, between the button base and the diffuser to gently pry the button
assembly off the button plunger, as shown in figure 93.
2. Locate the small corner notch on the clear lens cap, and slide the screwdriver
between the lens cap and the diffuser (see b in figure 93).
3. Using a rotating motion of the screwdriver, carefully pry the two pieces apart (see c in
figure 93).
4. Lift out the transparent square label that you want to replace, being careful not to
damage the circuits beneath it. You may need to use the small screwdriver to gently
pry the label out.
5. Insert one of the new labels you created in before starting into the clear button cap,
align the white backing plate with the cap, and firmly snap it into place.
6. Gently, but firmly, press the reassembled button into place on the HDXP front panel.
7. Repeat steps 1 through 6 as needed to relabel other buttons.
Plunger
Base
TE
XT
3
Clear Lens
Diffuser
Button Label
Pry the two
pieces apart.
2
Notch
Separating the twopiece button here at
the corner.
Figure 93. Replacing a Button Label
HDXP Plus Series Switchers • Matrix Software
94