1
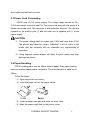
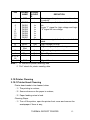
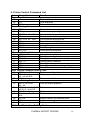
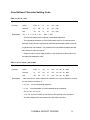
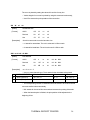
CONTENT
Guide …………………………………………………………………………… 2
1. General Information …………………………………………………………3
1.1 Main Features ……………………………………………………………..3
2. Technical Specification ……………………………………………………...3
3. Setting up the Printer
……………………………………………………… .5
3.1 Unpacking the Printer ……………………………………………………..5
3.2 Installation of Printer ………………………………………………………5
3.3 Power Cord Connecting …………………………………………………..7
3.4 Paper Handling …………………………………………………………….7
3.5 Power Switch, Buttons and Indicators …………………………………..7
3.6 The Printer Self Test ………………………………………………………8
3.7 Hexadecimal Dumping ……………………………………………………8
3.8 Serial Interface …………………………………………………………… 9
3.9 Parallel Interface ………………………………………………………...9
3.10 Printer Cleaning ………………………………………………………...10
3.11 Paper Jam Fixing ……………………………………………………….12
3.12 Trouble Shooting ……………………………………………………….12
4. Print Control Command List ……………………………………………….16
5. Printer Control Command ………………………………………………… 17
5.1 Command Conception ………………………………………………….17
5.2 Command Description ………………………………………………….18
THERMAL RECEIPT PRINTER
1
Guide
The new series of PD230 are advanced versions of embedded thermal
receipt printer, which have the fastest printing speed, the most reliable quality,
and the most advanced technique.
Due to the characters of small size, easy operating and high cost
performance ratio, PD230 series printers have been widely used in areas of
medical instrument, communication testing application, electronic weighing
apparatus, banking, superstore, fire department, electric power system and
restaurant, and etc…
This product comes with a one-year warranty and whole-life technical
support services.
Safety Notice
Before using the printer, please read the following items carefully and abide to
the instructions strictly.
1. SAFETY WARNING
WARNING: Do not touch the printer cutter.
WARNING: Do not touch the printer head or other accessories in and
after the printing process, while the printer head is a heating
part.
WARNING: Do not touch the printer head or the connecting plug,
avoiding the damage of static.
2 . CAUTION
(1) Install the printer on the stable surface. Choose firm, level surface where
the printer will not be exposed to vibration.
(2) Do not use and store the printer in the location exposed to high
temperature, high humidity and pollution.
THERMAL RECEIPT PRINTER
2
(3) Do not let water or other electric conductive materials into the printer.
Cut off the power when it unfortunately happens.
(4) Do not operate the printing task without paper feed. This will make
serious damage to the roller and printer head.
(5) Do not disassemble the printer for reparation or modification without
authorization.
(6) High quality paper is recommended for printing to assure the printing
quality and printer lifespan.
(7) Make sure the printer power is off when plug and unplug the cable.
(8) Properly keep this manual for your reference.
1. General Information
1.1 Main Features
●
High printing quality
●
Low working noise and high printing speed
●
Small size and nice outlook
●
Easy paper loading and easy maintenance
●
Parallel and Serial interface are available
●
Built-in data buffer (Enable receiving data when printing)
●
Enlarge font printing and line space adjusting supported
●
Different DPI bitmap and image download printing supported
●
Various barcode printing supported
●
Low power consumption and operation cost (without ribbon and cartridge)
●
Compatible with ESC/POS command protocols
THERMAL RECEIPT PRINTER
3
2. Technical Specification
●
Print method: Thermal line printing
●
Paper width: 57.5±0.5mm
●
Printable width: 48mm
●
Printing speed: 60mm/sec. or 16lines/sec.
●
Printer head character:
Print density: 384dots/line or 8dots/mm
Reliability: 50,000 meters
When temperature is too high inside the printer, the printer head’s
overheating protection function makes printer offline and stop printing, and
the error indicator lighting or status indicator flashing. After the temperature
falls, the printer resumes to online status and continue printing.
●
Interfaces:
4
3
2
1
25 23 21 19 17 15 13 11 9 7
26 24 22 20 18 16 14 12 10 8
D C 5 V/ 3 A PO W ER S O CK E T
5
6
3
4
P AR A L LE L P OR T S OC K ET
1
2
9
10
7
8
5
6
3
4
1
2
S ER I A L P O R T S O C KE T
Serial: D-SUB 10-socket (Panel style), baud rate 1200bps, 2400bps,
4800bps, 9600bps(Default) and 19200bps are available, no
parity check for data structure, 8byte data bit, one or more
than one stop bit, support RTS/CTS and XON/XOFF
Handshake Protocol.
Parallel: D-SUB 26-socket (Pin style), two-way parallel, 8byte parallel
interface, supports BUSY/nAck handshake protocol.
Power Supply: DC 5V/3A
●
Character:
ASCII Font Set:
12×24 dots,1.25(W)×3.00(H) mm
Simplified / Traditional Chinese:
24×24 dots, 3.00(W)×3.00(H) mm
THERMAL RECEIPT PRINTER
4
Barcode: EAN(JAN)13、EAN(JAN)8
●
Paper:
Paper type: Thermal Print Paper
Width: 57.5±0.5mm
Thickness: 0.06~0.08mm
Paper roll diameter (Max):Φ65mm
Paper roll diameter (Min):Φ12mm
Recommended Paper:
Model
Manufacturer
AF50KS-E Jujo Thermal Oy(Finland)
TF-50KS-E Nippon Paper Industries Co.,Ltd
CAUTION:
(1) High quality or equivalent paper is recommended for printing to
assure the printing quality and printer head lifespan.
(2) Do not use paper rolls that have paper glued to the core, otherwise
the printer may be damaged.
(3) If the paper is polluted by the chemical or oil, which leads to fade
color or less sensibility of heat, and printing quality may be
influenced.
(4) Do not rub the paper surface by any hard goods, otherwise the
paper will depigmentize.
(5) When the temperature is higher than 70℃, paper will depigmentize.
Please pay special attention to the temperature, humidity and
illumination.
6
●
Reliability: 5×10 lines(MCBF)
●
Protocol: Compatible with ESC/POS protocol
Character Printing: ANK character, defined characters and Chinese
character proportional printing, and character margin adjust
supported.
Bitmap Printing: Support different density image download and print
Curve Printing: Support curve print
THERMAL RECEIPT PRINTER
5
●
Printer DC Input: DC 5V/3A
●
Printer weight: Approx.140g (without paper roller)
●
Dimensions: 85(L)× 85(W)× 42.6(H)mm
●
Environmental:
Operation Temperature:
0~45℃
Storage Temperature: -10~50℃
●
Operation Humidity: 10~80%
Storage Humidity: 10~90%
Models:
PD230S Serial Interface
PD230P Parallel Interface
3. Setting up the Printer
3.1 Unpacking the Printer
Make sure you have the following items:
Printer
1 unit
Power Cord and Adapter
1 set
User’s Manual
1 unit
3.2 Installation of Printer
3.2.1 Measurement
The shape structure and dimension of the printer are as follows:
●
Dimension: 85mm×85mm×42.6mm
●
Embedded Deepness: 40.7mm
●
The max diameter of paper roll is 30mm.
THERMAL RECEIPT PRINTER
6
3.2.2 Installations
Please insert the embedded part of the printer into the fix hole of other
instruments or devices. Then put the clip into position A and tighten the screw.
Another side’s installation is as the same.
The print can be installed horizontally or vertically. If it's installed vertically,
the paper hollow needs to be adown. It's recommended to use the 0.5mm to
10mm thickness of plate or plastic panel, even though the thickness of panel
THERMAL RECEIPT PRINTER
7
won't affect the fastness of printer.
3.3 Power Cord Connecting
PD230 uses 5V DC power supply. The voltage range should be 5V±
0.25V and electric current at least 3A. The power cord along with the printer is a
double wire power cord. The connector is with protection structure. The red wire
connects to the positive pole (+) and the other one to negative pole (-) of the
power supply.
CAUTION:
(1)The power voltage can't be higher than 5.25V and lower than 4.75V.
The electric pole must be correct. Otherwise, it will do harm to the
printer and the company will not undertake any responsibility of
reparation.
(2)Using improper power adapter will affect the print quality and even
damage the printer.
3.4 Paper Handling
PD230 is designed to use the 58mm thermal paper. Easy paper loading
structure makes loading paper convenient. The max diameter of paper roll is
30mm.
Follow the steps:
(1) Open the printer front cover.
(2) Insert the paper roll into the paper hollow.
(3)Feed the paper manually and close the front cover.
(4)Make the paper edge neat by the printer cutter.
THERMAL RECEIPT PRINTER
8
3.5 Buttons and Indicators
FEED: To feed the paper
When the indicator on standing status, press “FEED” button to feed
continuously, and it is invalid during the printing process.
ONLINE: To switch online/offline status
Press ONLINE to switch online/offline status.
When the printer is online, the STATUS indicator is light.
When the printer is offline, the STATUS indicator is dim.
STATUS: Status Indicator
Indicating the printer status.
When the status indicator is light, the printer is online;
When the status indicator is dim, the printer is turned off or offline;
When the status indicator flashes, happens shortage of the paper, printer
head overheating, printer head error or other unconventionalities.
3.6 The Printer Self Test
The self-test checks whether the printer has any problems. If the printer
can correctly print the self-test list, it means the printer itself function well.
Otherwise, the printer needs repair.
The self-test prints the current printer status, which provides the control
ROM version, current interface, English letters and some Chinese characters.
Self Test Operation: Make sure paper roll has been installed properly
as well as the power cord. Turn on the power while holding down the FEED
button. Release the FEED button after less than five seconds. The self-test
THERMAL RECEIPT PRINTER
9
begins.
The self-test automatically ends after printing the following.
** Completed **
3.7 Hexadecimal Dumping
This feature allows experienced users to see exactly what data is coming
to the printer. This can be useful in finding the transmission problem between
the printer and computer.
Start Hexadecimal Dumping: Make sure paper roll has been
installed properly as well as the power cord. Turn on the power while holding
down the REVERSE button. Release the REVERSE button after more than five
seconds. The hexadecimal dumping mode is on. Begins with “Hexadecimal
Dump”, the printer automatically starts printing the hexadecimal codes and the
corresponding characters.
CAUTION:
(1)A period “.” is printed for each code that no ASCII equivalent.
(2)During the hexadecimal dumping, all commands are disabled.
End Hexadecimal Dumping: Turn off the printer and then the
hexadecimal mode is off.
Sample is as follow:
3.8 Serial Interface
PD230S use the serial interface of D-SUB 10-socket (Panel style), baud
rate 1200bps, 2400bps, 4800bps, 9600bps(Default) and 19200bps are
available, no parity check for data structure, 8byte data bit, one or more than
one stop bit, support RTS/CTS and XON/XOFF Handshake Protocol.
THERMAL RECEIPT PRINTER
10
Pins and Functions Definition:
9
10
PIN
5
3
7
8
5
6
3
4
1
2
SIGNAL
NAME
TXD
RXD
SIGNAL
SOURCE
In
Out
DEFINITION
Receive data.
When using the XON/XOFF handshake
protocol, the printer sends the control
code XON/XOFF to the computer.
6
CTS
Out
Low voltage for busy status. High
voltage for ready to send data to the
printer.
2
DSR
Out
The signal response the printer status.
High voltage for printer online.
9
GND
-Signal Grand
Note: 1. “In” stands for printer receiving data.
2. “Out” stands for printer sending data.
3.9 Parallel Interface
PD230P uses the parallel interface of D-SUB 26Pin socket with 8bit
transmission speed, and supports BUSY/nAck Handshake Protocol.
Pins and Functions Definition:
25 23 21 19 17 15 13 11 9
26 24 22 20 18 16 14 12 10
7
8
5
6
3
4
THERMAL RECEIPT PRINTER
1
2
11
PIN
1
/STB
SIGNAL
SOURC
E
In
3
5
7
9
11
13
15
17
19
DATA0
DATA1
DATA2
DATA3
DATA4
DATA5
DATA6
DATA7
nAck
In
In
In
In
In
In
In
In
Out
21
23
BUSY
Paper
End
Select
Out
Out
Out
High voltage for printer online.
NError
NC
Out
Out
Error Signal.
No connection.
GND
——
Signal Grand.
25
4
2,6,8,
26
10~24
SIGNAL
NAME
DEFINITION
Data trigger the pulse, receive data when
it reduce.
Stands for parallel data of 1st bit to 8th
bit.
Logic “1” signal for high voltage and logic
“0” signal for low voltage.
Response signal for had received 1 bit
data.
High voltage for busy.
High voltage for paper shortage.
Note: 1. “In” stands for printer receiving data.
2. “Out” stands for printer sending data.
3.10 Printer Cleaning
3.10.1 Printer Head Cleaning
Printer head needs to be cleaned, when
(1)The printing is unclear;
(2)Some columns on the paper is unclear;
(3)Paper feeding noise is loud.
Cleaning Steps:
(1)Turn off the printer, open the printer front cover and remove the
wastepaper if there is any;
THERMAL RECEIPT PRINTER
12
(2)Wait for cooling of the printer head when after printing;
(3)Wipe the printer head by a soft cloth with isopropyl alcohol (IPA) to
remove the dust and dirt;
(4)After the volatilization, close the front cover and operate the self-test
print.
3.10.2 Paper Sensor Cleaning
Paper sensor needs to be cleaned, when
(1)Sometimes stop printing and indicate shortage of paper during the
printing process;
(2)Shortage of paper but do not indicate.
Cleaning Steps:
(1)Turn off the printer, open the printer front cover and remove the
wastepaper if there is any;
(2)Wipe the paper sensor by a soft cloth with isopropyl alcohol (IPA) to
remove the dust and dirt;
(3)After the volatilization, close the front cover and try printing.
3.10.3 Roller Cleaning
The roller needs to be cleaned, when
(1)Printed characters is unclear;
(2)Some columns on the paper is unclear;
(3)Paper feeding noise is loud.
Cleaning Steps:
(1)Turn off the printer, open the printer front cover;
(2)Wipe the roller by a soft cloth with neutral detergent to remove the
dust and dirt;
(3)After the volatilization, close the front cover.
THERMAL RECEIPT PRINTER
13
CAUTION:
(1)
Make sure the printer is tuned off during the maintaining.
(2)
Do not touch the printer head by hand or any metal goods, such as
tweezers, which will do harm to the printer head, roller and paper
sensor.
(3)
Do not use organic solvent, such as gas or acetone.
(4)
Do not turn on the printer and start printing before the volatilization of
detergent.
3.11 Paper Jam Fixing
When paper jam happens, please turn off the printer first, and open the
front cover. After the cooling of the printer head, remove the jammed paper
carefully. Then reload the paper and close the front cover. High quality or
equivalent paper is recommended to avoid paper jam.
3.12 Trouble Shooting
If the printer does not function, please check the printer by following the
suggestions. Contact the dealer or manufactory directly if the trouble can’t be
solved.
3.12.1 Indicator on the control panel doesn’t light
Make sure the power cord connects with printer, adaptor, and power outlet
correctly, and the power switch is on.
3.12.2 ERROR indicator flash continuously and printer doesn’t
work
If the printer has worked for long time, the printer head is overheating. Try
to wait some minutes, and the printer will continue printing after cooling.
If neither paper jammed nor hot working, turn off the printer power, and
then restart after 10 minutes. Unplug the power cord from the power outlet and
THERMAL RECEIPT PRINTER
14
contact the technical service for help if the trouble continues.
3.12.3 ERROR indicator is light and printer doesn’t work
Run the printer self test to check if the printer works properly. Contact the
dealer or technician directly if the self test can’t be run.
If the self test runs properly, please check the followings:
(1) Check the connection between printer and host computer, and at the
same time please confirm that the connection cable accords with the
specification of both printer and computer.
(2) Data transmitting settings between printer and host computer maybe
different. Make sure printer data parameters as same as the
computer. You can use self test to print out the interface settings
information.
If the printer can’t run self test, please contact your dealer or technician for
help.
THERMAL RECEIPT PRINTER
15
4. Printer Control Command List
Num Control Code
Function
Paper Feed Code
01
LF
Print and line feed
02
CR
Print and enter
03
ESC J n
Print and feed n lines
Format Setting Code
04
ESC 1 n
Set n dots line spacing
05
ESC p n
Set characters spacing
06
ESC B n1 n2…NUL
Set vertical table position
07
VT
Execute vertical table printing
08
ESC D n1 n2…NUL
Set horizontal table position
09
HT
Execute horizontal table printing
10
ESC f m n
Print a space or a blank line
11
ESC Q n
Set right margin
12
ESC l n
Set left margin
13
ESC m n
Select printing deepness
Character Setting Code
14
ESC U n
Enlarge horizontally
15
ESC V n
Enlarge vertically
16
ESC W n
Enlarge horizontally and vertically
17
ESC - n
Select/Cancel underline
18
ESC + n
Select/Cancel upper line
19
ESC i n
Select/Cancel reverse color printing
20
ESC c n
Select/Cancel reverse direction printing
User Defined Character Setting Code
21
ESC & m d1 d2…dk
Define user-defined characters
22
ESC % m1 n1 m2 Replace user-defined characters
n2…mk nk NUL
23
ESC :
Resume the built-in characters
Graphics Printing Code
24
ESC K nL nH d1
Print dot matrix graphics
d2…dk
25
ESC ’nL nH l1 h1 l2 Print curve
h2 l3 h3…lk hk CR
26
GS W n1 n2
Set barcode size
27
GS k m d1 d2…dk Print barcode
NUL
28
GS H n
Select/Cancel HRI character print
29
GS h n
Set barcode height
30
GS w n
Set barcode width
Chinese Characters Setting Code
THERMAL RECEIPT PRINTER
16
31
32
33
34
Initial
35
FS W n
FS + n
FS - n
FS i n
Code
ESC @
Enlarge characters
Select/Cancel upper line
Select/Cancel underline
Select/Cancel reverse printing
Initialize the printer
5. Control Command
5.1 Command Conception
GP-5830 series printer support ESC/POS commands set.
Command description:
Print Command
Format:
Functions
ASCII: Showing as standard ASCII characters
Decimal: Showing as Decimal figure list
Hex: Showing as hex figure list
Description: This command function and instruction.
Example: Give some examples to understand this command clearly.
5.2 Command Description
LF
[Name]
Print and line feed
[Format]
ASCII
LF
Hex
0A
Decimal
10
[Description]
Prints the data in the print buffer and feeds one line based on the current line
spacing.
This command sets the print position to the beginning of the line.
THERMAL RECEIPT PRINTER
17
CR
[Name]
Print and enter to next line
[Format]
ASCII
CR
Hex
0D
Decimal
13
[Description]
It’s the same as LF command.
ESC J n
[Name]
Print and feed n dots line
[Format]
ASCII
ESC
J
n
Hex
1B
4A
n
Decimal
27
74
n
[Description]
Print the data in the print buffer and feed n dots line. (0≤n≤255)
ESC 1 n
[Name]
Print and feed n dots line
[Format]
ASCII
ESC
1
n
Hex
1B
31
n
Decimal
27
49
n
[Description]
Setting n dots line space for the changing line command. (n is absolute value and
not effective by the enlarge or dwindle command.)
0≤n≤255, n=3 after power on or initialization
ESC p n
[Name]
Set characters spacing
[Format]
ASCII
ESC
p
n
Hex
1B
70
n
Decimal
27
112
n
[Description] ·Use this command to set the characters spacing.
·By default, n=0, that means there is no spacing between characters.
·n is absolute value and not effective by the enlarge or dwindle command.
·0≤n≤255
THERMAL RECEIPT PRINTER
18
ESC B n1 n2…NUL
[Name]
Set vertical tab position
[Format]
ASCII
ESC
p
n1
n2 … NUL
Decimal
27
66
n1
n2 … 0
Hex
1B
42
n1
n2 … 00
[Description] ·Use n1, n2 and etc to set the vertical tab position. (Eight positions can be set.)
·The Null data followed means the end of the command.
·All of the vertical tab position can be cleared by the command ESC B NUL.
VT
[Name]
Execute vertical tab position
[Format]
ASCII
VT
Decimal
11
Hex
0B
[Description] ·Feed paper to the next vertical tab position set by the command ESC B.
·If the vertical tab positions have be cleared or the current position is on or exceed
the last vertical tab position, command VT feeds a single line.
ESC D n1 n2…NUL
[Name]
Set horizontal tab position
[Format]
ASCII
ESC
D
n1
n2 … NUL
Decimal
27
68
n1
n2 … 0
Hex
1B
44
n1
n2 … 00
[Description] ·Use n1, n2 and etc to set the horizontal tab position. Eight positions can be set. All
of this data should be less than the max numbers of characters. Each character is
calculated as 12+ character spacing.
·The Null data followed means the end of the command.
·All of the horizontal tab positions can be cleared by the command ESC D NUL.
·When setting the horizontal tab position for Chinese characters, it should be noticed
that the positions are set by the characters setting.
THERMAL RECEIPT PRINTER
19
HT
[Name]
Execute horizontal tab position
[Format]
ASCII
HT
Decimal
9
Hex
09
[Description] ·Moves the print position to the next horizontal tab position set by the ESC D.
·If the horizontal tab positions have be cleared or the current position is on or
exceeds the last horizontal tab position, command VT is ignored.
ESC f m n
[Name]
Print a space or a blank line
[Format]
ASCII
ESC f
m
n
Decimal
27
102
m
n
Hex
1B
66
m
n
[Description] ·If m=0, n spaces will be printed. Each space is calculated as 12+ character spacing.
The value of n should be less than the max numbers of characters.
·If m=1, n lines will be printed. (24dots per line)
·0≤n≤255
ESC Q n
[Name]
Set right margin
[Format]
ASCII
ESC Q
n
Decimal
27
81
n
Hex
1B
51
n
[Description] ·0≤n≤32 and the default is that n = 0, which means there is no right margin.
·Right margin means that the number of characters that won’t be printed on the right
side. The value is an absolute one and won’t be affected by the characters enlarging
command ESC U and ESC W. Each space is calculated as 12+ character spacing.
·After power on or initialization, n = 0, which means there is no right margin.
·When this command is used, printer will automatically add enter command as
soon as arrives the right margin position.
THERMAL RECEIPT PRINTER
20
ESC l n
[Name]
Set left margin
[Format]
ASCII
ESC l
n
Decimal
27
108
n
Hex
1B
6C
n
[Description] ·0≤n≤32 and the default is that n = 0, which means there is no left margin.
·Right margin means that the number of characters that won’t be printed on the left
side. The value is an absolute one and won’t be affected by the characters enlarging
command ESC U and ESC W. Each space is calculated as 12+ character spacing.
ESC m n
[Name]
Select printing deepness
[Format]
ASCII
ESC m
n
Decimal
27
109
n
Hex
1B
6D
n
[Description] ·Set different print deepness according to different thermal paper.
·0≤n≤6 and the default is that n = 4. n=1 is for the least deepness and n=6 is for
the most deepness.
Character Setting Code
ESC U n
[Name]
Enlarge horizontally
[Format]
ASCII
ESC U
n
Decimal
27
85
n
Hex
1B
55
n
[Description] ·0≤n≤8 and the default is that n = 1.
·The width of characters is printed n times larger than the normal size after using this
command.
THERMAL RECEIPT PRINTER
21
ESC U n
[Name]
Enlarge vertically
[Format]
ASCII
ESC V
n
Decimal
27
86
n
Hex
1B
56
n
[Description] ·0≤n≤8 and the default is that n = 1.
·The height of characters is printed n times larger than the normal size after using
this command.
ESC W n
[Name]
Enlarge horizontally and vertically
[Format]
ASCII
ESC W
n
Decimal
27
87
n
Hex
1B
57
n
[Description] ·0≤n≤8 and the default is that n = 1.
·Both of width and height of characters are printed n times larger than the normal
sizes after using this command.
ESC - n
[Name]
Select/Cancel underline
[Format]
ASCII
ESC -
n
Decimal
27
45
n
Hex
1B
2D
n
[Description] ·0 ≤ n ≤ 255, and the default is that n = 0.
·n is available only for the least significant bit (LSB).
·When the LSB of n is 0, the underline mode is canceled.
·When the LSB of n is 1, the underline mode is selected.
·
When the underline mode is selected, all characters, including Kanji Characters and
spaces are printed with underline.
THERMAL RECEIPT PRINTER
22
ESC + n
[Name]
Select/Cancel upper line
[Format]
ASCII
ESC +
n
Decimal
27
43
n
Hex
1B
2B
n
[Description] ·0 ≤ n ≤ 255, and the default is that n = 0.
·n is available only for the least significant bit (LSB).
·When the LSB of n is 0, the upper line mode is canceled.
·When the LSB of n is 1, the upper line mode is selected.
·When the upper line mode is selected, all characters, including Kanji Characters
and spaces are printed with upper line.
ESC i n
[Name]
Select/Cancel reverse color printing
[Format]
ASCII
ESC i
n
Decimal
27
105
n
Hex
1B
69
n
[Description] ·0 ≤ n ≤ 255, and the default is that n = 0.
·n is available only for the least significant bit (LSB).
·When the LSB of n is 0, the reverse color mode is canceled.
·When the LSB of n is 1, the reverse color mode is selected.
·When the reverse color mode is selected, all characters, including Kanji Characters
and spaces are printed with white font and black background.
ESC c n
[Name]
Select/Cancel reverse direction printing
[Format]
ASCII
ESC i
n
Decimal
27
105
n
Hex
1B
69
n
[Description] ·0 ≤ n ≤ 255, and the default is that n = 1.
·n is available only for the least significant bit (LSB).
THERMAL RECEIPT PRINTER
23
·When the LSB of n is 0, the reverse direction printing mode is canceled. In this
mode, the print direction is from left to right.
·When the LSB of n is 1, the reverse direction printing mode is selected. In this
mode, the print direction is from right to left.
·
When the printer is plumb installed, reverse direction printing mode may be used for
convenient observation of the print result.
THERMAL RECEIPT PRINTER
24
User Defined Character Setting Code
ESC & m d1 d2…d36
[Name]
Define user-defined characters
[Format]
ASCII
ESC &
m
d1
d2 … d36
Decimal
27
38
m
d1
d2 … d36
Hex
1B
26
m
d1
d2 … d36
[Description] ·32 ≤ m ≤ 61, 0 ≤ d1 …. d36 ≤ 255.
·The command allows user to define an user-defined character m.
·The user-defined character is a 12X24 dots matrix, which is 12 columns and 24
dots each. Every column is expressed by 3 bits data and the setting order is from left
to right and from top to bottom. The d stands for the user-defined character data and
the numbers of d data are up to 36.
·If there are many m value setting by ESC &, only the last one is efficient and user
can define 30 characters at most.
ESC % m1 n1 m2 n2…mk nk NUL
[Name]
Replace user-defined characters
[Format]
ASCII
ESC %
m1
n1
m2
n2…mk nk NUL
Decimal
27
37
m1
n1
m2
n2…mk nk NUL
Hex
1B
25
m1
n1
m2
n2…mk nk NUL
[Description] ·This command is used to replace the character n in current character set with
the user-defined character m.
·m1, m2, ... mk are user-defined characters.
·n1, n2, ... nk are characters in current character set to be replaced.
·32≤m≤61, 32≤n≤61.
·1≤k≤32, the max number of characters to be replaced is 32 characters.
·The data 0 adding in the end stands for the end of this command.
THERMAL RECEIPT PRINTER
25
ESC :
[Name]
Resume the built-in characters
[Format]
ASCII
ESC :
Decimal
27
58
Hex
1B
3A
[Description] ·Use this command to resume the built-in characters, which were replaced by
the user-defined characters by the ESC % previously.
THERMAL RECEIPT PRINTER
26
Graphics Printing Code
ESC K nL nH d1 d2…dk
[Name]
Print dot matrix graphics
[Format]
ASCII
ESC K
nL
nH
d1
d2…dk
Decimal
27
75
nL
nH
d1
d2…dk
Hex
1B
4B
nL
nH
d1
d2…dk
[Description] ·The values of nL and nH are 16-bit binaries. The nL stands for the low 8 bits
and nH stands for the high 8 bits. The numbers of input graphics data are
nH×256+nL. That’s k = nH×256+nL. The graphics size will be affected by the
characters enlarge and reduce commands.
·This command print (k / 3) × 24 dots lattice image and the width is k/3 dots and
height is 24 dots. 24 dots of each column are presented by three 8bit bytes that
have the highest bit on top. While the data setting is input, the order is from top
to bottom and left to right of the 8bit bytes.
·After sending the above graph command twice or more than twice, the output graph
snap to the first column. The width can be different and can be mixed with any other
characters.
·When the height of the graph is large than an unit of graph, it can be separated
to different units and printed one by one. Null dots can be used to fill up.
ESC
’
nL nH l1 h1 l2 h2 …lk hk CR
[Name]
Print curve
[Format]
ASCII
ESC ’
nL
nH
l1
h1
l2
h2 …lk hk CR
Decimal
27
39
nL
nH
l1
h1
l2
h2 …lk hk CR
Hex
1B
27
nL
nH
l1
h1
l2
h2 …lk hk CR
[Description] ·This command is used to set and print curve graph line by line in the paper feed
direction. The values of nL and nH are the dots of curve needed to be printed in each
line, which are range from 1 dot to the max number of dots in every line.
·lk and hk stand for the position of the k dot in the curve. The lk is low byte and hk is
high byte and both value should be less than the max numbers of dots in every line.
THERMAL RECEIPT PRINTER
27
The curve is printed by setting the values of lk and hk of every line.
·Various length of curve can be printed by using this command continuously,
·Use CR to execute the print operation of the current line.
GS
W
n1
n2
[Name]
Set barcode size
[Format]
ASCII
GS
W
n1
n2
Decimal
29
87
n1
n2
Hex
1D
57
n1
n2
[Description] ·Use this command to set the barcode size.
·n1 stands for narrow bars. The unit is a dot and 0.125mm each.
·n2 stands for broad bars. The unit is a dot and 0.125mm each.
GS k m d1 d2…dk NUL
[Name]
Print barcode
[Format]
ASCII
GS
k
m
d1
d2…dk NUL
Decimal
29
107
m
d1
d2…dk NUL
Hex
1D
6B
m
d1
d2…dk NUL
[Description] ·m = 2 or m = 3.
·Use m to select barcode type. The d stands for the characters to be printed.
m
BARDCODE TYPE
Number of Characters
Characters
Note
2
JAN13 (EAN13)
12 ≤ k ≤ 13
0~9
48 ≤ d ≤ 57
3
JAN8 (EAN8)
7≤k≤8
0~9
48 ≤ d ≤ 57
·The corresponding number of characters should be noticed. All kinds of barcode
can make verified code automatically.
·NUL stands for the end of this command and executes the printing of barcode.
·When the barcode print is finished, the print position will be adjusted to the
beginning of line.
THERMAL RECEIPT PRINTER
28
GS H n
[Name]
Select/Cancel HRI character print
[Format]
ASCII
GS
H
n
Decimal
29
72
n
Hex
1D
48
n
[Description] ·0 ≤ n ≤ 255 and n = 0 by default.
·n is available only for the least significant bit (LSB).
·When the LSB of n is 0, HRI characters won’t be printed.
·When the LSB of n is 1, HRI characters will be printed under the barcode.
Print position of HRI
Not to print
Print under the barcode
n(LSB)
0
1
·HRI characters are remarks of barcode.
GS h n
[Name]
Set barcode height
[Format]
ASCII
GS
h
n
Decimal
29
104
n
Hex
1D
68
n
[Description] ·0 ≤ n ≤ 255 and n = 90 by default.
·Use this command to set height of the barcode to n×0.125mm.
GS w n
[Name]
Set barcode width
[Format]
ASCII
GS
w
n
Decimal
29
119
n
Hex
1D
77
n
[Description] ·0 ≤ n ≤ 4 and n = 3 by default.
·Use this command to set width of the barcode.
·Specify the width of barcode module by n as follows:
n
Narrow module (mm)
Broad module (mm)
1
2
3
4
0.125
0.25
0.375
0.5
0.375
0.625
0.875
1.125
THERMAL RECEIPT PRINTER
29
Chinese Characters Setting Code
FS W n
[Name]
Enlarge characters
[Format]
ASCII
FS
W
n
Decimal
28
87
n
Hex
1C
57
n
[Description] ·0 ≤ n ≤ 8 and n = 1 by default.
·The Chinese characters after this command will be printed in n times larger than
normal size, both in width and height.
FS + n
[Name]
Select/Cancel upper line for Chinese characters
[Format]
ASCII
FS
+
n
Decimal
28
43
n
Hex
1C
2B
n
[Description] ·0 ≤ n ≤ 255 and n = 0 by default.
·n is available only for the least significant bit (LSB).
·When the LSB of n is 0, upper line mode for Chinese characters is canceled.
·When the LSB of n is 1, upper line mode for Chinese characters is selected.
·While the upper line mode is selected, all of the characters including space will be
printed with upper line.
FS - n
[Name]
Select/Cancel underline for Chinese characters
[Format]
ASCII
FS
-
n
Decimal
28
105
n
Hex
1C
69
n
[Description] ·0 ≤ n ≤ 255 and n = 0 by default.
·n is available only for the least significant bit (LSB).
·When the LSB of n is 0, underline mode for Chinese characters is canceled.
THERMAL RECEIPT PRINTER
30
·When the LSB of n is 1, underline mode for Chinese characters is selected.
·While the underline mode is selected, all of the characters including space will be
printed with underline.
FS i n
[Name]
Select/Cancel reverse printing
[Format]
ASCII
FS
i
n
Decimal
28
105
n
Hex
1C
69
n
[Description] ·0 ≤ n ≤ 255 and n = 0 by default.
·n is available only for the least significant bit (LSB).
·When the LSB of n is 0, reverse printing is canceled.
·When the LSB of n is 1, reverse printing is selected.
·While the reverse printing mode is selected, all of the characters will be printed in
white font color and black background.
THERMAL RECEIPT PRINTER
31
Initial Code
ESC @
[Name]
Initialize the printer
[Format]
ASCII
ESC @
Decimal
27
64
Hex
1B
40
[Description] ·After receiving this command, the printer will be initialized.
·There are two ways to initialize the printer. One is to use command ESC @ to
initialize the printer in software way and the other one is to power on/off the printer.
·The initialization including:
(1) Clear the print buffer;
(2) Characters and Chinese character will be print in normal size;
(3) Cancel the upper line, underline and reverse printing mode;
(4) Forbid the upper line, underline and reverse printing mode;
(5) Print characters in reverse way, from right to left;
(6) No left margin or right margin setting;
(7) Set the print deepness to default value n=4;
(8) Set the line spacing to default value 3 and character spacing to 0.
THERMAL RECEIPT PRINTER
32
WARNING: All rights reserved. No part of this publication may be reproduced, stored in a
retrieval, or transmitted in any form or by any means, electronic, mechanical,
photocopying, recording, or otherwise, The company reverses the rights of
modifications of manufacture technology, assembly, software and hardware
without notice. Contact your franchiser if you need further information about
the product.
THERMAL RECEIPT PRINTER
33