1
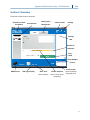
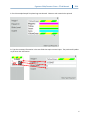
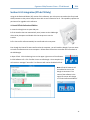
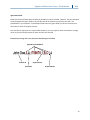
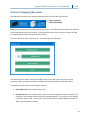
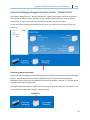
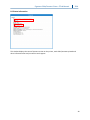
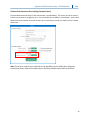
 PTLab User Manual Overview Manual Input Barcode Input
LIS Integration Managing Slide Levels Managing Hoppers (Cassette Printer)
Job Queue and Pending Queue Settings and Preferences Multiple Printers © 2014 All rights reserved. Updated 8‐25‐14 (For use with PTLab 2.4.0 or higher)
Signature Slide/Cassette Printer –PTLab Manual 2014 Table of Contents Section 1 PTLab Overview Section 2 Manual Input Section 3 Barcode Input 3.1 Overview (Sample / Demo Scan) 3.2 Scanned Barcode Requirements 3.3 Incomplete Templates Section 4 LIS Integration (PTLab Pro Only) 4.1 Install PTLab Professional Edition 4.2 Format Data from LIS 4.3 Watch Folder Location 4.4 Set Default Templates PTLab 4.5 Set your Pending Jobs Queue Preference Section 5 Managing Slide Levels Section 6 Managing Hoppers (Cassette Printer) Section 7 Job Queue and Pending Jobs 7.1 Job Queue 7.2 Pending Jobs Section 8 Settings and Preferences 8.1 Settings 8.2 Printer Information 8.3 Template Management 8.4 Software Info Check for Updates 8.5 Logging 8.6 Set the Slide Type on a Slide Cartridge 8.7 Preload Slide in Auto‐Feed Mode (Slide Printer) 8.8 Auto Print Cassettes after loading (Cassette Printer) 8.9 Advanced Settings Section 9 Multiple Printers 2 Signature Slide/Cassette Printer –PTLab Manual 2014 Section 1: Overview PTLab with a Slide Printer Connected. Click here to check for Updates Print Preview Waiting Jobs / Finished Jobs
Scanner Status Settings Pending Jobs Browse for Templates Print a Slide Setup Multiple Printers Ribbon Level Slide Type Display Slide Level (Click to Reset) Printer Status Current Template (Errors would be (Click to view recent displayed here) templates) 3 Signature Slide/Cassette Printer –PTLab Manual 2014 PTLab with a Cassette Printer – Robotic Feed connected (Only differences are noted) Visual representation of cassette Adjust horizontal offset of printed cassette Template Designed specifically for size 1 cassette Cassette Size associated with current template (Edit template to change) Current Hopper Level (Mouse over to see all hopper levels) Hopper selection (Only Present when Robot is connected) Indicates Cassette Printer (Robotic Feed is connected) 4 Signature Slide/Cassette Printer –PTLab Manual 2014 Section 2: Manual Input This is the least difficult data entry method to implement but still presents the possibility for data errors to be introduced by the user. Enter the data by typing or by choosing from menus. The type of menu, the order, the labels and even the slide type are all customizable using the PTTemplate software. The software comes preloaded with several template options. These options are meant to provide you with a sampling of the printer’s capability. They are not necessarily suited for practical use. Before using the printer in a lab you will probably want to edit an existing template or create an entirely new template using the PTTemplate software (See the PTTemplate software manual). To quickly choose a preloaded template click the drop down arrow to view recent templates. Choose one. Browse Button You may also click the browse button to the right of the currently selected template to view the same list of available templates with a preview. Once you have selected the template you must enter the information you would like to print. 5 Signature Slide/Cassette Printer –PTLab Manual 2014 1. For this example Sample Template2.svg was selected. Choose a color swatch to be printed. 2. Type the necessary information in the text fields that require manual input. The preview will update as you enter the information. 6 Signature Slide/Cassette Printer –PTLab Manual 2014 3. This template also includes three other automatic fields/features: Barcode Slide Number in Set Example: Slide “2 of 7” will be A barcode encoded with the patient ID and the Slide Level will be printed. printed on the slide. Date The current date will automatically be printed. 4. Finally, this template requires Slide Type 1. Slide type could be set to any number between 1 and 100 or removed entirely. Slide types can be used as internal designations in a lab for different types of slides such as charged slides (See section 7.6) There are many other template fields/features available to preview in the other preloaded slide templates. Any of the fields found in the other preloaded templates can be added to a custom template that you can create in the PTTemplate software. 7 Signature Slide/Cassette Printer –PTLab Manual 2014 Section 3: Scan a Barcode 3.1 Overview (Sample / Demo Scan) If the template supports it you can scan an existing linear or 2D barcode using the optional scanner from another label. This will allow you to directly transfer some or all the information on the label to the slide printer template. If all information to complete the template is present, you can either choose to automatically print the slide or send the job to the Pending Jobs queue. If the scanned barcode contains the proper fields, the software can automatically choose the template needed, automatically adding the information to be printed, set a slide type (section 7.6), and even set the number of copies. Follow the instructions below to see an example of how this can work. Connect your scanner and install the driver. Open PTLab. To verify that PTLab is communicating with your scanner, click the scanner icon at the top right part of your screen. Scanner Status should report Connected and Running. If it cannot communicate you will see an error message and a “Reconnect” button will be present. Click “Reconnect”. On this screen you may also display the character string which is actually encoded into any scanned barcode. Simply scan the barcode and the data string will appear. Close this window before attempting a scan/print or scan/pending jobs operation. 2. At any point while the software is open, simply scan a barcode to print its corresponding template or send the template to the pending jobs queue for review. The following sample label is preconfigured to automatically print or send it to pending jobs. 3. If “Move all scanned jobs to pending queue” is unchecked, the associated template will automatically print the slide. 8 Signature Slide/Cassette Printer –PTLab Manual 2014 4. If “Move all scanned jobs to pending queue” is checked, the job will appear in the pending jobs queue. 5. Click on the job to display the template and review the data before printing. 6. Click Print to print the slide. 9 Signature Slide/Cassette Printer –PTLab Manual 2014 3.2 Scanned Barcode Requirements In the sample case described in the previous section, the printed barcode on the specimen label required that the barcode be encoded with the following data in the order shown. This is not a requirement for all templates. You can edit or create a template to accept data in the format of an existing 2D barcode that is currently being printed. This can be accomplished using the PTTemplate software. Patient ID Image Color Template Number Slide Level Urgent Status 3.3 Incomplete Templates If the template has more input fields than are provided by the data string scanned in from the bardcode, the job will automatically go into the Pending Jobs queue. This will be the case regardless of whether you have “Move all scanned jobs to pending queue” checked or unchecked. Scanned data will be shown here if fields are missing. Extra Field not found in Barcode Scan Data
You may now choose to fill in the missing information or print the slide without the extra field information. 10 Signature Slide/Cassette Printer –PTLab Manual 2014 Section 4: LIS Integration (PTLab PE Only) Using the Professional Edition (PE) version of this software, your LIS system can send orders for printed slides/cassettes to the printer and print them with no user interaction at all. This capability requires the purchase of an upgrade to this software. 4.1 Install PTLab Professional Edition 1. Insert the Dongle into an open USB port. 2. If the installer does not automatically start, browse to the USB dongle drive via My Computer and double click the setup.exe to run the installer. 3. The License File will automatically be transferred to the computer. Even though the license file was transferred to the computer, you will need the dongle if you ever want to install the software onto a new computer. Follow these instructions to transfer the license back to the USB Dongle. 1. Open PTLab. Click the Settings icon on the upper right corner of the software. 2. Click Software Info. Click Transfer License to USB Dongle. Once complete you will receive a message if successful. Pro features will now be disabled in PTLab. Note: PTLab PE Features will be enabled as soon as the dongle is connected. The name of the software in the upper left corner will change to “PTLab Professional Edition” 11 Signature Slide/Cassette Printer –PTLab Manual 2014 4.2 Format Data from LIS Configure your LIS to place an ANSI or UTF8 text file which contains the data you would like to print, into the Watch folder. If PTLab Pro is installed, the software will immediately recognize the file, process it and then delete it. Data Format •
•
•
ANSI or UTF8 (.txt file) Comma delimited fields Each new record (patient) on a new line (separated by carriage return) Note: If you need multiple copies of the same slide/cassette printed you may drop the same text file in the watch folder multiple times or set your print template to accept a “number of copies” field. Example data: Patient ID Image Number Username Urgent Status Special Fields ‐ Add these fields to your data string to designate which printer, templates or hoppers should be used. !, !Cassette Type!, #Number# No Special Print on Cassette Printer –Manual. Precede all data in the string with this character followed by a comma to use the manual cassette printer. Example data: !,John Doe,A,4,1 Print on Cassette Printer – Robotic. Set Cassette printer to pick cassettes from the designated hopper based on the cassette type set. First, hoppers need be assigned a type description. (See Section 6). Cassette Type = 1‐16 Example data: !7!,John Doe,A,4,1 Set Template Number. Set data to use a specific template number. Template numbers are set in the PTTemplate software. If this is set, the designated template is chosen no matter which printer is currently connected. Note: Use for Slide Printer Number = 1 ‐ ? or Cassette Printer. Example data: #2#,John Doe,A,4,1 Use Slide Printer. To use the slide printer no special characters are necessary. If the Slide Printer is connected, the default template will be used. 12 Signature Slide/Cassette Printer –PTLab Manual 2014 Ignore data fields Ideally the file should have ONLY the data you would like to print included. However, the print template can be configured to ignore fields in the text file that do not need to be printed on the slide. Use placeholders in your template ‐ Input/Output fields section to ignore fields you do not intend to print. See section 5 of the PTTemplate manual. Each text file can represent one unique slide/cassette or you may separate each record with a carriage return to print one slide/cassette for each record in the same file. Example Data String with extra data that should be ignored in RED Ignored by Placeholders Patient ID Urgent Status Username Image Number 13 Signature Slide/Cassette Printer –PTLab Manual 2014 4.3 Watch Folder Location By default the watch folder is located at C:\ProgramData\PTI\PTLab\WatchFolder\ You may change the watch folder to any other location accessible by the PC running PTLab without using additional passwords. Change the watch folder by editing this file: "C:\ProgramData\PTI\PTLab\Plugins\FlatFilePlugin.xml" Edit this key: <WatchFolderPath>C:\ProgramData\PTI\PTLab\WatchFolder\</WatchFolderPath> Status of the current job will be provided in two xml files (CurrentSlideJobs.xml and CompletedSlideJobs.xml) in the same Watch folder location. 14 Signature Slide/Cassette Printer –PTLab Manual 2014 4.4 Set Default Templates PTLab When PTLab detects data in the watch folder it needs to determine what to do with it. You will need to set the default templates to use for both slide and cassette printers. The appropriate default template will be chosen depending on the which printer is connected. For example, if the cassette is the only printer connected, PTLab will send the data to the default LIS cassette template unless a specific template has been designated using the special field format described in the previous section. 1. Connect the Cassette printer or Slide printer. Different templates will appear depending on which printer is connected. 2. Open PTLab. 3. Go to the Settings icon. 4. Click the Templates Menu. Select the template you would like as your default and click “Set LIS Default” Note: You must first create and export the template you will use in PTTemplate. Be sure to add input/output fields that correspond with the text file you place in the watch folder. Slide Printer Templates 15 Signature Slide/Cassette Printer –PTLab Manual 2014 Cassette Printer Templates Default Template is set!
16 Signature Slide/Cassette Printer –PTLab Manual 2014 4.5 Set your Pending Jobs Queue preference You can set PTLab to automatically print any slide/cassette as soon as the necessary text file with the data appears in the watch folder ‐or‐ you can set PTLab to automatically place all jobs in the pending queue. Note: If there is insufficient data to complete fill all fields in your template, the job will always go to the pending jobs queue no matter the setting. If “Move all LIS jobs to pending queue” is unchecked, the associated template will automatically print the slide. 4. If “Move all LIS jobs to pending queue” is checked, the job will appear in the pending jobs queue. 5. Click on the job to display the template and review the data before printing. You may enter additional data in empty fields, leave them blank or change data in any field. Click “Print” when you are ready to print. 17 Signature Slide/Cassette Printer –PTLab Manual 2014 Section 5: Managing Slide Levels The slide level is tracked by the software and displayed on the status bar at the bottom. Click to Open Set Slide Level Window Note: The printer does not have a physical slide level sensor. The software tracks when a slide has been printed and subtracts one from the total. If the original total was incorrect for some reason, the slide level reported by the software would also be incorrect. To set the slide level, click on the slide icon. The following screen will appear. This window will also appear if the slide cartridge is taken out of the printer with 2 or less slides remaining. When you replace the slide cartridge you will be prompted with the window above. An explanation of the function of each button is below. •
•
Reset Slide Level resets the slide level to 100 Set Slide Level sets to a specific number that you can set by typing the number to the left. This number will be remembered the next time this window appears. This is useful if your slides do not come in packs of 100. You can easily reset the slide counter to equal whatever number of slides your standard box includes. 18 Signature Slide/Cassette Printer –PTLab Manual 2014 •
•
Hide Slide Level will stop this window from appearing after a cartridge change and remove the slide level icon from the status bar. You can always track the slide level by looking at the actual slides remaining through the clear blue slide cartridge. You can re‐enable the slide icon in the settings area. Ignore dismisses the window and does not change the slide level. Use this if you removed and inserted the same slide cartridge but did not alter the slide count. 19 Signature Slide/Cassette Printer –PTLab Manual 2014 Section 6: Managing Hoppers (Cassette Printer – Robotic Feed) The Signature Cassette Printer – Robotic Feed has four hoppers (40 cassettes each) that can be filled with cassettes of different types. The different type cassettes could be different colors or different constructions as long as they meet the specifications outlined in the printer manual. To view the current hopper levels and descriptions, hover your mouse over the hopper icon on the status bar. Programming Hopper Descriptions Using PTLab you may program up to 16 different type descriptions that can be selected for each hopper location. Once the descriptions have been programmed you may set the current hopper type description on the control panel of the Robot or via the PTLab software. However, it is only possible to program the descriptions using PTLab. To program hopper descriptions, double‐click on the hopper icon on the status bar. You may also click on the settings icon and choose settings – Hopper Settings. Double‐Click 20 Signature Slide/Cassette Printer –PTLab Manual 2014 To change the currently selected hopper type, click on the drop down menu next to each hopper number. All available descriptions will appear in the drop down. Hopper numbers start with “1” on the left side of the printer. Once the hopper types are selected for each hopper number, click “Set”. A confirmation dialog will appear. Set hopper types Edit or add hopper type descriptions If you would like to change or add hopper descriptions you can do so on the same screen. Simply change the current description or enter a new description in one of the 16 available boxes. Click “Submit”. Note: You must click submit before any changes or additions will appear in the Hopper drop down menus at the top of the screen. 21 Signature Slide/Cassette Printer –PTLab Manual 2014 Cassette/Hopper Type Mismatch The hopper descriptions are stored on the printer (not the robot) and the currently connected computer. The descriptions are stored in both locations so that you do not have reenter them if either the printer or the computer is changed. If you change the computer that is connected to the printer or change the printer attached to the Robot, you will receive a Cassette Type Mismatch error. You will need to reconcile the differences. 1. The screen below will appear if you open the hopper settings window. Simply click “OK” below the descriptions you would like to keep. 2. The Hopper Settings window will open. Set the hopper types to correspond with the cassettes which are actually loaded in the hoppers as described on the previous page. 22 Signature Slide/Cassette Printer –PTLab Manual 2014 Section 7: Job Queue and Pending Jobs 7.1 Job Queue The Job Queue displays all current jobs which are printing or waiting to be printed. If ten copies of one slide/cassette are printed, and then another job of is sent to print immediately after, both jobs will appear in the Current Jobs Queue. The currently printing job will show a status of “printing”. The waiting job will appear below the printing job. Printing Successfully Printed Waiting to Print Cancelled Clear all Jobs Cancel Job Pause all Jobs Reprint selected jobs Reprint Multiples (Specific Slides in a Job) When a job has been successfully printed or cancelled it will be moved to the Completed Jobs window. The results of the job will be displayed below the status. You may also cancel a currently printing job, pause jobs while they are printing, clear all jobs from the list, or reprint jobs using the buttons at the bottom of the window. Click “Reprint Multiples” to reprint specific slides in a job. Enter the slide range you would like to reprint including the starting slide, the total slides in the set and the number of slides you want to print. The slides the software will be printing are shown in the white box. Note: Use this feature ONLY if your slide has a number range component. Number Range 23 Signature Slide/Cassette Printer –PTLab Manual 2014 7.2 Pending Jobs The Pending Jobs area is only used if data for your templates is received from an LIS or a connected barcode scanner. You can set PTLab to automatically print any slide/cassette as soon as the necessary data is received by the template ‐or‐ you can set PTLab to automatically place all jobs from an LIS or scanner in the pending queue. Note: If there is insufficient data to completely fill all fields in your template, the job will always go to the pending jobs queue no matter the setting. Click on the job to open the template and finish filling fields or just click “Print”. If “Move all LIS jobs or scanned jobs to pending queue” is unchecked, the associated template will automatically print the slide. If “Move all LIS jobs or scanned jobs to pending queue” is checked, the job will appear in the pending jobs queue. Click on the job to display the template and review the data before printing. You may enter additional data in empty fields, leave them blank or change data in any field. Click “Print” when you are ready to print. 24 Signature Slide/Cassette Printer –PTLab Manual 2014 Section 8: Settings and Preferences The settings window contains the following information: •
•
•
•
Various software settings Printer firmware version and printing statistics Template management Logging options Open the settings area by clicking the tool icon in the upper right corner of the software. To open or close each settings area click on the ribbon header above each section. In the following sections you will find descriptions of each of the functions within each settings area. 8.1 Settings •
Full Screen Mode. Check or uncheck to toggle between automatic full screen or standard window mode. You must restart the software for this setting to take effect. 25 Signature Slide/Cassette Printer –PTLab Manual 2014 •
Require Login. Check this box to require a login username when the software starts. This is not necessarily meant as a security feature. If this is checked, a user will be prompted to scan their 2D barcode on their security card or enter a username. This username can be used by a template to print on the slide, encode on the slide barcode or simply be logged by the software. The following screen will appear if this option is checked: Once this setting is enabled you may add new users or manage current users by clicking the admin icon. Here you can switch the current user, delete a user, or setup a new user. Check the Administrator box to allow this user to manage users. You may set “Printed on Slide” to initials or some other code that will discreetly identify the user on the slide. •
Show Slide Level. Uncheck this box to remove the slide level icon from the start bar and stop tracking the number of slides in a cartridge. 26 Signature Slide/Cassette Printer –PTLab Manual 2014 •
•
•
•
•
•
•
•
•
Language. Choose one of the many available languages. The text will immediately be changed to that language. Move all scanned jobs to pending queue. If unchecked, the associated template will automatically print the slide/cassette. If checked, the job will appear in the pending jobs queue. See section 6 for more information. Move all LIS jobs to pending queue. If unchecked, the associated template will automatically print the slide/cassette. If checked, the job will appear in the pending jobs queue. See section 6 for more information. Color Print Heat / Black Print Heat. Increase the heat settings to improve print quality. The minimum heat setting that achieves acceptable print quality should be used. Increasing print heat shortens print head life and increases the likelihood of a ribbon break. Separate heat settings for color and black ribbons can be stored. If using a color ribbon, the color heat setting will automatically be used. If using a black ribbon, the black heat setting will automatically be used. Current Slide Type. (Visible with Slide Printer Connected) See section 8.6 Enable auto‐feed mode. (Visible with Slide Printer Connected) See section 8.7 Cassette Printer Mode (Visible with Cassette Printer Connected) See section 8.8 Auto Mode Delay (Visible with Cassette Printer Connected) See section 8.8 Hopper Settings Button (Visible with Cassette Printer Connected) See section 6 27 Signature Slide/Cassette Printer –PTLab Manual 2014 8.2 Printer Information This window displays the current firmware version on the printer, total slides/cassettes printed and other information that may be useful to tech support. 28 Signature Slide/Cassette Printer –PTLab Manual 2014 8.3 Template Management All current templates are displayed. Click “Remove Template” to remove a template from the list of templates available to the user via the “Choose Template” drop down menu or the browse button. Any template that has been removed can be recovered using the “Recover Removed Templates” button. You will be brought to the deleted Templates folder to recover your template. If you have exported a template (for another computer) from the PTTemplate editing software you can add that template by clicking the” Add Template” button. Templates exported (for this computer) from the PTTemplate software installed on the same computer as the PTLab software do not need to be added manually in this way. They will be automatically added to the list. You may also Set your Scanner and LIS Default in this location. See section 3 and 4 for more information. 29 Signature Slide/Cassette Printer –PTLab Manual 2014 8.4 Software Info/Check for Updates The Software Info area will tell you the current version of the software and Check for Updates. If you have a PTLab Professional License Dongle connected you will have options to transfer that license to or from the computer. See Section 4. 30 Signature Slide/Cassette Printer –PTLab Manual 2014 8.5 Logging Several fields can be logged to the log file located where you choose. •
•
•
•
•
•
Date. Logs the date the slide was printed. Time. Logs the time the slide was printed. Template Info. Logs the Template fields printed for each slide. Output Barcode. Logs the information encoded in the barcode printed on the slide. User Name. Logs the Username associated with a template, if required. User ID. Logs the ID associated with a Username associated with a template. 31 Signature Slide/Cassette Printer –PTLab Manual 2014 8.6 Set the Slide Type on a Slide Cartridge (Slide Printer) The slide type setting can be used to encode the blue slide cartridge with a unique number. Slide type can be set to any number between 1 and 100. Slides types can be used as internal designations in a lab for different types of slides such as charged slides. An encoded slide cartridge can be used in combination with a template that requires a specific slide type. In this way you can ensure certain procedures are done on the appropriate slides. Note: To require a specific slide type your template must have either an image list or text list which has the “Set default copies and slide type” option checked in the “Edit Text/Image List” area within PTTemplate. When the cartridge is inserted, the slide type will be displayed below the slide icon on the status bar. PTTemplate Slide Type If a slide cartridge encoded with a slide type other than what the template requires is inserted into the printer the following error will appear. Slide Cartridge The default designation for any new slide cartridge is “1”. If you would like to use the slide type setting to track different slide types, follow this procedure. 1. Purchase additional slide Cartridges for each of the slide types you would like to track. Extra slide cartridges may be purchased from your printer supplier. You can track many different slide types. Below are a few examples: •
•
•
•
Charged slides Colored slides Various manufacturers of slides Slides with different coatings and treatments for specific procedures Slide Type 2 Charged Slides
32 Signature Slide/Cassette Printer –PTLab Manual 2014 2. Label the slide cartridges. Once you have received the extra slide cartridges, label them by placing a label or writing on the front or side of the blue cartridge. The label should be permanent so it will withstand daily handling. The label should specify the slide type number and a description of the slide type. 3. To encode the slide type number to the IC chip imbedded in the Slide Cartridge, insert the cartridge into the printer. 4. Open the settings area by clicking the tool icon in the upper right corner of the software. 5. The settings window will appear. Click the settings ribbon to view all settings. 6. Choose the slide type number you would like to encode (1‐100). Click Set. The cartridge will be encoded. Important Note! If you switch between different slide cartridges encoded with different slide type numbers and you have the auto‐feed mode enabled, the slide of a different type left inside the printer will be automatically ejected. 33 Signature Slide/Cassette Printer –PTLab Manual 2014 8.7 Preload slides in Auto‐feed Mode (Slide Printer) The auto‐feed mode automatically feeds a slide from the cartridge into printing position before a print is sent to the printer. This greatly reduces the time it takes for the first slide in a batch of slides to print. This feature, if enabled, is especially useful if you only print one slide at a time. Important Note! 1. If you switch between different slide types and you have the auto‐feed mode enabled, a slide of a different type could be left inside the printer after your remove a slide cartridge and insert another one of a different type. Press the Slide button
on the printer to eject the slide! 2. If the cartridges containing different slide types have been encoded with different slide type numbers, the slide left inside the printer will be automatically ejected (see section 7.6). Enable or Disable Auto‐Feed Mode. 1. Open the settings area by clicking the tool icon in the upper right corner of the software. 2. The settings window will appear. Click the settings ribbon to view all settings. 3. Check the Enable auto‐feed mode box. 34 Signature Slide/Cassette Printer –PTLab Manual 2014 8.8 Auto Print Cassettes after loading (Cassette Printer) The Auto Mode automatically print the cassette after a specified delay. This means you do not have to press the print button to engage the print. Set the Cassette Printer Mode to “Auto Mode”. Set the Auto Mode Delay to the number of seconds it takes you to comfortably remove your hand from the cassette holder area. Note: If you fail to remove your hand with in the specified time the safety door will gently contact your hand. Because the safety door is not fully closed the print will not continue.
35 Signature Slide/Cassette Printer –PTLab Manual 2014 8.9 Advanced Settings Press Shift +A on your keyboard to enable the advanced menu. In this area you can set your print head resistance value, adjust print offsets, restore factory defaults or adjust heat offsets. Contact technical support before adjusting any of these settings. 36 Signature Slide/Cassette Printer –PTLab Manual 2014 Section 9: Multiple Slide Printers 9.1 Setup Multiple Printers You can connect multiple Slide Printers to the same computer and control them all through PTLab. This is useful if you have two different slide types that you regularly print to and you do not want to continuously change slide cartridges. To set this up click the gear Icon above the picture of the currently connected slide printer. The slide printer currently connected will be displayed only with the USB Serial. This is the number that Windows uses to differentiate between printers. If two different printers have the same USB serial number windows will recognize them as the same printer. If they both connected at the same time with the same serial number you may experience a Windows Blue Screen crash. 1. To get started click “Add Printer”. 2. You will be prompted to Unplug all slide printers from the system. Click OK when that has been completed. 3. Now you will be prompted to Plugin the new slide printer. Plug it in and wait 5 seconds. Now click “OK”. 4. The new printer will appear by default as Slide Printer (Copy 1). If successful it should have a USB Serial of 002. 37 Signature Slide/Cassette Printer –PTLab Manual 2014 Refresh Button Note: If the slide printer says “Not Connected” click the refresh button. 5. Connect the original Slide Printer. Click “Refresh”. You will now see both connected. 6. If you choose, you can now rename the slide printers. Select the one you want to rename and click “Rename Printer”. You will be presented with a window that allows you to do so. Consider naming the printers after the slide type which will be installed. You may want to further label the cartridge and the printer itself to match this new name. 7. Close this window. You will see both printers connected. Click the Refresh button if ever you have need to disconnect one printer and reconnect it while not restarting PTLab. 38 Signature Slide/Cassette Printer –PTLab Manual 2014 9.2 Printing to Multiple Slide Printers To print to multiple slide printers simply click on the one you wish to print BEFORE clicking the “Print” button. You will see the current number of prints remaining, slides remaining, printer name, current status and possibly the slide type change when you click on each different slide printer. Note: Because both printers share the same PTLab printer queue, only one printer can be printing slides at any given time. 39