1
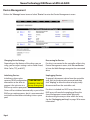
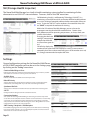
eSATA 6G RAID PCIe 2.0 Controller Card
User Manual
NewerTechnology MAXPower eSATA 6G RAID
Table of Contents
Part 1: Introduction
a.
b.
c.
d.
Overview
MAXPower eSATA 6G RAID Features
What is eSATA 6Gb/s?
What is RAID?
Part 2: System Requirements & Installation
a. System Requirements
b. Hardware Installation
c. Driver & Software Installation
Part 3: Management
a.
b.
c.
d.
e.
f.
g.
h.
NewerTech Web Manager Access
Device Management
Array Management
Spare Pool Management
Events
Tasks
SHI (Storage Health Inspector)
Settings
Page 3
Page 3
Page 3
Page 3
Page 3
Pages 4-6
Page 4
Page 4
Page 5-6
Page
Page 7
Page 8
Page 9-10
Page 10
Page 11
Page 11
Page 12
Page 12
Part 4: Troubleshooting & FAQ
Page 13
Part 5: Contact Information
Page 13
Package Contents
• MAXPower eSATA 6G RAID PCIe 2.0 Controller Card
• User Manual
• Driver & Software Installation Disc
• Low Profile Bracket
Images and descriptions may vary slightly between this manual and the unit shipped.
Please visit the product webpage for the most recent specifications.
Page 2
NewerTechnology MAXPower eSATA 6G RAID
Part 1: Introduction
MAXPower eSATA 6G PCIe 2.0 RAID Controller Card
Utilizing the latest eSATA 6Gb/s technology, the MAXPower eSATA 6G RAID card is the ideal choice for high-speed,
efficient, low-cost, RAID capable connectivity for the Mac or PC.
MAXPower eSATA 6G RAID Features:
• PCIe 2.0 x1 (500MB/s bandwidth)
• Compatible with PCIe 1.0 (250MB/s
bandwidth)
• Two eSATA 6Gb/s ports (600MB/s per port*)
• eSATA Hot Plug Support
• Port Multiplier support for up to 10 drives
• RAID level 0, 1, 5, 10, SPAN and individual drive
support
• Convenient browser-based management
• SHI (Storage Health Inspector) for the monitoring
and reporting of drive health
• Compatible with SATA based hard disk drives and
solid state drives
• 3 year warranty
*SATA 6Gb/s speeds (600MB/s) will be limited by the PCIe x1 bandwidth (500MB/s total for x1 PCIe 2.0 or 250MB/s total for x1 PCIe 1.0)
What is eSATA 6Gb/s?
eSATA stands for External Serial Advanced Technology Attachment. eSATA 6Gb/s (revision 3.0) is the latest SATA
standard at the time of this printing, and provides data transfer rates up to 6Gb/s (600MB/s) for external storage
devices.
What is RAID?
RAID stands for Redundant Array of Independent Drives. Put simply, this means taking multiple matching drives
and arranging them together to achieve large storage space, speed, data protection, or any combination of
the three. The MAXPower eSATA 6G RAID PCIe 2.0 Controller Card supports RAID 0, 1, 5, and 10 levels as well as
supporting JBOD (SPAN and individual drive modes).
RAID 0 “Stripe”
RAID 1 “Mirror”
RAID 10 “Mirror + Stripe”
RAID 5 “Stripe & Protection”
Speed & Large Storage
Speed: Data is alternated across two or more drives to gain
speed by essentially distributing the workload. Protection: No built-in protection.
Capacity: Usable space is the combined capacity of all the drives.
Fast, Large, & Protected Storage
Speed: Combines a pair of RAID 1 “Mirrored” sets by using RAID 0
“Striping” to gain speed.
Protection: There are two RAID 1 “Mirrored” sets used in order to
tolerate 1-2 drives failing depending on which drives they are. Capacity: Usable space is half of the combined capacity of all the
drives used.
Page 3
Protected Storage
Speed: No speed benefits gained.
Protection: One drive can go down and all data will still be
accessible.
Capacity: One drive worth of usable space out of the two total
drives used. Optimized Speed, Capacity, & Protection
Speed: Data is striped like in a RAID 0, so significant speed gains
are seen.
Protection: Utilizes mathematical parity to achieve data
protection while taking up a minimum of space. Capacity: All but one drive worth of capacity is usable. In a four
drive RAID 5 array, there is three drives worth of usable space. NewerTechnology MAXPower eSATA 6G RAID
Part 2: System Requirements & Installation
System Requirements
Mac®
Hardware: Intel-based Mac with available PCIe 2.0 or 1.0 slot*
Operating System: Mac OS X 10.5 and later
PC
Hardware: Any computer with available PCIe 2.0 or 1.0 slot*
Operating System: Windows® 2000/XP/2003 and later
*Maximum PCIe x1 bandwidth is 500MB/s total for PCIe 2.0 and 250MB/s total for PCIe 1.0
Hardware Installation
Before Installing the MAXPower eSATA 6G RAID card...
• Make sure computer is turned off and unplugged from its power source
• Take appropriate electrostatic discharge precautions:
Your computer is a static-sensitive device. It is susceptible to invisible damage if
not protected during installation.
We recommend proper grounding by using a grounding strap. Make sure to work
in a clean and static-free area, and avoid wearing clothing that retains static
charges.
For more information, please visit:
http://www.newertech.com/static
Step 1
Open the computer systems chassis and locate an unused PCIe 2.0 or 1.0 slot (x1, x4,
x8, or x16).
Step 2
Remove the PCI slot cover.
Step 3
Gently insert the MAXPower card into the PCIe slot and secure the bracket to the
computer chassis.
Step 4
After installing the MAXPower card attach any eSATA storage devices to the card and
start your computer. Step 5
Once you have installed the MAXPower card into your computer, start your
computer and insert the Driver & Software Installation Disc to install the necessary
drivers for your computer operating system.
Page 4
NewerTechnology MAXPower eSATA 6G RAID
Driver & Software Installation
Your NewerTech MAXPower eSATA 6G RAID Card comes with a disc containing the drivers and software for
Mac and Windows. For the latest drivers and installation software visit:
http://www.newertech.com/support.
Mac OS X
Once you have installed the NewerTech MAXPower eSATA 6G RAID Card and booted your Mac, follow these
instructions to install the drivers and the NewerTech Web Manager software:
1. Insert the NewerTech MAXPower eSATA 6G RAID Card Install Disc into your Mac and navigate to the “Mac
OS X” folder. 2. Double-click on the “Newer_Controller_mac_XXXXXX.dmg” file to mount the disc image containing the
Mac OS X software and drivers. 3. Double-click on the installer package labled “MAXPower_eSATA_6G_RAID” to start the installation
process.
4. Follow the on-screen steps to complete the installation process. After install has completed, you will be
prompted to restart your computer. You will need to restart in order to use the NewerTech MAXPower
eSATA 6G RAID Card. Windows 7/Vista/2008
After starting your computer with the NewerTech MAXPower eSATA 6G RAID Card installed, Windows
will display the “New Hardware Found” notification in the taskbar, which will state that the “Device driver
software was not successfully installed”.
To install the drivers:
1. Click on the Windows Start menu and right click on “Computer” and select “Properties” which will launch
the System screen.
2. Click on “Device Manager” on the left side of the window to launch Device Manager. 3. Under the “Other Devices” category, the MAXPower RAID Card will appear with a yellow warning symbol. 4. Right click on the MAXPower RAID Card and select “Update Driver Software...” to start the driver
installation.
5. Click on “Browse my computer for driver software”
6. Browse to the NewerTech MAXPower eSATA 6G RAID Card Install Disc.
7. From within the install disc, browse to “...\Windows\Drivers\Windows 7_Vista_2008” and click “OK”.
8. Click “Next”
9. When asked: “Would you like to install this driver software?” select “Install”.
10.Reboot your computer when prompted to complete the installation of the NewerTech MAXPower eSATA
6G RAID Card.
To install the NewerTech Web Manager Software:
1. From the NewerTech MAXPower eSATA 6G RAID Card Install Disc, browse to “...\Windows\WebGUI” and
double-click on “Setup.exe” to launch the installer.
2. Follow the installer to complete the installation. 3. Restart your computer.
Page 5
NewerTechnology MAXPower eSATA 6G RAID
Windows XP/2003/2000
After starting your computer with the NewerTech MAXPower eSATA 6G RAID Card installed, Windows
will display the “New Hardware Found” notification in the taskbar, which will state that the “Device driver
software was not successfully installed”.
To install the drivers:
1. Click on the Windows Start menu and right click on “Control Panel” and double-click “System” which will
launch the System screen.
2. Click on “Hardware” tab then click the “Device Manager” button. 3. Under the “Other Devices” category, the MAXPower RAID Card will appear with a yellow warning symbol. 4. Right click on the MAXPower RAID Card and select “Update Driver Software...” to start the driver
installation.
5. Click on “Browse my computer for driver software”
6. Browse to the NewerTech MAXPower eSATA 6G RAID Card Install Disc.
7. From within the install disc, browse to “...\Windows\Drivers\Windows XP_2003” and click “OK”.
8. Click “Next”
9. When asked: “Would you like to install this driver software?” select “Install”.
10.Reboot your computer when prompted to complete the installation of the NewerTech MAXPower eSATA
6G RAID Card.
To install the NewerTech Web Manager Software:
1. From the NewerTech MAXPower eSATA 6G RAID Card Install Disc, browse to “...\Windows\WebGUI” and
double-click on “Setup.exe” to launch the installer.
2. Follow the installer to complete the installation. 3. Restart your computer.
Page 6
NewerTechnology MAXPower eSATA 6G RAID
Part 3: Management
NewerTech Web Manager
The NewerTech Web Manager is an easy-to-use utility to set up RAID arrays, manage connected drives, view
storage health status, and view information about your connected storage.
Access
The NewerTech Web Manager can be accessed from any web browser* on the computer being used by entering the following address into the address bar:
https://localhost:7402/
When prompted for a username and password, enter the following:
Username: admin
Password: admin
The username and password can be changed at any time from within the Web Manager. *Browser must support XML (e.g. Safari, Firefox, Chrome, Internet Explorer, etc.)
Page 7
NewerTechnology MAXPower eSATA 6G RAID
Device Management
Click on the “Manage” menu item and select “Device” to enter the Device Management screen.
Changing Device Settings
Rescanning for Devices
Depending on the features of the drives you are
using, you can adjust settings such as Read Ahead,
Write Cache, TCQ, and NCQ. If a drive is connected to the controller while in the
Device Management screen, click “Rescan Devices”
to have the Web Manager recognize the connected
drive. Initializing Devices
Unplugging Devices
Initializing a drive writes
necessary RAID configuration !! IMPORTANT !!
information to the drive to
Initializing a drive will
prepare it for inclusion in a
destroy existing data!
RAID array and/or spare pool.
To properly disconnect a drive from the controller
card, click on the drive to be removed and then
click “Unplug” to allow the drive to be physically
disconnected from the controller card. Drives will be initialized automatically as part of the
RAID array creation process, but it is recommended
to initialize a drive before including it into a spare
pool.
Page 8
If a drive is included in a RAID array, the entire
RAID array will need to be unplugged from the
Array Management screen before physically
disconnecting the array or drive within the array. See the “Unplugging an Array” on page 10 for more
information.
NewerTechnology MAXPower eSATA 6G RAID
Array Management
The Array Management screen acts as the Web Manager’s home screen, but to access it from any other
screen click on the “Manage” menu item and select “Array” to enter the Array Management screen.
Creating a RAID Array
To create a RAID array, click on the “Create Array” button in the “Logical Device Information” section. Once
the “Create Array” screen has loaded, configure the following settings to create the RAID array:
1) Array Type
Select the RAID level you want to use. See page 3
of the manual for RAID type explanations.
Select “JBOD (Volume)” if you want to use a single
drive or want to do a concatenation/spanning of
drives.
!
For optimal performance,
always use matching drives in a
RAID array.
!! IMPORTANT !!
- Matching size
- Matching speed
- Matching manufacturer
- Matching part number
Creating an array will
destroy existing data!
2) Array Name
Name the array for identification within the Web
Manager. The volume name will be created after
you format the created array.
3) Initialization Method
Quick Initialization
Skips the full build/initialization of the array and
allows for a volume to be created. This is not
usually recommended and is only acceptable
for use with new drives that have not had data
previously written to them.
Foreground
The RAID will fully initialize before a volume
can be created and the array utilized. This
may take hours.
Background
Allows a volume to be created and utilized
while the RAID initialization is conducted in
the background.
4) Cache Policy
Write Back
Writes to the array are cached, which will result
in higher performance but data loss may occur in
the event of a power failure.
6) Available Disks
Write Through
Writes to the array are always passed to the
drives and subsequent reads may still be
completed from the cache if necessary.
Click on “Create” to build the array. A pop-up notification will display with the creation
confirmation.
5) Block Size
A smaller block size results in faster small file
reads and writes. A larger block size results in faster large file reads
and writes.
Page 9
Select the available drives you want to use in your RAID array.
7) Create
After the array has initialized, depending on the initialization method chosen, the array will be
passed to the operation system to be formatted as a volume for use.
NewerTechnology MAXPower eSATA 6G RAID
Array Information Window
To manage a RAID array after it has been created, you need to access the Array Information window of
the array you wish to manage. From within the Array Information window you can unplug, verify, delete,
rename, rebuild, and expand/migrate an array.
To access the Array Information window, click on the “Maintenance” link for the array you wish to manage.
Unplugging an Array
To properly disconnect a RAID array from the controller card, you must
access the Array Information window and click “Unplug”. If an array is physically disconnected without clicking “Unplug” an alarm
will sound.
Verifying an Array
Verification can only be done on RAID arrays that have data redundancy
(data protection).
RAID 1 & RAID1/0
The verify process compares the data of one mirror with the other.
RAID 5
The verify process calculates RAID5 parity and compares it to the parity
data on the array.
In general, verification also checks each sector on a drive for any errors
or problems. Periodic verification of an array allows the drive firmware
to take corrective action on any problem areas of a drive to assist in
minimizing the occurrence of uncorrectable read and write errors.
For instruction on how to schedule periodic
verification, see page 11 on Tasks.
Deleting an Array
Do delete an array, click on the “Delete” button from within the Array
Information window. A pop-up window will ask you to confirm the
array deletion. Click “OK” to continue with the deletion or “Cancel” to
cancel the deletion. Renaming an Array
To change the name of an array, enter the desired name into the empty
field next to the “Rename” button and then click the “Rename” button.
Rebuilding an Array
When a redundant array becomes degraded and enters a “Critical” state,
it will need to be rebuilt. Rebuilding generally occurs automatically when it is needed, but if the
rebuild process has been previously aborted, it will need to be restarted. To start/restart a rebuild click the “Rebuild” button in the Array
Information window of the degraded array. Expanding/Migrating an Array
By utilizing Online Capacity Expansion (OCE) and Online RAID Level
Migration (ORLM) techniques, it is possible to migrate a RAID array from
one RAID level to another and also expand the capacity of the array
without taking the array offline or deleting the existing data.
!! WARNING !!
Use on Mac OS X will
destroy existing data!
Due to a limitation in Mac OS X which will
require the migrated and/or expanded
array to be reformatted, it is only
recommended to use the OCE/ORLM
feature with Windows systems.
Spare Pool Management
The purpose of a spare pool is to have drives in reserve to instantly take the place of any failed drives in a
redundant RAID array such as RAID 1, RAID 1/0, and RAID 5 arrays. This allows rebuilds to start instantly in
order to minimize the risk of data loss.
To access the Spare Pool Management
screen, click on the “Manage” menu item
and select “Spare Pool”.
To add a drive to the Spare Pool, select an
available drive from the “Available Disks”
section and click on the “Add Spare” button.
Page 10
NewerTechnology MAXPower eSATA 6G RAID
Events
The NewerTech Web Manager software will automatically log all events that occur on the MAXPower
controller card. Indicates general information and
general occurrances.
Warning of minor occurrences
and issues. These include
plugging of devices into the
card and minor issues such as
inconsistent data that can be
easily fixed by a verify or rebuild.
Warns of major occurrences and
problems such as failed drives
and improper disconnections of
drives and arrays.
Tasks
The NewerTech Web Manager has a built-in scheduling system to run background rebuilds, verifications,
integrity, and health checks to the attached arrays and drives. To enter the task scheduling systems, click on “Task” menu item.
Health Inspector Scheduler
The Health Inspector Scheduler is always visible in the Task screen of
the Web Manager to check drive temperatures, bad sector counts,
and any other errors that may ben reaching high levels. If any
problems are found, a warning event will be created and logged. If you have set the email notification for warnings in the “Settings”
section, you will receive an email notification.
New Verify Task Scheduler
The New Task Scheduler is only visible when redundant RAID
arrays are present and is used to schedule times to run background
verifications and rebuilds of arrays.
Tasks List
Once a Verify or Health Inspector task is created, it will appear in the
“Tasks List” section. To delete a scheduled task, select the checkbox
next to the task and click on the “Delete” button.
Page 11
NewerTechnology MAXPower eSATA 6G RAID
SHI (Storage Health Inspector)
The NewerTech Web Manager has a built-in health monitoring system to allow for monitoring of drive
characteristics and S.M.A.R.T status attributes. To access, click on the “SHI” menu item.
Self-Monitoring, Analysis, and Reporting Technology (S.M.A.R.T.) is a
monitoring system built into drives to monitor different health attributes
to assist in warning of potential problems before catastrophic failure can
occur. To view the S.M.A.R.T status attributes of an attached drive, click
on “SMART” to expand the attributes for viewing.
Within the SHI section of the Web Manager, you can also set the
temperature warning threshold for attached drives. Certain drives
have different maximum operating temperatures, so always check your
specific drives before
changing the threshold
setting. If a temperature
exceeds the threshold,
it will turn from green to
red.
SHI will also display the
number of bad sectors found and repaired. Having a small number is
acceptable, but if the number continually grows or the number turns red,
it is strongly recommended to replace the drive.
Settings
General configuration settings for the NewerTech MAXPower
eSATA 6G RAID controller card can be set in the Settings page
by clicking on the “Setting” menu item. Continue Rebuilding on Error
Enabling this allows the controller to keep rebuilding the array as much as possible
even if there are read errors occurring on the source drives. Audible Alarm
Enables and disables the audible alarms for major events.
Rebuild Priority
Sets the rebuild priority grade with the higher the priority providing the fastest
rebuild times, but slowing down any access that occurs during the rebuild. Spindown Idle Disk
Sets the time in minutes for hard disk drives to spin down when not being used. SAF-TE
Configures SAF-TE settings for SAF-TE activated enclosures.
Connection Options
Sets options for accessing the Web Manager. Restricting to localhost only allows
access while on the computer that the controller card is installed into. A secure https
connection can be enabled along with authentication using/setting a username
and password. The controller card’s listening port can be changed if there are cards
installed with the same access port specification.
SMTP Setting / Recipients / Add Recipient
Enter SMTP (outgoing) mail server setting here to allow notifications and warnings
to be sent to email recipients. You can add multiple recipients and choose level of
events that are sent to each email recipient.
Page 12
NewerTechnology MAXPower eSATA 6G RAID
Part 4: Troubleshooting & FAQ
Troubleshooting Tips
If a connected storage device is not recognized after connecting it:
First try unplugging the eSATA cable from the MAXPower eSATA 6G RAID card and then plugging it back
in. If the device is still not recognized, keep the storage device turned on and connected via eSATA to the
MAXPower eSATA 6G RAID card and restart your machine. Please contact Technical Support for further
assistance.
If the MAXPower e SATA 6G RAID card is not being recognized by the computer:
First make sure the card is seated completely in the PCIe slot by reviewing the Hardware Installation steps. If the card is still not recognized, try installing the card into a different PCIe slot. If the card is still not
recognized, please contact Technical Support for assistance. FAQ
Does the MAXPower eSATA 6G card support booting?
Booting from the MAXPower eSATA 6G RAID card is not currently supported for Mac. On PC’s, BIOS booting
to RAID is supported.
Part 5: Contact Information
Telephone
(815) 308-7001
8AM - 10PM CT Monday - Friday
9AM - 4PM CT Saturday
Live Chat
Available 24 hours a day, 7 days a week through NewerTech’s distributor, OWC.
For more information, visit:
http://www.newertech.com/support Email
Submit your email at:
http://www.newertech.com/support
Page 13
NewerTechnology MAXPower eSATA 6G RAID
FCC Certification Information
FCC Part 15 Class B Radio Frequency Interference Statement
This equipment has been tested and found to comply with the limits for a Class B digital device, pursuant
to part 15 of the FCC Rules. These limits are designed to provide reasonable protection against harmful
interference in a residential installation. This equipment generates, uses and can radiate radio frequency
energy and, if not installed and used in accordance with the instructions, may cause harmful interference
to radio communications. However, there is no guarantee that interference will not occur in a particular
installation. If this equipment does cause harmful interference to radio or television reception, which can be
determined by turning the equipment off and on, the user is encouraged to try to correct the interference
by one or more of the following measures:
• Reorient or relocate the receiving antenna
• Increase the separation between the equipment and receiver
• Connect the equipment into an outlet on a circuit different from that to which the receiver is
connected.
• Consult the dealer or an experienced radio/TV technician for help.
Modifications not expressly approved by the manufacturer could void the user’s authority to operate the
equipment under FCC rules.
This device complies with part 15 of the FCC Rules. Operation is subject to the following two conditions:
(1) this device may not cause harmful interference, and
(2) this device must accept any interference received, including interference that may cause undesired
operation.
European Union Compliance Statement This Information Technologies Equipment has been tested and
found to comply with the following European directives:
• European Standard EN55022 (1998) Class B
• European Standard EN55024 (1998)
Page 14
Revision 1 - 4/8/10 CH