1
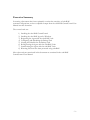
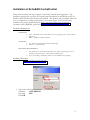
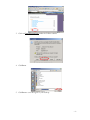
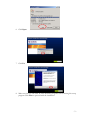
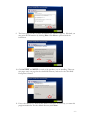
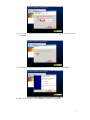
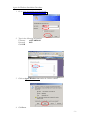
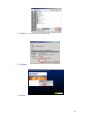
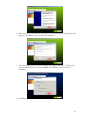
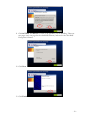
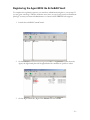
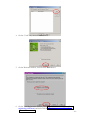
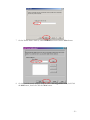
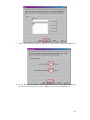
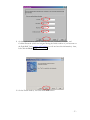
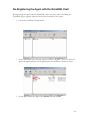
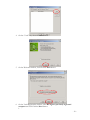
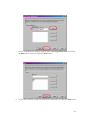
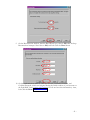
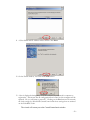
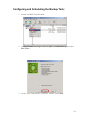
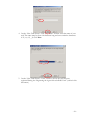
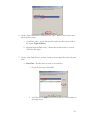
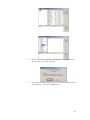
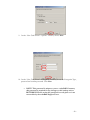
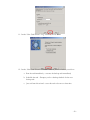
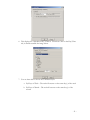
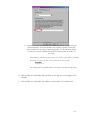
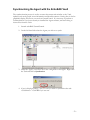
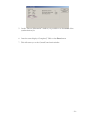
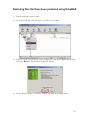
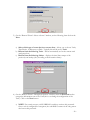
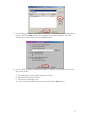
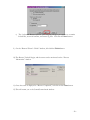
Frequently Used Tasks Manual
Frequent Tasks Manual
Brief Objective: This document focuses on tasks that many EchoBAK Customers will
perform.
Document Revision: 1.00
File Name: Frequent Tasks
Date: 1/11/2005
Author: DWG
Table of Contents:
Executive Summary
Installation of echoBAK Central Control
Installation of echoBAK Windows agent
Registering the echoBAK agent with the vault
Re-registering the echoBAK agent with the vault
Configuring and Scheduling Backup Tasks
Altering the Schedule for a Backup Task
Synchronizing the agent with the echoBAK vault
Restoring files that have been protected using echoBAK
Contact Information
-1–
Executive Summary
In creating a document that focuses primarily on tasks that a majority of echoBAK
customers will perform, we have compiled excerpts from the echoBAK CentralControl User
Manual into this document.
The covered tasks are:
1)
2)
3)
4)
5)
6)
7)
8)
Installing the echoBAK CentralControl
Installing the echoBAK Agent for Windows
Registering the Agent with the echoBAK Vault
Configuring and Scheduling the Backup Task
Altering the Schedule for the Backup Task
Re-Registering the Agent with the echoBAK Vault
Synchronizing the Agent with the echoBAK Vault
Restoring files that have been protected using echoBAK
Most other tasks not mentioned in this document are contained in the echoBAK
CentralControl User Manual.
-2–
Installation of EchoBAK CentralControl
This portion describes the steps required to install the CentralControl application. The
installation requires that you have the CentralControl installation kit and Windows NT 4.0,
Windows 2000, Windows XP Professional installed. This product, when installed, allows the
user to communicate, configure and manage one or more agents. The CentralControl
installation file can be downloaded from http://www.asiguardian.com/downloads
(username: asiGUARDIAN, password: 2003). The filename is CentralControl.exe
Installation Requirements
HARDWARE
SOFTWARE
CPU – Should meet basic requirements of your operating system, as prescribed by
Microsoft
HDD – 10MB of available disk space
OS – Windows NT4 (SP6a) / Windows 2000 (sp2)
Network – A TCP/IP stack
PRIVILEGE REQUIREMENTS
The Installation of the CentralControl does not require any privileges if you are
installing on Windows NT 4 – Backup Files and Directories
If you are installing on Windows 2000, you need Administrator privileges
Installation Procedures
1. Go to www.asiguardian.com/downloads
2. Type in the following information:
Username
asiGUARDIAN
Password
2003
Click OK
-3–
3. Click on CentralControl.exe under the Utilities subtitle.
4. Click Save.
5. Click Save to save this agent to your desktop.
-4–
6. Click Open.
7. Click Yes
8. Make sure that you exit from all other Windows programs before running this setup
program. Click Next to proceed with the installation.
-5–
9. The Notes page provides contact information for technical support. If desired you
may print this information by clicking Print. Click Next to proceed with the
installation.
10. Click ACCEPT and NEXT for each of the products you are installing, There are
two pages total, one page for the echoBAK Software, and one for the echoBAK
Encryption Software.
11. If any other directory is desired click Browse and chose the directory you want this
program installed in. For the default directory click Next.
-6–
12. Use the same Username and Password that you use when logging onto your system.
Click Next
13. Click Yes to install CentralControl 4.60.1502 to your desktop. Click Next.
14. Make desired selection. Click Finish to complete installation.
-7–
Agent for Windows Installation
This chapter describes the steps required to install the Agent under Windows NT4 Server,
Windows 2000 Server, and Windows XP Professional systems. The installation requires that
you have the Agent for Windows Installation kit. To communicate with, configure and
manage the Agent, the CentralControl program must be installed on the same or a separate
32-bit Windows system. The Windows Agent installation file can be downloaded from
http://www.asiguardian.com/downloads (username: asiGUARDIAN, password: 2003).
The filename is Agent-Windows.exe.
System Requirements
HARDWARE
CPU
o
o
o
Minimum: Intel 80486 or 100% compatible
Recommended: Pentium 90 or faster
NOTE: if your operating system suggests different minimum hardware
requirements, employ whichever system is greater
RAM – 64MB or more recommended
HDD – 10MB of available disk space
SOFTWARE
OS – Windows NT4 Server (sp6a) / Windows 2000 (sp2)
Network – TCP/IP
Optional Under NT4 Server / Windows 2000 Server
o Open Transaction Manager OTM 1.11 Build 147 for Windows OTM 1.11
o Open File Manager – OFM 8.1
PRIVILEGE REQUIREMENTS
Installation – To install the Agent for NT 4 Server / Windows 2000 Server / XP
Professional, Administrator or equivalent access is required for the target machine
Functional – There are 3 modes of operation
o Ad-Hoc: Using the CentralControl application, the user can configure,
backup and restore tasks on an Agent. The specified user must have the
"backup Files and Directories" privilege. Alternatively a user named
"vytalvault" can be created (using User Manager/User Manager for
Domains) to allow Ad -Hoc mode interactions.
o Scheduled: Backup jobs can be configured to run in scheduled mode.
Using the CentralControl application, the user can schedule, backup and
restore tasks on an Agent. If the VVAGENT.EXE program is run as a
system service logged in under the System Account user, no special
privileges are required to run scheduled jobs.
o CLI: Command Line Interface mode allows the user logged on to the
system console to execute backup and restores directly from the
command line interface. Users must log in with an account that includes
"Backup Files and Directories" privilege. This privilege is enabled by
default for the Backup Operators and Administrators groups.
o NOTE: The initial configuration requires Ad-HOC mode
privileges.
-8–
Agent for Windows Installation Procedure
1
Go to www.asiguardian.com/downloads
2
Type in the following information:
Username
asiGUARDIAN
Password
2003
Click OK
3
Click on Agent-Windows.exe under the Utilities subtitle.
4
Click Save.
-9–
5
Click Save to save this agent to your desktop.
6
Click Open.
7
Click Yes
- 10 –
8
Make sure that you exit from all other Windows programs before running this setup
program. Click Next to proceed with the installation.
9
The Notes Page provides contact information for technical support. If desired you
may print this information by clicking Print. Click Next to proceed with the
installation.
10 Click Next
- 11 –
11 Click ACCEPT and NEXT for each of the products you are installing, There are
two pages total, one page for the echoBAK Software, and one for the echoBAK
Encryption Software.
12 Click Next
13 Click Finish
- 12 –
Registering the Agent With the EchoBAK Vault
To complete the registration process you must have administration rights to your system. If
you are given a message “Failed to authorize user (xxxx) or user (xxxx) possesses insufficient
privilege” contact your network administrator or contact asiGUARDIAN tech support.
1
Launch the echoBAK CentralControl
2
On the Left-Hand side, select the Agent you wish to Register. After you select the
Agent, the right hand pane will be populated with a number of options to select.
3
On the Right-Hand side, Right-Click Global and choose Edit
- 13 –
4
On the “Vault” tab, select the New button
5
On the Welcome window, Left-Click the Next button
6
On the Vault Registration window, select Register as a new computer (if reregistering click here) and Left-Click the Next button
- 14 –
7
On the Profile Name window, enter echoBAK and Left-Click the Next button
8
On the Vault Network Address window, enter vault.asiguardian.com, Left-Click
the Add button, then Left-Click the Next button
- 15 –
9
On the Ports window, accept the default port values and Left-Click the Next button
10 On the Reconnection window, alter the Reconnect Every value to 300, alter the Stop
Reconnection Attempts After value to 300, and Left-Click the Next button
- 16 –
11 On the Authentication window, enter the Account, Username, Password, and
Confirm Password (which was assigned during the initial creation of your account on
the EchoBAK Vault, contact asiGuardian if you do not have this information). then,
Left-Click the Next button
12 On the Finish window, Left-Click the Finish button
- 17 –
Re-Registering the Agent with the EchoBAK Vault
Re-Registering the Agent with the EchoBAK Vault is necessary after re-installing the
EchoBAK Agent (typically after the OS has been reloaded on the Agent).
1
Launch the echoBAK CentralControl
2
On the Left-Hand side, select the Agent you wish to Register. After you select the
Agent, the right hand pane will be populated with a number of options to select.
3
On the Right-Hand side, Right-Click Global and choose Edit
- 18 –
4
On the “Vault” tab, select the New button
5
On the Welcome window, Left-Click the Next button
6
On the Vault Registration window, select Re-register previously registered
computer and Left-Click the Next button
1. .
- 19 –
7
On the Vault Network Address window, enter vault.asiguardian.com, Left-Click
the Add button, then Left-Click the Next button
8
On the Ports window, accept the default port values and Left-Click the Next button
- 20 –
9
On the Reconnection window, alter the Reconnect Every value to 300, alter the Stop
Reconnection Attempts After value to 300, and Left-Click the Next button
10 On the Authentication window, enter the Account, Username, Password, and
Confirm Password (which was assigned during the initial creation of your account on
the EchoBAK Vault, contact asiGuardian if you do not have this information). then,
Left-Click the Next button
- 21 –
11 A Host Name and IP Address will be shown. Click Next.
12 On the Finish window, Left-Click the Finish button
13 A box is displayed alerting that, “You have selected to perform this computer reregistration. This means that all configuration data located on this computer will be
replaced. Do you still want to proceed?” Clicking on the Yes button will overwrite
the local settings for EchoBAK CentralControl with those settings that are retained
on the EchoBAK Vault.
The wizard will return you to the CentralControl main window.
- 22 –
Configuring and Scheduling the Backup Task:
1. Launch echoBAK CentralControl
2. On the Left-Hand side, Right-Click the Agent you wish to backup, and select
New Task…
3. On the “New Task Wizard – Welcome” window, select Next.
- 23 –
4. On the “New Task Wizard – New Task Name” window enter the name of your
task. The name must be from 1-8 characters long and can contain the characters
A-Z, a-z, 0-9, _-$. Click Next.
5. On the “New Task Wizard – Vault” window, choose the vault that was
registered during the “Registering the Agent with echoBAK Vault” (earlier in this
document).
- 24 –
6. On the “New Task Wizard – Backup Source Type” window, choose the source
where the files reside.
a. Local Drive Only – means that the files reside on a drive that is local to
the Agent (Typical Choice)
b. Mapped Network Drive Only – Means that the files reside on a server
other than the Agent
7. On the “New Task Wizard – Source” window, choose Data Files and/or System
State.
a. Data Files – Flat files that you wish to be backed up
i. Check the box next to Data Files
ii. Left-Click on the Add button, and you will see a screen similar to
the image below
- 25 –
iii. Click the “+” next to the drive (in this case C:\) scroll down to
find the folder you wish to backup
iv. Left-Click the Include button, and you will be prompted with the
following box. Left-Click the Yes button.
- 26 –
v. You will be able to see the folder added to the bottom portion of
the window. If you wish to add more folders, simply scroll
through the folders under C:\, and Add them again. When you
have selected all of the files and/or folders click OK.
b. System State – These files make up the files used by the operating
system (e.g. COM+ database, Registry, System Files…etc.)
8. You will return to the New Task Wizard – Source screen with the files you have
selected showing in the bottom part of the screen. Click Next.
- 27 –
9. On the “New Task Wizard – Options” window, choose Next
10. On the “New Task Wizard – Encryption” window, choose the Encryption Type,
password and confirm password. Click Next
a. NOTE: This password is unique to you as a echoBAK Customer,
this password is required for any changes to this backup task or
RESTORES!!! Please retain this password in a safe place as it not
recoverable by the echoBAK Support Team.
- 28 –
11. On the “New Task Wizard – Log” window, choose Next
12. On the “New Task Wizard – Finished!” window, choose whether you wish to:
a. Run the task immediately – executes the backup task immediately
b. Schedule the task – Prompts you for a backup schedule for the new
backup task
c. Just exit from this wizard – saves this task to be run at a later time.
- 29 –
Altering the Schedule for a Backup Task
1. Launch echoBAK Central Control
2. On the Left-Hand side, select the Agent you wish to alter
3. On the Right-Hand side, Right-Click Schedule and choose Edit
4. The Schedule List window is displayed, and you are able to see any previously
scheduled backup tasks. From here you can create New schedules for backup
tasks, or you can alter the existing schedules.
5. To edit your backup schedule or click Edit.
- 30 –
6. This displays the “Schedule Entry” window. From here Click on the Day/Time
tab; it should resemble the image below
7. You are then able to choose the Command Cycle
a. By Days of Week – The task will execute on the same day(s) of the week
b. By Days of Month – The task will execute on the same day(s) of the
month
- 31 –
c. Custom – You may specify your own custom schedule by entering time and
date information. A custom schedule entry requires a specific syntax that
must be adhered to in order to function properly. Use the following format
to enter your custom schedule data: min/hour/day/month/dow (days of
the week).
Values: Minutes (0-59), Hours (0-23), days (1-31), months (1-12), dow(0-6, 0=Sunday)
Keywords: “*” means everytime, “Last” means last day of the month.
Example:
0/18/*/*/1-5
This example tells StorageCARE OLB to start at 6pm on Monday through Friday.
8. Click on OK on the Schedule Entry window to exit and save your changes to the
schedule
9. Click on OK on the Schedule List window to return back to CentralControl.
- 32 –
Synchronizing the Agent with the EchoBAK Vault
The synchronization process is used to connect the current task window to the Vault,
updates local catalogs with server information and then disconnects. Catalog data is used to
graphically display the files in your task on CentralControl. It is necessary to perform a
synchronization if you have recently re-installed the Agent software, and are looking to
restore files from the Vault.
1. Launch echoBAK CentralControl
2. On the left-hand side select the Agent you wish to re-synch
3. Under the Agent, you will see the Tasks configured for that agent. Right-click
the Task and choose Synchronize.
4. A box is displayed asking, “Are you sure you wish to synchronize the task
<TaskName>.” Click Yes if you are sure
- 33 –
5. On the “Process Information” window, it is possible to see the status of the
synchronization job.
6. Once the status displays “Completed,” Click on the Close button.
7. This will return you to the CentralControl main window
- 34 –
Restoring files that have been protected using EchoBAK
1) Launch echoBAK Central Control
2) On the left-hand side select the Agent you wish to restore from.
3) Under the Agent, you will see the Tasks configured for that agent. Right-click the Task
and choose Restore. This launches the Restore Wizard.
4) On the “Restore Wizard – Welcome” window, left-click on the Next button
- 35 –
5) On the “Restore Wizard – Select a Source” window, set the following, then click on the
Next.
a) Select which type of source device to restore from – allows you to choose Vault,
Tape Device, or Directory on Disk. Typically this will be set for Vault
b) Restore from the following Vault: - will be automatically set for the current vault
(and grayed out)
c) Restore from the following Safeset – displays the time/date stamps of the
previously run backup jobs (according to their retention times).
6) On the “Restore Wizard – Encryption Options” window, enter the Password used to
encrypt the information sent to the Vault (this is set during the configuration of the
Task). Click on the Next button
a) NOTE: For security reasons, asiGUARDIAN is unable to retrieve this password.
Once a task is configured for encryption, the echoBAK Customer is the only person
who knows this password.
- 36 –
7) On the “Restore Wizard – Select Restore Objects” you are able to choose which files to
restore. Left click Add, and then choose directories or files to include. Once the
selections have been made, click on the Next button.
8) On the “Restore Wizard – Destination Options” window, you are given 3 choices for
the restore routine:
a)
b)
c)
d)
Restoring files to their original/alternate locations
Recreate sub-directories or not
Restore by overwriting or not
Once you have decided on these choices, left-click the Next button
- 37 –
e) The “Advanced Restore Options” (below figure) will give you options to overwrite
locked files, restore all streams, and create log files. Left-click the Next button.
9) On the “Restore Wizard – Finish” window, left-click the Finish button
10) The Restore Task will begin, and the status can be monitored on the “Process
Information” window.
11) Once the status is displayed as “Restore Completed,” left-click on the Close button.
12) This will return you to the CentralControl main window.
- 38 –
Contact Information
asiGuardian, LLC.
193 Computrex Dr.
Nicholasville, KY 40356
859-885-1499
www.asiguardian.com
Tom Tipton
Business Development Manager
[email protected]
echoBAK Support Team
David Barnes
Eric Carpenter
Don Garrison
Send Questions to:
[email protected]
- 39 –