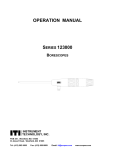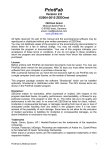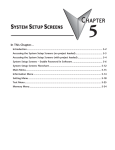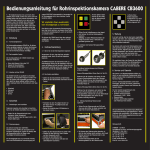
1
English MediaWorkStation Basic Edition Tec Version 2.9 User Manual Translation of the German edition Issue 1-2014 MediaWorkStation Basic Edition Tec User Manual GA_MWS29BETec_1-2014_EN.doc Contents Contents .............................................................................................................................................1 1. General ...........................................................................................................................................3 1.1. Abbreviations and icons .........................................................................................................3 1.2. Legal information ...................................................................................................................3 2. Introduction .....................................................................................................................................4 2.1. Intended use ..........................................................................................................................4 2.2. Functionality...........................................................................................................................4 2.3. Safety guidelines....................................................................................................................4 3. Installation ......................................................................................................................................5 3.1. Requirements on the computer ..............................................................................................5 3.2. Required system components ................................................................................................5 3.3. Configure the software ...........................................................................................................5 Video input device ..................................................................................................................6 Audio input device ..................................................................................................................6 Audio output device................................................................................................................7 Export setup default destination .............................................................................................7 4. Operation ........................................................................................................................................8 4.1. General remarks ....................................................................................................................8 4.2. Activation ...............................................................................................................................8 4.3. User front-end ........................................................................................................................9 4.4. Operation by touch display ...................................................................................................10 4.5. Select working mode ............................................................................................................11 4.6. New area .............................................................................................................................12 Select project .......................................................................................................................12 Edit project data ...................................................................................................................13 Edit project data „Tube inspection“ .......................................................................................13 Record videos, photographs and audio data .........................................................................14 Using the ring storage ..........................................................................................................15 Add graphical markers .........................................................................................................16 Add comments .....................................................................................................................17 Create a report .....................................................................................................................18 4.7. Archive area.........................................................................................................................19 Select project .......................................................................................................................19 Select session for display and report ....................................................................................20 Playback video .....................................................................................................................21 Display picture .....................................................................................................................22 4.8. System area.........................................................................................................................23 Authorisation ........................................................................................................................23 System area.........................................................................................................................23 5. Avoiding, identifying and resolving issues ......................................................................................24 6. Technical data ..............................................................................................................................25 7. List of figures ................................................................................................................................26 1-2014 1 MediaWorkStation Basic Edition Tec User Manual 1. General Translation of the original German user manual. Please read this user manual carefully and observe the notes given. 1.1. Abbreviations and icons MWS-BT MES F1 DVI VGA GNU GPL MediaWorkStation Basic Edition Technic Medien Elektronik Software Control key “F1” on the keyboard Digital Visual Interface, digital interface for transmitting video data Video Graphics Array, analogue interface for transmitting video data GNU General Public License Consult instructions for use. User manual is available in folder c:\mws\manual\ after software installation. Visit www.mediaworkstation.de for the latest version of the user manual. General warning. Sections marked with this icon contain important requirements for the safe operation. General precept. Sections marked with this icon contain important hints for the best operation. Symbol of the manufacturer. 1.2. Legal information GA_MWS29BETec_1-2014_EN.doc The product "MediaWorkStation Basic Edition" – short MWS-BT - is marked with the CE-Sign according to the EU-guideline 93/42/EWG. The product is protected by the "End User License Agreement" of MES. Parts of the product are protected by the "GNU GPL". All trademarks and registered trademarks are the property of their respective owners MES Medien Elektronik Software Neuendorfstrasse 18b D-16761 Hennigsdorf Germany phone: +49 3302 2094825 fax: +49 3302 2094835 e-mail: [email protected] web: www.mesnet.de 1-2014 3 MediaWorkStation Basic Edition Tec User Manual 2. Introduction 2.1. Intended use Imaging techniques are used in many areas of industry: in endoscopic inspections as well as in production monitoring and many other applications. "MediaWorkStation Basic Edition Technic" - short MWS-BT - is software for Windows for the recording, displaying, administration, documentation and playing of pictures and videos in technical contexts. Permanent storing of the recorded pictures and video is not provided in MWS-BT. The operating period is defined to CONTINUOUS OPERATION. After 24 hours the system must be rebooted. 2.2. Functionality The output signal of visualising devices such as cameras, videoscopes and sonographic devices is displayed on the monitor connected to the computer working with MWS-BT, and can be recorded as individual picture or as video. The recorded information is saved to a database which is sorted by projects and sessions. Several display and search functions make it possible to directly address and select individual data sets. The programme provides text fields to write down additional comments. For review and continued documentation, MWS-BT offers several functions for displaying pictures and videos, for visual comparison, for adding comments and for exporting picture and video data in standard formats. 2.3. Safety guidelines Protect your computer and the programme against unauthorised access by using passwords. Protect your computer against virus attacks and other malware by using antivirus software. If the computer is part of a local network or connected to the internet, install a firewall, in order to protect the computer against unauthorized attacks from outside. Please observe the safety requirements by your web administrator, too. If the data are saved on a central server, make sure the server is started up and linked to the network. Make sure that you are fully authorised for access to the central data server. Also observe the hints and explanations of the online help of the product. You can find the online help in the relevant part of the programme menu (e.g. Start Program Files MediaWorkStation Help) or, after starting the software, by pressing the keys [Help] or [F1]. 4 1-2014 GA_MWS29BETec_1-2014_EN.doc MES cannot guarantee uninterrupted permanent operation of the MWS-BT! For this reason, the MWS-BT may only be used within a redundant system pool, if an uninterrupted visualisation must be guarantied. MediaWorkStation Basic Edition Tec User Manual 3. Installation 3.1. Requirements on the computer • • • • • • • Windows 8 / 7 / Vista Processor Intel Core i5 2,4 GHz or comparable System memory 2 GB DDR3 Harddisk space 200 GB Intel HD graphics 3000 Video converter with DirectShow support Display, 1024x768 pixel, color 32Bit The requirements are minimum values. A more powerful equipped computer, especially in processor speed, memory and storage space, is recommended. Access right as administrator are necessary for installation procedures. 3.2. Required system components Please consider light sources (reflections on the screen) and lighting conditions. Do not expose to direct sunlight or heating. The following additional components are necessary: • Video camera or another modality with compatible video output • Display • Keyboard and mouse or "touch"-display The following accessories can be used to control the recording of videos and pictures: • USB footswitch (one pedal) • USB footswitch (two pedals) • USB remote cable GA_MWS29BETec_1-2014_EN.doc 3.3. Configure the software In the system settings area it is possible to adjust all pre-settings to user-specific requirements. The settings will be saved in the Windows registry database and configuration files. They control many of the functions of the system. Modifications of the parameters may result in malfunctions and are thus exclusively reserved to authorised administrators. You find the settings in the system area. Use the programme „MWSConfig“ (Start -> program files -> MediaWorkStation -> MWSConfig) for basic system configuration. 1-2014 5 MediaWorkStation Basic Edition Tec User Manual Video input device A list displays all “devices” of the type ”video input” available in the system. When selecting a device it will be enabled, and in the window situated below the list the current input signal is displayed for check. For some devices (such as the USB cameras) all possible video formats will be listed additionally. From the check box, select the format promising the best play quality, and pay special attention to a proper geometrical presentation. Figure 1 - Video input configuration Audio input device Figure 2 - Audio input configuration If a USB video input device was selected, the device cannot at the same time be the audio input device. If you are using a DV-converter as video input device, please select them as audio input device too. 6 1-2014 GA_MWS29BETec_1-2014_EN.doc A list displays all devices of the type ”audio input” available in the system. When selecting a device, it will be enabled and the recent input signal will be played. This acoustic check makes it possible to choose between those devices which are properly working currently. MediaWorkStation Basic Edition Tec User Manual Audio output device A list displays all devices of the type ”audio output” available in the system. When selecting a device, it will be enabled and a test tone will be generated. This acoustic check makes it possible to choose between those devices which are currently properly working. Figure 3 - Audio output configuration Export setup default destination GA_MWS29BETec_1-2014_EN.doc MWS-BT has been developed for exporting pictures to mobile data carriers. In order to copy the relevant data automatically to the medium in the export area, select the standard medium. Plug a USB stick into the selected port, and then select it as target medium. Figure 4 - Settings database 1-2014 7 MediaWorkStation Basic Edition Tec User Manual 4. Operation 4.1. General remarks The operational sequences explained in this manual describe only the fundamental steps to perform the task. The online help gives a complete description of the entire functionality of the programme. Open the online help by pressing the key [F1] on the keyboard or the [Help] button. Basically, the software is a Windows programme. Thus all features of use and presentation of Windows are valid: • Full mouse support • Underlined letters are short cuts, ALT + letter = pressing the button • An element which is focussed by a dotted rectangular is to be confirmed with [Enter] or [Space] • Buttons with greyed letters are disabled and cannot be pressed. 4.2. Activation The software is protected against unauthorised use by a protection mechanism which avoids the start of the programme after a certain period of testing (usually 30 days). When you have bought a licence and installed the programme you must order an activation key with the help of which you can activate the software for unlimited use. Please follow the hints given in the activation dialogue. The dialogue will appear at every start of the programme as long as the software is not activated yet. During the evaluation period you can skip this [Activate later]. 1 Figure 5 - Activation dialouge box Please note that you will have to send your bill of sale (receipt) or voucher code together with the activation request. 8 1-2014 GA_MWS29BETec_1-2014_EN.doc dialogue by clicking MediaWorkStation Basic Edition Tec User Manual 4.3. User front-end The user front-end of the MediaWorkStation is devided in the portions status bar, display area, tool/message area and menu bar. The arrangement of the window will not be changed throughout of the entire duration of the program. 1 2 4 3 5 Figure 6 - User interface GA_MWS29BETec_1-2014_EN.doc The status bar displays the name of the project and more mode-specific information. Our example shows the recorder mode stating the remaining recording capacity. The display area displays the picture information in preview mode, recording mode and playing mode, as well as selection lists and input masks for editing project data and findings. The tool and message area contains tools for the direct control and manipulation of the display area. Action status messages, warnings and error messages are also prompted in this area. At the right side you find the menu bar and the name of the current mode in the headline section. The top section of the menu bar is variable and contains tools for operation control and additional functions. The bottom section of this menu bar is invariable and contains the buttons for calling up the help function (context-sensitive) and leaving the current programme mode. 1-2014 9 MediaWorkStation Basic Edition Tec User Manual 4.4. Operation by touch display You can operate the programme almost completely via a screen sensitive to touch. All essential functions of the programme can be called up by touching large and clearly arranged buttons on the screen, except functional areas of the system configuration and special dialogues for the opening and saving of files. Touching the screen substitutes the function of the indicating device, e.g. the mouse. A touch corresponds to pressing the primary mouse key. For example, if you wish to select a picture detail for enlargement, touch the screen at the first selection point of the rectangle and move your finger or pen on towards the second selection point. Conclude the selection by removing your finger or pen. The removal of finger or pen from the screen corresponds to the release of the primary mouse key. Figure 7 - Touch operation In addition to the buttons for programme control a screen keyboard exists for text input. The keyboard configuration is adjusted to the respective language. Under settings you may select, whether or not the screen keyboard will be displayed. GA_MWS29BETec_1-2014_EN.doc Usually the touch-sensitive surface of the touch screen requires calibration for exact position detection results. Please observe the relevant information by the manufacturer. 10 1-2014 MediaWorkStation Basic Edition Tec User Manual 4.5. Select working mode You are at the central entry to the programme. From here you may choose between several modes. 1 2 3 [New] After selecting a project, a new session will be created and the recorder mode is started. [Archive] This button gives access to all projects and sessions. Already existing dates and video clips can be analysed, edited or deleted. See also 4.7. [System] You can edit basic settings and make user-specific settings. See also 4.8. 4 [About] This button calls up a dialogue displaying version and licence information on the programme. GA_MWS29BETec_1-2014_EN.doc Figure 8 - Start area 1-2014 11 MediaWorkStation Basic Edition Tec User Manual 4.6. New area Select project You can select a project from the list or make a new entry. You may see the list for project numbers or names. 2 3 4 For directly searching a project press one of the buttons [Find by ABC] or [Find by 123] and start with the input of the search term. The data record cursor is automatically positioned to the data set showing the highest degree of congruence. Highlight a project for selection or create a 1 [New] project file. Makes the highlighted project the relevant and enters his name in the status line on the top margin. Additionally a new session file is prepared for this project and the programme jumps to recorder mode. GA_MWS29BETec_1-2014_EN.doc Figure 9 - Select project new area 12 1-2014 MediaWorkStation Basic Edition Tec User Manual Edit project data For the unambiguous assignment of recordings to the projects some data are necessary. Beside necessarily required data like project name and ID, value and description are optional. Figure 10 - Projekt bearbeiten allgemein Name: Project name. ID: Project identification. In order to simplify input an unambiguous project number will automatically be suggested by the system. Value: Freely usable data field for a reference characteristic (e.g. tolerance, dimension) of the relevant object. Info: Additional information for the project description. Edit project data „Tube inspection“ There exist specific editions of the software. For an optimized project management the data fields for identification and description are used differently. Figure 11 - Projekt bearbeiten “Rohrinspektion” GA_MWS29BETec_1-2014_EN.doc Name: Project name. ID: Project identification. In order to simplify input an unambiguous project number will automatically be suggested by the system. Value: Diameter of the sewer section. Info: Location of the sewer section. 1-2014 13 MediaWorkStation Basic Edition Tec User Manual Record videos, photographs and audio data This is a fully digital “video recorder” for the recording of videos, photographs and audio data. Optionally, the video or photo recording can be controlled by the foot switch or a remote control. In the display area you see the video preview. Start 3 video recording by . This button pressing the button has different functions depending on the state of recording: it stops recording, in recording state . This button takes a photo and displays it for a few seconds as freeze image. 1 2 Figure 12 - Recorder area [Archive] Shows the sessions saved under the respective project. You can compile complex reports on the basis of individual pictures combined with project information and comments. The duration of a video recording is automatically limited. With the setting "AVI time limit" you can adjust this limit. You absolutely have to consider the impact of enabled ring storage to the database. All crucial recordings should be exported as quickly as possible because of the limited capacity of local storage. GA_MWS29BETec_1-2014_EN.doc For recording specific comments exists a free definable database. Hints for creation and usage of the database you find in section “Add comments” 14 1-2014 MediaWorkStation Basic Edition Tec User Manual Using the ring storage If ring storage is enabled, before and after recordings the local storage space will be checked. In case the disk space is running low a message appears which requests you to archive the data. Figure 13 - Message "Disk space is running low" Depending on the amount of available storage space, an enabled ring storage may result in the deletion of not yet exported recordings which will then be permanently deleted. Figure 14 - Message "Retention period" The expected retention period of the recordings signalled by the system is an estimation on the basis of the usual handling, and may deviate considerably! After successful export you can log off the mobile data carrier, or keep it logged on for more exports. Removing mobile data carriers without prior logoff can result in data loss! GA_MWS29BETec_1-2014_EN.doc The logged off storage device is no longer available as export destination. In order to use it again, the device has to be pulled out and plugged in anew. 1-2014 15 MediaWorkStation Basic Edition Tec User Manual Add graphical markers In order to emphasise details in the picture you can draw graphical markers into the picture with different drawing tools. Tools are offered for arrows, circles, outlines, text and other special markers. The markers do not cause modifications of the image content as they are saved independently from the image content and are added to the image not before it is displayed (overlay). Markers contained in an image will be put out together with the report. Colour and form of the markers can be modified in the system settings. Besides the simple markers arrow, circle and outline exists markers with special functionality. Draw a complex marker. Complex markers are an arrangement of single markers. They can be used for example, in order to bring a basic structure into images. The first click with the primary mouse button defines the origin and the second click defines the size of the marker. 1 2 3 4 Figure 15 - Edit graphical markers Draw a point-marker („Hotspot“). Mark significant points with point markers. Comments can be assigned to these points. In connection with an origin-marker the clockwise position can be automatically inserted into comments. Draw an origin-marker. It marks the origin of a coordinate system which is used for automatic creation of position information of “Hotspots”. Also complex markers usually contain an origin-marker. Only one origin-marker per image is possible. GA_MWS29BETec_1-2014_EN.doc In order to edit the contents of a text marker after the entry, click with the secondary mouse button on the reference point. 16 1-2014 MediaWorkStation Basic Edition Tec User Manual Add comments To each dataset and point-marker („hotspot“) separate comments can be assigned to. This is an optional text that can be used for any other purpose. Although the text may be as long as you wish, it is recommended to use short key texts as only the first lines are displayed in the list of all data sets. You may select findings from a pool of standard findings. These findings serve the purpose of a better comparability and increase the understanding of the entries in the data set list. You can at any time add additional information to these findings or edit them. Standard comments are available in lists structured by categories. Categories as well as the category content can be spread on more than one page. Switch to the next page by clicking the last list position. The comment text can be entered and formatted too by manual typing. The selected comment from the 1 3 4 5 2 Figure 16 - Edit comment list view is inserted into the edit field. Alternatively a list entry can be inserted by double clicking the primary mouse button too. The entire image and the inserted point-markers („hotspots“) will be sequentially selected for commenting. The name of the selected pointmarker is inserted as text into the edit field. In similarity with a clock, the direction of the point-marker is inserted as a clockwise position into the edit field. As a reference serves an origin-marker or the origin of a complex marker. All modifications are stored to the database. Functions regarding markers are only applicable if point-markers („hotspots“) were inserted. For position-information the insertion of an origin-marker is necessary. GA_MWS29BETec_1-2014_EN.doc There exist independent comments for whole sessions and single recordings or markers. The database is only available for comments to single recordings or markers. 1-2014 17 MediaWorkStation Basic Edition Tec User Manual Create a report You can export the data sets (pictures, project information and session information), that were recorded during the session, onto an external data carrier. The bar graph below the display area will inform you about the utilisation of the data carrier. By individually highlighting the data 1 3 4 you can adjust the export sets volume to the data carrier. Select a data set and change the status of the export highlighting by clicking at . Data the tick mark or the cross sets reserved for the export are marked with the symbol . Add a comment to the selected data sets and start exporting . 2 Figure 17 - Report area Each data set contains a number of additional information details. Time of creation. The symbol stands for the data set as single picture recording. There is no symbol for video recordings. 1 The arrow symbolises that the data set is highlighted for export. The green tick mark and the red cross serve to highlight the data set. 2 3 GA_MWS29BETec_1-2014_EN.doc Figure 18 - Report dataset Removing mobile data carriers without prior logoff can result in data loss! 18 1-2014 MediaWorkStation Basic Edition Tec User Manual 4.7. Archive area Select project In the archive area you have access to all existing project and session data. Stored data and videos can be analysed, edited, exported or deleted. 2 3 For directly searching a project press one of the buttons [Find by ABC] or [Find by 123] and start with the input of the search term. The data record cursor is automatically positioned to the data set showing the highest degree of congruence. Highlight a project for selection. 1 [Select] Makes the highlighted project the current project and enters his name in the status line. After this, all existing sessions are listed. GA_MWS29BETec_1-2014_EN.doc Figure 19 - Select project archive area 1-2014 19 MediaWorkStation Basic Edition Tec User Manual Select session for display and report The session view offers a quick overview over all examinations of the project. A mouse click at the picture or symbol opens the attached data set. In order to create a report select the desired session. Switch to the report area by clicking the button [Report]. 1 2 Figure 20 - Session area The list of sessions contains additional and detailed information. 1 3 2 Figure 21 - Session dataset Date and time of session creation as well as the first line of the comment are displayed. This symbol shows the number additional data sets. Clicking this symbol links you directly to the dataset area. Learn more about reports in section „New area“ under „Create a report“. 20 1-2014 GA_MWS29BETec_1-2014_EN.doc The symbol marks the data set as a still picture recording. Datasets without this symbol are video recordings. MediaWorkStation Basic Edition Tec User Manual Playback video When you open a video from the session or export area, the video player will be displayed. By shifting the control triangle on the positioning bar you can set it to any play position in the video. On the left margin, the position will be indicated as time display in the format minutes:seconds:milliseconds. Press this button to play the video. The button has different functions depending on the state of playing. After starting to “play”, this button has the function of a “pause” button. 1 Press this button to stop playing and jump to the start of the video. 2 3 4 5 Press this button to picture-wise play forward or reverse. When pressing the button longer than 3 seconds the video changes to slow forward/reverse. The video is played in “slow motion”. Figure 22 - Player area Fast forward/fast reverse. When pressing this button longer than 3 seconds, the video clip jumps to the end/beginning of the video. GA_MWS29BETec_1-2014_EN.doc Learn in section „New area“ under „Add comments“, how you can add additional information to a recording. 1-2014 21 MediaWorkStation Basic Edition Tec User Manual Display picture When you open a picture from the session or export area, the picture area will be displayed. You can optimise the picture representation for getting maximum precision or watch details with the zoom function. You can horizontally, vertically or pixel-accurately adjust the picture to the display area. For detailed views select a square section, which can then be freely shifted over the entire picture. Press this button to jump to the operation mode [Selection of a picture section]. If the mouse cursor is on top of the picture it appears in the form of crosshairs. You can select areas for enlargement. 1 2 3 4 Press this button to jump to the operation mode [Shifting of a picture section]. If the mouse cursor is on top of the picture it appears in the form of a hand. You can shift the enlarged area over the entire picture. Figure 23 - Picture area The picture is displayed in the original resolution having assigned exactly one pixel of the display to exactly one pixel of the original picture. If the original picture is larger than the display area, this corresponds to an enlargement. Press this button to switch between the current and the last selected picture display. GA_MWS29BETec_1-2014_EN.doc Learn in section „New area“ under “Add graphical markers” and „Add comments“, how you can add additional information to a recording. 22 1-2014 MediaWorkStation Basic Edition Tec User Manual 4.8. System area Authorisation For highly sensitive settings there are access authorisations. These settings are very sensitive, and thus it is recommended to consult the responsible authorised service technician. The initial login name is “Supervisor” without a password. Figure 24 - System area login System area The system area allows a number of specific settings and adjustments. Only experienced users should modify these settings. Click [Settings] to get to the software configuration. 1 2 Click [Devices] in order to select and configure all necessary devices. With the help of [Diagnosis] the system analyses itself and creates a status report for the service. 3 GA_MWS29BETec_1-2014_EN.doc Figure 25 - System area 1-2014 23 MediaWorkStation Basic Edition Tec User Manual 5. Avoiding, identifying and resolving issues System start-up Be sure that all system components are correctly connected. The components of the system should be switched on one after the other, with the computer as the last one. It is not allowed to use masterslave-sockets. System shut-down in the You always have to switch off the device properly by repeatedly pressing [Back] or the icon status bar. Each interruption causes severe, often irreparable damage to the database and thus to the data. Mobile data carriers Even if the configuration of the destination data carrier has been carried out properly, the system might in some cases not be able to find a currently connected data carrier. Hence, the availability of the data carrier must be checked before export is started. Data backups Data backups must be made on a regular basis in order to be able to restore the data in the case of a hardware defect. When restoring, the data must be back-transferred from the backup medium into an empty database folder. Automatic limitation of recording The recording duration is limited to one hour by standard. The maximum duration of a recording can be adjusted in the settings area with the help of the parameter "AVI time limit". Recording impossible The circle storage automatically organises the availability of sufficient hard disk space for storing new recordings. If the circle storage is disabled the hard disk might quickly be full, depending on how it is used. The export of videos does not release hard disk space. Calibrating the touch-display Usually the touch-sensitive surface of the touch screen requires calibration for exact position detection results. Please observe the relevant information by the manufacturer. Audio and video data are not lip-sync Audio and video data are only lip-sync if both signals are processed by the same capture device. Central database Also a database stored in a network is not simultaneously accessible for multiple MediaWorkStation clients. Only one of the clients has the exclusive access right at a time. 24 1-2014 GA_MWS29BETec_1-2014_EN.doc Print out of picture findings The picture is printed on the printer selected in the system area „devices“. High quality printers and papers should be used for the print out exclusively. MediaWorkStation Basic Edition Tec User Manual 6. Technical data Name Classification Video format Video standard Audio format Video resolution Value Class 1 according to 93/42/EWG DV / MPEG2 PAL / NTSC / Full HD PCM, MP3, stereo Input signal: 640x480 pixel (NTSC) 768x576 pixel (PAL) max.1920x1080 pixel 60fps (Full HD) Stored video: 720x480 pixel (NTSC) 720x576 Pixel (PAL) max. 1920x1080 pixel 60fps (Full HD) Audio resolution File format Storage space consumption Operation mode / duty cycle Stored picture: 640x480 pixel (NTSC) 768x576 pixel (PAL) max. 1920x1080 pixels (Full HD) 16 bit, 44,1/48 kHz stereo Video: MPEG2, DV-AVI Picture: BMP / JPEG Report: HTML / JPEG Video: 3,2MB/s (PAL/NTSC)(DV) max. 2 MB/s (PAL/NTSC)(MPEG2) max. 6 MB/s (Full HD)(MPEG2) Picture: 1,26MB (BMP) / ~39KB (JPEG)(PAL/NTSC) max. 8MB (Full HD) Continous operation / restart after 24h GA_MWS29BETec_1-2014_EN.doc Table 1 - Technical data 1-2014 25 MediaWorkStation Basic Edition Tec User Manual 7. List of figures GA_MWS29BETec_1-2014_EN.doc Figure 1 - Video input configuration .....................................................................................................6 Figure 2 - Audio input configuration .....................................................................................................6 Figure 3 - Audio output configuration ...................................................................................................7 Figure 4 - Settings database ...............................................................................................................7 Figure 5 - Activation dialouge box .......................................................................................................8 Figure 6 - User interface......................................................................................................................9 Figure 7 - Touch operation ................................................................................................................10 Figure 8 - Start area ..........................................................................................................................11 Figure 9 - Select project new area .....................................................................................................12 Figure 10 - Projekt bearbeiten allgemein ...........................................................................................13 Figure 11 - Projekt bearbeiten “Rohrinspektion”.................................................................................13 Figure 12 - Recorder area .................................................................................................................14 Figure 13 - Message "Disk space is running low"...............................................................................15 Figure 14 - Message "Retention period" ............................................................................................15 Figure 15 - Edit graphical markers.....................................................................................................16 Figure 16 - Edit comment ..................................................................................................................17 Figure 17 - Report area .....................................................................................................................18 Figure 18 - Report dataset ................................................................................................................18 Figure 19 - Select project archive area ..............................................................................................19 Figure 20 - Session area ...................................................................................................................20 Figure 21 - Session dataset...............................................................................................................20 Figure 22 - Player area .....................................................................................................................21 Figure 23 - Picture area ....................................................................................................................22 Figure 24 - System area login ...........................................................................................................23 Figure 25 - System area ....................................................................................................................23 26 1-2014