1
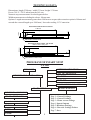
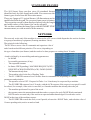
Proper adjustment:
1) The nylon wire is streched uniformly against the aluminium profile
2) There is no gap in the STOP/MACHINE joint (J).
If this is not the case, move the right extremity of the NS backward or forward
until the nylon wire is fully streched in line with the aluminium guide. Move the
NS left or right until the gap in the joint J disappears.
NYLON WIRE
STOP
Perpendicular level
(base)
CS 969
Table
J
Stop
fig 5
Horizontal
level
Levelling:
EH
With a 19mm open-end wrench, adjust the NS levels in relation to the
machine table by screwing and unscrewing nut EH of the NS feet.
Check the levels with a ruler.
After adjusting level alignment, tighten the nuts of bracket E
permanently (10mm tubular socket wrench + 5mm hex head key).
Remove the alignment nylon wire.
Insert the plug at the end of the aluminium profile.
CUTTING
TABLE
E
CONNECTING THE NUMERIC STOP
The NS has 3 DIN plugs to be connected to the machine, above the front right-hand foot.
1
2
3
1
2
3
MALE FEMALE
FEMALE
5P DIN
4P DIN
5P DIN
4