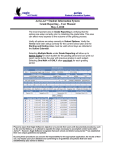
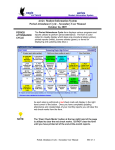
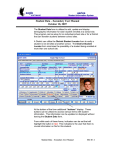
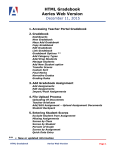
1
Aeries.net Student Information System Query – User Manual April 29, 2009 The Aeries.net Query option enables you to create queries from data stored within the database tables. This process generates a query statement and collects the data, which will allow you to create a report or excel spreadsheet. The following documentation will provide you with information on some of the general functions available to you through Query. WHAT IS A QUERY A query is a statement that gets entered onto the Query screen. The statement will contain a Command that will instruct Aeries.net to pull specific data from tables entered into the query statement. WHAT IS A TABLE A table is a file that stores certain data entered into the Student Information System. The Query form above displays some of the tables that are contained within Aeries.net. Please be aware that Eagle Software’s objective is to provide their users with documented procedures, such as the one that follows, in an attempt to expedite the steps necessary to accomplish certain tasks within Aeries™. However, Eagle Software recognizes that each school and district using Aeries™ has established their own unique guidelines and policies. By using these procedures you assume full responsibility for the appropriate application, the results of their use, any impact upon your database and conforming to all guidelines and policies that have been established by your school or district. Page 2 –Aeries.net Student Information System HOW IS A TABLE CREATED The form displayed below is the Teachers form. When you click on the Add button the screen allows you to enter specific data about a teacher. After you have typed information into the different fields and clicked on Insert a record is created and saved in the TCH table. As you keep entering teachers a new record is created for each teacher. After the first record is created, essentially you have created the TCH table. WHY IS THERE MORE THAN ONE TABLE? Instead of creating one large table that contains all of the student’s data, smaller tables are created. Having multiple tables increases processing time that allows you to pull data from specific tables instead of one large table. To access information from various tables a field has been flagged that will create a link between the tables. For instance, the MED and STU tables both contain the student number (SN) field which creates a link that allows you to pull data from both tables. Query – User Manual Page 3 –Aeries.net Student Information System QUERY PROCESS To begin the query process, click the mouse on the Query node from the Navigation Tree. The following screen will display. Various commands can be selected by using the mouse or you can type the query by hand. Query – User Manual Page 4 –Aeries.net Student Information System The commands available are: • LIST performs a display function. • TOTAL will calculate a total amount of specific records. • SKIP will bypass specific records. • KEEP will select specific records. A text box is displayed at the top of the form. This area is where the query will be entered. Below the text box, messages display indicating the steps to be performed. TO CREATE A QUERY Click the mouse on the Command selected. The command will display in the text box at the top of the form. Query – User Manual Page 5 –Aeries.net Student Information System A message will display below the text box to Enter Table Code. A listing will display of all TABLES available and will be outlined with a yellow border. A 3-character code will display under the TABLES heading. The Table Name will display to the right. Use the up and down arrows or the scroll bar to locate the table. Click the mouse on the Table selected. The 3-letter code for the table selected will display in the text box after the command selected. The next available steps that can be performed will display below the text box. NOTE: After a table is selected only related tables will display. Query – User Manual Page 6 –Aeries.net Student Information System A listing will display of all FIELDS that are available. A 2 or 3 character field name will display on the left under the Fields heading. The Field Name will display to the right of the Field column. Click the mouse on the fields selected and the field name will display to the right of the table in the text box. When clicking the mouse on the fields a space will automatically be placed in between each field. Query – User Manual Page 7 –Aeries.net Student Information System TO SORT A QUERY A query can also be sorted in order by a particular field. To sort the query, click the mouse on the BY option under SORT. Determine the order that you want this query to be sorted and click the mouse on the field selected. The field will display to the right of the BY statement. For example, BY GR will sort the query in order of grade level. TO SELECT SPECIFIC RECORDS For this query to utilize only specific records, click the mouse on the IF option and IF will display at the end of the query. Click the mouse on a field for specific record selection. Type the criteria necessary to select specific records. EXAMPLE: For a listing of only female students, type IF SX = F Query – User Manual Page 8 –Aeries.net Student Information System COMPARISONS Different Comparisons can be used when adding IF to your query statement. A Comparison box displays on the left side of the screen. Examples are given of how these comparisons can be used. The following are query examples that utilize these comparisons. The query listed below displays: IF FN = ALLEN When this query is RUN only the students that their first name is Equal to ALLEN will display as in the example below. Query – User Manual Page 9 –Aeries.net Student Information System The query listed below displays: IF HP # “ “ When this query is RUN any student record that is Not Equal to a blank in the Health Problem field will display as in the example below. The query listed below displays: IF GR > 12 When this query is RUN only students in a grade Greater Than 12 will display as in the example below. Query – User Manual Page 10 –Aeries.net Student Information System The query listed below displays: IF GR < 9 When this query is RUN only students in a grade Less Than 9 will display as in the example below. The query listed below displays: IF AD : GREENBRIAR When this query is RUN only students that Contains GREENBRIAR in the address field will display as in the example below. Query – User Manual Page 11 –Aeries.net Student Information System The query listed below displays: IF PG : LN When this query is RUN only students that Contains the students Last Name in the Parent/Guardian field will display as in the example below. The query listed below displays: IF PG ; LN When this query is RUN only students that does NOT Contain the students Last Name in the Parent/Guardian field will display as in the example below. Query – User Manual Page 12 –Aeries.net Student Information System SPECIAL CHARACTERS There are Special Characters that can be utilized within a query statement that will provide shortcuts to the final query generated. These characters are displayed on the right hand side of the form under Special. • • • • STU.NM will join LN with a comma and the FN, for example: Abbott, Lori STU.MI will only display the first letter of the MN \ forces the print line to drop down one line Barcode will generate a number into a scanning barcode on a label The following is an example of a query utilizing the STU.NM and STU.MI Special Characters listed above: Query – User Manual Page 13 –Aeries.net Student Information System TO GENERATE A QUERY Once the query statement is entered, click the mouse on the RUN button and the query will begin to process. The following is the definition for this query: LIST STU SN LN FN MN ID SX GR BY GR IF SX = F = select data to display = from the Student Data table = the student Number = the students Last Name = the students First Name = the students Middle Name = the permanent ID = the sex = the current grade = In the order of grade = only include female students After the query is generated the screen will display the data selected. Compare the data and verify it meets the standards of the query that you are interested in. Click the mouse on the Red X to close. Query – User Manual Page 14 –Aeries.net Student Information System ADDITIONAL FUNCTIONS There are buttons in a column on the right side of the QUERY screen. These buttons are used to generate reports, labels, excel spreadsheets, etc. after the query statement has been generated. The following are the ADDITIONAL FUNCTIONS available: • NEW will clear the text box area of any query displayed to enter a new query statement. • RUN will generate the query statement and display the data. • EXCEL will generate an excel spreadsheet. • REPORT will generate a formatted report from the data displayed. • LABELS will generate formatted labels from the data displayed. • SAVE allows you to save the query for later use. • LOAD will allow you to re-load a query previously saved. Query – User Manual Page 15 –Aeries.net Student Information System A Multiple Table Query uses more than one table to access different information. For example, the query below will create a list of students having a medical condition by accessing data from the STU and MED tables. The link between these two tables is the Student Number (SN). CREATING A MULTIPLE TABLE QUERY When two tables are selected notice the change in the field names. They now contain the table name first, a period, then the field name, such as MED.SN. This is to make sure query pulls the right data from the right table. Two tables could have a field with the same name but each holds different data. The following is the definition for this Query: LIST STU MED STU.SN STU.LN STU.FN MED.CD MED.CO IF MED.CD # " " = display on the screen = using two tables, student and medical data = student number from the STU table = student last name from the STU table = student first name from the STU table = medical code from the MED table = medical comment from the MED table = if the medical code is not blank This Query will display the student number, last name, first name, medical code and any medical comments for students with a medical condition. Query – User Manual Page 16 –Aeries.net Student Information System After the RUN button is clicked and the query is generated the screen will display the data selected. Compare the data and verify it meets the standards of the query that you are interested in. Click the mouse on the Red X to close. CREATE EXCEL SPREADSHEET Query – User Manual After generating your query statement, an Excel spreadsheet can be created by clicking the mouse on the EXCEL button. Page 17 –Aeries.net Student Information System The option will display to Open or Save the file. To open the file, click the mouse on the Open button. The Spreadsheet will display. Query – User Manual Page 18 –Aeries.net Student Information System To save the file click the mouse on the Save button. The Save As box will display. Select the folder where the file will be saved. Enter the File Name. Click the mouse on the Save button. The file will now be saved in the folder selected. Query – User Manual Page 19 –Aeries.net Student Information System CREATING A REPORT After generating your query statement, a formal looking report can be created by clicking the mouse on the REPORT button. The following report options will display. In the Report Title type the Title to be printed at the top of the report. Select the report line spacing, Single, Double or Triple spaced. Select the Report Orientation, Automatic, Portrait or Landscape. Click the mouse on the Run Report button. Query – User Manual Page 20 –Aeries.net Student Information System A PDF File will be generated and the option will display to Open or Save the file. To open the file, click the mouse on the Open button. The PDF file will display. To print the report, click the mouse on the Printer icon. Query – User Manual Page 21 –Aeries.net Student Information System To save the file click the mouse on the Save button. The Save As box will display. Select the folder where the file will be saved. Enter the File Name. Click the mouse on the Save button. Query – User Manual Page 22 –Aeries.net Student Information System The file will now be saved in the folder selected. LABELS BUTTON After generating a query statement, the LABELS button will allow you to create labels, such as, mailing labels, student folder labels, etc. Listed below is an example of a Query to print mailing labels. To create mailing labels or any label containing more than one line, you must use the ‘\’ in your query statement. This will force the query to drop down to the next line when printing the label. The following is the definition for the above query: LIST STU STU.NM \ AD \ CY ST ZC Query – User Manual = select data to display = using the student data table = students full name from the STU table = drops down to the next line = students address from the STU table = drops down to the next line = students city from the STU table = students state from the STU table = students zip code from the STU table Page 23 –Aeries.net Student Information System To generate the query statement, click the mouse on the RUN button. The following query result will display. The backslashes ‘\’ entered into the query create their own column for each student record. The ‘\’ column is read by query and forces the program to drop down one line when printing labels. After you RUN the query statement, close the result window then click the mouse on the LABELS button. Query – User Manual Page 24 –Aeries.net Student Information System A PDF File will be generated and the option will display to Open or Save the file. To open the file, click the mouse on the Open button. The PDF file will display. To print the labels click the mouse on the Printer icon. Query – User Manual Page 25 –Aeries.net Student Information System The Print options will display. Set up the labels to print and click the mouse on the OK button. To save the file click the mouse on the Save button. Query – User Manual Page 26 –Aeries.net Student Information System The Save As box will display. Select the folder where the file will be saved. Enter the File Name. Click the mouse on the Save button. The file will now be saved in the folder selected. NOTE: Query – User Manual Please be advised that labels are only formatted to be printed on only AVERY 5160 laser-printer labels. Page 27 –Aeries.net Student Information System Once you have created a query statement, you can save the query and access this query for later use. SAVE QUERY STATEMENTS To save a query, you must first generate the Query using the RUN button. Click the mouse on the SAVE button. The following text box will display. Type a descriptive name for the query to assist you in locating your query after being saved. Click the mouse on the SAVE button. The following message will display when the query has been saved. LOADING SAVED QUERIES To LOAD a saved Query statement, click the LOAD button on the right side of the form. Query – User Manual Page 28 –Aeries.net Student Information System The following form will display. The saved queries can be displayed by the name of the Query or by the Author’s name. If many Query statements have been saved you may want to Sort By Author’s name to have all personal Queries listed together. A filter can also be added for the Query Name or Author to help locate specific queries. Once the query is located click the mouse on the Query. The Query statement will now display on the main Query form and can be generated by clicking the mouse on RUN. Query – User Manual Page 29 –Aeries.net Student Information System Make sure when saving queries that you only save the queries that were hard to create. Queries can be deleted but you can only delete the queries that you created. To delete a query click the mouse on the X to the left of the query statement. The following message will display. Click the mouse on the OK button and the query will be deleted. To exit the LOAD screen click the mouse on the CLOSE button. Query – User Manual Page 30 –Aeries.net Student Information System SKIP OR KEEP COMMANDS The SKIP and KEEP commands are used to create temporary tables that will only contain certain “groups” of data such as a particular grade. For example, a QUERY using SKIP to “NOT include” students in grades 11 and 12 would be: SKIP STU IF GR > 10 This will allow you to run queries and access student data for students who are currently in grades less than grade 11. SKIP COMMAND Using the SKIP command, the query or student data will not access the students selected. In the query option type: SKIP STU IF GR > 10 Click the mouse on the RUN button. Query – User Manual Page 31 –Aeries.net Student Information System The following Query results will display. Take note that the grade level of the students displayed is only for grades 9 and 10. All other grade levels above grade 10 are skipped. Close this screen by clicking the “X” in the upper right-hand corner of the result window. At the bottom right of the Query screen the Keep/Skip History will display the SKIP statement generated. Any further queries or access to student data will skip all grades greater than grade 10 Query – User Manual Page 32 –Aeries.net Student Information System RUN QUERY USING SKIP To give you an example of how a SKIP statement works, now type the following query statement: LIST STU SN LN FN GR BY GR. Click the mouse on the RUN button. Notice there is no IF in the query statement. When the Query results displays click the mouse on the End of File button. The highest grade to be displayed will be the students up to grade 10. All query statements will utilize the SKIP statement until RESET. Query – User Manual Page 33 –Aeries.net Student Information System RESET SKIP When you are finished running queries and/or reports, you must RESET query by clicking the RESET button. The Keep/Skip History will NO LONGER display at the bottom right corner. NOTE: If you do not perform reset, the only data accessible will be the data entered in the SKIP command. KEEP COMMAND The KEEP command will give access to only the students selected. In the query text box type KEEP STU IF SX = F and click the mouse on the RUN button. Notice that the only students displayed are Female students. Any query statement or program will only look at these students. Query – User Manual Page 34 –Aeries.net Student Information System Close the results screen by clicking the Red “X” in the upper right corner of the result window. At the bottom right of the Query screen the Keep/Skip History will display the KEEP statement generated. Any further queries or access to student data will only be for female students. ACCESSING DATA USING KEEP To give you an example of how a KEEP statement can also work when accessing data, click the mouse on the Navigation Tree. Select Student Data then Demographics node. The Student Data Demographics form will display only female students. The Navigation Tree will display STUDENT RECORDS ARE BEING SKIPPED. Query – User Manual Page 35 –Aeries.net Student Information System RESET SKIP OR KEEP When you are finished running queries and/or reports, you must RESET query. Drag the mouse over the message STUDENT RECORDS ARE BEING SKIPPED at the top of the Navigation Tree. Click the mouse on the RESET button. Student Records Are Being Skipped will no longer display. Any further queries or accessing data will now include all students. NOTE: If Reset is not performed the only data accessible will be the data entered in the KEEP command. Query – User Manual Page 36 –Aeries.net Student Information System TOTAL COMMAND The TOTAL command can be utilized to add up a specific series of students to create a running total on the screen. For example, to determine the number of male and female students for each grade type the following TOTAL query. Take note to the SORT order selected, BY SX GR. These fields must be selected in the TOTAL query statement. Click the mouse on the RUN button. The following calculation will be generated and will display. A report can be created and printed out with the Query results. Query – User Manual