Download Station Setup Guide to Access OMEL Information Systems
Transcript
Station Setup Guide to Access OMEL Information Systems Operador del Mercado Ibérico de Energía - Polo Español Alfonso XI, 6 28014 Madrid Version 1.2 Date: 2011-06-30 Ref : GuiaConfAccesoSistemasOMEL_12_Eng.doc CONTENTS 1 INTRODUCTION .............................................................................................................. 3 2 PRE-REQUISITES ........................................................................................................... 4 2.1 OPERATING SYSTEM............................................................................................................ 4 2.2 MICROSOFT INTERNET EXPLORER ....................................................................................... 5 2.3 BROWSER CONFIGURATION OPTIONS ................................................................................... 6 2.4 CARD READER INSTALLATION (ONLY FOR SMARTCARD CERTIFICATES) ................................ 11 2.5 USER CERTIFICATE REGISTRATION ..................................................................................... 12 2.5.1 Smartcard certificates ................................................................................................ 12 2.5.2 Software certificates .................................................................................................. 15 2.6 SIGNING ENTITY CERTIFICATE (OMEL ROOT CA CERTIFICATE) .......................................... 17 2.7 SCREEN SETUP ................................................................................................................. 22 3 AUTOMATIC INSTALLATION OF COMPONENTS ...................................................... 23 3.1 3.2 FIRST SYSTEM ACCESS...................................................................................................... 23 COMPONENTS UPDATE ...................................................................................................... 27 4 SIGNATURE APPLET SETUP ...................................................................................... 28 5 FREQUENT PROBLEMS ............................................................................................... 31 5.1 5.2 5.3 5.4 5.5 5.6 5.7 5.8 5.9 5.10 5.11 5.12 Version 1.2 ERROR MESSAGES APPEAR DURING INSTALLATION OF APPLETS .......................................... 31 THE CARD PIN REQUEST TAKES A LONG TIME, OR THE BROWSER STALLS ............................ 32 “SECURITY ALERT” APPEARS ON LOGGING ONTO THE SYSTEM ............................................. 32 A REQUEST DENIED SCREEN APPEARS ............................................................................... 33 THE SERVER DOES NOT ALLOW ACCESS TO THE SYSTEM .................................................... 33 USE OF NAMESPACES IN XML DOCUMENTS (ONLY FOR THE ELECTRICITY MARKET WEBSITE) ........................................................................................................................................ 34 BLOCKING POP-UP WINDOWS ............................................................................................. 35 PROBLEMS WHEN DOWNLOADING COMPONENTS ................................................................ 38 INCORRECT VERSION OF JAVA VIRTUAL MACHINE ............................................................... 39 FILE DOWNLOAD WARNING................................................................................................. 39 PROBLEMS STARTING AUTOMATIC DOWNLOAD (ONLY FOR THE ELECTRICITY MARKET WEBSITE) ......................................................................................................................... 40 PROBLEMS LOGGING ONTO THE WEB WITH NO JAVA INSTALLED AND WITH IE8 .................... 41 GuiaConfAccesoSistemasOMEL_Eng.doc Pg. 2 of 42 1 INTRODUCTION This guide describes the requirements for a client station to access OMEL Information Systems and the necessary steps to start using the Web environments of the Electricity Market’s Information System (hereinafter SIOM). The current version of the present document focuses on the configuration of the client station for access to SIOM by means of Microsoft’s Internet Explorer browser and on Sun’s Plug-in 1.6 for running Java components in the browser. Likewise, it is supported to access using user certificates provided by OMEL, both smartcard or file (software certificate) support There are no sections on the installation of hardware and standard software components, such as the operating system, browser, or the hardware installation of the card reader. However, the following paragraphs outline the necessary requirements as regards versions and some setup details for the same to ensure proper working. For the basic installation of products, you should consult their installation or help guides. Version 1.2 GuiaConfAccesoSistemasOMEL_Eng.doc Pg. 3 of 42 2 PRE-REQUISITES 2.1 Operating system The operating system tested with this version is: • • Windows XP Home / Professional, SP2 or higher Windows 7 Using Windows 7, it is necessary to launch the web browser as administrator or disable the security windows module “UAC” (User Account Control) for the first access to system for letting the installation of Java applets on the user station. To disable UAC, go to: Control Panel Æ User Accounts Æ User account control settings In this screen slide the slider bar to the lowest value (towards Never Notify), with description showing “Never notify me.” This is the required setup for the first web access components installation. Once finished the installation and the first system access, UAC can be enabled again. It can be necessary to disable UAC again (see chapter 3.2) in case of updating the installed components, Note: Screenshots of this document are taken on a Windows XP system. For Windows 7 systems follow the corresponding steps on that operation system. Version 1.2 GuiaConfAccesoSistemasOMEL_Eng.doc Pg. 4 of 42 2.2 Microsoft Internet Explorer The browser version currently supported for the SIOM is: • Microsoft Internet Explorer 7.0 or higher On Windows 7, 32 bits version of Internet Explorer web browser must be used. On the other hand, given that the SSL (Secure Sockets Layer) protocol with strong encryption (128 bits) is used to establish a session, the browser must support this level of encryption. To check the level of encryption supported by the browser, just press the menu option “Help Æ About Internet Explorer”, and a screen similar to the following will display: This guide assumes that the participant has already installed a correct version of the browser and that it works correctly by logging onto the Internet. The said installation has no requirements as regards the directory tree although the default installation directory suggested by Microsoft is recommended. Version 1.2 GuiaConfAccesoSistemasOMEL_Eng.doc Pg. 5 of 42 2.3 Browser configuration options OMEL’s website interface makes intensive use of executable components which are downloaded from the web server. These components are Java programs, also known as Applets, which have been previously signed by OMEL so that the browser can check their authenticity to ensure that execution of the same does not lead to any security problem. In order to execute these Applets, you need to set up the browser as follows: Step 1 You must install and activate the browser’s Java virtual machine (JVM, which is the Applet execution environment. The required JVM is the one provided by Sun, version 1.6 or higher, although it’s recommended to install the latest version supported (available in the public website download section). The browser uses the said virtual machine through an extension or Plug-in, which is installed together with the JVM. To check if this JVM is installed, see if the “Java” option exists in the Windows Control Panel: Version 1.2 GuiaConfAccesoSistemasOMEL_Eng.doc Pg. 6 of 42 In the event that the said option is not available, you must install Sun JVM. To do so, log onto the SIOM website and activate the download from there (see instructions below). If a Sun JVM is already installed, to check its version, start the Java Control Panel, and click on the “About” button: If the version is not valid, update by removing the installed version and access OMEL’s website. From there, and as described in Chapter 3, the correct JVM will automatically be installed, without the need to previously download any version of the said virtual machine (in order to carry out this installation, the user connected to the operating system is required to have the necessary Administrator privileges). The current version must be removed from the “Add or remove programs” option in the Windows Control Panel, by selecting entry-J2SE Runtime Environment with the corresponding version, and by clicking on Remove. Chapter 3 describes the way to install the correct JVM from the OMEL website. Note: Updating the JVM version can be carried out through the options available in the Update tab in the Java Control Panel, or by downloading the latest version from the Sun website. However, in order to avoid installing versions which have not yet been certified for use in SIOM, you are recommended to carry out the installation by accessing the website with no virtual machine installed. Version 1.2 GuiaConfAccesoSistemasOMEL_Eng.doc Pg. 7 of 42 Step 2 The browser is required to permit downloading of the signed Applets. To do so, you just have to select “Medium” for the security level in the “Internet” zone, which is the default security level setting on installing Internet Explorer. To check this setting, follow these steps from the browser menu: Tools Æ Internet options Æ Security From this screen, select the “Internet” zone and activate the “Medium” security level. In the event that the OMEL Website has been included in the “Trusted sites” zone, this zone must have “Medium” security level. This security level is sufficient for most safe Web servers, and implies that downloaded components can be executed, though always with user confirmation. Step 3 Your browser must support COOKIES (small elements of information that the server stores in the client computer). The COOKIES of the OMEL Website Web interface are only used to control an active session. To allow the use of COOKIES, register the access URL in the “Trusted sites”, or select a medium security setting (which is the browser’s default setting) for the internet zone in: Tools Æ Internet options Æ Security Step 4 The browser must not block the SIOM website popup windows, as the said windows include the necessary functions for the correct working of the system. In the event that tools have been installed that block popup windows (for example, MSN or Google bars), or in the event that Windows XP SP2 (which adds privacy options allowing blocking of popup windows) is being used, you will need to configure the said tools so that the SIOM Web popup windows are not blocked. As regards this particular aspect, you are recommended to disable Blocking pop-up windows for all OMEL servers, by using the “*.omel.es” mask on disabling blocking popup windows (for further information, see section 5.7). In Internet Explorer 8 you are recommended to maintain the browser’s default tab settings, so that the popup windows always open in a new window. The said settings are found in: Tools Æ Internet options Æ General Æ Tabs Æ Settings Version 1.2 GuiaConfAccesoSistemasOMEL_Eng.doc Pg. 8 of 42 Step 5 (Only for access to the Market website) If you wish to use the option for editing the content of bids through Excel (recommended for stations from which the bids are sent), you will need to modify the default setting of the “Medium” security level. At Tools Æ Internet options Æ Security Æ Internet Click on “Custom level” and look for: ActiveX controls and plug-ins Initialize and script ActiveX controls not marked as safe for scripting. ( ) Disable ( ) Enable (9) Prompt Although the default option is “Disable”, you will need to mark “Prompt” or “Enable” in order to be able to launch Excel from the browser. This is due to the fact that Windows does not permit the Excel Active X (installed by Excel itself) to be marked as safe, as it has given rise to virus problems in the past. You are recommended to check the “Prompt” option (which implies that the browser requests the user confirmation to run the Excel ActiveX). For more information about the setup and working of the bid edit option through Excel, read the 'Excel Bid Editing, User Manual'. Step 6 Review the minimum options. For the case in which client security setup has already been customised due to the use of other applications, or to corporate security policies, indicated below are the minimum options, which must be activated for the correct use of the system (only the necessary options are described, those not listed do not affect the application). These values will be activated in the “Internet” zone, unless the OMEL Website has been included in one of the other zones (local intranet, trusted sites, restricted sites), in which case they will be activated in the corresponding zone. Tools Æ Internet options Æ Security Æ Internet Version 1.2 GuiaConfAccesoSistemasOMEL_Eng.doc Pg. 9 of 42 ActiveX controls and plug-ins Download signed ActiveX controls ( ) Disable ( ) Enable (9) Prompt1 Run ActiveX controls and plug-ins ( ) Administrator approved ( ) Disable (9) Enable ( ) Prompt Generate scripts of ActiveX controls marked as safe for scripting ( ) Disable (9) Enable ( ) Prompt Initialize and script ActiveX controls not marked as safe for scripting. ( ) Disable ( ) Enable (9) Prompt2 Downloads File download ( ) Disable (9) Enable3 Scripting Active scripting ( ) Disable (9) Enable ( ) Prompt Scripting of Java applets ( ) Disable (9) Enable ( ) Prompt As for advanced setup options, the following option must be selected: Tools Æ Internet Options Æ Advanced options Security [9]Use SSL 3.0 1 Necessary for downloading applets to the client on first accessing the application. 2 Necessary for editing bids with Excel on the Electricity Market website. 3 Necessary for downloading bids and other data to a file. Version 1.2 GuiaConfAccesoSistemasOMEL_Eng.doc Pg. 10 of 42 2.4 Card reader installation (Only for smartcard certificates) In order to access SIOM Websites, a X.509 personal security certificate it’s needed, which OMEL issues on a Gemplus smart card or file. In case of using a certificate issued in a smartcard a smart card reader is needed. The user can use any standard PC/SC compatible reader, in which Gemplus software must be installed. The 'Gemplus software installation guide', which is provided as a separate document, outlines the steps to be followed. The card reader must be previously installed and you must be able to use the security card with Internet Explorer in order to be able to follow the steps listed below for setting up the station. If you wish to install a GemPCTwin card reader, the specific drivers for this card reader will need to be installed once the Gemplus software has been installed. Version 1.2 GuiaConfAccesoSistemasOMEL_Eng.doc Pg. 11 of 42 2.5 2.5.1 User certificate registration Smartcard certificates When using a new security card for the first time at a user station, keep in mind that you will need to register with Windows the certificate stored in the card so that it can be used from the browser (it is a requirement of Internet Explorer). In Windows XP this registration is carried out automatically under certain conditions, although you are recommended to do it manually in all cases in order to ensure the correct working with different users and profiles on the same PC. Use the Card reader software to register a certificate, as follows: Insert the card in the reader and start the GemSAFE Toolbox program from Windows: Click on Card contents Æ Certificates (Contenido tarjeta Æ Certificados) and enter the card PIN in the NIP Code section. Click on the Start session button to start the session: Version 1.2 GuiaConfAccesoSistemasOMEL_Eng.doc Pg. 12 of 42 To register the certificate, select the card icon and click on Register all (Registrar todos): The following screen will display after a few seconds indicating that the certificate has been registered. Version 1.2 GuiaConfAccesoSistemasOMEL_Eng.doc Pg. 13 of 42 Click Accept (Aceptar) to finish the process of registration of the certificate. Version 1.2 GuiaConfAccesoSistemasOMEL_Eng.doc Pg. 14 of 42 2.5.2 Software certificates File support certificates a.k.a. software certificates, are issued on “.p12” file (PKCS #12 standard). For registering issued software certificates, follow the next steps. Download “.p12” file in an accessible location from the station where software certificate is going to be registered. Select the file with double click (this process can be started from the web browser too in “Tools / Internet options / Content / Certificates / Import”) Follow the given steps showing in the screen using the default options until this window is shown: Type OMEL’s issued private key password and check “Enable strong private key protection” box. Follow with default options until this window is shown: Click on “Set security level…” Version 1.2 GuiaConfAccesoSistemasOMEL_Eng.doc Pg. 15 of 42 In this window, “Medium” or “High” level can be selected for setting up system behaviour when using certificate to SIOM access or information sent signing. Selecting “Medium” browser only will show a confirmation window when private key access is needed. Selecting “High”, browser will request the password for the private key access. It’s recommended to select “High” level and choose a password as a PIN for system access and data sent signing. Doing this, this window will appear after clicking “Next” for typing and confirm the chosen password: Alter clicking on “Finish” and “OK”, this window will mean the end of the process: Version 1.2 GuiaConfAccesoSistemasOMEL_Eng.doc Pg. 16 of 42 2.6 Signing entity certificate (OMEL Root CA Certificate) An indispensable requisite for the correct installation of components typical of SIOM Webs is having the OMEL CA Signing Entity certificate installed in the browser. The steps for installing the OMEL CA certificate are outlined below. When accessing the system for the first time, or whenever the said certificate is not installed, the following warning screen will display. At the said screen, click on “Continue to this website”: Then click on “Certificate error” which displays on the right hand side of the address bar: Version 1.2 GuiaConfAccesoSistemasOMEL_Eng.doc Pg. 17 of 42 This window will display. Click on “View certificates”: In the next window, click on the third tab (Certification Path). Select the tree root (omelCA) and click on “View Certificate”: At the next window, click on “Install certificate”: Version 1.2 GuiaConfAccesoSistemasOMEL_Eng.doc Pg. 18 of 42 Click on “Next”: At the next window, leave the default option checked and again click on “Next” Version 1.2 GuiaConfAccesoSistemasOMEL_Eng.doc Pg. 19 of 42 Once the next window opens, select “Finish”: Then the next window opens where you click on “Yes” to finish the certificate import: Version 1.2 GuiaConfAccesoSistemasOMEL_Eng.doc Pg. 20 of 42 
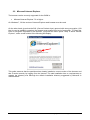
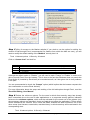
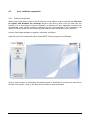
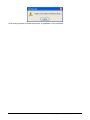
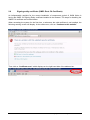
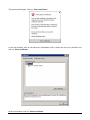
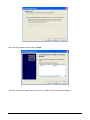
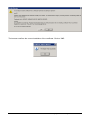
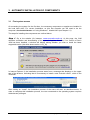
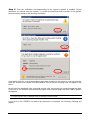
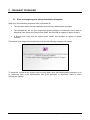
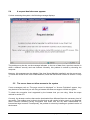
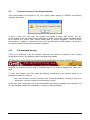
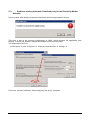
The browser confirms the correct installation of the certificate. Click on “OK”: Version 1.2 GuiaConfAccesoSistemasOMEL_Eng.doc Pg. 21 of 42 2.7 Screen setup The website was designed for the following optimal setup: Desktop: Browser: 1024x768 pixels, 65536 colours and Small Fonts See > Font Size > Small The following is an example of a Electricity Market website screen displayed using this setup. Version 1.2 GuiaConfAccesoSistemasOMEL_Eng.doc Pg. 22 of 42 3 AUTOMATIC INSTALLATION OF COMPONENTS 3.1 First system access On accessing the system for the first time, the necessary components or applets are installed in the local hard drive. For correct installation, on this first occasion you will need to be the computer’s local administrator or if using Windows 7 disable UAC (see chapter 2.1) The steps for installing the components are outlined below: Step 1. Go to the website (for instance, www.mercado.omel.es). At this page, the JVM activates verification and downloading of the system’s Applets. However, if no version of Sun’s JVM has been installed, a window will display asking whether you wish to install the latest supported version (the shots show version 1.6.0_16) In Internet Explorer 8, the installation process starts from a message that displays on the upper part of the browser, indicating that it is necessary to install a new “ActiveX control”, which is the JVM itself. After clicking on “Install”, the installation process of the same will start, as described below. In order to complete this installation process, the user connected to the operating system requires Administrator privileges. Version 1.2 GuiaConfAccesoSistemasOMEL_Eng.doc Pg. 23 of 42 Several installation screens display until the process has been completed: Note: If you are using an installer other than the one that is run on accessing the SIOM Website, the option to install the so-called “Google bar” may display. In the event of its installation, keep in mind that it could cause interference in the control of opening pop-up windows from the SIOM application. To check the version of the recently installed JVM, you can once again consult the option “About” in the Java Control Panel: In addition, due to the possibility of Sun releasing a new version of JRE which has not yet been certified for use in SIOM, you are recommended to disable the automatic update of the JVM. This is configured by disabling the next box in the Java Control Panel: Version 1.2 GuiaConfAccesoSistemasOMEL_Eng.doc Pg. 24 of 42 Version 1.2 GuiaConfAccesoSistemasOMEL_Eng.doc Pg. 25 of 42 Step 2. Then the verification and downloading of the system’s Applets is enabled. During download, you cannot enter the system. To confirm the download and execution of the applets, several screens similar to the following will display: In all cases, click OK, until all the packages have been installed. In the event of a security warning, mark the “Always trust content from this publisher” box so that this warning does not appear in the future. At this point the installation has concluded and the user can browse as normal through the Web. From now on, the browser will automatically repeat some of these steps only when OMEL updates the Applets. Note: In the event that Sun’s JVM version is updated in the PC, the download and automatic installation of components process is repeated when the website is entered again. If you click on the “ENTER” link before the download is completed, the following message will display: Version 1.2 GuiaConfAccesoSistemasOMEL_Eng.doc Pg. 26 of 42 3.2 Components update When some local components installed in the station are update by OMEL the web browser will repeat the steps described in the first installation automatically, showing few windows like the following: After clicking “OK” new applet will be installed and normal access to system will be completed. If any problem happens during installation, this window will be shown: This problem may be happening because Windows 7 is being used and UAC (User Account Control. See chapter 2.1) is enabled. Please disable UAC for components updating and re-enable it when completed. Version 1.2 GuiaConfAccesoSistemasOMEL_Eng.doc Pg. 27 of 42 4 SIGNATURE APPLET SETUP The ‘Signature applet’ is the Java component used to send digitally signed information to OMEL. Its graphical view when any signed transmission is made is as follows: This applet shows the certificate to use for digital signing data sents, that it’s the same certificate used for system connection. It also shows a field to type the certificate’s PIN in case a smartcard is being used. If a software certificate is being used this field will be disabled and it will be the web browser itself who will ask for the confirmation of using that certificate, with or without password according to the security level chosen in the first installation. Version 1.2 GuiaConfAccesoSistemasOMEL_Eng.doc Pg. 28 of 42 This ‘Applet’ has a setup file located in ‘C:\OMEL\ConfAppletFirma.xml’. The default ‘Applet’ establishes an initial configuration in the event that the said file does not exist, creating it for subsequent modification of the user. On the first installation of the station, this file will not be created until the website main page is accessed The content of the said file is as follows: <?xml version='1.0'?> <!-NOTE : Any change in this file will be taken into account when the browser is next restarted. --> <ConfAppletFirma> <Seguridad> <PINTimeout>0</PINTimeout> </Seguridad> <Log> <DirEnviosFirmados>c:\omel\EnviosFirmados</DirEnviosFirmados> </Log> </ConfAppletFirma> Version 1.2 GuiaConfAccesoSistemasOMEL_Eng.doc Pg. 29 of 42 Two configurable parameters are established in this file: • PINTimeout: PIN time-out. This time expressed in minutes establishes the maximum time that the Applet waits between the signed transmission in order to once again request the user PIN. If the maximum time defined has not passed between the signed transmission, the user will not be asked for the PIN again. The ‘0’ value indicates that the user will always be asked for the PIN. This parameter has a maximum value established in 30 minutes. If set at a greater value, a default time of 30 minutes will be used. • DirEnviosFirmados: Destination directory of the signed transmissions. A structure of subdirectories with all the signed transmissions made by the user with the ‘Applet’, will be created in this directory, organised by types of transmissions (“BidsMD”, “ExecutionsCB”, “BidsAuctions”, “Claims Auctions”, etc.). In the event that a non-existent directory is specified, the Applet will automatically create it. If the said directory cannot be created, the destination directory will be the one by default defined by the Applet, which is ‘c:\omel\EnviosFirmados’. Any change in this file will not take effect until the browser is restarted. Version 1.2 GuiaConfAccesoSistemasOMEL_Eng.doc Pg. 30 of 42 5 FREQUENT PROBLEMS 5.1 Error messages appear during installation of applets When any of the following situations arise in Windows XP: • The user who makes the first installation does not have administrator privileges, • The Administrator did not give component update privileges to Advanced Users, and an Advanced User enters the system when OMEL has included an update of applet versions, • A Normal User logs onto the system when OMEL has included an update of applet versions, The browser main page will automatically close and the following message will display: To avoid this, access to the system must be made with a user with administrator privileges, or as an Advanced User if the Administrator has given privileges to Advanced Users to make subsequent updates. Version 1.2 GuiaConfAccesoSistemasOMEL_Eng.doc Pg. 31 of 42 5.2 The card PIN request takes a long time, or the browser stalls This problem may be due to the fact that there are other Internet Explorer sessions open. To solve the problem, close all browser sessions, and repeat the entry to the system. If the problem persists, check to see if there are processes active in the system Task Manager, under the name IEXPLORE.EXE, as shown in the image. In such an event, these processes must be manually closed from the Task Manager (by clicking on “End Process”), before trying to access to the system again. 5.3 “Security alert” appears on logging onto the system As explained in section 2.5, this window opens when the OMEL CA Signing Entity certificate has not been registered in the browser. This can occur, even if the said certificate has already been registered, if you are using an operating system user that has not previously accessed the SIOM website or due to the update of the root CA in SIOM. To solve this problem, follow the steps outlined in the present document, from section 2.6, onwards, and review the browser set up options for the user, as described in section 2.3. Version 1.2 GuiaConfAccesoSistemasOMEL_Eng.doc Pg. 32 of 42 5.4 A request denied screen appears If, when accessing the system, the following message displays: The problem may be due, as the message indicates, to the use of data from a previous session in which a different security card was inserted. Normally, this problem is solved by rebooting the computer. However, this message can also display if the Java Virtual Machine installed is not the correct one. To check the version of the Java Virtual Machine, follow the instructions outlined in section 2.3 step 1. 5.5 The server does not allow access to the system If error messages such as “The page cannot be displayed” or “Access Forbidden” appear, they may be due to the fact that you are using a browser that does not support 128-bit encryption. To check the encryption level supported by the browser that you are using, follow the steps outlined in section 2.2. Currently, the browser versions that can be downloaded from Microsoft have the necessary level of encryption. The problem may be due to the fact that an old version is being used, or one obtained when versions containing strong encryption and those that did not were differentiated for international legal reasons. Consequently, the problem is solved by installing an updated version of the browser. Version 1.2 GuiaConfAccesoSistemasOMEL_Eng.doc Pg. 33 of 42 5.6 Use of Namespaces in XML documents (only for the Electricity Market website) When XML documents which do not include the correct specification of the namespace are sent, either through the browser or through Web Services, an error message displays. In the case of transmission through the browser, a window with the following message displays: A document parsing error has occurred: The XML file does not have the correct namespace 'http://www.omel.es/Schemas' For a XML document sent to OMEL to have the correct namespace, its header must include the contents as shown in the following example: <MensajeOfertasMD xmlns="http://www.omel.es/Schemas"> <IdMensaje v="OfertasMD-2004-10-05"/> <FechaMensaje v="2004-10-04T09:19:43-00:00"/> <IdRemitente v="AGENT"/> ... </MensajeOfertasMD> The error produced in the event of using a Web Service interface, taking as an example the forwarding of bids to the Daily Market, would be the following, which indicates that the server would be unable to find the element 'MensajeOfertasMD' associated with the corresponding Namespace, within the document sent: AxisFault faultCode: {http://xml.apache.org/axis/}Server.userException faultString: org.xml.sax.SAXParseException: Declaration not found for element 'MensajeOfertasMD'. The namespace is used to avoid nomenclature conflicts between XML documents which could have the same labels with different purposes. With an aim to avoid possible future conflicts, strict appliance of standards and the specification of the namespace shall be obligatory in SIOM2. Below are two examples of documents with nomenclature conflict: Document with stock Exchange information: Document with product information: <table> <value> <ticker>TLR3</ticker> <last>18.23</last> </value> </table> <table> <name>American coffee table</name> <width>80</width> <length>120</length> </table> If these two types of document are aggregated in one document, there will be a conflict of elements as both documents contain the element <table>. The use of Namespaces solves this type of problem by assigning a name space to a group of labels. Namespaces are usually defined in the XML document root, thus assigning this namespace to all the elements including children. Below are the two former XML documents which have been corrected to incorporate their Namespace: Version 1.2 GuiaConfAccesoSistemasOMEL_Eng.doc Pg. 34 of 42 Document with stock Exchange information: Document with product information: <table xmlns="http://www.mibolsa.com/tabla"> <value> <ticker>TLR3</ticker> <last>18.23</last> </value> </table> <table xmlns="http://www.muebles.es/Catalog"> <name>Mesa de cafe Americana</name> <width>80</width> <length>120</length> </table> Due to the foregoing, all XML documents sent to OMEL and received from OMEL shall have the correct namespace to avoid possible conflicts. 5.7 Blocking pop-up windows The process for installing components of SIOM websites uses pop-up Windows to execute some of the steps (see chapter 3). In the event that popup windows are blocked in the browser, the said installation will not run correctly, and prevent operation in the web. Windows XP Service Pack 2 includes a modification in the Internet Explorer browser that includes the possibility of setting up Block pop-up windows. Below are some brief instructions on how to proceed in this case. To configure block popup windows, do as follows Tools Æ Internet Options Æ Privacy Æ Turn on Pop-up Blocker Version 1.2 GuiaConfAccesoSistemasOMEL_Eng.doc Pg. 35 of 42 If the “Pop-up Blocker” option is enabled, you won’t be able to access SIOM correctly. To solve this problem, you must disable this option, or specify that OMEL’s Web servers can open pop-up windows. To do so, click on “Settings”, and the “Address of website to allow” text box and type “*.omel.es” and click on “Add” (see screen shot below). You will then have no problem in accessing all OMEL web servers. In the event that the pop-up windows are blocked, and the OMEL windows have not been allowed, the following warning line may display in the browser. If you click on that line, the following options will display: Version 1.2 GuiaConfAccesoSistemasOMEL_Eng.doc Pg. 36 of 42 If you choose the “Always allow pop-ups from this site” option, the following confirmation window will display (example for the website “http://www.mercado.omel.es”): If you click on “Yes”, the Block up windows will be disabled for this server, and you can make another attempt to access the website. However, the first procedure described in this section is recommended, as it allows access to all OMEL servers with just one operation. On the other hand, the blocking of pop-up windows can be enabled in other ways, such as for example by installing tools which, among other functions, allow the blocking of the said windows. This is the case of the MSN or Google bars (among others). In the event that one of these tools is installed, you will need to configure it so that OMEL web pop-up windows (*.omel.es), at least, are not blocked. To do so, check the documents provided by the said tools. Version 1.2 GuiaConfAccesoSistemasOMEL_Eng.doc Pg. 37 of 42 5.8 Problems when downloading components If, after downloading components, there are any problems, when you click on the “ENTER” link the following message may display: If the problem persists after repeating the operation, after accepting all the downloads and after a reasonable time (which will depend on the speed of the connection), you can try the following operation. • Close the browser • Check the JVM version that is installed and active (there may be more than one version installed). To do so, run the “java –version” command in the command prompt window (Start / All Programs / Accessories / Command Prompt), and check the version that is displayed, for example: java version "1.5.0_10" Java(TM) 2 Runtime Environment, Standard Edition (build 1.5.0_10-b03) Java HotSpot(TM) Client VM (build 1.5.0_10-b03, mixed mode, sharing) • Remove all files with extension .JAR from the directory “C:\Program files\Java\jre[vers]\lib\ext” (where [vers] is the active version, which, in the previous example would be “1.5.0_10”), except those belonging to the JVM (currently, the said files are, for version 1.5.0_xx: dnsns.jar, sunjce_provider.jar, and sunpkcs11.jar, and for version 1.6.0_xx: meta-index, sunjce_provider.jar, sunmscapi.jar, sunpkcs11.jar and localedata.jar). • Repeat access to the Website, accepting all downloads. If the problem is still not solved, it could be due to certain problems detected in the installation and removal of some versions of Java. To avoid these problems, take the following steps: • Close the browser • Remove the active Java version, and remove the “C:\Program files\Java\jre[vers]\” directory and its entire contents. • Reinstall the required Java version or log on to the web so that the latest version supported by SIOM websites is installed. Version 1.2 GuiaConfAccesoSistemasOMEL_Eng.doc Pg. 38 of 42 5.9 Incorrect version of Java Virtual machine If the JVM installed is not version 1.5.0_10 or higher, when clicking on “ENTER” the following message will display: In such a case, you must close the browser and install a newer JRE version. You are recommended to use the latest version supported by SIOM. The recommended procedure would be to remove the current JVM (Control Panel/ Add or remove programs / J2SE RunTime environment x.x Update x / Remove) and log on to the Web with no JVM installed. You will then only need to follow the instructions outlined in chapter 3. 5.10 File download warning If you try to download a file (for example, download the request or response from a signed transactions enquiry), the following warning message may display: Although you indicate that you wish to download the file, the browser displays the web’s main page. To solve this problem, you must make the following modification to the browser setup (as is indicated in section 2.3, Step 6): Tools / Internet options / Security / Internet [or zone in which the SIOM web is located] / Custom level / Downloads / Automatic prompting for file downloads / Enable. In this way, when requesting a file to be downloaded, the warning message will not display, and only the standard dialog box for opening it or saving it to disk will display. Version 1.2 GuiaConfAccesoSistemasOMEL_Eng.doc Pg. 39 of 42 5.11 Problems starting Automatic Download (only for the Electricity Market Website) In some cases, after booting “Automatic Download” the following exception occurs: This error is due to the incorrect configuration of JAVA, which prevents the application from booting. To solve this problem, change the settings from the control panel. The said setup is found in: Control panel Æ Java Æ General Æ Temporary Internet Files Æ Settings Æ From here, activate verification “Keep temporary files on my computer”. Version 1.2 GuiaConfAccesoSistemasOMEL_Eng.doc Pg. 40 of 42 5.12 Problems logging onto the Web with no Java installed and with IE8 In some cases when logging on to the Web with IE8 and no Java JRE installed, the following error message displays: This error is due to a security mechanism incorporated in Explorer to avoid execution of malicious code (“Data Execution Prevention”). When installing JRE, just like in other browser extensions, this problem can arise if the said extensions are not updated for compatibility with this mechanism. If you wish to carry out the installation from the Web, you can disable the verification as follows: Tools Æ Internet Options Æ Advanced Disable the “Enable memory protection to help mitigate online attacks” check box, reboot the browser and log on to the system again. Version 1.2 GuiaConfAccesoSistemasOMEL_Eng.doc Pg. 41 of 42 You are recommended to reactivate this box after the installation process. Another alternative is to download Java from the website itself; http://java.sun.com/javase/downloads/index.jsp Download the “JRE” version compatible with the application. Once it has been downloaded, install as outlined in point 3, step 1 and then log onto the web again. Version 1.2 GuiaConfAccesoSistemasOMEL_Eng.doc Pg. 42 of 42