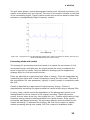
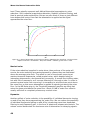
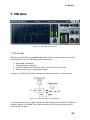
1
Wave Arts
Master Restoration
Suite
User Manual
Last updated: April 27, 2007
Copyright © 2007, Wave Arts, Inc. All Rights Reserved
1
Table of Contents
Table of Contents
1. Installation and Registration...............................................................5
1.1 Mac OS X Installation ...................................................................5
1.2 Windows Installation ....................................................................6
1.3 Registration ................................................................................7
1.4 Registration Troubleshooting ....................................................... 10
2. Plug-in Control Operation ................................................................ 13
2.1 Knobs....................................................................................... 13
2.2 Text Entry................................................................................. 13
2.3 Selector button .......................................................................... 14
2.4 Sliders...................................................................................... 15
2.5 Buttons .................................................................................... 15
2.6 Output Meters ........................................................................... 15
3. Menu Bar and Preset Manager .......................................................... 17
3.1 Bypass ..................................................................................... 17
3.2 Undo ........................................................................................ 17
3.3 Copy ........................................................................................ 17
3.4 A/B buffers ............................................................................... 17
3.5 Preset name and arrow controls ................................................... 18
3.6 Preset menu.............................................................................. 18
3.7 Factory Presets .......................................................................... 18
3.8 User Presets.............................................................................. 19
3.9 Save… ...................................................................................... 19
3.10 Import….................................................................................. 19
3.11 Export… .................................................................................. 20
3.12 Reset… ................................................................................... 20
3.13 Tools menu ............................................................................. 20
3.14 About… ................................................................................... 20
3.15 Open User Manual… .................................................................. 21
3.16 Unlock Plug-in… ....................................................................... 21
3.17 Check for Updates….................................................................. 22
3.18 Visit Website… ......................................................................... 22
4. MR Hum ........................................................................................ 24
4.1 Overview .................................................................................. 24
4.2 About Hum, Buzz, and Brickwall filtering ....................................... 25
4.3 Using MR Hum........................................................................... 28
4.4 Parameters ............................................................................... 30
4.5 Presets ..................................................................................... 32
4.6 Specifications ............................................................................ 32
5. MR Click ........................................................................................ 33
5.1 Overview .................................................................................. 33
5.2 About Clicks and Crackle ............................................................. 34
5.3 Using MR Click........................................................................... 36
5.4 Parameters ............................................................................... 38
5.5 Presets ..................................................................................... 39
5.6 Specifications ............................................................................ 39
3
Wave Arts Master Restoration Suite
6. MR Noise....................................................................................... 41
6.1 Overview .................................................................................. 41
6.2 About Noise Reduction ................................................................ 42
6.3 Using MR Noise.......................................................................... 45
6.4 Parameters ............................................................................... 50
6.5 Presets ..................................................................................... 52
6.6 Specifications ............................................................................ 53
7. MR Gate........................................................................................ 55
7.1 Overview .................................................................................. 55
7.2 About Gating ............................................................................. 56
7.3 Using MR Gate........................................................................... 58
7.4 Parameters ............................................................................... 58
7.5 Presets ..................................................................................... 59
7.6 Specifications ............................................................................ 59
8. Master Restoration ......................................................................... 61
8.1 Overview .................................................................................. 61
8.2 Using Master Restoration ............................................................ 62
8.3 Presets ..................................................................................... 63
8.4 Specifications ............................................................................ 63
License Agreement ............................................................................. 65
Support ............................................................................................ 67
Index ............................................................................................... 69
4
1. Installation and Registration
1. Installation and Registration
1.1 Mac OS X Installation
If you are Installing from the Master Restoration Suite CD-ROM, insert the
CD-ROM and double click the Master Restoration Suite OSX folder. You will
see the “Master Restoration Suite OSX.mpkg” file as shown below. If you are
installing from a download, the download manager will create a file
“MasterRestoration.dmg”. Double click on this file to create the file “Master
Restoration.mpkg”. If you are downloading and installing an individual plugin or another bundle, the procedure is similar, but the files will be named
after the plug-in or bundle rather than named “Master Restoration”.
Now double click the “Master Restoration.mpkg” icon, and proceed though
the installation process:
5
Wave Arts Master Restoration Suite
1.2 Windows Installation
If you are installing from a CD-ROM, insert the CD-ROM and double-click the
file “MasterRestoration.exe” shown below. This will start the installation
process as described below. If you are downloading Power Suite, the file
“MasterRestoration.exe” will be created on your computer. Double-click this
file to start the installation process. If you are downloading and installing an
individual plug-in or another bundle, the installation process is similar, but
the files will be named after the individual plug-in or bundle rather than
named “Master Restoration”.
If you have downloaded the installer from the Wave Arts web site, when you
run the installer you may get a warning message from Windows that the
publisher could not be verified. Ignore the warning and click “Run” to
continue.
6
1. Installation and Registration
The installer will guide you through the following screens:
1. Welcome. Click Next to continue.
2. Read Me File. Displays information about demo and registration
procedure. Click Next to continue.
3. License Agreement. Read and click Yes if you agree to the terms of the
agreement. The agreement is reprinted at the end of this user guide.
4. Select Components. Here you have the option to select DX, VST, and
RTAS formats for installation. Click each box to toggle the checkmark on/off;
boxes with checkmarks indicate the corresponding component (i.e., plug-in
format) will be installed. By default, all three boxes are checked and thus all
three formats will be installed. Click Next to continue.
5. Choose Destination Location. For each of the plug-in formats selected
to install, choose the destination location on your file system. The first
location is for DX format plugs, and also serves as the destination for the
user manual. The second location is the folder where VST plug-ins are
installed. The third location is the folder where RTAS plug-ins are installed.
Click Next to continue.
6. Select Program Manager Group. Enter the name of the folder in the
Windows start All Programs menu where the Wave Arts files can be accessed.
7. Start Installation. Click next to perform installation.
8. Installation complete. Click Finish to exit the installer. If you are
attempting to install plug-ins that are currently in use, you may be asked to
restart your computer.
1.3 Registration
After your plug-ins are installed, they will function in demo mode for 30 days.
While in demo mode they will be fully functional, however you must register
(i.e., unlock) your plug-ins or they will stop working after 30 days. You will
be warned when you have 7 days remaining in your demo period.
To unlock the plugs after installation, go to
http://www.wavearts.com/register.html and enter the required information.
You’ll need your Serial Number (either emailed to you or printed on a page
in the product box), and your Machine ID, which can be determined by
selecting the “About…” command in the Tools menu of any Wave Arts plug-in
as shown in the figure below. The Machine ID is a number which identifies
7
Wave Arts Master Restoration Suite
the computer you are using. Different computers will have different machine
IDs.
After selecting the About… item you’ll see an About dialog box like the one
below. The About box shows the version number of the plug-in, the host
plug-in format (e.g., DirectX, VST), the registration status of the plug-in, and
the Machine ID of your computer. Make note of the Machine ID:
At our registration site (http://www.wavearts.com/register.html) you will
enter your Serial Number (the number that begins with “WA-“) and your
Machine ID. If you purchased an electronic download, your Serial Number
was emailed to you when you purchased the product. If you purchased the
8
1. Installation and Registration
software in a shrink-wrapped box, the Serial Number can be found in the box
contents. The registration page has the following fields to fill out:
The registration page needs the following information: your name, your email
address, your Serial Number, and your Machine ID. It’s very important to
provide a working email address because your Key Code will be emailed to
this address. Also be sure to enter the Serial Number and Machine ID
correctly.
Once the required information is entered at the Register web page you will
be emailed a reply containing your 10-digit Key Code. An example reply is
shown below:
Your key code for Wave Arts Master Restoration Suite for Machine
ID 18869 is below:
38F40-B591D
To activate your software, go to the Unlock Plug-In item in the
Tools menu of the plug-in and enter this number. A bundle can be
registered by entering this key code in any plug-in included with
the bundle.
Please contact us if you have any problems.
Thank you!
Wave Arts, Inc.
You then unlock the plug-ins be selecting the Unlock Plug-In command in the
Tools menu:
9
Wave Arts Master Restoration Suite
Enter the Key Code in the dialog box:
You should see a dialog indicating that the registration was successful.
If you need to install the plug-ins on another machine, such as a laptop, you
may repeat the procedure above. Our license policy permits up to three
installations provided you are the only user. The registration web page keeps
track of the number of machines on which you have installed your plugs.
Each computer will have a different Machine ID.
When registering a bundle, such as Master Restoration Suite, you can obtain
the Machine ID from any one of the plug-ins in the bundle, and you can enter
the key code in any one of the plug-ins. If registration is successful, all the
plug-ins in the bundle will be unlocked.
If you do not have web access, you can obtain a key code by calling Wave
Arts customer support at 781-646-3794.
1.4 Registration Troubleshooting
Invalid key code message – make sure you are entering the 10-digit key
code from the registration email, NOT the serial number that begins with
“WA-“. All letters should be uppercase, and you must enter the ‘-‘ character.
Website says my number of registrations is used up - contact Wave
Arts support ([email protected]) and let us know the number of
computer(s) the plug-ins are installed on. As a single user you can install
the plug-ins on up to three computers, but additional users must purchase
their own copies of the plug-ins.
Key code email not received - make sure the mail is not being filtered by
a junk or SPAM mail program. The key code is mailed immediately and
10
1. Installation and Registration
should arrive in your email inbox within several minutes. Check your junk
mail folder.
Machine ID changed - the Machine ID is based on your computer’s network
hardware (specifically, the MAC address of the computer’s default internet
adaptor). In normal circumstances this number will not change. However, if
you change your network hardware or configuration, the Machine ID may
change. If the Machine ID changes after the plug-ins have been unlocked,
the plug-ins will display a message to this effect the next time they are
opened. The plug-ins will then revert to 30-day demo mode to give you time
to obtain a new unlock code based on the new Machine ID. In the case that
the Machine ID is flipping between two values based upon two different
network configurations, you can simply register both Machine IDs and the
plug-ins will stay unlocked even if the Machine ID changes.
11
2. Plug-in Control Operation
2. Plug-in Control Operation
2.1 Knobs
Please refer to the following guide for information about the various ways
you can use knobs:
Function
Increase/Decrease a parameter value
(rotate clockwise/counterclockwise)
Mac
Windows
Click on the knob +
drag up/down
Click on the knob +
drag up/down
Shift + click + drag
up/down
Right click + drag
up/down
-orShift + click + drag
up/down
Fine adjustment — increase/decrease
RTAS: Command +
click
Reset knob to default value
Command + click
-orDouble-click
RTAS: Option +
click
RTAS: Ctrl + click
Control + click
-orDouble-click
RTAS: Alt + click
2.2 Text Entry
Many value displays are editable text. A text field is editable if your mouse
cursor changes to an I-beam when moved over the text. Following is a table
that fully describes how to use the text editing features:
Function
Mac
Windows
Click in the display
Click in the display
Select text
Click + drag
Click + drag
Select entire text
Double-click
Double-click
Delete
Backspace
Del
Delete
Enter text entry mode
Delete character to left of cursor
Delete character to right of cursor
13
Wave Arts Master Restoration Suite
Move the cursor left/right
Extend the current selection
Exit text entry mode
Left/Right arrow
keys
Left/Right arrow
keys
Shift + click + drag
-orShift + left/right
arrow keys
Shift + click + drag
-orShift + left/right
arrow keys
ESC*
-orClick outside value
box
-orTab
-orReturn/Enter
ESC*
-orClick outside value
box
-orTab
-orReturn/Enter
Tab
Tab
Shift + Tab
Shift + Tab
Select next parameter to edit
Select previous parameter to edit
*Typing ESC causes the text to revert its original value before editing.
You'll find that many parameters, such as frequency, will recognize units
typed into the text field. The following values, when typed into a frequency
value box, are equivalent:
2k = 2 kHz = 2000 = 2000 Hz
2.3 Selector button
The selector button cycles through a number of fixed values. Click on the
button to go to the next value. Click on the text to display a pop-up menu of
the available values. The table below describes the functionality of the
selector button:
Function
Go to next value
Go to previous value
Display pop-up menu of all choices
14
Mac
Windows
Click on the knob
Click on the knob
Shift + click on knob Shift + click on knob
Click on text
Click on text
2. Plug-in Control Operation
2.4 Sliders
Function
Increase/Decrease a parameter
value
Fine adjustment —
increase/decrease
Reset slider to default value
Mac
Windows
Click on the slider
handle + drag
up/down
Click on the slider
handle + drag
up/down
Shift + click + drag
up/down
Right click + drag
up/down
-orShift + click + drag
up/down
Command + click
-orDouble-click
Control + click
-orDouble-click
2.5 Buttons
Lighted buttons show a toggle state. A green, orange or yellow
light indicates "on" and a black (extinguished) light indicates
"off." Click the button to toggle the state.
Buttons that do not light up are used to activate certain
commands.
2.6 Output Meters
Output meters show the peak signal power in short time
updates — in green from -96dB to -6dB, in yellow between 6dB and 0dB, and in red above 0dB. Peak hold levels are also
drawn. The meter also stores the overall peak value for each
channel, and displays these values in the peak indicator
boxes above the meter. If the detector finds a peak value
above 0dB, the text color will turn red as a warning. Click on
either indicator box to reset them back to -96dB. If the plugin has an output gain knob, you can right click (PC) or Shiftclick (Mac) on an indicator box to automatically increase or
decrease the output gain so that the peak will be -0.1dB.
15
3. Menu Bar and Preset Manager
3. Menu Bar and Preset Manager
All Wave Arts plug-ins in the Master Restoration Suite have the following
menu bar displayed at the top of the plug-in:
This section describes the operation of the menu bar, preset manager, and
the other functions available in the menus.
3.1 Bypass
Clicking on the bypass button bypasses the effect, that is, audio will pass
through the effect without alteration. The button is lit when the effect is
bypassed.
3.2 Undo
Clicking the Undo button causes the parameters to revert to their settings
prior to the last edit. Only one level of undo is available, so clicking the undo
button again will restore the parameters after the edit. Both A and B buffers
(described below) have their own undo buffers.
3.3 Copy
Clicking the Copy button copies the current set of effect parameters to the
unused A/B buffer. Hence, if the A buffer is currently selected, the
parameters are copied to B, and if the B buffer is selected, the parameters
are copied to A. After clicking Copy, you can continue to make changes, and
then revert to the original copied settings by clicking either the A or B
buttons to switch buffers.
3.4 A/B buffers
The A/B edit buffers allow you to compare two different sets of parameters or
presets. One of the A or B buttons is always lit; the button that is lit shows
the current buffer. Clicking either the A or B button will switch to using the
other buffer, thus changing the effect settings (assuming different settings
are stored in A and B).
Here’s how to use the A/B buffers to compare two different presets. Select a
preset from the Preset menu, then switch to the other buffer and select a
different preset. Now switch between the two buffers to alternate between
the two different presets.
17
Wave Arts Master Restoration Suite
3.5 Preset name and arrow controls
The currently selected preset name is displayed in the text field in the menu
bar. Changing any parameters causes an asterisk (*) to be displayed at the
end of the name. This indicates that changes have been made to the preset.
In order to save the changes to a user preset you must select the “Save…”
item in the Preset menu, described below.
The arrow controls to the left and right of the preset name cycle through the
set of factory and user presets. Clicking the right arrow goes to the next
preset, clicking the left arrow goes to the previous preset.
3.6 Preset menu
The Preset menu contains lists of factory and user presets for easy selection,
and options for managing presets. The functions are described in the
following sections.
3.7 Factory Presets
Factory presets are selected from a rolloff menu at the top of the Preset
menu. Factory presets cannot be modified or deleted. The Default preset is
always first in the list; it defines all default parameter settings.
18
3. Menu Bar and Preset Manager
3.8 User Presets
User presets are selected from a rolloff menu just below the Factory presets
in the Preset menu. When you first run a Wave Arts plug-in, there will not be
any user presets and the menu will be empty. When you save a preset using
the “Save” option the preset is added to the User menu. All instances of a
plug-in share the same set of user presets. So, after you save a preset with
one instance of a plug-in, you can go to another instance and find that the
preset can be found in its User preset menu too.
You can delete an individual user preset by holding down the SHIFT key while
selecting the preset. The entire set of user presets can be deleted using the
Reset option, described below.
User presets are stored in a text file called “Master Restoration Presets.txt”.
On Macintosh, the presets are stored in the folder “/Library/Application
Support/Wave Arts”. On Windows the presets are stored in the folder
“C:\Documents and Settings\All Users\Application Data\Wave Arts”. If the
preset file is deleted it will be created automatically by the plug-in. Note that
all Master Restoration plug-ins share the same preset file; this is so presets
created by the individual plug-ins are automatically shared with the Master
Restoration plug-in.
3.9 Save…
When you have created an effect you want to save as a preset, select the
“Save…” option. You will be asked to name the preset and the preset will be
saved in the set of User presets. If you supply the same name as an existing
user preset, the preset will be overwritten with the new preset without any
warning notice.
3.10 Import…
User presets can be written to files using the “Export” function, and read
from files using the “Import” function. Selecting the “Import…” option will
first ask if you want to replace or merge the imported presets. Replacing
causes your current set of user presets to be deleted and replaced with the
presets read from the file, merging will add the presets read from the file to
your set of User presets. Then you will be asked to choose a preset file for
importing and the presets are read from the file.
Import can also be used to convert presets from an older version of the plugin to the current version. If the plug-in detects presets from an older version
and it knows how to convert them to the current version it will ask you if you
want to convert the older presets to the current format.
19
Wave Arts Master Restoration Suite
3.11 Export…
Selecting the “Export…” option will first ask if you want to replace or merge
the exported presets. Replacing causes the presets in the file to be deleted
and replaced with the exported user presets, merging will add the user
presets to the presets in the file. Then you will be asked to choose a preset
file for exporting and the presets are written to the file.
Preset Export is also useful for making backup copies of your user presets. If
you have a large set of user presets, be sure to export them to a backup file.
3.12 Reset…
Reset is used to delete all of your user presets. Selecting “Reset…” will first
ask you if you really want to do this, and if you confirm, all the user presets
are deleted.
3.13 Tools menu
The Tools menu contains various important options, described below.
3.14 About…
The About option displays important information about your plug-in. An
example is shown below:
20
3. Menu Bar and Preset Manager
On the top line, the plug-in name and version are displayed, along with the
current plug-in format (DirectX, VST, AU, RTAS, or MAS). This is useful if you
aren’t sure which format of the plug you are running. The build date of the
plug-in is displayed on the next line. The registration status is displayed on
the next line. If the plug-in is operating in demo mode, the time remaining (if
any) is displayed. If the plug-in has been successfully registered (unlocked),
the key code and bundle name is displayed. The Machine ID of the computer
is displayed on the next line. Finally, buttons are provided for opening the
registration dialog and the user manual.
3.15 Open User Manual…
Select this option to open the user manual in a browser. If the manual isn’t
found, you will be asked to navigate to it. Once the manual is opened
successfully the plug-in remembers the location.
3.16 Unlock Plug-in…
This option is described in the Installation and Registration chapter of this
manual.
21
Wave Arts Master Restoration Suite
3.17 Check for Updates…
If you are connected to the internet, selecting this option will launch a
browser and will navigate to the Wave Arts Downloads page.
3.18 Visit Website…
If you are connected to the internet, selecting this option will launch a
browser and will navigate to the Wave Arts home page.
22
Wave Arts Master Restoration Suite
4. MR Hum
Figure 4-1. MR Hum user interface.
4.1 Overview
MR Hum combines hum removal, buzz removal, brickwall filtering, and spectrum
analysis into one easy to use plug-in. The functions of MR Hum are also available in
the Master Restoration plug-in. Here are some of MR Hum’s key features:
•
•
•
•
•
•
Hum removal using from 1 to 10 harmonic notch filters.
Buzz removal for frequencies from 20 Hz to 200 Hz.
Adjustable notch widths.
Brickwall filtering for rumble and hiss removal.
High resolution spectrum analysis.
All sections can be monitored to hear removed signal.
MR Hum's audio routing and meter placement is shown in the diagram below:
Figure 4-2. MR Hum audio routing diagram.
The input signal is first processed by the spectrum analyzer, if set to “pre” mode.
The input signal is then processed by the brickwall filter. This allows the user to
24
4. MR Hum
eliminate rumble using the low brickwall filter, or hiss using the high brickwall filter.
The signal is next processed by the hum filter, which applies from 1 to 10 harmonic
notch filters to cancel 50 Hz or 60 Hz hum and associated harmonics. The signal is
next processed by the buzz removal filter. The result is input to the spectrum
analyzer, if set to “post” mode.
When the monitor feature is enabled, the output consists of the signal that is
removed by each of the enabled sections. For the low brickwall filter, the monitor
will contain all frequencies up to the cutoff of the low brickwall. For the high
brickwall, the signal will contain all frequencies above the cutoff of the high
brickwall. For the hum filter, the monitor signal will contain only those frequencies
that are notched by the hum filter; this is accomplished using a parallel sum of
bandpass filters at the harmonics of the hum fundamental. For the buzz filter, the
monitor signal will contain frequencies of the buzz fundamental and all harmonics.
4.2 About Hum, Buzz, and Brickwall filtering
Hum
Hum is caused by interference of audio circuitry with line power. Line power
oscillates at either 50 Hz or 60 Hz depending on your world location. So in its
simplest form, hum is a low frequency interference tone at either 50 Hz or 60 Hz.
However, Hum often contains harmonics (multiples) of the fundamental frequency.
For example, in a region with 60 Hz power, interfering hum would typically contain
frequencies of 60 Hz, 120 Hz, 180 Hz, and so on. Below is a frequency spectrum of
typical hum with a 60 Hz fundamental. It shows significant energy at 60 Hz, 120
Hz, 180 Hz, 300 Hz, and 420 Hz, i.e. the fundamental, 2d, 3d, 5th, and 7th
harmonics.
25
Wave Arts Master Restoration Suite
Figure 4-3. Frequency spectrum of typical 60 Hz hum.
Hum is generally caused by poor grounding of audio equipment. Ground loops,
where the ground connections between different pieces of equipment create a loop
circuit, form a loop antenna which is effective at picking up line power oscillations.
A typical ground loop can be created when two pieces of grounded equipment, say
a pre-amp and an amplifier, are connected with a shielded audio connector that
completes a ground loop. Ground loops can be broken by breaking the ground
connection on the audio path. It is also possible to lift the ground connection of a
piece of equipment, but this is a dangerous practice because it eliminates the safety
feature of a ground, which is to prevent electrocution. Even without ground loops,
hum can be created when sensitive audio electronics share a ground with other
equipment that may be discharging significant current through the ground. Hum
harmonics are created when electronic equipment rectifies AC power to create DC,
or by other devices such as dimmers.
Hum is best removed by using a set of sharp notch filters to eliminate the
fundamental and harmonic frequencies of the hum. Sharp notch filters work well
because the frequency of line power is very stable so the filters can be very
narrowly tuned. MR Hum uses up to 10 notch filters to eliminate up to the 10th
harmonic.
The frequency of hum depends on the frequency of the local line power. 60 Hz
power is used in North America (except Greenland), Central America, most of South
America, Saudi Arabia, and parts of southeast Asia including Korea. The rest of the
world, including Europe, Asia, Africa, and Australia uses 50 Hz power.
26
4. MR Hum
Buzz
Buzz is a periodic impulsive contamination which like hum can be caused by poor
grounding. The simplest example of a buzz is that of a very bad hum whose
harmonics extend up to very high frequencies. However, buzz can also be caused
by a periodic signal, like a camera motor, which is recorded along with the audio
program. The plot below shows buzz created by very poor grounding with 60 Hz
line power. The periodicity of the signal is about 16.7 msec.
Figure 4-4. Time plot of 60 Hz buzz.
Buzz removal differs from hum removal in that the buzz harmonics extend to high
frequencies, and the fundamental frequency might be something other than 50 or
60 Hz. Buzz processing consists of a set of notch filters located at the fundamental
buzz frequency and at all harmonics in the audio range. The set of notch filters is
created using a “comb filter” which essentially computes the difference of the input
signal with a copy of the input signal delayed by one fundamental period. The
difference calculation removes any periodic contamination. However, the side effect
imparted to the signal is that of a comb filter, that is, an echo with a very short
delay. This can sound like a hollow room ambience and may be objectionable.
Hence, buzz removal imparts significant side effects.
Brickwall filters
Brickwall filters are lowpass or highpass filters with very steep cutoffs, used to pass
all frequencies up to the cutoff frequency and eliminate all frequencies beyond the
cutoff. The frequency range that is passed unaltered is called the "passband", the
frequency range that is attenuated is called the "stopband". MR Hum's brickwall
filters are implemented using 10th order elliptical filters, with at least 90 dB of
stopband attenuation and less than 0.1 dB of passband ripple.
27
Wave Arts Master Restoration Suite
Brickwall filters are used to eliminate unwanted frequency ranges. One use of the
low brickwall filter is to eliminate low frequency rumble which can occur from
phonograph playback or due to wind or other low frequency noise during an
acoustic recording. Brickwall filters can also be used when processing a noisy
recording of an instrument sound that does not use the entire frequency range. The
brickwall filter would be positioned at the edge of the instrument's frequency range
to eliminate out-of-band noise. So for example, when processing voice, one could
use the brickwall filters to eliminate all frequencies below 100 Hz and above 8 kHz.
The brickwall filters can also be used to zero in on a particular frequency range just
for analysis purposes. For example, one could use the brickwall filters to listen to
selected overtones in an organ, or to isolate the sibilants of a human voice.
4.3 Using MR Hum
MR Hum has three sections: the hum filter, the buzz filter, and the brickwall filters.
Each section can be enabled with the corresponding ENABLE button. Hence the
enable buttons can be used to compare the results of processing enabled with
processing disabled (bypassed). The monitor feature is also extremely useful to
tune the parameters by listening. The spectrum analyzer can be used to visualize
the spectrum before and after processing.
Spectrum analysis
Spectrum analysis works by transforming the time signal into its constituent
frequencies and displaying the resulting spectrum amplitudes as a function of
frequency. You can see at a glance what frequencies are present in your signal. MR
Hum uses a long time window when transforming blocks of the input signal; hence
the resulting spectrum has very good resolution at low frequencies which makes it
easy to see low frequency tones as spikes in the spectrum. See figure 4-2 for an
example of a spectrum display. Because of the long time block sizes, the update
rate is fairly slow, just a few updates per second. When using the spectrum
analyzer to visualize hum or buzz, it is best to audition a portion of your signal
which contains only the hum or buzz.
MR Hum spectrum analysis can be set to “pre” mode, meaning it runs before hum
processing, or “post” mode, meaning it runs after hum processing; see figure 4-1.
You can select between the two modes by SHIFT-clicking (right-clicking on
Windows) on the vertical axis of the display; this causes a popup menu to appear
containing the two choices. By default the post mode is selected. The vertical range
of the spectrum analysis is fixed: the bottom of the display is -120 dB and the top
of the display is 0 dB, hence each division is 15 dB.
Brickwall
Each of the low and high brickwall filters has an enable button and a knob for
setting the cutoff frequency. When one of the bands is enabled, a corresponding
brickwall control handle appears in the frequency response display. You can edit the
28
4. MR Hum
brickwall frequency by dragging the control handle or dragging the frequency knob.
The monitor feature can be used to hear the signals that are removed by the
brickwall filters. If both the low and high brickwall filters are enabled, the monitor
signal will contain both low and high frequencies.
Hum
If your signal has an obvious hum, the first place to start is to enable the Hum
section, then select either the 50 Hz or 60 Hz hum preset depending on the
frequency of the hum. In the case where you are processing a signal of unknown
origin, you should be able to see the fundamental of the hum frequency in the
spectrum analysis display. You can also hear the hum frequency using the monitor
feature. Press the MONITOR button to enable monitoring. This will pass only the
frequencies of the hum fundamental and the selected harmonics. Then alternately
select the 50 Hz or 60 Hz preset. One of these will pass the hum.
The default width is 1 Hz. This is the bandwidth of the notch filters defined as the
width between the half-power frequencies. Hence, with a width of 1 Hz, the notch
at 60 Hz will have half power (-3 dB) response at 59.5 Hz and 60.5 Hz. Obviously
these filters are very sharp. The notches are infinite depth; at the center frequency
the response is 0 which equals -inf dB.
Very narrow width filters have a long time response. Consequently, a narrow notch
filter will take some time to reject the hum. When applying the hum filter to a
signal with hum, if you notice that the hum persists at the very start of the signal,
you can increase the width of the notch filters and this will make the filters respond
faster to the onset of the hum.
Deciding how many harmonics should be used can be done by examining the
spectrum display which is overlaid with the hum frequency response showing the
notch filters. As you increase the number of harmonics you can see if the spectrum
has a corresponding spike at that frequency. If there is no corresponding spike in
the spectrum, then the newly added notch will have little effect. In some cases you
may have to use a large number of notches in order to cancel a high order
harmonic. For example, in Fig 4-3, one would select 7 harmonics in order to reach
the 7th harmonic which has significant energy. Although the 4th harmonic of the
hum is not present, there is no way to disable the 4th harmonic of the notch filter.
One can also listen to the harmonics using the monitor feature. With monitor
enabled, try increasing the number of harmonics starting with 1. If adding
harmonics does not increase the amount of hum in the monitor signal, then you
should not add harmonics. You may also notice frequencies from the desired signal
appearing in the monitor. This indicates frequencies that will be cut by the hum
filter. While monitoring, you should select the number of harmonics that maximize
the monitored hum signal while minimizing the amount of desired signal.
29
Wave Arts Master Restoration Suite
The frequency response of the hum filter is shown in the MR Hum display. This
reflects the fundamental frequency, the number of harmonics, and the width of the
notch filters. However, the parameters cannot be edited by clicking in the display.
Buzz
If the hum is bright and buzzy, you should try processing with the buzz filter
instead. In this case you should disable the hum filter. The buzz filter can also be
used for any sort of periodic contamination. After enabling the buzz section, the
first step is to determine the buzz frequency. If you know the buzz is created by
line power, then enter the fundamental in the buzz frequency control by adjusting
the knob or by typing in the value. You can also examine the spectrum display and
look at the frequency of the buzz fundamental. You can also use the monitor
feature while slowly adjusting the frequency to scan for the proper fundamental.
When the frequency parameter is adjusted close to the fundamental, the monitor
will begin to pass the buzz sound. Similarly, with monitoring off and with the
spectrum analysis set to “post” mode, you can scan for the buzz fundamental and
see when the buzz harmonics are canceled by the buzz filter; this should be plainly
audible as well.
Once the fundamental is determined, turn off the monitor and proceed to adjust the
width control. Generally, larger widths will reduce the resonant sound of the comb
filter. Now try enabling/disabling the buzz section to hear the effect of the buzz
processing. It’s possible the comb filter effect imparted by the buzz filter is more
annoying than the buzz. If so, you can seek other methods to remove the buzz.
Broadband noise reduction as provided by MR Noise can be extremely effective in
removing buzz. Also the buzz can be gated in quiet sections using MR Gate.
4.4 Parameters
The table below lists all the internal parameters of MR Hum and shows the range of
values as would be displayed by a generic parameter-value plug-in interface. Most
of these parameters have a one to one correspondence with controls on the user
interface.
Parameter name
Enable
Monitor Enable
Brickwall Low Enable
Brickwall Low Freq
Brickwall High Enable
Brickwall High Freq
Hum Enable
Hum Frequency
Hum Width
Hum Num Harmonics
Buzz Enable
30
Values
0 = Off, 1 = On
0 = Off, 1 = On
0 = Off, 1 = On
20 – 20000 Hz
0 = Off, 1 = On
20 – 20000 Hz
0 = Off, 1 = On
20 – 200 Hz
0.1 to 10 Hz
1 - 10
0 = Off, 1 = On
4. MR Hum
Buzz Frequency
Buzz Width
Gain
Monitor Gain
20 – 200 Hz
10 – 100 Hz
-12 to +12 dB
-12 to +12 dB
The parameters are described in more detail below.
Enable — This parameter is only available in the standalone MR Hum, where it
functions as the global bypass control. The Master Restoration plug-in does not
display an enable control for the Hum&Buzz section and the Hum&Buzz section is
always enabled.
Monitor Enable — This enables/disables the monitor feature. When monitoring is
enabled, the output signal consists of all the signals that would be removed by the
MR Hum filters.
Brickwall Low Enable — Enables or bypasses the brickwall lowpass filter.
Brickwall Low Freq — Sets the brickwall lowpass filter cutoff.
Brickwall High Enable — Enables or bypasses the highpass brickwall filter.
Brickwall High Freq — Sets the brickwall highpass filter cutoff.
Hum Enable — Enables/disables the hum removal filter.
Hum Frequency — This parameter sets the fundamental frequency of the hum,
from 20 to 200 Hz. Typically you will use 50 Hz or 60 Hz which can be selected
using the presets.
Hum Width — This parameter sets the bandwidth of the hum notch filters in Hz,
where bandwidth is defined as the difference between the half-power (-3 dB) points
of the notch response.
Hum Num Harmonics — Sets the number of notch filters used in the hum filter,
from 1 to 10. This should be set to the number of prominent harmonics in the hum
for maximum cancellation.
Buzz Enable — Enables/disabled the buzz removal filter.
Buzz Frequency — This parameter sets the fundamental frequency of the buzz,
ranging from 20 to 200 Hz.
Buzz Width — This parameter sets the bandwidth of the buzz notch filters in Hz,
where bandwidth is defined as the difference between the half-power (-3 dB) points
of the notch response.
Gain — Output gain in dB.
31
Wave Arts Master Restoration Suite
Monitor Gain — Monitor output gain in dB.
4.5 Presets
MR Hum factory presets are listed in the table below. In the standalone plug-in
these appear in the preset menu in the menu bar. In Master Restoration, these
presets appear in the Hum&Buzz Preset selector.
Name
Default
60 Hz Hum
50 Hz Hum
60 Hz Buzz
50 Hz Buzz
Rumble
Speech band
Description
Default settings, 60 Hz hum removal
60 Hz hum removal
50 Hz hum removal
60 Hz buzz removal
50 Hz buzz removal
Low frequency rumble filter
Isolate speech range
4.6 Specifications
Description
Hum and buzz suppression filters, brickwall filters for rumble and
hiss suppression, and spectrum analysis
Platforms
Pentium & compatible; PowerPC
Operating Systems
Windows 2000/XP; Mac OS X 10.4 or higher
Plug-in Formats
AU, DirectX, MAS, RTAS, VST
Sampling Rates
up to 192 kHz
Precision
64-bit hum and brickwall filters, 32-bit buzz filtering
Latency
none
I/O Formats
mono-mono, stereo-stereo
32
4. MR Click
5. MR Click
Figure 5-1. MR Click user interface.
5.1 Overview
MR Click combines click and crackle filtering specifically intended for restoring
phonograph recordings. The functions of MR Click are also implemented as part of
the Master Restoration plug-in. Some of MR Click’s features include:
•
•
•
•
•
Separate algorithms optimized for click and crackle processing.
Sophisticated detection algorithms for clicks and crackle focus processing on
contaminating events.
Onset detection allows crackle processing to bypass onset events, keeping
attacks bright.
Monitoring feature for hearing eliminated clicks and crackle.
Comprehensive stereo display of signal level, clicks, crackle, and onset
events.
A diagram of MR Click’s audio routing and meter placement is shown below.
Figure 5-2. MR Click audio routing diagram.
33
Wave Arts Master Restoration Suite
The input signal is processed by the click filter first, then the crackle filter. When
the monitor feature is enabled, the output consists of the signal that is removed by
each of the enabled sections. If both the click and crackle processors are enabled,
the monitor signal will contain both removed clicks and crackle.
5.2 About Clicks and Crackle
The playback of phonograph recordings often contains noticeable clicks and crackle
caused by degradation of the recording grooves, surface scratches, or accumulation
of foreign matter in the grooves. We use the term “click” to mean a large
disturbance, such as caused by a scratch or an obstruction in the groove. Clicks
might also be called pops. The disturbance that causes a click is always so large
that both stereo channels will be similarly affected. We use the term “crackle” to
mean the frequently occurring, lower amplitude disturbances due to groove
degradation or accumulated dust. These are small enough to affect just one wall of
the recording groove, and hence crackles will often occur on just one stereo
channel at a time.
The plot below shows a typical phonograph click. The click is considerably louder
than the surrounding signal.
Figure 5-3. Plot of a vinyl phonograph click during a signal. Only one channel is shown; however both
channels were affected by the click event.
Clicks may also be present in digital audio signals that have undergone some kind
of error in transmission or processing. If the contamination results in various
samples taking on random values, these will sound similar to phonograph clicks and
can be effectively suppressed using MR Click.
34
4. MR Click
The plot below shows a typical phonograph crackle event. Although not shown, this
crackle event affects only one channel. The level of the crackle is similar to the level
of the surrounding signal. Typical crackle events have a shorter duration than clicks
and have a correspondingly higher frequency content.
Figure 5-4. Time plot of a vinyl phonograph crackle event. Only one channel is shown, and only one
channel was affected by the crackle event.
Processing clicks and crackle
The strategy for processing clicks and crackle is to detect the occurrence of click
and crackle events, and then alter the signal around the event to suppress the
sound of the click or crackle. Both the detection strategy and the suppression
strategy differ for click and crackle events.
Clicks are detected as a rapid onset and offset of energy. Clicks are suppressed by
overwriting the signal with a linear interpolation during the click event. The time of
the interpolation is a user parameter; typically 1 msec is ample to completely mask
the click.
Crackle is detected as a rapid onset of high frequency energy. Crackle is
suppressed by smoothing the signal around the crackle event using a lowpass filter.
In many cases, crackle caused by degradation of the phonograph groove is not
distinguishable from the content of the original recording. Typical percussive
events, such as snare drum hits, ride cymbal hits, etc., contain rapid onsets of high
frequency energy that are indistinguishable from crackle events. If the crackle
processing was applied uniformly, the percussive attacks would be dulled by the
crackle smoothing. To alleviate this problem, MR click has an option to bypass
crackle processing during note onsets. MR Click contains a broadband onset
35
Wave Arts Master Restoration Suite
detector that will trigger on note onsets. When the bypass onsets option is
engaged, the crackle processing will by bypassed during note onsets.
5.3 Using MR Click
MR Click Display
Operation of MR Click is greatly facilitated by the event display shown below:
Figure 5-5. Click and Crackle event display. The green plot shows signal level, red lines are clicks,
yellow lines are crackle, and grey lines are onset events.
The display is active when MR Click is enabled. The display shows the past few
seconds of signal history and scrolls from right to left as audio playback proceeds.
The green plot shows input signal level. Red lines indicate detected click events.
Yellow lines indicate detected crackle events. White lines indicate detected onset
events. These are summarized in the table below.
Green
Input signal level
Red
Click events
Yellow
Crackle events
Grey
Onset events
Click events are shown only if the click processor is enabled. Crackle and onset
events are shown only if the crackle processor is enabled.
To change the time range, right-click (SHIFT-click on Mac) the horizontal time axis
and a popup menu will appear with different choices for the time range in seconds.
To change the vertical range, right-click (SHIFT-click on Mac) the vertical amplitude
axis and a popup menu will appear with different choices for the amplitude range in
dB.
36
4. MR Click
MR Click Operation
When processing phonograph recordings to remove clicks and crackle, the strategy
is to first remove the loud clicks and pops and then remove the lower level crackle.
You should first audition the material to be processed and listen for offending clicks.
Then, rewind your track and enable the click processor by clicking on the ENABLE
button. Start playback of the track and adjust the click threshold knob until all the
offending clicks are detected. Lower threshold values will detect more click events,
and higher threshold values will detect fewer click events (only the loudest clicks
will be detected at high threshold settings). You can see the clicks appear in the
event display as red lines. You can also enable the monitor feature and listen to the
detected clicks in the monitor signal. When the monitor feature is off, you can also
enable/disable the click processor to compare the results of click removal versus no
processing.
A click duration of 1 msec usually works well, but in some cases you might want to
lengthen the duration, if there is still a residual thump sound after click removal.
Once you are satisfied that the loud clicks and pops have been suppressed, you can
proceed to process the crackle. Again, it is good to audition the track ahead of time
to get a good idea of the amount of crackle present. Then enable the crackle
processor and begin playback. You will see the detected crackle events appear as
yellow lines in the display. Adjust the threshold to change the number of crackle
events detected; lower thresholds will detect fainter crackle and will create more
crackle events, while higher thresholds will detect louder crackle and will create
fewer crackle events.
The monitor feature is particularly useful for hearing the detected and removed
crackle events. Note that if the click processor is still engaged you will also hear the
removed click events. With lower thresholds, the crackle processor will detect high
frequency portions of your signal and process these as crackle; this will be apparent
when monitoring because you will be able to hear parts of your signal in the
monitor signal. This is a good indication that the threshold is set too low. Basically,
the monitored crackle signal should sound like random crackle events and should
not resemble your input signal. If your signal is fairly percussive, it is likely that the
crackle processor will detect the percussive onsets as crackle events. This will be
audible in the monitor signal because you will hear the underlying rhythm. Your
choices here are to increase the threshold, or to engage the onset bypass
mechanism.
To use the onset bypass, adjust the onset threshold until you see onset events
(white lines in the display) that correspond to the underlying rhythm of your track.
Lower thresholds result in more onsets events; higher thresholds reduce the
number of onset events. Now enable the onset bypass by clicking on the BYPASS
button. When monitored, you should hear that the crackles corresponding to
musical onsets are no longer present, or at least reduced, when the onset bypass is
engaged.
37
Wave Arts Master Restoration Suite
It is unrealistic to expect that you will be able to remove all audible clicks and
crackle without adversely affecting the sound of the original signal. A better
strategy is to remove the most offending events, leaving the signal as untouched as
possible. Because crackle is most audible during silent portions, say between
tracks, one might be tempted to lower the threshold until all of the crackle is
suppressed during these silent portions. But this is probably overdoing it, and there
are other techniques which can be used to clean up the quiet portions. Both
broadband noise reduction, as provided by MR Noise, and noise gating, as provided
by MR Gate, can clean up the quite portions. Hence you should focus on removing
the clicks and crackle that are audible while the music is playing.
5.4 Parameters
The table below lists all the internal parameters of MR Click and shows the range of
values as would be displayed by a generic parameter-value plug-in interface. Most
of these parameters have a one to one correspondence with controls on the user
interface.
Parameter name
Enable
Monitor Enable
Click Enable
Click Threshold
Click Duration
Crackle Enable
Crackle Threshold
Onset Bypass
Onset Threshold
Gain
Monitor Gain
Values
0 = Off, 1 = On
0 = Off, 1 = On
0 = Off, 1 = On
6 – 20 dB
0.5 – 10 msec
0 = Off, 1 = On
12 – 40 dB
0 = Off, 1 = On
0 – 40 dB
-12 to +12 dB
-12 to +12 dB
The parameters are described in more detail below.
Enable — This parameter is only available in the standalone MR Click, where it
functions as the global bypass control. The Master Restoration plug-in does not
have an enable for the Click & Crackle section.
Monitor Enable — This enables/disables the monitor feature. When monitoring is
enabled, the output signal consists of the click and crackle signals that are removed
by MR Click.
Click Enable — Enables or bypasses the click processor.
Click Threshold — Sets the click detection threshold. Lower values result in many
faint clicks detected, high values result in only a few loud clicks detected.
38
4. MR Click
Click Duration — Sets the interpolation time for each click. MR Click will overwrite
the click event with a linear interpolation starting 0.5 msec before the click and
lasting a duration set by this parameter.
Crackle Enable — Enables/disables the crackle removal filter.
Crackle Threshold — This parameter sets the crackle detection threshold. Lower
values result in many faint crackles detected, high values result in only a few loud
crackles detected.
Onset Bypass — When onset bypass is engaged, crackle processing is bypassed
during detected onset events. This is useful to prevent decrackling of percussive
onsets that can easily be recognized as crackle.
Onset Threshold — This parameter sets the onset detection threshold. Lower
values result in many faint onsets detected, high values result in only a few loud
onsets detected.
Gain — Output gain in dB.
Monitor Gain — Monitor output gain in dB.
5.5 Presets
MR Click factory presets are listed in the table below. In the standalone plug-in
these appear in the preset menu in the menu bar. In Master Restoration, these
presets appear in the Click & Crackle Preset selector.
Name
Default
Vinyl Clean
Description
Default settings with nothing enabled
Typical vinyl phonograph settings, both click
and crackle
Light cleaning settings for vinyl
Hard cleaning settings for vinyl
Click removal
Crackle removal
Vinyl Light Clean
Vinyl Hard Clean
Clicks
Crackle
5.6 Specifications
Description
Click and crackle removal filters
Platforms
Pentium & compatible; PowerPC
Operating Systems
Windows 2000/XP; Mac OS X 10.4 or higher
Plug-in Formats
AU, DirectX, MAS, RTAS, VST
39
Wave Arts Master Restoration Suite
Sampling Rates
up to 192 kHz
Precision
32-bit
Latency
click: 10.5 milliseconds when enabled
crackle: 3 milliseconds when enabled
I/O Formats
mono-mono, stereo-stereo
40
6. MR Noise
6. MR Noise
Figure 6-1. MR Noise user interface.
6.1 Overview
MR Noise is broadband noise reduction processor. Here are some of MR Noise’s key
features:
•
•
•
•
•
•
•
•
Great sounding with minimal artifacts.
Low latency (under 20 msec) noise reduction can be used in live situations.
Fast noise floor learning time (down to 50 msec), hence noise looping is not
required.
Auto dynamics mode keeps transients sharp while avoiding squirrelly
artifacts.
Monitor feature to hear removed noise.
Very easy to use.
Comprehensive display shows spectrum of input signal, output signal and
noise floor.
Parameters can be edited as function of frequency.
41
Wave Arts Master Restoration Suite
A diagram of MR Noise’s audio routing and meter placement is shown below.
Figure 6-2. Audio routing in MR Noise.
In normal processing, the noise processor removes noise from the signal and
outputs the noise reduced signal. When the monitor feature is enabled, the output
consists of the signal, i.e. the noise, that is removed by the noise processor.
6.2 About Noise Reduction
Noise
Noise is a general term that can apply to various types of unwanted artifacts in an
audio signal, including hum, buzz, clicks, crackle, rumble, and hiss. We use the
term “broadband noise” to describe noise consisting of a random signal which
sounds like hiss. This type of noise is present in every audio signal. There are many
sources of broadband noise:
Digital quantization – in digital signals, the quantization of the signal to a certain
bit resolution creates broadband noise called quantization noise.
Acoustic recordings – there is always some acoustic noise, which can be due to
ventilation sounds or other background noises.
Electronics – all electronics, particularly high gain amplifiers, will add noise to a
signal due to thermal variation in the amplifier elements.
Magnetic tape recordings – magnetic tape is composed of individual grains of
magnetic material which are each magnetized differently to record an audio signal.
The finite number of grains and limited tape speed causes random noise during
playback.
Phonograph recordings – surface irregularities cause playback noise.
An important characteristic of the noise is its spectrum, that is, the distribution of
energy at different frequencies. The noise spectrum is also called the noise “floor” ,
because it defines the lowest signal level at each frequency that can be
distinguished from the noise. In order for a signal to be audible, it has to be above
the noise floor. The noise floor is also called the noise “profile” in other noise
reduction literature.
For many sources of noise, the noise floor spectrum will remain fairly constant over
time. This is typical of quantization noise, electronic noise, magnetic tape noise,
42
6. MR Noise
and phonograph noise. Acoustic noise, however, can either be constant or varying.
We would expect the acoustic noise in a quiet recording room to be fairly constant.
But the acoustic noise in an outdoor environment can vary significantly over time
due to traffic noise, wind, or other background sound.
Noise reduction
The noise reduction algorithm used by MR Noise is very effective at removing noise
with a constant spectrum. The MR Noise algorithm operates in the frequency
domain. At each frequency, it compares the signal level with the noise floor. If the
signal level is well above the noise floor, it is unchanged, but signals that are close
to the noise floor are attenuated. This is like having a noise gate running at each
frequency, where the gate threshold is set to the noise floor level at that frequency.
Learning the noise floor
MR Noise must first learn the noise floor spectrum. This is done by finding a portion
of the recording where there is just noise without signal. The noise sample is played
through MR Noise with the LEARN option enabled. When learning, MR Noise
computes the noise spectrum, and when learning is complete, MR Noise remembers
this spectrum and uses it for subsequent noise removal. The MR Noise algorithm
requires only a short noise sample, down to 50 msec, to learn the noise spectrum
effectively, although longer learning times give more accurate results.
To handle varying noise floors, there are two approaches. One can learn a long
varying portion of noise and use this average floor, or one can segment the audio
into different clips and learn different noise floors for each clip. The latter method is
more effective.
Reduction amount
It is often necessary to limit the maximum amount of attenuation. This is done via
the Amount parameter, which specifies the maximum attenuation. By limiting the
maximum attenuation, we limit the amount of noise reduction, but also limit
processing artifacts.
Knee shape
As described above, the noise reduction algorithm is essentially a dynamics
processor applied to each frequency band in the spectrum. Maximum attenuation is
applied when the signal level falls equal (or below) the noise floor. Signal levels
above the noise floor are attenuated less because they are less likely to be noise.
When the signal rises to about 20 dB over the noise floor, there is very little
attenuation, since it is very unlikely the signal could be noise. So this is like a gate
or expander dynamics curve where there is no attenuation at high signal levels with
respect to the noise, but attenuation is applied as the signal level gets lower. In the
MR Noise algorithm, the curve of attenuation versus level above noise floor is
defined by the Knee parameter. There are three knee shapes: soft, medium, and
43
Wave Arts Master Restoration Suite
hard. These actually represent well defined theoretical approaches to noise
reduction: Soft is spectral magnitude subtraction, Medium is Weiner filtering, and
Hard is spectral power subtraction. But we can also think of them as just different
knee shapes that control how fast the attenuation is applied as the signal
approaches the noise floor.
0
dB
-5
-10
-15
-20
0
5
10
dB
15
20
Figure 6-3. Plots of attenuation as a function of level in dB above the noise floor. The three knee
shapes are shown: red dashed = Soft, blue dotted = Medium, green solid = Hard.
Musical noise
If the noise reduction is applied to noise alone, then portions of the noise will
survive the noise reduction processing because by chance they are distributed
above the average noise floor. The result is a set of tone bursts occurring at
random times and frequencies, called musical noise, which despite being an
interesting phenomenon, also sounds fairly annoying. It sounds like trickling water,
but with lots of resonance, as if one was listening to it through a tube. In order to
prevent musical noise from occurring it is necessary to raise the knee point above
the noise floor so that more attenuation is applied to signals just above the noise
floor. In the MR Noise plug-in, the Threshold parameter specifies an offset that
raises the knee point above the noise floor. About 6-9 dB of noise floor offset is
usually sufficient to completely silence any musical noise.
Dynamics
Another artifact of noise reduction is the possibility of individual harmonics turning
on and off as they decay approaching the noise floor. We can reduce the possibility
of individual frequencies gating on and off by introducing some time dependent
filtering to each frequency gain, in the form of attack and release rate controls. The
release control determines the maximum rate of attenuation for decaying signals.
44
6. MR Noise
The attack control determines the maximum rate of boost for increasing signals.
Using short attack and release times means the frequency band gains will respond
very quickly to the input signal. Using longer attack and release times means the
frequency band gains will respond slower to changing inputs.
6.3 Using MR Noise
Learning the noise floor
The first step is to identify a section of your track that contains only background
noise. Often this can be found at the very start of the track before the signal comes
in. However, if the track has already been cropped to eliminate leading and trailing
signal, then you will have to find noise during a silent section in the track. MR Noise
can learn a noise profile with as little as 50 msec of noise, so this could be found
between words in a dialog track for example. If you can’t find any part of the track
which is quiet then the noise floor will have to be estimated by learning the quietest
portion you can find and then manually editing the floor parameters to lower and
smooth the floor. Editing the noise floor is described later.
Figure 6-4. Learn time and Learn button.
The learn time is specified using the LEARN TIME parameter. It has various choices
from 50 msec to 5 seconds, and also has a manual mode. Manual mode would be
used for doing very long averages. Choose the longest learn time that is shorter
than the portion of noise you have identified.
If you are using the Master Restoration plug-in, first enable the noise section by
clicking on the ENABLE button. If you are using the MR Noise plug-in it should
already be enabled unless it happens to be bypassed, in which case you should turn
off the bypass.
Now click the LEARN button. It will light in a lovely purple color. Now start playback
of your track. During learning you can see the noise floor evolve in the spectrum
display as the averaging takes place. When learning is complete the LEARN button
will extinguish and the displayed noise floor spectrum is smoothed as it is converted
from a spectrum to a set of 31 noise floor parameters spaced at 1/3-octave bands.
For stereo inputs, MR Noise learns independent noise floors for the left and right
channels.
At this point the noise reduction is active. You can adjust the noise reduction
parameters as described below.
45
Wave Arts Master Restoration Suite
Manual learning can be used for learning very long portions of noise, or for
controlling the start of learning. When the LEARN TIME is set to Manual, learning
will continue for as long as the LEARN button is on. You must click LEARN again to
turn off learning.
Adjusting the noise reduction
Assuming you are starting from the default preset values, the noise reduction
parameters will be set to something sensible. Recommended parameters are: AUTO
mode enabled, Soft Knee type, Threshold from 6 to 9 dB to eliminate musical noise,
and Amount from 3 to 40 dB based on preference.
Adjusting the Threshold can be done easily if you have a quiet portion of the track
that contains only noise. When this is processed adjust the threshold as low as
possible until you hear some musical noise (random tones), and then raise the
threshold by 2-3 dB so the tones disappear.
The Amount control is the most important for adjusting the tradeoff between noise
reduction and processing artifacts. When Amount is set to 0 dB, there is no noise
reduction and the output signal should exactly match the input. Increasing the
Amount increases the amount of noise reduction, but also increases the possibility
of processing artifacts. Possible processing artifacts include:
•
•
•
•
smearing of attack transients,
harmonic tones gating on and off, causing a watery effect,
musical noise during quite portions,
loss of signal content, particularly at high frequencies.
MR Noise is designed to minimize artifacts and give you really great noise reduction
performance. But you may encounter difficult input signals that can reveal artifacts
under heavy noise reduction. Using moderate Amounts, say 6-12 dB, can leave a
bit of noise in your recordings, but this may be more desirable than trying to fully
suppress noise and causing artifacts.
Another useful technique when processing extremely noisy recordings is to do
multiple passes. Instead of doing one pass with a large amount of noise reduction,
do several passes using gentle noise reduction settings. This technique will usually
result in fewer bad sounding artifacts.
Sometimes a large Amount value is needed to fully suppress noise during quiet
portions. However, it may be better to focus instead on what sounds best when the
music is playing. Suppressing noise during quiet portions can also be done using a
basic noise gate, such as MR Gate.
46
6. MR Noise
Adjusting attack and release times
For transient input sounds with sharp attacks you will want to use short attack and
release times to preserve the transients. For slower changing legato sounds, you
want to use long attack and release times to prevent harmonics from gating on and
off rapidly as they decay near the noise floor. If the attacks seem to be smoothed
out by the noise reduction, try using a faster attack time. If you hear individual
harmonics gating on and off as they decay, try using a longer release time.
Auto dynamics mode
MR Noise features an AUTO dynamics mode that adjusts the attack and release
times based upon transients in the input signal. When AUTO mode is enabled, MR
Noise detects transients in the input signal and automatically uses short attack time
during rapid onset events and uses short release times during rapid offset events.
When there are no transients, MR Noise uses the attack and release times set by
the user for maximum smoothness during slowly changing passages. We
recommend enabling AUTO mode at all times.
Monitoring the removed signal
Enabling the MONITOR feature allows you to hear the signal that is being removed
by the noise reduction processor. Ideally this would contain only noise, but in
practice it is impossible to perfectly separate the unwanted noise from the desired
signal, hence the monitor signal will contain some residue from your desired signal,
usually at high frequencies and during transients. Listening to the monitor can be
useful for adjusting the various parameters to optimize the noise reduction
performance. Adjusting the Amount parameter directly controls the amount of noise
signal you will hear in the monitor. Increasing the Amount also increases the
amount of residue from the desired signal. You should also be able to hear the
effect of adjusting the attack and release parameters. Slower attack and release
times allow more of the transients to leak into the noise monitor. Using faster
attack and release times (or enabling the AUTO mode) retains more of the desired
signal during transients, so that less transient signal leaks into the noise monitor
signal. If the monitor signal contains a lot of low or mid frequencies from the
desired signal, you should consider adjusting the frequency scaling parameters to
prevent these frequencies from being removed as noise. Try reducing the amount
and threshold parameters at these frequencies.
Although the monitor feature is useful, you should base your decisions on the sound
of the processed signal, comparing this to the original sound when the plug is
bypassed. Listening to the noise monitor by itself ignores the fact that many low
level details of the noise reduction process are masked by the desired signal. Thus,
details in the noise monitor signal may be inaudible in the processed signal.
Spectrum display
MR Noise features a spectrum display which is shown below.
47
Wave Arts Master Restoration Suite
Figure 6-5. Noise reduction spectrum display. Green is input signal spectrum, red is output signal
spectrum, and yellow is the noise floor spectrum. For stereo inputs, the left channel is displayed on
top, and the right channel is displayed below.
When processing a stereo signal, the display is divided into two sections; the top
display is the left channel and the bottom display is the right channel. For greater
detail you can look at just one channel by using the DISP MODE control. DISP
MODE has values of “Stereo”, “Left”, and “Right”. Use the Left or Right values to
select just the left and right channels for display. When processing mono signals
the DISP MODE control will show “Mono” and the display will show the single
channel.
In the display, the input signal spectrum is shown in green, the output signal
spectrum is shown in red, and the noise floor spectrum is shown in yellow. The
input and output spectra are shown only when the MR Noise is enabled and the
plug-in is processing audio.
Green
Input signal spectrum
Red
Output signal spectrum
Yellow
Noise floor spectrum
MR Noise uses a fairly short spectral analysis time, under 20 milliseconds, and
consequently the spectrum display does not have good resolution at low
frequencies. This is seen in the spectrum display as a very smooth curve at low
frequencies. The choice of using a short analysis time was made to optimize the
noise reduction performance, without regard to display resolution.
Editing the noise floor
It may be impossible to find a portion of sound that contains only background
noise. In this case, the noise floor can be learned from a portion of your sound that
48
6. MR Noise
has the lowest signal level, and then you can manually adjust the floor by editing.
To edit the noise floor, click on the FLOOR button.
Figure 6-6. Clicking the floor button allows the noise floor to be edited manually. Click the floor
button again to turn off editing.
When the FLOOR button is lit, a set of 31 control points are drawn on each of the
stereo noise floor curves. The curves can then be modified by clicking and dragging
the control points. As shown in Figure 6-5 it is also possible to click and drag a
selection window to select multiple points. You can also SHIFT-click on points to
select any set of points. Note that when LEARN is enabled (button lit) the noise
floors cannot be edited until learning is complete. After editing you may want to
save a preset to save your noise floor edits. Click the floor button again to turn off
editing. When the FLOOR button is lit, clicking RESET will reset the noise floor to 160 dB at all frequencies.
Figure 6-7. Editing the noise floor. Clicking and dragging will select multiple points. The selected
points are highlighted.
Editing the frequency scaling curves
For challenging noise reduction problems, it may be useful to specify different
threshold, amount, attack time, and release time parameters at different
frequencies. This can be done by scaling the parameters as a function of frequency.
MR Noise allows the user to specify a scaling curve for each of the above
parameters. To edit the scaling curve, click on the corresponding edit button. The
figure below shows the Amount button selected.
Figure 6-8. The Amount parameter is selected for editing as a function of frequency.
49
Wave Arts Master Restoration Suite
When one of the parameter buttons is selected, a blue scaling curve is drawn on
the display. The scaling curve is specified using 11 control points at frequencies
from 20 Hz to 20 kHz such that each point spans roughly one octave. Each control
point can scale the parameter from 0% to 200% of the parameter’s nominal value.
The parameter value at any frequency is determined by the product of the value
shown on the knob times the value of the scaling curve at that frequency. The
figure below shows an example scaling curve. Although the display is stereo, the
scaling curves are monophonic; the scaling parameters are the same for each
channel. If you click RESET when editing a scaling curve, the curve will be reset to
x1 at all frequencies.
Figure 6-9. Example scaling curve for the Amount parameter. Frequencies below 160 Hz are at 50%
value. If the Amount knob was set to 12 dB, then Amount would be 6 dB up to 160 Hz, and 12 dB
above 320 Hz.
6.4 Parameters
The table below lists all the internal parameters of MR Noise and shows the range of
values as would be displayed by a generic parameter-value plug-in interface, or by
an automation interface. Most of these parameters have a one to one
correspondence with controls on the user interface.
Parameter name
Enable
Monitor Enable
Threshold
Amount
Attack Time
Release Time
Knee Type
Learn Enable
Learn Time
50
Values
0 = Off, 1 = On
0 = Off, 1 = On
0 – 40 dB
0 – 60 dB
0 – 100 msec
0 – 1000 msec
0 = Soft, 1 = Medium, 2 = Hard
0 = Off, 1 = On
0 = 50 msec, 1 = 100 msec, 2 = 200 msec, 3
6. MR Noise
Auto Mode
Gain
Monitor Gain
Left Floor 0-30
Right Floor 0-30
Thresh Scale 0-10
Amount Scale 0-10
Attack Scale 0-10
Release Scale 0-10
= 500 msec, 4 = 1 sec, 5 = 2 sec, 6 = 5 sec,
7 = manual
0 = Off, 1 = On
-12 dB to +12 dB
-12 dB to +12 dB
-160 to 0 dB
-160 to 0 dB
0 to 2
0 to 2
0 to 2
0 to 2
The parameters are described in more detail below.
Enable — Enables or bypasses the noise reduction processing.
Monitor Enable — This enables/disables the monitor feature. When monitoring is
enabled, the output signal consists of the noise signal that is removed by MR Noise.
Threshold — Sets the amount the noise floor is offset to start signal attenuation at
higher levels than the noise floor. The threshold raises the knee point above the
noise floor.
Amount — Sets the amount of noise reduction in dB. This is the maximum amount
of attenuation for signals that are at or below the noise floor level.
Attack Time — This parameter sets the attack time constant of the dynamics
processor for each frequency, that is, how fast a signal can increase at each
frequency. A time of 0 means attacks are followed as quickly as possible. Longer
time constants cause smoothing of attacks.
Release Time — This parameter sets the release time constant of the dynamics
processor for each frequency, that is, how fast a signal can decay at each
frequency. A time of 0 means releases are followed as quickly as possible. Longer
time constants cause smoothing of decays.
Knee Type — The Knee determines how fast the attenuation is applied as the
signal approaches the noise floor. The Soft knee applies attenuation slowly, Medium
is a sharper transition, and Hard is the hardest transition.
Learn Enable — Enables learning. When learning is enabled, the input signal
spectrum is averaged to form the noise floor spectrum.
Learn Time — Sets the learn time from 50 msec to 5 seconds. Learning will
automatically stop after the learn time period. Manual learning means the learn
enable must be turned off manually to stop learning.
51
Wave Arts Master Restoration Suite
Auto Mode — When enabled, Auto mode overrides the attack and release times
with automatically determined times based on a broadband transient analysis. MR
Noise will use fast attacks during rapid onsets and will use fast releases during
rapid offset events. During slowly changing signals without transients, the usual
attack and release times are used for maximum smoothness.
Gain — Output gain in dB.
Monitor Gain — Monitor output gain in dB.
Left Floor – Noise floor levels in dB for the left channel. There are 31 floor
parameters ranging from 20 Hz to 20 kHz in roughly 1/3-octave intervals.
Right Floor - Noise floor levels in dB for the right channel. There are 31 floor
parameters ranging from 20 Hz to 20 kHz in roughly 1/3-octave intervals.
Thresh Scale – Frequency scaling values for the Threshold parameter ranging from
x0 to x2. There are 11 scaling parameters ranging from 20 Hz to 20 kHz in roughly
one-octave intervals.
Amount Scale – Frequency scaling values for the Amount parameter ranging from
x0 to x2. There are 11 scaling parameters ranging from 20 Hz to 20 kHz in roughly
one-octave intervals.
Attack Scale – Frequency scaling values for the Attack Time parameter ranging
from x0 to x2. There are 11 scaling parameters ranging from 20 Hz to 20 kHz in
roughly one-octave intervals.
Release Scale – Frequency scaling values for the Release Time parameter ranging
from x0 to x2. There are 11 scaling parameters ranging from 20 Hz to 20 kHz in
roughly one-octave intervals.
6.5 Presets
Following is the list of presets that ship with MR Noise.
Name
Default
Clean
Light Clean
Vinyl
Tape
LP33 Floor
Cassette Floor
52
Description
Default settings, same as Clean
Default settings with learn enabled
Light cleaning settings with learn enabled
Vinyl phonograph settings with reduced
threshold and amount at low frequencies,
learn enabled
Magnetic tape settings, harder knee than
Clean, learn enabled.
Example vinyl phonograph noise floor
Example cassette tape noise floor
6. MR Noise
6.6 Specifications
Description
Frequency domain noise reduction processor
Platforms
Pentium & compatible; PowerPC
Operating Systems
Windows 2000/XP; Mac OS X 10.4 or higher
Plug-in Formats
AU, DirectX, MAS, RTAS, VST
Sampling Rates
up to 192 kHz, supported rates listed below
Precision
32-bit processing
Latency
20 milliseconds or less, depending on sampling rate, listed below
I/O Formats
mono-mono, stereo-stereo
MR Noise is designed to work at the sampling rates listed in the table below. When
processing audio at some other sampling rate, the closest sampling rate in the table
below will be chosen. The table also lists the processing latency in samples and
milliseconds for each sampling rate.
Sampling rate
8000
11025
16000
22050
32000
44100
48000
88200
96000
176400
192000
Latency, samples
160
160
320
320
640
640
640
1280
1280
2560
2560
Latency, msec
20
14.5
20
14.5
20
14.5
13.3
14.5
13.3
14.5
13.3
53
7. MR Gate
7. MR Gate
Figure 7-1. MR Gate user interface.
7.1 Overview
MR Gate is a full featured expander/gate that can be used to gate noise during
quiet sections. Some of MR Gate’s key features are:
•
•
•
•
Adjustable lookahead
Comprehensive metering
Dynamic display shows recent history of input and gain levels
Monitor allows you to hear gated signal
A diagram of MR Gate’s audio routing and meter placement is shown below.
Figure 7-2. MR Gate audio routing diagram.
In normal processing, the gate mutes the audio during silent portions. When the
monitor feature is enabled, the output consists of the low level signal that is
removed by the gate.
55
Wave Arts Master Restoration Suite
7.2 About Gating
A noise gate is a conceptually simple device that passes high level signals and
attenuates low level signals. This is useful for muting the noise that can be heard in
the quiet sections between loud parts. A gate monitors the level of the input signal,
and if the level falls below a predetermined threshold, the signal is attenuated. The
threshold is set to be just above the level of the background noise.
The amount of attenuation applied depends on the ratio control. The definition of
ratio is somewhat confusing. A ratio of 1 means no attenuation is applied as signals
fall below threshold, while a ratio of infinity means the signal is maximally
attenuated. For other ratios R, the attenuation is (R-1) times the difference
between the input signal and the threshold. So for example, if the ratio is 5 and the
signal is 10 dB below threshold, then 40 dB of attenuation will be applied. MR Gate
has a maximum ratio of 50 which for practical purposes can be considered infinite.
Because MR Gate has a ratio control it is more properly considered to be an
“expander” than a gate.
The attack and release time parameters control how fast gain changes are applied.
The release time controls low fast the gain is turned down and the attack time
controls how fast the gain is restored. Consider the example of a drum recording
containing background noise, assuming the threshold has been set just above the
background noise and the ratio is large. When the signal goes below threshold the
gate kicks in and begins reducing gain. A short release time will decrease gain
rapidly, abruptly cutting off the decay of the drum. Longer release times cause the
gain to decrease more slowly, which may sound more natural but also allow the
noise to be audible at the end of the drum decay. On the next drum hit, the gate
will restore gain according to the attack time. Using a short attack time is prudent
in this case, otherwise the attack of the drum will be lost due to the slow attack
fade-in of the gate. So, when gating, the attack and release times correspond to
the attack and release times of the instrument you are processing.
Another important parameter for gating is the lookahead time. Lookahead allows
the gate to respond to events in the signal before they occur. This is done by
delaying the audio signal after level detection and before gain processing.
Lookahead is particularly important for restoring gain just before onset (attack)
events. A few milliseconds of lookahead is sufficient to allow the gain to ramp up
before the attack is processed by the gain stage. Running a gate without lookahead
risks cutting off all attack events.
MR Gate Input and Gain meters
MR Gate displays an input meter on the left and a gain reduction meter on the
right. The input meter shows the peak signal level coming into the gate and the
gain reduction meter shows the amount of gain reduction being applied.
56
7. MR Gate
Figure 7-3. MR Gate input meter (left) and gain reduction meter (right).
The meters show both the minimum and maximum values since the last meter
redraw. The meter is drawn with a dark color up to the minimum value, and drawn
with a lighter color from minimum to maximum value. These types of meters are a
Wave Arts innovation. The “min/max” meters let you see at a glance how much the
signal is modulating. If the signal level is constant the meter bar will be a solid dark
color. If the signal level is modulating rapidly, this is shown by a large light section.
The size of the light section indicates how much a signal is changing dynamically.
The input meter has a triangular control that lets you set the input threshold level.
Drag the control up and down to change the threshold.
MR Gate display
Figure 7-4. MR Gate time display. The green plot is the input signal level, the blue plot is the gate
gain, and the yellow line is the threshold.
MR Gate features a dynamic display that plots signal level and the gate gain. The
MR Gate display is shown above. Signal level is plotted in green, the gate gain is
plotted in blue, and the threshold level is plotted as a horizontal yellow line. The
display is mono for either mono or stereo inputs. This is because when processing
stereo inputs, MR Gate applies the same gain to both channels based on peak level
calculated across both channels. The display is only active if MR Gate is enabled.
57
Wave Arts Master Restoration Suite
The display plots the last few seconds. As processing continues, the display
contents scroll from right to left. The vertical amplitude axis range can be changed
by right-clicking (SHIFT-clicking on Mac) the vertical axis; this will display a popup
menu of choices for vertical axis range. Similarly the horizontal time axis range can
be changed by right clicking (SHIFT-clicking on Mac) the horizontal axis; this will
display a popup menu of choices for horizontal axis range.
7.3 Using MR Gate
A good place to start is to select the “Fast Gate” preset. If you are using the
Master Restoration plug-in, click on the DISPLAY button to bring up the MR Gate
display. Now start playback and adjust the threshold to be just above the level of
the background noise during quiet sections. After the threshold is set, you may
want to adjust the release time to get the most natural sounding decays into
silence. For best results you want to match the release time of the gate with the
release time of the sound you are gating.
If the noise gating is too obtrusive, you may want to reduce the attenuation during
quiet sections. This can be done by using lower ratio values.
Selecting the MONITOR button allows you to hear the sound that has been removed
by the gate. Typically this will contain background noise, and perhaps some
reverberant decay tail from the sound you are gating. If you hear the leading
portions of sound onsets, you may want to increase the lookahead time to prevent
these from being gated.
7.4 Parameters
The table below lists all the internal parameters of MR Gate and shows the range of
values as would be displayed by a generic parameter-value plug-in interface, or by
an automation interface. Most of these parameters have a one to one
correspondence with controls on the user interface.
Parameter name
Enable
Monitor Enable
Ratio
Threshold
Attack
Release
Lookahead
Knee
Gain
Monitor Gain
Values
0 = Off, 1 = On
0 = Off, 1 = On
1 to 50 (1:1 to 1:50)
-72 to 0 dB
0.1 to 1000 msec
1 to 2000 msec
0 = off, 1 = 1 msec, 2 = 2 msec, 3 = 5 msec
0 = Soft, 1 = Medium, 2 = Hard
-12 to +12 dB
-12 to +12 dB
The parameters are described in more detail below.
58
7. MR Gate
Enable - Enables/bypasses MR Gate. In the standalone MR Gate plug-in, this
parameter is implemented with the bypass control. In the Master Restoration plugin, this parameter is implemented with the ENABLE button.
Monitor Enable - Enables/disables monitoring. When monitoring is enabled, the
output signal contains only the signal that is being removed (gated).
Ratio - Controls the amount of attenuation. Higher ratios cause more attenuation
as the signal falls below threshold.
Threshold - Input signals are attenuated when they fall below the threshold level.
Attack Time - Sets the time it takes to increase gain.
Release Time - Sets the time is takes to decrease gain.
Lookahead - Sets the lookahead time. Lookahead is useful when gating to provide
a bit more time for the gate to restore gain prior to an onset.
Knee - Sets the dynamics knee shape; options are soft, medium and hard.
Gain — Output gain in dB.
Monitor Gain — Monitor output gain in dB.
7.5 Presets
Following is the list of presets that ship with MR Gate.
Name
Default
Fast Gate
Slow Release Gate
Medium Gate
Description
Default settings with MR Gate disabled
Fast release gate
Slow release gate
Small ratio downward expander, use for
medium ducking during silence
Very small ratio downward expander, use for
mild ducking during silence
Mild Gate
7.6 Specifications
Description
Expander/gate
Platforms
Pentium & compatible; PowerPC
Operating Systems
Windows 2000/XP; Mac OS X 10.4 or higher
Plug-in Formats
AU, DirectX, MAS, RTAS, VST
59
Wave Arts Master Restoration Suite
Sampling Rates
up to 192 kHz
Precision
32-bit processing
Latency
0-5 msec depending on lookahead setting
I/O Formats
mono-mono, stereo-stereo
60
Master Restoration
8. Master Restoration
Figure 8-1. Master Restoration user interface.
8.1 Overview
Master Restoration combines the functions of MR Hum, MR Click, MR Noise, and MR
Gate into one plug-in. The audio routing diagram for Master Restoration is shown
below.
Figure 8-2. Master Restoration routing diagram.
61
Wave Arts Master Restoration Suite
The signal processing order is MR Hum, MR Click, MR Noise, and MR Gate. When
any of the processors is monitored, the output consists of a mix of all the monitor
outputs from the processors. Hence, you can monitor any combination of the
processors to hear a mix of all the signals that have been removed by the individual
processors.
8.2 Using Master Restoration
The individual processors are described in detail in the preceding chapters, and the
descriptions will not be repeated here. This section will describe some issues
specific to using Master Restoration.
Switching the display.
The processors share the same common display area. There are three ways to
switch the active display:
1. Click on the tabs at the bottom of the display,
2. Click on the DISPLAY button in each section
3. Click on the panel in each section.
Monitoring sections
Each section has a MONITOR button which can be selected to hear the signal that is
removed by the processor. In Master Restoration, it is possible to select multiple
sections to be monitored, in which case the output contains a mix of the monitored
sections. Master Restoration keeps has separate gains for monitored and nonmonitored output. Hence, when monitoring, you can increase the output gain
control to more easily hear the monitor signal. When monitoring is turned off, the
normal output gain is applied.
Section presets
In Master Restoration, each section has a preset control as shown below. Click on
the button to advance to the next section preset (SHIFT-click moves backwards to
the preceding preset). Click on the text area to display a popup menu of preset
options. There are rolloff menus for factory and user presets, and Save and Save As
options for saving a section preset. This menu works like the main preset menu in
the menu bar, which is described in Chapter 3.
Figure 8-3. Section preset control.
62
Master Restoration
Sharing presets between processors
User presets created in the various processor sections of Master Restoration are
automatically imported into the individual plug-ins. Simply save the preset using
the section preset control, then you will see this preset in the main preset menu of
the individual plug-in. For example, if you save a preset in the Noise section of
Master Restoration, this preset will be available in the MR Noise main preset menu,
under the User rolloff menu. Similarly, if you save a preset in MR Noise, this preset
will automatically appear in the preset control of the Noise section of Master
Restoration.
8.3 Presets
Master Restoration factory presets are listed in the table below.
Name
Default
Tape clean
Vinyl clean
Description
Default settings with nothing enabled
Magnetic tape
Vinyl phonograph
8.4 Specifications
Description
Hum, buzz, click, crackle, and broadband noise removal with gating,
brickwall filters, and spectrum analysis
Platforms
Pentium & compatible; PowerPC
Operating Systems
Windows 2000/XP; Mac OS X 10.4 or higher
Plug-in Formats
AU, DirectX, MAS, RTAS, VST
Sampling Rates
up to 192 kHz
Precision
64-bit hum and brickwall filters, 32-bit buzz filtering, 32-bit click and
crackle removal, 32-bit noise reduction, 32-bit gating
Latency
Sum of latency of individual sections. See specifications for individual
plug-ins.
I/O Formats
mono-mono, stereo-stereo
63
License Agreement
License Agreement
END-USER LICENSE AGREEMENT FOR WAVE ARTS SOFTWARE
IMPORTANT-READ CAREFULLY: This Wave Arts End-User License Agreement
("EULA") is a legal agreement between you (either an individual or a single entity)
and Wave Arts, Inc. ("Wave Arts") for the Wave Arts software accompanying this
EULA, which includes computer software and may include associated media, printed
materials, and "on-line" or electronic documentation ("SOFTWARE PRODUCT" or
"SOFTWARE"). By exercising your rights to make and use copies of the SOFTWARE
PRODUCT, you agree to be bound by the terms of this EULA. If you do not agree to
the terms of this EULA, you may not use the SOFTWARE PRODUCT.
SOFTWARE PRODUCT LICENSE
The SOFTWARE PRODUCT is protected by copyright laws and international copyright
treaties, as well as other intellectual property laws and treaties. The SOFTWARE
PRODUCT is licensed, not sold.
GRANT OF LICENSE This EULA grants you the following rights:
Installation and Use.
You may install and use the SOFTWARE PRODUCT on up to three computers,
provided you are the only user. A license must be acquired for each individual user
of the SOFTWARE PRODUCT.
Reproduction and Distribution.
You may not reproduce or distribute the SOFTWARE PRODUCT except to make
backup copies, or to install as provided for above.
DESCRIPTION OF OTHER RIGHTS AND LIMITATIONS
Limitations on Reverse Engineering, Decompilation, and Disassembly.
You may not reverse engineer, decompile, or disassemble the SOFTWARE
PRODUCT, except and only to the extent that such activity is expressly permitted
by applicable law notwithstanding this limtation.
Software Transfer.
You may permanently transfer all of your rights under this EULA, provided you
retain no copies, you transfer all of the SOFTWARE PRODUCT, and the recipient
agrees to the terms of this EULA.
65
Wave Arts Master Restoration Suite
Termination.
Without prejudice to any other rights, Wave Arts may terminate this EULA if you fail
to comply with the terms and conditions of this EULA. In such event, you must
destroy all copies of the SOFTWARE PRODUCT and all of its component parts.
COPYRIGHT
All title and copyrights in and to the SOFTWARE PRODUCT (including but not limited
to any images, text, and "applets" incorporated into the SOFTWARE PRODUCT), the
accompanying printed materials, and any copies of the SOFTWARE PRODUCT are
owned by Wave Arts or its suppliers. The SOFTWARE PRODUCT is protected by
copyright laws and international treaty provisions. Therefore, you must treat the
SOFTWARE PRODUCT like any other copyrighted material.
LIMITED WARRANTY
NO WARRANTIES. Wave Arts expressly disclaims any warranty for the SOFTWARE
PRODUCT. The SOFTWARE PRODUCT and any related documentation is provided
"as is" without warranty of any kind, either express or implied, including, without
limitation, the implied warranties or merchantability, fitness for a particular
purpose, or noninfringement. The entire risk arising out of use or performance of
the SOFTWARE PRODUCT remains with you.
NO LIABILITY FOR CONSEQUENTIAL DAMAGES. In no event shall Wave Arts or its
suppliers be liable for any damages whatsoever (including, without limitation,
damages for loss of business profits, business interruption, loss of business
information, or any other pecuniary loss) arising out of the use of or inability to use
this Wave Arts product, even if Wave Arts has been advised of the possibility of
such damages. Because some states/jurisdictions do not allow the exclusion or
limitation of liability for consequential or incidental damages, the above limitation
may not apply to you.
MISCELLANEOUS
If you acquired this product in the United States, this EULA is governed by the laws
of the State of Massachusetts.
If this product was acquired outside the United States, then local laws may apply.
66
Support
Support
For assistance, please send email to:
[email protected]
If you are having problems with a plug-in, please include the following information: plug-in
name, operating system, and host software you are using. The version numbers are also
helpful.
For software updates, revision history, frequently asked questions (FAQ), and more, please
visit our website at:
www.wavearts.com
Contact information:
Wave Arts, Inc.
99 Massachusetts Ave.
Arlington, MA 02474
tel:
fax:
+1 781-646-3794
+1 781-646-7190
67
Index
Index
A
L
A/B buffers .......................................17
About ...............................................20
Acoustic noise ...................................42
Amount ...................................... 43, 46
Attack time ............................44, 47, 56
Auto mode ........................................47
Latency ......................32, 40, 53, 60,
Learn ......................................... 43,
Lookahead .......................................
Lowpass filter .............................. 27,
63
45
56
35
M
Clicks ......................................... 34, 37
Copy ................................................17
Crackle....................................... 34, 37
Mac OS-X........................................... 5
Machine ID......................................... 8
Magnetic tape................................... 42
Master Restoration ............................ 61
Menu bar ......................................... 17
Meters........................................ 15, 56
Monitor................. 29, 30, 37, 47, 58, 62
MR Click .......................................... 33
MR Gate .......................................... 55
MR Hum .......................................... 24
MR Noise ......................................... 41
Musical noise ............................... 44, 46
D
N
Demo mode ....................................... 7
Display ............................ 28, 36, 47, 57
Noise .............................................. 42
B
Brickwall filter ............................. 27, 28
Broadband noise ................................42
Buttons ............................................15
Buzz .......................................... 27, 30
Bypass .............................................17
C
E
Export preset ....................................20
F
Factory presets..................................18
Floor .....................................42, 45, 49
G
Gating ..............................................56
H
Harmonics .................................. 25, 29
Highpass filter ...................................27
Hum .......................................... 25, 29
I
Import preset .............................. 19, 63
Installation ........................................ 5
K
Key code ........................................... 9
Knee ................................................43
Knobs ..............................................13
O
Onset ......................................... 35, 37
P
Phonograph............................34, 37,
Preset menu.....................................
Preset name .....................................
Presets ..................................18, 62,
42
18
18
63
R
Ratio ............................................... 56
Registration ....................................... 7
Release time ..........................44, 47, 56
Reset ......................................... 49, 50
S
Save preset...................................... 19
Scaling ............................................ 49
Section preset .................................. 62
Selector button ................................. 14
Serial number..................................... 8
Sliders............................................. 15
Spectrum...............................28, 42, 47
69
Wave Arts Master Restoration Suite
T
U
Text entry.........................................13
Threshold ................................... 44, 56
Tools menu .......................................20
Undo ............................................... 17
Unlock ............................................... 7
User manual..................................... 21
User presets..................................... 19
70
Index
71