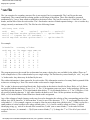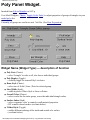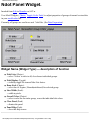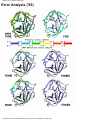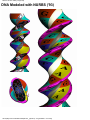
1
Ribbons Manual Help
Ribbons On-Line Manual.
Usage: ribbons [options]
ribbons is driven by mouse and an X/Motif interface, once data has been prepared with auxiliary
programs. Coordinate files must be in Protein Data Bank (*.pdb) format. Recommend that you make a
new directory and copy over a *.pdb file to begin.
To initialize for default drawing data from a PDB entry, type:
ribbons -e YourMol.pdb
To display once the data above is prepared, type:
ribbons -n YourMol
To create any data from 'YourMol.pdb' with ribbons-data GUI, type:
ribbons-data YourMol
The choices from the "Help" submenus bring up the additional information screens listed below:
Data Preparation
●
Required Files
●
Auxiliary Programs
●
Tutorial Overview
●
X-ray Error Analysis
Graphics
●
Motif MenuBar
●
Control Panels
●
Model Transformation
●
Menubar Options
❍ File
●
❍
Edit
❍
Model
❍
View
❍
Help
The Ribbon Drawing Panels
❍
Ribbon Style
file:///C|/My Documents/ribbons/help/manual.html (1 of 2) [4/3/2001 1:52:00 PM]
Ribbons Manual Help
●
●
●
❍
Ribbon Dimensions
❍
Ribbon N-primitives
❍
Ribbon Palette
Primitive Control Panels
❍ Atom Panel
❍
Bond Panel
❍
Poly Panel
❍
Ndot Panel
❍
Text Panel
Material and Image Control Panels
❍ Image Panel
❍
Color Panel
❍
Light Panel
❍
colorIndex Panel
❍
Motion Panel
Keyboard Shortcuts
Images
●
Saving Images
●
Example Images
●
Artistic Images
●
Color Indexing Scheme
●
PostScript Plots
●
Raytracing
●
Virtual Reality
Program
●
Frequently Asked Questions
●
Licensing
●
Source Code
●
Ribbon References
Ribbons User Manual / UAB-CBSE / [email protected]
file:///C|/My Documents/ribbons/help/manual.html (2 of 2) [4/3/2001 1:52:00 PM]
Ribbons Data Preparation Help
Ribbons Data Preparation
Ribbons requires generation of a database of files for display. All files are ASCII.
The Protein Data Bank format is the standard adopted for atomic coordinate files (but see important note
below). It is recommended that you create a new subdirectory named `ribbons' for the project you are
working on, copy over your coordinates, and begin.
A tutorial overview is excerpted from the Methods in Enzymology chapter.
The best way to explain the possibilities is through the demos.
Example Images shows you representative drawing types.
To examine the data yourself, just run the command: ribbons-demo .
Files and Programs
The auxiliary programs provided generate the many small files needed from the *.pdb files. All file
names should follow the convention `MoleculeName.RequiredExtension'.
The ribbons-data utility available in versions 2.8 and higher provides a convenient point-and-click
interface to create all auxiliary data, making the auxiliary programs transparent to the user.
The Ribbons File Types summarizes the file types and nomenclature.
Important: This should be read the first time through.
Important note on PDB files
The *.pdb files accepted for ribbon drawings are actually only a subset of those supplied by the
Brookhaven group. Files used by crystallographers for the programs FRODO and X-PLOR should in
general be acceptable. Only the ATOM and HETATM records are scanned. The current maximum
number of residues is 2000 (set in the utility programs by constant MAXRES).
Ribbon drawings require each subunit or contiguous chain to be in a separate file. Only amino acid
residues should be present. An N-terminal `ACE' group will cause problems. Each amino acid residue
must have an atom named `CA' and each nucleic acid residue must have an atom named `P'. Each residue
should have a unique `residue number'. Alternative residue numbering schemes, e.g., `36A', `36B', as
found in the serine protease family are OK. The chain code identifier is ignored.
file:///C|/My Documents/ribbons/help/dataprep.html (1 of 4) [4/3/2001 1:53:57 PM]
Ribbons Data Preparation Help
Ribbons Data Preparation Examples
Note: If you have IRIX 6.2, see ribbons-data for data preparation. The notes below will acquaint you
with the command line interface.
Creation of a default view from a PDB entry
Go to the directory where you plan to run ribbons . Get any entry deposited at Brookhaven or any
coordinates in *.pdb file as a test case, either use your favorite molecule or simply copy over
$RIBBONS_HOME/data/1nnb.ent . This example will assume that you have done the latter.
This will create all files to show macromolecular chains (proteins and nucleic acids) as ribbons and all
other atoms (including waters) as spheres or balls-and-sticks as the model `1nnb':
entry-ribbons 1nnb.ent
Creation of a ribbon model
Go to the directory where you plan to run ribbons . Get a SINGLE protein or nucleic acid chain *.pdb
file as a test case, either use your favorite protein or simply copy over
$RIBBONS_HOME/data/ubiq.pdb . This example will assume that you have done the latter.
● create the files to have a model named `ubaby':
ribbon-model ubiq.pdb ubaby
A ribbon model named `ubaby' is now ready for viewing by invoking:
ribbons -n ubaby
Creation of a ball-and-stick model
Go to the directory where you plan to run ribbons . Get a small *.pdb file as a test case, perhaps use a
few residues of your favorite protein or a cofactor or copy over $RIBBONS_HOME/data/his.pdb . This
example will assume that you have done the latter.
● create the files to have a model named `H57':
atom-model his.pdb H57.model
A ball and stick model named `H57' is now ready for viewing by invoking:
ribbons -n H57
Combining spheres and ribbons
Given the protein chain `ubiq' and the small molecule `his' in the previous examples, combine them into
a single display.
file:///C|/My Documents/ribbons/help/dataprep.html (2 of 4) [4/3/2001 1:53:57 PM]
Ribbons Data Preparation Help
●
create the files to have a model named `Uh':
ribbon-model ubiq.pdb Uh.model
atom-model his.pdb Uh.model
A ribbon plus the ball and stick model named `Uh' is now ready for viewing by invoking:
ribbons -n Uh
Doing it the hard way
This section gives explicit steps to do the above examples. This may be useful background for
customizing the display.
Creation of a ribbon model
Go to the directory where you plan to run ribbons . Get a monomeric protein *.pdb file as a test case,
either use your favorite protein or simply copy over $RIBBONS_HOME/data/ubiq.pdb . This example
will assume that you have done the latter.
The following steps explicitly produce the files needed to run ribbons :
● make the model file:
●
pdb-model ubiq.pdb ubiq.model
make the secondary structure file:
●
pdb-pro-ss ubiq.pdb ubiq.ss
make the coords and ribbons files:
ls ubiq.pdb > ubiq.coords
ls ubiq.ss > ubiq.ribbons
A ribbon model named `ubiq' is now ready for viewing by invoking:
ribbons -n ubiq
Creation of a ball-and-stick model
Go to the directory where you plan to run ribbons . Get a small *.pdb file as a test case, perhaps use a
few residues of your favorite protein or a cofactor or copy over $RIBBONS_HOME/data/his.pdb . This
example will assume that you have done the latter.
The following steps will produce the files needed to run ribbons :
● make the model file:
●
pdb-model his.pdb his.model
make the sphere and cylinder files:
file:///C|/My Documents/ribbons/help/dataprep.html (3 of 4) [4/3/2001 1:53:57 PM]
Ribbons Data Preparation Help
●
pdb-atom-sph his.pdb his.sph
sph-bond his.sph his.cyl
make the atoms and bonds files:
ls his.sph > his.atoms
ls his.cyl > his.bonds
A ball and stick model named `his' is now ready for viewing by invoking:
ribbons -n his
Combining spheres and ribbons
Given the files created for the protein `ubiq' and the small molecule `his' in the previous examples, both
can be displayed together in a number of ways.
● Link the display of his spheres to the display of the ubiq ribbon:
●
ls his.sph > ubiq.atoms
ls his.cyl > ubiq.bonds
ribbons -n ubiq
Create a separate model called `u-and-h:'
cp ubiq.coords u-and-h.coords
cp ubiq.ribbons u-and-h.ribbons
cp his.atoms u-and-h.atoms
cp his.bonds u-and-h.bonds
cp ubiq.model u-and-h.model
vi u-and-h.model (change model name)
ribbons -n u-and-h
Ribbons User Manual / UAB-CBSE / [email protected]
file:///C|/My Documents/ribbons/help/dataprep.html (4 of 4) [4/3/2001 1:53:57 PM]
Ribbons File Types Help
Ribbons File Types
Ribbons requires generation of special files for display. All files are ASCII. All files may be generated
from *.pdb files and the auxiliary programs provided.
All file names should follow the convention `MoleculeName.RequiredExtension'.
File named `Name.model'
Required files with required filename extension:
●
*.model ---- required to define a 'model' and display anything
eg: protease.model
One or more files named `Name.*'
Optional files named
'*.required_filename_extension':
●
*.atoms ---- required to display spheres of corresponding model
●
*.bonds ---- required to display cylinders of corresponding model
●
*.coords ---- required to display ribbons of corresponding model
●
*.ribbons ---- required to display ribbons of corresponding model
●
*.texts ---- required to display strings of corresponding model
●
*.polys ---- required to display polygons of corresponding model
●
*.ndots ---- required to display dot surface of corresponding model
eg: protease.texts
Graphics Primitives
Optional files with recommended (but optional)
filename extension:
●
*.pdb ---- atomic coordinates used to create all files
●
*.ss ---- sequence and secondary structure for *.ribbons
●
*.sph ---- sphere primitives associated with *.atoms
●
*.cyl ---- cylinder primitives associated with *.bonds
file:///C|/My Documents/ribbons/help/filetypes.html (1 of 2) [4/3/2001 1:54:18 PM]
Ribbons File Types Help
●
*.dot ---- dot/normal primitives associated with *.ndots
●
*.tri ---- triangle/normal primitives associated with *.polys
●
*.color ---- color mappings of residue or atom or scalar types
●
*.rgb ---- SGI format image file
●
*.tiff ---- Tagged image format file
eg: protease_site.sph
Optional files with highly recommended (but
optional) extensions:
●
*.orient ---- viewing orientation of a model
●
*.matter ---- material and lighting properties, for `color'
●
*.defaults ---- style settings
eg: protease.orient
Ribbons User Manual / UAB-CBSE / [email protected]
file:///C|/My Documents/ribbons/help/filetypes.html (2 of 2) [4/3/2001 1:54:18 PM]
Ribbons ribbons-data Help
Data preparation with ribbons-data
●
ribbons-data --- make everything possible for the display model.
●
model-data --- create and manage *.model file
●
atoms-data --- create spheres and manage *.atoms file
●
bonds-data --- create cylinders and manage *.bonds file
●
texts-data --- create strings and manage *.texts file
●
polys-data --- create triangles and manage *.polys file
●
ndots-data --- create dot surfaces and manage *.ndots file
●
ribns-data --- create ribbon drawings and manage *.ribbons/*.coords file
●
scripts used --- some notes on how this is implemented
ribbons-data
Create all the files required to run the ribbons.
Examples and images in version 2.81 and beyond were produced with ribbons-data.
Note: The prototype interface was created with the SGI tool RapidApp to guide the user through all
possible modes of data preparation. This version is no longer supported, but executables for SGI IRIX
6.2+ are still available.
Version 3.1 of ribbons has converted to a Tcl/Tk version8.0 interface that works the same (only better),
with a slightly different look/feel. This works the same on my SGI, Compaq(DEC), and Linux machines,
and hopefully soon on the PC's and Mac's.
Each GUI panel invoked has at least one help panel available. It is all supposed to be self-explainatory.
Let me know what you think.
usage:
ribbons-data [ModelName]
An interface pops up to control all data generation for model 'ModelName' ('ModelName.pdb' is assumed
by default) through a set of sub-data buttons. A red check will appear when it is ok to continue or data
already exists. The first time, you must click to enter 'model-data' and make a *.model file. Then you will
invoke 'atoms-data', etc, interfaces to create more data. Each sub-data command follows the same
procedure: adjust settings on the form if you want to change from the default action, hit the 'Execute'
button, then 'Quit and Exit'. Then you may fire up the ribbons display program directly.
General Atom Selection
Most of the data preparation panels have a a 'Selection' field. It is based on the X-PLOR syntax, but leave
off the 'sele =' and parentheses. Most commands should work, except for wildcards. You should use
file:///C|/My Documents/ribbons/help/aux_gui.html (1 of 5) [4/3/2001 1:55:18 PM]
Ribbons ribbons-data Help
either all upper- or lowercase for keywords, and only certain abbreviations are allowed. The keywords
are: and, or, not, all, name, resi|resid|residue, resn|resname, chem, hydr|hydro|hydrogen, point, cut, byres,
around, segi|segid. If a floating point number is expected, the decimal must be present. Also, the PDB
`Chain ID' may be used as the X-PLOR `SEGId'
Examples:
name ca
-- pick only Calpha
resi 10:30
-- range of residues
name ca and resi 10:30 -- CAs in range
chem o
-- all oxygen atoms
resname phe
-- all phenyalanines
resn phe or resid 1
-- all PHEs, plus res.1
not hydro
-- all but hydrogens
segid A
-- all of chain A
byres resi 1 around 5.0
-- residues near res.1
point (31.2 27.3 4.2) cut 5.0 -- atoms near point
model-data
Creates the required *.model file. This command is normally invoked from the GUI, but may run
stand-alone.
usage:
model-data [name]
The workings should be self-explanatory.
atoms-data
Creates *.sph files of atomic spheres that are managed by the *.atoms file. This command is normally
invoked from the GUI, but may run stand-alone.
usage:
atoms-data [name]
The workings should be self-explanatory. If you create a set of C-alpha atoms, bonds will not be made
automatically (as bonding is based on inter-atomic distances) - bonds-data must be invoked to link
consecutive spheres. Note: spheres, with their radii and colors, are used to generate most other objects.
file:///C|/My Documents/ribbons/help/aux_gui.html (2 of 5) [4/3/2001 1:55:18 PM]
Ribbons ribbons-data Help
bonds-data
Creates *.cyl files of atomic bonds or cylinders that are managed by the *.bonds file. This command is
normally invoked from the GUI, but may run stand-alone.
usage:
bonds-data [name]
The workings should be self-explanatory. For multicolored bonds, you must first create a sphere set. To
fit cylinders to helices, a PDB file and list of residue ranges is required. If dipole coloring is chosen for
helices, the N-terminus is blue and the C-terminus red. Special files of hydrogen-bonding or metal
coordination are still best made by hand or custom programs/scripts.
texts-data
Creates *.str files of positions and strings that are managed by the *.texts file. This command is
normally invoked from the GUI, but may run stand-alone.
usage:
texts-data [name]
The workings should be self-explanatory. For ultimate control of string placement, you may need to
create one *.str file per string, as interactive translations are applied to the entire file.
ribns-data
Creates *.ss files of per residue secondary structure information. Paired *.ss and *.pdb are managed by
the *.ribbons and *.coords files, respectively. This command is normally invoked from the GUI, but
may run stand-alone.
usage:
ribns-data [name]
The workings should be self-explanatory.
polys-data
Creates *.tri files of triangular surfaces or contour levels that are managed by the *.polys file. This
command is normally invoked from the GUI, but may run stand-alone.
usage:
file:///C|/My Documents/ribbons/help/aux_gui.html (3 of 5) [4/3/2001 1:55:18 PM]
Ribbons ribbons-data Help
polys-data [name]
The workings are supposed to be self-explanatory, but this panel has many options and will probably be
split in two. The default assumes an electron density map. It must be in FRODO format (X-PLOR has a
utility for conversion). The old ribbons surface programs first calculate this type of map if you choose
surface creation mode. Then you must contour it. (These programs are being reworked). There are nice
options if you have Connolly's Molecular Surface Package. The pdb-vet command will calculate the *.vet
file from a PDB file using the MSP executables (not included). The vet-rib command will color-code a
variety of properties.
ndots-data
Creates *.dot files of dots colored by atomic spheres that are managed by the *.ndots file. This command
is normally invoked from the GUI, but may run stand-alone.
usage:
ndots-data [name]
The workings should be self-explanatory. In order to show only the surface of say residues 30 to 35, you
must first create a sphere set with selection = resi 30:35, then create an exclusion sphere set from the rest
of the molecule, selection = not resi 30:35.
Scripts
Additional Tcl/Tk GUI panels were added in version 3.1 and linked to the ribbons ~/bin directory. These
scripts are not normally used in command line mode. ln -f helpData.tcl ../bin/help-data ln -f showData.tcl
../bin/show-data ln -f showFile.tcl ../bin/show-file ln -f showRibns.tcl ../bin/show-ribns ln -f
colorIndex.tcl ../bin/color-index ln -f povImage.tcl ../bin/pov-image
● help-data --- help panels for all Tcl/Tk GUIs
● surfs-data --- called by polys-data to create molecular surfaces
● show-data --- called by scripts to manage, eg, *.atoms file
● show-ribns --- called by scripts to manage *.ribbons/coords file
● show-file --- called by scripts to edit miscellaneous files
● color-index -- called by scripts to set color
Each GUI panel builds a command line and executes a system command of a script in the ribbons ~/bin
directory. These scripts are not normally used in command line mode. The list below gives the script and
the command that invokes it.
● pdb-sph --- atoms-data
● sph-atoms --- atoms-data
● pdb-cyl --- bonds-data
file:///C|/My Documents/ribbons/help/aux_gui.html (4 of 5) [4/3/2001 1:55:18 PM]
Ribbons ribbons-data Help
●
●
●
●
●
●
●
●
●
●
cyl-bonds --- bonds-data
hxfit-cyl --- pdb-cyl
ring-tri --- polys-data
tri-polys --- polys-data
dot-ndots --- ndots-data
str-copy --- texts-data
str-texts --- texts-data
ss-ribbons --- ribns-data
ribns-ps --- ribns-data
pdb-ribns --- ribns-data
Ribbons User Manual / UAB-CBSE / [email protected]
file:///C|/My Documents/ribbons/help/aux_gui.html (5 of 5) [4/3/2001 1:55:18 PM]
Ribbons Data File Formats Help
Ribbons Data File Formats
The formats of the file types used by the programs are given below, along with examples and important notes. See the
$RIBBONS_HOME/data directory for sample files.
The file types are referenced by a convention of extensions.
*.model file
A display model, some-name is made known to the program by an ASCII file, some-name.model , in the current
directory named with the following format:
single-string-name-for-menu
x.center
y.center
z.center
Note: C format: ` %s %f %f %f ', so NO BLANKS allowed in the name string (use underscores or caps to convey
multiple words).
*.atoms and *.bonds and *.texts files
These are ASCII files consisting of lists of filenames, one to a line. Each filename refers to a *.sph or *.cyl for atoms
or texts and bonds respectively. These files provide groups of atoms, text or bonds whose graphical attributes may be
modified.
Note: ONE filename per line. The files must be explicitly named `molecule.atoms', `molecule.texts', or
`molecule.bonds' to correctly match with the `molecule.model'.
*.ribbons and *.coords files
These are ASCII files consisting of lists of filenames, one to a line. There must be a one-to-one correspondence
between the *.pdb coordinate files and the *.ss secondary structural files that define a continuous polymer chain of
each ribbon to be displayed. The lines of the *.coord file have the format:
chain1.pdb
optional-string
The `chain1.pdb' is the filename of a coordinate file assumed to be one continuous chain with unique residue numbers.
The `optional-string' defaults to protein coordinates; the program expects amino acids with standard atom names (one
CA per residue must be present). An optional-string beginning with the letter `N' (or `n') signifies nucleic acid
coordinates; the program expects nucleotide residues with standard atom names. (one P per residue must be present).
The lines of the *.ribbon file have the format:
molecule.ss
optional-file.color
If no *.color file is present, default assignments are used: `$RIBBONS_HOME/data/protein.color' or `nucleic color'.
There must be a file `name.coords' and a file `name.ribbons' to draw ribbons with model `name.model'. There must be a
one-to-one correspondence between the *.pdb files and the *.ss files. The same *.ss or *.color file may be used with
any number of *.pdb files.
file:///C|/My Documents/ribbons/help/fileformats.html (1 of 7) [4/3/2001 1:58:24 PM]
Ribbons Data File Formats Help
*.pdb file
The *.pdb extension for atomic coordinate files is not required, but is recommended. The Protein Data Bank files have
the following format:
ATOM
1
N
^
MET
^
1
^^
27.340
^
24.430
^
2.614
^
1.00
^
9.67
^
1UBQ
71
The programs generally skip all input lines that do not begin with the `ATOM' keyword. The atom name, residue name,
residue number (combines the integer with the alt.code, if present), x, y, z, occupancy and B-factor are returned. The
occupancy and temperature factor are generally optional.
Note: Ribbon drawings require each subunit or contiguous chain to be in a separate file. Only amino acid residues
should be present. An N-terminal `ACE' group will cause problems. Each amino acid residue must have an atom named
`CA' and each nucleic acid residue must have an atom named `P'. Each residue should have a unique `residue number'.
Alternative residue numbering schemes, e.g., `36A', `36B', as found in the serine protease family are OK. The chain
code identifier is ignored.
FORTRAN format: (`ATOM',2X,I5,2X,A4,A4,1X,I4,A1,3X,3F8.3,2F6.2) as in FRODO, BUT the residue number is
expected to be an integer.
*.sph file
The *.sph extension for sphere files is not required, but is recommended. Sphere files consist of 5 required (and an
optional 6th) fields. The fields are blank-separated in the following format:
x
y
z
radius
colorindex
name
For example:
17.047 14.099 3.625 1.94 4 n_1_T
Note: C format: ` %f %f %f %f %d %s ', x,y,z,r must have a decimal, colorindex is 1..40. The special `name' in my
format is required for the surface routines. If it is used for `*.texts' files, the radius is required by ignored. Here `name'
may have embedded blanks and is the string displayed. This name is also displayed if a sphere is picked.
*.cyl file
The *.cyl extension for cylinder files is not required, but is recommended. Cylinder files are similar to sphere files,
consisting of eight required (and an optional 9th) fields. The fields are blank-separated in the following format:
x1 y1 z1
x2 y2 z2
radius
colorindex
name
For example:
17.047 14.099 3.625
16.967 12.784 4.338
0.16 7
Note: C format: ` %f %f %f %f %f %f %f %d %s ', x,y,z's, r must have a decimal, colorindex is 1..40. name is
file:///C|/My Documents/ribbons/help/fileformats.html (2 of 7) [4/3/2001 1:58:24 PM]
Ribbons Data File Formats Help
displayed if picked.
*.ss file
The *.ss extension for secondary structure files is not required, but is recommended. The *.ss files are the most
complicated. They control both the coloring and the overall shape of the ribbon. These files should be generated
automatically by `pro-ss', then edited or modified to the desired effect. The *.ss file consists of a 1-line title, a 1-line
header, and one line of data for each residue. The 1-line header consists of blank-separated strings --- the ss-residue-key
strings (currently a maximum of 20). The files have the following format:
arbitrary text title
res#
seq
ss
option-1 option-2 ... option-18
resi-1 seq-char ss-char option-char-1 ... option-char-18
resi-2 ... (repeat for all residues) ...
resi-N seq-char ss-char option-char-1 ... option-char-18
For example:
Calmodulin. courtesy of babu.
res# seq ss hb range sspp rama om
5
T
c
O
7
c
?
?
6
E
H
O
8
H
r
T
7
E
H
O
8
H
R
T
... ... ... ... ...
144
M
H
H
5
H
R
T
145
M
H
H
5
H
r
T
146
T
H
H
5
H
R
T
147
A
H
H
5
c
?
?
The program processes the second line to determine how many coloring keys are available for the ribbon (There are 7
in the example above). The residue header keys are single strings. The first three keys must literally be `res#', `seq', and
`ss' in that order. Any others may be defined by the user.
The residue information is then scanned in for each residue. This information consists of as many blank separated fields
as there are coloring keys. Note: The actual residue codes must be single characters.
The `ss-char' is the most special and literal code. Each residue in the chain is classified as Sheet, Helix, or Coil. Sheets
are specified with the characters `S' (not `s') or `A'. The `A' designation creates an `arrow' in the renderings. Helices are
specified with the characters `H' for right-handed alpha-helices, `L' for left-handed helices, or `3' for 3/10 helices. Coils
are specified with the character `c'. Any other character defaults to coil. Note: All the operations involving Sheet,
Helix, or Coil in the Ribbon Control Panels are based on this assignment.
Any of the columns of single character codes may be used to determine the coloring of the corresponding portion of the
ribbon. Any ASCII character (`A' different than `a') may be used. The characters `1',`2',...`9', correspond directly to the
color-indices 1...9. For example, suppose you want to color the entire chain white (default color 7 = White) except for a
small number of critical residues to be orange (default color = 8). A *.ss file could be edited as follows: 1) add an
identifying string, eg, `critical' to the end of the second line; 2) add `(one-or-more-blanks) 7' to the end of all lines
except the first two ( vi command --- :3,$s/$/(one-or-more-blanks) 7/ ); 3) change the `7' to `8' for all of your critical
residues.
file:///C|/My Documents/ribbons/help/fileformats.html (3 of 7) [4/3/2001 1:58:24 PM]
Ribbons Data File Formats Help
*.polys and *.ndots files
These are ASCII files consisting of lists of filenames, one to a line. Each filename refers to a *.tri or *.dot for polygons
(triangles only) and dots requiring normals respectively. These files provide groups of triangles or dots whose graphical
attributes may be modified.
Note: The files must be explicitly named `molecule.polys' and/or `molecule.ndots' to correctly match with the
`molecule.model'.
*.dot file
The *.dot extension for surface dot files is not required, but is recommended. Dot files consist of 8 required fields. The
fields are blank-separated in the following format:
colorindex
x y z
atom#
nx ny nz
For example:
6 28.932 24.204 2.064 1 0.937 -0.133 -0.324
Note: C format: ` %d %f %f %f %d %f %f %f ', colorindex is 1..40, x,y,z are the coordinates, atom# is currently not
used (but required), nx,ny,nz are the normal vector.
*.tri file
The *.tri extension for triangle files is not required, but is recommended. Tri files consist of 4 lines per triangle with 10
required fields. The fields are blank-separated in the following format:
colorindex
x1 y1 z1 nx1 ny1 nz1 [color1]
x2 y2 z2 nx2 ny2 nz2 [color2]
x3 y3 z3 nx3 ny3 nz3 [color3]
For example:
6
20.752 31.122 0.602
21.160 30.823 0.318
20.186 31.133 0.626
-0.0597 0.7278 -0.6832 4
-0.1210 0.2642 -0.9569 6
-0.2602 0.3571 -0.8971 6
Note: C format: ` %f %f %f %f %f %f %d ', colorindex is 1..40 and applies to entire triangle, unless the vertices are
given individual colors. The x,y,z are the coordinates and nx,ny,nz are the normal vectors for each vertex. If individual
vertex colors are give, colors are blended. Vertices must be defined in a counterclockwise direction to set `outside'
correctly.
file:///C|/My Documents/ribbons/help/fileformats.html (4 of 7) [4/3/2001 1:58:24 PM]
Ribbons Data File Formats Help
*.color file
The *.color extension for color mapping files is not required, but is recommended. There are actually several formats
for various types of *.color files referenced in the manual, depending on whether you need to color ribbons, spheres, or
ranges of residues, or ranges of scalar values, like B-factors or electrostatics. See examples in
$RIBBONS_HOME/data/*.color.
ribbons color file
The files consist of groups of three lines, repeated for as many secondary structure keys as needed in the following
format:
ss-residue-key-string arbitrary-text
resi-char-1 resi-char-2 ... resi-char-N
color-int-1 color-int-2 ... color-int-N
For example:
ss
color codes for secondary structure
H
S
A
c
T
3
6
2
2
8
1
4
seq
amino acid class coloring
A C D E F G H I K L M N P Q
2 3 1 1 2 6 4 2 4 2 3 5 6 5
R
4
S
8
T
8
V
2
W
7
Y
8
In the example above, the color-coding by sequence `seq' is set so that `C' and `M' both correspond to the index `3'
(default color 3 = Yellow ). Thus all sulfur containing residues will be yellow if coloring by the key `seq' is chosen with
Sequence Color from the Ribbon Style Panel .
Note: The first string read must literally match a residue key in the corresponding *.ss file. The second line consists of
the blank-separated 1-character codes associated with the residues of the *.ss key. The third line consists of
blank-separated integer color indices. There is a one-to-one correspondence between the second and third lines. There
must be as many characters in line two as there are integers in line three. White is the default color for any 1-character
code not explicitly set.
atom/residue sphere color file
The files consist of three lines only, in the same format as above. except the first line is completely arbitrary, eg:
amino acid residue coloring
A C D E F G H I K
2 3 1 1 2 6 4 2 4
L
2
M
3
N
5
P
6
Q
5
R
4
S
8
T
8
V
2
W
7
Y
8
range of scalars color file
The files consist of 3 lines. The first is a header that must begin with an integer N. The program then expects N
increasing floating point range values on the next line, and N+1 color integer codes on the last line. The example maps
temperature factors from deep blue to red. Values less than 7.3 are color 10 and values greater than or equal 33.4 are
red.
file:///C|/My Documents/ribbons/help/fileformats.html (5 of 7) [4/3/2001 1:58:24 PM]
Ribbons Data File Formats Help
5
!! set colors and range for pdb-bf-sph N, N ranges, N+1 colors
7.3 11.5 16.0 24.7 33.4
10
6
2
3
8
1
residue range file
The files consist of lines of an inclusive residue range and a colorInt (or a colorChar if you are working with a *.ss
file). The example colors the first 89 residues color 3, and the rest color 4:
1 89
90 153
3
4
*.rgb and *.tiff files
Images are saved in the SGI `*.rgb' format on SGI machines, or the tagged image format `*.tiff' on other platforms.
Both formats are binary files, and more or less standards (along with *.gif, *.png, etc). Use the SGI tool `imgworks' to
crop/scale/enhance or change format of the image. Usage: imgworks image.rgb
Similar capabilities are available with the freeware tool `xv' for other platforms.
*.orient file
The special file to save/restore/set a given view is read/written through the Menubar File menu.
For example:
Ribbon Orientation:
ScaleFactor= 1.647189
XYZcenter= -3.245867 53.830696 27.089184
Matrix=
-0.200795 -0.685288
0.700070
0.007665
0.713505
0.700641
-0.979629
0.146051 -0.138013
SlabFactor= 1.000000
The `ScaleFactor=' is the relative scale factor. The default is 1.0 (a 50 angstrom graphics window width is hardwired).
Larger values increase the scale.
The `XYZcenter=' is the x y z value in orthogonal angstroms for the center of the screen, which is the center of
rotation. Translations change this value. The default is read in from the *.model file.
The `Matrix=' is an orthogonal rotation matrix to transform the original coordinates(x) as: x' = Mx. The identity matrix
is the default.
The `SlabFactor=' is the relative slabbing of the clipping planes.
This isn't quite free-format. If you want to change anything, don't change anything but the values of the numbers
(precision doesn't matter, they just must be blank-separated).
file:///C|/My Documents/ribbons/help/fileformats.html (6 of 7) [4/3/2001 1:58:24 PM]
Ribbons Data File Formats Help
*.matter file
The special file to save/restore a given set of `colors' (material and lighting properties) is read/written through the
Menubar File menu.
See also the ribbons color index scheme.
This is the start of the default example $RIBBONS_HOME/data/Ribbons.matter:
#
'.matter' file
# Description: whatever text you want
#
# '#' begining a line is a comment
# materials must be in order, kolor = 0..MAX_MATTER
# RGB model (Red,Green,Blue) 2 lines/material
#
amb,dif,spec,emit = Ambient,Diffuse,Specular,Emissive
#
# Lights must follow colors
# kolor pattern
Ramb Gamb Bamb
Rdif Gdif Bdif Alpha
#
Rspec Gspec Bspec
Remit Gemit Bemit
Shininess
0
0
0.0000 0.0000 0.0000
0.1000 0.1000 0.1000 1.0000
0.9000 0.9000 0.9000
0.0000 0.0000 0.0000
10.0000
1
0
0.2000 0.0600 0.0600
0.8000 0.1000 0.1000 1.0000
0.5000 0.4000 0.4000
0.0000 0.0000 0.0000
30.0000
2
0
0.0000 0.2000 0.0000
0.1000 0.8000 0.1000 1.0000
0.2000 0.2500 0.2000
0.0000 0.0000 0.0000
10.0000
*.defaults file
The special file to save/restore all the geometric information (except orientation) adjusted by the widgets. It is
read/written through the Menubar File menu.
You probably don't want to edit this file in general - let the program create it. Except, maybe to change my default +/stereo angle from 2.5 at the end of the file.
This is the start of the default example $RIBBONS_HOME/data/Ribbons.defaults:
#
# this should be named '.defaults' or 'model.defaults'
# sets defaults from dir where Ribbons is started.
#
# will all ribbons, atoms, etc be initially displayed?
# DispXxxx is for all; DispXxxxI for each file.
#
1 == TRUE ;
0 == FALSE
#
DispRibns 1
DispAtoms 1
Ribbons User Manual / UAB-CBSE / [email protected]
file:///C|/My Documents/ribbons/help/fileformats.html (7 of 7) [4/3/2001 1:58:24 PM]
Ribbons Auxiliary Program Help
Ribbons Auxiliary Programs
The programs are grouped by general function.
All programs are also listed alphabetically.
The ribbons-data utility GUI of version 2.8 and higher does most of the commands for you, based on the
old command line interface below.
Functional command groupings.
●
Graphic Display
●
Model Data Preparation
●
Sphere Data Preparation
●
Cylinder Data Preparation
●
Secondary Structure Determination
●
Surface Data Preparation
●
Error Analysis Execution (deprecated)
●
PostScript Plots
Alphabetical command listing.
All commands are listed in this format:
Command ----- Functionality
●
access --- create accessible/molecular surface
●
ahelix --- analyze secondary structure from C-alpha only
●
atom-model --- convert *.pdb file to ball and stick model
●
atoms-data --- GUI to create sphere data
●
bestfits --- best-fits helices to a range of C-alphas
●
bonds-data --- GUI to create cylinder data
●
bf-ps --- converts B-factor list to PostScript plot
●
cell-box-cyl --- create a unit cell box
●
chis-plot --- display sidechain `rama' plot
●
chis-ps --- converts sidechain dihedrals to PostScript plot
●
cmc-vet --- calculate approximate *.vet surface file
file:///C|/My Documents/ribbons/help/auxprogs.html (1 of 4) [4/3/2001 1:58:54 PM]
Ribbons Auxiliary Program Help
●
compare --- superimposes coordinate sets
●
dihe-sig --- used by error analysis protocol
●
dsn6stat --- outputs information about a FRODO map
●
entry-ribbons --- convert *.pdb entry to default display files
●
facets --- output contours of FRODO map as *.tri file
●
fithelix --- fit alpha carbons to helices
●
geom-ps --- converts geometric strain to PostScript plot
●
hx-dipole-cyl --- convert pdb-hx-fit output to multi-color cylinders
●
hx-mono-cyl --- convert pdb-hx-fit output to mono-color cylinders
●
ilabel --- add text to a saved *.rgb image (SGI only, deprecated)
●
interhx --- calculates angles between helices
●
ipaste --- display *.rgb image (SGI only)
●
iwhite --- change *.rgb file to white background (SGI only, deprecated)
●
luz-ps --- converts Luzzati plot information to PostScript plot
●
merge-lists --- used by error analysis protocol
●
model-copy --- copy one model to another
●
model-data --- GUI to create model file data
●
ms --- Connolly's molecular surface
●
ms-cyl --- converts *.dot file to *.cyl file
●
ms-input --- converts *.sph files to ms input
●
ndots-data --- GUI to create dot surface data
●
pdb-atom-sph --- make *.sph file, color by atom type
●
pdb-bf-sph --- make *.sph file, color by B-factor
●
pdb-bf-ss --- add coloring by B-factor to *.ss file
●
pdb-bbond --- make bond *.cyl file, color by B-factor
●
pdb-bond --- make bond *.cyl file
●
pdb-chi-ss --- make protein *.ss file from sidechain dihedrals
●
pdb-ell-tri --- fit ellipsoid to *.pdb file
●
pdb-geom-pdb --- make C-alpha protein *.pdb file from fit helix locii
●
pdb-geom-ss --- make protein *.ss file from differential geometry
●
pdb-hb-cyl --- output mainchain H-bonds in *.cyl format
●
pdb-hedra-tri --- make metal coordination polyhedra from a *.pdb file
●
pdb-hx-fit --- fit ranges of alpha carbons to ideal helices
file:///C|/My Documents/ribbons/help/auxprogs.html (2 of 4) [4/3/2001 1:58:54 PM]
Ribbons Auxiliary Program Help
●
pdb-link-ca --- output linked ball-and-stick from Calpha atoms
●
pdb-model --- make *.model file
●
pdb-nuc-ring --- make nucleic acid base ring *.tri file
●
pdb-nuc-ss --- make nucleic acid *.ss file
●
pdb-phob-sph --- make *.sph file, color by hydrophobicity
●
pdb-pro-ring --- make protein aromatic ring *.tri file
●
pdb-pro-ss --- make protein *.ss file
●
pdb-rama-ss --- make protein *.ss file from phi/psi
●
pdb-range-sph --- make *.sph file, color by residue ranges
●
pdb-range-ss --- make *.ss file, color by residue ranges
●
pdb-res-sph --- make *.sph file, color by residue type
●
pdb-sele-pdb --- select subset using X-PLOR selection
●
pdb-ss-model --- create model from *.pdb and *.ss
●
pdbext-model --- make *.model file from extents, not center
●
pdb-vet --- create Connolly's surfaces if you have MSP.
●
polys-data --- GUI to create polygonal surface data
●
pov-image --- render POV raytracing data to an image file
●
rama-plot --- display ramachandran plot
●
rama-ps --- ramachandran plot in PostScript
●
recompare --- refines superimposition of coordinate sets
●
reform-lists --- used by error analysis protocol
●
ribbon-errors --- execute full error analysis protocol (deprecated)
●
ribbon-model --- convert *.pdb file to ribbon model
●
ribbons --- main graphics display program
●
ribbons-data --- GUI to create and manage all ribbons data
●
ribbons-demo --- ribbon graphics demonstration script
●
ribbons-help --- display hypertext help screens
●
ribbons-gallery --- display additional favorite images
●
ribbons-image --- display SGI ribbons demo images
●
ribns-data --- GUI to create ribbon model data
●
rms-ps --- converts rms shift list to PostScript plot
●
RSR --- run real-space residual fit analysis
●
rsr-paste --- add 2 rsr fields to an *.ss file (deprecated)
file:///C|/My Documents/ribbons/help/auxprogs.html (3 of 4) [4/3/2001 1:58:54 PM]
Ribbons Auxiliary Program Help
●
rsr-ps --- converts real-space R list to PostScript plot
●
rsr3-paste --- add 3 rsr fields to an *.ss file (deprecated)
●
sig-ps --- converts error sigma lists to PostScript plot
●
sph-bond --- make split bonds colored by sphere type
●
sph-color-tri --- colors triangles based on nearest sphere
●
sph-link --- output linked list of cylinders from spheres
●
sph-ms --- make a molecular dot surface from *.sph files
●
sph-vet --- make a molecular VET surface from *.sph files
●
ss-hx-range --- determine residue ranges of helices from *.ss file
●
ss-ps --- create linear SS cartoon in PostScript
●
ss-sheet-range --- determine residue ranges of sheets from *.ss file
●
stereo-view --- display a pair of left/right *.rgb files (SGI only)
●
surf-ps --- converts accessible surface list to PostScript plot
●
texts-data --- GUI to create text string data
●
tri-a-tri --- splits multi-colored triangles
●
tri-sph-tri --- keeps only triangles near sphere set
●
turn-class --- analyzes classes of beta-turns
●
vet-rib --- convert Connolly's MSP surfaces to ribbons format
●
O-chi-ss --- convert O sidechain into *.ss field (deprecated)
●
O-pep-ss --- convert O peptide plane into *.ss field (deprecated)
●
O-rsr-ss --- convert O real space R into *.ss field (deprecated)
●
X-bf-ss --- convert X-PLOR B-factor into *.ss field (deprecated)
●
X-geom-ss --- convert X-PLOR geometric strain into *.ss field (deprecated)
●
X-rms-ss --- convert X-PLOR rms shifts into *.ss field (deprecated)
Ribbons User Manual / UAB-CBSE / [email protected]
file:///C|/My Documents/ribbons/help/auxprogs.html (4 of 4) [4/3/2001 1:58:54 PM]
Ribbons Graphics Display Help
Graphic Display
●
ribbons --- main graphics display program
●
ribbons-demo --- ribbons graphics demonstration script
●
ribbons-help --- browse hypertext help screens
●
ribbons-image --- browse ribbons demo images and recipes
●
ribbons-gallery --- browse additional favorite images
●
rama-plot --- display ramachandran plot
●
chis-plot --- display sidechain ``rama'' plot
●
ipaste --- display *.rgb image (SGI only)
●
ilabel --- add text to a saved *.rgb image (SGI only)
●
iwhite --- change *.rgb file to white background (SGI only)
●
stereo-view --- view stereo pair of *.rgb files (SGI only)
ribbons
Run the main graphics program to display any *.model files and associated data in the current directory.
usage:
ribbons [options]
options:
-n ModelName
-f
-d
-h
-e file.pdb
-w ix,iy
-------
load specific model
start in fast-draw mode
use dial box if available
start ribbons-help
create default model from PDB entry
initial window size in pixels
(!! no space allowed by comma)
ribbons-help
Invokes hypertext help screens in World Wide Web HTML format. Also invoked by selecting ``Help''
while running ribbons
usage:
ribbons-help
file:///C|/My Documents/ribbons/help/aux_graphics.html (1 of 4) [4/3/2001 1:59:27 PM]
Ribbons Graphics Display Help
ribbons-demo
Run the demonstration script --- temporarily places the user in the $RIBBONS_HOME/data directory,
then invokes the main program. Select from `Model' on the menubar to see an example. Can use all the
`ribbons' options except `-e'.
usage:
ribbons-demo [options]
ribbons-image
Browse sample images and descriptions of the interactive settings and files in the
$RIBBONS_HOME/data directory used to create them.
usage:
ribbons-image
ribbons-gallery
Browse various interesting and historic images created by ribbon, ribbons and Ribbons++ .
usage:
ribbons-gallery
ipaste
SGI only. Display a saved *.rgb image file with the standard SGI image viewing tool (for more
information: man ipaste ). There are so many useful tools SGI available, eg, `imgworks', `imgcopy'...
usage:
ipaste image-file.rgb [options]
options:
-n
-o x y
--- display with no border
--- display with origin at screen x,y
ilabel
SGI only. Add labels to a saved image file. I wrote this using the standard SGI image viewing library.
The display is pop-up menu driven (Press RightMouse):
usage:
ilabel input-image.rgb output-image.rgb
file:///C|/My Documents/ribbons/help/aux_graphics.html (2 of 4) [4/3/2001 1:59:27 PM]
Ribbons Graphics Display Help
menu options:
Color
-Fonts
-Points
-Open Color -Undo Last -Save
-Quit
--
invoke sub-menu to select label color
invoke sub-menu to select label font
invoke sub-menu to select label size
open control panel window to modify colors
erase the last string placed
write the labeled *.rgb file and exit program
quit the program, without saving file
Arbitrary text is entered at the keyboard until RETURN is pressed. Text is then placed on the image
begining at the current cursor position by clicking the LeftMouse button. If there is a problem, select
"Undo Last" (Note: this ONLY will undo the very last string entered). Clicking the LeftMouse again
after undo will redisplay the last string.
iwhite
SGI only. Convert the background color of an image to white, eg, convert a slide image to one better for
printing.
usage:
iwhite input-image.rgb output-image.rgb
Place cursor over a background pixel, press LeftMouse to save and echo color. Press MiddleMouse to
convert each pixel of that color into white. Press RightMouse to save output, press Escape to exit.
rama-plot
Displays a phi/psi plot from the diagnostic output of the "pdb-rama-ss" program.
usage:
rama-plot [options] < pdb-rama-ss.out
pdb-rama-ss mol.pdb mol.ss | rama-plot
options:
-x ---
label the bad phi/psi values
Clicking a circle with the LeftMouse button will identify the residue. Clicking the MiddleMouse button
will clear all labels. For nice PostScript plot, use: rama-ps.
chis-plot
Display small chi1/chi2 plots of each amino acid from the diagnostic output of the "pdb-chi-ss" program.
usage:
chis-plot [options] < pdb-chi-ss.out
pdb-chi-ss mol.pdb mol.ss | chis-plot
file:///C|/My Documents/ribbons/help/aux_graphics.html (3 of 4) [4/3/2001 1:59:27 PM]
Ribbons Graphics Display Help
Clicking a circle with the LeftMouse button will identify the residue. Clicking the MiddleMouse button
will clear all labels. For nice PostScript plot, use: chis-ps.
stereo-view
SGI only. Display two *.rgb files in hardware stereo mode.
usage:
stereo-view left.rgb right.rgb
Press any key to activate. ESC to exit.
Ribbons User Manual / UAB-CBSE / [email protected]
file:///C|/My Documents/ribbons/help/aux_graphics.html (4 of 4) [4/3/2001 1:59:27 PM]
Ribbons Model Data Preparation Help
Model data preparation
●
entry-ribbons --- make all default drawing files from *.pdb file
●
pdb-sele-pdb --- select atom subset using X-PLOR selection
●
pdb-model --- make *.model file
●
pdbext-model --- make *.model file from extents, not center
●
ribbon-model --- convert *.pdb file to ribbon drawing
●
atom-model --- convert *.pdb file to ball and stick model
●
pdb-ss-model --- convert *.pdb file plus existing *.ss to ribbon drawing
●
model-copy --- copy one model set to another
●
pdb-geom-pdb --- make C-alpha protein *.pdb file from fit helix locii
●
compare --- superimpose two *.pdb files
●
recompare --- refine superposition of two *.pdb files
entry-ribbons
Create all the required files to run ribbons from a *.pdb entry. This default mode creates ribbon models
of all macromolecular chains, and ball-and-stick models of all heteroatom entries. Splits input into
separate *.pdb files for each chain.
usage:
entry-ribbons [-s] entry.pdb [nametag]
The default `nametag' is `entry'
The `-s' options splits the PDB file only, no ribbons data.
pdb-model
pdbext-model
Create the required *.model file.
usage:
pdb-model molecule.pdb [name.model]
pdbext-model molecule.pdb [name.model]
The "molecule" and "name" above are the same string in the default cases. A model must have a name
and a center for optional viewing. The center is taken as the average of the coordinates in the first case,
and the center of the extremities in the second case. The name in this case is `name'. The file can be
edited to change what appears on the menu or the initial center.
file:///C|/My Documents/ribbons/help/aux_data.html (1 of 3) [4/3/2001 1:59:57 PM]
Ribbons Model Data Preparation Help
ribbon-model
atom-model
pdb-ss-model
Create all the required files to run ribbons for simple cases.
usage:
atom-model molecule.pdb [name.model]
ribbon-model molecule.pdb [name.model]
pdb-ss-model mol.pdb mol.ss [name.model]
The first case creates a ribbon model only for the monomeric protein `molecule.pdb'. The second case
creates a ball and stick model only from the input. The third case is used if there is a pre-existing *.ss
file. They can be used repeatedly to add additional molecules to the model, eg:
atom-model mol2.pdb ModelName
model-copy
Copy the files defining an existing model to create a new model name. Used to customize a model based
on another.
usage:
model-copy existing new
Note: the primitives are not copied, eg, just the *.atoms file is copied, not all the *.sph files.
pdb-sele-pdb
Select a subset of a *.pdb file based on a subset X-PLOR `selection' syntax. Most commands should
work, except for wildcards. Here you must have the 'sele = ( SelectionExpression )' format. You should
use either all upper- or lowercase for keywords, and only certain abbreviations are allowed. The
keywords are: and, or, not, all, name, resi|resid|residue, resn|resname, chem, hydr|hydro|hydrogen, point,
cut, byres, around, segi|segid, sele|select|selection. If a floating point number is expected, the decimal
must be present. Also, the PDB `Chain ID' may be used as the X-PLOR `SEGId'
usage:
pdb-sele-pdb old.pdb new.pdb < sele.inp
Examples:
sele = ( name ca ) --> pick only Calpha
sele = ( resi 10:30 ) --> range of residues
sele = ( name ca and resi 10:30 ) --> CAs in range
sele = ( chem o ) --> all oxygen atoms
file:///C|/My Documents/ribbons/help/aux_data.html (2 of 3) [4/3/2001 1:59:57 PM]
Ribbons Model Data Preparation Help
sele = ( resname phe ) --> all phenyalanines
sele = ( resn phe or resid 1 ) --> all PHEs, plus res.1
sele = ( not hydro ) --> all but hydrogens
select = ( segid A ) --> all of chain A
select = ( point (31.2 27.3 4.2) cut 5.0 ) --> atoms near point
selection = ( byres resi 1 around 5.0 ) --> residues near res.1
Note: When running interactively, CTRL-D gives an EOF signal.
pdb-geom-pdb
Create a Calpha *.pdb file based on the fit of a run of residues to a helix (see pdb-geom-ss ). Suggested
use is for tube and cylinder pictures. The helix portion will roughly pass along the helix axis when this
*.pdb file is displayed as a ribbon with the HelixShift parameter set to 0.0.
usage:
pdb-geom-pdb old.pdb new.pdb < pdb-geom-ss.output
compare
LSQ fits two sets of atoms, which must correspond 1-to-1, and optionally transforms additional
coordinates. With two arguments, the 2 input pdb files are fit only, and the results reported. The first file
is the stationary reference. With three arguments, the transformed second file is output. With four
arguments, the transformed third file is output. This is a common case, where the first two sets are
CA-coords, and the third set is the full-atom model.
usage:
compare one.pdb two.pdb
compare one.pdb two.pdb out-rotated-two.pdb
compare one.pdb two.pdb three.pdb out-rotated-three.pdb
recompare
Refines the LSQ fit of two sets of atoms, based on their CA coordinates and a tolerance. The two sets
must already be roughly superimposed. CA atom pairs with distance within the input tolerance (default:
tol = 1.0 ) are found, and a LSQ fit executed. Then the pairing/LSQ step is repeated until no more pairs
are found.
usage:
recompare [-tol] one.pdb two.pdb
recompare [-tol] one.pdb two.pdb out-refined-two.pdb
Ribbons User Manual / UAB-CBSE / [email protected] ~
file:///C|/My Documents/ribbons/help/aux_data.html (3 of 3) [4/3/2001 1:59:57 PM]
Ribbons Sphere Data Preparation Help
Atom Sphere Data Preparation
●
pdb-atom-sph --- make *.sph file, color by atom type
●
pdb-res-sph --- make *.sph file, color by residue type
●
pdb-range-sph --- make *.sph file, color by residue ranges
●
pdb-bf-sph --- make *.sph file, color by B-factor
●
pdb-occ-sph --- make *.sph file, color by occupancy field
●
pdb-phob-sph --- make *.sph file, color by hydrophobicity
Generally programs run with either with no or a small amount of interactive input, producing a small
amount of diagnostic output. Preparation of spheres is based on scanning a *.pdb ATOM record for the
atom, residue, res-number, x,y,z, occupancy, and B-factor. The programs then make up an appropriate
radius. The simple format of the *.sph file allows one to easily reformat some special `atom' list for use
with the program.
The programs all have the following general usage features:
usage:
pdb-xxxx-sph [options] a.pdb a.sph [< input] [> diagnostics]
options:
-h
-r value
-s scale
-b 0
-b N
-c file
-------
ignore all hydrogen atoms.
radii all set to single `value' (float).
multiply all radii by `scale' (float).
ignore all backbone atoms.
set all backbone atoms to color `N' (int).
set colors from a 3-line
*.color file.
errors:
*.pdb file does not exist.
*.sph file already exists.
Optional *.color file does not exists.
pdb-atom-sph
Create a list of spheres color-coded by atom type.
usage:
pdb-atom-sph [options] molecule.pdb molecule.sph
Note: Atom type based solely on 1st character of name. Thus chlorine or calcium will be colored like
carbon by default.
file:///C|/My Documents/ribbons/help/aux_sph.html (1 of 3) [4/3/2001 2:00:13 PM]
Ribbons Sphere Data Preparation Help
pdb-res-sph
Create a list of spheres color-coded by residue type.
usage:
pdb-res-sph [options] molecule.pdb molecule.sph
pdb-bf-sph
pdb-occ-sph
Create a list of spheres color-coded by atomic temperature factor or a list of spheres color-coded by the
occupancy field.
usage:
pdb-bf-sph molecule.pdb mol_bf.sph
pdb-occ-sph molecule.pdb mol_occ.sph
Note: Default B-factor scale and colors correspond to my sensibilities. The mapping of the ranges of B to
a colorindex are set with a file like $RIBBONS_HOME/data/bfactor.color. To change, use option: -c
bf.colors_file .
I use X-PLOR to store partial charges in the occupancy field for electrostatics programs. Anything of
interest could be put there for custom colorings.
pdb-range-sph
Create a list of spheres color-coded by residue ranges.
usage:
pdb-range-sph molecule.pdb molecule.sph < input
queries:
Enter inclusive integer residue range and color index:
Enter another range and color? (EOF to quit)
Note: When running interactively, CTRL-D gives an EOF signal. It is often convenient to store the input
in a file with one range pair and color index per line.
pdb-phob-sph
Create a list of spheres color-coded by hydrophobicity / H-bonding code. This is mostly used by my
SoftDock , which isn't distributed with ribbons
Hydrophobics are white, formal positive blue, H-bond donors cyan, formal negative red, H-bond
acceptors orange, and other polar magenta.
usage:
file:///C|/My Documents/ribbons/help/aux_sph.html (2 of 3) [4/3/2001 2:00:13 PM]
Ribbons Sphere Data Preparation Help
pdb-phob-sph molecule.pdb molecule.sph
Ribbons User Manual / UAB-CBSE / [email protected]
file:///C|/My Documents/ribbons/help/aux_sph.html (3 of 3) [4/3/2001 2:00:13 PM]
Ribbons Cylinder Data Preparation Help
Bond Cylinder Data Preparation
●
pdb-bond --- make bond *.cyl file
●
sph-bond --- make split bonds colored by sphere type
●
pdb-link-ca --- make C-alpha trace
●
sph-link --- make bonds by linking successive spheres
●
pdb-bf-bond --- make bond *.cyl file, color by B-factor
●
cell-box-cyl --- make a unit cell box
●
pdb-hb-cyl --- output mainchain H-bonds in *.cyl format
●
ms-cyl --- converts *.dot file to *.cyl file
●
pdb-hx-fit --- fit ranges of alpha carbons to ideal helices
●
fithelix --- fit alpha carbons to helices
●
bestfits --- best-fits helices to a range of C-alphas
●
interhx --- calculates angles between helices
●
hx-mono-cyl --- convert pdb-hx-fit output to mono-color cylinders
●
hx-dipole-cyl --- convert pdb-hx-fit output to multi-color cylinders
Generally programs run with interactive input, producing a small amount of diagnostic output.
Preparation of bonds is based on the assumption of near ideal geometry and only the `biological'
elements H,C,N,O,S, and P. The simple format of the *.cyl file allows one to easily reformat some
special `bond' list for use with the program.
The programs all have the following general usage features:
usage:
xxx-bond [options] mol.xxx mol.cyl [> diagnostics]
options:
-r radius
-k N
-- set all radii to `radius' (float).
-- set all bonds to color `N' (int).
errors:
*.pdb file does not exist.
*.sph file already exists.
file:///C|/My Documents/ribbons/help/aux_cyl.html (1 of 4) [4/3/2001 2:00:38 PM]
Ribbons Cylinder Data Preparation Help
pdb-bond
Create cylinders from atomic bonds implied by the *.pdb coordinates. Defaults bond radius is 0.15 and
default color is 7 (white).
usage:
pdb-bond molecule.pdb molecule.cyl
sph-bond
Create "split-bonds" based on the color assigned to the spheres. Defaults bonds radius is 0.15 angstroms.
usage:
sph-bond molecule.sph molecule.cyl
pdb-link-ca
Create a C-alpha tracing with linked cylinders and spheres.
usage:
pdb-link-ca mol.pdb mol_ca.sph mol_ca.cyl
Note: Defaults to carbon atom radius, colored green (2), bonds with radius = 0.15 angstroms. No options,
change interactively.
sph-link
Create a linked set of cylinders colored according to spheres.
usage:
sph-link mol_ca.sph mol_ca.cyl
Note: Defaults to bonds with radius = 0.15 angstroms. No options, change interactively.
pdb-bf-bond
Create "split-bonds" based on the B-factors of the atom. Defaults bonds radius is 0.15 angstroms.
usage:
pdb-bbond molecule.pdb molecule.cyl
Note: Default B-factor scale and colors correspond to my sensibilities. The mapping of the ranges of B to
a colorindex are set with a file like $RIBBONS_HOME/data/bf.colors. To change, use option:
-c bf.colors_file .
file:///C|/My Documents/ribbons/help/aux_cyl.html (2 of 4) [4/3/2001 2:00:38 PM]
Ribbons Cylinder Data Preparation Help
cell-box-cyl
Output a unit cell box in in *.cyl format. Cell constants are included on the command line. The default
color is lavender.
usage:
cell-box-cyl [-r 0.1 -k 12] A B C Alpha Beta Gamma > box.cyl
pdb-hb-cyl
Output the mainchain hydrogen bonds in *.cyl format. The default radius is 0.10 angstroms.
usage:
pdb-hb-cyl file.pdb file.cyl
ms-cyl
ms-cyl MS dots to 'circles' Convert a *.dot file into very short cylinders (or set a specific length with `-l'
option) aligned with the dot's normal. Produces shaded disks of variable radius.
usage:
ms-cyl [-l length] file.dot file.cyl
pdb-hx-fit
hx-dipole-cyl
hx-mono-cyl
Fit the alpha carbons of the *.pdb file for each of the residue ranges to an ideal helix. These range files
may be made with ss-hx-range . Convert the fit output to cylinders, either `mono' for a single cylinder per
helix, or `dipole' for 3 cylinders per helix that color the dipole direction.
usage:
pdb-hx-fit mol.pdb mol_helix.range > mol_helix.fit
hx-mono-cyl mol_helix.fit mol_helix.cyl
hx-dipole-cyl mol_helix.fit mol_helix.cyl
See the Calmodulin example .
fithelix
Used by pdb-hx-fit .
See $RIBBONS_HOME/fithelix/ for scripts and examples.
file:///C|/My Documents/ribbons/help/aux_cyl.html (3 of 4) [4/3/2001 2:00:38 PM]
Ribbons Cylinder Data Preparation Help
bestfits
interhx
bestfits mol_helix.range < protein.pdb > bestfits.out
interhx < bestfits.out > interhx.out
See $RIBBONS_HOME/fithelix/ for scripts and examples.
Ribbons User Manual / UAB-CBSE / [email protected]
file:///C|/My Documents/ribbons/help/aux_cyl.html (4 of 4) [4/3/2001 2:00:38 PM]
Ribbons Secondary Structure Determination Help
Secondary Structure Determination
●
pdb-pro-ss --- make protein *.ss file from H-bonding patterns
●
pdb-rama-ss --- make or add to protein *.ss file from phi/psi
●
pdb-range-ss --- add to *.ss file, color by residue ranges
●
pdb-nuc-ss --- make nucleic acid *.ss file
●
pdb-bf-ss --- add to *.ss file, color by residue B-factors
●
turn-class --- analyzes classes of beta-turns
●
ss-hx-range --- determine residue ranges of helices from *.ss file
●
ss-sheet-range --- determine residue ranges of sheets from *.ss file
●
ahelix --- analyze secondary structure from C-alpha only
●
pdb-chi-ss --- add to protein *.ss file from sidechain dihedrals
●
pdb-geom-ss --- make or add to protein *.ss file from differential geometry
All ribbons must have a *.pdb and an associated *.ss file. Programs exist to automatically generate a
sensible *.ss files for proteins --- in practice the user will make modifications according to experience.
The nucleic acids are all given a value of ``sheet'' for best results. Other programs ``edit'' the default *.ss
files, adding columns for additional color-coding information. The user is encouraged to add extra
columns for custom results.
The programs all have the following general usage features:
usage:
pdb-xxx-ss molecule.pdb molecule.ss [< input] > output
errors:
*.pdb file does not exist.
*.ss file already exists.
pdb-pro-ss
Create a *.ss file for a single protein chain. Determine the secondary structure from hydrogen bonding
patterns. An implementation of the Kabsch & Sander algorithm has been coded.
usage:
pdb-pro-ss molecule.pdb molecule.ss < input > output
queries:
Enter a title for output ribbon SS file:
The output *.ss file has columns for sequence, secondary structure, and hydrogen bonding. The ``hb''
column for each residue adheres to the following codes: `B' if both carbonyl and amide form mainchain
file:///C|/My Documents/ribbons/help/aux_ss.html (1 of 4) [4/3/2001 2:00:54 PM]
Ribbons Secondary Structure Determination Help
H-bonds for the residue, `O' carbonyl is not bonded, `H' amide is not bonded, `x' neither are bonded, `P'
proline with carbonyl bonded, `Q' is proline with free carbonyl.
Note: the diagnostic output is the summary in Kabsch & Sander notation.
pdb-nuc-ss
Create a *.ss file for a single nucleic acid chain. This is essentially a dummy program. It simply outputs
the 1-letter-code for the nucleotide and assigns each residue to a sheet. Suggestions are welcome from
nucleic acid specialists.
usage:
pdb-nuc-ss molecule.pdb molecule.ss < input > output
queries:
Enter a title for output ribbon SS file:
pdb-rama-ss
Create a new or modify an existing *.ss file, adding columns for coloring based on phi/psi and omega
values of the mainchain torsion angles.
usage:
pdb-rama-ss mol.pdb mol-new.ss < input > output
pdb-rama-ss mol.pdb mol-old.ss > output
queries:
Enter a title for output SS file:
The output *.ss file has additional columns for ``rama'' and ``om''. The ``rama'' maps the phi/psi angles to
the letters as shown on the printed version of the plot in the diagnostic output. For example, `E' is highly
probable extended conformation, `e' slightly less probable, and `R' is right-handed helical conformation.
The grid was determined by a database analysis. The ``om'' gives the omega angle, with `T' for trans, `s'
and `u' for slightly below and above 180 degrees, `C' for cis, `b' and `d' near cis, and `X' a bad value.
Note: The diagnostic output can be saved to view as a Ramachandran plot with the command
``rama-plot''. If the latter usage is chosen, the ``mol-old.ss'' will be replaced with its updated version.
pdb-geom-ss
Create a new *.ss file, assigning secondary structure from differential geometry. Only alpha carbons
coordinates are used. An implementation of the Louie and Somorjai algorithm has been coded.
usage:
pdb-geom-ss mol.pdb mol-new.ss > output
The standard `ss' codes are output.
file:///C|/My Documents/ribbons/help/aux_ss.html (2 of 4) [4/3/2001 2:00:54 PM]
Ribbons Secondary Structure Determination Help
pdb-chi-ss
Modify an existing *.ss file, adding a column for coloring based on the sensibility of the side chain
dihedral values. The rotamer dictionary of Ponder and Richards as well as my database analysis have
been used.
usage:
pdb-chi-ss mol.pdb mol-old.ss > output
The output *.ss file has additional columns for ``chi''. `N' is for residues with no side chains, `X' for
residues with non-standard chi values, `A' is the most probable conformation for that residue, `B' the
second best, etc.
pdb-range-ss
Modify an existing *.ss file, adding a column for coloring based on residue ranges. Behaves like
``pdb-range-sph'' (can use same input file).
usage:
pdb-range-ss mol.pdb old.ss [KeyString] > output
queries:
Enter inclusive integer residue range and color index:
Enter another range and color? (EOF to quit)
Note: Default KeyString is `range'. Any range not explicitly set defaults to colorindex 7 (white). To
change this, first input a ``range'' consisting of the entire chain, then individually color the various ranges
of interest.
pdb-bf-ss
Modify an existing *.ss file, adding a column for coloring based on residue temperature factors.
usage:
pdb-bf-ss old.ss new.ss [KeyString] < input > output
Note: Default color mapping based on database analysis. Average B for proteins is 24, standard deviation
is 12.
ss-hx-range
Analyze an existing *.ss file, outputting the residue ranges defining helices, one per line.
usage:
ss-hx-range your.ss output.range
file:///C|/My Documents/ribbons/help/aux_ss.html (3 of 4) [4/3/2001 2:00:54 PM]
Ribbons Secondary Structure Determination Help
ss-sheet-range
Analyze an existing *.ss file, outputting the residue ranges defining strands in sheets, one per line.
usage:
ss-sheet-range your.ss output.range
ahelix
Used by pdb-geom-ss .
See $RIBBONS_HOME/fithx/ for scripts and examples.
turn-class
Analyze the output of pdb-rama-ss to classify turns based on phi/psi angles.
usage:
turn-class < your.rama > output
O-xxx-ss
X-xxx-ss
This has been superceded by the ribbons-error analysis.
Modify an existing *.ss file, adding a column for coloring based on output of X-PLOR or O. See
$RIBBONS_HOME/analysis/xplor/ or $RIBBONS_HOME/analysis/O/ for scripts and examples.
Ribbons User Manual / UAB-CBSE / [email protected] ~
file:///C|/My Documents/ribbons/help/aux_ss.html (4 of 4) [4/3/2001 2:00:54 PM]
Ribbons Surface Data Preparation Help
Surface Data Preparation
●
sph-ms --- make a molecular dot surface from *.sph files
●
pdb-nuc-ring --- make nucleic acid base ring *.tri file
●
pdb-pro-ring --- make protein aromatic ring *.tri file
●
access --- create accessible/molecular surface
●
facets --- output contours of FRODO map as *.tri file
●
dsn6stat --- prints info about a FRODO map file
●
tri-sph-tri --- keeps only triangles near a sphere in set
●
sph-color-tri --- colors triangles based on nearest sphere
●
tri-a-tri --- splits multi-colored triangles
●
cmc-vet --- create an approximate Connolly surface file
●
vet-rib --- convert Connolly's MSP surfaces to ribbons format
●
pdb-vet --- create Connolly's surfaces if you have MSP
●
pdb-ell-tri --- fit an ellipsoid to a PDB file
●
pdb-hedra-tri --- create a coordination polyhedron
sph-ms
Create a dot surface representation color coded by sphere type.
usage:
sph-ms [options] mol.sph mol.dot [> output]
options:
-r probe_radius
-d dot_density
-s sphere_cut
-o Xc Yc Zc
-b exclude.sph
------
default
default
default
default
spheres
1.6 angstroms
6.0, larger for more dots
none, only dots within this radius
origin, center used with -s option
whose surface is not output
ms ms-input
These are used by the sph-ms script to create primitives.
Note: This is a modified (old) version of Mike Connolly's code, the one distributed with FRODO.
file:///C|/My Documents/ribbons/help/aux_surface.html (1 of 6) [4/3/2001 2:01:06 PM]
Ribbons Surface Data Preparation Help
pdb-pro-ring
pdb-nuc-ring
Create aromatic ring polygons as *.tri files. The 'radius' is the thickness of the polygonal prism.
usage:
pdb-pro-ring [options] input.pdb output.tri
pdb-nuc-ring [options] input.pdb output.tri
Options:
-r radius
-- default 'radius' is very small for a flat ring.
-c file.color -- only first three lines of 'file.color' are read
defaults to normal ribbons sequence colors.
cmc-vet
Mimics Connolly's MSP program (see below) using marching cubes. Create *.vet data structure to define
surfaces. Script checks for files and runs the 'sph-vet' program.
usage: cmc-vet [options] mol.sph mol.vet
options:
-r Probe.Radius
-c Cube.size
-acc
-pdb file.pdb
-elec
-B
-x x0 y0 z0 x1 y1 z1
[1.6]
[1.0]
[default is to compute molecular surface]
[required for -elec or -B options]
[false, don't compute electrostatics]
[false, don't add B field to VET]
[corners of box for limits, else all]
pdb-vet
Requires MSP. You might consider buying Mike Connolly's new Molecular Surface Package for $850.
The ribbons interface will display the surface in a variety of ways.
Create MSP vertex/edge/triangle *.vet files from a *.pdb file. Should include polar hydrogens if you plan
to estimate electrostatics. Uses utility programs elec-vet and b-to-vet.
usage:
pdb-vet [options] input.pdb output.vet
Options:
-r radius -- default 'radius' is 1.6 for personal preference.
-omega
-- compute analytical surface curvature.
file:///C|/My Documents/ribbons/help/aux_surface.html (2 of 6) [4/3/2001 2:01:06 PM]
Ribbons Surface Data Preparation Help
Note: can take hours for proteins.
-- compute electrostatic potential.
Note: requires charges in occupancy field.
-- assign either of these fields to each vertex.
-elec
-B|Q
Notes: To make a file for electrostatics calculations, I assume you have X-PLOR all set up:
{**input is "dan_gen.pdb" **}
coor @dan_gen.pdb
vector do ( Q=charge) (all)
write coordinates output=my_q.pdb end
vet-rib
Create display objects for ribbons from an MSP *.vet file.
usage:
vet-rib [options] input.vet output.file
Options:
-k colorInt
-s input.sph
-- All one color [6==cyan].
-- Color by sphere color.
Note: sphere file must be 1-1 with input PDB file.
-c range.color -- Color by range/color file,
based on one of the vertex values.
-v 1|2|3
-- Choose vertex field for coloring
[1==omega, 2==elec, 3==B|Q].
-r Rad -o Xc Yc Zc -- Spherical cutoff [None]
Examples:
● make a solid cyan (default ribbons color #6 ) surface:
●
vet-rib mol.vet mol-6.tri
make a solid green (ribbons color #2 ) surface:
●
vet-rib -k 2 mol.vet mol-2.tri
make a surface colored by atom type:
●
pdb-atom-sph mol.pdb mol-atom.sph
vet-rib -s mol-atom.sph mol.vet mol-atom.tri
make a surface colored by residue type:
pdb-res-sph mol.pdb mol-res.sph
vet-rib -s mol-res.sph mol.vet mol-res.tri
file:///C|/My Documents/ribbons/help/aux_surface.html (3 of 6) [4/3/2001 2:01:06 PM]
Ribbons Surface Data Preparation Help
access
Currently you must create intermediate data to create a surface. First, create a FRODO-style electron
density map from a set of spheres. The map values range from 1.0 (inside) to 0.0 (outside, solvent). Use
`facets' with a contour level of 0.2 to make an approximate accessible surface, and a contour level of 0.8
to make an approximate molecular surface. Use 'tri-sph-tri' and 'sph-color-tri' to color and cull triangles.
usage:
access [options] input.sph output.dsn6
Options:
-r probe.radius
-- default 1.4 angstroms, higher values
(eg, 2.0) give a smoother surface.
-- default is 1.0 angstrom
-- defaults to whole cell,
else set limits of a box.
-c cube.size
-x x0 y0 z0 x1 y1 z1
facets
Create a triangular isosurface (contour) from a FRODO-style electron density map. These can be
displayed as solids for surfaces made with 'access', or as lines as is typical for real density maps.
Smoothing will make it look nicer, but will sacrifice some accuracy
usage:
facets [options] input.map output.tri
Options:
-k colorIndex
-- default 6 (cyan).
-s nSmooth
-- default 0 (# smoothing passes)
-t contour.level
-- default is 0.5
-x x0 y0 z0 x1 y1 z1 -- defaults to whole cell
else set limits of a box.
dsn6stat
Display information about a FRODO-style map. Should quickly tell you if you have the right format and
what a sensible contour.level should be
usage:
dsn6stat frodo.map
file:///C|/My Documents/ribbons/help/aux_surface.html (4 of 6) [4/3/2001 2:01:06 PM]
Ribbons Surface Data Preparation Help
tri-sph-tri
Filter an input set of triangles, outputting only those within a radial `-r' distance of any point in a set of
neighboring spheres, or excluding `-x' any point radial distance of
usage:
tri-sph-tri [-r 3.0] input.tri naybor.sph > output.tri
sph-color-tri
Sets each vertex color of the input triangles to the color of the nearest sphere.
usage:
sph-color-tri input.tri colored.sph > colored.tri
tri-a-tri
Splits any multi-colored triangle such that each output triangle is a single color.
usage:
tri-a-tri input.tri > output.tri
pdb-ell-tri
Fits an elliposid to a PDB and output an icosahedral triangulation.
usage:
pdb-ell-tri [options] input.pdb output.tri
Options:
-k colorIndex
-r radial scale
-t tessLevel
-- default 7 (white).
-- default is 2.0
-- tesselation level [1] 0=20,1=80,2=320,..
pdb-hedra-tri
Create coordination polyhedra and bonds from a specially ordered PDB file.
`ordered.pdb' is a PDB file ordered such that the metal (or central coordination point) is the first atom,
followed by the other coordinated atoms. The second and third atoms are taken to be axial, if there are
more than 4 coordinated atoms. Add hedra.tri to your *.polys file to see a solid polyhedra. Add
coordination.cyl to your *.bonds file to see a cage, plus the coordination to the metal ( may only want one
file:///C|/My Documents/ribbons/help/aux_surface.html (5 of 6) [4/3/2001 2:01:06 PM]
Ribbons Surface Data Preparation Help
or the other).
usage:
pdb-hedra-tri [options] ordered.pdb hedra.tri > coordination.cyl
Options:
-k colorIndex
-r cyl.radius
-- default 12 (lavender).
-- default is 0.1
Ribbons User Manual / UAB-CBSE / [email protected]
file:///C|/My Documents/ribbons/help/aux_surface.html (6 of 6) [4/3/2001 2:01:06 PM]
Ribbons PostScript Plots Help
PostScript Plots
●
rama-ps --- ramachandran plot in PostScript
●
chis-ps --- converts sidechain dihedrals to PostScript plot
●
luz-ps --- converts Luzzati plot information to PostScript plot
●
ss-ps --- create linear SS cartoon in PostScript
●
bf-ps --- converts B-factor list to PostScript plot
●
geom-ps --- converts geometric strain to PostScript plot
●
rms-ps --- converts rms shift list to PostScript plot
●
rsr-ps --- converts real-space R list to PostScript plot
●
sig-ps --- converts error sigma lists to PostScript plot
●
surf-ps --- converts accessible surface list to PostScript plot
Programs are available to produces ASCII PostScript *.ps output of the crystallographic error analysis
results. (This assumes you don't have 'Mathematica' or something better.) These are generally per residue
bar graphs. These *.ps files are line drawings that may be plotted if you have an appropriate
printer/viewer.
Sample data and sample PostScript output may be found in the directory
$RIBBONS_HOME/analysis/plot.
The plots may be viewed on an SGI machine by the following:
● xpsview fdb.ps
●
xpsview fdm.ps
bf-ps
rsr-ps
rms-ps
geom-ps
dihe-ps
surf-ps
sig-ps
The ribbon-errors script produces ASCII lists of per-residue information. These *.list files are my
``standard'' per residue listing of output. All consist of a required 3-line header, followed by lines of: res#
res-name value-res value-mc value-sc.
file:///C|/My Documents/ribbons/help/aux_postscript.html (1 of 3) [4/3/2001 2:01:25 PM]
Ribbons PostScript Plots Help
The default plotting action uses only the res# and values of mainchain (mc) and sidechain (sc). The mc
values are shown on top of the X-axis and sc values mirrored below, with the residue number scale
below that. Options allow one to change this behavior.
All of these programs have the following usage:
xxx-ps [options] ascii.list > output.ps
Options are:
● -t "Your title string"
This must be in quotes if the title is more than one word. Default title is taken from the list file. To
eliminate the title, use: -t ""
● -s Xsize.inch,Ysize.inch
The default is: -s 5.0,1.5
Please note: !! No space allowed before/after the comma !!
Please note: !! This size if for the data axes only !!
It doesn't take labels into account. There is always about 1 inch of labeling to the left of the
``origin'', and about 1/4 inch above and below.
● -o Xorigin.inch,Yorigin.inch
The default is: -o 2.0,5.5 which centers on a standard page. The origin is the point where the
X-axis meets the Y-axis, which is different for a ``-2'' or a ``-1'' plot (see below).
● -2 res | mc | sc,res | mc | sc
The default behavior is: -2 mc,sc
which plots mainchain values on top, sidechain on bottom. These are the literal strings 'res' or 'mc'
or 'sc'. Again, no space is allowed between the strings and comma. These ''mirror'' plots always
assume positive values only, true for the ``bf'', ``rsr'', ``shift'', ``geom'', and ``dihe'' data. This
option should not be chosen with a Sigma plot.
● -1 res | mc | sc
The default is automatically set to ``res'' if doing a sigma plot.
● -m max.value
The default is determined from data. This is used to set a common scale. For example, if one set of
data has a maximum B-factor of 50, and another a maximum of 30, each plot will have a different
scale factor along Y. Use -m 50.0 to force each to be on the same scale.
● -d
Put the tick marks/labels for residue axis pointing down. The default points them up, which may
overlap with your data if the Ysize is small. For ``-1'' plots, they are always down.
Secondary Structure Cartoons
A representation of the linear sequence in terms of helix, sheets, and everything else may be generated
from a ribbons *.ss file. This will usually be used in conjunction with the per-residue plots above. The
options are the same as above, but only the ``-o'' and ``-s'' make any sense:
ss-ps [options] ribbons.ss > output.ps
file:///C|/My Documents/ribbons/help/aux_postscript.html (2 of 3) [4/3/2001 2:01:25 PM]
Ribbons PostScript Plots Help
Ramachandran Plots
Another class of plots are generated from the output of pdb-pro-ss and pdb-chi-ss (which are
automatically called by ribbon-errors .) These produce ascii lists which include information on the
dihedral angles for each residue.
The ``rama'' plot has circles for each amino acid except glycine, which is marked by a diamond. Allowed
regions are shaded according to probability. The lightest regions are allowed only for glycine. The ``chis''
give ramachandran-like plots for each amino acid type. They are generated as follows:
rama-plot < ascii_list.rama > rama.ps
rama-plot "Your title string" < ascii_list.rama > rama.ps
chis-plot < ascii_list.chis > chis.ps
Luzzati Plots
A commonly used error analysis technique is the Luzzati plot. The input is edited from the standard
output of X-PLOR's ``print R-factor'' command (see examples described in
$RIBBONS_HOME/analysis/plot/Read.Me). Use as follows:
luz-plot [luzOptions] edited_xplor.out > luz.ps
Ribbons User Manual / UAB-CBSE / [email protected]
file:///C|/My Documents/ribbons/help/aux_postscript.html (3 of 3) [4/3/2001 2:01:25 PM]
Tutorial
Tutorial
Excerpted from: Methods in Enzymology, Volume 277, [25] Ribbons
The Ribbons software interactively displays molecular models, analyzes crystallographic results, and creates
publication quality images.
The `ribbon drawing' popularized by Richardson(1) is featured. Space-filling and ball-and-stick
representations, dot and triangular surfaces, density map contours, and text are also supported. Atomic
coordinates in Protein Data Bank(2) (PDB) format are input.
Output may be produced in the Inventor/VRML format. The VRML (virtual reality modeling language) has
become the standard for 3-dimensional interaction on the World Wide Web. The on-line manual is presented
in HTML (hyper-text markup language) suitable for viewing with a standard Web browser.
The examples give the flavor of the software system. Nearly 100 commands are available to create primitives
and output. Examples: create spheres colored by residue type, fit a cylinder to a helix, make a Ramachandran
plot. The user essentially creates a small database of ASCII files. This provides extreme flexibility in
customizing the display.
Examples
Ribbons is typically used on a terminal in a darkened room. The default settings give a dark screen
background and vivid colors for display. This is recommended to produce slides for presentations. A white
background with pastel colors is recommended for publication.
Example 1:
Given any PDB entry or file in PDB format entry.pdb, create default files and view all macromolecular chains
as ribbons and all other atoms as balls-and-sticks.
ribbons
-e
entry.pdb
Example 2:
Given the single chain protein coordinates in file ubiquitin.pdb(3), create the required files for a ribbon
drawing, then display it.
ribbon-model ubiquitin.pdb
ribbons -n ubiq
ubiq.model
Figure 1 is the display screen, presenting an X/Motif interface. The user interacts through `point-and-click'
with the mouse. Choosing `Help' from the menu bar accesses the hypertext manual.
file:///C|/My Documents/ribbons/help/tutorial.html (1 of 5) [4/3/2001 2:01:48 PM]
Tutorial
Figure 1. The ribbons graphics window.
Example 3:
Given the crystal structure of the influenza virus neuraminidase complexed with the inhibitor DANA (PDB
entry 1nnb.ent(4)), create the required files for a more complicated model, then display and interactively
adjust to the desired visual result. The image saved is Figure 2.
Figure 2. Active site of Neuraminidase
The PDB entry is edited into three coordinate files for the protein (na.pdb), the bound calcium ion (cal.pdb),
and the inhibitor (dana.pdb).
ribbon-model
na.pdb
na.model
creates the files necessary for the display of the protein as a ribbon, as in the previous example.
pdb-sele-pdb na.pdb site.pdb
sele = ( not ( name N or name C or name O or hydro )
and byres point (27.0 18.5 63.5) cut 8.0 )
file:///C|/My Documents/ribbons/help/tutorial.html (2 of 5) [4/3/2001 2:01:48 PM]
Tutorial
selects all non-hydrogen side chain atoms of na.pdb belonging to residues having any atom within 8 A of the
inhibitor center and writes coordinates as site.pdb. The X-PLOR(5) atom selection syntax is used.
pdb-atom-sph cal.pdb cal.sph
pdb-atom-sph dana.pdb dana.sph
pdb-res-sph site.pdb site.sph
sph-bond dana.sph dana.cyl
sph-bond site.sph site.cyl
sph-ms dana.sph dana.dot
creates spheres colored by atom type for the calcium and inhibitor, and colored by residue type for the active
site; creates cylinders for bonds colored as the spheres for the inhibitor and the active site; and creates the dot
surface(6) of the inhibitor colored as the nearest sphere.
ls
ls
ls
dana.sph
dana.cyl
dana.dot
cal.sph site.sph > na.atoms
site.cyl > na.bonds
> na.ndots
creates the required files to link the display of the primitives generated in the previous step to the model `na'.
The latest version of ribbons provides a point-and-click graphical interface as an alternative to the command
line mode to manage primitives.
ribbons -n na
opens the graphics window for viewing and interactive adjustment. Mouse motions rotate, scale, and translate
to focus on the active site. Primitives are adjusted with collections of widgets called `Control Panels'.
Selecting `Edit' from the menu bar (see Figure 1) presents the options. The `Atom Panel' is shown in Figure 3.
Figure 3. The Atom Control Panel.
The `Atom Panel' scales the radii of the three groups of spheres to different values (see Figure 2). The calcium
is set fairly high and the inhibitor set very low. The complexity of the calcium sphere is set high to ensure
smoothness. The `Bond Panel' scales the radii of the two groups of cylinders in line with their respective
atoms. The `N-Dot Panel' scales the dots. The `Ribbon Style Panel' forces the ribbon through the C-alpha
atoms in the coils, otherwise defaults are used. (There are nearly 40 widgets in three panels to set aspects of
the style, dimensions, and complexity of ribbon drawings.) The `Light Panel' adjusts the lighting and
depth-cueing. The `Image Panel' sets full-screen antialiasing. Selecting the `Save Image' option of `File' from
the menu bar completes the process.
file:///C|/My Documents/ribbons/help/tutorial.html (3 of 5) [4/3/2001 2:01:48 PM]
Tutorial
Example 4:
Given a partially refined crystal structure, determine and tabulate the quality of the results, and display either
interactively or through static plots. Preliminary data is from the aldehyde reductase/NADPH complex(7). The
full details are given in the ribbons manual. Five input files must be present: the final coordinates with
individual B factors (here alr1.pdb), the corresponding coordinates of the previous refinement, the best
`observed' map in FRODO(8) format, a purely calculated map at the same scale, and a short list of X-PLOR
commands to set parameters.
ribbon-errors
executes the analysis protocol. The protocol(9) claims crystallographic data is required to reliably assess the
quality of a coordinate file. Statistical analysis implies a linear model of 5 independent variables fits the error
function. The temperature factors (B), real-space fit residuals (R), geometric strains (G), dihedral angles (D),
and shifts from the previous refinement cycle (S) for main chain (mc) and side chain (sc) atoms determine an
overall error factor (E). Output files summarize the results for each protocol criteria.
rsr-ps
-t "Alr1 RSR of 11jan95"
alr1_rsr.list
>
alr1_rsr.ps
creates the PostScript file alr1_rsr.ps from an output list of ribbon-errors. The `rsr' refers to the real-space
residual advocated by Jones et al(10), which is the best single error-detection criterion. This plot is Figure 4.
A `*.ss' (secondary structure) file is required to display a ribbon drawing. The file is created automatically by
the ribbon-model command in the previous examples. The user adds columns to this file for custom
color-coding. The ribbon-errors protocol produces an extended `*_xa.ss' file with a letter grade assigned for
each error analysis criteria, in addition to the standard sequence and secondary structure information. A few
lines of alr1_xa.ss follow:
res# seq
288
Q
289
L
290
D
291
A
292
L
ss sshb hb Eres Emc Esc Rmc Bmc Smc Gmc Dmc Rsc Bsc Ssc Gsc Dsc
H
H
H
B
A
B
A
C
A
A
A
B
C
A
A
A
H
H
B
A
A
A
A
B
C
A
A
A
A
A
A
A
c
T
H
C
C
C
C
C
E
A
B
C
C
F
A
A
c
T
x
B
B
A
B
B
C
A
A
A
A
B
A
A
c
c
H
A
A
A
A
B
A
A
A
A
A
A
A
A
pdb-ss-model alr1.pdb
ribbons -n alr1
alr1_xa.ss
creates required files then displays the ribbon. The `Ribbon Style Panel' selects among `seq', `ss', etc., for per
residue color codings.
Figure 5, a stereo drawing, has the `Eres' key selected to color the ribbon based on residue error. Hot spots in
the structure should be obvious. Dark colors indicate problems here. A residue may be picked to display
information. The contour surface is created from a cofactor difference map in FRODO format.
file:///C|/My Documents/ribbons/help/tutorial.html (4 of 5) [4/3/2001 2:01:48 PM]
Tutorial
Figure 5. Residue error in preliminary Alr1 refinement.
Summary:
Each user created file is eligible for display and editing as a separate graphics object. All files have a simple
format. For example, each sphere file line has coordinates (xyz), radius, color code, and label. The file cal.sph
from example 2 is shown below:
28.73
30.05
62.86
2.30
11
cal_471_X
Ribbons can write/read files to save/restore the current orientation, styles and scale factors, colors and lighting.
Data from other programs may be reformatted to generate the lists of spheres, cylinders, or triangles for
display. An example is the visualization of ribosomal models(11). Ribbons can output primitives suitable for
input into several ray-tracing packages.
Ribbons saves raster images as Silicon Graphics (SGI) `*.rgb' files. Many utilities support this file format.
Figure 6 is a final example compositing several (ribbons) images of the DNA/trp repressor complex (PDB
entry 1tro.ent(12)). The figures were converted to PostScript for printing.
Figure 6. DNA/protein rendering styles.
file:///C|/My Documents/ribbons/help/tutorial.html (5 of 5) [4/3/2001 2:01:48 PM]
Ribbons Error Analysis Help
Crystallographic Error Analysis
A method to detect problem residues in a crystallographic refinement is presented. Each protein residue is analyzed in
terms of mainchain (mc) and sidechain (sc) atoms. Poorly modeled regions in the structure are reliably identified. The
results may be plotted or viewed with ribbons .
Background
Reference
For background on the method and for purposes of citation the following reference is given:
M. Carson, T.W. Buckner, Z. Yang, S.V.L. Narayana and C.E. Bugg (1994) Error Detection in Crystallographic
Models. Acta Cryst. D 50:900-909.
Abstract
A variety of criteria were tested for identifying errors in protein crystal coordinates. Statistical analysis was based on
comparisons of a highly refined crystal structure and several preliminary models derived from molecular replacement.
A protocol employing temperature factors, real-space fit residuals, geometric strains, dihedral angles, and shifts from
the previous refinement cycle is developed. These results are generally applicable to the detection of errors in partially
refined protein crystal structures.
Key Points
Crystallographic data is required to reliably assess the quality of a coordinate file. Statistical analysis implies that a
linear model of 5 independent variables (see abstract) is required to fit the error. The error model was taken as the
deviation between the preliminary coordinates and the final refined coordinates. Grossly incorrect residues (1.0A
deviation) are identified with approximately 90% accuracy for the mainchain and 70% for the sidechains. Real-space
fit using maps calculated with individual B-factors was the single criteria having the highest per-residue correlation
with coordinate error (about 0.7).
Executing the Analysis
The Full Protocol: ribbon-errors
usage:
ribbon-errors < errors.in > diagnostic.output
X-PLOR and ribbons need be set up as expected on your system (see Program Environment later in this chapter).
Required Data
The following 5 files must be present to begin (see Data Preparation for Analysis later in this chapter):
●
final.pdb -- your final coordinates, with individual B-factors
file:///C|/My Documents/ribbons/help/analysis.html (1 of 7) [4/3/2001 2:02:02 PM]
Ribbons Error Analysis Help
●
●
●
●
prev.pdb -- the coordinates, before last round of SA refinement
Fobs.map -- your best `observed' map, FRODO format
Fcal.map -- a purely calculated map, same scale as above
Xplor.inp -- a short list of X-PLOR commands to set parameters
Input File
The input file consists of a name tag and the list of files above in the order above. The sample input `errors.in' is
shown below. (notes in parentheses are not actually in the file):
fdm_may94
(name_tag)
fdm_bref.pdb
(final.pdb)
fdm_prep.pdb
(prev.pdb)
fdm_2fo.dsn6
(Fobs = 2Fo-Fc.map)
fdm_calc.dsn6
(Fcal.map)
fdm_xa_ribbons.inp
(Xplor.inp)
The script may also be run interactively by answering the prompts for input.
Output Files
The `diagnostic.output' file is mostly an echo of prompts and input, useful only if something goes wrong (see
Problems? at the end of the chapter). The last line should read: ` Successful completion of 'ribbon-errors'.'
The script produces 11 ascii files of per-residue information, with each file name prefaced with the `name_tag' set on
input:
● name_tag_rsr.list -- Real Space Residual fit of model to map
● name_tag_shift.list -- Shift (rms) from previous position
● name_tag_bf.list -- Temperature (B) factors
● name_tag_geom.list -- Geometric strain of bonds, angles, planes
● name_tag_dihe.list -- Dihedral sensibilities of mainchain and sidechain
● name_tag_rsr.log -- Additional diagnostics for the RSR step
● name_tag_xa.hbss -- Mainchain H-bonding used to get secondary structure
● name_tag_xa.rama -- Phi/Psi/Omega angles, ribbons format
● name_tag_xa.chis -- Sidechain Chi angles, ribbons format
● name_tag_xa.ss -- Xtal error Analysis ribbons *_xa.ss file
● name_tag_error.list -- Crystallographic error analysis summary list
file:///C|/My Documents/ribbons/help/analysis.html (2 of 7) [4/3/2001 2:02:02 PM]
Ribbons Error Analysis Help
The Best Single Criterion: ribbons-rsr
usage:
EM> RSR final.pdb Fobs.map Fcal.map rsr.list > diagnostics
ribbons needs be set up as expected on your system (see Program Environment later in this chapter).
Required Data
The following 3 files must be present to begin (see Data Preparation for Analysis later in this chapter):
●
●
●
final.pdb -- your final coordinates, with individual B-factors
Fobs.map -- your best `observed' map, FRODO format
Fcal.map -- a purely calculated map, same scale as above
Output Files
The `diagnostics' file is mostly an echo of input data, useful only if something goes wrong (see Problems? at the end
of the chapter).
The script produces an ascii files of per-residue information, `rsr.list' with the Real Space Residual fit of model to
map.
Interpreting the Results
The method averages the results from the rsr(R), shift(S), bf(B), geom(G), and dihe(D) results for mainchain(mc) and
sidechain(sc) atoms to determine an overall error factor (E) in standard deviation(sigma) units relative to the mean.
Residues with E-values > 1.0 are most probably in error. Results are kept for each criteria, and finally all combined
into a summary file.
The Individual ribbons *.list files
Some sample lines from the RSR output `neu_dec93_rsr.list' follow. Raw data for each criteria are maintained. These
*.list files may be converted into PostScript plots.
res# aa
84 D
85 F
R-all R-mc R-sc
0.281 0.220 0.320
0.147 0.140 0.148
The ribbons *_error.list file
Some sample lines from the summary `neu_dec93_error.list' follow. It is seen that Phe 85 is OK, while Asp 84 is not.
The latter has significantly poor rsr, B-factor, and shifts for its mainchain atoms, while its adherence to ideal
geometry and allowed torsion dihedral is good. The biggest problem with Phe 85 is its mainchain B-factor being 1.0
sigma above the mean. The data:
res#
84
aa
D
Eave
1.64
Emc
1.86
Esc
1.43
Rmc
3.7
Bmc
2.8
Smc Gmc Dmc
3.7 -0.4 -0.5
file:///C|/My Documents/ribbons/help/analysis.html (3 of 7) [4/3/2001 2:02:02 PM]
Rsc
3.8
Bsc
2.9
Ssc Gsc Dsc
1.1 -0.3 -0.4
Ribbons Error Analysis Help
85
F
0.05
0.20 -0.11
0.7
1.0
0.6 -0.9 -0.5
0.1
0.2 -0.2 -0.3 -0.4
The ribbons *_xa.ss file
The corresponding `neu_dec93_xa.ss' file assigns a letter grade, and can be used directly with ribbons to visualize
problem areas. The data:
84
D
c
c
x
C
C
C
E
D
E
A
A
E
D
C
A
A
85
F
c
c
x
B
B
A
B
C
B
A
A
B
B
A
A
A
Scores are based on the value of an error criteria in standard deviation units relative to the mean for all the residues.
These scores are assigned colors for visualization with ribbons .
Display of Results
Bar Graph Plots
The rsr(R), shift(S), bf(B), geom(G), dihe(D), and error summary(E) *.list files can all be converted into individual
per-residue PostScript plots. See the documentation in PostScript Plots} for options and examples. For default plots,
the commands are:
● rsr-ps your_rsr.list > your_rsr.ps
● rms-ps your_shift.list > your_shift.ps
● bf-ps your_bf.list > your_bf.ps
● geom-ps your_geom.list > your_geom.ps
● dihe-ps your_dihe.list > your_dihe.ps
● sig-ps your_error.list > your_error.ps
Ramachandran-like plots can also be created:
● rama-ps < your_xa.rama > rama.ps
● chis-ps < your_xa.chis > chis.ps
Viewing with ribbons (on supported workstations)
For a standard ribbon drawing of the single protein chain analyzed with ribbon-errors , your final *_xa.ss file and
your final *.pdb file are required. Issue the commands to setup ribbons (note: this will create the files `final.model',
`final.coords', and `final.ribbons' in your current directory). Then invoke the display program:
● pdb-ss-model final.pdb final_xa.ss ``Optional title''
● ribbons -n final
Hot spots in the structure should be obvious. The default coloring scheme for grading is as follows:
A -- cyan : better than average
B -- green : within 1 sigma of the mean
C -- yellow : within 2 sigma
D -- orange : within 3 sigma
E -- red : within 4 sigma
F -- magenta : within 5 sigma
I -- white : greater than 5 sigma above the mean
file:///C|/My Documents/ribbons/help/analysis.html (4 of 7) [4/3/2001 2:02:02 PM]
Ribbons Error Analysis Help
ribbons version 2.5 or later employs an X Windows/Motif interface. Choose pop-up menus by pressing the
LeftMouseButton on the labeled Menubar at the top of the screen. Use the Ribbon Style Panel Sequence Color
Widget to select any analysis feature for display by selecting the `Ribbon Style' choice of `Edit' from the Menubar.
Pressing the ALT key while the cursor is over a residue will display information about the error criteria. Press ALT
with the cursor over the background to clear the message.
Ramachandran-like plots can be viewed directly on SGI machines as follows:
● rama-plot < your_xa.rama
● chis-plot < your_xa.chis
Data Preparation for Analysis
Coordinate Files
The RSR protocol requires only one set of coordinates. Two sets of coordinates in PDB format *.pdb are required for
the full protocol: the current best model and a comparison set. (I use the coordinates prior to the last round of
simulated annealing refinement with X-PLOR for comparison.) You must split the PDB coordinate file of your crystal
model into pieces, unless you have a monomer with no co-factors or waters. For example, if your current model
contains a dimer, a co-factor, and some waters, you must create 3 files: one for each monomer and one for the
non-protein atoms. This splitting must be repeated for the comparison set. This is similar to the data preparation
required for X-PLOR before the `generate' step.
Each *.pdb file must have as its last line the `END' record. The current best model must have the polar hydrogens
used by X-PLOR. Each protein chain subjected to the full analysis should contain only standard amino acids with
standard atom names, else the results will be suspect for the non-standard residues. The programs cannot distinguish
between `mainchain' and `sidechain' or look up the residue's preferred conformations for the `hetero' atom files; thus,
less information is output for these.
Map Calculation
Two electron density maps in FRODO *.dsn6 format are required: the best observed and a purely calculated map. (I
use 2Fo-Fc coefficients with calculated phases for the `observed' map. Our results show omitmaps are not
significantly better.) The calculated map must be produced at the same scale, with calculated amplitudes and phases.
Each map must completely cover all atoms to be analyzed, so please add a cushion of at least 3A. The two maps must
be exactly the same size in grid points. To create the maps with X-PLOR, copy the sample input file into your
directory:
cp $RIBBONS_HOME/analysis/xplor/rsr_maps.inp .
Edit this file to incorporate your data and set the file names for the output maps. The sample data is from the
monolclinic crystal form of Factor D. Here is a shell script ( $RIBBONS_HOME/analysis/xplor/rsr_maps.csh ) to
produce the maps (I usually do this interactively):
#!/bin/csh
#
#
'xplor' executes Brunger's X-PLOR.
#
'xmappage' executes his utility to create FRODO maps.
file:///C|/My Documents/ribbons/help/analysis.html (5 of 7) [4/3/2001 2:02:02 PM]
Ribbons Error Analysis Help
#
# calculate the maps and create the output X-PLOR *.map files.
# you can save the output to create Luzzati plots.
#
# this file is: $RIBBONS_HOME/analysis/xplor/rsr_maps.inp
#
xplor < rsr_maps.inp > rsr_maps.out
# convert the *.map files to FRODO binary format
#
xmappage < < END
fdm_2fo.map
fdm_2fo.dsn6
END
xmappage < < END
fdm_calc.map
fdm_calc.dsn6
END
#
pitch the big ascii *.map files
#
rm fdm_2fo.map fdm_calc.map
Of course you can use any appropriate program to create the maps, eg, Wm. Furey's PHASES package.
X-PLOR Input Script
The supplied ribbon-errors command script that runs the full error analysis protocol relies on X-PLOR and the
X-PLOR shell language. It is assumed that you are reasonably comfortable with X-PLOR. A local X-PLOR command
file must be copied and edited to incorporate your data and limit the atoms of interest:
cp $RIBBONS_HOME/analysis/xplor/xplor_ribbons.inp .
Edit the file in the three places where comments draw your attention. You must: 1) set your X-PLOR *.psf file name,
2) include any required parameter files, 3) and most importantly set the selection statement at the end to include only
the inclusive residue numbers of the atoms of the particular protein chain or set of atoms being analyzing.
But I Don't Use X-PLOR!
The X-PLOR shell language is used as a convenience (instead of writing more auxiliary programs). For each protein
chain or group of heteroatoms, the script: 1) averages temperature factors for each residue and its mc and sc atoms; 2)
determines the rms shift from the previous model in the same fashion; 3) evaluates the geometric strain energy due to
bond, angle, and planar deviations from ideality for each residue and its mc and sc atoms. Each of the 3 outputs is a
simple formatted ascii list. Only the latter calculation really uses X-PLOR.
Alternative refinement programs such as PROLSQ or TNT could likely give an equivalent list of geometric strain.
Anyone interested in adapting the protocol to a different refinement program should contact me (who is counting on
your being an expert on the refinement program of choice!).
file:///C|/My Documents/ribbons/help/analysis.html (6 of 7) [4/3/2001 2:02:02 PM]
Ribbons Error Analysis Help
Program Environment
The default script to execute the error analysis depends heavily on Axel Brunger's X-PLOR program (see above if you
don't have X-PLOR).
You are expected to have a command named `xplor' that executes the X-PLOR program. (You could change this by
editing the definition of `run_xplor' in the `ribbon-errors' script in $RIBBONS_HOME/bin.) Additionally, you should
set the environment variable `TOPPAR' to point to the X-PLOR topology and parameter directory.
ribbons must be installed correctly on your system (see Installation Notes ). You must: 1) have at least the main
ribbons directory and the /analysis, /bin, /data, and /help subdirectories, 2) have the environment variable
`RIBBONS_HOME' set to point to the root of the ribbons directory tree, 3) have `$RIBBONS_HOME/bin' added to
your command path.
See the VMS section if you are running on a VAX.
Problems?
The script tries to detect whether each required program and input file is available. It does not check file types. Did
you enter the input files in the right order? Are xplor and ribbons installed as expected on your system? (see Program
Environment ). Did you supply all required information for X-PLOR? (see X-PLOR Input Script ).
X-PLOR produces voluminous and generally useless diagnostics during the procedures. This output and the
temporary input are generally deleted. For debugging purposes, copy the error script to your current directory:
cp $RIBBONS_HOME/bin/ribbon-errors .
Change the 27th line of the file: #set DebugXplor = "Yes"
Simply remove the leading comment character `#'. (For VAX, see the VMS section of the manual). Re-run the script
and study the generated files `xa_NNN.inp' and `xa_NNN.out', where NNN is the process number generated by your
operating system.
Do you have non-standard amino acids in your protein {\em *.pdb} file? (A leading ACE residue may seriously
confuse ribbons If the RSR results are suspicious, make sure there are no associated warnings in the `your_rsr.log' file
for grid points out of range. If still baffled, send me e-mail: [email protected].
VMS???
E-mail me if you are serious: [email protected].
Bibliography
FactorD \\ Ribbons \\ X-PLOR \\ FRODO \\ O \\ Phases \\ PROLSQ \\ TNT \\ "TNT" stands for "Ten Eyck 'n'
Tronrud". ("'n'" = "and".) As far as I know, TNT is still being maintained by Dale Tronrud. His e-mail address is
"[email protected]".
Ribbons User Manual / UAB-CBSE / [email protected]
file:///C|/My Documents/ribbons/help/analysis.html (7 of 7) [4/3/2001 2:02:02 PM]
Ribbons Motif Menubar Help
Ribbons Motif Menubar.
Ribbons 2.5 and higher is driven by mouse and an X/Motif interface.
This is the Menubar...
The Motif Menubar Widget is a list of choices at the top of the graphics window. Press and HOLD
DOWN LeftMouseButton with cursor over an item. This action displays a pull-down menu. Slide to
desired item and release LeftMouseButton. Slide outside of the menu and release to void selection.
Widget Name (Accelerator Keys) --- description of function
●
File (none) -- all I/O, eg, Save Image (Alt-i).
●
Edit (none) -- edit graphics, eg, Ribbon Style Panel.
●
Model (none) -- choose previously prepared model to display.
●
View (none) -- set viewing parameters, eg, Stereo View.
●
Help (Alt-h) -- access to hypertext manual pages.
Ribbons User Manual / UAB-CBSE / [email protected]
file:///C|/My Documents/ribbons/help/menubar.html [4/3/2001 2:02:15 PM]
Ribbons Transformation Help
Ribbons Graphics Transformations.
Model manipulation in ribbons is performed by holding down the mouse button(s) and moving the cursor
in the graphics window. A dial box may also be used for transformations, if ribbons is invoked with the
-d option. Picking requires you to hold down the Shift key and click any mouse button. The arrow keys
cause small rotations.
Mouse Buttons
In the schematic below, the dark filled ovals indicate the button is pressed.
Notes:
Up(larger) and down(smaller) also effect scaling - going along lower-left to upper-right diagonal gives
the larges response. For XY rotation, up and right specify clockwise rotation about Y and X,
respectively.
Auto-rotation (spinning) is caused by making a quick rotation, followed by release of the mouse. The
speed is controlled by the distance moved, which may be too sensitive on some machines. Auto-Rot may
be disabled from the View menu.
Dial Box
The cursor must be in the graphics window. The layout of the program is as in the program CHAIN. A
schematic is below, with ((Scale)) being the dial in the lower-left corner:
((RotX)) ((TransX))
((RotY)) ((TransY))
file:///C|/My Documents/ribbons/help/transform.html (1 of 2) [4/3/2001 2:02:30 PM]
Ribbons Transformation Help
((RotZ)) ((TransZ))
((Scale)) ((ThickZ))
Also:
See Menubar View , eg, Reset View (Alt-o), Stereo, and Rotate +/- 90 .
The left/right arrows cause 0.5 degree rotations about Y, and the up/down arrows rotate about X.
To save/restore/set a given view, use the Menubar File menu.
The special file to save/restore/set a given view is by convention called a *.orient file.
Ribbons User Manual / UAB-CBSE / [email protected]
file:///C|/My Documents/ribbons/help/transform.html (2 of 2) [4/3/2001 2:02:30 PM]
Ribbons Control Panel Widgets Help
Control Panel Widgets.
Ribbons Control Panel Widgets: invoked by Edit in Menubar or ALT-keys.
Uses Motif Bulletin Board Dialog Widgets to post a rectangular array of small control widgets of four
types: Choice, Toggle, Scale, Push.
Each uses a point (move cursor with the mouse) and click (press and immediately release the mouse
button) mechanism.
Available Control Panel editors include:
Atom, Bond, Poly, Ndot, Text ( for sphere, cylinder, triangle, dot, and 3D text geometric objects )
RibS, RibN, RibD, ( for ribbon drawing Style, Number of primitives, Dimensions )
Color, Light, Image, Motion, ( for materials/lighting/saving/movies )
Push
Push Widget: has a label below and a 'PushButton' above.
Move Cursor inside the PushButton, click LeftMouseButton to immediately invoke action.
Scale
Scale Widget: has a label that includes minimum/maximum below, a
'Slider' with a current value indicator in the middle, and a current value label above.
Move Cursor on the current value indicator of the slider, press LeftMouseButton and slide to move,
release LeftMouseButton at desired value to invoke the action.
Move Cursor on the background of the slider. Click LeftMouseButton
to move the value incrementally toward the cursor. Click MiddleMouseButton to set the value to the
cursor position. Note: if active, use left/right arrow keys for finest possible adjustments.
file:///C|/My Documents/ribbons/help/controlpanels.html (1 of 2) [4/3/2001 2:02:40 PM]
Ribbons Control Panel Widgets Help
Toggle
Toggle Widget: has a label below and a 'PushButton' above.
Move Cursor inside the PushButton, which includes a diamond-shaped indicator and a description of the
current state. click LeftMouseButton to toggle the state.
The indicator button is dark/out when Off, and light/in when On.
Choice
Choice Widget: has a label below, and a PopUp Option Menu above.
Move Cursor on the Menu PushButton, press LeftMouseButton to invoke the choice options display.
Move Cursor up/down to highlight the desired choice.
Release LeftMouseButton to select the highlighted item. This will invoke the action and display the
current choice.
Move Cursor completely outside the menu and release LeftMouseButton to
void selection.
Ribbons User Manual / UAB-CBSE / [email protected]
file:///C|/My Documents/ribbons/help/controlpanels.html (2 of 2) [4/3/2001 2:02:40 PM]
Ribbons Menubar File Help
Ribbons File Menu.
The File Widget is a PopUp Choice invoked from the Menubar.
Selection of an item opens a File Selection Dialog Widget. These are used to read/write various ASCII
files to the disk.
Widget Name (Accelerator Keys) --- description of function
●
●
●
●
●
Invoke ribbons-data (Alt-r) -- call the data preparation GUI with the current model to save
-- Must currently re-start ribbons if you create a brand new model.
-- Must currently re-read data (below) if you create new primitives.
Re-Read Data (none) -- after editing any input file to change something, choose from sub-menu
to update the display.
Save Image (Alt-i) -- set name of binary `*.rgb/*.tiff' file to save
-- !!! Must hit `PrintScreen' key to start save on SGI !!!.
-- Quality/type of image set via Image Panel and/or View Menu.
Save All 3 Startups (Alt-z) -- output the 3 special startup files below immediately, overwriting if
they already exist. Creates `ModelName.defaults', `ModelName.orient', and `ModelName.matter',
Read/Write Startups (Alt-z) -- invoke submenu of items below:
❍ Read Orientation (none)
❍ Save Orientation (none) -- input/output special `.orient' file of scale/rotation/translation to
save/restore a particular view.
❍ Read Defaults (none)
❍ Save Defaults (none) -- input/output special `.defaults' file to control initial startup, eg,
sphere radius scale, ribbon styles, etc.
file:///C|/My Documents/ribbons/help/filemenu.html (1 of 2) [4/3/2001 2:03:03 PM]
Ribbons Menubar File Help
Read Materials (none)
❍ Save Materials (none) -- input/output special `.matter' file of material properties and
lighting to save/restore a particular coloring scheme.
Export VRML/Raytracing (none) -- choose from submenu to output special ASCII formats:
❍ VRML 2.0 (Alt-w) -- output screen data as a Virtual Reality Modeling Language version
2.0 `*.wrl' file for 3-D viewing on the World Wide Web.
❍
●
❍
Inventor (none) -- output screen data as an SGI Inventor (aka VRML version 1.0) `*.iv' file
for 3-D viewing on the World Wide Web.
POV-Ray (Alt-v) -- output screen data in the POV-Ray `*.pov' ray-tracer format.
❍
Rayshade (none) -- output screen data in the rayshade `*.ray' ray-tracer format.
❍
Wavefront (none) -- output ribbon models as Alias Wavefront objects.
❍
PS300 (none) -- output ribbon line-drawings as old Evans and Sutherland PS300 firmware.
Export Ribbons Files (none) -- choose from submenu to output special ribbons files.
-- All currently `*.cyl' files . -- These depend on the current shape/style/color of the ribbon
drawing, below CR stands for the point in the center of the ribbon section for the residue in
question:
❍ SG-bond (none) -- output all protein intramolecular `disulphides': CR-SG-SG'-CR'
❍ CB-bond (none) -- output all protein CR-CB bonds (note: ribbon doesn't go through CA,
unless forced with Style Panel). Often edit by hand to get a few selected bonds to hang side
chain atoms from.
❍ Base-A (none) -- output all nucleic acid `Base Attachments': CR-N1 or CR-N9 (purines).
See the t-RNA example .
❍
●
❍
Base-H (none) -- output all nucleic acid `Base H-bonding': CR--MidpointOfPairInteraction.
See the DNA example .
FlatRib-Cyl (none) -- output `flat' portion of ribbon models as `line drawings'
Quit (Alt-q) -- Exit the program.
❍
●
Ribbons User Manual / UAB-CBSE / [email protected]
file:///C|/My Documents/ribbons/help/filemenu.html (2 of 2) [4/3/2001 2:03:03 PM]
Ribbons Menubar Edit Help
Ribbons Edit Menu.
The Edit Widget is a PopUp Choice invoked from the Menubar.
Selection of an item toggles the display of a Control Panel Widget. These are used to edit the various
types of objects in Ribbons
Widget Name (Accelerator Keys) --- description of function
●
Atom Control Panel (Alt-a) -- adjust spheres display, eg, atomic radii, draw style.
●
Bond Control Panel (Alt-b) -- adjust cylinders display, eg, bond radii, draw style.
●
Poly Control Panel (Alt-p) -- adjust triangles display, eg, draw style.
●
Ndot Control Panel (Alt-n) -- adjust surface dots, eg, dot radii.
●
Text Control Panel (Alt-t) -- adjust string display, eg, font, placement.
●
Ribbon Style Panel (Alt-s) -- adjust ribbon drawing display, eg, style, coloring.
●
Ribbon N-primitives Panel (Alt-x) -- adjust ribbon drawing, eg, sampling, texturing.
●
Ribbon Dimensions Panel (Alt-d) -- adjust ribbon drawing, eg, widths, arrows.
●
Color Control Panel (Alt-c) -- adjust material properties, eg, color, shininess.
file:///C|/My Documents/ribbons/help/editmenu.html (1 of 2) [4/3/2001 2:03:11 PM]
Ribbons Menubar Edit Help
●
Light Control Panel (Alt-l) -- adjust lighting properties, eg, directions, depthcue.
●
Image Control Panel (Alt-l) -- currently a dummy slot for Ribbons 3.0. Use view menu.
●
Motion Control Panel (Alt-l) -- defines simple animations and saves images.
Ribbons User Manual / UAB-CBSE / [email protected]
file:///C|/My Documents/ribbons/help/editmenu.html (2 of 2) [4/3/2001 2:03:11 PM]
Ribbons Menubar Model Help
Ribbons Model Menu.
The Model Widget is a PopUp Choice invoked from the Menubar.
Selection of an item triggers the reading of all the display data for that particular model: ribbons, atoms,
bonds, polygons, dots, text, styles, coloring, orientation
(See Data Preparation)
If you subsequently edit any data file, use the Menubar File ReRead Data option to update the display.
Each *.model file in the directory from which you run ribbons generates an entry in the model submenu.
Each string displayed on the menu is taken from your *.model file.
The menu presented above is seen when you run `ribbons-demo'.
All the files are found in the $RIBBONS_HOME/data directory.
Ribbons User Manual / UAB-CBSE / [email protected]
file:///C|/My Documents/ribbons/help/modelmenu.html [4/3/2001 2:03:19 PM]
Ribbons Menubar View Help
Ribbons View Menu.
The View Widget is a PopUp Choice invoked from the Menubar.
Selection of an item affects an overall change in the viewing style. These are all toggle or push-button
operations. Most invoke sub-menus.
Widget Name (Accelerator Keys) --- description of function
●
●
●
●
●
●
Reset View (Alt-o) -- restore scale/rotation/translation to default, or last values from Read
Orientation.
Fast Draw Mode (Alt-f) -- toggle for minimal representation for fastest interaction.
Stereo (none) -- invoke submenu for hardware viewer (Alt-3), side-by-side (Alt-2), or rotations
about Y (Alt-y, undo with Alt-u) for saving stereo images. The half-rotations are for stereo views
exactly down an axis.
Hide/Show Objects (none) -- invoke submenu to turn on/off all ribbons, spheres, etc, in order to
speed up interactive response.
Rotate +/- 90 (none) -- invoke submenu for orthogonal rotations about any axis, or to view down
any axis.
B/W Background (Alt-g) -- toggle between white and black background, use Light Control Panel
to set to arbitrary color.
file:///C|/My Documents/ribbons/help/viewmenu.html (1 of 2) [4/3/2001 2:03:28 PM]
Ribbons Menubar View Help
●
●
●
●
●
●
●
Outline Image (none) -- invoke submenu to set width of black outlines around primitives, for
'line-drawing' effect.
Rock (Alt-k) -- toggle a rocking motion of the display. Rocking parameters are set in the Motion
Panel.
Auto-Rot Disabled (none) -- toggle allowing 'spinning' triggered by quick rotate/release action.
Grid (none) -- toggle display of a 5 angstrom grid underlay, whose color is gray (#9) by default.
Ruler (none) -- toggle display of a ruler below the image, whose color is either black (#13) or
gray (#9).
Peptide Plane (none) -- toggle display of the S.S.Peptide Plane rocket ship, for flying over the
ribbon.
Cockpit View (none) -- toggle display from the perspective of the Plane, currently, must use
mouse motion to drive the plane.
Ribbons User Manual / UAB-CBSE / [email protected]
file:///C|/My Documents/ribbons/help/viewmenu.html (2 of 2) [4/3/2001 2:03:28 PM]
Ribbons Menubar Help Help
Ribbons Help Menu.
The Help Widget (Alt-h) is a PopUp Choice invoked from the
Menubar.
Selection of a menu or submenu item opens an HTML screen. Click on blue highlighted items for
hypertext navigation.
The command `ribbons-help' invokes stand-alone version of the manual.
Ribbons User Manual / UAB-CBSE / [email protected]
file:///C|/My Documents/ribbons/help/helpmenu.html [4/3/2001 2:03:39 PM]
Ribbons General Ribbon Panel Help
General Ribbon Drawing Panel Widgets.
Three Ribbon Drawing Control Panels may invoked from Edit (or through Alt-keys) in Menubar.
The panels are:
● RibS (alt-s) --- Ribbon Style.
●
RibN (alt-x) --- Ribbon #-Primitives.
●
RibD (alt-d) --- Ribbon Dimensions.
All 3 panels uses Motif Widgets ( Choice, Toggle, Scale, Push ) to adjust features of ribbon drawings set by the *.pdb files in
your model.coords list and the *.ss files in your model.ribbons list. (See Data Preparation).
Common Widgets to the 3 Ribbon Drawing Panels.
Widget Name (Widget Type) --- description of function
●
●
●
●
●
●
Ribbon Lists (Choice)
-- select `coord' to refer to all, else choose individual coordinate file for adjustment.
Open Panel (Push)
-- two buttons open/close the other Ribbon Drawing Panels.
Auto Redraw (Toggle)
-- toggle automatic updating of Widget changes (turn off if response is too slow and/or you have many parameters to set).
Redraw Ribbon (Push)
-- force an explicit redraw if AutoRedraw is Off.
Close Panel (Push)
-- dismiss the panel
Panel Help (Push)
-- show this help screen
Hints:
Also see other types of and general information on Control Panels.
Ribbons User Manual / UAB-CBSE / [email protected]
file:///C|/My Documents/ribbons/help/ribgpanel.html [4/3/2001 2:03:55 PM]
Ribbons Ribbon Style Panel Help
Ribbon Style Panel Widget.
Invoked from Edit in Menubar or ALT-s.
Uses Motif Widgets ( Choice, Toggle, Scale, Push ) to adjust `style' properties of ribbon drawings.
Widget Name (Widget Type) --- description of function
●
●
●
●
●
●
●
●
Ribbon Lists (Choice)
-- select `coord' to refer to all, else choose individual coordinate file.
Ribbon Display (Toggle)
-- visibility toggle for current Ribbon List choice.
Sequence Color (Choice)
-- initial value is `ss' to color by secondary structure. Select choices from columns in the *.ss file to
color-code on a variety of per-residue modes.
Chain Color (Choice)
-- if Sequence Color is `chain', select color index to uniformly color the entire ribbon.
Ribbon Palette (Push)
-- if Sequence Color is not `chain', select color indices for each character key in your *.ss file.
Ribbon Style (Choice)
-- select Line | Flat | Square | Circle to apply to entire ribbon.
Sheet/Helix/Coil Styles (Choice)
-- like Ribbon Style, but apply only to that secondary structure type.
Uniform Coil (Toggle)
-- force all tubes (Circle) to have constant radii(default: On).
file:///C|/My Documents/ribbons/help/ribspanel.html (1 of 2) [4/3/2001 2:04:07 PM]
Ribbons Ribbon Style Panel Help
●
●
●
●
Display Arrows (Toggle)
-- display `A' arrows (default: On), else as normal sheets.
Force Thru CA/ Including Sheets (Push)
-- gives flowing ribbons (default: Off), else force to pass through C-alphas.
Close Panel (Push)
-- dismiss the panel
Panel Help (Push)
-- show this help screen
Hints:
Must use Sequence Color to pick available per-residue coloring schemes.
New in version 3.0 is the Ribbon Palette widget, to make changing these schemes interactive.
Also see general information on ribbon drawing panels.
Also see other types of and general information on Control Panels.
Ribbons User Manual / UAB-CBSE / [email protected]
file:///C|/My Documents/ribbons/help/ribspanel.html (2 of 2) [4/3/2001 2:04:07 PM]
Ribbons Ribbon Dimensions Panel Help
Ribbon Dimensions Panel Widget.
Invoked from Edit in Menubar or ALT-d.
Uses Motif Widgets ( Choice, Toggle, Scale, Push ) to adjust dimensions (sizes) of ribbon drawings.
Widget Name (Widget Type) --- description of function
●
●
●
●
●
●
Ribbon Width (Scale)
-- set width in angstroms across the ribbon for the current selection of Ribbon Lists.
Sheet/Helix/Coil Widths (Scale)
-- like Ribbon Width, but apply only to that secondary structure type.
Ribbon Depth (Scale)
-- set depth in angstroms perpendicular to width for the current selection of Ribbon Lists (controls
linewidth if DrawStyle is Lines).
Sheet/Helix/Coil Depths (Scale)
-- like Ribbon Depth, but apply only to that secondary structure type.
Arrow Head (Scale)
-- behaves like Ribbon Width, to set width at `point' of the arrows.
Arrow Base (Scale)
-- behaves like Ribbon Width, to set width at the start of the arrows.
file:///C|/My Documents/ribbons/help/ribdpanel.html (1 of 2) [4/3/2001 2:04:19 PM]
Ribbons Ribbon Dimensions Panel Help
●
●
●
●
●
●
●
3-10 as Helix (Toggle)
-- treat all 3-10 helices (SS code '3') as helix (default). Else as coil.
Helix Shift (Scale)
-- shift the spline curve out from the helix axis.
MRC Analysis (Toggle)
-- initiallize wavelet transforms. Note: prompts for std.input.
Float MRC level (Toggle)
-- interpolate fraction wavelet levels. Else allow only integers.
MRC Level (Scale)
-- set the wavelet level to approximate ribbon curves.
Close Panel (Push)
-- dismiss the panel
Panel Help (Push)
-- show this help screen
Hints:
Negative values of Helix Shift can force the ribbon to `hide' inside of cylinders fit to helices.
For the MRC wavelet analysis, first set the ribbons style to Circle, and set dimensions of width==depth,
then toggle on. It will prompt for input, and initiallization may take a while for large proteins. Play with
the level & watch. Still experimental. MRC stands for Multi Resolution Curves (see Wavelets and
Molecular Structure on my web site.)
Also see general information on ribbon drawing panels.
Also see other types of and general information on Control Panels.
Ribbons User Manual / UAB-CBSE / [email protected]
file:///C|/My Documents/ribbons/help/ribdpanel.html (2 of 2) [4/3/2001 2:04:19 PM]
Ribbons Ribbon N-primitives Panel Help
Ribbon N-primitives Panel Widget.
Invoked from Edit in Menubar or ALT-x.
Uses Motif Widgets ( Choice, Toggle, Scale, Push ) to adjust complexity (#polygons, texture) of ribbon
drawings.
Widget Name (Widget Type) --- description of function
●
●
●
●
●
●
●
Ribbon Threads (Scale)
-- sets # of threads (or subdivisions) across the ribbon's width for the current selection of Ribbon
Lists.
Sheet/Helix/Coil Threads (Scale)
-- like Ribbon Thread, but apply only to that secondary structure type.
Ribbon Samples (Scale)
-- sets the # of curve samples along each residue's length for the current selection of Ribbon Lists.
Sheet/Helix/Coil Samples (Scale)
-- like Ribbon Samples, but apply only to that secondary structure type.
Ribbon Textures (Scale)
-- sets rudimentary texturing of residues for the current selection of Ribbon Lists.
Sheet/Helix/Coil Textures (Scale)
-- like Ribbon Textures, but apply only to that secondary structure type.
Panel Help (Push)
-- show this help screen
file:///C|/My Documents/ribbons/help/ribnpanel.html (1 of 2) [4/3/2001 2:04:28 PM]
Ribbons Ribbon N-primitives Panel Help
Hints:
Decrease thread/samples for increased interactive speed. Increase them for higher quality rendering.
Also see general information on ribbon drawing panels.
Also see other types of and general information on Control Panels.
Ribbons User Manual / UAB-CBSE / [email protected]
file:///C|/My Documents/ribbons/help/ribnpanel.html (2 of 2) [4/3/2001 2:04:28 PM]
Ribbons Atom Panel Help
Atom Panel Widget.
Invoked from Edit in Menubar or ALT-a.
Uses Motif Widgets ( Choice, Toggle, Scale, Push ) to adjust properties of groups of spheres in your
model.atoms list.
Currently, all groups are read in as ascii *.sph files. (See Data Preparation).
Widget Name (Widget Type) --- description of function
●
●
●
●
●
●
●
Atom Lists (Choice)
-- select `sphere' to refer to all, else choose individual groups.
Atom Display (Toggle)
-- visibility toggle for current Atom List choice.
Radius Scale (Scale)
-- overall_scale if Atom List choice is `sphere', else sets group_scale.
radius = overall_scale * group_scale * atomic_radius
Draw Style (Choice)
-- select one of: Solid | Lines | Dots for selected group.
Complexity (Scale)
-- tesselation level of the sphere, for selected group.
Line Width (Scale)
-- width in pixels if Draw Style is Lines or Points. for selected group.
Overall Color (Choice)
-- select a color for the entire group, or use the individual sphere colors.
file:///C|/My Documents/ribbons/help/atompanel.html (1 of 2) [4/3/2001 2:04:36 PM]
Ribbons Atom Panel Help
●
●
Close Panel (Push)
-- dismiss the panel
Panel Help (Push)
-- show this help screen
Hints:
Sphere drawings create a rather large overhead (lots of triangles). For improved performance for
interactive drawing, set Complexity = 0.0 (or Atom Display (spheres) Off). Set Complexity high for final
rendering of the desired view.
Each change in a Widget forces a redraw. For complicated adjustments, set Atom Display (spheres) Off,
(or Hide All Atoms from View in Menubar), then set all Scales, Complexity, etc.
Also see other types of and general information on Control Panels.
Ribbons User Manual / UAB-CBSE / [email protected]
file:///C|/My Documents/ribbons/help/atompanel.html (2 of 2) [4/3/2001 2:04:36 PM]
Ribbons Bond Panel Help
Bond Panel Widget.
Invoked from Edit in Menubar or ALT-b.
Uses Motif Widgets ( Choice, Toggle, Scale, Push ) to adjust properties of groups of cylinders in your
model.bonds list.
Currently, all groups are read in as ascii *.cyl files. (See Data Preparation).
Widget Name (Widget Type) --- description of function
●
●
●
●
●
●
●
Bond Lists (Choice)
-- select `cylinder' to refer to all, else choose individual groups.
Bond Display (Toggle)
-- visibility toggle for current Bond List choice.
Radius Scale (Scale)
-- overall_scale if Bond List choice is `cylinder', else sets group_scale.
radius = overall_scale * group_scale * bond_radius
Draw Style (Choice)
-- select one of: Solid | Lines | Antialias(lines) | Cones for selected group.
Complexity (Scale)
-- tesselation level of the cylinder, for selected group.
-- Dash style (0=solid) if Draw Style is Lines.
Line Width (Scale)
-- width in pixels if Draw Style is Lines.
Overall Color (Choice)
file:///C|/My Documents/ribbons/help/bondpanel.html (1 of 2) [4/3/2001 2:04:45 PM]
Ribbons Bond Panel Help
●
●
-- select a color for the entire group, or use the individual cylinder colors.
Close Panel (Push)
-- dismiss the panel
Panel Help (Push)
-- show this help screen
Hints:
Cylinder drawings create some overhead (lots of triangles). For improved performance for interactive
drawing, set Complexity = 0.0 (or Bond Display (cylinders) Off). (Set Draw Style to Lines for the fastest
interaction). Set Complexity high for final rendering of the desired view.
Each change in a Widget forces a redraw. For complicated adjustments, set Bond Display (cylinders)
Off, (or Hide All Bonds from View in Menubar), then set all Scales, Complexity, etc.
Cones have their apex at the first point of each cylinder record. Dashed lines are made by adjusting the
complexity while in line mode.
Also see other types of and general information on Control Panels.
Ribbons User Manual / UAB-CBSE / [email protected]
file:///C|/My Documents/ribbons/help/bondpanel.html (2 of 2) [4/3/2001 2:04:45 PM]
Ribbons Poly Panel Help
Poly Panel Widget.
Invoked from Edit in Menubar or ALT-p
Uses Motif Widgets ( Choice, Toggle, Scale, Push ) to adjust properties of groups of triangles in your
model.polys list.
Currently, all groups are read in as ascii *.tri files. (See Data Preparation).
Widget Name (Widget Type) --- description of function
●
●
●
●
●
●
●
Poly Lists (Choice)
-- select "triangle" to refer to all, else choose individual groups.
Poly Display (Toggle)
-- visibility toggle for current Poly List choice.
Draw Style (Choice)
-- select one of: Solid | Lines | Dots for selected group.
Line Width (Scale)
-- width in pixels if Draw Style is Lines or Points.
Overall Color (Choice)
-- select a color for the entire group, or use the individual triangle colors.
Surface Index (Push)
-- select a separate 'color' to control overall material properties.
-- IFF a multi-colored surface (see hints below).
2-Sided Style (Toggle)
-- enable different coloring of the inside and outside of a surface.
-- (see hints below).
file:///C|/My Documents/ribbons/help/polypanel.html (1 of 2) [4/3/2001 2:05:05 PM]
Ribbons Poly Panel Help
●
●
Close Panel (Push)
-- dismiss the panel
Panel Help (Push)
-- show this help screen
Hints:
The `material' is the same for each triangle in a group, even though the individual vertices may have
different diffuse colors. For groups where all triangles are the same color, or whose overall color has
been set to a single index, the 'material' is the same as the Overall Color. For multi-colored surfaces, the
default material is black (colorindex=13).
For multi-colored surfaces, the `SurfaceFinish' index controls the material's ambient, specular, and
transparency properties. The 'color' of each vertex controls the diffuse `color' properties. An auxiliary
program 'tri-a-tri' spits multi-colored surfaces so that each triangle is always one color (but yields more
triangles). This creates sharp bands of color and is recommended for ray-tracing output. Otherwise,
OpenGL blends the colors across the vertices. Depends on your preference.
For 2-sided surfaces, the triangles are drawn twice with coloring dependent on their normal vectors. If a
single-colored surface, the 'outside' is the Overall Color, while the inside is colorIndex 9 (grey by
default). If a multi-colored surface, the 'outside' is as usual, but the 'inside' diffuse color components
darkened to a quarter of their original values and their SurfaceFinish index is set to 9. A *.tri file with
multi-colored vertices causes a slight performance penalty. For improved performance for interactive
drawing, set the Overall Color to some integer value and/or to line mode.
Also see other types of and general information on Control Panels.
Ribbons User Manual / UAB-CBSE / [email protected]
file:///C|/My Documents/ribbons/help/polypanel.html (2 of 2) [4/3/2001 2:05:05 PM]
Ribbons Ndot Panel Help
Ndot Panel Widget.
Invoked from Edit in Menubar or ALT-n.
Uses Motif Widgets ( Choice, Toggle, Scale, Push ) to adjust properties of groups of normal vectors/dots
in your model.ndots list.
Currently, all groups are read in as ascii *.dot files. (See Data Preparation).
Widget Name (Widget Type) --- description of function
●
●
●
●
●
●
●
Ndot Lists (Choice)
-- select `N-dots' to refer to all, else choose individual groups.
Ndot Display (Toggle)
-- visibility toggle for current Ndot List choice.
Draw Style (Choice)
-- select one of: Square | Round(antialiased) for selected group.
Line Width (Scale)
-- width in pixels.
Overall Color (Choice)
-- select a color for the entire group, or use the individual dot colors.
Close Panel (Push)
-- dismiss the panel
Panel Help (Push)
-- show this help screen
file:///C|/My Documents/ribbons/help/ndotpanel.html (1 of 2) [4/3/2001 2:05:17 PM]
Ribbons Ndot Panel Help
Hints:
For nice round dots, set Draw Style to Round and increase the Line Width.
For a quicky surface, greatly increase the Line Width.
Also see other types of and general information on Control Panels.
Ribbons User Manual / UAB-CBSE / [email protected]
file:///C|/My Documents/ribbons/help/ndotpanel.html (2 of 2) [4/3/2001 2:05:17 PM]
Ribbons Text Panel Help
Text Panel Widget.
Invoked from Edit in Menubar or ALT-t.
Uses Motif Widgets ( Choice, Toggle, Scale, Push ) to adjust properties of groups of string in your
model.texts list.
Currently, all groups are read in as ascii *.sph (!) files. (See Data Preparation).
Widget Name (Widget Type) --- description of function
●
●
●
●
●
●
●
Text Lists (Choice)
-- select `strings' to refer to all, else choose individual groups.
Text Display (Toggle)
-- visibility toggle for current Text List choice.
Text Font (Choice)
-- select a font (and point size) for the entire group.
-- Currently only Helvetica, Courier and Symbol provided.
X/Y/Z Shift (Scale)
-- translate the entire group in screen coordinates.
Overall Color (Choice)
-- select a color for the entire group, or use the individual string colors.
Close Panel (Push)
-- dismiss the panel.
Panel Help (Push)
-- show this help screen.
file:///C|/My Documents/ribbons/help/textpanel.html (1 of 2) [4/3/2001 2:05:29 PM]
Ribbons Text Panel Help
Hints:
You may have to break up one file of strings into several if you can't get a good translational adjustment
for the entire group. The string begins at the xyz position of the sphere. You may edit each *.sph record
to customize the format. Any text (including blanks) following the color index integer is displayed.
There is currently a very limited choice of font sizes. If the figure is for publication, make font as large as
possible and only use about 2/3 full screen image for best results.
Also see other types of and general information on Control Panels.
Ribbons User Manual / UAB-CBSE / [email protected]
file:///C|/My Documents/ribbons/help/textpanel.html (2 of 2) [4/3/2001 2:05:29 PM]
Ribbons Color Panel Help
Color Panel Widget.
Invoked from Edit in Menubar or ALT-c.
Uses Motif Widgets ( Choice, Toggle, Scale, Push ) to adjust properties of the material `colors' assigned
to each primitive.
All primitives assigned an integer index (See Ribbons Color Index Scheme ).
Changing the definition of `color #1' (red) will change everything that was red to the new color.
Widget Name (Widget Type) --- description of function
●
●
●
●
●
Color Index (Choice)
-- choose color index 0..40 of material to edit. The displayed sphere will reflect the change.
Color Fill Pattern (Choice)
-- choose a fill pattern for the current color index, used to set `screendoor' transparency.
Light Panel (Push)
-- open the `Light Panel'.
Red/Green/Blue Ambient (Scale)
-- adjust RGB ambient (light-source independent) components of color.
Red/Green/Blue Diffuse (Scale)
-- adjust RGB diffuse (Lambert's law, light-source dependent) components of color.
file:///C|/My Documents/ribbons/help/colorpanel.html (1 of 2) [4/3/2001 2:05:49 PM]
Ribbons Color Panel Help
●
●
●
●
●
Red/Green/Blue Specular (Scale)
-- adjust RGB specular (reflected `highlight') components of color.
Red/Green/Blue Emission (Scale)
-- adjust RGB emissive (local glow, but not a light source) components of color.
Shinyness (Scale)
-- adjust degree of specularity, higher numbers give more focused highlights.
Close Panel (Push)
-- dismiss the panel
Panel Help (Push)
-- show this help screen
Hints:
Colors for every graphics object are assigned an index = 0..40 (0==background, but means `invisible' for
a primitive). The indices 15 are generally not used by the data preparation programs, thus are good for
special colors.
Also see other types of and general information on Control Panels.
BUGS:
Alpha Diffuse is currently disabled. Use the Fill Pattern to simulate. However, this value is passed on
output to assorted ray-tracers.
Ribbons User Manual / UAB-CBSE / [email protected]
file:///C|/My Documents/ribbons/help/colorpanel.html (2 of 2) [4/3/2001 2:05:49 PM]
Ribbons Light Panel Help
Light Panel Widget.
Invoked from Edit in Menubar or ALT-l.
Uses Motif Widgets ( Choice, Toggle, Scale, Push ) to adjust lighting model properties.
Widget Name (Widget Type) --- description of function
●
●
●
●
●
●
●
●
●
●
●
Light Source (Toggle)
-- on/off switch for primary white light source.
2nd Light Source (Toggle)
-- on/off switch for a second independent white light source.
Light X/Y/Z (Scale)
-- adjust vector direction of the primary light source (2nd Light X/Y/Z works just the same).
Light I (Scale)
-- adjust relative intensity of the primary light source (2nd Light I works just the same).
Depthcue Fog (Toggle)
-- toggle `depthcueing' simulated by fog.
Fog Mode (Choice)
-- set the fog equation as Linear, Exponential, or Exp2.
Fog Density (Scale)
-- adjust the fade into background for the depthcueing effect.
Ambience (Scale)
-- adjust the overall ambient background level, this is multiplied by each material's ambient RGB.
Red/Green/Blue Background (Scale)
-- adjust RGB components of the screen background color.
Close Panel (Push)
-- dismiss the panel
Panel Help (Push)
file:///C|/My Documents/ribbons/help/lightpanel.html (1 of 2) [4/3/2001 2:05:58 PM]
Ribbons Light Panel Help
-- show this help screen
Hints:
Use only one light source for increased interactive performance.
Fog effect depends on both the slab thickness and Z-coordinate (see Model Transformation ).
Also see other types of and general information on Control Panels.
Ribbons User Manual / UAB-CBSE / [email protected]
file:///C|/My Documents/ribbons/help/lightpanel.html (2 of 2) [4/3/2001 2:05:58 PM]
Ribbons Image Panel Help
Image Panel Widget.
Uses Motif Widgets ( Choice, Toggle, Scale, Push ) to adjust properties of appearance/style of the output
image.
In Ribbons 3.0, invoked from Edit in Menubar or ALT-j
If an existing image file named `background.rgb' is present, it will be the background.
Use ``Outline Image'' in Menubar View to outline the primitives.
May also use ``Save Image'' in Menubar File to set the filename to be saved.
Critical! On an SGI, hit ``PrintScreen'' key to actually save the image, or the ``Pause'' key to cancel the
save.
Other platforms now simply save the image.
Widget Name (Widget Type) --- description of function
●
Image Type (Choice)
❍ WYSIWYG -- (default) saves the screen image.
❍ Black&White -- processes screen to give the impression of an artist's line drawing with
cross-hatching for shading and depth-cueing.
❍ Blend Inten -- the Black&White image is blended with the grayscale version of the
WYSIWYG image. Slider below controls amount of blending.
❍ Blend RGB -- the Black&White image is blended with the normal color image of the
WYSIWYG mode. Slider below controls amount of blending.
file:///C|/My Documents/ribbons/help/imagepanel.html (1 of 4) [4/3/2001 2:06:08 PM]
Ribbons Image Panel Help
SuperSample -- use off-screen rendering to render the WYSIWYG image larger than
screen resolution (Warning - see notes below).
❍ SuperSamp-BW -- use off-screen rendering to render the Black&White image larger than
screen resolution.
❍ A.StereoGram -- process image to produce an auto-stereogram.
❍ EPS -- process image to produce Encapsulated PostScript (Warning - see notes below).
AntiAlias Passes (Choice)
-- Set number of imaging passes for full-screen antialiasing. Gets rid of the `jaggies'. Can use with
super-sampling, but slow.
SuperSamplingScale (Scale)
-- set the scale factor for off-screen rendering.
-- Note: this may fail. Save settings before you try. See notes below.
Image Format (Choice)
-- either SGI (*.rgb) or the Tagged Image Format (*.tiff).
-- Note: if SuperSampling (or non-SGI alpha), can only be TIFF.
0 RGB--B&W 1 (Scale)
-- set the scale factor for blending Black&White and WYSIWYG images. Used if ImageType is
BLEND.
BW 'Shadow' Color (Choice)
-- select a color to be given special cross-hatching in the Black&White style. The default is gray
(colorindex=9).
Mock Line Drawing (Toggle)
-- removes all `shading'. Makes all colors (except gray and black) white. Should turn on outlining.
Be sure to antialias if saving.
Scale BG Image (Toggle)
-- force the background image to be scaled to the current window. This image must be in the
current directory and named `background.rgb'.
BW.read (stdin) (Toggle)
-- change parameters for Black&White rendering. Prompts at the terminal for values that won't
mean anything to you, unless you read Goodsell/Olson paper (see Notes below).
Save Image (Push)
-- set the filename to be saved (then hit PrintScreen key on SGI).
-- Same as the selection from the File menu (or Alt-i).
Close Panel (Push)
-- dismiss the panel
Panel Help (Push)
-- show this help screen
❍
●
●
●
●
●
●
●
●
●
●
●
file:///C|/My Documents/ribbons/help/imagepanel.html (2 of 4) [4/3/2001 2:06:08 PM]
Ribbons Image Panel Help
Hints:
If you have a file named 'background.rgb' in your directory, it will serve as the background. It is placed at
the far clipping plane. Will slow you down if you toggle on scaling of this image to the window.
For SuperSampling, the scale is for the current window. Values between 1-4 are allowed. 2 gives ~300
dpi resolution. 4 would give 600 dpi, but I can't do it on my machines with a full screen (?).
This works on my O2:
ribbons -n yourmodel -w 1000,800
hit alt-j to invoke ImagePanel
choose 'SuperSample' from ImageType (upperleft)
choose Save Image ( Note: forces a *.tiff == TIFF file)
hit PrintScreen to actually save and say a small prayer
imgworks yourfile.tiff (it should be ~2000x1600)
Then maybe try to make even bigger! (or smaller if it crashes, see Bugs below). Also see other types of
and general information on Control Panels.
Notes:
The recently added EPS option uses OpenGL's feedback mode and code by SGI's Mark J. Kilgard to
capture as much information as possible. It does limited hidden surface removal by sorting. This may
cause occasional screw-ups, especially with long bonds. It does smooth shading of Gouraud triangles,
albeit limited due to PostScript. Ribbons ^& spheres look pretty good. It can't remember the current state
of line widths, so an overall value is set (you can edit in the file). You must also edit if you desire text.
The program adds a placeholder for each bitmapped string. This is really not too painfull if you only
have a few labels.
The Black and White code is based on an algorithm from a Japanese group, implemented & published
(&copied by me) from: Molecular Illustrations in Black and White, D.S. Goodsell and A.J. Olson,
J.Mol.Graphics (92).
We get autostereograms in the funny papers. Looks like random noise, but 3-D picture hidden within.
Algorithm for drawing an autostereogram: H.W.Thimbleby, S.Inglis & I.H.Witten (Oct94) Computer,
p38-48.
SuperSampling based on code kindly supplied by Jason Freund at SGI (formerly at UAB). All SGI
computers that support its offscreen 'P-buffer' OpenGL extension are supposed to make at least
2000x2000 images, but...
file:///C|/My Documents/ribbons/help/imagepanel.html (3 of 4) [4/3/2001 2:06:08 PM]
Ribbons Image Panel Help
Bugs:
SuperSampling might dump core if not supported on your computer. (i tried to put in the checks as
explained in the man pages). More likely it will simply fail if you attempt to create an image larger than
the new SGI Pbuffer extension can handle. If so, will spit out this:
> X Error of failed request: BadAlloc (insufficient resources ...)
>
Major opcode of failed request: 141 (GLX)
>
Minor opcode of failed request: 17 (X_GLXVendorPrivateWithReply)
>
Serial number of failed request: 0
All SGI computers that support this are supposed to make at least 2000x2000 images, but... From their
man page: MACHINE DEPENDENCIES
The SGIX_pbuffer extension is supported only on RealityEngine, RealityEngine2, and VTX systems, on
InfiniteReality systems, on High Impact and Maximum Impact systems, and on O2 systems.
Ribbons User Manual / UAB-CBSE / [email protected]
file:///C|/My Documents/ribbons/help/imagepanel.html (4 of 4) [4/3/2001 2:06:08 PM]
Ribbons Index Panel Help
Index Panel Widget.
Sets the color index for the current object.
Invoked from assorted editor widgets Atom, Bond, Poly, Ndot, Text (for primitives) and RibS, (for
overall ribbon drawing).
Use the Color Panel Editor to adjust the color itself (ie, turn red into pink).
Click one of the 40 colored squares, laid out 1..40, to set the (integer )Current Index. The results are
applied immediately.
Remember, all 'colors' in ribbons are integers! (See Ribbons Color Index Scheme ).
Widget Name (Widget Type) --- description of function
●
●
●
●
Current Index (OpenGL)
-- Default index. Not pickable.
Array of Colored Squares (OpenGL)
-- Pick with any mouse button to set Current Index.
Close Panel (Push)
-- dismiss the panel
Panel Help (Push)
-- show this help screen
Hints:
The last function chosen remains active.
Ribbons User Manual / UAB-CBSE / [email protected]
file:///C|/My Documents/ribbons/help/indexpanel.html [4/3/2001 2:06:22 PM]
Ribbons Palette Panel Help
Palette Panel Widget.
Sets the mapping of residue codes to color indices for the current ribbon.
Invoked from the Ribbons Style Panel.
Must open the Index Panel to pick the current color.
Each residue character subsequently picked is assigned that color.
Widget Name (Widget Type) --- description of function
●
●
●
●
●
Array of Labeled Squares (OpenGL)
-- Pick with any mouse button to set Character Key to change.
Sequence Color (Choice)
-- select choices from columns in the *.ss file to color-code on available per-residue modes.
Default is the setting of the same widget in the Ribbons Style Panel.
Index Panel (Push)
-- open the Color Index panel, tieing function to the Paletter
Close Panel (Push)
-- dismiss the panel
Panel Help (Push)
-- show this help screen
Hints:
First pick the Color Index, then pick as many characters that you want to become that color.
The initial coloring is based on your *.ss , *.color , and *.ribbons files.
file:///C|/My Documents/ribbons/help/paletpanel.html (1 of 2) [4/3/2001 2:06:39 PM]
Ribbons Palette Panel Help
Bugs:
Current version does not let you save these changes. Must edit *.color file by hand.
Ribbons User Manual / UAB-CBSE / [email protected]
file:///C|/My Documents/ribbons/help/paletpanel.html (2 of 2) [4/3/2001 2:06:39 PM]
Ribbons Motion Panel Help
Motion Panel Widget.
Invoked from Edit in Menubar or ALT-m.
Uses Motif Widgets ( Choice, Toggle, Scale, Push ) to define an animation sequence and save images.
Widget Name (Widget Type) --- description of function
●
●
●
●
●
●
Start Motion (Push)
-- start the sequence of motion (and optional saving of images) based on the values of the widgets
below.
Pause Motion (Toggle)
-- on/off switch to suspend the current motion sequence.
Record Motion (Toggle)
-- on/off switch for saving of images.
Motion Reset (Push)
-- reset all widgets and orientation to their initial value.
Number Steps (Scale)
-- set total number of frames in the animation.
Cycle Models (Toggle)
-- read in a new model for each frame.
#steps automatically set = #models.
file:///C|/My Documents/ribbons/help/motionpanel.html (1 of 2) [4/3/2001 2:06:49 PM]
Ribbons Motion Panel Help
●
●
●
●
●
●
●
●
●
●
Init Scale (Scale)
-- set initial value of the log of the scale factor.
Final Scale (Scale)
-- set final value of the log of the scale factor.
Init X/Y/Z rot (Scale)
-- set initial value of rotation about X/Y/Z axes in degrees.
Final X/Y/Z rot (Scale)
-- set final value of rotation about X/Y/Z axes in degrees.
Init X/Y/Z trns (Scale)
-- set initial translation along X/Y/Z axes in angstroms.
Final X/Y/Z trns (Scale)
-- set final translation along X/Y/Z axes in angstroms.
Rock Angle per Step (Scale)
-- set rocking angle step in degrees. Rocking is toggled from the view menu.
Number Rock Steps (Scale)
-- sets total steps per swing. Rocking is toggled from the view menu.
Close Panel (Push)
-- dismiss the panel
Panel Help (Push)
-- show this help screen
Hints:
The root image file name may be set with the normal Save Image (alt-i). If no image file name set, the
root name is `motion.rgb'. The files for each frame are named: motion_000.rgb, motion_001.rgb, etc.
Set a `.orient' and a `.defaults' file for the sequence before you start.
Also see other types of and general information on Control Panels.
BUGS:
After the first session of image saving, subsequent sequences will have their 1st 2 images screwed up.
Ribbons User Manual / UAB-CBSE / [email protected]
file:///C|/My Documents/ribbons/help/motionpanel.html (2 of 2) [4/3/2001 2:06:49 PM]
Ribbons Keyboard Accelerator Help
Ribbons Keyboard Accelerator Keys
Keyboard shortcuts are available within ribbons .
Press the ``Alt'' key and the key in the table below simultaneously. Note these are all lowercase letters.
● a -- open/close Atom editor panel
● b -- open/close Bond editor panel
● c -- open/close Color editor panel
● d -- open/close ribbon-Dimension editor
● f -- toggle Fast-drawing mode
● g -- toggle backGround black/white
● h -- open Help screens
● i -- open Image file save dialog
● j -- open Image Panel in Ribbons 3.0
● l -- open/close Light editor panel
● m -- open/close Motion editor panel
● n -- open/close N-dot editor panel
● o -- restore Original transformation
● p -- open/close Polygon editor panel
● q -- Quit
● r -- invoke ribbons-data GUI for data preparation
● s -- open/close ribbon-Style editor
● t -- open/close Text editor panel
● u -- Undo rotate y for stereo image
● v -- write scene as poV-ray format
● w -- write scene as vrml *.Wrl format
● x -- open/close ribbon-compleXity editor
● y -- rotate Y for stereo image
● z -- save all current settingZ for startup
● 2 -- show 2 side-by-side stereo images
● 3 -- show 3-D hardware stereo viewing
Keyboard shortcuts are available within X-windows .
Press the ``Alt'' key and the Function Key in the table below simultaneously.
● 1 -- Raise window to the top
● 3 -- Lower window to the bottom
● 9 -- Minimize (iconify) window
● 10 -- Maximize (full screen) window
file:///C|/My Documents/ribbons/help/altkeys.html (1 of 2) [4/3/2001 2:06:59 PM]
Ribbons Keyboard Accelerator Help
Ribbons User Manual / UAB-CBSE / [email protected]
file:///C|/My Documents/ribbons/help/altkeys.html (2 of 2) [4/3/2001 2:06:59 PM]
Ribbons Image Saving Help
Saving Images.
Easy as 1-2-3:
1. Get the picture you want on the screen. Use the options of the Image Panel to enhance.
2. Use ``Save Image'' (Alt-i) in Menubar File or the same command from the Image Panel to set the
filename to be saved. The program will go into single buffer mode (for highest quality images on
low-end machines), remove the menubar and give you a message as your window title.
3. Hit the ``PrintScreen'' key to actually save the image to disk, or the ``Pause'' key to cancel the
save. If PrintScreen is hit, rendering begins. On completion, the graphics state and menubar will be
restored, along with a pop-up message that your file has been saved.
Hints:
Example Images shows images of representative drawing types and how to make the data.
For the highest possible resolution, maximize the window before you begin (however, if you have text,
you have to consider the effect of size reduction if for prints).
For even higher than full-screen resolution, try the SuperSampling options of the ImagePanel on an
SGI machine, or use a supported raytracing package.
For the highest possible quality, adjust all appropriate graphics widgets to high values, and set the
full-screen antialiasing level to the limit. (note: you may want to go into FastDraw mode (toggle with
Alt-f) to make all the adjustments)
For identically sized images, invoke ribbons with the -w option.
For slides, use a black background and vivid colors.
For printing, use a white background, fewer and more pastel colors, and turn on outlining in the View
menu for a nice line-drawing effect.
For black and white images, check out the options of the Image Panel.
For stereo slides, save the first (left) image, hit (Alt-y) for the stereo rotation, then save the right image
(you can undo the rotation with Alt-u)
For stereo prints, can do as above and then composite the images with standard tools, or display as
side-by-side stereo (Alt-2) and save the left/right pair as one image.
To scale, crop, enhance (I personally like to sharpen about 10%) on an SGI machine use the command:
imgworks file.rgb
file:///C|/My Documents/ribbons/help/imagesave.html (1 of 2) [4/3/2001 2:07:21 PM]
Ribbons Image Saving Help
To convert between graphics formats, use imgworks on the SGI, or the free imconv package from the
San Diego Supercomputer Center.
For DEC machines, /freeware/bin/ImageMagick/import has been recommended.
Ribbons User Manual / UAB-CBSE / [email protected]
file:///C|/My Documents/ribbons/help/imagesave.html (2 of 2) [4/3/2001 2:07:21 PM]
Ribbons Demo Image Help
Ribbons 2.8+ Demo Models and Images
All highlighted names in the list below are available through the command:
ribbons-demo -n name
All data here was prepared with the new 'ribbons-data' interface.
If you have a pre-2.8 version of ribbons, life is a little harder - you must use a command line interface to
generate all the data.
See: Ribbons 2.0 Demo Models and Images for the old data (even if you have 2.8 or above).
New styles are available through the Image Panel of ribbons 3.0+.
Picking any of the choices below jumps to the image. The commands and interactions used to create
them are given in the notes below the image.
These are low-quality *.gif file images for HTML. The corresponding *.rgb file names are in the
$RIBBONS_HOME/rgb directory.
●
●
inhib -- simple labeled ball-n-stick drawing of a small molecule.
na -- extending example above with ribbon drawing.
file:///C|/My Documents/ribbons/help/image_eg.html (1 of 2) [4/3/2001 2:07:58 PM]
Ribbons Demo Image Help
●
map -- stereo electron density.
Ribbons User Manual / UAB-CBSE / [email protected]
file:///C|/My Documents/ribbons/help/image_eg.html (2 of 2) [4/3/2001 2:07:58 PM]
Ribbons Version 3.0 Image Examples Help
Ribbons 3.0 Demo Images
Below are sample images showing new features available from the Image Panel and Raytracing Options.
All use data from the Calpain structure solved at the CMC by Narayana's group. A regular ribbons picture
made the cover of Nature Structural Biology, Vol.4(7) July '97.
Default settings are used, except the ray tracing was spiffed up. Note these are low-quality *.gif file images
for HTML.
Black&White
file:///C|/My Documents/ribbons/help/image_eg_30.html (1 of 4) [4/3/2001 2:08:39 PM]
Ribbons Version 3.0 Image Examples Help
Blend RGB
file:///C|/My Documents/ribbons/help/image_eg_30.html (2 of 4) [4/3/2001 2:08:39 PM]
Ribbons Version 3.0 Image Examples Help
Mock Line-drawing
file:///C|/My Documents/ribbons/help/image_eg_30.html (3 of 4) [4/3/2001 2:08:39 PM]
Ribbons Version 3.0 Image Examples Help
POV-Ray
Ribbons User Manual / UAB-CBSE / [email protected]
file:///C|/My Documents/ribbons/help/image_eg_30.html (4 of 4) [4/3/2001 2:08:39 PM]
Ribbons 'inhib' Sample Image Help
ribbons-demo -n inhib
Data Files:
The coordinates of a viral neuraminidase (na) and its inhibitor dana (basically PDB entry 1nnb) was split
into separtate files: na.pdb and inhib.pdb. Here a labeled ball-and-stick figure of the inhibitor will be
made.
The data preparation utility was called:
ribbons-data inhib
The NameTag is the default 'inhib'. Click 'Create inhib.model'. The model-data utility is called, bringing
up a sub-panel.
The defaults are fine. Click 'Generate' at the lower left of the form. A message of successful completion
should appear. Now click 'Quit and Exit' at the lower right. The sub-panel disappears and a red check
should appear saying the model file exists. Now you can add display objects to the model.
Click 'Setup inhib.atoms' to create atomic spheres. The atoms-data utility is called, bringing up a
sub-panel. The defaults create a ball and stick colored by atom type. Click 'Execute' at the lower left of
the form. This will create the *.atoms and *.bonds database files, and the primitives as *.sph and *.cyl
files. Now click 'Quit and Exit' at the lower right. The subpanel disappears and a red check says the files
exist for both atoms and bonds.
To make the labels, click 'Setup inhib.texts'. The default behavior makes use of the *.sph file just created.
In 'Reformatting Options', the 3rd choice of the RadioBox, atom name only, is chosen. Then click
'Execute' and 'Quit' after successful completion.
file:///C|/My Documents/ribbons/help/inhib_rgb.html (1 of 2) [4/3/2001 2:09:10 PM]
Ribbons 'inhib' Sample Image Help
The labeled ball-&-stick model is now ready for display.
Click 'Execute Command: ribbons -n inhib' at the bottom of the form.
Image File: (none saved - this is just a warm-up)
The graphics window was made about half the size of the screen. Alt-g (or view menu) was hit to toggle
backGround to white. LeftMouse to scale up the molecule. The orientation looks good. Alt-t (or edit
menu) was hit to bring up the text panel. The overall color was set to black, and the largest font chosen.
The overall text translations were set to move the labels off the atom centers. Alt-t closes the text panel.
The atom panel (Alt-a) & bond panel (Alt-b) were called and complexity increased for a smoother
picture. Decided on black carbons. Since it is the only green, called the color editor (Alt-c) and adjusted
'green' to shiny black. Decided this was enough for the first tutorial. Alt-i (or file) to set image file for
save, hit PrintScreen to save the image, and finally Alt-z (or file) to save all the changes as initialization
files for the demo.
Quit and Exit 'ribbons-data'. To view again: ribbons -n inhib
Ribbons User Manual / UAB-CBSE / [email protected]
file:///C|/My Documents/ribbons/help/inhib_rgb.html (2 of 2) [4/3/2001 2:09:10 PM]
Ribbons 'na' Sample Image Help
ribbons-demo -n na
Data Files:
The coordinates of a viral neuraminidase (na) and its inhibitor dana (basically PDB entry 1nnb) was split
into separtate files: na.pdb and inhib.pdb. 'na.pdb' is a single protein chain. Remember, you still must
split each chain into a file for a ribbon. Here a nice view of the active site, sort of like the figure on the
home page, will be made.
The data preparation utility was called:
ribbons-data na
The NameTag is the default 'na'. Click 'Create inhib.model'. The model-data utility is called, bringing up
a sub-panel.
The defaults are ok, but I wish to center on the inhibitor, so the PDBfile name field will be changed to
'inhib.pdb'.. Click 'Generate' at the lower left of the form. A message of successful completion should
appear. Now click 'Quit and Exit' at the lower right. The sub-panel disappears and a red check should
appear saying the model file exists. Now you can add display objects to the model.
Click 'Setup inhib.ribbons' to create ribbon diagrams. The ribns-data utility is called, bringing up a
sub-panel. The defaults create a standard protein ribbon drawing. Click 'Execute' at the lower left of the
form. This will create the *.ribbons and *.coords database files, and the *.ss file describing the secondary
structure. Now click 'Quit and Exit' at the lower right. The sub-panel disappears and a red check saying
display files exist.
To make the key residues of the active site, click 'Setup inhib.atoms'. The default behavior is changes to
file:///C|/My Documents/ribbons/help/na_rgb.html (1 of 2) [4/3/2001 2:09:23 PM]
Ribbons 'na' Sample Image Help
color by residue, to make the names of the output files 'na_site.sph' and 'na_site.cyl', and finally the
selection (like in the tutorial chapter) is set:
not ( name N or name C or name O or hydro ) and byres point (27.0 18.5 63.5) cut 8.0
This means not the mainchain atoms and keep whole residues within 8 angstroms of the inhibitor (see the
help on ribbons-data concerning atom selection). Click 'Execute', but don't exit.
Now make the files for the inhibitor. Change the name of the PDB file to 'inhib.pdb' and the names of the
output files to 'in_site.sph' and 'in_site.cyl'. Set to output all as the single color 14 (gold). chosen.
'Execute' again, then 'Quit' after successful completion.
The ribbon/active site/inhibitor model is now ready for display.
Click 'Execute Command: ribbons -n na' at the bottom of the form.
Image File: $RIBBONS_HOME/rgb/na.rgb
The graphics window was made as large as possible. The adjustments were made much as described in
Example 3 of the tutorial. Decided this was close enough for now. Alt-i (or file) to set image file for
save, hit PrintScreen to save the image, and finally Alt-z (or file) to save all the changes as initialization
files for the demo.
Quit and Exit 'ribbons-data'. To view again: ribbons -n na
Ribbons User Manual / UAB-CBSE / [email protected]
file:///C|/My Documents/ribbons/help/na_rgb.html (2 of 2) [4/3/2001 2:09:23 PM]
Ribbons 'map' Sample Image Help
ribbons-demo -n map
Data Files:
The coordinates of an enzyme inhibitor bound to a domain of calpain is named 'map.pdb'. Here a
ball-and-stick figure of the inhibitor will be made in stereo, along with a density map.
The data preparation utility was called:
ribbons-data map
The NameTag is the default 'map'. Click 'Create map.model'. The model-data utility is called, bringing up a
sub-panel.
The defaults are fine. Click 'Generate' at the lower left of the form. A message of successful completion
should appear. Now click 'Quit and Exit' at the lower right. The sub-panel disappears and a red check
should appear saying the model file exists. Now you can add display objects to the model.
Click 'Setup map.atoms' to create atomic spheres. The atoms-data utility is called, bringing up a sub-panel.
The defaults create a ball and stick colored by atom type. One change to the defaults is made: a color files
file:///C|/My Documents/ribbons/help/map_rgb.html (1 of 2) [4/3/2001 2:09:33 PM]
Ribbons 'map' Sample Image Help
is copied over 'map_atoms.color' and edited to make the iodine purple. Click 'Execute' at the lower left of
the form. This will create the *.atoms and *.bonds database files, and the primitives as *.sph and *.cyl
files. Now click 'Quit and Exit' at the lower right. The subpanel disappears and a red check says the files
exist for both atoms and bonds.
A dot surface was made for comparison. Click 'Setup map.ndots' to invoke the ndots-data utility . The
default behavior makes use of the *.sph file just created. The defaults are file. Just click 'Execute' and 'Quit'
after successful completion.
For the density map 'diff_map.dsn6' (not included as too big), click 'Setup map.texts' to invoked the
polys-data utility. The default is for density maps with a 2.0 sigma cutoff. The default map name was set to
the file above, and clipping was set for a 7.0 angstrom box around the center (as calculated by model-data).
Click 'Execute' and 'Quit' after successful completion.
The density map model is now ready for display.
Click 'Execute Command: ribbons -n map' at the bottom of the form.
Image File: (none saved - this is just a warm-up)
The graphics window was made as large as possible. Alt-g (or view menu) was hit to toggle backGround to
white. LeftMouse/MiddleMouse to scale/rotate the molecule. Alt-p (or edit menu) was hit to bring up the
poly panel. The (default) solid surface was put into line mode and the line width increased. Alt-p closes the
poly panel.
The atom panel (Alt-a) & bond panel (Alt-b) were called and complexity increased for a smoother picture.
The bonds were scaled smaller. The ndot panel (Alt-n) was used to create large, round dots, with all colors
set to deep blue. Alt-2 (view menu -> stereo) puts the display in side-by-side stereo mode. Alt-i (or file) to
set image file for save, hit PrintScreen to save the image, and finally Alt-z (or file) to save all the changes
as initialization files for the demo. Scaled and sharpened the image with the SGI tool imgworks.
Quit and Exit 'ribbons-data'. To view again: ribbons -n map.
Ribbons User Manual / UAB-CBSE / [email protected]
file:///C|/My Documents/ribbons/help/map_rgb.html (2 of 2) [4/3/2001 2:09:33 PM]
Ribbons Raytracing Support Help
Raytracing in General
Raytracing is a computationally expensive computer graphics technique that attempts to generate
photorealistic images, casting rays of light that are followed as they interact with and bounce off different
object. Radiosity is a newer, even more expensive method that tries to really get the physics of light right.
I've dabbled with ray-tracing for over 10 years for arty effects, but think the output with the interactive
OpenGL in ribbons is good enough.
However, seeing the program POV-Ray has changed my attitude somewhat. It is fast, good, and free support has been added for ribbons 3.0. The other previously supported ray-tracing formats are still there.
These formats and the source code (for full-support license holders) should allow one to incorporate
ribbons output into any ray-tracer. Ken Eward of BioGrafx made some very nice cover pictures for
Nature Biotechnology by converting one of the old formats into POV-Ray. Tod Romo of Rice has
modified the source code (see files print*.C) to create format in PIXAR Animation Studio's `RenderMan'
format (they did the dinosaurs in Jurasic Park).
The list below gives the supported formats and links to the home pages of the ray tracing programs.
Supported Raytracing Programs
●
●
●
ribbons to POV-Ray
Persistence Of Vision is a high-quality, totally free tool for creating stunning three-dimensional
graphics. It is available in official versions for Microsoft Windows 3.1/Win32s and Windows
95/NT, DOS, the Macintosh, i86 Linux, SunOS, and Amiga. The source code is available for those
wanting to do their own ports. All POV-Ray software is copyrighted freeware. It is not shareware
or public domain.
The current recommended ray-tracer of choice with ribbons.
ribbons to Rayshade
Rayshade is a public domain ray tracer by Craig Kolb. It is an extensible system for creating
ray-traced images. It is written in C, yacc, and lex, and runs on many different platforms.
The format is very simple and easy to understand.
ribbons to Wavefront
Alias|Wavefront is an independent software subsidiary of SGI. They are big in film, games, and
graphics design market - and probably too expensive for a scienctific lab.
They used to bundle their `Personal Visualizer' product for free with SGI machines long ago. The
ribbons output worked fine with their product 6 years ago, last time I tried. Examples with ribbons
are the artworks `Mother of All Molecules' and `Interferon: Wood on Marble' shown in the Image
Gallery.
●
ribbons to Radiance
Radiance is a synthetic imaging system of UNIX freeware for lighting design and rendering,
developed by Greg Ward Larson and the U.S. Department of Energy and the Swiss federal
file:///C|/My Documents/ribbons/help/raytrace.html (1 of 4) [4/3/2001 2:09:54 PM]
Ribbons Raytracing Support Help
government, copyrighted by the Regents of the University of California.
Only partially supported now - but expect more in the future. IMHO, this method has the best `feel'
to it. See the PNP trimer panel of the artwork `X-ray Crystallography' shown in the Image Gallery.
POV-Ray and ribbons
1) adjust the ribbons display to your pleasure.
The AlphaDiffuse slider of the Color Panel (alt-c) sets the transparency of the material for ray-tracing (but
it has no visible effect in ribbons).
Lines cannot be used for bonds; for density maps thin cylinders are used. Cones are OK. Circular disks
are drawn for dot surfaces, the size will only approximately match.
If you plan to use perspective (unlike in ribbons), this may cause some distortion. Suggest you leave extra
room around the edges to make sure all is visible. You can create files at higher that screen resolution. 2)
save a *.ray format ascii file of rendering commands:
Menubar -> File -> Export VRML/Raytracing -> POV-Ray
3) run the x-povray program through my Tcl/Tk script `pov-image':
Notes: you must have `x-povray' in your path and edit the file:
$RIBBONS_HOME/elmo/povImage.tcl to configure for your system.
pov-image hides x-povray's clunky command-line interface (the PC version's is better!).
usage:
pov-image yourfile.pov [output.image]
Notes: The input `*.pov' file is ascii and can be edited for special effects. The script allows you to add
some frills, like planes for shadows. The output.image file format is set to your specification in the
configuration step. 4) get real fancy: Notes: The background is rendered as `sky' of the current
background color. See cool examples of backgrounds in $RIBBONS_HOME/misc/pov.
Rayshade and ribbons
1) adjust the ribbons display to your pleasure.
Notes: A background plane (of the background color, recommend grey) is placed at the far clipping plane
(middle+right mouse to adjust). Shadows will be cast on this plane. The background grid may be turned
on.
The AlphaDiffuse slider of the Color Panel (alt-c) sets the transparency of the material for ray-tracing (but
it has no visible effect in ribbons).
file:///C|/My Documents/ribbons/help/raytrace.html (2 of 4) [4/3/2001 2:09:54 PM]
Ribbons Raytracing Support Help
Lines can not currently be drawn (eg, for bonds, density maps). Cones are OK. Circular disks are drawn
for dot surfaces, the size will only approximately match.
Perspective is used (unlike in ribbons) - this may cause some distortion. Suggest you leave extra room
around the edges to make sure all is visible.
2) save a *.ray format ascii file of rendering commands:
Menubar -> File -> Export VRML/Raytracing -> Rayshade
3) run the rayshade program:
rayshade [options] < yourfile.ray
options:
-O output_image.rgb ( default: rayshade.rgb with the sgi version )
-R nxPixels nyPixels ( set output image size. default 512x512 )
-p
( run in fast preview mode )
-n
( don't render shadows )
-r
( create a right-eye view for stereo )
-l
( create a left-eye view for stereo )
Notes: there are lots more options, above seem most useful to me. You can create files at higher that
screen resolution, eg: -R 2500 2000 Example above maintains the 5/4 aspect ratio of ribbons, but don't
have to. The input '*.ray' file is ascii and can be edited for special effects.
Wavefront and ribbons
1) adjust the ribbons display to your pleasure.
Notes: only the actual ribbon drawings will be saved. See the directory 2) save a *.wave format ascii file
of rendering commands:
Menubar -> File -> Export VRML/Raytracing -> Wavefront
This will create several files: the output `your.wave' is a Wavefront command file that can be processed in
command mode:
set path "your/full/path/directory"
run your.wave
For each separate color and ribbon, files named `your_N.obj' are written that actually describe the
graphical objects.
To get in other objects, ie, spheres, go to $RIBBONS_HOME/misc/wave and look at the Read.Me file. 3)
run the wavefront program:
file:///C|/My Documents/ribbons/help/raytrace.html (3 of 4) [4/3/2001 2:09:54 PM]
Ribbons Raytracing Support Help
You are on your on - it has so many options. The example images had various wood and metalic textures
applied.
Radiance and ribbons
1) adjust the ribbons display to your pleasure. Currently, only sphere, cylinder, and faceted polygons
supported.
2) save the orientation matrix. Process all the files to transform the primitives. Will supply the *.C code &
awk scripts on request. This makes it much easier to get the lighting right.
3) run the radiance program.
This needs more work - please let me know if interested.
Ribbons User Manual / UAB-CBSE / [email protected]
file:///C|/My Documents/ribbons/help/raytrace.html (4 of 4) [4/3/2001 2:09:54 PM]
Ribbons Virtual Reality Support Help
Virtual Reality Modeling Language
VRML is the standard for 3-D graphics on the World Wide Web. VRML is a platform-independent file
format. SGI's `Inventor' format was initially chosen as a basis of scene and geometric object description
language in 1995 (VRML 1.0). In 1996, the `Moving Worlds' proposal by a consortium of companies
(mostly SGI) was voted by the VRML community to form the new standard (VRML 2.0), defeating the
proposal of MicroSoft. VRML 2.0 worlds can be interactive and animated. You can get free VRML
plug-ins for your brower (I use CosmoPlayer on both my SGI and PC) from SGI's VRML Web site:
http://www.vrml.com
The VRML home page is: http://vrml.wired.com
There's lots of good stuff on VRML at the San Diego Supercomputing Center's VRML Repository:
http://www.sdsc.edu/vrml
Inventor is nearly dead, but most will be incorporated into either OpenGL++ or the Fahrenheit project.
The Open Inventor Home page is: http://www.sgi.com/Technology/Inventor.html
VRML and ribbons
Some background, examples, and the steps to create the files are given below.
VRML 1.0 (Inventor)
Ribbons++, presented at the 1993 annual meeting of the Molecular Graphics Society, used the Inventor
toolkit ( it's on my website ).
Some sample `*.iv' files are on the CMC web site: http://www.cmc.uab.edu/VRML1.0
1. adjust the ribbons display to your pleasure.
2. save a *.iv format VRML-1.0 ascii file:
Menubar -> File -> Export VRML/Raytracing -> Inventor
3. view with `ivview' on an SGI machine.
Note, the files are `centered' for convenient viewing. If using a viewer that takes multiple files, and
you need the absolute origin, comment out (add '#' before) the centering translation at the 5th line:
Transform {translation ...
VRML 2.0
The Sound of Sequence was a VRML 2.0 site prepared for the first Molecular Graphics and Modeling
Society Electronic Conference on the Web in 1996. This site uses the audio and animation techniques
new in VRML 2.0: http://www.cmc.uab.edu/SoundOfSequence
Part of the CMC intranet site also has demonstrations in VRML 2.0: http://www.cmc.uab.edu/VRML2.0
file:///C|/My Documents/ribbons/help/vrml.html (1 of 2) [4/3/2001 2:10:57 PM]
Ribbons Virtual Reality Support Help
1. adjust the ribbons display to your pleasure.
2. save a *.wrl format VRML-2.0 ascii file:
Menubar -> File -> Export VRML/Raytracing -> Inventor
(or just: Alt-w)
Note: this saves `your.wrl' and `your_inline.wrl', the latter being the actual geometry. The former
defines the viewpoints (see below).
3. view with netscape, after you install the CosmoPlayer plug-in.
4. toggle the different Viewpoints.
'default' should be about as it was in ribbons , 'flying' gives a rollercoaster effect.
Note, the files are `centered' for convenient viewing. If using a viewer that takes multiple files, and
you need the absolute origin, comment out (add '#' before) the centering translation at ~the 25th
line, right after `DEF CompleteModel Transform': translation ...
Can add more named viewpoints to allow user to examine from several pre-defined views (get
these by saving more `*.wrl' files). Pitch everything after the `animation' stuff starts, if this is
annoying.
Ribbons User Manual / UAB-CBSE / [email protected]
file:///C|/My Documents/ribbons/help/vrml.html (2 of 2) [4/3/2001 2:10:57 PM]
Ribbons Color Index Help
Ribbons Color Index Scheme
Color is one of the main user-configurable options of ribbons .
`Color' is used in two senses:
(1) colors (`material properties' in graphics lingo) are set by
(2) color index integers in the range 0..40.
For example, everything that has color index `5' will be the same material/shininess.
Color indices are set explicitly for each primitive brought in by the atoms, bonds, texts, polys, and ndots
files. Each group of these may be set to a single color index through the appropriate control panel.
For each residue section in the ribbons, the `*.ss' file determines the ribbon's residue colors through a
look-up table set in the `*.color' file. White is the default color if no look-up is set. Each chain may be set
to a single color through the ribbons style panel. The different ribbon coloring schemes are also set with
this panel.
Default Color Index Table
1. Red
2. Green
3. Yellow
4. Blue
5. Magenta
6. Cyan
7. White
8. Orange
9. Grey
10. Lapis
11. Silver
12. Lavender
13. Black
14. Gold
15. Rose
16. Lightgreen
17. .. 40. `rainbow'
The first seven colors indices are the old SGI colormap defaults. Color '0' is the background. This menu
of colors may be changed by means of the Color Panel . Recommend that you make drastic changes only
to colors 15 and higher (ie, use these for your `special' colors and surface properties).
WHATIF? If you use ribbons as part of the WHATIF modeling program, all the colors 1..39 form a
file:///C|/My Documents/ribbons/help/colorindex.html (1 of 2) [4/3/2001 2:11:10 PM]
Ribbons Color Index Help
spectrum based on the old PS300 color wheel, going from blue to red to green and back to blue.
Initialization
The color index material properties may be saved/restored with the Write/Read Materials widgets from
the File option of the MenuBar in the form of a *.matter file.
The file `$RIBBONS_HOME/data/.matter' may be setup for alternative colors for all users. When the
program begins execution it reads this file if present, then searches your current directory for `.matter',
then `model_name.matter'. See the sample files there for examples.
Special colors
Special colors are `reserved' for ribbon texturing. The colorindex and purpose are given below
● 0 -- don't draw this ribbon residue
● 9 -- backside of the ribbon and underlay grid (GRAY)
● 1 -- `oxygen-edge' of the ribbon (RED)
● 4 -- `nitrogen-edge' of the ribbon (BLUE)
Black and white
Black and white is usually cheaper for publication. Try out some of the new options in the Image Panel.
An *.rgb file can be converted to black and white and sharpened with the SGI utility `imgworks'
usage: imgworks image.rgb
Ribbons User Manual / UAB-CBSE / [email protected]
file:///C|/My Documents/ribbons/help/colorindex.html (2 of 2) [4/3/2001 2:11:10 PM]
Ribbons Demo Image Help
Ribbons 2.0 Demo Models and Images
All highlighted names in the two lists below are available through the command: ribbons-demo -n name
Picking any of the choices below jumps to the image. The commands and interactions used to create
them are given in the notes below the image.
These are low-quality *.gif file images for HTML. The corresponding *.rgb file names are in the
$RIBBONS_HOME/rgb directory.
●
his -- histidine black and white, space-filling and ball-n-stick.
●
ubiq -- ubiquitin ribbon drawing.
●
calmod -- calmodulin ribbon, plus helices fit to cylinders.
●
toxin -- scorpion toxin, highlighting aromatics.
●
dna -- DNA double helix, `ladder' style.
file:///C|/My Documents/ribbons/help/image_eg_20.html (1 of 2) [4/3/2001 2:11:45 PM]
Ribbons Demo Image Help
●
●
trna -- tRNA with `paddle' bases, labeled by domain.
fancy -- ray-traced interferon.
Picking any of the choices below jumps to a description of the commands used to create the display
model. No sample image is provided. (Make your own!).
● globin -- Hb tetramer with Multiple protein ribbons and surfaces.
●
combo -- mixing protein and nucleic acid ribbons.
●
n9 -- neuraminidase surface, plus ball-n-stick inhibitor.
●
movie -- animation sequence of protein conformational change.
Ribbons User Manual / UAB-CBSE / [email protected]
file:///C|/My Documents/ribbons/help/image_eg_20.html (2 of 2) [4/3/2001 2:11:45 PM]
Ribbons 'his' Sample Image Help
ribbons-demo -n his
Data Files:
The single histidine from the protein ubiquitin was filtered out of the *.pdb file:
grep HIS ubiq.pdb > his.pdb
Files for a default ball-n-stick drawing were generated:
atom-model his.pdb
The model name 'his' is taken by default from the name of the *.pdb file. The ribbons database for this display is
generated by 'atom-model'. Below explains what is going on and the actual ribbons commands issued.
A set of spheres color-coded by atom type was generated:
pdb-atom-sph his.pdb his.sph
A set of split bonds colored by atom type was generated:
sph-bond his.sph his.cyl
file:///C|/My Documents/ribbons/help/his_rgb.html (1 of 2) [4/3/2001 2:12:02 PM]
Ribbons 'his' Sample Image Help
The *.atoms file consists of only one filename:
ls his.sph > his.atoms
The *.bonds file consists of only one filename:
ls his.cyl > his.bonds
The *.model file was generated:
pdb-model his.pdb his.model
The data base was enhanced by hand editing 'his.model' file to change the descriptive name to 'histidine'. The file
'his.str' was created with the editor to display a single string. (The string files have the same format as the *.sph
files). The color index is 14 (gold).
The *.texts file consists of only one filename:
ls his.str > his.texts
The model is now ready for display:
ribbons -n his
Image File: $RIBBONS_HOME/rgb/his.rgb
The colors were adjusted to be shades of gray with different shinyness properties. The background was set to
white. Outlining was turned on with a line width of 4. One image had the Sphere Radius set to 0.6 for a
space-filling model, the other had the Radius set to 0.12 for a ball-and-stick.
The window size was maximized before saving the file 'save.rgb' through the File Menu and PrintScreen. On my
machine, this gives an image 1224x978 pixels. (Use SGI command 'istat save.rgb' to get pixel size.) On my
machine, the monitor is 1280x1024 pixels. To make the image as large as possible, use the SGI command:
izoom save.rgb full.rgb 1.046 1.047'
( 1.046 = 1280/1224; 1.047 = 1024/978 ).
The two images were compositied using the standard SGI image tools. Clip the full screen images in half in X:
subimg full.rgb half.rgb 320 959 0 1023
These two ``half'' images were placed side by side:
ipaste ball.hrgb -n -o 0 0
ipaste stick.hrgb -n -o 640 0
scrsave temp.rgb
izoom temp.rgb his.rgb 0.5 0.5
Note: The 'tobw' command will convert full-color RGB to black and white:
tobw color.rgb bw.rgb
Note: The SGI 'imgworks' command will start a program to do all sorts of image manipulations.
Ribbons User Manual / UAB-CBSE / [email protected]
file:///C|/My Documents/ribbons/help/his_rgb.html (2 of 2) [4/3/2001 2:12:02 PM]
Ribbons 'ubiq' Sample Image Help
ribbons-demo -n ubiq
Data Files:
The small protein ubiquitin solved in this laboratory was taken from the Protein Data Bank (code is
`1UBQ'). The file was edited to remove all but the main reference and protein atoms and named `ubiq.pdb'.
A secondary structure assignment was made based on H-bonding:
pdb-pro-pdb ubiq.pdb ubiq.ss
This file was then edited to replace the 'S' at the ends of the sheets with an 'A' to produce `arrows' on the
sheet. The first residue was also changed, from `coil' to "sheet" ( program doesn't know how to calculate
N-terminal hydrogens ).
The *.ribbons file consists of only one filename:
ls ubiq.ss > ubiq.ribbons
file:///C|/My Documents/ribbons/help/ubiq_rgb.html (1 of 2) [4/3/2001 2:12:14 PM]
Ribbons 'ubiq' Sample Image Help
This file was then edited to add a special color file, `protein.color'.
The *.coords file consists of only one filename:
ls ubiq.pdb > ubiq.coords
The *.model file was generated:
pdb-model ubiq.pdb ubiq.model
The protein ribbon model is now ready for display.
Image File: $RIBBONS_HOME/rgb/ubiq.rgb
The file ubiq.ss was edited to add arrows to the ss key. The model was displayed with default settings on the
Ribbon Panel for everything except:
Sequence Color = `seq'
Sheet Style = `Square'
Helix Style = `Flat'
Coil Style = `Circle'
Helix Texture = `Sided'
The light source was moved overhead with the Color Panel. The image was saved from the Geom Panel.
Labels were added with the ilabel command:
ilabel ubiq0.rgb ubiq.rgb
Ribbons User Manual / UAB-CBSE / [email protected]
file:///C|/My Documents/ribbons/help/ubiq_rgb.html (2 of 2) [4/3/2001 2:12:14 PM]
Ribbons 'calmod' Sample Image Help
ribbons-demo -n calmod
Data Files:
The calcium binding protein calmodulin solved in this laboratory was taken from the Protein Data Bank
(code is `3CLN'). The file was edited to remove all but the main reference and protein and calcium atoms
and named `calmod.pdb'.
A secondary structure assignment was made based on H-bonding:
pdb-pro-pdb calmod.pdb calmod.ss
This file was then edited to replace the 'S' at the ends of the sheets with an 'A' to produce "arrows" on the
sheet. ( at Babu's advice, set 26-28, 62-64, 99-101, 135-137 to sheets, and lengthened helices 4 and 6 by one
residue, helix 8 by 2. )
The *.ribbons file consists of only one filename:
file:///C|/My Documents/ribbons/help/calmod_rgb.html (1 of 3) [4/3/2001 2:12:18 PM]
Ribbons 'calmod' Sample Image Help
ls calmod.ss > calmod.ribbons
This file was then edited to add a special color file, `protein.color'.
The *.coords file consists of only one filename:
ls calmod.pdb > calmod.coords
The calcium atoms were separated placed in a separate file:
GREP HETATM calmod.pdb > calmod_cal.pdb
The calciums were turned into silver spheres (color-11)
pdb-range-sph calmod_cal.pdb calmod_cal.sph
( input line-1 at terminal: 1 4 11 )
( input line-2 at terminal: ctrl-D )
The *.atoms file consists of only one filename:
ls calmod_cal.sph > calmod.atoms
The cylinders to model the helix were created in several steps. First, a list was prepared of the residue
ranges in the helices:
ss-hx-range calmod.ss calmod_hx.run
Next the alpha carbons in these ranges are fit to ideal helices:
pdb-hx-fit calmod.pdb calmod_hx.run > calmod_hx.fit
Finally the fit output is converted to bond format:
hx-dipole-cyl calmod_hx.fit calmod_hx.cyl
The *.bonds file consists of only one filename:
ls calmod_hx.cyl > calmod.bonds
The *.ss file was enhanced to include coloring by equivalent helices in the domains and by mainchain
dihedral values.
The file calmod_hx.run was edited to chose colors for the ranges, then a new *.ss file was created (the old
thrown replaced):
pdb-range-ss calmod.ss new.ss
mv new.ss calmod.ss
Next `rama' and `omega' keys were added:
pdb-rama-ss calmod.pdb calmod.ss
The *.model file was generated:
pdb-model calmod.pdb calmod.model
The protein ribbon model, plus atoms, plus `bonds' is now ready for display.
Image File: $RIBBONS_HOME/rgb/calmod.rgb
The model was displayed with default settings on the Ribbon Panel for everything except:
Chain Color = `15' (gold)
Helix Style = `Circle'
file:///C|/My Documents/ribbons/help/calmod_rgb.html (2 of 3) [4/3/2001 2:12:18 PM]
Ribbons 'calmod' Sample Image Help
Coil Style = `Circle'
Ribbon Threads = `13'
Ribbon Samples = `13'
Sheet Width = `4.0'
Helix Width = `1.3'
Helix Depth = `1.3'
Coil Width = `1.7'
Coil Depth = `0.3'
The color #11 (silver) was modified with the Color Panel to add Blue Emission, to produce the glowing
calcium atoms. The Geom Panel had the default settings except:
Sphere Radii = `1.25'
Bond Radii = `1.35'
Cylinder Depth = `24'
The image was then saved.
Ribbons User Manual / UAB-CBSE / [email protected]
file:///C|/My Documents/ribbons/help/calmod_rgb.html (3 of 3) [4/3/2001 2:12:18 PM]
Ribbons 'toxin' Sample Image Help
ribbons-demo -n toxin
Data Files:
The small protein scorpion neurotoxin (variant-3) solved in this laboratory was taken from the Protein Data
Bank (code is `1SN3'). The file was edited to remove all but the main reference and protein atoms and
named `toxin.pdb'.
A secondary structure assignment was made based on H-bonding:
pdb-pro-pdb toxin.pdb toxin.ss
The *.ribbons file consists of only one filename:
ls toxin.ss > toxin.ribbons
This file was then edited to add a special color file, `protein.color'.
file:///C|/My Documents/ribbons/help/toxin_rgb.html (1 of 3) [4/3/2001 2:12:27 PM]
Ribbons 'toxin' Sample Image Help
The *.coords file consists of only one filename:
ls toxin.pdb > toxin.coords
The *.model file was generated:
pdb-model toxin.pdb toxin.model
( edited the *.model file to change the menu name )
The *.atoms file will consist of two parts. These are all created from a temporary file `tox.sph', colored by
residue with backbone atoms excluded:
pdb-res-sph -b 0 toxin.pdb tox.sph
1) create a file of SG atomic spheres:
grep sg tox.sph > toxin_sg.sph
2) create a file with only aromatic spheres:
touch toxin-arom.sph
foreach i ( F Y H W )
grep $i tox.sph >> toxin-arom.sph
end
Group atoms together:
ls toxin-arom.sph > toxin.atoms
ls toxin_sg.sph >> toxin.atoms
The model was displayed at this stage to color and select the special `ribbon-bonds':
ribbons
( display the ribbon, open Ribbon Panel. set Sequence Color = `seq', set Print Select = `CB-bond', Print File
=> toxin_cb0.rcyl set Print Select = `SG-bond', Print File => toxin_sg0.rcyl Exit ribbons )
The *.bonds file will consist of three parts.
1) The disulphide bonds are set (all CYS form bridges in the toxin):
mv toxin_sg0.rcyl toxin_sg.rcyl
2) The ribbon-bonds to the aromatic residues are selected:
touch toxin_cb.sph foreach i ( F Y H W ) grep $i toxin_cb0.rcyl >> toxin_cb.rcyl end
3) The bonds in the aromatic side chains are calculated:
sph-bond toxin-arom.sph toxin-arom.cyl
Group bonds together:
ls toxin-arom.cyl > toxin.bonds
ls toxin_sg.rcyl >> toxin.bonds
ls toxin_cb.rcyl >> toxin.bonds
Create the solid aromatic ring polygons:
pdb-pro-ring toxin.pdb toxin-ring.tri
Create the *.polys file from this single set:
ls toxin-ring.tri > toxin.polys
file:///C|/My Documents/ribbons/help/toxin_rgb.html (2 of 3) [4/3/2001 2:12:27 PM]
Ribbons 'toxin' Sample Image Help
Image File: $RIBBONS_HOME/rgb/toxin.rgb
The model was displayed with default settings on the Ribbon Panels for everything except:
Sequence Color = `ss'
Ribbon Style = `Circle'
Sheet Width = `2.5'
Helix Width = `2.2'
The Atom Panel had the default settings except:
Sphere Radii = `0.30' ( for toxin_sg.sph )
Sphere Radii = `0.45' ( for toxin-arom.sph )
The image was saved.
-ps, this demo was used in the movie `Jurassic Park' (for about a second).
Ribbons User Manual / UAB-CBSE / [email protected]
file:///C|/My Documents/ribbons/help/toxin_rgb.html (3 of 3) [4/3/2001 2:12:27 PM]
Ribbons 'dna' Sample Image Help
ribbons-demo -n dna
Data Files:
An ideal 24-base pair B-DNA model was provided by Robert Tan. This file was edited to produce two pdb
files, one for each strand: `bdna_1.pdb' and `bdna_2.pdb'.
A secondary structure assignment was made automatically:
foreach i ( 1 2 )
pdb-nuc-ss bdna_$i.pdb bdna_$i.ss
end
The *.ribbons file consists of two filenames:
ls bdna_1.ss > dna.ribbons
ls bdna_2.ss >> dna.ribbons
file:///C|/My Documents/ribbons/help/dna_rgb.html (1 of 2) [4/3/2001 2:12:35 PM]
Ribbons 'dna' Sample Image Help
This file was then edited to add a special color file, `nucleic.color'.
The *.coords file consists of two filenames:
ls bdna_1.pdb > dna.coords
ls bdna_2.pdb >> dna.coords
This file was then edited to add the special `nucleic' keys.
The *.model file file was created, then edited to change the menu name:
pdb-model dna.pdb dna.model
The model was displayed at this stage to color and select the special `base-Hydrogen bonding' bonds:
ribbons
( display the ribbon, open Ribbon Panel. set Sequence Color = `seq', set Print Select = `base-H', Print File =
`dna_bh0.rcyl' Exit ribbons )
This cylinder file was renamed:
mv dna_bh0.rcyl dna_base.cyl
The *.bonds file consists of only one filename:
ls dna_base.cyl > dna.bonds
The complete double-stranded nucleic acid model is now ready for display.
Image File: $RIBBONS_HOME/rgb/dna.rgb
The model was displayed with default settings on the Ribbon Panel for everything except:
Sequence Color = `chain'
Chain Color = `11' ( bdna_1 )
Chain Color = `16' ( bdna_2 )
Ribbon Style = `Circle'
Ribbon Samples = `11'
The image was saved.
-ps, this was the demo used in the movie `Jurassic Park' (for about 2 seconds).
Ribbons User Manual / UAB-CBSE / [email protected]
file:///C|/My Documents/ribbons/help/dna_rgb.html (2 of 2) [4/3/2001 2:12:35 PM]
Ribbons 'trna' Sample Image Help
ribbons-demo -n trna
Data Files:
A F-MET t-RNA modelled by Prabhakaran was used.
A secondary structure assignment was made automatically:
pdb-nuc-ss trna.pdb trna.ss
This file was then edited by hand to add a code for the `domains' of the tRNA molecule.
The *.ribbons file consists of only one filename:
ls trna.ss > trna.ribbons
This file was then edited to add a special color file, `nucleic.color'.
The *.coords file consists of only one filename:
file:///C|/My Documents/ribbons/help/trna_rgb.html (1 of 2) [4/3/2001 2:12:48 PM]
Ribbons 'trna' Sample Image Help
ls trna.pdb > trna.coords
This file was then edited to add the special `nucleic' key.
The *.model file file was created, then edited to change the menu name:
pdb-model trna.pdb trna.model
The model was displayed at this stage to color and select the special `base-attachment' bonds:
ribbons
( display the ribbon, open Ribbon Panel. set Sequence Color = `dom', set Print Select = `base-A', Print File =>
trna_ba0.rcyl Exit ribbons )
This cylinder file was renamed:
mv trna_ba0.rcyl trna_ba.rcyl
Created white bonds to outline the bases:
pdb-range-sph -b 0 -h trna.pdb trna.bb
( range 1,77; color 7)
sph-bond trna.bb trna_base.cyl
The *.bonds file consists of two filenames:
ls trna_ba.rcyl > trna.bonds
ls trna_base.cyl >> trna.bonds
Create the solid aromatic ring polygons:
pdb-nuc-ring trna.pdb trna-ring.tri
Create the *.polys file from this single set:
ls trna-ring.tri > trna.polys
The complete nucleic acid model is now ready for display.
Image File: $RIBBONS_HOME/rgb/trna.rgb
The model was displayed with default settings on the Ribbon Panel for everything except:
Sequence Color = `dom'
Ribbon Style = `Square'
Ribbon Texture = `Dipole'
Sheet Width = `6.0'
Helix Width = `0.3'
Ribbon Sample = `13'
Adjusted the bond radii of the `trna_base.bond' list to 0.5. The image was saved from the Geom Panel.
Ribbons User Manual / UAB-CBSE / [email protected]
file:///C|/My Documents/ribbons/help/trna_rgb.html (2 of 2) [4/3/2001 2:12:48 PM]
Ribbons Image Gallery Help
Ribbons Image Gallery
Assorted images from programs Ribbon, Ribbons 2.0, and prototype Ribbons++.
Picking any of the choices below jumps to the image and notes.
Note these are low-quality *.gif file images for HTML.
Old files with black backgrounds have been changed to white with my tool iwhite for printing the
manual. All images have been scaled to about 1/4 size, sharpened, and converted to *.gif with the SGI
tool imgworks . Links to the original corresponding *.rgb files are provided in the notes.
●
Calmodulin ('86)
-- Original raster version of Ribbon.
●
Transfer RNA ('87)
-- First nucleic acid model with Ribbon.
●
Ubiquitin Space Curve ('88)
-- Mapping secondary structure from the ribbons's differential geometry.
●
PNP Electron Density ('88)
-- Mapping degree of fit of native structure to electron density map.
●
Superimposed Proteins ('91)
-- Ribbons 2.0 developed on SGI 4D machine.
file:///C|/My Documents/ribbons/help/image_art.html (1 of 3) [4/3/2001 2:13:13 PM]
Ribbons Image Gallery Help
●
Mother of All Molecules ('91)
-- Wavefront software used for fanciful ray-tracing of DNA and Venus.
●
Interferon: Wood on Marble ('91)
-- Wavefront software used for fanciful ray-tracing of a protein.
●
Diffraction Space: The Final Frontier ('92)
-- Area detector frames become a landscape with insulin as the moon.
●
Molecular Replacement ('93)
-- Visualization of molecular replacement results from X-PLOR.
●
Error Analysis ('93)
-- Comparison on modeling of Factor D with MIR X-ray results.
●
PNP: Target for Drug Design ('93)
-- Ribbons++ prototype and a little joke.
file:///C|/My Documents/ribbons/help/image_art.html (2 of 3) [4/3/2001 2:13:13 PM]
Ribbons Image Gallery Help
●
DNA Modeled with NURBS ('93)
-- A new way to look at DNA, module DNurbs from Ribbons++.
●
More Textured DNurbs ('93)
-- Two patch per base pair DNurb with chemistry shown by texturing.
●
Protein Crystallography ('94)
-- The technique explained in five easy steps.
●
Wavelets Transforms ('95)
-- Multiresolution curve analysis of Neuraminidase.
●
Drug at the end of the Rainbow ('98)
-- POV ray tracer applied to ribbon model of Trypsin.
Ribbons User Manual / UAB-CBSE / [email protected]
file:///C|/My Documents/ribbons/help/image_art.html (3 of 3) [4/3/2001 2:13:13 PM]
Ribbons 'cmrib0' Gallery Image Help
Calmodulin ('86)
Notes:
The lab got its first UNIX workstation and raster device, an SGI IRIS 2400, in '86. Program 'Ribbon'
adapted from its 3D manipulation demo and the my E&S PS300 program 'BSribbon' soon thereafter.
Shown at '88 ACA art show. Hangs in my den.
file:///C|/My Documents/ribbons/help/cmrib0_rgb.html (1 of 2) [4/3/2001 2:13:32 PM]
Ribbons 'cmrib0' Gallery Image Help
Image File: website/cmrib0.rgb
Ribbons User Manual / UAB-CBSE / [email protected]
file:///C|/My Documents/ribbons/help/cmrib0_rgb.html (2 of 2) [4/3/2001 2:13:32 PM]
Ribbons 'trna0' Gallery Image Help
Transfer RNA ('87)
Notes:
First raster nucleic acid model with Ribbon program, developed after prodding from Steve Harvey. It is a
model of the f-Met tRNA. Shown at '88 ACA art show.
Image File: website/trna0.rgb
Ribbons User Manual / UAB-CBSE / [email protected]
file:///C|/My Documents/ribbons/help/trna0_rgb.html [4/3/2001 2:13:42 PM]
Ribbons 'ubiq_kt' Gallery Image Help
Ubiquitin Space Curve ('88)
Notes:
Mapping of secondary structure from the curvature and torsion of the ribbon space curve as defined in
the '87 ribbons paper. Presented at '88 ACA meeting.
Image File: website/ubiq_kt.rgb
Ribbons User Manual / UAB-CBSE / [email protected]
file:///C|/My Documents/ribbons/help/ubiq_kt_rgb.html [4/3/2001 2:13:49 PM]
Ribbons 'pnp_ed' Gallery Image Help
PNP Electron Density ('88).
Notes:
Degree of fit of native structure of Purine Nucleoside Phosphorylase to the best map at that time. Cooler
colors show better fit. Presented at '88 ACA meeting.
Image File: website/pnp_ed.rgb
Ribbons User Manual / UAB-CBSE / [email protected]
file:///C|/My Documents/ribbons/help/pnp_ed_rgb.html [4/3/2001 2:15:19 PM]
Ribbons '7_ases' Gallery Image Help
Superimposed Proteins ('91)
Notes:
Ribbons 2.0 was developed in '90 once we got an SGI 4D series machine, using the new & improved graphics, eg
hardware lighting effects. Seven serine proteases superimposed, used to model Factor D, the rate-limiting enzyme
in the human complement pathway. Image published in 'Ribbons 2.0' paper in J.Appl.Cryst, '91.
Image File: website/7_ases.rgb
Ribbons User Manual / UAB-CBSE / [email protected]
file:///C|/My Documents/ribbons/help/7_ases_rgb.html [4/3/2001 2:15:25 PM]
Ribbons 'mother' Gallery Image Help
Mother of All Molecules ('91)
Notes:
Ribbons 2.0 has nucleic acid features and can output files in 'Wavefront' format. Wavefront is a big name in
graphics modeling software (their 'Personal Visualizer' used to be free with your SGI). Attached various textures
to the ribbons and bases, and used assorted 3D objects provided by Wavefront. Presented at '91 MGS meeting.
Given a 'Visual Computing' award by SGI in '97.
Image File: website/mother.rgb
Ribbons User Manual / UAB-CBSE / [email protected]
file:///C|/My Documents/ribbons/help/mother_rgb.html [4/3/2001 2:15:54 PM]
Ribbons 'fancy' Sample Image Help
Interferon: Wood on Marble ('91)
Data Files: ( none included )
The protein gamma-interferon solved in this laboratory was taken in its current state of refinement. This picture
and a paper were submitted to "Science". (Didn't make it as the cover picture, but article has some good images.
see Ealick etal, 1991, Science, 252:698-702.)
The image inspired the creation of a large sculpture commissioned Schering-Plough for their Research Institute in
Kenilworth, NJ, created in wood by the Alabama artist Craig Nutt.
The active molecule is a dimer, the tetramer is an artifact of crystallization. Four *.pdb files were prepared. A
secondary structure assignment was made: interferon is all helical with coils between the helices.
file:///C|/My Documents/ribbons/help/fancy_rgb.html (1 of 2) [4/3/2001 2:16:08 PM]
Ribbons 'fancy' Sample Image Help
Image File: $RIBBONS_HOME/rgb/fancy.rgb
The model was displayed with default settings on the Ribbon Panel for everything except:
Ribbon Style = "Circle'
The Wavefront files were saved from the Ribbon Panel.
The rendering was done with the Personal Visualizer.
Ribbons User Manual / UAB-CBSE / [email protected]
file:///C|/My Documents/ribbons/help/fancy_rgb.html (2 of 2) [4/3/2001 2:16:08 PM]
Ribbons 'dspace' Gallery Image Help
Diffraction Space: The Final Frontier ('92)
Notes:
Area detector frames from the x-ray diffraction of an insulin crystal were input into the IRIS Explorer, a dataflow
environment for scientific visualization (which used to be free with your SGI). The 'land' has the beam stop to the
far left, peaks proportional to sqrt(I), and background color mapping adjusted to make the water ring bluish. An
insulin from Ribbons as the moon. Unsuccessful entry in the MGS '94 art show. Part of the '96 IUCr art show,
was destroyed in shipping. Used to hang in my study.
Image File: website/dspace.rgb
Ribbons User Manual / UAB-CBSE / [email protected]
file:///C|/My Documents/ribbons/help/dspace_rgb.html [4/3/2001 2:16:22 PM]
Ribbons 'fd_mr' Gallery Image Help
Molecular Replacement ('93)
file:///C|/My Documents/ribbons/help/fd_mr_rgb.html (1 of 2) [4/3/2001 2:16:32 PM]
Ribbons 'fd_mr' Gallery Image Help
Notes:
My 'solution' of factor D structure using my model built by homology and the molecular replacement
results of X-PLOR. Program 'MolRep' in the Inventor environment was created, another module of
'Ribbons++'. (The program is an ad-hoc toy, specific for me, not general, and not ready for release).
Image presented at '93 MGS meeting. Part of the '94 SigGraph Applications slide set.
Image File: website/fd_mr.rgb
Ribbons User Manual / UAB-CBSE / [email protected]
file:///C|/My Documents/ribbons/help/fd_mr_rgb.html (2 of 2) [4/3/2001 2:16:32 PM]
Ribbons 'fd_err' Gallery Image Help
Error Analysis ('93)
file:///C|/My Documents/ribbons/help/fd_err_rgb.html (1 of 2) [4/3/2001 2:16:46 PM]
Ribbons 'fd_err' Gallery Image Help
Notes:
Comparison on my modeling of Factor D with Narayana's MIR X-ray results. Rendering with the free
ribbons version 2.4, legend added with IRIS 'Showcase'. Top left are the serine proteases used for the
majority of the modeling and top right final Factor D, all colored by B-factor. Lower panels are my initial
models and models made by Quanta's homology modeling package before and after Xplor (different, but
no improvement, both 90% right and wrong in critical active site regions). See our error detection
protocol paper.
Image File: website/fd_err.rgb
Ribbons User Manual / UAB-CBSE / [email protected]
file:///C|/My Documents/ribbons/help/fd_err_rgb.html (2 of 2) [4/3/2001 2:16:46 PM]
Ribbons 'target' Gallery Image Help
PNP: Target for Drug Design ('93)
file:///C|/My Documents/ribbons/help/target_rgb.html (1 of 2) [4/3/2001 2:17:06 PM]
Ribbons 'target' Gallery Image Help
Notes:
Ribbons++ prototype developed with 'Inventor', the 3D object-oriented toolkit sold by SGI. Dart is a
sample object provided in the Inventor format. Code was first-pass conversion of the ANSI C ribbons 2.4
into the C++ language. Presented at MGS '93 meeting. Also shown at the MGS '94 art show.
Image File: website/target.rgb
Ribbons User Manual / UAB-CBSE / [email protected]
file:///C|/My Documents/ribbons/help/target_rgb.html (2 of 2) [4/3/2001 2:17:06 PM]
Ribbons 'dnurb1' Gallery Image Help
DNA Modeled with NURBS ('93)
file:///C|/My Documents/ribbons/help/dnurb1_rgb.html (1 of 2) [4/3/2001 2:17:21 PM]
Ribbons 'dnurb1' Gallery Image Help
Notes:
This representation inspired by Steve Harvey, he calls it a 'barber-pole' illustration. DNurbs is a C++
program written to model the surface of DNA with the NURBS (Non Uniform Rational B-Spline) curves
and surfaces from the IRIS Inventor 3-D object-oriented toolkit. This is a module in the 'Ribbons++'
project. Presented at MGS '93 meeting. Also shown at the MGS '94 art show.
Image File: website/dnurb1.rgb
Ribbons User Manual / UAB-CBSE / [email protected]
file:///C|/My Documents/ribbons/help/dnurb1_rgb.html (2 of 2) [4/3/2001 2:17:21 PM]
Ribbons 'dnurb2' Gallery Image Help
More Textured DNurbs ('93)
Notes:
More Textured DNurbs ('93)
Two patch per base pair DNurb with chemistry shown by texturing. Compare the 'Ribbons++' spacefilling
version, colored by atom, with the colored texture patches. Four segments color the major groove and three
segments color the minor groove per atom type. The DNurbs algorithm is published: J.Mol.Graphics, Sept '94.
Image File: website/dnurb2.rgb
Ribbons User Manual / UAB-CBSE / [email protected]
file:///C|/My Documents/ribbons/help/dnurb2_rgb.html [4/3/2001 2:17:32 PM]
Ribbons 'xtallog' Gallery Image Help
Protein Crystallography ('94)
Notes:
This rendition from a sketch on a napkin by Charlie Bugg. Used a Mac to scan in the image of an actual
crystal, IRIS Inventor and Ribbons create the other panels, with assistance from Greg Ward's ray-tracer
'radiance'. Part of the '94 SigGraph Applications slide set.
Image File: website/xtallog.rgb
Ribbons User Manual / UAB-CBSE / [email protected]
file:///C|/My Documents/ribbons/help/xtallog_rgb.html [4/3/2001 2:17:45 PM]
Ribbons 'wavelets' Gallery Image Help
Wavelet Analysis of Protein Backbones ('95)
Notes:
Uses the multiresolution representation of B-spline curves developed by Finkelstein and Salesin at SigGraph '94.
This is a module in the 'Ribbons++' project. Presented at MGS '95 meeting. From `Wavelets and Molecular
Structure', J. Computer-Aided Molecular Design (1996) 10:273-283.
Image File: website/wavelets.rgb
Ribbons User Manual / UAB-CBSE / [email protected]
file:///C|/My Documents/ribbons/help/wavelets_rgb.html [4/3/2001 2:17:58 PM]
Ribbons 'rainbow' Gallery Image Help
Drug at the End of the Rainbow ('98)
Notes:
Uses the free and very cool POV ray-tracer to render the output of ribbons with some atmospheric effects. The
model is Trypsin plus a potential drug molecule. Shown in the poster session at the ACA '99 meeting. From
Recacha et al, `Structure of the RWJ-51084-Bovine Pancreatic beta-Trypsin Complex at 1.8A', Acta Cryst (1999)
D55:1785-1791.
Image File: website/rainbow.rgb
Ribbons User Manual / UAB-CBSE / [email protected]
file:///C|/My Documents/ribbons/help/rainbow_rgb.html [4/3/2001 2:18:16 PM]
Ribbons Frequently Asked Questions Help
Frequently Asked Questions
●
Why can't I save an Image?
●
How do I save all my adjustments?
●
How do I set the Background Color?
●
How do I custom-color my Ribbon Model?
●
How do I draw Disulphides?
●
How do I draw Hydrogen Bonds / Dashed Bonds?
●
All my secondary structure keys don't show up?
Why can't I save an Image?
You probably didn't hit the `PrintScreen' key on your SGI after the menus go away.
How do I save all the adjustments I've interactively set?
Hit 'Alt-z' to zero and save the three files below.
Use the `File' submenu from the `MenuBar':
Save Defaults -- to save all style and scale adjustment.
Save Materials -- to save any color adjustments
Save Orientation -- to save any viewing parameters
If you save `.matter', this will apply to all models in that directory the next time you start ribbons. If you
save `YourModel.matter', this will apply to the model `YourModel'. Ditto for `.defaults' and `.orient'
files.
If you think every user in your group should always use some particular settings, save, for example,
`.matter' in the $RIBBONS_HOME/data directory.
How do I set the Background Color?
Use the Light Panel (alt-l), then adjust the sliders.
If you want black/white background: 1) select "View" sub-menu from the main menu.
2) select the toggle "White Background" (this is good for screen dumps to a printer) The next time it is
selected, it should read: "Black Background"
file:///C|/My Documents/ribbons/help/faqs.html (1 of 3) [4/3/2001 2:18:42 PM]
Ribbons Frequently Asked Questions Help
How do I custom-color my Ribbon Model?
It depends: First read elsewhere - mail be if still stumped.
For each residue section in the ribbons, the `*.ss' file determines the ribbon's residue colors through a
look-up table set in the `*.color' file . White is the default color if no look-up is set. Each chain may be
set to a single color through the ribbons style panel. The different ribbon coloring schemes are also set
with this panel.
How do I draw Hydrogen Bonds / Dashed Bonds?
Ribbons has no facilities for general H-bonding information. One command exists to write out
MainChain H-bonds (the same as those computed to automatically determine secondary structure
information with 'pdb-pro-ss'):
pdb-hb-cyl protein_chain.pdb mainchain_hb.cyl
The output 'mainchain_hb.cyl' is an ascii ribbons-style bond file, with the bonds from the carbonyl O to
the amide H.
For general H-bonds, I have used either 'X-PLOR' or 'hbcalc'.
Usually, you would just like a few selected H-bonds for an image. It is probably fastest to just do this by
hand editing. Recall, my special cylinder file format is:
x.1 y.1 z.1 x.2 y.2 z.2 rad.bond kolorIndex
To create 'dotted' bonds with ribbons:
If you just want dashed lines, use the Bond Panel Editor (alt-b), set the draw style to `lines', and adjust
the complexity. If you want dashed cylinders, you must create a file with lots of short little cylinders.
There is a little awk file to accomplish this. You may want to copy a version over and edit to adjust the
'DASH' variable if the pattern is not to your liking.
cp $RIBBONS_HOME/misc/awks/dash-cyl.awk your.awk
awk -f your.awk < normal.cyl > dashed.cyl
How do I draw Disulphides?
Currently, must get the ribbon just how you like it, then create a special *.cyl file from Menubar File,
Export Ribbons Files, SG-bond. This links ribbon to SG to SG' to ribbon'. Then include this *.cyl file in
your *.bonds list. May also want to make a *.sph file of just the SG atoms for prettiness.
file:///C|/My Documents/ribbons/help/faqs.html (2 of 3) [4/3/2001 2:18:42 PM]
Ribbons Frequently Asked Questions Help
All my secondary structure keys don't show up?
The default "Sequence color" options in ribbons displayed on the menu are set to those in common and in
order at the top of the *.ss files. These options are available to be applied to all the ribbon models at
once. However, all of the *.ss keys are available on a per ribbon basis.
Examples: (1) The user has added a custom coloring scheme for two protein chains, A & B. The tops of
the *.ss files are listed below:
Protein A (Astuff added)
res# seq ss sshb hb Astuff
15
V
c
c
O
X
.....
Protein B (Bstuff added)
res# seq ss sshb hb Bstuff
1
G
c
c
x
Y
.....
The default Sequence color options will be: "seq" "ss" "sshb" "hb" Solution: name the key in both
"stuff".
(2) The user has a protein chain and a nucleic acid chain. There is more information for the protein
generated by the *.ss programs, and the user has added extra information for each.
Protein (xtra added to mark binding site)
res# seq ss sshb hb
xtra
1
G
c
c
x
N
.....
DNA
(xtra added to mark binding site)
res# seq ss xtra
1
C
S
Y
.....
The default Sequence color options will be: "seq" "ss" Solutions: Hack - add dummy "sshb" & "hb"
columns to the DNA.ss file before you add the "xtra" column.
*** Note: *** In either case above, you can always set the individual *.ss color. Take the second
example: Open the Ribbons Style panel, select "Ribbon Lists" (which should say "coord" by default,
indicating that any changes you make to any of the widgets apply to EVERY ribbon model). You should
see "coord", "Protein", & "DNA". Select "Protein", then select "xtra" with the Sequence Color widget
(here you will see every field in Protein's *.ss file listed). Then select "DNA", and again select "xtra"
with the Sequence Color widget (here you will see every field in the DNA's *.ss file listed).
Ribbons User Manual / UAB-CBSE / [email protected]
file:///C|/My Documents/ribbons/help/faqs.html (3 of 3) [4/3/2001 2:18:42 PM]
Ribbons Source Code Help
Ribbons Source Code
Installation
A basic familiarity with UNIX and system administration is assumed. Everything has been set up for the
C-shell. It is assumed you have all the source code directories from over the net.
Important Note: Please read the file 'Read.Me' in the ~ribbons/install directory, which is probably more
up-to-date than this page.
Compilation
As distributed, the `ribbons' software suite should be ready to run on any SGI system. There may also be
a ready-to-run version available for other systems - check it out on the web site.
Else, you will need to recompile by executing the commands in this directory:
● configure
to set appropriate Makefiles for the target machine. You will be prompted for one of the supported
machine types.
● make clobber
to get rid of all old compiled files, libraries, and executables.
● make compile
to compile all the files, libraries, and executables. You will be prompted for the name of your C++
compiler. Each directory will be entered in turn and its unix Makefile invoked. First, please see the
special notes below for Alpha and Linux boxes. There may be some warnings. Please report any
errors to me!
● make install
to move all the executables to the $RIBBONS_HOME/bin directory. Your `path' should include
$RIBBONS_HOME/bin to run all the programs.
● Make clean
to get rid of all the old compiled files. No need to do this with an SGI, the distribution is already
`clean'. Do this once the program has been tested (see below).
Special notes for Compaq (DEC) Alpha machines
The widgets connecting X/GL are in a different place than on the SGI. Suggest you make symbolic links
of the small *.h files, (else change LOTS of includes, or hack on the Makefiles). You need root
permission to do this:
cd /usr/include/GL
ln -s /usr/include/X11/GLw/GLwMDrawA.h .
ln -s /usr/include/X11/GLw/GLwDrawA.h .
file:///C|/My Documents/ribbons/help/srccode.html (1 of 4) [4/3/2001 2:18:55 PM]
Ribbons Source Code Help
You must have the TIFF libraries installed if you want to save images. TIFF and other libraries are
available from: http://www.tru64unix.compaq.com/demos/ossc-v5.0/html/shwindex.htm or you can get
them from my compilation, tiff 3.4, version 5.1 alpha. You need:
/usr/lib/libtiff.a
/usr/include/tiff.h, tiffio.h, etc
Special notes for Linux boxes
These boxes require currently too much care and feeding for my taste. Have relied on the kindness of
strangers (especially Suhaib Siddiqi of Inspire Pharmaceuticals) to get this going. The problem is getting
the right X/Motif/OpenGL libraries in place. I hope more kind strangers will provide me with working
Makefiles and/or libraries for their particular setup.
Currently, two setups are supported:
linux == just like on my box, with these libs loaded:
-lXm -lGLw -lGLU -lGL -ltiff -lX11 -lXt -lXext -lXp -lm
mesa == just like on David Johnson's box, with these libs:
-L/usr/X11R6/lib -lMesaGLw -lXm -lXt -lGLU -lGL -lX11 -lXext -lXp -ltiff -lm
Program testing
To test the `ribbons' distribution, after recompiling if necessary, and setting your command path:
First, as a normal user, create a new directory and go there, eg:
mkdir ribtest
cd ribtest
Then execute the perl script test protocol interactively:
ribbons-test
This runs over 40 representative commands with various options, and compares their output to that in
$RIBBONS_HOME/test. A summary is output to the terminal, and a complete record is saved to the file
`ribbons-test.log' Several `differences' will appear, just due to temporary file names. Please report any
non-trivial errors to me!
[email protected]
Program organization
The default distribution consists of the main ``$RIBBONS_HOME'' directory and the following
subdirectories:
● analysis
Structure analysis tools.
● bin
file:///C|/My Documents/ribbons/help/srccode.html (2 of 4) [4/3/2001 2:18:55 PM]
Ribbons Source Code Help
●
●
●
●
●
●
Executable versions of the programs (some are simply shell scripts; most are links to executable
commands).
data
Assorted example data. All files referred to in the manual are found here.
gallery
Artistic images (optional) in *.rgb format.
help
The hypertext help screens and *.gif images.
images
Artistic images (optional) in *.gif format.
misc
Assorted trivia.
rgb
Sample images (optional) in *.rgb format from example data.
The source code distribution consists of Makefiles, C++ ( *.C ) source code (and some FORTRAN), and
*.h include files in the following subdirectories:
● analysrc
Source code for structure analysis tools.
● elmo
Tcl/Tk data preparation GUI programs.
● facets
Density map surface faceting programs.
● fithx
Helix fitting program suite source code.
● gutils
Assorted graphics utilities
● install
The Make.* shell scripts to install and compile all programs.
● ms
Molecular surface source code (old version).
● msp
Molecular Surface Package conversion utilities.
● nutils
Newer utilities that use OOP library.
● oop
First-pass OOP code for the 'ribbons++' project
● ps
PostScript utilities source code.
● src
Main ribbons graphics program.
file:///C|/My Documents/ribbons/help/srccode.html (3 of 4) [4/3/2001 2:18:55 PM]
Ribbons Source Code Help
●
utils
Most data preparation utility programs and libraries for ribbons .
Changing things
If you are feeling lucky, dig right in.
If you have a support license, I'll be happy to advise and might even help.
Theory
See references.
Disclaimer
If architects built buildings the way programmers write programs, the first woodpecker that came along
would destroy civilization. UNIX fortune
Ribbons User Manual / UAB-CBSE / [email protected]
file:///C|/My Documents/ribbons/help/srccode.html (4 of 4) [4/3/2001 2:18:55 PM]
Ribbons References Help
Ribbons Citation References.
The software is copyrighted by Mike Carson and licensed through the UAB-CBSE.
The background for the software is given below.
If appropriate, one of the following should be cited:
1. M. Carson and C.E. Bugg (1986) ``Algorithm for Ribbon Models of Proteins'' J.Mol.Graphics,
4:121-122.
2. M. Carson (1987) ``Ribbon Models of Macromolecules'' J.Mol.Graphics, 5:103-106.
3. M. Carson (1991) ``Ribbons 2.0'' J.Appl.Cryst., 24:958-961.
4. M. Carson (1997) ``Ribbons'' Methods in Enzymology, 277:493-505. R.M. Sweet and C.W.
Carter, eds, Academic Press.
All the ribbons references are available on-line from my web site.
Photo of mc (circa `93), and ribbons demo used (for 2 seconds) in the movie Jurassic Park.
Need more help?
First, read the friendly manual, then contact me (E-mail preferred).
Send all opinions and questions to [email protected]
205-934-0480 (fax)
205-934-1983 (phone)
University of Alabama at Birmingham
Center for Macromolecular Crystallography
274 BHS, 79 THT, University Station
file:///C|/My Documents/ribbons/help/reference.html (1 of 2) [4/3/2001 2:19:23 PM]
Ribbons References Help
Birmingham, AL 35294
Ribbons User Manual / UAB-CBSE / [email protected]
file:///C|/My Documents/ribbons/help/reference.html (2 of 2) [4/3/2001 2:19:23 PM]