1
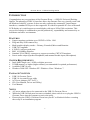
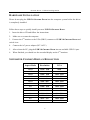
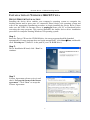
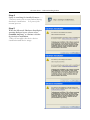
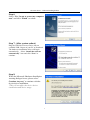
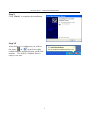
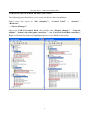
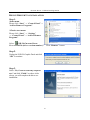
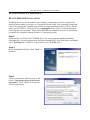
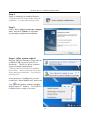
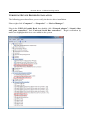
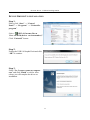
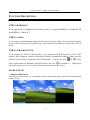
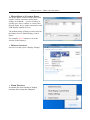
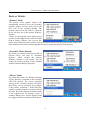
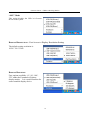
GRAPHIC DOCK USB 2.0 Docking Station USER MANUAL CONTENTS INTRODUCTION ............................................................................................................. 3 FEATURES .............................................................................................................. 3 SYSTEM REQUIREMENTS ....................................................................................... 3 PACKAGE CONTENTS ............................................................................................. 3 NOTES .................................................................................................................... 3 HARDWARE INSTALLATION .......................................................................................... 4 SUPPORTED COMMON DISPLAY RESOLUTION............................................................. 4 INSTALLATION ON WINDOWS 2000/XP/VISTA ........................................................... 5 DEVICE DRIVER INSTALLATION ............................................................................ 5 VERIFYING DEVICE DRIVER INSTALLATION ......................................................... 9 DEVICE DRIVER UN-INSTALLATION .................................................................... 10 INSTALLATION ON WINDOWS 7 ...................................................................................11 DEVICE DRIVER INSTALLATION ...........................................................................11 VERIFYING DEVICE DRIVER INSTALLATION ...................................................... 13 DEVICE DRIVER UN-INSTALLATION .................................................................... 14 FUNCTION DESCRIPTION ............................................................................................ 15 USB TO ETHERNET.............................................................................................. 15 USB TO AUDIO .................................................................................................... 15 USB TO GRAPHICS/VGA..................................................................................... 15 SUPER UTILITY .................................................................................................... 15 IDENTIFY MONITOR...................................................................................... 15 MULTI-DISPLAY CONTROL PANEL ............................................................... 16 DISPLAY SETTINGS ....................................................................................... 16 FIXED POSITION ........................................................................................... 16 DISPLAY MODES .................................................................................................. 17 “Primary” Mode ......................................................................................... 17 “Extended” Mode (Default) ....................................................................... 17 “Mirror” Mode ........................................................................................... 17 “OFF” Mode ............................................................................................... 18 DISPLAY RESOLUTION – Fast Access to Display Resolution Setting ...................... 18 DISPLAY ROTATION ...................................................................................... 18 Q&A .......................................................................................................................... 19 TROUBLESHOOTING TIPS ........................................................................................... 20 Known Issues....................................................................................................... 20 General Recommendation ................................................................................... 20 Media Playback ................................................................................................... 20 Others .................................................................................................................. 21 REGULATORY COMPLIANCE ...................................................................................... 22 GRAPHIC DOCK – USB 2.0 Docking Station INTRODUCTION Congratulations on your purchase of the GRAPHIC DOCK – a USB 2.0 Universal Docking Station. The adoption of USB 2.0 interface allows the GRAPHIC DOCK to virtually work with all Windows-based PC systems. It does not only replicate the common PC Input/Output interfaces, a standard VGA port is also supported. It is ideal for portable PC users with small LCD display as it could support a second display with up to 1920x1200 resolutions. This easy-to-use solution is committed to provide productivity, expandability and connectivity to both home and office environment. FEATURES Support monitor resolution up to WUXGA 1920 x 1200 Plug-and-Play USB connectivity Multi graphics display modes – Primary, Extended, Mirror and Rotation USB 2.0 Compliant 4 USB 2.0 self-powered ports RJ45 10/100Mbps Ethernet Standard VGA (DB15) connector to support secondary CRT/LCD monitors Stereo audio output (Speaker/Headphone) and monaural audio input (Microphone) SYSTEM REQUIREMENTS Intel/AMD Single core 1.0GHz or higher processor 512MB memory or higher (higher memory recommended for optimal performance) Available USB 2.0 port Windows 2000 SP4 / Windows XP / Windows Vista / Windows 7 PACKAGE CONTENTS USB 2.0 GRAPHIC DOCK USB 2.0 A to mini B type cable AC Power Adapter (DC 3A/5V) CD (User Manual, Driver and Utility) User Manual NOTES AC power adapter has to be connected to the USB 2.0 GRAPHIC DOCK. When the USB 2.0 Hub ports become overloaded, please refresh or re-plug the USB 2.0 GRAPHIC DOCK into the computer to active the ports. Do not plug the USB 2.0 GRAPHIC DOCK into your PC or Notebook before executing the set-up or un-installation program. 3 GRAPHIC DOCK – USB 2.0 Docking Station HARDWARE INSTALLATION Please do not plug the USB 2.0 GRAPHIC DOCK into the computer system before the driver is completely installed. Follow these steps to quickly install your new USB 2.0 GRAPHIC DOCK. 1. Insert the driver CD and follow the instructions. 2. Make sure to restart the computer. 3. Connect the 2nd monitor to the VGA (DB15) connector of USB 2.0 GRAPHIC DOCK and switch it on. 4. Connect the AC power adapter (DC 3A/5V) 5. After reboot the PC, plug the USB 2.0 GRAPHIC DOCK into an available USB 2.0 port. 6. When finished, you should see the extended display on the 2nd monitors. SUPPORTED COMMON DISPLAY RESOLUTION Aspect Ratio Resolution VGA 16:10 16:9 16:10 16:9 16:10 16:10 15:9 5:4 4:3 4:3 4:3 4:3 4:3 4:3 1920 * 1200 1920 * 1080 1680 * 1050 1600 * 900 1440 * 900 1280 * 800 1280 * 768 1280 * 1024 1600 * 1200 1400 * 1050 1280 * 960 1152 * 864 1024 * 768 800 * 600 16bit 16bit 16bit, 32bit 16bit, 32bit 16bit, 32bit 16bit, 32bit 16bit, 32bit 16bit, 32bit 16bit, 32bit 16bit, 32bit 16bit, 32bit 16bit, 32bit 16bit, 32bit 16bit, 32bit 4 GRAPHIC DOCK – USB 2.0 Docking Station INSTALLATION ON WINDOWS 2000/XP/VISTA DEVICE DRIVER INSTALLATION Installing the device driver enables your computer’s operating system to recognize the docking station and its ports once it’s connected. Please check your operating system and refer to the appropriate installation procedure to begin installing the device driver. Please make sure the USB 2.0 GRAPHIC DOCK is unplugged from your PC or Notebook before executing the setup program. This section illustrates the simple device driver installation procedure for computer running Windows XP operating system. Step 1. Insert the Driver CD into the CD-ROM drive; the setup program should be launched automatically. If setup program does not begin automatically, click StartRun, and double click “D:\setup.exe” (where D: is the path of your CD-ROM drive). Step 2. Driver Installation Wizard, click “Next” to continue. Step 3. License Agreement; please review it and check “I accept the terms of the license agreement.” Click “Next” to accept the License Agreement. 5 GRAPHIC DOCK – USB 2.0 Docking Station Step 4. Setup is searching for installed features…... *You may notice the screen flashed during hardware installation. It is part of the normal process. Step 5. When the Microsoft Hardware Installation warning dialogue boxes, please select” Continue Anyway” to continue with the device driver installation. *This will not affect the device driver installation and device usage. 6 GRAPHIC DOCK – USB 2.0 Docking Station Step 6. Select “Yes, I want to restart my computer now” and click “Finish” to reboot. Step 7. (After system reboot) Plug the USB 2.0 GRAPHICS DOCK into an available USB 2.0 port of your PC or Notebook. The hardware installation driver will begin automatically. Select “Install the software automatically” item and click “Next” to continue. Step 8. When the Microsoft Hardware Installation warning dialogue boxes, please select” Continue Anyway” to continue with the device driver installation. *This will not affect the device driver installation and device usage. 7 GRAPHIC DOCK – USB 2.0 Docking Station Step 9. Click “Finish” to complete the installation. Step 10. After the driver is configured, you will see the icons “ ” & “ ” in the lower right taskbar, and the extended display on the 2nd monitor. The USB 2.0 Graphic Dock is ready to use now. 8 GRAPHIC DOCK – USB 2.0 Docking Station VERIFYING DEVICE DRIVER INSTALLATION The following procedure allows you to verify the device driver installation. Please move the cursor to “My computer”→ “Control Panel” → “System”→ “Hardware” → “Device Manager”. Plug-in the USB 2.0 Graphic Dock, then double click “Display adapters” , “Network adapter”, “Sound, video and game controllers ” , and “Universal Serial Bus controllers”. Begin verification by make sure highlighted devices were added to the system. 9 GRAPHIC DOCK – USB 2.0 Docking Station DEVICE DRIVER UN-INSTALLATION Step 1. *Start menu: Please click “Start” → “Control Panel”→ “Add or Remove Programs”. *Classic start menu: Please click “Start” → “Settings” → “Control Panel”→ “Add or Remove Programs”. Select “ USB 2.0 GRAPHIC DOCK 11.xx.xxxx.0130 (driver version number)”. Click “Remove” button. Step 2. Unplug the USB 2.0 Graphic Dock and click “OK” to continue. Step 3. Select “Yes, I want to restart my computer now” and click “Finish” to reboot. After reboot, you will complete the driver uninstallation. 10 GRAPHIC DOCK – USB 2.0 Docking Station INSTALLATION ON WINDOWS 7 DEVICE DRIVER INSTALLATION Installing the device driver enables your computer’s operating system to recognize the docking station and its ports once it’s connected. Please check your operating system and refer to the appropriate installation procedure to begin installing the device driver. Please make sure the USB 2.0 GRAPHIC DOCK is unplugged from your PC or Notebook before executing the setup program. This section illustrates the simple device driver installation procedure for computer running Windows 7 operating system. Step 1. Insert the Driver CD into the CD-ROM drive; the setup program should be launched automatically. If setup program does not begin automatically, click Start, Run, and double click “D:\Setup.exe” (where D: is the path of your CD-ROM drive). Step 2. Driver Installation Wizard, click “Next” to continue. Step 3. License Agreement; please review it and check “I accept the terms of the license agreement.” Click “Next” to accept the License Agreement. 11 GRAPHIC DOCK – USB 2.0 Docking Station Step 4. Setup is searching for installed features….. *Yyou may notice the screen flashes during the installation. It is part of the normal process. Step 5. Select “Yes, I want to restart my computer now.” and click “Finish” to reboot the system and to complete the installation. Step 6. (After system reboot) Plug the USB 2.0 GRAPHICS DOCK into an available USB 2.0 port of your PC or Notebook. The device driver software setup will begin automatically. *This may take several minutes for installing device driver. And, you may notice the screen flashes during the installation. It is part of the normal process. After the driver is configured, you also could click “Show hidden icon” and see an in the taskbar, and the extended icon display on the 2nd monitor. The USB 2.0 Graphic Dock is ready to use now. 12 GRAPHIC DOCK – USB 2.0 Docking Station VERIFYING DEVICE DRIVER INSTALLATION The following procedure allows you to verify the device driver installation. Please right click “Computer”→ “Properties” → “Device Manager”. Plug-in the USB 2.0 Graphic Dock, then double click “Network adapter”, “Sound, video and game controllers”, and “Universal Serial Bus controllers”. Begin verification by make sure highlighted devices were added to the system. 13 GRAPHIC DOCK – USB 2.0 Docking Station DEVICE DRIVER UN-INSTALLATION Step 1. Please click “Start” → “Control Panel””→ “Programs” → “Uninstall a program”. Select “ USB 2.0 GRAPHIC DOCK 11.xx.xxx.0130 (driver version number)”. Click “Uninstall” button. Step 2. Unplug the USB 2.0 Graphic Dock and click “OK” to continue. Step 3. Select “Yes, I want to restart my computer now” and click “Finish” to reboot. After reboot, you will complete the driver uninstallation. 14 GRAPHIC DOCK – USB 2.0 Docking Station FUNCTION DESCRIPTION This section describes the main functions provided by the USB 2.0 GRAPHICDOCK. USB TO ETHERNET It can support the 10/100Mbps LAN transfer, and it is compliant IEEE802.3u 100BASE-TX and IEEE802.3 10BASE-T. USB TO AUDIO It can support one Microphone input and one Stereo Speaker output. An external microphone device can be connected to record the voice, and connect to the Speaker to output the voice or music. USB TO GRAPHICS/VGA It can support the LCD or CRT monitor; it can attach the D-SUB interface LCD or CRT monitor and it supports 3 kinds of selections, Primary, Extended and Mirror. Make sure the USB GRAPHIC DOCK is attached to the PC/Notebook. Look for the icon & at the lower right toolbar on Windows 2000/XP/Vista or the icon on Windows 7. Right-click these two icons to access the variety of functions associated to the device. SUPER UTILITY IDENTIFY MONITOR Easy display identification via a serial number will be showed on the upper right corner of all attached display devices. 15 GRAPHIC DOCK – USB 2.0 Docking Station MULTI-DISPLAY CONTROL PANEL An unique feature to allow much quicker and simpler working experience under multidisplay environment. A series of hotkey to quickly move active window or cursor to the desired display device (either on-board or each USB Display enabled devices). The default setting of hotkeys can be found on the Hotkey List of “Multi-Display Control Panel”. For example: Ctrl +2 means: to move the window to the Display 2. DISPLAY SETTINGS Fast access to the system “Display Settings”. FIXED POSITION It remains the prior setting of display location after restart the computer. 16 GRAPHIC DOCK – USB 2.0 Docking Station DISPLAY MODES “Primary” Mode The system’s main graphics adapter will automatically switch to act as the secondary graphics adapter and the main screen will now work as the extended desktop. The monitor connected to the USB 2.0 GRAPHIC DOCK will now act as the primary Windows desktop. *Please be advised that some display utility and drivers that shipped with certain AGP and built-in display adapters may prevent this option from working on some systems. You can disable the other utility program (usually found in the same toolbar located on the bottom right hand corner) to make this function work properly. “Extended” Mode (Default) By default, the monitor connected to USB 2.0 GRAPHIC DOCK will work as, “Extended Desktop” which extends the primary Windows desktop of your system. You can change the relative position of this extended desktop under the Display Properties. “Mirror” Mode By setting this mode, the Windows desktop will be mirrored / replicated to the secondary CRT/LCD monitor. The screen resolution setting on the secondary monitor will follow the primary screen’s resolution. For example, if the primary resolution is 1024x768x32bit, and the secondary monitor’s resolution will be the same. But if the selected resolution setting is not supported by the primary screen, a warning dialogue box will be displayed and the suggested screen resolution will be shown. 17 GRAPHIC DOCK – USB 2.0 Docking Station “OFF” Mode This option disables the USB 2.0 GRAPHIC DOCK on the system. DISPLAY RESOLUTION – Fast Access to Display Resolution Setting The default setting resolution is: 1024 * 768 * 32bit. DISPLAY ROTATION Four options available: “0°, 90°, 180°, 270° under the Extended or Primary display modes. It is a useful function for some rotatable display device. 18 GRAPHIC DOCK – USB 2.0 Docking Station Q&A This section describes the common Q&A regarding to the installation or operation of the USB 2.0 GRAPHIC DOCK. Q: Why can’t I make the USB 2.0 GRAPHIC DOCK the primary display? A: Some video cards ship their product with a utility that prevent other video cards from being set as the primary card. Check the bottom right hand corner taskbar for the utility. Disable the utility before switching our adapter to be the primary display. Q: Why won’t my DVD player work when I move it over to the extended display? A: Some DVD playback software packages do not support playing on a second display adapter of any kind. You may try to open the program in the secondary display first before playing the DVD. Q: How come my video will not play on Media Player if I move it over to the extended desktop? A: Check that you have moved the Media Player window completely over to the second screen. Q: Why does my mouse not move pass the right side of the screen as it should on extended desktop? A: Check the display settings and make sure that your display number ‘2’ is on the right side of display number ‘1’. You can rearrange how Windows treats each display in relation to each other in the Display Properties Settings. Q: There are lines running horizontally up and down my screen. A: This is due to a low refresh rate setting. You can change this in the Display Properties Settings Advanced Monitor. Make sure you select the USB 2.0 GRAPHIC DOCK first and not set the refresh rate higher than what your monitor can support. This may damage your monitor. You can also try to reset/refresh/resynchronize your monitor. Q: Direct3D does not work? A: This is a current limitation of the Graphic Dock. Please check for driver updates in the future to add support for this. If your application requires this, please use the main display device. 19 GRAPHIC DOCK – USB 2.0 Docking Station TROUBLESHOOTING TIPS This section describes the general troubleshooting tips regarding to the installation or operation of the USB DISPLAY DEVICE. Known Issues - Please set the Aero desktop theme to play the DVD on Windows 7. - Direct 3D is not supported on Windows XP/Vista. It supported on Windows 7 Aero mode. General Recommendation - Check to make sure that the device is plugged in correctly to the host system. - Make sure that the USB port that you are using is USB 2.0. - Unplug the USB cable of USB graphics device and re-insert it. - Check to see that the monitor is connected correctly and is powered ON. - Make sure to restart your computer after the driver installation. - Try a different USB 2.0 port and/or computer. - Unplug all other USB devices from the system. - Try connecting the USB cable of USB graphics device directly to the computer instead of through a hub. - Reset/refresh/resynchronize your monitor. Media Playback - During video playback on all platforms, please do not change the display mode, position or arrangement of video player window (such as dragging the video player window between main display and attached display). This usually causes the video player to have strange behavior and the video may stop playing. We suggest stopping the video playback, moving the window to the USB graphics device attached display and then selecting the video clip to start playing. - You may experience poor video performance on USB graphics device attached display under some low-spec PC system. - Video rendering using hardware overlays is supported. - Some DVD playback software packages do not support playing on a second display adapter of any kind. You may try to open the media player in the secondary display first before start 20 GRAPHIC DOCK – USB 2.0 Docking Station playing the DVD. - Your PC may be lack of certain video codec to support playback of certain video format. Please use the link below to install license free media codec. K- Lite: http://www.free-codecs.com/download/K_Lite_Codec_Pack.htm - Video/Media players have different decoding capability under different display modes. For better performance on watching DVD or certain video format on the USB graphics device attached display, it is recommended to use the following license free software. VLC Media Player: http://www.videolan.org/vlc/ Media Player Classic: http://sourceforge.net/projects/guliverkli/ Others - Some graphics card, i.e. Intel, prevents other secondary graphics chipset from being set as the primary card. As the result of this, primary mode might not work or the display maybe disabled. - If you have problems during the boot up process, start your computer in Safe Mode and uninstall the driver. Hold the CTRL key until the Windows startup menu appears and select Safe Mode. - To verify the driver version that you installed, please click “Control Panel” → “Add or Remove Programs” to check the program: USB Graphic Dock 11.xx.xxxx.0130 (the number means the driver version). - Please contact your dealer to obtain the latest driver or for additional assistance if needed. - Some limitation exists in different media player on file format support. We enclose our compliance test result in the tables according to different operating system, main system graphics card/chipset, media players, and the supported media format. It will be updated periodically with new version of media players or our latest driver. 21 GRAPHIC DOCK – USB 2.0 Docking Station REGULATORY COMPLIANCE FCC This equipment has been tested and found to comply with Part 15 of the FCC rules. Operation is subject to the following two conditions: • This device may not cause harmful interference • This device must accept any interference received, including interference that may cause undesired operation. CE This equipment is in compliance with the requirements of the following regulations: EN 55022: CLASS B (2006), IEC/EN 61000-3-2 (2006), IEC/EN 61000-3-3 (1995+A1:2001+A2:2005) EN 55024 (1998+A1 :2001+A2 :2003), (IEC/EN 61000-4-2 (1995+A1:1998+A2:2001) /-3 (2006)/-4 (2004)/-5 (2006)/-6 (1996+A1:2001)/-11 (2004)) C-Tick This equipment is in compliance with the requirements of the following regulations: EN 55022: CLASS B (2006), AS/NZS CISPR22 © IEC: 2005. VCCI This equipment is in compliance with the requirements of the following regulations: CISPR 22 © IEC: 2005. Disclaimer Information in this document is subject to change without notice. The manufacturer does not make any representations or warranties (implied or otherwise) regarding the accuracy and completeness of this document and shall in no event be liable for any loss of profit or any commercial damage, including but not limited to special, incidental, consequential, or other damage. No part of this document may be reproduced or transmitted in any form by any means, electronic or mechanical, including photocopying, recording or information recording and retrieval systems without the express written permission of the manufacturer. Copyright© 2011 Magic Control Technology Corp. All rights reserved. notice. Product may not be exactly as shown in the diagrams. All trade names are registered trademarks of their respective owners. Features and specifications are subject to change without 22