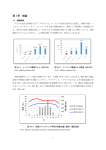
1
SECTION 3
Adding Media Content to a Course
To add media content to a course
1. Go to Courses> Content> Tools.
2. Select Kaltura Media from the dropdown menu.
The Add Media Content window is displayed.
Kaltura Video Building Block 3.0 for Blackboard 9.x Quick Start Guide
12
Adding Media Content to a Course
3. Enter a Name. You can add text to describe the content.
4. Click “Add Media”.
The Kaltura Uploader is launched allowing you to upload a video, record from webcam or select
from previously uploaded content (“My Content”).
Kaltura Video Building Block 3.0 for Blackboard 9.x Quick Start Guide
Adding Media Content to a Course
5. Follow the wizard steps to add the media.
6. After adding the media, it will be represented in the WYSIWYG editor as a thumbnail taken from
the video/media file.
7. You may choose to add the media to the Course Gallery and select other options from the
Options section.
8. Click Submit to add the media content to the content list and to the course gallery if selected.
Kaltura Video Building Block 3.0 for Blackboard 9.x Quick Start Guide
SECTION 4
Repurposing Media in other Tools and
Content Areas via the Mashup Tool
Users can add media to various resources using Blackboard’s Mashup Tool that is available via the text
editor. Users can use the Mashup Tool in different resources according to their role in the course.
For example, instructors can repurpose media via the Mashup Tool in:
•
Announcements
•
Assignments
•
Content Item
•
Discussion Board
•
Glossary
•
Messages
•
Tasks
Students, for example can repurpose media via the Mashup Tool in:
•
Discussion board
•
Messages
•
Tasks
•
Assignments submission
To repurpose media via the Mashup Tool
1. Select the Add Mashup icon in the WYSIWYG editor.
The options available depend on the institution’s configuration.
Kaltura Video Building Block 3.0 for Blackboard 9.x Quick Start Guide
15
Repurposing Media in other Tools and Content Areas via the Mashup Tool
2. Select Kaltura Media from the dropdown menu.
The Search for a Kaltura Media window is displayed where you can browse, search, preview and
select media.
NOTE: Available media includes all the media ‘owned’ by you, as it appears in My Media.
Faculty members also have media from the Faculty Repository (if enabled) available.
Kaltura Video Building Block 3.0 for Blackboard 9.x Quick Start Guide
Repurposing Media in other Tools and Content Areas via the Mashup Tool
3. Browse or search for the media you want to repurpose.
4. Click Preview to preview the media item.
5. Click Select to select the media to repurpose.
The Create Mashup Item window is displayed.
Kaltura Video Building Block 3.0 for Blackboard 9.x Quick Start Guide
Repurposing Media in other Tools and Content Areas via the Mashup Tool
6. Select the MashUp Options for displaying the media.
a. Show media information
b. Show media description and tags
7. Click Submit to proceed.
The media will be represented in the text editor as a thumbnail. Text can be added before and
after the media.
Kaltura Video Building Block 3.0 for Blackboard 9.x Quick Start Guide
SECTION 5
Course Gallery
The course gallery is a searchable and sortable display of all media content assigned to a course, and
allows users to add new media (upload or record from webcam).
Faculty and admins also have the option to:
•
Make this item public in gallery: Display or hide the media to all course members (by default,
media is hidden to course members and only faculty and content creators see the media in the
gallery)
If the video is public:
•
Add to Gallery Module – these selected videos appear in the course gallery module that can be
added to the course home page.
•
Display embed code - Allows users to copy embed codes of videos and paste them elsewhere
Other actions available to faculty/admin and content creators are:
•
Remove from gallery
•
Delete media (if viewer is the content owner)
•
Edit metadata (Title, Tags, Description)
•
Create clip (if enabled and if the viewer is the content owner, or the configuration and the owner
allowed it).
Students can:
•
View public media
•
Create clip (if enabled and if the viewer is the content owner, or the configuration and the owner
allowed it).
To view a Course Gallery
1. Select the Courses tab and select a course.
2. Select Course Tools and then select Course Gallery.
Kaltura Video Building Block 3.0 for Blackboard 9.x Quick Start Guide
19
Course Gallery
Kaltura Video Building Block 3.0 for Blackboard 9.x Quick Start Guide
SECTION 6
My Media
My Media” is accessed from the My Institution tab.
My Media allows users to view their media, add and edit media, and assign media to a specific course.
Faculty may also contribute meida to the Faculty Repository. .
Kaltura Video Building Block 3.0 for Blackboard 9.x Quick Start Guide
21
My Media
The available actions are:
•
Capture frame from video for new thumbnail display – use the camera icon in the player.
•
Edit metadata- select Edit near the field you want to edit.
•
Clipping - allow other users to make clips of this video . If allowed, other users that belong to
courses that the video is assigned to can create clips from the video.
•
Delete Media
•
Create clip (if enabled)
•
Add to Gallery - assign to course gallery. A list of courses associated with users is displayed,
allowing them to add the media to the course gallery (multiple choices) and remove from the
gallery. The availability of this action depends on the Building Block configuration.
•
Contribute media to the Faculty Repository (only available for faculty members).
Kaltura Video Building Block 3.0 for Blackboard 9.x Quick Start Guide
SECTION 7
Faculty Repository
The Faculty Repository is a central gallery where faculty can browse, search, watch and use media
shared by other faculty members. Kaltura Administrators can populate the Faculty Repository with
curriculum and library content.
Contributing to the Faculty Repository
Faculty members can contribute media to the Faculty Repository for other faculty members to use.
Finding the relevant media depends on how descriptive the metadata of the media is. There are
additional metadata fields specific to the Faculty Repository to provide more information.
NOTE: Metadata fields are configurable and may be different than what is displayed in the
examples included here.
To contribute media to the Faculty Repository
1. In My Media select the media you want to contribute.
2. Click Contribute to Faculty Repository.
A window to add additional metadata is displayed.
3. Choose the field of study (or more than one) that the media is relevant to. You may browse the
Kaltura Video Building Block 3.0 for Blackboard 9.x Quick Start Guide
23
Faculty Repository
taxonomy or search for suggestions in the search box.
4. Click “Next”.
A screen to add additional data is displayed.
5. Fill in the additional metadata fields.
6. Click Accept the Terms of Use.
7. Click Contribute.
Using the Faculty Repository
The Faculty Repository is a module accessed from the My Institution page.
To add the Faculty Repository module to My Institution page
1. Click Add Module.
2. Find the Faculty Repository in the list of modules.
3. Click Add.
Kaltura Video Building Block 3.0 for Blackboard 9.x Quick Start Guide
In the Faculty Repository you can search and browse media, view media and add the media to your
course Gallery. Media from the Faculty Repository may also be added to other tools and content via the
Mashup Tool. See Repurposing Media in other Tools and Content Areas via the Mashup Tool.
To add media from the Faculty Repository to your course
1.
2.
3.
4.
Find the media item you want by searching and browsing.
Click the thumbnail or the name of the media to have it appear in the player area.
Click Add to a Course Gallery.
Choose the relevant course and click OK.
Defining Faculty Repository Metadata
Faculty Repository metadata is used to facilitate searching and finding relevant media for the user. The
faculty repository metadata is comprised of two types of metadata in Kaltura:
•
Field of study – represented as a categories branch in Kaltura
• Additional textual fields – defined as a Custom Data Schema in Kaltura
Both types of metadata can be edited and redefined in the Kaltura Management Console (KMC). Kaltura
administrators are encouraged to configure the metadata that suits the needs of their institution when
enabling the Faculty Repository.
To define the Field of Study taxonomy, we recommend that you create categories in a tree structure as a
child of the Faculty Repository Root category as defined in Faculty Repository Settings. For instructions
on how to define categories see the Kaltura Management Console User Manual.
Kaltura Video Building Block 3.0 for Blackboard 9.x Quick Start Guide
To define the additional text fields, create a schema and insert the name of it in the Faculty Repository
Settings. For instructions on how to define custom data schema refer to Kaltura Management Console
User Manual. Each field type in the schema is represented in the Faculty Repository in the following way:
•
Text field - represented as a text field
•
Text Select List field with possible single value - represented as a dropdown
•
Text Select List field with unlimited maximum number of values - represented as a multi-select
box
Other types of fields are not supported in the Faculty Repository module and will not be represented.
Kaltura Video Building Block 3.0 for Blackboard 9.x Quick Start Guide
SECTION 8
Searching Through Galleries
My Media, Course Gallery and Faculty Repository have a similar search UI that is comprised of a
combination of filtering, searching and sorting. In addition, frequent search queries can be saved for
future use.
Searching combines all types of search criteria. For example, if you are searching for the tag “test” in My
Media on media that appears in course ‘Biology 101’, the search will return only results that are yours,
have the tag “test” and appear in course Biology 101.
NOTE: There are some differences in the available filters between the different galleries, and
the ability to filter by Field of Study is only available in the Faculty Repository.
Saving Searches
Frequently used search queries can be saved and re-used. Searches are saved per user and per gallery.
To save a search
1. In My Media, Course Gallery Faculty Repository, perform a search.
2. After you are satisfied with a search query, click Save Search.
3. Choose a name for the frequently used search and click Save.
To use a saved search
1. Select Saved Search from the Filter dropdown.
2. Select the saved search you want from the dropdown menu.
3. Click Go.
Kaltura Video Building Block 3.0 for Blackboard 9.x Quick Start Guide
27
SECTION 9
Clipping Workflow
If you have the ability to create a clip from a video (depends on the following factors: Building Block
configuration, video ownership, enrolment to courses and the video owner allowing it), the “Create Clip”
button is available to open the Clipping Tool.
The new clip created is owned by the person who created it and is treated thereafter as any other
standalone video. The clip appears in the owner’s My Media, and can be assigned to courses, used via
the Mashup tool or contributed to the Faculty Repository (if you are a faculty member).
To create a clip from your media using the Clipping Tool
1.
2.
3.
4.
Go to My Institution> My Media.
Select a media item.
Click Create Clip.
To enable others to create clips from your media , check Allow others to make clips of this video
in the Clipping field.
To create a clip from other users content using the Clipping Tool
1. Go to Courses > Course Gallery.
2. Select a media item.
3. Click Create Clip.
Kaltura Video Building Block 3.0 for Blackboard 9.x Quick Start Guide
28