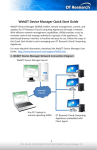
1
WebDT Content Manager © Copyright 2007-2010, DT Research, Inc. All Rights Reserved Version 4.0 (Updated 05/2010) 1 WCM 4.0 User Manual Table WebDT Content Manager ........................................................................................................................................... 1 Copyright© 2007-2010, DT Research, Inc. All Rights Reserved ................................................................................... 1 Version 4.0 (Updated 05/2010) ................................................................................................................................... 1 Introduction to WebDT Content Manager................................................................................................................ 8 About WebDT Content Manager ................................................................................................................................. 8 WebDT Content Manager Components ............................................................................................................ 8 System Architecture ......................................................................................................................................... 9 Main Sections of WebDT Content Manager .............................................................................................................. 11 DT Research WebDT Content Manager (WCM) System Requirements .................................................................... 11 Setting up a WebDT Content Manager Server .......................................................................................................... 12 Installing the WebDT Content Manager .......................................................................................................... 13 Installing Content Manager by Quick Setup Mode................................................................................ 17 Installing Content Manager Servers with Customized Setup Mode ...................................................... 21 Modifying the WebDT Content Manager .............................................................................................. 30 Repairing The WebDT Content Manager ............................................................................................. 31 Uninstalling WebDT Content Manager ................................................................................................. 32 Collecting Server Log .......................................................................................................................... 33 Site Management ........................................................................................................................................... 35 Creating a New Site ............................................................................................................................. 35 Modifying a Site ................................................................................................................................... 38 Deleting a Site ..................................................................................................................................... 39 Searching for a Site ............................................................................................................................. 40 Active Directory ................................................................................................................................... 42 Edition Information ............................................................................................................................... 44 Upgrading your WebDT Content Manager ........................................................................................... 44 System Management .............................................................................................................................................. 45 Managing the System..................................................................................................................................... 45 Changing the Administrator Password ................................................................................................. 45 System Settings ................................................................................................................................... 47 Setting Default Site Playlist ....................................................................................................... 49 Setting Wallpaper for a Site ....................................................................................................... 50 Count Result ............................................................................................................................. 51 Software Upgrades ........................................................................................................................................ 51 Uploading a New Patch ....................................................................................................................... 53 Moving or Deleting a Patch .................................................................................................................. 55 Dispatching a Patch file to Players/ Edge Servers................................................................................ 57 Canceling Dispatch for Players or Edge Servers .................................................................................. 58 Uploading an OS/BIOS ........................................................................................................................ 58 2 Updating OS/BIOS to Players .............................................................................................................. 59 Moving OS/BIOS ................................................................................................................................. 59 Deleting OS/BIOS ................................................................................................................................ 60 Canceling an Update for Player or Edge Server OS/BIOS ................................................................... 61 Preloading an OS/BIOS to Edge Servers ............................................................................................. 62 Updating from Host .............................................................................................................................. 62 Log Collection ................................................................................................................................................ 64 Adding the Conditions .......................................................................................................................... 64 Log Collecting ...................................................................................................................................... 67 Downloading Collected Log ................................................................................................................. 68 Account Management ............................................................................................................................................... 69 Creating an Account ....................................................................................................................................... 69 Creating a new user account ............................................................................................................... 70 Change the Member Of property ......................................................................................................... 72 Setting Preview Players ....................................................................................................................... 74 Downloading WebDT Preview Player .................................................................................................. 76 Searching for an Account ............................................................................................................................... 77 Active Directory Account ................................................................................................................................ 78 Role Management .......................................................................................................................................... 79 Creating a New Role............................................................................................................................ 80 Deleting a Role .................................................................................................................................... 82 Changing the General Privilege Settings.............................................................................................. 82 Managing the Accounts in Role ........................................................................................................... 83 Active Directory Role ........................................................................................................................... 86 Urgent Cast .............................................................................................................................................................. 88 Creating a New Urgent Cast Folder ................................................................................................................ 89 Creating, Previewing and Publishing a New Urgent Cast................................................................................ 89 Stopping an Urgent Cast ................................................................................................................................ 95 Preloading an Urgent Cast ............................................................................................................................. 96 Searching for an Urgent Cast ......................................................................................................................... 98 Urgent Cast Simple Interface ......................................................................................................................... 99 Registering the WebDT Player ................................................................................................................................ 100 Registering the WebDT Edge Server ...................................................................................................................... 103 Proxy Detecting ...................................................................................................................................................... 106 Player, Group and Edge Server Management ..................................................................................................... 107 Managing Players, Groups and Folders .................................................................................................................. 107 Menu Elements ............................................................................................................................................ 107 Main Tab Menu .................................................................................................................................. 107 Title Menu.......................................................................................................................................... 108 Frame Menu ...................................................................................................................................... 108 Players ......................................................................................................................................................... 109 Updating Player Information............................................................................................................... 109 3 Deleting a Player ............................................................................................................................... 113 Preloading Media to a Player ............................................................................................................. 114 Assigning a Player to a Group ........................................................................................................... 114 Removing a Player from a Group ....................................................................................................... 116 Moving a Group ................................................................................................................................. 116 Generating a Player Report ............................................................................................................... 117 Searching for Players ........................................................................................................................ 119 Dispatching a Patch to Players .......................................................................................................... 121 Updating Player OS/BIOS to Players ................................................................................................. 121 WebDT Preview Player ................................................................................................................................ 121 Installing WebDT Preview Player ....................................................................................................... 122 Using WebDT Preview Player ............................................................................................................ 126 Menu bar ........................................................................................................................................... 128 Shortcut Keys .................................................................................................................................... 129 Groups ......................................................................................................................................................... 129 Creating New Groups ........................................................................................................................ 129 Moving a Group or Folder .................................................................................................................. 130 Deleting a Group ............................................................................................................................... 132 Preloading Media to a Group ............................................................................................................. 133 Group Information .............................................................................................................................. 133 Player Information tab ........................................................................................................................ 133 Preload Urgent Cast tab .................................................................................................................... 135 Power Management tab ..................................................................................................................... 135 Setting Default Group Playlist ............................................................................................................ 135 Deleting Default Group Playlist .......................................................................................................... 136 Turning off Screen Settings for a Group ............................................................................................. 136 Setting/ Deleting Wallpaper for a Group ............................................................................................. 136 Saving Group Updates ...................................................................................................................... 137 Privilege Management .................................................................................................................................. 137 Adding a role ..................................................................................................................................... 141 Adding an account ............................................................................................................................. 141 Deleting a role/account ...................................................................................................................... 142 Setting as parent ............................................................................................................................... 142 An Example of Setting Privilege ......................................................................................................... 142 Folders ......................................................................................................................................................... 143 Creating a New Folder ....................................................................................................................... 143 Deleting a Folder ............................................................................................................................... 144 Moving a Folder ................................................................................................................................. 145 WebDT Edge Servers ............................................................................................................................................. 147 Menu Elements ............................................................................................................................................ 148 Main Tab Menu .................................................................................................................................. 148 Frame Menu ...................................................................................................................................... 149 4 Edge Server Information .............................................................................................................................. 150 Player/Edge Servers Tab ................................................................................................................... 152 Current Downloading ......................................................................................................................... 152 OS/BIOS Tab..................................................................................................................................... 153 Power Management Tab.................................................................................................................... 153 Dispatching Patches to Players/Edge Servers .............................................................................................. 153 Updating OS/BIOS for Edge Servers ............................................................................................................ 154 Setting a Preferred Server ............................................................................................................................ 156 Moving Edge Servers or Players to Target Servers ...................................................................................... 157 Deleting an Edge Server .............................................................................................................................. 158 Media Content Management ................................................................................................................................ 159 Media ........................................................................................................................................................... 159 Menu Elements.................................................................................................................................. 162 Main Tab Menu........................................................................................................................ 162 Frame Menu............................................................................................................................ 163 Creating a Folder ............................................................................................................................... 164 Adding Media to a Folder ................................................................................................................... 164 Saving Media to a New Location ........................................................................................................ 169 Adding Real Time Analog Video Feed ............................................................................................... 171 Adding Real Time Video .......................................................................................................... 172 Creating Real Time Video........................................................................................................ 173 Adding Multi-file Contents........................................................................................................ 173 Adding Executable Application Sources ............................................................................................. 174 Uploading an Executable Application....................................................................................... 176 Adding TV Program Signal ................................................................................................................ 177 Channel Option ....................................................................................................................... 179 Search Channel ...................................................................................................................... 179 Control TV Program at Player Side.......................................................................................... 183 Use Touch-control Buttons at Player Side................................................................................ 184 Batch Uploading ................................................................................................................................ 187 Searching for Media........................................................................................................................... 188 Tickers ............................................................................................................................................... 190 Creating a Ticker Folder .......................................................................................................... 190 Creating a Ticker ..................................................................................................................... 191 Saving a Ticker to a New Location .......................................................................................... 193 Deleting a Ticker ..................................................................................................................... 194 Searching for a Ticker ............................................................................................................. 195 Playlists........................................................................................................................................................ 196 Menu Elements.................................................................................................................................. 197 Main Tab Menu........................................................................................................................ 197 Frame Menu............................................................................................................................ 198 Playlist Menu ..................................................................................................................................... 198 5 Creating a Playlist Folder ................................................................................................................... 200 Creating/ Editing a New Playlist ......................................................................................................... 201 Setting Background Audio ....................................................................................................... 202 Selecting Templates ................................................................................................................ 203 Editing Templates .................................................................................................................... 204 Adding Media Files and Ticker Content ................................................................................... 205 Setting Duration/Transition Effect ............................................................................................ 213 Saving a Playlist to a New Location ................................................................................................... 214 Searching for a Playlist ...................................................................................................................... 215 Combolists ................................................................................................................................................... 218 Creating a New Combolist (Adding Linked and Embedded Playlists) ................................................. 218 Searching for a Combolist .................................................................................................................. 220 Templates .................................................................................................................................................... 223 Creating a Template Folder ............................................................................................................... 223 Creating a Template from a Built-in Template .................................................................................... 223 Creating a New Template .................................................................................................................. 226 Adding New Zones ............................................................................................................................ 229 Adding a Normal Zone ............................................................................................................ 230 Adjusting Normal Zone Attributes ............................................................................................ 231 Adding a Ticker Zone .............................................................................................................. 233 Adjusting Ticker Zone Attributes .............................................................................................. 234 Setting Template Attributes ................................................................................................................ 237 Zone Privileges ....................................................................................................................... 238 Setting the Z-Order ............................................................................................................................ 240 Saving a Template to a New Location ................................................................................................ 240 Searching for a Template................................................................................................................... 241 Privilege Management .................................................................................................................................. 242 Privilege Actions ................................................................................................................................ 242 Adding a role ..................................................................................................................................... 245 Adding an account ............................................................................................................................. 246 Deleting a role/account ...................................................................................................................... 246 Restore the privileges ........................................................................................................................ 246 Schedule and Publishing Management ............................................................................................................... 247 Main Features .............................................................................................................................................. 247 Menu Elements ............................................................................................................................................ 247 Main Tab Menu .................................................................................................................................. 248 Command Submenu .......................................................................................................................... 249 Frame Menu ...................................................................................................................................... 249 Status Menu ...................................................................................................................................... 250 Working with Schedules ............................................................................................................................... 250 Schedule ........................................................................................................................................... 251 Arranging Schedules ............................................................................................................... 251 6 Editing Schedules ................................................................................................................... 254 Setting Tickers ........................................................................................................................ 256 Requesting Schedule Publishing ............................................................................................. 257 Publishing Schedules .............................................................................................................. 258 Back to Edit and Rejecting Schedules ..................................................................................... 260 Searching for a Schedule ........................................................................................................ 262 Spot List ............................................................................................................................................ 264 Adding/ Editing a Spot List ...................................................................................................... 264 Requesting Spot List Publishing .............................................................................................. 266 Approving and Rejecting Spot List ........................................................................................... 267 Searching for Time Slots ......................................................................................................... 268 Publish Rules..................................................................................................................................... 270 Appendix ............................................................................................................................................................... 273 Installing the WCM Signage Tool on Your PC .............................................................................................. 273 WebDT Batch Register Tool ......................................................................................................................... 278 WebDT Change Log Level Tool ................................................................................................................... 281 WebDT Collect Log Tool .............................................................................................................................. 282 WebDT Offline Content Deployment Tool ..................................................................................................... 284 WebDT Wi-Fi and Resolution Configuration Tool ......................................................................................... 288 Setting Wireless Link ......................................................................................................................... 289 Deleting a preferred network .............................................................................................................. 291 Modifying the property of a preferred network .................................................................................... 291 Setting Resolution.............................................................................................................................. 291 Making the auto setup disk ................................................................................................................ 292 Applying the configuration.................................................................................................................. 294 WebDT Multi-Screen Layout Designer Tool .................................................................................................. 294 The Main Functions: .......................................................................................................................... 295 Detected Players ............................................................................................................................... 297 Select Player ..................................................................................................................................... 297 Select and Move Screen .................................................................................................................... 298 Set Matrix .......................................................................................................................................... 299 Rotate the Screens ............................................................................................................................ 299 Apply the Setting ............................................................................................................................... 300 Link to Player ..................................................................................................................................... 301 Setting by Flash Disk ......................................................................................................................... 301 Multi-Screen Monitor.......................................................................................................................... 303 WebDT PPT DT Add-in Setup ...................................................................................................................... 303 Publish .............................................................................................................................................. 304 Preview.............................................................................................................................................. 307 WebDT SignagePCClient ............................................................................................................................. 309 Functionality ...................................................................................................................................... 309 7 Introduction to WebDT Content Manager AboutWebDTContent Manager ebDT Content Manager is a comprehensive multimedia software management system that supports digital signage networked DT Research signage appliances (players). WebDT Content Manager provides a web browser interface in front of a database management system. This enables digital content designers and managers the ability to import digital files such as: W Images (GIF, JPEG, PNG, BMP, TIFF) Plain-text and RSS content as Tickers HTML, FLASH, ZIP, MMS, RTSP Audio Execute Applications Real Time S-video and composite video input TV Tuner Microsoft® PowerPoint Additional digital media formats are also supported WebDT Content Manager lets you manage your digital signage content, publish the content to players, and monitor players online in real-time. WebDT Content Manager Components The three major areas of the system include: Manage players Register players - register players to the system to publish content to the players. Manage player groups - assign players to groups, to play specified content as scheduled. Manage edge servers - manage, save and move edge servers, and manage or batch dispatch images to each edge server. Manage content 8 Create and upload media - create online media or upload local media such as video, audio, Flash, and PowerPoint. Create playlists - a playlist contains media content that is scheduled for deployment. It combines multiple media files together. Create spot list - a spot list contains media content can be added on top of scheduled playlists. Create Combo lists - a combo list contains multiple playlists, which can contain different layouts, settings and media content that are scheduled for deployment. Create template - a template defines the layout for content display. Select from built-in templates or create and save a custom template. Create ticker - create a ticker to display a scrolling or static line of text and online RSS feeds to remote players. Publish schedule Create and manage publishing schedules. Centralized distribution of published materials. System Architecture WebDT Content Manager supports a back-end database setup during the initial system installation. The WebDT Content Manager Enterprise version allows a single site that can establish a first level grouping of players. Through an Internet network connection, authorized system users can access the WebDT Content Manager Server to manage media content, publish schedules and control system settings from a Microsoft® Internet Explorer browser at a remote site. The published schedule and content will then be transmitted to players within the designated groups for playback over an Internet/ Network connection. 9 Figure 1 10 MainSections ofWebDTContent Manager This manual introduces various aspects of the WebDT Content Manager. The following section outlines and briefly describes the manual to help you get started quickly. Introduction to WebDT Content Manager System Management Player/Group and Edge Server Management Media Content Management Schedule and Publish Management About WebDT Content Manager, setting up a server and registering a player. Establishing site grouping, general system settings, active directory system settings, account management, role management, software upgrade, log collection, links to creating Urgent Casts Set a wide variety of unit management activities within the subset of WebDT Content Manager functions. Setup media formats, manage and upload files, oversee tickers, playlists, and media content. Select from built-in templates or create new template layouts for content display. Creating, arranging, and approving scheduling and publishing events. DT ResearchWebDTContent Manager (WCM) System Requirements Server Hardware: 1. 2. 3. 4. 2GB DRAM or above Pentium 4 CPU 2.0 GHz or above 10/100Mbit Ethernet Adapter Hard drive Space at least 80GB Server Software: 1. WebDT Content Manager runs on Windows Server 2003 or 2008 R1/R2 Standard/Enterprise Edition. 2. Windows Java Development Kit (JDK) 1.6 or later from (http://www.java.com/en/download/index.jsp) 11 3. JavaScript- enabled browser Internet Explorer 7.0 or above Communication Ports 1. User access to WebDT Content Manager Server By default, only port 80 (standard HTTP) is required. However during installation you can also choose to install the web server on a separate port number which is not being utilized. Users can also choose to enable SSL on the web server which then requires port number 443 to be opened. 2. Client Software (SA1000/SA2000 or other WebDT Signage Appliance) to WebDT Content Manager Server Only port 80 is required, depending on what has been selected as default under section A. User just needs to go through a onetime “registration” process in order to enter the correct server address and communication is handled by standard http port. Before you begin, please note the following sites which offer additional FAQs, support questions and help: 1. http://signage.dtri.com/web/support/general.html 2. http://webdtsignage.blogspot.com/ Setting up a WebDT Content Manager Server To setup your WebDT Content Manager Server, see Installing the WebDT Content Manager. To install your server, you will need the product key that came attached on the CD-ROM box, shipped with your player. IMPORTANT! Before setting up your WebDT Content Manager Server, please make sure you complete the following steps to ensure a smooth installation process: 1. Download and install Java Development Kit (JDK) 6(1.6) or later from http://java.sun.com/javase/downloads/index.jsp a. Look for the JDK6.XX , where XX represents the updated version. b. Use the Java SE Development Kit version 6.0 or later - take note of any pertinent release information issued with later versions of the Java JDK. 12 c. The whole installation package should be over 70Mb in size. 2. Ensure that any firewall settings are disabled. Your firewall can be enabled after a successful installation. Note Make sure that you login to the local server before proceeding. Do not login to a networked Windows Domain Server. Login as the administrator for the local PC server, on which you intend to install this application. Note If you want to access Content Server or register a player to the Publish Server after the installation of the WebDT Content Manager Server, the third part firewall must be disabled or Web Server firewall exception ports must be added. Installing the WebDT Content Manager 1. Insert the WebDT Content Manager CD and select Install WebDT Content Manager to begin the installation. Note If the installation screen does not display automatically, browse to find WebDT Content Manager Enterprise setup.exe. Double click the file to start the installation process. The WebDT Content Manager screen displays as shown in figure 2. 13 Figure 2 2. Click Next to continue. The License Agreement screen displays as shown in figure 3 14 Figure 3 3. After reading the Software License Agreement, select I accept the terms in the License agreement and click Next. 4. Enter the serial number as shown in figure 4. This number is affixed to the cover of the CD-ROM. 15 Figure 4 5. Click Next to continue. The Select Installing Mode screen displays as shown in figure 5. 16 Figure 5 If you decide to install the full Content Manager Server in one computer, you can complete the installation process for Database Server, Content Server, and Publish Server all at once by choosing the Quick Setup.– this is the preferred and recommended method. However, if you want to install the three servers on different computers, or customize the detail options, choose the Customized Setup and go to customize steps. Follow the instructions given. Note If the Java Development Kit (JDK) is not installed in your system, a warning message will be displayed. You cannot install the Content Manager successfully until you have installed the Java SDK. You can download it at the Sun site: http://java.sun.com/javase/downloads/index.jsp Installing Content Manager by Quick Setup Mode To install the full Content Manager in one computer, it is recommended to use the Quick Setup mode. Using Quick Setup allows the least values for installation, making it easier and faster. 17 1. To install the full set of content servers within WebDT Content Manager in one computer, choose Quick Setup and click Next as shown in figure 6. Figure 6 2. Click Change button in the step, you can change the Destination Folder as shown in figure 7. 18 Figure 7 3. Click Next to go to the Ready to Install the Program. Before installation starts, the Server Information will be shown as in figure 8. 19 Figure 8 4. The program is ready to install. To change any setting, click Back. To exit the process, click Cancel. Note If you are using the third part Firewall, please ensure the Database Server port and Web Server ports are open on your computer if installed. 5. Click Install to begin. Once the installation process is complete, the InstallShield Wizard Completed screen displays as shown in figure 9. And a Start.html page will be open to help set up the server. 20 Figure 9 6. Select the check box and click Finish to exit. Note A default Site will be automatically created after installation, default values are: User ID/Password: manager / 123456 Organization: my site You can log into the site directly or change the site information. See Site Management for further information. The Creating a New Site screen displays. See Creating a New Site section for further instructions. Installing Content Manager Servers with Customized Setup Mode If you want to change advanced options, or install Content Manager Servers in different computers, please use Customized Setup, which allows you to choose the components to install and offers more configure options. 1. Select Customized Setup and click Next button in Select Installing Mode step as shown in figure 10. 21 Figure 10 2. The Shared Library Folder screen as shown in figure 11. 22 Figure 11 Note The shared library folder is under the install path by default. If you want to set up Content Manager system on multiple computers, make sure the shared library folder is writable by any of the WebDT Servers. Click here for details. 3. Click Next to switch to Select Component screen as shown in figure 12. 23 Figure 12 There are three components for the WebDT Content Manager: Note WebDT Content Manager Database Server WebDT Content Manager Content Server WebDT Content Manager Publish Server If you are installing Content Manager on the first computer, the Database Server component must be installed. 4. Database Information screen as shown in figure 13. 24 Figure 13 Update the fields as required. The table that follows gives you a brief description of all the items. Field Description Represents the data port of the Database server. Database Port Note: Database Port field cannot be left blank. Superuser Name* Represents the internal database username. WebDT Content Manager Content Server and Publish Server will use the Superuser name to login and access the database. Enter the password for the Superuser Name account. Password Caution: For security reasons, the password should not be the same as the Service Account. Service Account The Service Account Name runs the Database 25 Name Service on computer. Please ensure you have created it with enough permission. Account Domain If account does not belong to any domain, leave the Account Domain field empty. Account Password The Account Password is need with the Service Account Name *For naming conventions, use a-z, A-Z, 0-9, _ and a space entry only. Do not include special characters. Note Write down the value of the Database Port, Superuser name and password, since you will need to use them later in the installation process. 5. Web Server Information screen as shown in figure 14 Figure 14 To enable the SSL feature, select Support SSL Server to install Secure Socket Layer (SSL) protocol on the Web Server and specify the HTTPS port. 26 To fully enable SSL support you need to subscribe to a valid SSL Certificate from a qualified Network Authority, such as VeriSign®. Note Port 443 is typically the designated SSL port. Enter the Web Server Port (between 1 and 65535). A message displays if the port number is already in use. Click Next to continue. 6. The Add SSL For Server screen displays as shown in Figure 1415. Figure 15 Click Browse to select a CA-Key File and a CA-Cert File (supports SSL protocol only). Note Before you can apply SSL security to the server, purchase an SSL certificate from an SSL Certificate authority. Both files are used for generating a keystore file. 27 Note Content Server and Publish Server are being called Web Server in WCM, they are using the same port in one computer. 7. Click Next to go to the Ready to Install the Program screen displays. Before the installing is started, the Server Information will be shown. 8. Click Install to begin. If you have chosen Content Server, once the installation process is completed, the InstallShield Wizard Completed screen displays as shown in figure 16. Figure 16 Start.html page will open to help set up the server as shown in figure 17. 28 Figure 17 Several settings before WebDT Content Manager can be used Check the firewall settings: If the Windows built-in firewall is used, the installer already opened the required firewall ports. There is no need to change the firewall settings unless it had been changed manually after installation. Please change the firewall setting below (inbound and outbound) if third party firewall is used. 1. If the server is all installed in one machine (by default), please open TCP 80, 443(HTTPS) and 8005 port for internal server communication. 2. If the server is installed on multiple machines, a. Open TCP 5432 port on the database machine b. Open TCP 80, 443(HTTPS) and 8005 port on other server machines c. Open TCP 123 port on the Publish Server machines 29 These are the default port numbers used in installation. If different ports are used in installation, please open the corresponding ports. Shared Library Folder If you set the shared library folder on different machine, you should set the shared library folder to ensure each server can access it. An easier way is setting the shared library folder as everyone can read & write it. But if you do not like this way, please follow these steps: 1. Create an account (or use the existed account) on the shared folder machine or domain and set it can read & write the shared library folder. 2. Within each computer in which Content Server or Publish Server is installed: a) Create account with the same name and password as in step 1 if domain account is not used. b) Open “Control Panel > Management Tools > Service”, find any following services and change their login account in property dialog as above: - WebDT Content Manager Web Server - WebDT Content Manager Content Server - WebDT Content Manager Publish Server 3. If you set domain account to read & write the shared library folder, please use the domain account to log in the services. Modifying the WebDT Content Manager If there is any problem with the installed WebDT Content Manager server or you would like to make further modifications, follow the steps below to modify, repair or remove the WebDT Content Manager Servers. 1. Run the WebDT Content Manager setup.exe, or navigate Start | All Programs | DT Research | WebDT Content Manager and click Uninstall WebDT Content Manager, it will go to the Program Maintenance step as in figure 18. 30 Figure 18 To modify the WebDT Content Manager: 2. Select Modify and click Next to continue. Follow the steps described in Installing Content Manager Servers by Customized Setup Mode to modify your WebDT Content Manager server installation. Repairing The WebDT Content Manager To repair the WebDT Content Manager, go to the Program Maintenance step first: 1. Select Repair and click Next. The Ready to Repair the Program screen displays as shown in figure 19. 31 Figure 19 2. Click Install to repair Content Manager in the computer. The WebDT Content Manager All In One is repaired. Uninstalling WebDT Content Manager Note Before uninstalling, close any applications associated with the Database Server. To uninstall WebDT Content Manager, go to Program Maintenance step: 1. Select Remove and click Next. The Remove the Program screen displays as shown in figure 20. 32 Figure 20 2. Click Remove to uninstall Content Manager from the computer. The WebDT Content Manager is uninstalled. Collecting Server Log After installing the WebDT Content Manager Content Server or Publish Server, there is a Collect Log tool, in the Start menu. This tool will collect the log of the Content Server and Publish Server in local (If they are installed), the installing log, and configuration files. 33 1. Click the Collect Log tool from Start | Program Files | DT Research | WebDT Content Manager 4.0 to run the tool. Figure 21 2. Click Browse button to select a path to store the compressed log files. 3. Click Collect Logs button to start collecting; the processing information is displayed in the Output field as shown in figure 22. 34 Figure 22 4. After collection is finished, you can quit the tool and get the log files in the path selected. Site Management Enterprise level users can enjoy the functionality of setting up and maintaining their own site. Through the Site Management function, Administrators can create, delete, search and manage a site (only one site is available through the Enterprise Version). Note An Administrator account is required to access the Site Management function. Creating a New Site To publish digital signage media, a site must first be created to publish and manage the content. 35 1. Input the WebDT Content Manager address in Internet Explorer address bar. Internet Explorer launches the Content Manager login dialog as shown in figure 23. Figure 23 2. Login as an Administrator and click the New button to create a new site as shown in figure 24. Note The default User ID and Password are Administrator and Admin, respectively. The organization name is administration. Please remember to change the password for security reasons. All data entry is case sensitive. 36 Figure 24 By default, the Account System Type is selecting WebDT Content Manager Account System; to support the Windows Active Directory Account System, please see the 37 Active Directory section. When selecting WebDT Content Manager Account System, the following information is required: Organization: Specify the name of your organization. It is required for player registration and user login. Data of different organizations is not shared. Manager User ID: The Manager user can login to the WebDT Content Manager with this ID to manage system settings and accounts. Manager Password: Enter the password for the Manager account. Confirm Password: Enter the Manager password for confirmation. Email Address: Enter the email address for the Manager account. The system sends out notification emails such as player malfunctions, account information and schedule publications. Specify an Email SMTP server in the System Settings to receive e-mail based notifications. The following information is optional: Description: the description of the site. Address/City/State/Zip Code/Country: the address where the site is located. First Name/Last Name: the name of the Manager. Mobile Phone: the mobile phone number for the Manager user. The System will send SMS message to this phone number. This feature is only available for mobile users in the USA. Carrier: the service provider of the selected mobile phone number. Email Content Language: Specify the language for use with Email and SMS notification. Once a new site is created, the Manager can login to the site through the Content Manager login dialog page, as shown in Figure 25, to create new user accounts and control system settings. 38 Figure 25 Modifying a Site After creating a site, the reference information can be changed or updated by clicking on a particular site and directly altering the Site Information fields as required. 1. Login to the Administrator account, as shown in figure 26. 39 Figure 26 2. Click on the Site Management menu on left panel. 3. Select a Site to modify. 4. In the Site Information frame, click on the appropriate field and type the new information. Click Save to update the site. The site is updated and saved. Deleting a Site A site can be deleted by using the following steps. 1. Login to the Administration account, as seen on Figure 23 40 Figure 27 2. Click on the Site Management on the left panel. 3. Select a Site to delete. A confirmation window pops up. Click OK to delete. The site is deleted. Note Warning: If a site is deleted, all the content files under the site will be deleted and cannot be recovered! Searching for a Site The Search function scans rapidly through sites hosted on the system to find a requested entry as specified in the search criteria. This function is particularly useful if there are a large number of sites hosted by the system. 1. Click Search button, the Search Site screen displays as shown in figure 28 41 Figure 28 2. Enter search criteria in the Site ID and/or Description fields. Note If the entire name is unknown enter part of the name of description to display all sites containing those parts. 3. Click Start to begin the search. Matched sites are listed in the Search Results window. Note If the search criteria fields are left blank, then all sites are listed. 42 Active Directory WebDT Content Manager can be used with Windows Active Directory. The accounts are stored in the Active Directory. Content Manager can read the accounts and password, but cannot change them. This function is excellent for the company using Active Directory to manage their employee accounts. Click the drop menu of Account System Type, select the Windows Active Directory Account System option. The Site Information screen displays as shown in figure 29. Figure 29 When selecting Windows Active Directory Account System, the following information is required: Organization: Specify the name of your site; required for player registration and user login. Data of different sites is not shared. Domain Name: Assign the Active Directory domain name so Content Manager can find it for access. Port: The port of the Active Directory domain. Domain Account: The Domain Account should be an account with permission to access the information in Active Directory, allowing Content Manager to access necessary data. 43 Password: Enter the password for the Domain Account. Site Manager Role: Click the Browse button to select a group from Active Directory as the site manager role in Content Manager. As shown in figure 29a. Figure 29a Select the roles from Active Directory and click OK to import it into Content Manager. The following information is optional: Description: the description of the site. Address/City/State/Zip Code/Country: the address where the site is located. Note When the Windows Active Directory Account System is in use, the Content Manager will synchronize the account 44 information in 3:00am everyday from the Active Directory. Note Warning: If you change the Account System Type for a created site, the old account data will be completely deleted! Edition Information The Edition Information dialog box displays when you login as an Administrator. The screen displays Current Version and Current Edition information about the WebDT Content Manager. The maximum site number of the Enterprise Edition is one site. The default number of players is five units. If you have more than five players, you can request for an Upgrade Key by logging into the client section of the website http://signage.dtri.com. Upgrading your WebDT Content Manager 1. Type in your Upgrade Key in the dialog box as shown in Figure 30Error! Reference source not found. 2. Click Upgrade. The WebDT Content Manager Server is upgraded to allow the maximum number of connections associated with the Upgrade Key. Figure 30 45 System Management Managing the System The System section allows the account with related general privileges to establish critical system controls for information, settings, account and content management. If you are a Manager user, the following sub-sections are available in the System section: Settings Provides information about critical SMTP server settings, player access passwords as well as error alert settings. Software Upgrades Provides a tree view of all edge server and player patches or OS/BIOS, and information on each patch/OS/BIOS. Log Collection Allow users to collect log from players and servers, the collected log can be downloaded to a local disk. Account Management Allows user with account and role management privileges to create accounts (only for WebDT Content Manager account system) and manage account settings. Role Management Allows users with account and role management privileges to create or import roles and change role settings. Urgent Cast Urgent Cast is an immediate notification message to be broadcast to the selected WebDT Players. Changing the Administrator Password 1. Click Change Password as shown in figure 31 46 Figure 31 The Change Password screen displays as shown in figure 32: Figure 32 2. Enter the original password in the Old Password field. 3. Enter the new password in the New Password field. 47 Note Passwords must contain at least 5 characters. 4. Retype the new password in the Confirm New Password field. 5. Click OK to complete the Change Password process. Note To change your password, follow the procedures described above. System Settings Within the Settings sub-section of the System section, the account with System Setting privilege. can set up information pertaining to SMTP server, Player Access Password, default playlist, wallpaper, and so on. Click the Settings sub-section command, a Settings window displays as shown in figure 33. Figure 33 Organization: Displays the name of the site. Player Acess Password: The required password to register a player. 48 Confirm Password: Re-enter the Player Access Password. Default Playlist: Select and set the default playlist for the whole site. Note Wallpaper: Select an image (for the whole site) to set as the default player wallpaper. Note Group default playlists have priority over site default playlists. The image file used as wallpaper should be pre-loaded to Media Library. Please refer to Adding Media to a Folder for details about uploading an image file to Media Library. Player Progress Bar: Select the on-screen display frequency of the Player Progress Bar: Never, When Idle or Always. Note When the frequency is set to Always, the downloading progress bar displays over scheduled content. Time Range for Downloading: If downloading restrictions are required, check the box and enter the time within a 24 hour period when downloading is permissible. Player Error Alert: Select the Player Error Alert format by checking the appropriate box(es). SMTP Server Settings: Define the SMTP email settings and email address of the Manager to allow for automatic email notifications within the system. Update the required information to set the SMTP Server Settings. The table below gives you a brief description of all the different settings. Field SMTP Server Host Port Description Domain location of the SMTP server. Port number (default: 25) of the SMTP server 49 Account ID SMTP server login account ID. Password Enter the password of the account ID to log in to the SMTP server. Confirm Password Enter password to confirm the Password field. Enter the email address to be used for notifications through the WebDT Content Manager. Email Address Note: To avoid a setting conflict, ensure that the sender email address is different from that of the receiving account, see Figure 59. Note Failure to fill in the SMTP information fields will result in the inability to receive important technical information from the WCM server and player(s). We recommend that you complete the SMTP information page. Select Site Logo: Define an image file in JPG, BMP, JPEG, GIF or PNG format as site logo which can be shown when Show Site Logo checkbox is selected under Urgent Cast page. Figure 34 SET T IN G D EF AU L T SIT E PL AY L IST To set the default playlist for your site, use the following steps: 1. Click on System | Settings. 50 2. In the Default Playlist field, click on the Browse ( ) icon. The Select a Playlist window displays. Figure 35 3. Select the Playlist from the available list. 4. Click OK to continue. The Playlist now displays in the default field. SET T IN G W AL L P AP ER FO R A SIT E To set the default wallpaper for your site, use the following steps: 1. Click on System | Settings. 2. In the Wallpaper menu, click on the Select ( ) icon. The Select an Image window displays. 51 Figure 36 3. Select the Image from the available list. 4. Click OK to continue. The selected image is now the default site wallpaper. COUNT RESULT The number of PC Clients registered to the WCM server can be seen here. The number of these PC clients that are active is displayed as well. (This field should only be active if you have purchased the WebDT SimulCAST module.) Figure 37 Software Upgrades The Software Upgrades menu allows you to update OS/BIOS or apply new WCM patches to edge servers or players from the source WCM server. 52 Patches/OS/BIOS updates can be applied to a single or multiple players (edge servers) simultaneously. 1. Click the Software Upgrades sub-section command. The Software Upgrades window displays as shown in Figure 38. Figure 38 2. Select Player Patches, ES Patches, Player OS/BIOS and Edge Server OS/BIOS from the Software Upgrades Tree View on the left section. Information for the patch (creator, privileges, patch version, file size, compatible device, compatible OS version, and created time) is displayed figure 38. Information for the OS/BIOS (creator, privileges, Path in Publish Server, OS version, BIOS name, BIOS version, file size, compatible device and created time) is displayed as shown in Figure 38. Update Task tab displays current update tasks assigned to players or edge servers or groups. Preload tab displays edge servers that have preloaded the selected OS/BIOS. Files tab displays complete list of files of the OS/BIOS, including file size and last modified time. 53 Note Privilege Setting, Full Control: Users can modify privileges for the current node when this is selected, all options are selected Modify: User can Create, Edit, or Delete current node Read: User can read current node, without this option user cannot see current node in tree, in dialog, etc. Uploading a New Patch 1. Select Player Patches or Edge Server Patches from the Software Upgrades Tree View on the left section. 2. Click New from the top menu bar. 3. Select New Patch. The Patch Information window displays 54 Figure 39 4. Fill in the required fields. Figure 40 5. Click the Browse button to select the patch file. 55 6. Click the Save button on the top menu bar to save the new patch settings. Moving or Deleting a Patch 1. Select the patch to move from the Player or ES Patch Menu Tree. 2. Click the Move button on the top menu bar. Figure 41 56 A Select Folder window displays Figure 42 3. Select the target destination for the patch. 4. Click OK to continue. The patch is now moved to the new tree location. To delete the patch, click Delete button. A confirmation window will display, click OK to delete the patch. 57 Dispatching a Patch file to Players/ Edge Servers 1. Select the patch from the Player or ES Patch Menu Tree 2. Click the Select Players or Select Edge Servers icon on the right section The Dispatch to Players or Dispatch to Edge Servers window displays as shown in the following figure 43. Figure 43 3. Choose the players/edge servers to dispatch the patch file from the Player/ Group tree view on left section. Note Select Include installed or Exclude installed from the drop down menu on the top right corner. This can save time when organizing updated and non-updated players. 4. In Set install Time (bottom of window), choose Install the patch immediately after downloaded or select Date/ Time to start the installation process. 58 5. Click OK to complete the dispatch settings. 6. Dispatch progress will now be listed in the Patch window. Status of the dispatch activity will be shown in status column. Canceling Dispatch for Players or Edge Servers 1. Click the Cancel icon on right side to cancel the dispatch activity. 2. Click on the drop-down menu on right side to specify a dispatch status to players in the list. Note You can elect from the following: Show All, Show Not Issued, Show Downloading, Show Partially Downloaded, Show Downloaded, Show Installed, Show Canceling, Show Cancelled or Show Failed. Uploading an OS/BIOS 1. In System | Software Upgrades, select the Player OS/BIOS folder. 2. Click the New | New OS/BIOS. The OS/BIOS frame displays. Figure 44 3. Fill in all required information as seen in Figure 44. 4. Click Browse to select the new OS/BIOS to upload. 5. Click OK to continue. 6. Once the local file is uploaded, click Save. Note The file must be in a compressed (*.ZIP) package. 59 Updating OS/BIOS to Players 1. Select the OS/BIOS from the Player or ES OS/BIOS Menu Tree 2. Click the Select Players icon on the right section 3. The Update Players window displays. 4. Choose the players to dispatch the OS/BIOS from the Player/ Group tree view on the left section. Note Select Include updated or Exclude updated from the drop down menu on top right corner. This can save time to figure out which players have or have not been updated with the OS/BIOS. 5. In Update Options at left bottom section, choose update immediately or select Date/ Time to specify an installation period. 6. In Advanced Options (right bottom section of window), choose Update From Host to update from ….; choose Specify Wi-Fi Settings as needed …. 7. Click OK to update the settings. 8. Update details will now be listed in the OS/BIOS window. Moving OS/BIOS You can move an OS/BIOS pack to a subfolder within the root folder. 1. Navigate to System | Software Upgrades. 2. In the Software Upgrades column, select the OS/BIOS to move. 60 Figure 45 3. Click on the Move button. The Select Folder window displays Deleting OS/BIOS You can delete an OS/BIOS pack by following the procedures that follow. 1. Navigate to System | Software Upgrades. 2. In the Software Upgrades column, select the OS/BIOS to delete (e.g.; 160SA_02.02.01). 61 Figure 46 3. Click the Delete button. A confirmation window displays. Figure 47 4. Click OK. The OS/BIOS is now deleted. Canceling an Update for Player or Edge Server OS/BIOS 1. Click the Cancel icon on the right side to cancel an update task. 2. Click on the drop-down menu on right side to specify a dispatch status to players in the list. Note Select from the following: Show All, Show Not issued, Show Scheduled, Show Updating, Show Update, Show Cancelling, Show Canceled or Show Failed. 62 Preloading an OS/BIOS to Edge Servers 1. In System | Software Upgrades, select an OS/BIOS file under Player OS/BIOS or Edge Server OS/BIOS. 2. Select the Preload tab, located to the right. 3. Click the Select Edge Server button as shown in following image. Updating from Host You can update your OS/BIOS from a host Edge Server. To specify the remote host use the following guidelines. In this example, the server host is labeled Host A (IP is 10.10.1. 60, Port is 8888). 1. Find a Player/Edge Server OS/BIOS file (Publish Server file path is as follows: /library/00000BBC/sysimage/00/00/00/09/), refer to the following screenshot. Figure 48 2. Create a path on Host A, following the same Edge Server path structure, for example: http://10.10.1.60:8888/sysimage/00/00/00/10/. 63 3. Manually copy the OS/BIOS files to the path created in Step 2. The OS/BIOS file must be the same file type as used for Software Upgrades in WebDT Content Manager. 4. In the Software Upgrade page, select the OS/BIOS to be updated. 5. Click the button to open the Update Players or Update Edge Servers dialog. 6. Select compatible players or edge servers to update. 7. Specify Update from Host found on the bottom section, for example: http://10.10.1.60:8888/. 8. Click OK. The selected players or edge servers will then download the OS/BIOS files from Host A to update OS/BIOS. Figure 49 9. Check the corresponding boxes to select the Edge Servers for preloading the OS/BIOS file. Click OK to start the preload process. 64 Log Collection Within Log Collection, the user with corresponding privilege can collect the log information on Content Server, Publish Server, players and Edge Servers. Click Log Collection sub-section command, the Log Collection window displays as show in Figure 50. Figure 50 The current log collection information will be shown on top of the page. Trace Players/Edge Servers: Add players and Edge Servers to collect log information. Date scope of server log: select a date range to collect log information on Content Server and Publish Server. Note If you installed multiple Content Servers and Publish Servers, log data on all servers will be collected. Adding the Conditions You should add at least one condition between Trace Players/Edge Servers and Date scope of server log. Otherwise, you cannot click Collect Now button to start collecting. 1. Click Player under the Trace Players/Edge Servers to open the dialog as shown in figure 51: 65 Figure 51 2. Select players which are sorted by group and click OK button to add the selected players. 3. Click Edge Server to add the dialog as shown in figure 52: 66 Figure 52 4. Select Edge Servers or players under them and click OK button to add. 5. The players/Edge Servers are added as shown in figure 53, you can click the delete button after an item to delete it: Figure 53 67 6. Select Start Date and End Date of the Date scope of server log as shown in figure 54: Figure 54 Log Collecting 7. As soon as any of the conditions are selected, you can click Collect Now button to start collecting as show in figure 55: Figure 55 8. The log is collecting data as shown in figure 56, you can click Cancel button to cancel it: 68 Figure 56 Note When you refresh the page before collecting data is finished, the conditions will be cleared, but the current collecting is not affected. Downloading Collected Log 9. After the log is collected, it will be shown in the page, click download to download the file to a disk as shown in figure 57: Figure 57 Note WebDT Content Manager will keep one log file for each account, after current collecting is finished, the previous log file will be deleted, please download the log file before 69 collecting again if needed. Account Management Within Account Management, an account with the Account and Role Management privilege (Click here for details) is able to create additional accounts (as shown in Figure 58). The account can view and modify the existing user accounts and information stored within the account information. Users can select a Preview Player in order to preview any content (media, ticker, playlist and urgent cast ) before the schedule is published. Figure 58 Creating an Account In Account Management, you can add, edit, or delete accounts. When a new account is setup, the WebDT Content Manager will send a notification email to the specified email account. 70 Note The Email notification function can only be activated if the SMTP server settings have been established. Creating a new user account 10. Click New from the top menu bar. Figure 59 The Account Information screen displays as shown in Figure 60. 71 Figure 60 Update the fields with information to create a user account. Field User ID Description Required for the user to login to the Content Manager Enter the user password Password Note: Password field cannot be left blank Confirm password Retype the password to confirm First Name/Last Name Fill in name information if desired Description Information pertaining to the user Member of Click the Change button to add the account to one or several roles. General Privilege Click See Detail button to show the privilege settings for the account in a dialog, it is read-only. As show in 61a. 72 Email Address Enter the email address designated to receive notifications and warning alerts. Mobile Phone Enter the phone number to receive SMS notification messages. Note: This feature is only available for U.S. mobile phone users. Carrier Select the mobile carrier for the selected mobile phone. Preview Player Select the single or multiple players to preview. Click to select, click to clear, or click to delete the selected preview players. Email Content Language Select the desired language for SMS and email messages to the mobile phone (default: English). Receive Email Alert Enable or disable Email/SMS alerting to the new user. Figure 61a 11. Click Save at the top of the screen to create a new account. Change the Member Of property Account must be a member of role. In WebDT Content Manager, user can set it as member of one or several roles. 1. Click Change button of the Member Of label, the dialog displays as shown in figure 61: 73 Figure 61 2. Select the roles and click OK button, the screen displays as shown in figure 62: Figure 62 74 Setting Preview Players To add a preview player to an account, follow the steps described below. You can assign multiple players as preview players. After the players are assigned as preview players successfully, click the button on Media, Ticker ,Playlist or urgent cast page to preview contents. Click Select Player and Preview button to select preview players you want to preview for current content. With selecting specific players, click the Preview button to preview content on selected players. 1. In System | Account Management, click an account to select, as shown in figure 63. Figure 63 2. Click the Add Preview Player icon . The Add Preview Player window displays. 75 Figure 64 3. Select the player(s) to assign. 4. Click OK to continue. The player is now assigned to the management account. In this way, multiple players can be assigned when previewing content. To use the preview function, click the button found on Media, Ticker ,Playlist or urgent cast pages. The content is previewed on all assigned players. You can also select only certain players to perform the preview function. Click the Select Player drop-down menu in the Preview players for previewing,as show 65a, 76 button to select specific Figure 65a Downloading WebDT Preview Player WebDT Preview Player is designed especially for previewing content. It can be installed on your computer, so you can preview content with WebDT Content Manager without extra investment. 1. Click the Download Preview Player as shown in figure 65: 77 Figure 65 2. The WebDT Preview Player installer will be downloaded You can also find the download button in the title bar of Media, Ticker, Playlist and Urgent Cast module. Searching for an Account This function allows you to search user accounts based on specified criteria. The search fields are not case sensitive. Follow the steps below to search for user accounts: 1. Click Search on the top menu bar to invoke the Search Account dialog window as shown in figure 66 78 Figure 66 2. Select the Account Role to be searched: All roles, Site Manager, Publish Manager and Designer. 3. Enter keywords in The user ID contains or Description contains fields to search for user accounts. 4. Click Start to perform the search operation and the matched items will be listed in the Search Results window. Active Directory Account If the site is using Active Directory account system, the Account Management page is as shown in figure 66a: 79 Figure 66a 1. The account list come from Active Directory Server, You can only update the relative account setting, but you cannot remove a exists account or add a new account. 2. You still can setup the privileges and preview player for this account Role Management In WebDT Content Manager, a role means an account group, an account must be a member of a role, every role has its own privilege settings, and the account will receive the privilege from its role. The account can be a member of more than one role, if so, the account‟s privilege is the combination of all the groups he/she is member of. Within Role Management, an account with Account and Role Management privilege can create/ delete roles, change the general privilege settings, and manage accounts in roles. The role management screen displays as shown in figure 67: 80 Figure 67 Creating a New Role To create a new role, follow the steps below. 1. From the System tab, click Role Management. 2. Click New button from main toolbar menu. 81 Figure 68 The Role Information screen displays as shown in figure 69: Figure 69 3. Enter a Role Name and click Save to add the new role. 82 Note There are 3 roles created by default; Site Manager, Designer and Publish Manager. They have different settings at the beginning, and except for the Site Manager role, other ones can be deleted. Deleting a Role 1. From the System tab, click Role Management. 2. Select a role you want to delete, click Delete button on the top toolbar. 3. The selected role is deleted. Note When deleting a role, the accounts which are members of only this role will be deleted too. Changing the General Privilege Settings In the role information screen, there are 2 tabs: Privilege and Account. To change the privilege settings for the role, click Privilege tab as shown in figure 70: Figure 70 There are 3 general privilege settings in WebDT Content Manager. 83 Edge Server management: allow or deny managing the Edge Server functions in Edge Server module. Change system settings: allow or deny changing the system settings in Settings module. Account and role management: allow or deny managing the accounts and roles in Account Management and Role Management modules. Managing the Accounts in Role To add or remove accounts to the role, click Privilege tab as shown in figure 71: Figure 71 The following information is shown for all accounts in the role: Field Description Name The account name. Description The description of the account Member Of Which roles the accounts are members of. Email Address The email of the account 84 Mobile Phone The mobile phone number of the account You can create a new account in this role directly; click to open the screen as shown in figure 72: Figure 72 Input the required information and click OK button to create the account. Note The operations in the Account tab will immediately be affected, even before the user clicks the Save button in 85 the main toolbar. To add an account to this role, click to open the screen as shown in figure 73: Figure 73 Select the accounts and click OK button, the selected accounts are added to the group. To remove accounts from the role, select the accounts and click to remove them from the role. Note If the removed account is a member of other roles, it will not be deleted from Content Manager. Otherwise, if the 86 account is only a member of this role, the account will be deleted completely. Active Directory Role If the site is using Active Directory account system, the Role Management page is as shown in figure 74: Figure 74 Click Import to open the Account Information page, the roles in Active Directory are listed in the dialog as shown in figure 75: 87 Figure 75 Select the roles from Active Directory and click OK to import it into Content Manager. Click Synchronize button from Role Management page to synchronize the information from Active Directory. Click Save to save the General Privilege changes of the role. Note When using Active Directory account system, user cannot add/delete accounts in WebDT Content Manager. Click Delete to delete the role from Content Manager. It will not be deleted from Active Directory. 88 Figure 76 Select the Account Role to be searched. Enter keywords in The user ID contains or Description contains fields to search for user accounts. Click Start to perform the search operation and the matched items will be listed in the Search Results window. UrgentCast Urgent Cast enables the immediate broadcast of important content and messages to the players. This takes precedence over all normally published playlist schedules. The Urgent Cast message can contain a ticker-like text message, multi-media content, and background audio. This function will be enabled only if the current user has Full Control or Modify privilege. An Urgent cast can also be published to a PC client as well as WebDT signage appliances/ players. To install a PC client at other computers, please refer to the UrgentCastPlayer_UserGuide.pdf on the Software disk. 89 Note The PC Urgent Cast Module (also called the WebDT SimulCAST feature) is provided separately as a paid software module Figure 77 Creating a New Urgent Cast Folder To create a new folder for Urgent Casts, follow the steps below. From the System tab, click Urgent Cast. Click New and select New Folder from the drop down menu. Creating, Previewing and Publishing a New Urgent Cast To setup an Urgent Cast, follow the steps below. From the System tab, click Urgent Cast. Click New and select New Urgent Cast from the drop down menu. 90 Figure 78 The Urgent Cast dialog screen displays (0). Complete the upper fields for ticker-like message attributes Text, Speed, Duration, Font, Font Style, Font Size, Position, Background Color, Font Color, Direction, Full Screen, Reading Habits, Show Site Logo, Lock Screen, Background Audio, Other Media check box and Privileges Settings button. Note The default display Reading Habits for Urgent cast messages is Left to Right . Right to Left display can be applied to some languages, such as Arabic and Hebrew. The text and other media cannot be empty at the same time. 91 Note Select the Show Site Logo checkbox here to display the logo file uploaded in Settings page in front of the Urgent cast message. Select the Lock Screen checkbox to lock the Urgent cast player user's screen (pc client side), which means the keyboard and mouse will be disabled. Click "Ctrl+Alt+Delete" to enable the keyboard and mouse. Figure 79 To broadcast an audio file with the message, click in the Background Audio field to select an audio file to be broadcast. To broadcast a multimedia file with the message, click in the Other Media field to select an image or multimedia file to be broadcast. Preview the Urgent cast content files by clicking Preview at the top of the screen. Note If you have set up multiple preview players in Settings, click to select one of the preview players or 92 multiple preview players to preview the Urgent cast. 1. If you are satisfied with the message, click the Publish button at the top. In the Publish dialog window, select the groups or players you want to broadcast to by selecting the check box(es) in the Group/Players panel. If you want to publish the Urgent cast to pc clients as well, select the Publish to PC Client checkbox as shown in below picture. Figure 80 To save an Urgent Cast to a new location, follow the steps below. 1. In the System | Urgent Cast, select an Urgent Cast to re-save. 93 Figure 81 2. In the top menu bar, click Save As. The Select an Urgent Cast window displays. Figure 82 3. Select a target folder. 94 4. Enter the new name in the Name field. 5. Click OK. Note The Save preload information option is for saving the source preload players or groups to the new Urgent Cast. The new file name is re-saved under the selected folder. Figure 83 The Urgent Cast Folder screen displays. 95 Figure 84 Enter a Folder Name Click Save to add the new folder to the Urgent Cast folder list. Stopping an Urgent Cast The Stop function can immediately stop any Urgent cast published to players. To Stop an Urgent Cast, follow the steps below. Click Stop in the command bar to display the following screen. 96 Figure 85 Use the Group list to locate the player(s) currently showing the Urgent Cast. Check the Stop PC Client and player(s) and click Stop to halt the Urgent Cast on all the selected PC Clients. Check the player(s) and click Stop to halt the Urgent Cast on all the selected players. Preloading an Urgent Cast Note The user must modify the privilege in order to preload an Urgent cast. Preloaded Urgent Cast messages on players allow you to quickly publish Urgent Casts to multiple targets without manually entering to all the intended groups and players. This saves time to prepare emergency response video instructions that would be uploaded in advance to each player or groups of players in preparation for an emergency plan. 97 The limit on Urgent Cast preloads is five (5) scenarios for each player and group. Note When the maximum limit of five preloads is exceeded, the Urgent Cast schedule will not be uploaded to the player. Delete previously uploaded Urgent Cast schedules to continue with the new preload. To add Preloaded Groups or Players, follow the steps below. 1. Select the desired Urgent Cast from the Urgent Cast list. Figure 86 2. Select the Preload Groups or Preload Players tab in the Urgent Cast panel and use the tool bar to manage the preload targets. 3. Icon Menu Add Preload Group Description Click to display the Add Preload Group screen. Select the desired Group(s) and click OK to add to the preload list. 98 Add Preload Player Click to display the Add Preload Player screen. Select the desired Player(s) and click OK to add to the preload list. Select All Click to select all listed Groups/Players. Clear All Click to unselect all listed Groups/Players. Delete the selected items Click to delete the selected Groups/Players. 4. Click Save to complete the preload selection Searching for an Urgent Cast You can easily search for an Urgent Cast by following the described procedures below. 1. In System | Urgent Cast, click on Search in the top tool bar. The Search Urgent Cast window displays. 99 Figure 87 2. Enter a word or word phrase for the search criteria. 3. Click Start. The search results display in the lower frame of the Search Urgent Cast window. Urgent Cast Simple Interface To create and manage Urgent casts, an account with Full Control, Modify and Read privileges can also link to an alternative URL: The WCM Server domain name: port number/loginuc.jsp: e.g.: http://127.0.0.1:8080/loginuc.jsp 100 Note An account with Read Privilege only can read this Urgent Cast page, but cannot publish and create Urgent Casts. This link allows the account with Full Control, Modify and Read privilege to login and operate the Urgent cast functions from a simple interface as shown below. Figure 88 Registering theWebDT Player After personalizing and modifying the Settings, you can register your WebDT players. Please follow the operation guide to install the player. The player must be Internet/network enabled via Ethernet or wireless connection. For Ethernet connection, please make sure it is connected to a network or Internet. For wireless connection, please configure your wireless network before registration. When you turn on the WebDT player for the first time, a screen displays as shown in Figure 89 prompting you to register the player. 1. Press Ctrl + Shift + Space keys to stop the player software. 2. Configure your wireless settings to make sure your player is Internet/network enabled via wireless connection. 101 After the Internet/network is set up, restart Windows or reboot the player device. The Player Registration screen displays as shown in Figure 89. Figure 89 Fill in all fields to register. Fields marked (*) are required. Field Description 102 Language Select the language of operating interface. Player Name Enter the name of the player (The default name will be automatically detected, but users can rename it for better identification). Group Name Enter the group name of the player. If you don‟t know the group now, you can leave it blank and assign it later. Organization Name Enter your organization name received from your hosting partner or site manager. Player Access Password Enter the Player Access Password received from your site manager Enter the Publish Server URL from your hosting partner or site manager. Publish Server URL Note: Please input the IP address with the correct port number and not add http://and /publish are also ok Description Enter a short description to identify this player. The following fields are for proxy registration and are only visible by clicking the advanced button ( ) in the Player Registration window. Connect to the server via proxy Select this check box if registering the WebDT player by proxy. Proxy Host Enter the proxy host name and port number of the proxy server from your hosting partner, for example: http://w.x.y.w:80/ (80 is the port number). Username Enter the proxy user name from your hosting partner. Password Enter the proxy password from your hosting partner. Do not use proxy server for address: You can use this setting to bypass using the proxy server to register to the WebDT server if it is located in the same subnet as the proxy server. 103 3. Click OK to register and connect to the WebDT Content Manager Publish Server. The WebDT player is registered and a confirmation window displays. If it fails to register, please check if the Internet/network connection and the firewall settings work properly. Note After registration, the player is activated and downloading of scheduled programs begins. When you turn on the WebDT player and a static bitmap is displayed, the player has been registered. It is not necessary to register the player again. Registering theWebDT EdgeServer To register your Edge server: 1. Click Start WebDT Signage Edge Server on the desktop or click Start | All Programs | DT Research | WebDT Signage EdgeServer | Register WebDT Signage EdgeServer Again. 104 Figure 90 - If you previously registered and exited before completing the process, click the shortcut Start WebDT Signage Edge Server to continue with the registration process. Fill in all fields to register. Fields marked (*) are required. Field Language Description Select the desired language: English (default), Simplified Chinese, Japanese, Traditional Chinese, French, Spanish, German and Korean. 105 Edge Server Name Enter the name of the Edge Server. Organization Name Enter your organization name received from your hosting partner or site manager. Access Password Enter the Access Password received from your site manager. Enter the Publish Server URL from your hosting partner or site manager. Publish Server URL Note: Please input the IP address with correct port number, such as “http://127.0.0.1:8080/publish”, not adding “http:// ” or “/publish” is also ok. Description Enter a short description to identify this server. The following fields are for proxy registration and are only visible by clicking the advanced button ( ) in the Player Registration window. Connect to the server via proxy Select this check box if registering the WebDT Edge Server through a proxy. Proxy Host Enter the proxy host name from your hosting partner, include the port number of the proxy server, for example: http://w.x.y.w:80/ (whereas 80 is the port number). User Name Enter the proxy user name from your hosting partner. Password Enter the proxy password from your hosting partner. Do not use proxy server for address: You can use this setting to bypass using the proxy server to register to the WebDT server if it is located in the same subnet as the proxy server. 2. Click OK to register. The WebDT Edge Server is registered and a confirmation window displays. If it fails to register, please check if the Internet/network connection and the firewall settings work properly. 106 When you turn on the player and a static bitmap is displayed, the player has been registered. It is not necessary to register the player again Proxy Detecting Player/ES can support the proxy settings through local settings on IE and domain policy on the domain server (not support settings from DHCP server and DNS server and configuration script). In IE menu, open: Tools > Internet Options > Connections > LAN, 1) If "Automatically detect settings" is checked, Player/ES can use IE proxy settings. When proxy is start, Player/ES can register and download successfully by it; 2) If "ByPass Proxy server for local addresses" is checked, Player/ES will use IE settings and be same behavior with IE ; 3) If "Do not use proxy server for address beginning with" is set, Player/ES will use IE settings and be same behavior with IE; 4) If Player/ES has its own proxy settings in register dialog, Player/ES will use its own proxy settings and not use IE's. 107 Player,Group and Edge Server Management Managing Players,Groups andFolders Every player registered in WebDT Content Manager belongs to a group. Users can specify the group name when registering a player. If a player has no group name, then it belongs to a common group – Not Assigned. Users create playlists and schedules to publish to a group. All players in the same group will play the same playlists in the same schedule. It is convenient to group the players that play the same content. Menu Elements The following is a short description of the menu elements found in the Player Group management menus. Figure 91 Main Tab Menu The table that follows describes the Main Tab menu functions. Some functions are only available after selecting a player, group or both. Icon Menu Description 108 New Create new groups and folders. Delete Delete existing groups and folders. Assign Player Assigns a player to a selected group. Save Saves player/group information. Move Moves the selected folder. Report Generates a schedule report of the selected group. Search Used to search for player(s). Preload Preload media files to groups Title Menu Frame Menu The table that follows describes the Frame menu functions. Icon Menu Description Log level Click to set log level (Normal / Debug) Select All Click to select all listed player(s)/group(s) Clear All Click to unselect all listed player(s)/group(s) Delete Player Delete the selected player(s) Move Player Place selected player(s) to another group. 109 Click to display the selected player‟s Display Snapshot preview snapshot in the Player Information frame. Click to hide the selected player‟s preview Hide Snapshot snapshot in the Player Information frame. Click to select the target player(s), and set Dispatch Patch the time of release for the selected update(s). Click to select the target player(s), and set Update OS/BIOS the time of release for the selected updates(s). Players A player and its status are displayed automatically within Player Group section if the player has been registered. The players first appears in the Player Group section as Not Assigned and remains until assigned to a group. Updating Player Information From the Player Information screen, you can update a player‟s name, description, preferred server, time zone preference and log level. You also can enable or disable a player‟s remote desktop, and restart a player. Additional information available on the Player Information screen includes: privileges, Snapshot, Screen info, Status, Machine Name, IP Address, MAC Address, OS Version Information, Application Version, BIOS Version, Patch Name, Patch Status, Time Zone, Player Time, Free Space, Current Download File, Remote Desktop, Restart, Log Level, Publishing Status, Preloading Status, and Wallpaper/Default Playlist. To change the player information, follow the steps below. 1. In the Group column, select your target group. 2. In the Player Information tab, click on the player to modify. 110 Figure 92 The Player Information dialog screen displays as shown in figure 93. 111 Figure 93 3. Enter the information to change. Field Player Name Description Enter a name to identify the player. Display an image of the player‟s current scheduled event in progress. Snapshot Note: If the player operating system is Windows XP Embedded, only 1 screen with the screen resolution will be displayed under the snapshot. If the player operating system is Windows Vista, the total number of screens and total screen resolution will be displayed under the snapshot. 112 Description Enter a brief description to identify the player to the rest of the group(s). Status Displays the status of the player, Normal or abnormal (For Display Only). Privileges Click to show the privilege settings of the player which is read-only; the privileges are inherited from the player group. Current Server Displays the designated server for this player. Change Preferred Server by click .and click to clear the setting. Preferred Server Machine Name Displays the machine name. OS Version Information Displays the current version of the operating system in use. IP Address Displays the currently assigned IP address. MAC Address Displays the MAC address of the current player. BIOS Version Displays the current version of the BIOS in use. App Version Displays the current version of the application. Patch Name Displays the current name of the Patch Patch Status Displays the current status of the Patch Time Zone Displays the current assigned time zone for the player. Synchronization Time Synchronize time from the WCM Publish Server or Edge Server Free Space Displays the available amount of disk space in MB. Current Download Show the current file downloading on the player. The Preferred Server of player is a reference for player content downloading. If it has available value, current player download content from it, else, it will download content from Publish Server directly. 113 File Remote Desktop Enable or disable the remote desktop function on the player. Restart Click to restart the player system.. Log Level Display and change the log level on the player. Publishing Schedule Status tab Lists the current downloading status of the schedules/spot lists/Urgent Casts published to the player. Preloading Status tab Lists the current downloading status of the media files/Urgent Casts preloaded to the player. Wallpaper/Default Playlist tab Lists the downloading status of the wallpaper/default playlists assigned to the player. Note The length of the new player name is limited to 32 characters and the description is limited to 1024 characters. 4. Click OK to save the new player information or Cancel to return to the previous menu without saving. Deleting a Player In some cases, a player may not be available to the system. For example, a player has been uninstalled or removed. In that case, the player information is still stored in the system. To delete player information from the system completely, follow the steps as shown below: 1. Select the group from the Group column. 2. In the Group frame, select the player(s) to be deleted, 3. Click the Delete button. A confirmation prompt displays. 4. Select OK to continue or Cancel to return without deleting the selected player from the group. 114 Preloading Media to a Player Click the Preload link as in below figure to open a Player Preload Media File dialog window. Select media files from the "Select Media Files" frame and click the --> to preload the media files to the selected player. Once the media files are added to the right frame and saved, media files will be preloaded to players immediately. Figure 94 Assigning a Player to a Group Once a group is created, a player can be assigned to the group through the Assign Player function. To assign a player: 1. Select a target group from the group column, in Figure 92. 2. Click on the Assign Player button on the top menu bar. 115 Figure 91 Note Only the account which has Manager Group privilege on these groups is authorized to assign players. The Assign Player to Current Group dialog screen displays as shown in Figure 93. Figure 92 3. Open the From drop-down menu and select the source group, it‟s respective players are displayed on the right column. All current players assigned to the current group are displayed on the left side. 116 To remove a player from current group, check the player and click the button. The player is then moved to the Not Assigned group. To add a player to the current group, select a player located in the right-hand frame and click the button to move the selected players to the current group. 4. Click OK to complete the Assign Player operation. Removing a Player from a Group Select a group and all associated players are listed in order. Select the player(s) to remove. Then click the button; the selected players will be removed from the current group to the Not Assigned group. To remove a player, see step 3 of To assign a player above. Moving a Group A group can be moved to another folder. To move a group: 5. Select the group to be moved, the group Group_01 is selected as shown in figure 97. 6. Click on the Move button on the top menu bar. Figure 93 The Move to Target Folder dialog screen displays as shown in Figure 98 117 Figure 94 7. Select the target folder to move the group to. 8. Click OK to complete the Move Group operation. Generating a Player Report This function is used to generate the playback activity report of all the players in the selected groups. To generate a playback report: 1. Click the Report button as shown in figure 99 118 Figure 99 A Report dialog screen displays as shown in figure 100. Figure 100 2. Select the Group(s) to be used in generating the report. You can hold Shift or Ctrl key to select multiple groups. 119 3. Set the date range to include in the results. 4. Check the field Only report media created by current user to only retrieve results from media created by the current user. 5. Click OK to generate the report. The playback activities display in the Results window. You can also download the report data to a file by clicking the Download button. The file is saved in CSV format and can be imported into a spreadsheet such as Microsoft Excel. Note The report data is available one day after the content has played. Searching for Players This function is very useful if you have hundreds of players registered in your system. Click the Search button as shown in figure 101 Figure 101 A Search Player dialog screen displays as shown in figure 102. 120 Figure 102 If you know any keyword in the Player Name or Description, enter the keyword in those fields. Alternatively, if the player version number is available, use the version number as the search criteria. You can also search for a player by using the following: MAC Address Machine Name IP Address OS Version Number Once the criteria are entered, click the Start button and the matched players will be listed in the Search Results window. If the search criteria are empty, then all players will be listed. Click the group name under Group column to display the group detail information. 121 Dispatching a Patch to Players In Player/Group, user can select players here and then dispatch a patch file to selected players. 1. Select a group from left tree view in Group section. 2. Select players to be updated. 3. Click on right Frame Menu to launch the Dispatch to Players window. Available patch files will be listed in the middle of the window. 4. Choose to install the patch immediately or select a specific time in Set Install Time section. 5. Click OK to complete the dispatch process. Updating Player OS/BIOS to Players In Player/Group, user can select players here and then update OS/BIOS to selected players. 1. Select a group from left tree view in Group section. 2. Select players to be updated. 3. Click on right Frame Menu to launch the Update Players window. 4. Available OS/BIOS files will be listed in the middle of the window. 5. Choose to install the OS/BIOS immediately or select a specific time in Update Time section. 6. Set Update From Host and Specify Wi-Fi Settings in Advanced Options if necessary. 7. Click OK to complete the update process. WebDT Preview Player WebDT Preview Player is designed especially for previewing content. It can be installed on your computer, so you can preview content with WebDT Content Manager without extra investment. Preview Player is different from the normal players, you cannot publish schedule, spot list or Urgent Cast to a Preview Player. It is not supported either on setting download range, power management, default playlist, etc. 122 In the Select Player dialog when previewing content, there is an icon shown before the Preview Players. Installing WebDT Preview Player 1. Follow the steps described in Downloading WebDT Preview Player to download your WebDT Preview Player tool installation. 2. Run the “ WebDT Preview Player.exe” program, InstallShield Wizard screen displays as shown in figure103 Figure 103 3. Click Next to continue. The License Agreement screen displays as shown in figure 104 123 Figure 104 4. After reading the Software License Agreement, select I accept the terms in the License agreement and click Next. The Destination Folder screen displays as shown in figure105 124 Figure 105 5. Click Change to select a different installation path, if you have not installed ffdshow and silverlight, please check the check box to installed, or click Next to use the default as shown. The Ready to install the Program screen displays as shown in figure 106 125 Figure 106 6. Click Install to begin. Once the installation process is complete, the InstallShield Wizard Completed screen displays as shown in figure 107 126 Figure 107 7. Click Finish to exit the Installation. Using WebDT Preview Player 1. Navigate to Start | All Programs | DT Research | WebDT Preview Player v4.0 and click Start Player to start player, if you haven‟t register the preview player, the will open the Player Registration dialog as shown in figure 108: 127 Figure 108 Fill in all fields to register and the WebDT Preview Player is registered and a confirmation window displays. If it fails to register, please check if the Internet/network connection and the firewall settings work properly. Note The player is only for previewing. You cannot publish schedule to the preview players. 2. After registering the preview player, it is started as shown in Figure 109 128 Figure 109 Menu bar The buttons in the File of the tool is: Button Description Click to quit the WebDT Preview Player. Quit The buttons in the Action of the tool are: Button Description Stop Click to stop the WebDT Preview Player. Aspect Ratio Click to keep the content width and adjust the height to fit the selected ratio.( 16:9, 4:3, 9:16, 3:4) Full Screen Click to switch full screen mode. 129 Shortcut Keys Press the Ctrl, Shift, or Space keys, will show a tip in the right bottom of the screen, the tip will disappear after 10 seconds. Button Description ESC Press to stop the WebDT Preview Player. F2 Press to switch playing mode. Ctrl+Shift+Space Press to quit the WebDT Preview Player. Groups A group is composed of one or more players. Users schedule the content for each group and then the schedule and content are approved and published to all the players in the group. Players in the same group will play the same content. If the user did not assign a player to any group, the player is put into a Not Assigned group. Creating New Groups 1. To create a new Group, click the New Group button. Figure 110 The New Group dialog screen appears as shown in figure 111. 130 Figure 111 2. Enter the name of the group in Group Name field. 3. Type in description of the group in the Description field if desired. Click OK to create the group. Moving a Group or Folder To move a group or folder, use the following steps: 1. In the Player/Group main menu, click on Player Group. 2. In the Group column, select the Group or folder to move. In 0, the group Move Group was selected for this example. 131 Figure 112 3. Click Move. The Select Folder screen displays. 132 Figure 113 4. Select the destination location (Demo is selected as shown in Figure 113 ). 5. Click OK. The Group/Folder is moved. Deleting a Group 1. To delete a group, select the group to be deleted. 2. Click the Delete Group button. Players belonging to the deleted group are moved to the Not Assigned group. 133 Preloading Media to a Group Click the Preload link as in below figure to open a Group Preload Media File dialog window. Select media files from the "Select Media Files" frame and click the --> to preload the media files to the selected group. Once the media files are added to the right frame and saved, media files will be preloaded to groups immediately. Figure 114 Group Information The group window contains Group Name, Description, Creator, Privileges, Turn off Screen, Default Playlist and Wallpaper and Schedule. In addition, the Player Information, Preload Urgent Cast and Power Management tabs are available. Player Information tab In Player Information tab, all players under this group will be listed in the table. Snapshot for each player will be displayed by clicking Show button on right column. 134 Figure 115 If there‟s any patch file or OS/BIOS update is under processing, the processing status will be displayed in the App. Version column. If there is a schedule downloading or already downloaded, the processing status will be displayed in the Schedule column. Icon Menu Description Log level Click to set log level (Normal / Debug) Select All Click to select all listed player(s)/group(s) Clear All Click to unselect all listed player(s)/group(s) Delete Player Delete the selected player(s) Move Player Place selected player(s) to another group. 135 Click to display the selected player‟s Display Snapshot preview snapshot in the Player Information frame. Click to hide the selected player‟s preview Hide Snapshot snapshot in the Player Information frame. Click to select the target player(s), and set Dispatch Patch the time of release for the selected update(s). Click to select the target player(s), and set Update OS/BIOS the time of release for the selected updates(s). Preload Urgent Cast tab In Preload Urgent cast tab, all preloaded Urgent casts will be displayed in the table. Please refer to Urgent Cast chapter to add Urgent cast and preload to players/ groups. Power Management tab Power Management is used to designate the specific startup/shutdown time of selected players. This function is not available for all player versions. 1. Click the Power Management tab. 2. Check the day to be set a specific Start Up and Shut Down time. 3. Set Start Up time and Shut Down time at lower section. 4. Click Apply to apply the settings or click Clear to reset the time. Setting Default Group Playlist 1. Click to launch the Set Default Playlist menu as shown in below figure 116. 136 Figure 116 2. Select a default playlist from the playlist tree view 3. Click OK to complete the settings. Deleting Default Group Playlist Click to clear the current default playlist set for the group. Turning off Screen Settings for a Group This function is used to control the on/off settings for the display screens. Select Never if the screens should not be turned off anytime. Select other options from the drop down menu to turn off the screen after a certain period to extend monitor usage life. Setting/ Deleting Wallpaper for a Group 1. Click to launch the Select Wallpaper window 137 2. Select an image file from the tree view. 3. Click OK to apply the setting. Click to delete the current selected wallpaper. Saving Group Updates Modifications to groups or folders can be easily performed by filling or editing respective fields. For example: to change a folder name, click on the Folder Name field and type in a new entry. Figure 117 Privilege Management In Player/Group module, you can set the privileges on the groups and group folders, to control what functions the users can do or not. In WebDT Content Manager, child nodes will inherit privilege settings from their parent nodes. Each roles and accounts will inherit unless they have own setting on current node. For any node, you should have read privilege on all its parent folders to ensure you can read or modify it‟s Privilege Actions 1. Click Setting button after the Privilege label as shown in figure 118. 138 Figure 118 2. The Privilege screen displays as shown in figure 119. 139 Figure 119 Check on an action to enable it, or check off an action to disable it. For each role or account, there are action settings for it: Action Description Full Control Can do all the processions with the player group. When it is checked, all the other actions are checked. Manage Group Can add/remove players, create/remove groups in the child level, modify the group/folder‟s information, assign players(need both source and target group‟s privileges), set 140 power management, etc. Read Can see this group in Content Manager. When it is unchecked, all the other actions are checked off. Publish Schedule/Spot List Can publish or preview Schedule/Spot List to current player group; Edit Schedule/Spot List Can edit schedule/Spot List for current player group; Publish Urgent Cast Can publish or preview Urgent Cast to current player group; Preload Media Can preload medias to the players in current player group; Software Upgrades Can update software for the players in current player group. The buttons in the toolbar are: Button Set as parent Delete a role/account Description Setting all the privilege setting as parent folder Deleting the selected role or account. Add a role Adding a role in the privilege setting. Add an account Adding an account in the privilege setting. Note The Site Manager role is the built-in role; it is listed in every node with full control privilege but cannot be edited or deleted. Note If an account is member of several roles, its privilege setting is the combine of privilege setting of these roles. 141 Adding a role 1. Click to add roles to the list as shown in figure 120. Figure 120 2. Select the roles and click [OK] button to add them. 3. Click [Cancel] button to close the dialog without adding any role. Adding an account 1. Click to add an accounts to the list. Select accounts and click [OK] button as shown in figure 121. 142 Figure 121 2. Click the drop menu to select a role to filter the accounts as shown in figure 122. Figure 122 Deleting a role/account 1. Select a role/account and click to delete the selected role/account. 2. The selected role/account is deleted from current node. Setting as parent 1. Click to set the privilege setting as parent folder. 2. All the roles/accounts will be inherited from parent folder. An Example of Setting Privilege For instance, there is a folder named Airport. 143 For an account Jack, he has full control privilege in folder Airport, He creates a new folder named TowerA, and the privilege on TowerA will inherit from Airport and have the same settings as its parent folder Airport. If Jack‟s privilege on TowerA is changed to have only read privilege, then he can change the privilege settings on “Airport” but cannot change privilege settings on TowerA. If Jack has full control privilege on TowerA, but has no read privilege on “Airport”, then he cannot see the Airport even though he has full control privilege on it, because he cannot see the parent folder Airport, and then he cannot see the content under it. Note Without read privilege, the player/group/media will not be shown in the pages, or they will be shown as “unreadable player” or “unreadable media”, etc. Folders Folders can be created to organize and order groups. Creating a folder can be done through the Player Group menu. Creating a New Folder To create a new folder, select the location by clicking on the target source. 1. In the Group column, select a target location; in the example that follows, Forte is the starting location. 2. Open the New tab found at the top of the screen and select New Folder. Figure 123 144 The New Folder window displays. Figure 124 3. Fill in the Folder Name and Description fields. 4. Click OK to continue. Deleting a Folder To delete a folder: Select the folder to delete. Figure 125 1. Click the Delete button. 145 2. A confirmation prompt displays, click OK to continue. Moving a Folder You can move a folder from one part of the Player Group tree to another by using the following steps. Select the folder to move Figure 126 A Move to Target Folder window displays as shown in Figure 127. 146 Figure 127 1. Select the destination folder. 2. Click OK to continue. 147 WebDT EdgeServers Figure 128 As more WebDT players are added to the existing Digital Signage Network, existing bandwidth and system resources can be overwhelmed. Increased latency in the uploading of content is another indication that resources need to be reconfigured or reallocated. The WebDT Edge Server greatly resolves this problem by aggregating all connections. It lets administrators scale up or redistribute access to each WebDT player without dismantling their current deployment. Administrators can add additional WebDT Edge Servers; reallocate existing servers to match changes in the flow of traffic among different sites. For instance, if the remote site can only be configured with a cellular wireless connection; instead of having all WebDT players connect to the central WebDT Content Manager Server separately, players can be aggregated into a local area network, which can be served by a single WebDT Edge Server. Enhanced security is another benefit. Instead of having thousands of player server connections, administrators only have to secure traffic between the WebDT Edge Servers and the WebDT Content Manager Server. 148 You can manage and access all Edge Server information from this centrally located menu screen. The WebDT Edge Server is only offered preinstalled on a WebDT Signage Appliance. Please enquire through your local reseller or DT Research. Note Menu Elements The following is a short description of the menu elements found in the Edge Server management menu. Figure 129 Main Tab Menu The table that follows describes the Main Tab menu functions. Some functions are only available after selecting a player, group or both. Icon Menu Description Save Click to save after modifying any descriptive information. Move Click to move an edge server from one folder location to another. 149 Delete Click to delete an edge server or a folder. Frame Menu The table that follows describes the Frame menu functions. Icon Menu Description Log level Click to set log level (Normal / Debug) Select All Click to select all listed player(s). Clear All Click to unselect all listed player(s). Delete Edge Server Click to delete the selected Edge Server(s) Display Snapshot Click to display the selected edge server‟s preview snapshot in the Edge Server Information frame. Hide Snapshot Click to hide the selected player‟s preview snapshot in the Edge Server Information frame. Dispatch Patch Click to select the target edge server(s), and set the time of release for the selected update(s). Update OS/BIOS Click to select the target edge server(s), and set the time of release for the selected updates(s). 150 Edge Server Information In the edge server window, edge servers and players will be listed in the left Edge Servers tree view. Edge Server information will be listed on the right section. Please refer to Updating Player Information to view detailed descriptions of each item. Field Description Name Enter a name to identify the Edge Server. Description Enter a brief description to identify the Edge Server others. Status Displays the status of the Edge Server, Normal or abnormal (For Display Only). Current Server Displays the designated server for this player. Change Preferred Server by click .and click to clear the setting. Preferred Server The Preferred Server of Edge Server is a reference for player content downloading. If it has available value, current Edge Server download content from it, else, it will download content from Publish Server directly. 151 Machine Name Displays the machine name. OS Version Information Displays the current version of the operating system in use. IP Address Displays the currently assigned IP address. MAC Address Displays the MAC address of the current player. BIOS Version Displays the current version of the BIOS in use. App Version Displays the current version of the application. Patch Name Displays the current name of the Patch Patch Status Displays the current status of the Patch Time Zone Displays the current assigned time zone for the player. Edge Server Time Synchronize time from the WCM Publish Server or Edge Server Free Space Displays the available amount of disk space in MB. Remote Desktop Enable or disable the remote desktop function on the player. Restart Click to restart the player system.. Log Level Display and change the log level on the player. Player/Edge Servers tab Lists the players and Edge Servers under current Edge Server Current Downloading tab Lists the current downloading files on current Edge Server. OS/BIOS tab Lists the preloaded OS/BIOS on this Edge Server. Power Management tab Designate the specific startup/shutdown time of this edge server. There are four tabs in the Edge Server Information page; Player/Edge Server, Current Downloading, OS/BIOS and Power Management Tab. 152 Player/Edge Servers Tab In Player /Edge Servers information tab, all players under the selected edge server will be listed in the table. Group information, App. Version and status of the player will be listed. A snapshot for each player will be displayed by clicking Show button on right column. If there is a patch file or OS/BIOS update processing, the processing status will be displayed in the App. Version column. Current Downloading The Current Downloading tab lists currently downloaded files on this edge server as shown in Figure 130: Figure 130 1. Click the Current Downloading Tab show the files which the edge server is downloading. 2. In the Name column show the sort files name. 3. Click to show more info in the Description column, and click to hide description info. The Target column show the group/player which are going to use the file in current downloading. The Used In column show the tasks which will use the file. 153 OS/BIOS Tab The OS/BIOS tab lists preloaded OS/BIOS files on this edge server. Power Management Tab Power Management is used to designate the specific startup/shutdown time of available selected edge servers. This function is not available for all edge server versions. 1. Click the Power Management tab. 2. Check the day to be set a specific Start Up and Shut Down time. 3. Set Start Up time and Shut Down time at lower section. 4. Click Apply to apply the settings or click Clear to reset the time. Dispatching Patches to Players/Edge Servers 1. In the Player/Group main menu, select Edge Server. 2. In the Server Column frame, select the Edge Server (ES-1000 is used in this example) to update. Figure 131 3. Click the Dispatch Patch ( ) icon. The Dispatch to Edge Servers screen displays. 154 Figure 132 list of available patches is listed in the Select patch files in following table to apply frame. 4. Select the patch file to apply. 5. Select the installation time (default: immediately). 6. Click OK to dispatch. Updating OS/BIOS for Edge Servers 1. In the Player/Group main menu, select Edge Server. 2. In the Server Column frame, select the Edge Server (ES-1000 is used in this example) to update. Figure 133 155 3. Click the OS/BIOS ( ) icon. The –Update Edge Servers screen displays. Figure 134 The selected Edge Server is displayed in the first row. A list of BIOS versions is displayed in the second row. Note Only BIOS versions compatible with the Upper Edger Server are listed. If the latest BIOS version is not listed, your Upper Edge Server may need updating. 4. Select the OS/BIOS from the table. 5. In the Update Options frame, select the Update Time (default: immediately). 6. In the Advanced Options frame, fill in the appropriate fields (Update from Host and Specify Wi-Fi Settings) Note Do not check Update from Host if you prefer to use the Auto Update function. 7. Click OK to continue. 156 Setting a Preferred Server You can assign a preferred server to a player/Edge Server. Select the Player/Edge Server to modify and edit the information found in the Player Information frame. 1. Click on Player/Group | Edge Server. 2. In the Edge Server column, select the Player to update. The Player Information screen displays. Figure 135 3. In the Preferred Server field, click the Browse ( The Select Server window displays. 157 ) icon. Figure 136 4. Select the Edge Server/Publish Server from the available list. 5. Click OK. The new edge server is assigned. Moving Edge Servers or Players to Target Servers 1. Click the Move button ( ). 2. A Move window displays. 3. In the left-side column, select the source player(s) or edge server(s) to move. 4. In the right-side column, select the target Server to transfer the player/edge server. 158 Figure 137 Note The target server will become the player’s preferred source. 5. Press the Move ( ) button. The edge server or player is now associated with the new edge server. Deleting an Edge Server To delete an edge server from availability, click on the Delete button. Note The players from a deleted edge server are automatically moved to the Publish Server. 159 Chapter 4 Media Content Management ithin the Management section of WebDT Content Manager, users can upload and manage multimedia files, create and manage tickers, select templates or edit layouts, and define playlists that contain multimedia files and tickers. A playlist is the smallest playback unit to be arranged in schedule planning and played by players in a group. W In the Management section, there are four sub-sections; Media, Ticker, Playlist, and Template. Media: All the media files to be played on a player must be uploaded to WebDT Content Server first. When a player is scheduled to play a media file, it will be downloaded to the player for playback. In this sub-section, you can create media entries by uploading multimedia files. Ticker: A ticker is a scrolling line of text that appears on a specific zone on the displayed content. In this sub-section, you can create and manage tickers. Playlist: The list containing media and ticker events. You can create and manage playlists or combolists for playback scheduling. Template: You can select a desired layout from the built-in templates or create custom templates. Media In the Media sub-section, there are six pre-defined media folders- Image, Audio, Multimedia, Real time video, Executable Application and TV Tuner. In each folder, you can create sub-folders to save uploaded media files or select an input source. The Executable Application folder enables you to input the file path of executable applications already installed on a signage appliance/player as media content in a playlist. WebDT Content Manager supports the following media types and formats. 160 Image o JPEG (.jpg, .jpeg) o BMP (.bmp) o PNG (.png) o TIFF (.tif, tiff) o GIF (.gif) – less than 2048 X 2048 pixels o TGA (.tga) o PCX (.pcx) Audio o MP3 (.mp3) o MP2 (.mp2) o Wave Audio (.wav) o Windows Media Audio (.wma ) o MIDI (.midi, .mid) o RealNetworks Real Audio (.rmi) o Audio Interchange File Format (.aif) o AU (.au) o SND (.snd) o MP4 (.mp4) o Advanced Systems Format (.asf) Multimedia o Adobe Macromedia Flash (.swf) o MP4 (.mp4) (de-interlaced only) o MMS 161 o RTSP o ZIP (Multi-file html site or flash site) o Flash Video (.flv) (de-interlaced/progressive only) o Microsoft PowerPoint (.ppt, .pps) o MPEG1/2 (.mpe, .mpg, .mpeg) (de-interlaced/progressive only) o Window Media Video (.wmv, .asf, asx) (de-interlaced/progressive only) o AVI (.avi) (de-interlaced/progressive only) o DVD Video (.vob) (de-interlaced/progressive only) o Apple QuickTime (.mov) (de-interlaced/progressive only) o o mts/ts/mkv/m2ts HTML (.html, .htm) (Internet Explorer support required) Real Time S-video and Composite Video in NTSC or PAL (Available only on the SA2000) Executable Application (eg. VLC Player, Kiosk Application, etc) Executable Application Zip TV Tuner Image and multimedia files are scaled to full screen size when played, with the exception of PowerPoint files. Follow the steps below to scale Power Point files manually: To Scale PowerPoint files: 1. Open the PowerPoint file with Microsoft PowerPoint application. 2. Select File, Page Setup menu option. 3. Adjust the width/height of the slide to match the resolution of the display connected to the player. 4. Click OK and save the file. Ensure that all fonts are properly embedded into the PowerPoint File: 1. After you have designed and created a presentation, use the File | Save As command from the main menu. 162 2. Above the list of files and to the right is the Tools menu option. Click it and choose Save Options from the drop-down list. 3. At the bottom of the Save tab is the Font options section for current documents only. 4. Check the Embed fonts in the file box. 5. Choose the embed option that embeds only the font information for the characters in your presentation, which saves file space. 6. Or embed the complete font, which is needed if you are sending the presentation to a colleague who will be making changes. 7. Click on OK. 8. Choose the filename and click on OK to save the file. 9. When you save the file again, the embed option will have been set. To verify, simply use the Tools | Options command and choose the Save tab. You will see the same dialog box that you saw in step 3. Menu Elements The following is a short description of the menu elements found in the Media management menus. Figure 138 M AIN T AB M ENU The table that follows describes the Main Tab menu functions. Some functions are only available after selecting a player, group or both. Icon Menu New Media Description Create new media. 163 New Folder Create new folder. Batch Upload Upload multiple media files in a single batch. Save Saves media information. Save As Saves media information under a different file name. Delete Delete existing media listings./folder Search Used to search for media content. Preview Allows the sampling of selected media. Download Preview Player Download the WebDT Preview Player installer. F R AM E M EN U The table that follows describes the Frame menu functions. Icon Menu Description Select All Click to select all listed media listings/folder(s) Clear All Click to unselect all listed media listings/folder(s) Delete Media Click to delete the selected media listings. View Click to select the type of information to display for the folder: Detail (Default), Small or Large. 164 Note Some media files may have small variances compared to standard files. We strongly recommend you preview the content before publishing it to ensure the media plays correctly on the player. Creating a Folder You can create folders to store media files for better media management. To create a folder: 1. Select the destination for the sub-folder. 2. Click New and select the New Folder command. 3. Enter the name of the folder in Folder Name field. 4. Click and set privileges for this folder. 5. Click Save to save the folder. Adding Media to a Folder After creating a folder, you can upload media files to the folder. New media can be uploaded either as physical files (this ultimately will be uploaded to the Content Manager Server) or by creating a reference to the media through a Uniform Resource Locator (URL). The address of a resource on the Internet begins with http:// or https://. Note The URL resources must be accessible by the WebDT player (SA series, DS series and MS series) either via the Intranet or Internet. The Duration column shows the duration of each media file. User can set duration in the media files page. 165 Figure 139 Depending on the media type to add, select a folder under the desired media type. For example, to add an image file, select a folder under the main Image folder. To add media to a folder, follow the steps below: 1. Select the location for the target media. 2. Click New and select the New Media command. The screen displays as seen in Figure 140. 166 Figure 140 3. Enter a name for the media to be uploaded in the Name field. 4. If the type of media is video, real time video, audio, flash or video media the duration of the media (in seconds) is required. WebDT Content Manager automatically retrieves the duration period as found in the media, you can also change it by entering the desired number 5. Specially, if the type of media is video, the duration of the media can set to seconds and frames, as shown in figure 141. Figure 141 167 Note The duration length must be greater than zero and less than 86,400 seconds. 6. Enter a description for the media file in the Description field. 7. If you select a local file, click Browse and select the media file to be uploaded to the server. 8. If the media file is located on a remote server, enter the complete URL address beginning with http://, https://, or mms:// (Microsoft Media Streaming is supported), or rtsp://. Note If the media file added is real time video, the URL address must begin with mms:// or rtsp://. 9. Click Save to save the media to the current folder or click Save As to save the media to a different location. The media file is uploaded to a WebDT Content Manager Server. Note The privilege option is not shown until the new media is saved. After the media file is successfully updated, media file information, including Name, Duration, Description, Width, Height, File Size, Last Modified Time, Path in Player and Thumbnail will be displayed on the right section as shown in 0. Media content can be viewed by clicking the Show Content button. Only the image files display directly in thumbnail view. Other media formats are shown in a separate Internet Explorer window after clicking Show Content. 168 Figure 142 While changing duration of the media and clicking Save, a dialog screen will pop up to ask how you would like to update the media. Select from the three options as shown in the below picture depending if you want to change the playlists that contain the media or not. 169 Figure 143 Saving Media to a New Location 1. In the Management | Media, select the media file to re-save. 170 Figure 144 2. In the top menu bar, click Save As. The Select a Media window displays. 171 Figure 145 3. Select the correlating folder type, for example multimedia files are saved to the Multimedia folder. 4. Enter the new name in the Name field. 5. Click OK. The new file name is re-saved under the selected folder Adding Real Time Analog Video Feed Note Real Time Analog Video Feed is not supported by all versions of WebDT player. Please check with your sales representative to confirm the availability of this feature. You can use the built-in real time video sources (with a fixed duration of 1800 seconds) or create your own video source input as seen in Figure 146. 172 Ensure that you select the correct video broadcast signal available in your country, for example, NTSC for North America and PAL for most of Europe and Asia. If you are unsure, check the Internet for the broadcast signal available in your country. Although players support S-Video and Composite Video input ports, both formats cannot be scheduled and played at the same time. A 3 second delay between video-in sources is required to ensure the source is loaded successfully. For example, assuming you schedule an S-video input source to play from 10:00:00 to 10:30:00, a following scheduled Composite video input source must start after 10: 30:03. Note Figure 146 AD D IN G R E AL T IM E VID EO To add real time video from a built-in real time source to a folder, follow the steps below: 1. Select from the four built-in real time sources based on your input connector and source format. 2. Click Save As to save it to a different location. 173 C R E AT ING R EAL T IM E V ID EO To create a new real time video and save it to a folder, follow the steps below: 1. Click New. 2. Enter a name for the real time video in the Name field. 3. Enter the duration for the real time video (in seconds) in the Duration field. 4. Enter a description for the real time video in the Description field. 5. In the Source panel, select the Video In Connector from the drop-down menu: Composite or S-video. 6. Select the format from the drop-down menu: NTSC or PAL. 7. Click Save to save the real time video to the current folder or click Save As to save it to a different location. ADDING MULTI-FILE CONTENTS Figure 147 If a media content file needs to play with other media files, compress the target media files and name the package by using the name of the core media, for example: filename.zip (whereas filename is the name of your core media file). 174 After the player downloads the zip file from server, it will automatically expand & associate itself with these extra files. This step can be applied with an HTML page or a Flash (.swf) application that references multiple sub-files. Adding Executable Application Sources You can add the path of an executable application already installed on your player as media content for your playlist as shown in figure 148 and figure 149. Figure 148 175 Figure 149 The Executable Application should not be a full screen window or the top-most window. Note When you have added the source path of the executable application, you can preview the results on your preview player, but not through the Internet Explorer browser on your server. The Executable Application accepts the following messages sent from the server: Note WM_SIZE WM_MOVE WM_SHOWWINDOW You must design a template layout to fit your particular application–a full screen or customized size/position display requires a layout designed for that application. For example: If the application displays in full screen, use a full screen template. 176 If the application always displays in a set position or a particular size, design a template with a matching zone for the application. To add an executable application source, follow the steps below: 1. Click New. 2. Enter a name for the executable application in the Name field. 3. Enter the duration for the executable application (in seconds) in the Duration field. 4. Enter a description for the executable application in the Description field. 5. In the Source panel, input the absolute path of the executable application on the player in the Path field. 6. If the executable application window border should not be displayed, check the Hide the application window border check box. Enter the border width and height you want to hide at each side or click Default Size button to define the border size. Figure 150 7. Click Save to save the executable application to the current folder or click Save As to save it to an alternate location. U PL O AD IN G AN EXEC UT AB L E APPL IC AT IO N To upload an application, follow the steps below: 1. Click New Media. 2. Enter a name for the executable application in the Name field. 3. Enter the duration for the executable application (in seconds) in the Duration field. 4. Enter a description for the executable application in the Description field. 5. Select from the two radio buttons: 177 a. Import from Local file or input a path where you want to upload the application from as seen in Figure 151. b. If the uploaded application is a zip file, select an entry file to initialize the application playback. (If no entry file is selected, any file with .exe extension will be selected as entry file. Otherwise, the first file will be set as entry file in default. The entry file has to be executable or it will fail to play.) Figure 151 Adding TV Program Signal You can import TV signals as media content for your player(s) using the TV Tuner USB adapter as shown in Figure 152. The TV Tuner supports 3 types of signals: TV (digital or analog), S-Video and A/V composite input. 178 Figure 152 Follow the steps below to add TV program content to your player: 1. In Media/TV Tuner, click New. 2. Enter a name for the TV Tuner in the Name field. 3. Enter the duration for the TV Tuner signal (in seconds) in the Duration field. 4. Enter the description for the TV Tuner signal in the Description field. 5. In the TV Tuner panel, select the Video Port from the drop-down menu to determine what type of TV signal you are getting. a) There are 4 options: TV Digital, TV Analog, S-Video, Composite Input (A/V) Note When selecting TV Digital or TV Analog, you will have the Channel and Volume options available. Note When selecting S-Video or Composite Input, you will have only the Volume option available. 6. Select Format based on the video port, from the drop-down menu: NTSC, PAL, ATSC, etc. 7. Select Closed Caption to hide or display caption. 8. Select Signal Type from the drop-down menu. 179 9. Enter your desired volume (0-100) for the TV signal in the Volume field. You can also use the slide bar to adjust the volume. Note If you enter the volume number outside the range (0-100), an error message will appear and the number will go back to the last number you have entered. C H AN N EL O PT IO N The Channel option is used to define the channel when selecting TV Digital or TV Analog for your video port. You can select a channel from the drop-down menu or input a channel number, as shown in Figure 153. Figure 153 SE AR C H C H AN N EL You can use Search Channel to get the available channel list. The Channel drop-down menu is blank before you search channels. How to use Search Channel: 1. Click the Search Channel button. 2. A dialog box appears for you to select a player to search channels, as shown in Figure 154. 180 Figure 154 3. Under Group, select a group. In the right, you can find all the players within this group which have been detected with a TV tuner. a) Click the Refresh button in the upper right to find additional players with a TV tuner. b) Only players with a TV tuner are listed in the right. c) Those players which have already been searched for channels are shown with the icon are with Note ; Those players which have not been searched . When a TV tuner is inserted into a player, it will search all the channels automatically and report the status after finishing the search. 4. Once a player has been detected with a TV tuner, it is listed even if the TV tuner device is not plugged in. If you use this player to search for channels, you will get this error message: “Cannot find the TV Tuner on the selected player.” as shown in Figure 155. To fix this issue, simply check your player to ensure the TV tuner is plugged into your player and then restart the player. 181 Figure 155 5. Select a player detected with a TV tuner to search for a channel and click OK as shown in Figure 156. a) The Search Channel progress starts: Please wait… Figure 156 b) After the search finishes, the search record will be saved as the 182 channel list of the selected player. If the selected player has already been searched for channels, a message will appear as in Figure 156. You can choose “Use the player channel list which has been searched before” to use the existing channel list in the player from the drop-down menu, or you can click “Force the player to search the channel again”. The new search record will replace the previous one in the player. Figure 157 6. A channel list with description will appear in the Channel dropdown menu as shown in Figure 158: 183 Figure 158 7. You can select one channel in the dropdown menu, or search the channels again. 8. WCM records the TV frequency of the channel you have selected in the dropdown menu. When the media content is played, it will receive the frequency and match the real TV channel to play the TV program content on the player. C O NT RO L T V PRO GR AM AT PL AY ER SID E The TV Tuner media content is played in the playlist zone, like the other types of media content. When you tick “Show touch-control buttons” check box as shown in Figure 159, you enable the Touch Buttons feature on the screen so that you can select channels and adjust volume by touching the screen while playing the TV media content. 184 Figure 159 Note A touch screen is required for this feature. USE T O UCH -CONT RO L BUT T ONS AT PLAY ER SIDE 1. When you check on “Show touch-control buttons”, an icon button will appear in the right bottom corner of the zone as shown in Figure 160: 185 Figure 160 2. When you touch the TV Tuner zone or on the icon button, the touchable buttons will appear as shown in Figure 161. 186 Figure 161 3. You can use these buttons to change channels and adjust volume; a) Click on the Volume button (up or down) and the volume will change by 1 digit. b) Click on the Channel button (up or down), the channel will change by 1 channel. c) Hold on the Volume button (up or down) for 1 second, the volume will change at about 10 digits per second. d) Hold on the Channel button (up or down) for 1 second, the channel will change at about 10 channels per second. e) Only the channel searched in the player will be available for selection. For example, you have a channel list with Channel 1, 3, and 5; when you press Channel Up from Channel 1, it will go to Channel 3. f) The channels change in a loop. For example, with the same channel list, when you press Channel Up from Channel 5, it will go to Channel 1. g) The current channel and volume are displayed in the panel. 187 4. The panel will disappear after 10 seconds if you do not use this feature. Instead, the icon button will appear on the screen. Batch Uploading New media can also be batch uploaded to WebDT Content Manager. If you have multiple media files to upload, select the Batch Upload command. The benefit of using the Batch Upload command is that you can continue working on other tasks while your media is uploading in another browser window. 1. Select the Batch Upload command to open the WebDT Content Manager Batch Upload dialog screen as shown in figure 162. Figure 162 2. Click the Folder button in the Target Folder column and select a pre-defined folder to store the media file. 3. Click Browse to locate and select the local media file to be uploaded. 4. Enter the Duration of the media file. The media duration in a playlist must be greater than zero and less than 86,400 seconds. 5. You can upload a zip file to Multimedia folder in this page. 188 Searching for Media The Search function scans rapidly through files stored on the system to find a requested entry as specified in the search criteria. This function is particularly useful if there is a large number of media files stored on the system. 1. Click Search as shown in figure 163: Figure 163 The Search Media screen displays as shown in figure 164: 189 Figure 164 1. Enter search criteria in the Media name, Creator, and/or Description fields. Note If the entire file name is unknown, enter part of the name, owner, or description to display all media files containing those parts. 2. Click Start to begin the search. Matched media files are listed in the Search Results window. Note If the search criteria are left blank, then all media files are listed. 190 Tickers The Ticker function provides the ability to display a scrolling or static line of text or online RSS feeds to remote player units. Users can adjust ticker properties such as Font Color, Background Color, Font Size, ticker Position, and ticker scrolling Speed in Ticker Attributes when creating a ticker zone in a Playlist. Ticker Properties Property Slow Medium Fast Ticker scrolling speed 15 sec / line. 10 sec / line. 5 sec / line. 100 pixels / sec. 200 pixels/sec. 300 pixels/sec. (roll up and roll down) Ticker scrolling speed (Horizontal) C R E AT ING A T IC K ER FOL D ER Users can create ticker folders for organizing and storing ticker media. The stored files can be easily retrieved for creating playlists and schedules. Figure 165 191 To add a new folder within Ticker, follow the steps below: 1. Click New and select the New Folder command. 2. Enter the name of the folder in Folder Name field. 3. Click and set privileges for this folder. 4. Click Save to save the folder. C R E AT ING A T IC K ER To add a new ticker within the Ticker sub-section, follow the steps below. Figure 166 1. Select the destination folder. 2. Click New and select the New Ticker command. 3. Enter a name for the ticker in the Name field. The Ticker screen displays as shown Figure 166. 4. Enter a description for the ticker in the Description field. 5. Click and set privileges for this Ticker. 192 6. Use the Frame Menu buttons to edit the ticker contents. See the table below for more information: Icon Description New Content Add new ticker content to the list. Edit Content Edit the selected content. Select All Select all ticker content. Clear All De-select all ticker content. Up Move the selected item up. Down Move the selected item down. Delete Delete the selected item. 1. Add ticker content by selecting Type of the ticker in the Type column: Text or RSS. 2. Enter the text content if you select Text Type. The text content will be shown in the Content column Or Enter the RSS URL address if you select RSS type. The RSS URL displays in the Content column. 3. Select Yes or No in Show RSS Description column (tagged as <description> on the RSS XML feed) to toggle the RSS feed icon on or off. 193 Figure 167 To edit each content item listed in this ticker, select the checkbox and click Edit Content button to modify text content or RSS URL of the selected item. Figure 168 The entries can be ordered by using the or buttons. 1. All other options allowed for Ticker settings, such as Font Size, Font Color, Background Color, scrolling Speed and text Position can be set in Ticker Zone Attributes under Playlist or Ticker Settings under Set Ticker window in the Schedule section. See Adding a Ticker Zone and Setting Tickers for more information. 2. Click Save to save the ticker to the folder. S AVIN G A T IC K ER T O A N EW L OC AT ION Save As is used to save a ticker to an alternate location and/or name. It does not overwrite the original like a regular Save command. 1. Click Save As as shown in figure 169: 194 Figure 169 The Select a Ticker screen displays as shown in figure 170: Figure 170 2. Save the current ticker into another location by clicking the folder 3. Overwrite an existing ticker by clicking the Ticker node. 4. Save the current ticker under a different name by entering a new name in the Name field. 5. Click OK to complete the process. DELETING A TICKER To delete a ticker within the Ticker sub-section, follow the steps below: 195 1. Select the ticker on the left side of the ticker window. 2. Click the Delete button. The message “Do you want to delete this ticker?” displays. 3. Click OK to delete the selected ticker. SEARCHING FOR A TICK ER The Search function scans rapidly through tickers stored on the system to find a requested entry as specified in the search criteria. This function is particularly useful if there are a large number of tickers stored on the system. 1. Click Search as shown in figure 171: Figure 171 The Search Ticker screen displays as shown in figure 172: 196 Figure 172 2. Enter search criteria in the Ticker Name, Creator, Description, and/or Content Contains fields. Note If the entire file name is unknown enter part of the name, creator, content contains, or description to display all tickers containing those parts. 3. Click Start to begin the search. Matched tickers are listed in the Search Results window. Note If the search criteria are left blank, then all tickers are listed. Playlists A playlist is composed of media and tickers. Once media files and tickers are created within the WebDT Content Manager, you can create playlists and arrange schedules to be sent to remote players for playback. 197 Menu Elements The following is a short description of the menu elements found in the Playlist management menus. Figure 173 M AIN T AB M ENU The table that follows describes the Main Tab menu functions. Some functions are only available after selecting a player, group or both. Icon Menu Description New Playlist Create new playlist New Combolist Create new Combolist New Folder Create new folder Save Saves playlist information. Save As Saves playlist information under a different file name. 198 Delete Delete existing playlists/ combolist. Search Used to search for playlist/ combolist Preview Click to preview directly or click the drop down menu to select certain preview players for preview action. Download Preview Player Download the WebDT Preview Player installer. F R AM E M EN U The table that follows describes the Frame menu functions. Icon Menu Description Select All Click to select all listed all listed playlist(s) Clear All Click to unselect all listed playlist(s) Delete Playlist Click to delete the selected playlist(s) Playlist Menu The table that follows describes the Media menu functions. 199 Figure 174 Icon Menu Description Window Scale Toggle the media list full or half screen. Import Local File Import existing local files (.xls or .txt) to current playlist as media files. Select All Click to select all listed media listings/folder(s). Clear All Click to unselect all listed media listings/folder(s). Move Up Move the selected media up the playlist. Move Down Move the selected media down the playlist. Delete Playlist Click to delete the selected media listings. 200 Edit Edit the selected media. View Change the appearance of playlist icons. Select Icon, Small, or Large to determine the icon size. Preview Preview the selected item(s). Creating a Playlist Folder It is recommended to create playlist folders to store various playlists so they are logically grouped. To create a Playlist folder, follow the steps and refer to the figure below. Figure 175 1. Click New and select the New Folder command. 2. Enter the name of the folder in Folder Name field. 3. Click and set privileges for this folder 201 4. Click Save to save the folder. Creating/ Editing a New Playlist Figure 176 To create a new playlist, follow the steps below. 1. Select the destination folder under Playlist. 2. Click New and select the New Playlist command. The Playlist screen displays as shown in Figure 176. 3. Enter a name for the playlist in the Name field. 4. Enter a description for the playlist in the Description field. 5. Select Background Audio for the playlist from the drop down menu. See Setting Background Audio section. 6. Click and set privileges for this Playlist 7. Playback Mode: select Repeat media in specified time to play media in the media duration in a continuous loop; Select Keep last frame after media play end to stop media playing and show the last frame in the duration after media end. 8. Select Loop Media to play the media files in the respective zone in a continuous loop. 202 9. Click Show Cursor to display the cursor on-screen. SET T IN G B AC K G ROU N D AU D IO To select background audio to be used during playlist playback, use the following steps. 1. Click (Set Background Audio) button. The Select Background Audio dialog screen displays as shown in figure 177: Figure 177 2. Select an audio file from the Audio list and click the button to add the audio file. Multiple audio files can be used as the background audio. 3. Use and to select or clear all selections. 4. To adjust the sequence of the audio files, click entries up or down, respectively. 203 or to move the OR To delete an audio file, click the Note button. If the playlist duration is shorter than the background audio, the background audio stops at the end of the playlist. SEL ECT ING T EM PLAT ES 1. Click Select Template in Template View to select one from the built-in templates or other saved templates as shown in figure 178. Figure 178 In the Select Template window, you can select a template and the template layout is displayed in the Layout Preview window. In Figure 178, 16:9 (Left + 4:3) is selected, which is a 16:9 display screen split into two zones: the right zone which is a 4:3 screen and a left zone. A zone is a display area on the screen. 204 2. Select the desired layout. 3. Click OK to select the template. 4. If the template layout is okay, go to Adding Media Files and Ticker Content. ED IT IN G T EM PL AT ES Edit the template layout by clicking Edit Layout in the Template View window to adjust the layout of the selected template as shown in figure 179: Figure 179 In the Edit Layout dialog box, you can change the name of the layout, select the resolution type and calculation unit (percentage or pixel), add/delete new Normal or Ticker zones, set Template or Zone attributes or adjust zone order (Z-order). Please refer to Creating a New Template for a detailed description of template layout editing. 1. When finished editing, click Update Layout to update the layout. 205 2. If you would like to reuse this layout in the future, click Save as Template. A screen displays asking you to enter the Name of the template as shown in figure 180: Figure 180 3. Enter the template name and click OK to save the layout as a new template. AD D IN G M ED IA F IL ES AN D T IC K ER CON T ENT Media content can be added to normal zones, and Ticker (or scrolling text) files to Ticker zones. To add content to either normal or ticker zones, use the steps that follow. Adding media to normal zones 1. If there is more than one zone in the template view, first select the zone to modify by clicking on it from the Template View pane. As shown in figure 170: 206 Figure 181 2. Select Media File in the lower left window of the Playlist screen as shown in Figure 181. and click to add the selected media file. The selected entry is added and appears under Media Name as shown in Figure 181. Note If the Insert button is not visible, drag the content frame to expose the button. The Duration column shows the duration of each media file. The multimedias is shown precise the duration time to 0.01 second. A tooltip showing the time with frames is shown when the mouse is over the duration. As shown in figure 182: Figure 182 207 The Total Elapsed Time column shows the accumulated playback time through to the highlighted media files. The last entry in the Total Elapsed Time column represents the total duration of the playlist. Note If the Total Elapsed Time between zones is different, the longest Total Elapsed Time tab is highlighted. The Transition Effect/Duration field is used to determine what happens when the Player proceeds to the next file in the Media Name list. Figure 183 Select the desired transition effect from the drop down list and select the transition duration. Note The default Transition Effect, None, causes the Player to move from one media file to another without pausing. 3. Repeat step 2 to add media files. 4. To edit the media order sequence, use the tool bar. 5. Repeat steps 2 through 4 to add media files for each selected zone to complete the playlist. You can preview added content before saving the Playlist Note by clicking . 208 6. Click the Save button to save the playlist, OR Click the Save As button to save the playlist you are working on as a copy into another folder. This saves time when creating a master list and provides a backup duplicate of the selected folder. Note Only one real time video source can be added to a playlist. If you add more than one real time video-in, the system displays a message to warn you of a conflict and you cannot save the playlist. Import Local Files to Playlist This function allows users to import Excel or TXT files with a media file list to the current playlist. Clicking on the playlist tool bar will open an “Import media in local file to playlist” wizard as shown below. Figure 184 Browse and select a local file which contains the media list information and click Next. 209 If the local file is an Excel file, the wizard will request further information from the Excel file that matches the required media information. Select Tab, Range, File Name from the drop down menu. Duration, Transition Effect and Transition Duration are not required fields. Figure 185 After clicking Next, the media files and their related information will be listed. Click Import to import these media files from the Excel file to the current playlist. 210 Figure 186 If the local file is a TXT file, the file name will be displayed as shown below. Figure 187 211 After clicking Next, the file names listed in the TXT file will be displayed as shown below. The wizard will only read each text line in the TXT file as file names. Figure 188 Click Import to import these media files from the TXT file to the current playlist. Adding media to Ticker zones 1. Select the Ticker Zone by clicking on it from the Template View panel. As shown in Figure 189: 212 Figure 189 2. Select a Ticker file in the lower left window of the Playlist screen as shown in Error! Reference source not found. and click to add the selected media file. The selected entry is added and appears under Ticker Name as shown in Figure 189 3. Repeat step 2 to add more ticker files. 4. To edit the ticker order sequence, use the tool bar To increase the size of the Ticker Name panel, click Playlist and Template View panels. Click to close the to revert to the original three-panel view. To select all ticker files, click To unselect all selected ticker files, click To move a selected ticker file up or down, click To delete the selected ticker file, click 213 or You can preview added content before saving the Playlist Note by clicking . 5. Click the Save button to save the playlist, OR Click the Save As button to save the playlist you are working on as a copy into another Folder. This saves time when creating a master list and provides a backup duplicate of the selected folder. SET T IN G D UR AT ION /T R AN SIT IO N EFFECT The Duration field displays the duration of each selected media file. 1. To adjust the duration of a media file, click on the right-hand side of the screen as shown in figure 190: Figure 190 The Edit Playlist Item screen displays as shown in figure 191: 214 Figure 191 2. Edit the Transition Effect and Duration as required. 3. Select a Transition Effect and Duration as required. 4. Click OK to complete the change of media name and duration. Note Media duration in playlist must be larger than 0 seconds and smaller than 86400 seconds (24 hours). Saving a Playlist to a New Location You can save an existing Playlist to a different location. 1. Click on the Management | Template main menu. 2. In the Playlist column, select the target playlist. 3. Click Save As. The Select a Playlist window displays. 215 Figure 192 4. Select the target Playlist. 5. In the Name field, select a new name (not required). 6. Click OK. The playlist is now saved in a different location. Searching for a Playlist The Search function scans rapidly through files stored on the system to find a requested entry as specified in the search criteria. This function is particularly useful if there are a large number of playlists stored on the system. 1. Click Search as shown in figure 193: 216 Figure 193 The Search Playlist screen displays as shown in figure 194: 217 Figure 194 2. Select the Playlist Type and enter search criteria in the Playlist Name, Creator, Media in Playlist and/or Description fields. Note If the entire file name is unknown, enter part of the name, creator, media in playlist or description to display all playlists containing those parts. 3. Click Start to begin the search. Matched playlists are listed in the Search Results window. Note If the search criteria are left blank, then all playlists are listed. 218 Combolists A Combolist provides a function for the reoccurrence of multiple, continuous playlists. Through Combolists repetitive schedule entries are not necessary. The Combolist is organized under the playlist tree. Figure 195 There are two kinds of Playlists under the Combolist function. One is Linked Playlist and the other is the Embed Playlist. Linked Playlists are copies of existing playlists associated with the parent playlist, and change dynamically when the parent playlist is modified. For example, a linked playlist called Lobby is modified automatically when the parent Playlist Lobby is changed. Embed Playlists are also copies of existing playlists, but unlike Linked Playlists, they are not associated with the parent playlist and do not change when the parent playlist is modified. For example, an Embed Playlist called Lobby stands alone and does not change when the parent Playlist Lobby is changed. Creating a New Combolist (Adding Linked and Embedded Playlists) To create a Linked or Embed Playlist, use the following guide: 1. Click New, New Combolist to create the new combolsit. 2. The Combolist screen displays as shown in 196 219 Figure 196 3. Add a Name, Description, and then use the tool bar to add playlists and arrange the schedule. Icon Menu Change Window Scale Select Playlist Description Toggle the media list to full or half screen. Add an existing Playlist in the Combolist. Convert to Embed Convert the selected Linked Playlist into an Embed Playlist. Select All Click to select all playlists content. Clear All Click to unselect all listed playlists. Move Up Move the selected item up. Move Down Move the selected item down. Delete the selected item Click to delete the selected item. 4. Click Select Playlist button to display the Select Playlist screen as shown in figure 197. 220 Figure 197 5. Select a Playlist from the tree in the left-hand panel, and click Embed (red callout) or Linked (green callout) to add the Playlist to the Combolist. 6. Click OK to return to the Combolist screen and click Save to save to the Combolist. Note You can quickly convert a Linked Playlist to an Embed Playlist by clicking the Convert to Embed icon . Searching for a Combolist The Search for Playlist function is also applicable for Combolist. This function is particularly useful if there are a large number of combolists stored on the system. 1. Click Search as shown in figure 198. 221 Figure 198 The Search Playlist screen displays as shown in figure 199. 222 Figure 199 2. Select Combolist and enter search criteria in the Name, Creator and/or Description fields. Note 3. If the entire file name is unknown, enter part of the name, Creator or description to display all playlists containing those parts. Click Start to begin the search. Matched Combolists are listed in the Search Results window. Note If the search criteria are left blank, then all Combolists are listed. 223 Templates A template is a pre-defined layout style that defines how multiple content zones are displayed on the screen. In the Template sub-section, you can create, delete, or edit layout templates. The flexible layout editing functions allow you to set the Template Attributes, such as: Name, Privileges, Background Image, Screen Matrix, Description and Screen Ratio. It also allows you to adjust the zone size, location, alignment, and set zone order easily. Creating a Template Folder To create a Template folder, follow the steps below. Figure 200 1. Click New and select the New Folder command. 2. Enter the name of the folder in the Folder Name field. 3. Click and set privileges for this folder. 4. Click Save to save the folder. Creating a Template from a Built-in Template Instead of creating new templates, you can select a built-in template and modify it, then save it as a new template. 224 1. Click the Built-in folder from the left section of the Template sub-section as shown in 190: Figure 201 A list of built-in templates is displayed on the screen including basic layout templates for 16:9 and 4:3 screen ratio in landscape or portrait mode. 2. Select a built-in template from the list. The layout of the template and editing options are displayed in the right-hand window as shown in figure 202: 225 Figure 202 3. Click Save As to save the selected template as a new template as shown in figure 203. Figure 203 226 4. Enter the Name of the new template and click OK. The template is now saved as a new template, so you can edit it based on the existing layout. Creating a New Template To create a new template, follow the steps below. 1. Select the destination folder. 2. Click New and select the New Template command. The Template screen displays as shown in figure 204. Figure 204 3. Enter a name for the template in the Name field. 4. Select the template type from the Screen Resolution drop-down menu to adjust the resolution of the screen zone. 227 Figure 205 5. From the Unit drop-down menu, select the unit type: Percent or Pixel. Note If you use Percent as the unit, each zone position and size will be showed as a percentage in Zone Attribute. You will have to divide the media size to the screen resolution to get a percentage and fill in the Zone Attribute section. If you use Pixel as the unit, each zone position and size will be showed in pixels directly. 228 Figure 206 Note Media files with an exact size allow you to select your resolution type and then use Pixel as the unit. If you don’t have media files prepared but want to edit the template to a specific layout, you may use Percent as the unit to define the look of your template. You can use Percent to edit the layout of your template first, and then switch to Pixel to quickly display the dimensions (in pixel) of each zone. 6. In the Template Attribute frame, select a Background Image for the template. 7. Select a normal zone or ticker zone and click the Privileges to set zone privileges. Click the privileges button ( 229 ). A Privileges window displays. In the left-side column, select the roles or accounts and add to the right field; the roles and accounts can edit media and ticker lists in the zone. In the right-side column, select the roles and accounts and to the left field to cancel use Privileges. 8. In the Screen Mode drop-down menu, select landscape or portrait. Under Screen Mode, input number of screens in horizontal and in vertical if you have more than one screen. The number you input into Horizontal Screens text field means how many screens you need in every horizontal line. The number you input into Vertical Screens text field means how many screens you need in every vertical line. 9. E.g. user inputs 3 in the Horizontal Screens and 4 in the Vertical Screens; the template will show in 3*4=12 screens. 10. Click on Save to save the template using the description in the Name field Or Click Save As to provide a different name. Note Maximum number of screens is 16 for one template. You can select different layout combinations for the multiple screens; e.g. 2 in horizontal x 3 in vertical, then the total number of screens will be 6. You can use Percent to edit the layout of your template first, and then switch to Pixel to quickly display the dimensions (in pixel) of each zone. Adding New Zones To add a new zone: Click the Preset buttons on the top menu bar Or Click New Zone and add new zones individually. The currently selected zone is highlighted in blue. All the added zones are displayed on the screen and listed in the Z-Order window. 230 Note Each template can include up to 16 different normal zones and 2 ticker zones in WCM 4.0. If you add more than 16 zones in one template, a warning message shows "Maximum number of zones reached. Cannot create new zone" displays. AD D IN G A N O RM AL ZO N E To include a new normal zone in a template: 1. Click on the New Zone button. 2. Select New Normal Zone. Figure 207 The new zone displays in the zone panel, highlighted in blue. 3. Fill in the required information in the Zone Attribute frame. Set the percentage height of the zone according to the height of your screen resolution. 231 For example, to add a 1024x768 zone top left corner on a 1920x1080 template, enter the values shown in figure 208: Figure 208 4. Click Save to save the current template. AD JU ST ING N ORM AL Z ON E AT T R IBUT ES To adjust the Zone Attributes, use the following guidelines: 1. Select the zone by clicking on it or by clicking on the zone name in the Z-order window. The Zone Attributes window displays the attributes of the selected zone. 232 Figure 209 2. Fill in the required fields and change the settings listed in the following table. Field Description Name Enter a name to identify the zone (Required). Mute Click to mute the audio in the zone. Privileges Click to set privileges for this zone. Resize the selected zone ratio automatically to one of three preset values. Center the selected zone horizontally, vertically, or both. Define the L(left), R(right), T(top), B(bottom), Width and Height fields. Adjust Location Move the zone by dragging the zone outline; the values in the L, R, T and B are changed accordingly. Resize the zone by dragging one of the eight handles on the zone outline or enter Width and Height Values. Adjust Size The icon button locks the aspect ratio, while the unlocks the aspect ratio. 233 icon Logo Select the logo image of the zone. The image can be a PNG file, which can set transparency to hide the background, etc. Position Click to set logo position in the zone. There are 4 values: Top Left, Top Right, Bottom Left, Bottom Right. Select one corner and the H and V space to the logo. H-Space Click to set logo horizontal spacing to the selected logo. It cannot be bigger than the width of the zone. V-Space Click to set logo vertical spacing to the selected logo. It cannot be bigger than the height of the zone. Note To change the displayed Unit in the Normal Zone Attributes frame, select Pixels or Percentage from the Unit drop-down menu. Note When a zone is added, a default zone name is assigned. To change the zone name, enter the name of the Zone in the Name field. Note While moving or resizing two zones positioned closely together, the zones automatically align, leaving no space in between. ADDING A TICKER ZONE To include a ticker zone in a template: 1. Click on the New Zone button. 2. Select New Ticker Zone. 234 Figure 210 The new ticker zone displays at the bottom of the zone. 3. Fill in the required information in the Ticker Zone Attribute frame. Set the percentage height of the zone according to the height of the screen resolution. 4. Click Save to save the current template. AD JU ST ING T IC K ER ZO N E AT T R IB UT ES To adjust the Ticker Zone attributes, use the following guidelines: 1. Select the zone by clicking on it or by clicking on the zone name in the Z-order window. The Zone Attributes window displays the attributes of the selected zone. 235 Figure 211 2. Fill in the required fields and change the settings listed in the following table. Field/Icon Name Privileges Description Enter a name to identify the ticker zone. (Required) Click to set privileges for this zone. Font Select font face from the drop down menu that exists in the player. Font Style Select font style from the drop down menu that exists in the player. Font Color Select the color of the text. Font Size Select the size of the text :16,18,20,22,24,26,28,32,36,48,72. RSS Logo Check box to display the RSS logo. Direction Select the display direction of the ticker: Horizontal, Roll up, Roll down. Speed Select the display speed of the ticker: Medium, Fast or Slow 236 Select the reading orientation of the ticker: Left to right or Right to left. Reading Habits Click to restore content to default size and position. Restore Note: The default ticker size and position is 76 pixels high, the same width as the screen and always located at the bottom. Align Click to center the ticker zone horizontally. Horizontally Background Color Select the background color of the Ticker Zone. Background Image Select the background image of the Ticker Zone. Define the L(left), R(right), T(top), B(bottom), Width and Height fields. Adjust Location Move the zone by dragging the zone outline; the values in the L, R, T and B are changed accordingly. Resize the zone by dragging one of the eight handles on the zone outline or enter Width and Height Values. Adjust Size The icon button locks the aspect ratio, while the icon unlocks the aspect ratio. Note To change the displayed Unit in the Ticker Zone Attributes frame, select Pixels or Percentage from the Unit drop-down menu. Note When a zone is added, a default zone name is assigned. To change the zone name, enter the name of the Zone in the Name field. Note While moving or resizing two zones positioned closely together, the zones automatically align, leaving no space in 237 between. A thicker line between two zones shows that the two zones have no space in between. Setting Template Attributes Click the Attribute icon on the menu bar to switch from Zone Attributes to Template Attributes. You can change the name of the template in the Name field. 1. Click and set privilege for this Template 2. To select a Background Image, click the button. The Select Background Image screen displays as shown in figure 212: Figure 212 Note The background of a template can be blank or an image. 3. Select an image and click OK to finish. To delete the background image, click the button. 4. Enter the description of the template in the Description field. 238 5. Select an aspect ratio from 16:9, 4:3, 9:16 or 3:4 in the Screen Ratio drop-down list box. ZONE PRIVILEGES Click any zone in the layout to switch to the Zone Attributes. User can set the zone privileges in the Privilege label, to control which users can modify the media list in the zone. Note By default the setting is Use Playlist Privilege, the user who can modify the playlist can modify the zone. Figure 213 1. Click the to open the Zone Privilege dialog as shown in figure 214. 239 Figure 214 2. Select roles or accounts and click to add them to the allow list; click to remove the selected accounts. 3. Click OK button to close the dialog. The privilege label is as shown in figure 215: Figure 215 4. Check the Auto republish when content change to auto republish the schedule when the zone is changed. 5. Click Save to save the template, the zone privilege settings are changed. 240 Setting the Z-Order The Z-Order window at the bottom-right of the Template sub-section allows you to adjust the order of each zone. The uppermost zone is the topmost layer, which is completely visible. The lower layer zones may not be completely visible – upper layer zones may overlay some areas. 1. To select a zone, click on the name of the zone or click on the zone rectangle. The selected zone is highlighted in light yellow color. 2. To move the selected zone to the top, one layer up, one layer down or to the bottom or delete the zone, click respectively. Saving a Template to a New Location You can save an existing template to a different location. 1. Click on the Management | Template main menu. 2. In the Template column, select the target template. 3. Click Save As. The Select a Template window displays. Figure 216 4. Select the target Folder. 5. In the Name field, select a new name (not required). 6. Click OK. 241 The template is now saved in a different location. Searching for a Template The Search function scans rapidly through templates stored on the system to find a requested entry as specified in the search criteria. This function is particularly useful if there are a large number of templates stored on the system. 1. Click Search as shown in figure 217. Figure 217 The Search Template screen displays as shown in figure 218. Figure 218 2. Enter search criteria in the Template Name, Owner, and/or Description fields. 242 Note If the entire file name is unknown enter part of the name, creator or description to display all playlists containing those parts. 3. Click Start to begin the search. Matched templates are listed in the Search Results window. Note If the search criteria are left blank, then all templates are listed. Privilege Management In Media/Ticker/Playlist/Template/Software Upgrades/Urgent Cast module, you can set the privileges on the files and file folders, to control what functions the users can or cannot do. In WebDT Content Manager, child nodes will inherit privilege settings from their parent nodes. Each roles and accounts will inherit unless they have own setting on current node. For any node, you should have read privilege on all its parent folders to ensure you can read or modify it. Privilege Actions Click Setting button after the Privilege label as shown in figure 219. 243 Figure 219 The Privilege screen displays as shown in figure 220. 244 Figure 220 For each role or account, there are action settings for it: Action Description Full Control Can perform all functions with the file/file folder. Can change the privilege settings with full control. When checked, all the other actions are checked. Modify Can create new files/folders under the folder, edit/delete the file. Read Can see the file/file folder in Content Manager. When it is unchecked, all the other actions are checked off. The buttons in the toolbar are: Button Description 245 Set as parent Delete a role/account Setting all the privilege setting as parent folder Deletes the selected role or account. Add a role Adds a role in the privilege settings. Add an account Adds an account in the privilege settings. Note The Site Manager role is the built-in role; it is listed in every node with full control privilege but cannot be edited or deleted. Note If an account is member of several roles, its privilege setting is the combine of privilege setting of these roles. Adding a role 1. Click to add roles to the list as shown in figure 221. Figure 221 2. Select the roles and click [OK] button to add them. 3. Click [Cancel] button to close the dialog without adding any role. 246 Adding an account 3. Click to add an accounts to the list. Select accounts and click [OK] button as shown in figure 222. Figure 222 4. Click the drop menu to select a role to filter the accounts as shown in figure 223. Figure 223 Deleting a role/account 1. Select a role/account and click to delete the selected role/account. 2. The selected role/account is deleted form current node. Restore the privileges 1. Click to set the privilege setting as parent folder. 2. All the roles/accounts will be inherited from parent folder. 247 Chapter 5 Schedule and Publishing Management A fter creating the playlists, WebDT Content Manager offers the user a weekly calendar GUI (Graphic User Interface) to schedule the programs that run on players defined within the groups. Main Features Arrange schedule: a user with edit privileges set up playback schedule for players in specific groups. Request or publish schedule: An account without publish privileges can request to publish a schedule. An account with the publish privileges can publish a schedule without approval. Publish, Back to Edit and Reject schedule: An account decides to publish, back to edit or reject a publishing request from a user without publish privileges for the group. Prepare to publish Schedules: An account with publish privileges can change the schedule to Prepare for publication status, to check the schedule before it is published. Generate Report: User with read privileges can view the actual playback report of specified groups. Note The schedule cannot be modified when the status is Publish or Prepare for publication. Menu Elements The general Schedule operational buttons (Main Tab Menu) seen above the calendar view are listed below: Request: Click this button to send schedule request to the account with Publish Schedule/Spot List privileges to request schedule publishing. This 248 button will be enabled only if the current editor has Edit Schedule/Spot List privileges. Approve/Publish: Click this button to approve or publish a schedule request for the group. This button is enabled only if the current editor has Publish Schedule/Spot List privileges. Report: Click this button to open the report dialog screen. The following is a short description of the menu elements found in the Schedule management menus. Figure 224 Main Tab Menu The table that follows describes the Main Tab menu functions. Icon Menu Description Request Requests authorization to publish a schedule. Approve/Publish Publish, approve or reject a requested schedule. Report Creates a report of played media content and schedules in a selected date range. 249 Command Submenu The table that follows describes the Command Submenu Tab menu functions. Icon Menu Description Select Player and Preview Click to preview directly or click the drop down menu to select certain preview players to preview. Insert Playlist /Spot List Click to insert the selected playlist as normal playlist or spot list into the selected cell. Frame Menu The table that follows describes the Frame menu functions. Icon Menu Description Select Player and Preview Click to preview directly or click the drop down menu to select certain preview players to preview. Edit Schedule/Spot List Click to begin modifying the selected schedule/spot list. Set Ticker Click to place a ticker event in the selected schedule. Set Date Range Click to select a date range for the selected calendar cell. Cut Cell Click to remove the selected schedule/spot list cell. Copy Cell Click to copy a selected schedule/spot list cell. Paste Cell Click to paste schedule/spot list cell stored in clipboard. 250 Delete Cell Click to delete selected schedule/spot list cell. Search Schedule Click to begin a search for a particular playlist, media file or ticker by keyword in a specific time range. Search Time Slot Click to search for a schedule playlist in a particular time slot. Status Menu The table that follows describes the schedule status menu function. Icon Description All schedules in this group have been published. No schedules in this group. Some schedules have not been published yet. Schedule requests in this group waiting for approval. Working with Schedules As shown in figure 225 the scheduling feature is presented in a calendar view providing dates against times in a weekly chart . Each cell in the calendar represents an hour. 251 Figure 225 Schedule AR R AN G IN G SC H EDU L ES To arrange the play content and schedule of a group, follow the steps below: 1. Select a pre-defined group as shown in figure 226: 252 Figure 226 2. Select a cell in calendar view where the playlist will be scheduled as shown in Figure 226. 3. Collapse the playlist tree that appears in the lower left section of the Scheduling windows. Select the playlist you want to add, and then click to add the selected playlist into the schedule cell. Schedule cells can have multiple playlists added and associated as shown in figure 227: 253 Figure 227 A warning is displayed if the new selected playlist has an overlap time with the playlist on the weekly calendar. The user will be prompted to reduce the duration to fit the time slot. The definition of each graphic icon displayed in Group area in the scheduling section listed as below: : All schedules in this group have been published. : No schedules in this group. : Some schedules have not been published yet. : Schedule requests in this group waiting for approval. The above icons are displayed at the top right side of the weekly calendar view to show the status of schedule set in a specific date range. The definitions of each graphic icon in a schedule cell are listed below: 254 : Schedule has been published. : The current schedule is waiting for approval. : Schedule Tickers are scheduled in the time slot. : A scheduled playlist is added to a schedule cell. When you mouse over the icon, a tool tip will display the name, start time, and end time of the playlist. : A Spot List is added to a schedule cell. When you mouse over the icon, a tool tip will display the name, start time, and end time of the playlist. The background color of each cell has different definitions: White Cell: there is no playlist added in the time slot. Fulfilled Blue Cell: the schedule time slot has been completed by playlists within the selected date range. Gradient Blue Cell: playlists have been added to the schedule cell but do not fulfill the time slot. Yellow Border: indicates the current selected cell. EDITING SCHEDULES With the Edit Schedule privilege of a group, user can edit the schedule. To further review or edit the schedule, use the following guidelines: 1. Click the Edit button to open the Edit Schedule screen. The Edit Schedule screen contains three areas as shown in figure 228. 255 Figure 228 Playlist area: contains the available playlists in the system. Edit Schedule Items area: lists all the playlists for the selected date. Adding and deleting a playlist is also available. Under Schedule tab, lists all the playlists for the selected date. Adding and deleting a playlist is also available. Under Spot list, displays all the spot lists for the selected date. Adding and deleting a spot list is also available. Note In the Edit Schedule field, unscheduled time slots are displayed in the list including the size of the slot in seconds. This helps to ensure no time slots are omitted accidentally when scheduling playlists. Playlist Recurrence Settings area: includes the duration and recurrence settings of the selected playlist. 2. In the Playlist frame, click the to add a Playlist to the Edit Schedule Items frame. 3. In the Current Playlist State frame, manually change the Start Time, Duration, and End Time of the selected playlist. 256 For example: To play the selected playlist for the entire day, click the Whole Day button. The Start Time, Duration, and End Time are set to 00:00:00.00, 24:00:00.00, and 23:59:59.99 respectively. The Recurrence area enables the user to playback a playlist on an hourly, daily, weekly or monthly basis. There are four recurrence patterns: Today Only, Daily, Weekly and Monthly. Today Only: The playlist will play repeatedly according to the Every__ hour(s) set on the same day. Daily: Specify the number of days in the Every __ day(s) field for the playlist to play repeatedly within the specified date range. Weekly: Specify the day in a week for the playlist to play on a weekly basis in the specified date range. Monthly: Specify either a day in every month or a specific week of every month. 4. To delete a playlist, select the checkbox of the respective playlist and click the Delete button. 5. Click Apply to apply the changes and keep the dialog open for further editing. 6. Click Save to apply the changes and close the dialog screen. SETTING TICKERS This Set Ticker function is used to specify tickers for a single day or a date range. Follow the steps below to place a set of tickers within a schedule page: 1. Click at the right upper side of the weekly calendar. A Set Ticker in Schedule screen displays as shown in 229. 2. Select Tickers from the pre-defined drop down list on the left section. 3. Click to move the tickers to the right section and set the date range. To change the order of the tickers, select the ticker and click button. To delete a ticker from the list, click 257 or to delete the ticker. 4. In Settings area, set font color, size, style, background color, speed, reading habit position and direction for displayed tickers. Check or uncheck the RSS icon to decide if the RSS logo should be displayed. 5. Click OK to complete the ticker settings. Figure 229 Note The Playlist ticker will overwrite the Schedule ticker. REQUESTING SCHEDULE PUBLISHING After editing a group schedule, you can publish the schedule/spot list to the player(s). For Users who do not have Publish Schedule/Spot List privileges but do have Edit Schedule/Spot List privileges, click on the Request button to request approval for the schedule. 258 If you are a User who has Publish Schedule privileges, you don‟t need to request approval and when click Request button, it will pop up error message.. Follow the steps below to send a schedule publish request for approval: 1. Click Request to open the Request to Publish dialog screen as shown in figure 230. Figure 230 2. Specify the Start Date and End Date that you want to request for schedule publishing. 3. You can also select an existing editable schedule to request for publishing. 4. Any comments to be further explained for this request can be added. 5. Click Request to send out the publish request. An email or SMS message will be sent to the user with Publish Schedule/Spot List privileges. They will have to login to the system and approve the schedule after receiving the notification email. PUBLISHING SCHEDULES With the Publish Schedule/Spot List privilege, a user can edit a group schedule and publish the schedule directly by clicking the Approve/Publish button without the need to get approval. In the Approve/Publish dialog, there are three status types of schedule items: 259 The schedule is published. The schedule is waiting for publication. The schedule is editable. Note The Approve/Publish button will be enabled only if the current editor has Publish Schedule/Spot List privileges. Follow the steps below to publish a schedule: 1. Click Approve/Publish to open the Approve/Publish Schedule/Spot List dialog screen as shown in figure 231: Figure 231 2. Specify the Start Date and End Date that you want to publish. You can also select Waiting for Publication or Editable schedule to publish. 3. Any comments to be further explained for this schedule can be added. 4. Click the Publish to publish the schedule. No Email notification will be sent to the user as the schedule is published directly. 5. User can also click the Prepare to Publish button to lock the schedule but not publish it. 260 Note A schedule or media/playlist with the status Published or Waiting for Publication cannot be edited by any user. The status must be changed to Editable to make changes. B AC K T O EDIT AN D R EJECT ING SCH EDU L ES The users with Publish Schedule/Spot List privileges can change the schedule Back to Edit or Reject the schedule. Follow the steps below to go back to edit or reject a schedule: 1. Click the Approve/Publish button to open the Approve/Publish Schedule dialog screen as shown in figure 232: Figure 232 2. Select a Published or Waiting for Publication schedule item. 3. Any Request Comment for the selected request schedule will be displayed. 4. You can add comments to further explain this operation. 5. Click Back to Edit or Reject to edit the schedule. The schedule is changed to Editable or removed from the list. 6. Click Close to close the dialog screen. If the rejected schedule is requested from someone, the User who sent the request receives an email notification. 261 If there are any schedules/spot lists waiting for approval, the users with Publish Schedule/Spot List privileges will see the below dialog window open after login. The dialog window will remind the user to approve the requested schedule/spot list and indicate if SMTP settings have not been set. Figure 233 Clicking the Approve Schedule/Spot List button will open the Notice dialog with the schedule/spot list requests listed by Group. Clicking the GO button will link to the Group's schedule page to process the schedule requests. 262 Figure 234 SEARCHING FOR A SCHE DULE Manually searching for a defined schedule within the system can be time consuming. The Search Schedule function allows for searching of a particular schedule by using specified keywords or date range. Click on the button in Scheduling to begin using the Search Schedule function as shown in figure 235. Follow the steps below to search a schedule: 263 Figure 235 1. Select the desired radio button (Playlist, Media or Ticker) to begin the search. 2. Enter the search string criteria in the appropriate field (Name contains, Creator contains, or Description contains). Search criteria are not case sensitive. 3. Select the Start Date and End Date for the search date range. 4. Click Start to perform the search operation. Matching criteria displays in the Search Results window. Note Spot list cannot be searched. 264 Spot List ADDING/ EDITING A SPOT LIST A spot list is a separate playlist added into an existing schedule without affecting existing scheduled playlists. The player will always play the spot lists with highest priority. To add a spot list to a group, follow the steps below: 1. Select a cell in calendar view where the spot list will be scheduled. 2. Collapse the playlist tree that appears in the lower left section of the Scheduling windows. Select the playlist you want to add, click the right arrow of the button changed to and then select spot list. The button will be . Now click the button to add the selected playlist into the schedule cell as a spot list. To further review or edit the spot list, follow below steps: 1. Click the Edit button to open the Edit Schedule screen and click the Spot list tab as shown in below figure 236. 265 Figure 236 2. In the Playlist frame, click the to add a Playlist to the Spot List items frame. 3. Follow the same steps described in Editing Schedule to set Current Playlist State and Recurrence Settings. 4. To delete a spot list, select the checkbox of the respective spot list and click the Delete button. 5. Click Apply to apply the changes and keep the dialog window open for further editing. 6. Click Save to apply the changes and close the dialog screen. The spot list will appear in the scheduled cell as shown in the figure below: 266 Figure 237 REQUESTING SPOT LIST PUBLISHING After editing a spot list, you can publish the spot list to the player(s). For the users who do not have Publish Schedule/Spot list privileges but do have Edit Schedule/Spot List privileges, click on the Request button to request approval for the spot list. If you have Publish Schedule/Spot list privileges, you do not need to request approval and doing so will open the error dialog window. Figure 238 Follow the steps below to send a spot list publish request to the group manager: 5. Click Request to open the Request to Publish dialog screen as shown below in figure 239. 267 Figure 239 6. Specify the Start Date and End Date that you want to request for the spot list publishing. 7. Any comments to be further explained for this request can be added. 8. Click Request to send out the publish request. An email or SMS message will be sent to the user with Publish Schedule/Spot List privileges. They will have to login to the system and approve the spot list after receiving the notification email. AP PR O VIN G AN D R EJECT IN G SPOT L IST To approve/ reject a spot list, follow the steps below to publish schedules: 1. Click Approve/Publish to open the Approve/Publish Schedule dialog screen and click the Approve Spot List tab as shown in figure 240: 268 Figure 240 2. Specify the Start Date and End Date that you want to publish. 3. Any comments to be further explained for this spot list can be added. 4. Click Publish to publish the spot list. No email notification will be sent to user as the schedule is published directly. The published spot list will appear in the schedule cell with an approved icon. 5. Click the Reject to send out the publish reject and removed from the list. And the player will stop playing after rejection. SEARCHING FOR TIME SLOTS The Search time slot function quickly searches for time slots that have not been scheduled with playback content by using a specific date and time range. Click on the button in Scheduling to begin using the Search time slot function as shown in figure 241. 269 Figure 241 Follow the steps below to search for free time slots: 1. Select the Start Date and End Date for the search date range. 2. Enter a Start Time and End Time, if required. Note If you do not enter a start and end time, the system automatically searches for any free time slots within the supplied date range. 3. Click Search to perform the search operation. Matching free time slots and their duration displays in the Search Results window. 270 Publish Rules 1. When a schedule‟s status is Published, Prepare to Publish, or Requested, the schedule is locked, and any user cannot edit the schedule. 2. To edit the schedule, user can change the schedule status to Editable, or Reject it. 3. If a media, ticker or playlist is used in the locked schedule, user cannot edit the media/ticker/playlist either. When they do this, will pop an error message as shown in figure 242: Figure 242 4. Click OK to go to the Search Schedule page to search which schedule are using the meida, ticker or playlist as shown in figure 243: 271 Figure 243 5. The search conditions are filled already, click Start to show the result as shown in figure 244: 272 Figure 244 6. Click Cancel to exit the dialog. Record the schedule and change them Back to Edit, then you can edit the media/ticker/playlist. 273 Appendix A Appendix Installing the WCM Signage Tool on Your PC Follow the below steps to install the WebDT Signage Tools on your PC or notebook: 1. Find the tool on the CD included with the hardware package. 2. Extract and unzip the application and execute the “WebDT Signage Tools.exe” installation program. The WebDT Signage Tools Server screen displays as shown in Figure 245 274 Figure 245 3. Click Next to continue. The License Agreement screen displays as shown in figure 246: 275 Figure 246 4. After reading the Software License Agreement, select I accept the terms in the License agreement and click Next. The Destination Folder screen displays as shown in figure 247: 276 Figure 247 5. Click Change to select a different installation path or click Next to use the default as shown. The Ready to install the Program screen displays as shown in figure 248: 277 Figure 248 6. Click Install to begin. Once the installation process is complete, the InstallShield Wizard Completed screen displays as shown in figure 249: 278 Figure 249 7. Click Finish to exit. WebDT Batch Register Tool WebDT Content Manager offers the WebDT Batch Register Tool for large scale deployments of WebDT digital signage networks to "register" all the players in an efficient way without having to attach a mouse and keyboard to each player once they are installed in the field. The WebDT Batch Register Tool allows administrators or field service agents (via a laptop connected to the Signage network) to register all these players without going to each player individually. Step 1: Install the WebDT Signage Tools Package on a notebook PC (typically this is the PC which the field agent would be using). The WebDT Signage Tools can also be found on the local SA DT Research folder (Start -> All Programs -> DT Research -> WebDT Signage Tools -> Batch Register) 279 Figure 250 Step 2: Once installed and running, the tool should then automatically "Scan" your primary network connection subnet (where the laptop or the player is connected to). Bear in mind that this tool cannot be used to register players that are outside of the local area network. Step 3: Expand Publish Server and you should see all the players currently running (either already registered or not). You can then click on the player to view more information about that player (see screen shot below). Figure 251 280 Step 4: Select all the players which you would like to register to a particular server and then type in all required credentials (See picture below). Make sure the Publish Server URL is specified correctly with the full path such as http://signage.server.com: 8036/publish (or only fill the host such as signage.server.com:8036), not adding the “http;//” and “/publish” is also OK. Figure 252 Step 5: Once successfully registered, you are able to control the player from your WebDT Content Manager server. You can use the Batch Register Tool to change registration or even change the player name, etc. Step 6: You can set the player‟s Resolution and Rotation. Select all the players to set. Click the Batch setting button to open Batch setting dialog (See picture 281 below); (Resolution: Not change;1024x768;1280x 720; 1280x1024;1360x768;1366x768;1920x1080;1920x1200) Figure 253 Step 7: You can reset the player. Select all the players which you would like to reset. Click the Batch reset button to reset player. WebDT Change Log Level Tool The WebDT Change Log Level Tool allows users to change the player/ES log level on current player/ES. 282 5. Click the Change Log Level tool from Start | Program Files | DT Research | WebDT Signage Tools to run the tool. 6. The Change Log Level tool will detect the current log level setting and show them in the Output field as shown in figure 268. Figure 268 7. Check the radio button of the log level you want and click Apply button, the log level setting is changed. 8. Click the Quit button to quit the Change Log Level tool. WebDT Collect Log Tool The WebDT Collect Log Tool allows users to collect the log on the player/Edge Server and create a log package on the local disk. 283 Click the Collect Log tool from Start | Program Files | DT Research | WebDT Signage Tools to run the tool. Figure 269 9. Click Browse button to select a path to store the compressed log files. 10. Click Collect Logs button to start collecting; the processing information is displayed in the Output field as shown in figure 270. 284 Figure 270 11. After collection is finished, you can quit the tool and get the log files in the path selected. WebDT Offline Content Deployment Tool WebDT Content Manager also includes several WebDT Signage Tool applications for deploying content and schedules to players through a USB storage device when no network connection is available. Follow the steps below to copy content from the WCM Server to a USB storage device and deploy the content to players: 1. Publish the desired schedule on the WebDT Content Manager Server. 2. Click Start| All Programs| DT Research| WCM Signage Tools| Offline Deployment Tool. 3. A login screen displays. Enter the required login information as shown in figure 271: 285 Figure 271 4. The content and schedule is being downloaded to the Offline Deployment Tool as shown in figure 272. 286 Figure 272 Note The download process may take a few minutes depending on the content files. When downloading is complete, a completion message displays as shown in Figure 273. 287 Figure 273 5. Click Copy to USB to copy the schedule to a USB storage device. When the content and schedule are copied to the USB storage device, a completion message displays and the USB storage device can be unplugged. Note The copy process may take few minutes depending on the content files. If the copy process fails, a failure message displays. Repeat the process from step 2 above to re-start the download process. 6. On the player side, you need to register the player into the “Offline” mode. Make sure the organization and password are correct and match the server settings. Note you will need to re-register the player if you need to connect the player back to the networked WebDT Content Manager. 7. Insert the USB storage device in to the player to begin the automatic content and schedule upload. 288 When the content and schedule are uploaded successfully to the player, a completion tone sounds every 3 seconds. The USB storage device can be unplugged. Note The upload process may take few minutes depending on the content files. If the upload process fails, a failure tone sounds every 0.5 seconds. Remove and replace the USB storage device to restart the upload. WebDT Wi-Fi and Resolution Configuration Tool The WebDT Wi-Fi and Resolution Configuration Tool is used to configure the player‟s Wi-Fi and resolution settings. Figure 274 The buttons in the menu File: Button Description 289 New Create a new configuration. Open Open an existing configuration. Save Save the configuration. Save as Save the configuration as another file. Exit Exit the Wi-Fi and resolution configuration tool. Setting Wireless Link Adding a preferred network 1. Click button Add in the Wireless Link page to open the Wireless network properties dialog as shown in figure 275. Figure 275 Option Description Network Name(SSID): Enter the SSID to find the wireless router. Network Authentication Select the network authentication. 290 Data Encryption Select the data encryption. Network key Enter the network key if it is needed. Confirm network key Enter the network key again. 2. Click OK button and a preferred network is added in the preferred network list. 3. Click Search networks to open a dialog to show all available networks in range, as shown in figure 276. Figure 276 4. Click Refresh to get the latest available networks in range. 5. Select an available network and click Add to add it in the preferred network list. 6. If you want to continue to add a preferred network, repeat the step 5. 291 7. Click Close to go back to the Wireless Link page. Deleting a preferred network 1. Select a preferred network from the list in the Wireless Link page. 2. Click Delete and the item is deleted from the preferred networks list. Modifying the property of a preferred network 1. Select a preferred network from the list in the Wireless Link page. 2. Click Property to open a dialog to show the information of this network. 3. Make any modifications then click OK button to save the modifications or Cancel to quit. Figure 277 Setting Resolution 1. Select resolution from the dropdown list in Resolution page. If you don‟t want to modify the resolution, select No change. 2. Select rotation by clicking the radio button. 292 Figure 278 Making the auto setup disk 1. When saving a configuration successfully or opening an existing configuration, you can make an auto setup disk. If you want to save the auto setup disk to a removable disk please insert it before starting. 2. Pull down the menu Wizard and click Make Auto Setup Disk to start a wizard as below. Step 1: 293 Figure 279 Step 2: 294 Figure 280 3. Click Finish to exit the wizard and pull out the removable disk. Applying the configuration When creating a configuration successfully, it can be applied to the player with the following steps: 1. Insert the flash disk to the player; the player will auto detect the flash disk to apply the configuration. A dialog window will open to report the process. 2. When finished applying the configuration, the flash disk can be removed. The above operation can be repeated to apply the configuration to any player one by one. When finished applying the configurations (in folder __DTWIFIandResolutionSetting__ ) the flash disk can be removed. The file named "config_log.txt" in the root of the flash disk can be opened to see which players are configured successfully. WebDT Multi-Screen Layout Designer Tool The WebDT Multi-Screen Layout Designer Tool allows users to easily set the display layout of multiple screens in local or remote networks. 295 1. Click the Multi-Screen Layout Designer tool from Start | Program Files | DT Research | WebDT Signage Tools to run the tool. 2. The Multi-Screen Layout Designer Tool displays as shown in figure 281: Figure 281 The Main Functions: Button Description Detect Players (Ctrl+F1) Detect the available players in LAN Select Player/Screen (Ctrl+F2) Select player, click again to select screen. Detect Screens (Ctrl+F3) Detect the screens of the selected player. Identify On/Off (Ctrl+F4) Turn on the Identify ID on the screens, click again to turn off it. 296 Set Matrix…(Ctrl+F5) Set the screen layout in the dialog window. Resolution…(Ctrl+F6) Set the resolution in the dialog window. Rotate 90°(Ctrl+F7) Rotate all the screens by 90 degrees. Primary Screen…(Ctrl+F8) Set the primary screen in the dialog window. Apply (Ctrl+F9) Apply the settings to the selected player. Discard (Ctrl+F10) Discard the settings. Save to Flash…(Ctrl+F11) Save the settings in the flash disk in the dialog windows. The flash disk is used to set the player by inserting it into the player. Back to Default (Ctrl+F12) Use the default settings. There are more buttons in the drop menu: Figure 282 Button Description Save Settings…(Ctrl+S) Save the settings as a configure file. Import Settings…(Ctrl+I) Import the settings from the configure file. Link to Player…(Ctrl+L) Link to the player by inputting the IP address in the 297 popup dialog. Color Depth…(Ctrl+C) Set the color depth in the popup dialog. Frequency…(Ctrl+F) Set the frequency in the popup dialog. Move to Next Screen (Ctrl+M) Move the screen tool window to next screen. Exit (Ctrl+X) Exit the screen design tool. Detected Players Figure 283 1. The players running the Screen Monitor in the local area network will be detected and listed in the Multi-Screen Layout Designer tool. 2. The local player with the screen is shown as Local Screen Wall. 3. The other players are shown with the player name and IP address. 4. There is also a Virtual Screen Wall; user can design the screen layout without detected player. Select Player 1. Click the Select Player button to select the player. The selected player is highlighted orange. 298 Figure 284 2. Use up and down arrow keys to select the target player. 3. You can also use a mouse to select a player. Select and Move Screen 1. Click the Select Player button to select the player. The selected player is highlighted orange. Figure 285 299 2. Use the arrow keys to select the screen, use ctrl and the arrow keys to move the selected screen. 3. You can also use mouse to select and move the screen. Set Matrix 1. Click Set Matrix to open the dialog as shown in figure 286. Figure 286 2. Input Columns Number to change the layout. 3. The Screen Number and Customized Screens are available only for Virtual Screen Wall. 4. Click OK to apply the changes and close the dialog window. Rotate the Screens 1. Click Rotate 90° to rotate all the screens by 90°as shown in 287. 300 Figure 287 2. In each screen, there is a triangle to imply the direction of the screen. When the screen is 0°, the triangle is in the top right. Apply the Setting 1. Click Apply to apply the settings to the player. 2. When the setting is applied, a dialog opens asking to keep or restore the settings as shown in figure 288: Figure 288 301 3. Click Keep to keep the setting, click Restore to restore the setting or it will restore within 30 seconds. Link to Player 1. When you cannot detect the player in the local area network, you can Click Link to Player to assign an IP address manually as shown in figure 289: Figure 289 2. Input the IP and Port; click Link to detect the target player. Note The linked player will be kept until the Multi-Screen Layout Tool closed. Setting by Flash Disk 1. Insert a flash disk and Click Save to Flash open the dialog as shown in figure 290: 302 Figure 290 2. The tool will detect the flash disk and show the drive letter. 3. Select a driver letter and click OK, then the setting is saved to the flash disk. 4. Insert the flash disk to the screen wall player, a dialog window opens as shown in figure 291: Figure 291 5. Click OK to apply the setting from flash disk, or it will be applied within 10 seconds. 6. After the settings are applied, another dialog opens as shown in figure 292: 303 Figure 292 7. Click Keep or pull out flash disk within 1 minute, the settings will be saved; or the settings will be restored. Multi-Screen Monitor Multi-Screen Monitor is the application to monitor the screen player. When the Multi-Screen Monitor is running, there is an icon in the task toolbar. Figure 293 Input the IP and Port; click Link to detect the target player. Button Description Run Setting Tool…(Ctrl+Alt+F8) Run the Multi-Screen Layout Designer tool. Identify (Ctrl+Alt+F4) Turn on/off the identify ID on local screens. Restore to Default… (Ctrl+Alt+F12) Restore all the local screens to the default settings. WebDT PPT DT Add-in Setup Install the PPTDTAddinSetup on your PC or notebook, and User can create a PPT and publish it to WCM directly. 304 The PPTDTAddinSetup is only enabled for the Microsoft Office PowerPoint 2007 Publish 1. Open Microsoft PowerPoint and Click the Add-Ins| Publish .as shown in Figure 294. Figure 294 2. A WebDT Content manager screen displays. Enter the required login information to start publishing the content to the WCM. as shown in Figure 295. 305 Figure 295 3. Click the OK button to open the Publish screen; as shown in Figure 296. 306 Figure 296 4. In the left panel, select group(s) and set PPT duration in the right panel, in the Date option it will show a calendar 5. Click the As default Playlist button, user cannot choose calendar/set duration; click the Publish button to publish the PPT file to the WCM as group default playlist. 6. Click the As date range button, choose calendar and set Duration. 7. Today‟s date defaults as grey ( ), 307 8. Click the number ( )and it will turn blue, the date will be selected; click the number again to cancel the selection 9. Press the “shift” key to select multiple days. 10. Click the cancel all ( ) button to cancel all the selected dates 11. In the Duration option user can set the (Start time, Duration and End time) and click the publish button to publish the schedule. Note The PPT file must be saved before publishing/previewing; only one login is required for one PPT. Preview 1. Click the Add-Ins| Preview .as shown in Figure 297. Figure 297 2. A WebDT Content manager screen displays; Enter the required login information as shown in Figure . 3. Click the OK button to open the Preview screen; select the player(s ) click the OK button to preview PPT file. The following example demonstrates previewing uploaded PPT file content as shown in Figure 298. 308 Figure 298 4. Click the OK button, the Preview Detail Result screen displays as show in Figure 299. 309 Figure 299 Note Some media files may have small variances compared to standard files. We strongly recommend you preview the content before publishing it to ensure the media plays correctly on the player. WebDT SignagePCClient The WebDT SignagePCClient tool plays urgent cast from the server which it registered on. Functionality 1. There is our icon in the notification tray, right click it to pop up the menu, select „Open Home Page‟ to pop up the School Home Page, select „Help/About‟ to pop up the help information page. 310 Figure 300 2. After the server published urgent cast, We will see it on our desktop. Figure 301 3. Click on playing the urgent cast area to pop up a dialog which display details about the ”urgent cast”. If click button „Close‟, both the dialog and the urgent cast will disappear ;if click button „Continue‟, the dialog will disappear but the ”urgent cast” still keep playing. Figure 302 311