1
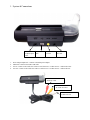
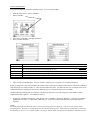
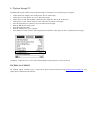
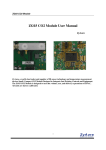
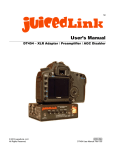
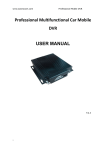
Wolverine ESP Cradle System
User Manual Version 1.0
August, 2006
FEATURES
? Use the ESP Cradle system to record directly from TV, DVD Player, VCR or any video source and
watch them anywhere, anytime
? Record hours of TV programs to the Wolverine ESP and enjoy the programs you watch every day - on
the go. Bring last night's game, cartoons or an entire season of your favorite series with you, anywhere
? It's easy - just follow the on-screen directions to set up the timer and Wolverine ESP will turn on to
record and turn off when recording is complete
? Use the ESP Cradle as a stand to view, to charge, to connect to a computer and to connect to any video
or audio source
1. System & Connections
Power
Adapter Input
Jack
1.
2.
3.
4.
USB Cable
Jack
Audio/Video
In Jack
Audio/Video
Out Jack
Power Adapter Input Jack: Connect to the ESP power adapter
USB Jack: Connect to the ESP’s USB cable
AV In: Connect to the Cradle AV Cable to record from TV’s or other devices’ “Audio/Video-Out”
AV Out: Connect to the Cradle AV Cable to connect to TV’s or other devices’ “Audio/Video In”
RED Connector to TV
Audio In or Out
Yellow Connector to
TV Video In or Out
White Connector to TV
Audio In or Out
2. How To Record Video to the ESP
Record video while power adapter connected to the Cradle.
?
?
?
?
?
?
?
?
?
Connect the Power Adapter into the Cradle’s “DC 5V” labeled Jack
Connect the AV Cable into the “AV IN” Jack
Connect the AV Cable Red and White connectors to the “Audio-Out” Jack on the TV/DVD/VCR/etc.
Connect the AV Cable Yellow connector to the “Video-Out” Jack on the TV/DVD/VCR/etc.
Dock the ESP gently into the Cradle system
Turn On the Wolverine ESP
From the “Home Screen” as seen below select “VideoRec”
After ESP acquires video signal press <MENU> to select quality of recording in pixels (for optimum file size/video quality
choose 320x240 normal or fine)
Press Joystick to start recording – Recording dot at the bottom of the screen will turn from green to red while recording
?
?
Press Joystick to pause or resume recording
Press <ESC> to save recording to ESP hard drive
3. How To Setup Recording Schedules
Setting Date and Time
? From the “Home Screen” click on “Options”
? Click on “Time Zone” – using the Volume (+)/(-) button select your time location from the preset world locations. <Press>
Joystick to set
? Click on “Date Time” – Set Date and Time, use Joystick to select date and time field and use Volume button (+) or (-) to
increase or decrease. <Press> Joystick to select
Set Recording Schedules
You could schedule up to 8 different recording sessions. To set a record schedule:
?
?
From the “Home Screen” select “VideoRec”
Select “Schedule”
?
?
Select any of “Schedule 1” through “Schedule 8”
Select “Set REC Schedule”
Schedule
Storage
Quality
Start Time
End Time
Remain Time
Planned Time
?
Choose between eight different time schedules
Choose between HDD or memory card (when inserted)
<Press> Joystick to select and use Volume button (+) or (-) to select quality of video in pixels (for optimum
file size to video quality choose 320x240 normal or fine)
<Press> Joystick to select and set recording start date and time
<Press> Joystick to select and set recording end date and time
Remaining available total recording time
Total planned recording time
After selecting all schedules press <ESC> to reach the “Home Screen” to properly save recording schedule(s).
Before recording time is due, place the ESP in the Cradle system, connect power adapter, connect the AV cable to the Cradle and
other end into the TV’s/DVD’s/VCR’s etc. video-OUT and Audio-Out source. The ESP will turn “On” one minute before set-torecord time and start recording at actual set time. Make sure the TV is turned ON at the time of recording.
The ESP will stop recording at the set “End Time” and turns off if the unit is set to turn off per the “Auto Shutdown Timer”
(adjusted from under “Option”> “Auto Shutdown Timer”).
?
To play back recorded video from the “Home Screen” select “VideoRec” and choose “Playback”. Video files are assigned
alphanumeric file names, i.e. VREC0001, VREC0002, etc. Video files could me renamed after connecting the ESP to a
computer.
NOTE:
Recording video from TV/DVD/VCR require converting an analog signal to a digital file. This conversion requires intense
processing power. The ESP is a portable device that has limited processing power. Such limitation could produce a video with
missed frames or incorrect sync of audio to video. Selecting a reduced output video quality may eliminate or minimize this issue.
4. Playback through TV
The ESP Cradle system could be used to connect the ESP to a TV/Projector for external large screen display.
?
?
?
?
?
?
?
?
?
Connect the Power Adapter to the Cradle into the “DC 5V” labeled Jack
Connect the AV Cable into the “AV OUT” Jack on the Cradle
Connect the AV Cable Red and White connectors to the “Audio-IN” Jack on the TV/Projector
Connect the AV Cable Yellow connector to the “Video-IN” Jack on the TV/Projector.
Select the appropriate TV Channel to receive the Audio/Video-In signal
Dock the ESP into the Cradle system
Turn On the Wolverine ESP
From the “Home Screen” go to “Options”
Select and Press “Cradle AVOUT” and using the joystick switch the “OFF’ option to “ON” as displayed in below figure
Turning the “Cradle AVOUT” to “ON” will switch the display from the ESP screen to the TV screen.
TECHNICAL SUPPORT
For technical support, warranty service, or paid service please contact Wolverine Data at [email protected] or by
calling 949-251-9888 M-F 9:00-5:00 PST