1
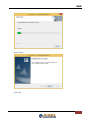
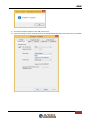
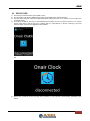
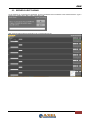
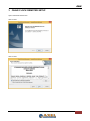
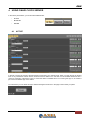
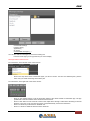
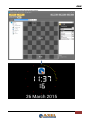
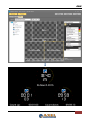
ENG
ON AIR CLOCK
User Manual
(Rev 2.0)
| INTRODUCTION
1
ENG
CONTENT
1
INTRODUCTION ................................................................................................................................................... 3
2
SETUP AND CONFIGURATION .............................................................................................................................. 3
2.1
2.2
2.3
SERVER SIDE:......................................................................................................................................................... 3
DEVICE SIDE: ......................................................................................................................................................... 8
SERVER-CLIENT PAIRING ....................................................................................................................................... 9
3
ONAIR CLOCK REMOTER SETUP ..........................................................................................................................11
4
USING ONAIR CLOCK SERVER ..............................................................................................................................14
4.1
4.2
4.3
ACTIVE ................................................................................................................................................................ 14
BLACKLIST ........................................................................................................................................................... 16
EDITOR ................................................................................................................................................................ 17
5
ONAIR CLOCK REMOTER .....................................................................................................................................22
6
FINAL CONSIDERATION AND AXEL TECHNOLOGY CONTACT ................................................................................23
| INTRODUCTION
2
ENG
1 INTRODUCTION
Thank you for purchasing Axel Technology new release of On-Air clock, the software that allows you to always have a
look on time, countdowns or countups that you want to watch on every display you need in your radio or tv studio.
This innovative product gives you the chance to have an analogic or digital performant clock in your server, controlled
from every client PC workstation in your broadcasting network.
Prerequisites:
1 PC with Windows OS
HDMI TV or Monitor
Usb Mouse and/or USB keyboard and/or USB hub
OnAirClock dongle
WIFI access point (if using a WIFI onairclock device)
OnAirClockSetup.exe installation sw
OnAirClockRemoterSetup.exe installation for Remoter service
OnAirClockDevice - any android device or a Smart TV Dongle with:
DroidVncServer.apk (android app to control your screen outputs on a remote browser of your LAN &
WIFI Network)
OnAirClock.apk (android app to install OnAirClock on your device)
2 SETUP AND CONFIGURATION
The PC with Windows OS will act as the time server. Time impulse will be pushed through the LAN (or WIFI) to the
OnAirClockDevice that will display Clock and other information on the HDMI video output.
2.1
1)
SERVER SIDE
Install OnAirClockSetup.exe on the Windows PC (installation may require additional libraries such as Microsoft
.NET Framework) as shown in following steps:
Click on Next
| INTRODUCTION
3
ENG
Click on Next
Click on Yes and wait…
| SETUP AND CONFIGURATION
4
ENG
Click on Finish
Click on OK
| SETUP AND CONFIGURATION
5
ENG
2)
3)
Connect the hardware dongle to a free USB port of the PC
Insert an incoming rule in the advanced option of windows firewall allowing all incoming connection on port 8090
| SETUP AND CONFIGURATION
6
ENG
4)
Run the Onairclock sw on the Windows PC
5)
Open the settings panel and be sure that in the IP Address field the current IP of the Windows PC is displayed
(if using multiple IPs or LAN cards, specify the IP on the subnet where the Access point and the OnAirClock
device are connected)
Onairclock software must be running 24/7. Eventually create a link in Windows Start menu to run Onairclock
automatically on windows startup.
| SETUP AND CONFIGURATION
7
ENG
2.2
1)
2)
3)
4)
DEVICE SIDE
Connect the Onairclock Device to the HDMI monitor
Connect USB mouse and/or USB Keyboard (using a USB HUB) to the Onairclock device
Connect power using the USB power supply (sometimes USB coming from TV or monitor is not enough for the
onairclock device)
On Startup, Onairclock will show a DISCONNECTED message (As the next picture shows on an android
device). Right click to exit the app, then configure WIFI (or LAN) settings to connect correctly to your local
network. DHCP and fixed IP configurations are possible.
OR
5)
Restart The Onairclock device and verify that connection to local network is automatically established upon
startup
| SETUP AND CONFIGURATION
8
ENG
2.3
SERVER-CLIENT PAIRING
On the windows PC a message box will appear, showing IP address and mac address of the Onairclock device. Type a
Name for the specific device (like “ OAC1”) and click on OK.
After a few seconds the device will appear in the connected devices list.
| SETUP AND CONFIGURATION
9
ENG
Select a default layout for the device from the list (OnairClock for example).
After a few seconds you will see the clock on the HDMI TV.
| SETUP AND CONFIGURATION
10
ENG
3 ONAIR CLOCK REMOTER SETUP
Open ‘OnAirclock Remoter.exe’
Click on Next
Click on Next
| ONAIR CLOCK REMOTER SETUP
11
ENG
Click on Yes
Click on Install
Wait…
| ONAIR CLOCK REMOTER SETUP
12
ENG
Click on Finish
Click on Finish
| ONAIR CLOCK REMOTER SETUP
13
ENG
4 USING ONAIR CLOCK SERVER
In the server part software, you can find three different tabs:
-
ACTIVE
BLACKLIST
EDITOR
4.1
ACTIVE
In this tab you have the control of all client devices connected to your network server. When you open the app for the first
time on any OnAirClock network device, OnAirClock server detects for it and adds it in the available device list with a
green led. If the light of the device is grey, it means the device is available but it is not running the app. So, to activate it
just run the OnAirClock app on the device.
For each device you can select through 4 default messages to be shown in the page in the moment you prefer:
| USING ONAIR CLOCK SERVER
14
ENG
Commercial break (0)
Incoming call (1)
Applause (2)
On Air (3)
Customizable messages (…)
You can also add new messages or remove the existing one:
In the box at the right you can type the text you want to display.
Messages will be numbered from
For each device, in the left side of the current screen:
-
Click on the drop down menu to select the layout you want to confirm. You have two default layouts, plus the
other ones you create and change in the editor part.
For each device, in the right side of the current screen:
-
Click on ‘Auto Update’ button to set the automatic update of the device release of OnAirClock app. The app
update itself to the same release of the OnAirClock on the server.
Click on ‘VNC’ button to have a remote control on the output device through a VNC service browsing on Internet
Explorer. In this way you do not need any mouse or keyboard directly connected to the device.
Click on ‘B’ button to put the device in the Black List.
Click on ‘X’ button to delete the device from the Active list.
| USING ONAIR CLOCK SERVER
15
ENG
4.2
BLACKLIST
In this tab you have the control of all client devices you previously put in the Black List. For each device, in the right side
of the current screen:
-
Click on ‘R’ button to restore the device to the Active list.
| USING ONAIR CLOCK SERVER
16
ENG
4.3
EDITOR
In this tab you can control all the available layouts,
you can choose the layout you need from the layout drop-down menu.
Next to the drop-down menu you have three buttons:
‘ADD’, ‘DEL’, ‘CC’ (Carbon Copy)
By clicking on ‘ADD’ you can add a new layout. Give it a name and set its width and height.
By clicking on ‘DEL’ you can delete the selected layout. Then confirm the removal.
By clicking on ‘CC’ you copy the selected layout. Give it a new name, then you can edit it.
| USING ONAIR CLOCK SERVER
17
ENG
In every layout you have the control of seven plugins and you can add them or remove them from the page.
Available Plugins are: Clock, Clock Counter, Time Counter, YouPlay, DateTime, Text, Picture.
Drag and drop an item of the list into the composer
| USING ONAIR CLOCK SERVER
18
ENG
You can resize the item by dragging the handles shown on its edges and corners. You can move the item into the
composer by drag & drop operation.
Clock:
this plugin is a mix between an analogic and digital clock
Clock Counter: this plugin is a mix between an analogic and a digital count up or count down.
Important Parameters: click on the clock counter item into the composer and set the parameters
appearing at the right side.
You can select the count up or count down mode for the counter and you can set the time starting point
Time Counter:
this plugin is a digital count up or count down
Important Parameters: click on the time counter item into the composer and set the parameters
appearing at the right side. You can select the count up or count down mode and the time starting
point.
YouPlay:
if you have a YouPlay running in your network, you can display its counters through this plugin.
Important Parameters: click on the YouPlay item into the composer and set the parameters appearing
at the right side. You must type YouPlay Pc IP address, and which data you want to display on your
OnAir Clock output.
DateTime:
this plugin allows you to set a viewer for the current date time.
Text:
this plugin allows you to set a customizable text you can put all over the page.
Important Parameters: click on the text item into the composer and set the parameters appearing at
the right side. You can type the text value to display
Picture:
this plugin allows you to set a picture you want to display in the page.
For each object, in the right side, you can decide the refresh time in milliseconds.
| USING ONAIR CLOCK SERVER
19
ENG
Two Examples of layouts and two output screens..
| USING ONAIR CLOCK SERVER
20
ENG
| USING ONAIR CLOCK SERVER
21
ENG
5 ONAIR CLOCK REMOTER
For each workstation of the network, you can set an OnAir Clock Remoter to have a constant control of messages and
counters.
After the installation, run ‘OAC Remoter.exe’.
To show a Message you previously set in the Messages section of the active tab, click on MSG, then click on the button
related to the number of the message you want to display on the output screen.
To start with a count, click on COUNT UP, or COUN DOWN, and type the starting time, then click on ENTER. Click again
on COUNT UP, or COUN DOWN, and click on the START/STOP button.
| ONAIR CLOCK REMOTER
22
ENG
6 FINAL CONSIDERATION AND AXEL TECHNOLOGY CONTACT
________________________________________________________________________________________________
________________________________________________________________________________________________
________________________________________________________________________________________________
________________________________________________________________________________________________
________________________________________________________________________________________________
________________________________________________________________________________________________
________________________________________________________________________________________________
________________________________________________________________________________________________
________________________________________________________________________________________________
________________________________________________________________________________________________
________________________________________________________________________________________________
________________________________________________________________________________________________
________________________________________________________________________________________________
________________________________________________________________________________________________
________________________________________________________________________________________________
________________________________________________________________________________________________
________________________________________________________________________________________________
________________________________________________________________________________________________
________________________________________________________________________________________________
________________________________________________________________________________________________
________________________________________________________________________________________________
________________________________________________________________________________________________
________________________________________________________________________________________________
________________________________________________________________________________________________
________________________________________________________________________________________________
________________________________________________________________________________________________
________________________________________________________________________________________________
________________________________________________________________________________________________
________________________________________________________________________________________________
________________________________________________________________________________________________
________________________________________________________________________________________________
________________________________________________________________________________________________
________________________________________________________________________________________________
________________________________________________________________________________________________
________________________________________________________________________________________________
________________________________________________________________________________________________
________________________________________________________________________________________________
________________________________________________________________________________________________
Main Office BOLOGNA: Via Caduti Di Sabbiuno 6/F
40011 Anzola Emilia - Bologna - Italy
Tel. +39 051 736555 - Fax. +39 051 736170
For Technical information or support
[email protected]
For General information and Sales dept
[email protected]
www.axeltechnology.com
| FINAL CONSIDERATION AND AXEL TECHNOLOGY CONTACT
23