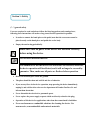
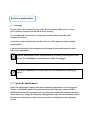
1
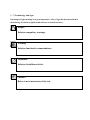
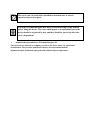
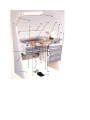
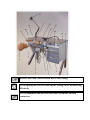
KOUSHA FAN PARS Engineering and Manufacturing Central Office Address: Islamic republic of Iran, shahrake-e-gharb, Farahzadi Blvd., next to Atieh Hospital, Sepehr street, No. 63 Telephone number: (+99)11- 99546963-4 (+99)11-61936 (Special line) Fax number: (+99)11-99541339 E-mail: [email protected] [email protected] (After sales service unit) Factory Address: Tehran-Qom (khalj-e-fars) highway, 53th kilometers, Shamsabad industrial town, Phase 5, Sarvestan Blvd., Gol-e-sorkh 9 street, Segment 1351 Telephone number: (+99)11- 34153163 -9 Fax number: (+99)11-34151331 E-mail: [email protected] Website: www.kfp-dental.com In the name of God Dear customer We thank you for your selectivity and trust in purchasing domestically produced products, and we are pleased that after continuous efforts, we have been able to manufacture Laboratory bench and Preclinical bench in Iran and put it at your disposal. This product has been designed by our technical and engineering team of experienced and committed people in the fields of mechanical, electronics and computer engineering, and by utilizing updated technology and building upon on 52 years of experience in manufacturing dental equipment, this product has reached production of export index quality. In designing the product, three principles of accuracy, reliability and safety performance and also being easy to use have been considered, so in order to correctly and completely utilize product features, we ask you to read the instruction manual carefully and if you have any questions or you need more information, contact the after sales unit. Instruction manual is a comprehensive reference for efficient and safe use of the product. Following the instructions of this manual has a great role in reducing consumable costs, avoiding risks and ultimately increasing product life. Instruction manual should always be kept near the product and the user should periodically read it. Please impart us with your constructive guidance, so that we can benefit from your comments, recommendations, and gain knowledge about your needs. With the hope of enticing your satisfaction, Kousha Fan Pars Engineering and Manufacturing Contents Topic Page Section 1- Introduction (1-1) How to use the manual…………………….......................3 (1-1) Terminology and signs……………………….…...….…….4 Section 1- General information (1-1) Company’s liabilities…………………….……….………...7 (1-1) Guarantee………………………………………….………..7 Section 5- Device introduction (5-1) Main parts of Laboratory bench………………...…………9 (5-1) Main parts of Preclinical bench………………...…………9 Section 6- Technical features (6-1) Device technical specification and installation rules……13 (6-1) Technical information……………………………………...13 Section 3- Transportation and installation (3-1) Unboxing……………………………………….………......11 (3-1) Device transportation………………………………………11 (3-5) environmental conditions…………………………………..11 (3-6) Device installation………………………………………….11 Section 4- Device applications (4-1) Complete start-up of Device……………………….………16 Section 7- Safety (7-1) General safety………………………………………………11 (7-1) safety measures of device…………………………………..11 Section 9- Maintenance (9-1) Clean-up………………………………………………………..15 (9-1) Periodical maintenance ………………………………………16 Section 1: Maintenance (1-1) How to use the manual This manual presents the instructions about use, installation and maintenance of Laboratory and preclinical bench made by Kousha Fan Pars Co. It should be noted that: The product should be used according to the instructions of this manual. Thus, all parts of it should be read carefully before starting and installing the tool. Special attention should be paid to the highlighted parts. (refer to section 1-1). Observing the instructions of manual assures the health and safe operation of the tool. Manual is an integral part of the product. Thus, it should always come with the product and should be used optimally as a reference for use during the operation of product. It should be available even during sale of the product, or even when it is not used. In case of losing or damaging the manual, get a replacement one from the aftersales service department of Kousha Fan Pars Co. The following are explained in detail in this manual: Installation and start-up of the product Operation details of the product and its parts Maintenance program Primary safety and preventive details (1-1) Terminology and signs Knowledge of signs meanings is of great importance. A list of signs has been introduced in the following for initial recognition and reference to them if necessary. Danger! Indicates compulsory warnings. Warning! Indicates functional recommendations. Forbidden! Indicates forbidden activities. Caution! Refers to user instructions of the tool. Section 2: General information (1-1) Company liabilities Kousha Fan Co. is not liable for any problem involving the following: Failure to follow the instructions of this manual (incorrect use of product), repair by an unauthorized person and part replacement without coordination with after-sales service department, failure due to power fluctuations. (1-1) Guarantee Guarantee of this product includes repairs, supply and replacement. If used appropriately, Kousha Fan Co, guarantee covers all main parts of the device for 1 year. Following cases are not covered by guarantee: power fluctuations incorrect transportation of device inappropriate and frequent use of device despite having obvious flaws not observing the maintenance instructions installation by unauthorized persons any repair or replacement by unauthorized persons. Commutation fees of company representatives to install or repair during guarantee period will be received from buyer at site. The device can’t be used before installation and insurance of correct operation of protective parts. It is highly recommended that user has a general knowledge of this manual before using this device. The cases which appear to be operation flaws in the device should be registered by user and they should be sent to the after-sale service department . Authorized representatives of Kousha Fan pars Co. These persons are endorsed by company to work on the device under any operational circumstances. They are also authorized to do any electrical and mechanical adjustment/repair, maintenance program and authorized parts replacement. Section 3: Device Introduction (5-1) Main parts of Laboratory bench 1. Oreo stand 1. Suction box 5. Pedal 6. Two drawers’ slot 3. Armrest 4. Shoulder vent 7. Protective shield 9. shoulder vent cap 9. Electrical Switchgear 13. Air poir 11. Three drawers slot 11. Panel 15. MDF sheet 16. Stand cap 13. Shelf 14. Work surface steel sheet 17. Cornice 19. Light stand 19. Fluorescent lamp (5-1) Main parts of Preclinical bench 1. K stand 1. Two drawers slot 5. Air poir 6. Suction box 3. Mini-unit box 4. Shoulder vent cap 7. Shoulder vent 9. Phantom head cap 9. Phantom head 13. protective shield 11. Arm-stand 11. Spotlight lamp 15. One drawer slot 16. Hand-piece guard 13. Table flame (benzene) 14. Hand-piece 17. Plastic pad 19. Composite sheet 19. Panel Benches with MDF surface should have a steel coating. Avoid opening the doors or removing the coating before disconnecting Electricity It is recommended that the local electronics system has an earth connection. Section 4: Technical features (6-1) Technical features and operation rules of device Kousha Fan Pars Co. products are manufactured based on the latest technologies and are of highest qualities. The most recent design and manufacturing methodologies are employed to increase lifetime and quality of products. (6-1) Technical details Technical specifications of the Laboratory and preclinical bench are given in Table 1: Power supply 212-242V AC 02/02 Hz Power 1422 W Device height 122 cm Device width 112 cm Device depth 02 cm Net weight 120 Kg Table 1- The device technical specifications Accessories Part Hand-piece Number Protective shield 1 Pedal 1 1 Table 1- A list of product accessories Section 0: Transportation and installation In order to avoid accidents, it is really important to follow the following instructions during installation and fixing of equipment. All steps are explained in detail: (3-1) Unboxing Having received the device, make sure that the main box is sealed and intact. Otherwise, inform the after-sales service department of Kousha Fan Co, or its authorized representatives. (3-1) How to move the device The device should be moved as follows: 1. Disconnect the device electricity connection. 1. Disconnect all connections. 5. Empty drawer contents and contents on the table. 6. Know the weight of the device because lack of knowledge about factors such as these may lead to many problems (these information are given in technical specifications part). 3. The device should remain in horizontal position during movement and moved carefully 4. Put the device in the designated box and if the box is not available, follow safety instructions for protection, because the company is not exposed to transportation risk and has no obligations towards it. Failure to follow the aforementioned instructions results in device being damaged, and Kousha Fan Pars Co, won’t be held liable. (3-5) environmental circumstances It is important to choose an appropriate environment during installation and operation for personal safety, correct operation and long lifetime. This environment not only should be big enough but also should be on enough, have proper ventilation and should be kept away from dust and direct sunlight. It should be noted that device must be placed in a way, so that the connections may be managed easily. Workplace temperature: 3-63OC Maximum humidity: 737 The device should not be used in a place where there is danger of explosion or firing The light of place should be high enough so that all parts of device can be seen clearly. The device should never be exposed directly to sunlight or humidity of rain, etc. The following should be done before use of device: 1. Laboratory and preclinical bench blast has been designed to be put on a stable and firm worktable in parallel with ground. The stability of all parts of the worktable should be checked. 1. Plug the device into the outlet after input power and mains electricity are checked (device working voltage is based on AC 113 electricity). The grid single –phase electricity should match the power supply specifications of device. (3-6) device installation 1. Get the device out of its box carefully. To do so, take out all the protective material (Plastofoams) around it, take out the steam cleaner, and put it on a flat and standard laboratory table such that the space within 13 cm radius of device is empty. Make sure that the surface and legs of the table are not made of metal. 1. Vacuum Mixer should not be exposed to sunlight directly. 5. An appropriate cord should be used to connect the device to its nearby power supply. 6. An electrical protector must be put on the way of socket by the user, so overload or indirect currents don’t have contact with the protective parts of device. It is recommended that the environment electronic system has an earth connection part. Section 0: Device application (4-1) Device initiation Before using the device, put it on a firm, flat and stable surface and plug the device in to electricity (and make sure that the device connection is intact according to part (6-3)) Now the device should be adjusted to be used. (4-1-1) Laboratory bench application In this stage, the user must adjust the General Box for application: Power button: to turn on the device FOOT and Hand buttons: to change the hand-piece function in pedal manual mode Clockwise-counterclockwise button: to adjust the condition of hand-piece rotation to Rev and For modes. Lamp button: Suction or vacuum cleaner button: It is used to turn the socket on and off (In manual mode). It should be mentioned that by pressing this button for a few seconds, the system enters suction adjustment mode and by pressing the arrows, suction can be adjusted between 3-133 and by pressing the suction key, the desired speed can be saved. Auto key: This key is used to place the system in automatic mode, so that the handpiece rotation and suction work in the same time. This function is designed so that the suction does not work constantly. when the system is in manual mode, the user can turn the suction on and off manually (explained in clause 3) Arrow keys: They are used to adjust the used elements (hand-piece speed, LCD light, suction power and etc) Stop and Run button: This button is used to start or stop the hand-piece rotation, so when the system is in Hand mode, by pressing this key, micro-motor start rotating and by pressing again, it stops. To adjust the LCD light, press Manual and Auto buttons at the same time and you can adjust it between 3-133. In case of hanging or locking of the panel, you can press Auto and down arrow to reset to factory settings. In order to start-up the device, you need at least 3 bar compressor air, metropolitan gas and electricity with earth connection. After adjusting necessary settings, your device is functional. (4-1-1) Preclinical bench application Preclinical bench have all the aforementioned applications of Laboratory bench. In addition to this, Preclinical bench is equipped with mini-unit. Mini-unit instructions are the following: The mini-unit has five main hose: 1. Turbine hose which has air and water. 1. Air-motors hose which only has air. 5. Poir hose which is for air and water exhaustion. This hose is used for or cleaning and has air and water. 6. Pedal hose which is for pneumatic air control of mini-unit. It is for commanding mini-unit pneumatic system for start-up of air and water inside the device. 3. Grade 4 blue orange hose is for entering mini-unit air and water. Grade 4 blue hose is for connecting to metropolitan water. Grade 4 orange hose is for entering regulated air with the maximum pressure of 3 bars. If selector button is in turbine mode, turbine hose is usable which is placed to adjust air pressure exactly behind the turbine hose and is capable of adjusting turbine air. On the box, there is an on/off button which is embedded to connect or disconnect turbine water and Flow volume is embedded for adjusting turbine water pressure. If selector button is in air-motor mode, air-motor hose is usable which is air-free and is placed to adjust air pressure exactly behind the air-motor hose and is capable of adjusting air pressure of air-motor. Section 7: Safety (7-1) general safety Users are required to read and always follow the listed suggestions and warnings here; following these instructions will assure a long-term, flawless operation for product. In order to connect the hand-piece or the pedal, note that the excrescence must be placed exactly on the hand-piece and pedal slot on the body. Empty the suction bag periodically. Make sure that all parts of the device are installed correctly before using the device. Never use a defected device. You should never use the device if its accessories are defected, otherwise, the device operation will be affected, and it will no longer be covered by guarantee. Thus, make sure all parts are flawless before operation. Do not let the hand-piece touch the ground. The place should be clean and well-lit and free of obstacles. If you see any flaws in the device operation, stop operating the device immediately, unplug it, and call the after-sales service department of Kousha Fan Pars Co and inform them about that. Never dissemble the electrical or pneumatic parts. Never replace the power supply or parts which are directly related to the plug. Operation of this device for applications other than those mentioned is forbidden. Never use benzene or combustible solutions for cleaning the device. Use noncorrosive, noncombustible and nontoxic materials. (7-1) Device safety measures Kousha Fan Pars Co. makes use of high-quality raw materials for advanced production processes to promote the safety level. Quality control is performed in three stages of input, middle control, and final control through several control stations, a procedure which minimizes error and defect chances. To assure that the device works safely, follow all the aforementioned steps. Always use filter and residual remover before entering water in the mini-unit box Never allow the air pressure to exceed 3 bars. Section 8: maintenance (9-1) cleaning Keep the device body clean using a dry cloth. Wet the cloth with little water or a nongreasy solution, if needed (only do this for body cleaning). Users should make sure the device is kept clean and free of dust water and other unexpected solutions. At the end of each operation and when the device is on OFF mode and stable, cleaning should be done. If the user decides that the internal parts need cleaning, he/she should contact the aftersales service department. Put the main button on the off position before cleaning external parts of the device. It is forbidden to clean the device while it is plugged. Never use combustible, corrosive, base or toxic solutions for cleaning the device. (9-1) periodic maintenance Inspection and periodic cleaning of the device depends on operation level. It is suggested for user to inform the company experts about the workflow through consultation after installation and learn the appropriate time for inspection and periodic cleaning from them. If user detects any damage or exhaustion during periodic inspections, he/she should contact the after-sales department, so that measures are taken for maintenance and compulsory service. Periodic service should be determined by user and is performed by the after-sales service department. It is suggested that the maximum time interval for periodic repairs be 11 months. If user detects any defects or problems on the device, he/she should place a warning sign on the device to indicate that it is being maintained and it should not be used (EC warning signs can be purchased at the associated stores). Cleaning, periodic maintenance and appropriate use of the device are important factors in lifetime and safety of it. When any defect is seen in the device operation, it is forbidden to use the device before solving that defect. Thanks for your selectivity Kousha Fan Pars Engineering and Manufacturing