1
TRANSACTION BANKING
Straight2Bank Universal Adaptor
The user’s manual for the online mapping tool
Straight2Bank Access Channel Management
Version 2.6
The user’s manual for the online mapping tool
TABLE OF CONTENTS
REVISIONS ............................................................................................................................ III
PURPOSE OF THE DOCUMENT ...................................................................................................... IV
AUDIENCE .............................................................................................................................. IV
CHAPTER 1: UNIVERSAL ADAPTOR AT GLANCE ................................................................................ 1
1. Background .......................................................................................................................... 1
2. What is Universal Adaptor? .................................................................................................. 1
CHAPTER 2: GETTING STARTED ................................................................................................... 3
1. Prerequisites ........................................................................................................................ 3
2. Login .................................................................................................................................... 3
3. Managing templates ............................................................................................................. 5
3.1 Creating a new template........................................................................................ 6
3.2 Editing a template................................................................................................. 6
3.3 Deleting a template............................................................................................... 6
3.4 Copying a template............................................................................................... 6
3.5 Exporting a template ............................................................................................. 6
3.6 Importing a template ............................................................................................. 7
3.7 Printing as pdf ...................................................................................................... 7
3.8 Cancelling ........................................................................................................... 7
CHAPTER 3: DEFINING TEMPLATES ............................................................................................... 8
1. File level definition ............................................................................................................... 8
Criterias for Excel files ................................................................................................. 9
2. Payment Record Definition for a delimited file type ............................................................. 9
2.1
2.2
2.3
2.4
2.5
2.6
Mandatory “Field Name” ...................................................................................... 12
Adding a new field .............................................................................................. 13
Removing a field ................................................................................................ 14
Default values .................................................................................................... 14
Additional provision for “Field Name” .................................................................... 14
Unnecessary data .............................................................................................. 14
3. Other Records Definition screen for a delimited file type ................................................... 15
4. Record level definition for fixed length files ....................................................................... 16
CHAPTER 4: SPECIAL MAPPING FUNCTIONS ................................................................................. 18
1.
2.
3.
4.
5.
6.
7.
8.
Sub String function............................................................................................................. 19
Split String ......................................................................................................................... 20
Concatenate ....................................................................................................................... 21
Dynamic Output.................................................................................................................. 23
Trim .................................................................................................................................... 24
Replace String .................................................................................................................... 25
Char Encoding Conversion .................................................................................................. 25
Other String operations ...................................................................................................... 26
1.1
1.2
1.3
1.4
1.5
Base64 Encode .................................................................................................. 26
Base64 Decode.................................................................................................. 27
Prefix ................................................................................................................ 27
Suffix ................................................................................................................ 27
Replace invalid Swift Char ................................................................................... 27
9. Arithmetic Operations ........................................................................................................ 27
CHAPTER 5: PLUG N PLAY CAPABILITY ........................................................................................ 29
CHAPTER 6: TEMPLATES AT WORK .............................................................................................. 30
1. Web upload ........................................................................................................................ 30
1.1 Bulk Import ........................................................................................................ 30
1.2 File Upload ........................................................................................................ 30
2. Host-to-host integration..................................................................................................... 30
ANNEXE A – UNIVERSAL ADAPTOR FIELD MAPPING CHANGES ....................................................... 31
ii
The user’s manual for the online mapping tool
REVISIONS
Version
Description
Author
Date
1.0
Initial version
Daniel Awanda
18/01/2013
1.1
Complementary info on identifiers
Daniel Awanda
28/01/2013
1.2
Revisions
F. Noorullah
14/02/2013
1.3
Revisions on section 2.6 (chapter 3) & Annexes
Daniel Awanda
15/03/2013
1.4
Annexes
Daniel Awanda
21/03/2013
1.5
Header edits
Daniel Awanda
24/04/2013
2.0
Edits for Excel support and UI improvements
Daniel Awanda
23/05/2013
2.1
Edits for Excel support and UI improvements
Daniel Awanda
19/06/2013
2.2
Edits for Excel support and UI improvements
Daniel Awanda
19/08/2013
2.3
Edits
Daniel Awanda
22/01/2014
2.4
Edits
Daniel Awanda
23/01/2014
2.5
Included Annex B for all UA Mapping related changes
Glenn Wee
17/04/2015
2.6
Included Reverse UA for Prior Day Bank Statements
Glenn Wee
06/07/2015
iii
The user’s manual for the online mapping tool
PURPOSE OF THE DOCUMENT
The objective of this document is to describe the purpose of the online mapping tool of Universal
Adaptor, and the necessary steps required to carry though the definition of a new file format.
AUDIENCE
This document is intended to clients, implementation managers, support specialists and channel
managers. It’s the propriety of Standard Chartered and cannot be externally shared without consent.
iv
The user’s manual for the online mapping tool
CHAPTER 1: UNIVERSAL ADAPTOR AT GLANCE
1. Background
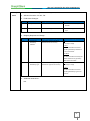
In the effort to better control their data and achieve process efficiency, companies have increasingly
relied on information technology applications, especially Enterprise Resource Planning (ERP) and
Web-based solution. As the need for more efficient integration between banks and their corporate
clients has become more important than ever, three challenges are left to be addressed:
i. Corporate systems generate unstructured client-specific files such as comma-separated
values (CSV) file, report, or spool, which are not “understandable” by banks systems, or are
simply not rich enough to allow the banks to process the transaction;
ii. The existing systems at the bank’s end are not flexible enough and do not exhaustively
integrate all the existing files originated by all their corporate clients;
iii. Clients resist changing the file formats to accommodate bank’s systems requirement as such
a change can impact their daily operations and induce more cost.
Banks have tried to address these challenges by developing and deploying data converters at the
client’s end. These tools are designed to the convert and remap “unstructured” payment files in bank
accepted formats before transmitting them to the bank either by Host to Host or internet banking. But,
this approach represents a partial solution which involves consistent risks for banks.
The Universal Adapter project aims at addressing the challenges highlighted above, and allowing all
the corporate clients of the banks to send any file format, from any application, to initiate a transaction
at the lowest possible costs.
2. What is Universal Adaptor?
Universal Adaptor (UA) is an online mapping tool enabling clients to send instructions in their own
formats through host-to-host and Web channels.
1
The user’s manual for the online mapping tool
Through a newly designed Web graphical interface, Universal Adaptor helps define the customer’s
proprietary formats. Based on these definitions and their related template IDs, the system later
accepts clients’ transaction files, extracts the transaction instructions, and carries them over to a
bank-specific format.
Universal Adaptor features:
Comprehensive library comprising industry, ERP and Bank formats
Easy online file mapping function through a rich and intelligent user interface
Interoperability across Web and host-to-host channels
Compliant with industry standard security and encryptions
No installation at clients’ premises in defining the file mapping
2
The user’s manual for the online mapping tool
CHAPTER 2: GETTING STARTED
1. Prerequisites
Three items are required to for an effective definition of file format template:
An access to Straight2Bank Web
A format specification document to help understand the file format
A sample file
Universal Adaptor runs on Straight2Bank Web platform. For an optimal performance, the user should
use a PC station meeting the following requirements:
Operating System: Windows 7 or Windows Vista* or Windows XP or Windows 2000 or
Windows 98 (Second Edition). Apple Mac is supported with these WIN OS.
Processor: 500 MHZ & Above.
RAM (memory): 256 MB RAM & Above.
Video Display: Minimum 800 x 600 resolution, 256-colour or higher.
Required Browser: Microsoft IE7, IE8 and IE9 (with 128 bit strong encryption).
Browser Settings: JavaScript Enabled.
Communications: HTTPS (port 443)
Java Runtime Environment 1.6.0_02.
Internet Connection: 56.5 Kbps & Above, Broadband and dedicated connection is
recommended.
Software: Adobe Acrobat Reader 5.0 or above.
Hardware Requirements: 1 Serial Com Port or 1 USB Port4 (Windows 98, ME, 2000, XP) or
1 PCMCIA slot CD-ROM drive for software installation.
2. Login
Universal Adaptor is available through the main Straight2Bank gateway. To access the only mapping
tool, the user needs to have handily his Group ID, User ID, and password for Straight2bank.
3
The user’s manual for the online mapping tool
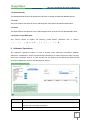
Since Universal Adaptor is currently only for payments’ purpose, it is accessible through Cash
Management Transactions Utilities Manage File Format Mapping on the navigation
menu.
4
The user’s manual for the online mapping tool
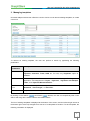
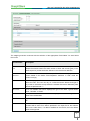
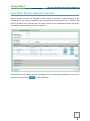
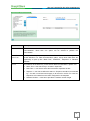
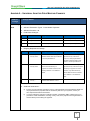
3. Managing templates
Universal Adaptor initial screen offers the user the choice to work around existing templates, or create
a new one.
To retrieve an existing template, the user can perform a search by populating the following
parameters:
Search
Parameters
Description
PRODUCT
Type of transaction or business function detailled in the file. This includes
Payments, Collection, Trade, iCAS, etc. For now, only “Payments” option is
available.
SUB-PRODUCT
Further categorization of the transaction/business function type. For “Payments”
application, sub-categories are ‘Payee’, ‘Payments’, “Payments with Multiple
Fields”, and “Payment Without Identifier”.
FILE FORMAT
TYPE
Describes the way field are separated within the file. This can be either
“Delimited”, “Fixed Length”, or “Excel File”
TEMPLATE ID
Unique identifier of the template.
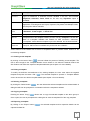
By clicking on the Search (
) and Reset (
) buttons, the user can respectively start a new
search and bring all the search fields to their default values.
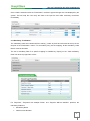
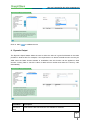
The list of existing templates is displayed at the bottom of the screen, and the left and right arrows at
the bottom right corner help navigate from one set of 10 templates to another. For each template, the
following information is displayed:
5
The user’s manual for the online mapping tool
Display Field
Description
PRODUCT
Type of transaction or business function detailled in the file. This includes
Payments, Collection, Trade, iCAS, etc. For now, only “Payments” option is
available.
SUB-PRODUCT
Further categorization of the transaction/business function type. For “Payments”
application, sub-categories are Payee, Payments, Payments with Multiple Fields,
and Payment Without Identifier
FILE FORMAT
TYPE
Describes the way field are separated within the file. This can be either
“Delimited”, “Fixed Length”, or “Excel File”
TEMPLATE ID
Unique identifier of the template.
STATUS
Completeness of the template creation process. The tag ”Complete” indicates the
state of a template available and useable for data conversion. Otherwise,
“Incomplete” means that the template is yet to be released and is saved as Draft.
SHARE
TEMPLATE
“Yes” means, template is available for selection for all the user ids under the
Group Id. “No” means it’s available only to the user who created it.
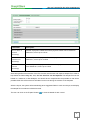
Action buttons at the bottom left of the list of templates allow to perform further actions on the
new/existing template.
3.1 Creating a new template
By clicking on the button ‘New’ (
), the user initiate the process of building a new template. The
user is then brought to the “Template Details” screen where he can select the desired Product and
Sub-Product and define the respective template attributes (see chapter 3 for more details).
3.2 Editing a template
To modify the definition and attributes of an existing template, the user must select the targeted
template and press the button ‘Edit’ (
). The selected template is opened in “Template Details”
screen where user can edit the template details (see chapter 3 for more details).
3.3 Deleting a template
By clicking the ‘Delete’ button (
), the user deletes the selected template and its related details. A
dialog box will then be prompted for confirmation before the template is deleted.
3.4 Copying a template
Pressing the button ‘Copy’ (
) allows user to copy the selected template to the same group id.
Once copied, the user is prompted with a dialog box to enter the template ID of the copy template.
3.5 Exporting a template
By clicking on the ‘Export’ button (
), the selected template and its respective details can be
exported as data file.
6
The user’s manual for the online mapping tool
3.6 Importing a template
The ‘Import’ button (
) allows the user to import template details into the system. Only the data
file generated during “Export” process can be used
3.7 Printing as pdf
The user can also save the definition of a template on a PDF format file by clicking on the “Print as
PDF” button (
).
3.8 Cancelling
By pressing the button ‘Cancel’ (
), no action is performed.
7
The user’s manual for the online mapping tool
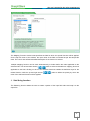
CHAPTER 3: DEFINING TEMPLATES
The template definition steps described in this chapter and in the next one are necessary to carry out
the definition of a new template, or to amend an incomplete template. They are available on choosing
the ‘New’ or ‘Edit’ on the “Manage File Format Mapping”. The definition of a template is performed at
two levels: the file level and the record level.
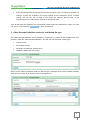
1. File level definition
The file level definition allows to capture the caracteristics of a file format to be mapped, and how data
are organized within this file.
On Universal Adaptor, two types of file format can be mapped: fixed or delimited. Information required
at the file level are as followed:
Field Name
Description
PRODUCT
Type of transaction or business function detailled in the file. This includes
transactions such as payments, collections, Trade, iCAS, etc. For current
release only “Payments” option is avalaible.
SUB-PRODUCT
Further categorization of the transaction type. For Payments products, the
value available are:
Payee: To create mapping template for payee / beneficiary records
Payments: To create mapping template for payments containing
payment and invoice records in the same file.
Payments with Multiple Files: To create template where payment and
invoice records are in different files
Payments without Identifier: To create template where the file contains
only payment records and no identifier. Every line in the file will be treated
as one payment item.
8
The user’s manual for the online mapping tool
TEMPLATE ID
A 20-characters unique identifier of the template. The uniqueness of the ID
must be kept across both Universal Adaptor and File Converter Utility’s tables.
SHARED
If check box is ticked, the template created would be available for selection to
all the user IDs under the current group ID. By default, the box its un-checked.
TEMPLATE
FILE FORMAT TYPE
Describe how fields coexist within the file. Options available are ‘Delimited’,
“Fixed Length”, and “Excel File”.
FIELD SEPERATOR
Applicable to “Delimited” file format type only. It’s the character that separates
each field in the file. It can be <comma>, <tab>, <space>, etc.
FIELD WRAPPER
Mandatory for “Delimited” file format type only. It’s the character that, when
doubled, enfolds each field in the file. It can be <double quotes>, <single
quotes>, etc. Defaulted to <double quotes>.
CHARACTER
ENCODING
This input allows to define how the characters are encoded within the file
format to be mapped. The default selection is ASCII and should be kept if the
file does not contain any local language characters. Other options are Chinese
Traditional (BIG5), Chinese Simplified (GBK), Thai, Japanese (Shift JIS).
IGNORE LINES
Indicates the number of lines to skip from the top and from the bottom of the
input file during data conversion.
FILE MERGE
OPTION
Applicable for “Payments with Multiple Files” sub-product only. It determines
how the records on the invoice file is merged into the corresponding payment
record on the payment file. Options are ‘Sequence’ or ‘Indexed’.
REPLACE INVALID
SWIFT
When activated (check box ticked), the following invalid SWIFT characters in
the
input
file
will
be
replaced
with
a
space:
CHARACTERS
* ~ □ \ | ` !
@ # $ % _ { }
[ ]
;
" < > &.
By default, the option is deactivated.
In Edit mode, the ‘Product’, ‘SubProduct’, “Template ID” & “File Type” are not editable.
Click on Save & Continue button (
) to futher proceed with the template creation.
Criterias for Excel files
The Excel files compatible with Universal Adaptor are subject to the following restrictions:
File extension can only be xls or xlsx
Originated from Microsoft Office version 97 and above
Encoding UTF-8
No macros allowed
Only the first spreadsheet will be read by Universal Adaptor
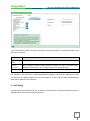
2. Payment Record Definition for a delimited file type
The Payment Record Definition screen allows to define input file’s data structure and specifications.
As a first step, the user can define the internal structure by stating how many lines are needed for the
header, the transactions, and the trailer’s records.
9
The user’s manual for the online mapping tool
Field Name
Description
NO. OF LINES
Number of payment header lines where payment values can be read from.
Default is 0, max is up to 5 lines
HEADER
RECORD(S)
NO. OF LINES
Number of parts of a payment line where payment values can be read from.
TRANSACTION
RECORD(S)
Default is 1, max is up to 10 lines
NO. OF LINES
Number of parts of a payment trailer lines where payment values can be read
TRAILER
RECORD(S)
from. Default is 0, max is up to 5 lines
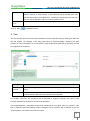
After having defined the structure of the file, the user must browse and import a sample file in order to
help define the fields. Only .txt, .csv, .xls and .xlsx files can be imported. The sample file must me
limited to a maximum of 500 kilobytes, and should be as comprehensive as possible so that all the
possible fields of the file’s structure are taken into account during the creation of the template.
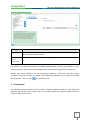
After the import, the system will automatically parse suggested fields in each record layer, and display
the sample file’s contain as individual records.
The user can click on the ‘Expand’ button (
) to view the details of each record.
10
The user’s manual for the online mapping tool
The mapping exercise continues with the selection of the appropriate “Field Name” for each field in
the record.
Column Name
Description
SELECT SAMPLE
FILE
Browse and select the sample file for which the structure is captured. The
sample file should contain the exact number of lines and record types (in the
same sequence) as that has been defined in the record level definition.
FIELD VALUE
In “New” mode, the values of the sample file’s fields are displayed on this
column based on the earlier “Field Seperator” definition. In “Edit” mode the
column is empty.
FROM FILE
FIELD NAME
Predefined payment field names selection are offered to the user to help
define the field. The user can rely on a wild-card search feature and type in
key words or characters to help select the relevant field name. Mandatory field
names are prefixed with “*”.
DATA TYPE
It’s a non-editable field which displays the type of the data. Typical values
“Text”, “Number” or “Date”.
LENGTH
It’s a predifined non-editable field which display the maximum length of the
value of the related data.
DATE FORMAT
Applies to only date field. It defines how date data is represented in the input
file.
DEFAULT VALUE
User will have the option to key in field value for the field selected. The value
provided will be used if no data is provided in the input file for the relevant
field; on the other hand, if a data is available on the the file, then the default
value will be ignored.
11
The user’s manual for the online mapping tool
Once a field is selected under the “Field Name”, the data’s type and length are auto-displayed by the
system. This will help the user verify the data in the input file and make necessary corrections
immediately.
2.1 Mandatory “Field Name”
The mandatory fields are indicated with an asterix (*) mark as prefix and are listed at the top of the
drop list of the “Field Name” column. To successfully carry out the mapping, all the mandatory “Field
Name” must be allocated.
The list of mandatory field for a specific mapping is available by cliquing on the “View mandatory
fields” link at the top right-hand corner.
For ‘Payments’, “Payments with Multiple Fields”, and “Payment Without Identifier” products, the
mandatory fields are:
Beneficiary Name
Debit Account Number
12
The user’s manual for the online mapping tool
Payment / Value Date
Payment Amount
Payment Currency
Payment Type
For ‘Payee’ the following fields are mandatory:
Beneficiary ID
Beneficiary Name
Debit Account Country Code
Debit Account City Code
Conditional data for transactions has been deemed optional. The user should refer to the bank’s
IPayment CSV’s specifications and his local country requirements in order to map the full set of
required data.
For each record, an identifier (RECIDENTIFIER) is also considered as mandatory. An identifier is
used to identify a specific line on a record in the input file. Thus, an identifier has to be defined for
each line of the input file during the creation of the template; otherwise the user is prompted to
provide the identifier. The record identifiers must be unique and static.
Identifiers are mandatory for ‘Payments’ and “Payments with Multiple Files sub-products”. They are
always mandatory for Transaction Records. However, they are not required for the header or the
trailer if they have only one line (the number of lines for “Payment Header” and “Payment Trailer” is
selected as “1”).
Another identifier, the merger identifier (MRGIDENTIFIER), is applicable only to “Payments with
Multiple Files” and is used to identify and merge payment and invoice files.
2.2 Adding a new field
If the input file does not contain any of the mandatory fields required by the bank, then a field can be
added by clicking on the “Add” button (
).
13
The user’s manual for the online mapping tool
For example, as illustrated above, to include the value date, the user can add a field by clicking the
‘Add’ button and type “Payment / Value Date” under the “Field Name” column. For date fields, the
user can also select the format in which the date field should be interpreted.
2.3 Removing a field
To remove a field, the user can click the radio button against a field and click on “Delete” button (
).
2.4 Default values
Default values can be assigned for each field by providing a value under the “Default Value” column.
The Default value can be configured only if no operations (see chapter 4) has been performed on the
field. For the date field, user will have the option to select the default data from the dropdown list. The
value date can be defaulted to a fixed date, e.g. System date, System date + 2 etc.
2.5 Additional provision for “Field Name”
Apart from standard payment field there is a provision to help the user create its own field: a ‘FILLER’.
A ‘FILLER’ field has empty input or default value, and can be derived from different fields (see chapter
4 on how to apply special mapping operations to fields). It is used to store a data which would be
used for further operations, or the result of these operations.
2.6 Unnecessary data
Data contained in the input file but which are not relevant to performed the transaction can remain
“undefined”. Thus, the tool will only process the defined data, and the unnecessary ones will be
ignored. The user can handle these unnecessary data in two ways:
Use ‘FILLER’ (see the section 2.5 above) in the “Field Name”; or,
14
The user’s manual for the online mapping tool
If the unnecessary data are the last ones on their record line, they can merely be ignored. For
instance, if there are 20 fields in the record (header record, transaction record, or trailer
record), and only the first 10 fields of the record are required, then the last 10 are
unnecessary and no “Field Name” needs to be attached to them.
Once all the fields are mapped to the corresponding fields under the “Field Name” column, the user
can click on “Save Record” (
) to save the template.
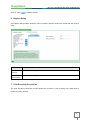
3. Other Records Definition screen for a delimited file type
The “Other Records Definition” tab is available for “Payments” or “Payments with Multiple Files” subproducts. Under the “Other Records Definition”, the user can map the below record types:
Invoice records
FX Contract records
Document Checklist (for Thailand only)
Regulatory Details (for China only)
When ‘Invoice’ option is selected under the “Record Type” dropdown list, the user is asked to identify
which line in the input file does the invoice record appears on.
15
The user’s manual for the online mapping tool
Based on the user input and the sample file uploaded, the system will parse the invoice record. The
user can then map the parsed information to the invoice related fields.
Field Name
Description
RECORD TYPE
Type of record relevant to the ‘SubProduct’ defined in main screen.
WHICH LINE IN THE
This entry allows to point out the line where the invoice record is located in
the sample file
FILE DOES THIS
RECORD TYPE
APPEAR?
FIELD DEFINITION
SELECT SAMPLE
FILE
Browse and select the file from which file structure has to be captured.
AUTO POPULATE
INVOICE AMOUNT
Available for Invoice Record Type only. If selected, the amount of the invoice
(for the 1st invoice line item) will be populated from the payment amount; for
the remaining invoice line items, the invoice amounts will be mapped as 0.00.
FIELD VALUE FROM
In “New” mode, the values of the sample file’s fields are displayed on this
column based on the earlier “Field Seperator” definition. In “Edit” mode the
column is empty.
FILE
FIELD NAME
Predefined payment field names selection are offered to the user to help
define the field. Mandatory field names is prefixed with “*”.
DATATYPE
It’s a non-editable field which displays the type of the data.
LENGTH
It’s a predifined non-editable field which displayx the maximum length of the
value of the related data.
DATE FORMAT
Applies to only date field. It defines how how date data is represented in the
input file.
DEFAULT VALUE
User will have the option to key in field value for the field selected.
4. Record level definition for fixed length files
Fixed length files are those in which data are placed next to each other without separators or
wrappers. For these files, the user must perform the same steps as for Delimited files until uploading
a sample file, and select “Fixed Length” for the file format type.
16
The user’s manual for the online mapping tool
Once the sample file is imported, the system splits each record by strings of 10 characters (with fields’
lengths defaulted to 10). The user can then overwrite the default length with the actual length of the
data fields and the system will auto-adjust the “Field Value From File” accordingly.
Once done, the user can proceed with allocation the field names and the rest of the mapping as
previously explained.
17
The user’s manual for the online mapping tool
CHAPTER 4: SPECIAL MAPPING FUNCTIONS
Special mapping functions are designed to further refine the definition of fields pertaining to the
transaction file. Any number of operations can be performed on a field and user can re-sequence the
order of operations to be executed. But only fields on which no prior operations have been performed
are eligible for special mapping functions’ operations.
Special functions are available under the “Mapping Functions” layer which is displayed once the user
presses the ‘Define’ button (
) for the related field.
18
The user’s manual for the online mapping tool
The Mapping Function window’s title specifies the field for which the special function will be applied.
On the top left corner of the window, the input value of the field is indicated as per the sample file
used. The user is also offered a detailed description of the function he selects.
Mutliple mapping function can be used simultaneously to further define the rules applicable to the
selected field. The left and blue arrows (
,
) allow to select and deselect a mapping functions
applicable to the field. Clicking on each of the selected functions enables the definition layer for the
related function, while the up and right arrows (
,
) allow to define the priority by which the
rules of the selected functions will be applied.
1. Sub String function
The Substring function allows the user to extract a portion of the input field value and map it to the
output file.
19
The user’s manual for the online mapping tool
To use the substring feature, the user should specify a starting position on the field and length of the
string to be extracted.
Field Name
Description
SUBSTRING
FROM
“Left”, “Right” or “Mid” options will be available for selection.
START
POSITION
Key in positive number as start position to extract the value. The field will be
disabled if user selects “Left” or “Right” option from “Substring From”.
LENGTH
Length of the string to be extracted from input field.
For example, if the field value is XXXXX3544034032001XXXXX, selecting the substring from Mid,
and specifying the starting position as 6 and the length as 13, will yield the value 3544034032001,
which will be mapped to the output file.
2. Split String
The Split String feature allows the user to partition a field based on a specified delimiter and then to
designate which part of the divided field to extract.
20
The user’s manual for the online mapping tool
Field Name
Description
DELIMITER
Charater use as seperator within the selected string (field). The <space> character
can be used as delimiter as well.
PART NUMBER
Portion of the string to be extracted after applying delimiter.
TO BE
EXTRACTED
For example, if the string (field value) is /TELEBEN/XXXXXXXXXX, specifying the delimiter as '/' and
the sequence as 2, will yield the value XXXXXXXXXX, and this will be mapped to the output file.
Multiple “Split String” operations can be configured successively. In that case, operations will be
executed in sequence whereby, the output of first Split String operation will be input for next Split
String operation. Click on ‘Add’ (
) to validate the rule.
3. Concatenate
The Concatenate feature allows the user to select a field and append a value to it. The value to be
appended can be either from another field or user-defined (static text, random number, sequence
number or date / time format).
21
The user’s manual for the online mapping tool
Field Name
Description
OPTION
The user can select from either of the two options “Input Field” or “Data
Concatenation”. More than one option can be selectd to perform the
Concatenate.
INPUT FIELD /
DATA TYPE
For “Input Field” option, a drop down field offers all field name listed by user in
record definition. For “Data Concatenation” option, a drop down field offers the
opportunity to pick up like “Static Text”, “DateTime”, ‘Sequence’ or ‘Random
Number’.
VALUE
This field will be enabled only if user selects “Data Concatenation” options. For
Static Text -> user has to key in a value in input field
Date Time -> user has to select the format from dropdown list box
Seqence -> user has to define the start no. Sequence would be incremented
by 1 for each record and would apply to all record in the file. For next file,
Sequence will re-start from the value configured in the template
Random Number -> user has to provide the random number length
22
The user’s manual for the online mapping tool
Click on ‘Add’ (
) to validate the rule.
4. Dynamic Output
The Dynamic Output feature allows the user to derive the value of a given field based on the value
provided in another field. For example, if the requirement is to derive the debit account currency as
'USD' when the Debit Account Number is 123456789, then this function can be applied on debit
account currency field to check the value of debit account number and derive the currency code
automatically.
Field Name
Description
INPUT FIELD
NAME
Fields from the Records’ definition are available for selection.
23
The user’s manual for the online mapping tool
INPUT VALUE
Conditional values offered to the client. The possible value are “Is Null”, “Is
NotNull”, ‘Default’ or “User Defined”. If ‘User Defined’ item is selected, then ‘User
Defined’ field needs to be enabled for a “conditional” manual input from the user.
The user can to default the value if no value condition is met.
OUTPUT
VALUE
Output value to map based on corresponding input value
Click on ‘Add’ (
) to validate the rule.
5. Trim
The Trim function allows the user to trim characters from the input field value by defining the start and
the end position. For example, if the string (field value) is CUST12345ABC, specifying the start
position as 9 and end position as 12 will yield the value CUST12345 (ABC will be trimmed), and will
be mapped to the output file.
Field Name
Description
START
POSITION
Define a non negative number which will be used as start position to truncate a
string.
END POSITION
End Position should be greater than Start Position. Combination of Start and End
positions will be used to truncate a portion from input data.
For multiple Trim rules, the operations will be executed in sequence whereby the output of first
truncate operation will be input for next truncate operation.
For multiple definition, the position needs to be maintained as per original string. For instance, if the
first 3 characters and last character need to trimmed, then the position will be defined as per the
original position, not based on the first trim output.
24
The user’s manual for the online mapping tool
Click on ‘Add’ (
) to validate the rule.
6. Replace String
The Replace String feature allows the user to replace a specific value within a field and with another
value.
Field Name
Description
STRING TO
REPLACE
Character or a string to be replaced
REPLACE
STRING WITH
Character or a string that will be used to replace the value in the input field
7. Char Encoding Conversion
The Char Encoding Conversion function allows the convertion of the encoding of the field value to
another encoding scheme.
25
The user’s manual for the online mapping tool
User can convert the characters to the following encodings: Chinese simplified, Chinese traditional,
Japanese, Thai, and unicode.
8. Other String operations
1.1 Base64 Encode
The Base64 Encode function will convert the field value into Base64 encoding scheme.
26
The user’s manual for the online mapping tool
1.2 Base64 Decode
The Base64 Decode function will decode the field value if already encoded with Base64 scheme.
1.3 Prefix
The Prefix function will allow the user to add a specific value before the selected field’s value.
1.4 Suffix
The Suffix function will allow the user to add a specific value at the end of the selected field’s value.
1.5 Replace invalid Swift Char
This function allows to replace the following invalid SWIFT characters with a <space>:
* ~ □ \ | ` !
@ # $ % _ { }
[ ]
;
" < > &.
9. Arithmetic Operations
The Arithmetic Operations feature is used to perform basic arithmetic calculations (addition,
subtraction, multiplication, division and percentage calculations) in order to derive the value of a given
field. Thus, information such as Invoice Amount and Tax Amount can be defined as different fields
and can be added up to arrive at the Net Payment Amount.
Field Name
Description
OPERATOR
Operator list is made of ‘+’, ‘-‘, ‘*’, ‘/’, ‘%’ for addition, subtraction, multiplication,
division and percentage calculations.
OPERAND
Data used for numeric operations. Options are “Input Field”, “Static Text”,
27
The user’s manual for the online mapping tool
“Round”, “Truncate” & “Formatting”.
SELECTED
FIELD OR
STATIC VALUE
For “Input Field” selected as “Operand”, dropdown list box will display list of all
fields available from the records’ definition. For:
Static Text -> user has to key in numeric value in input field
Round -> user has to define the number of place after the decimal to round off
Truncate -> user has to define the number of digits after decimal point to
truncate
Formatting -> user has to provide the number of digits formatting value
Click on ‘Add’ (
) to validate the rule.
28
The user’s manual for the online mapping tool
CHAPTER 5: PLUG N PLAY CAPABILITY
Straight2Bank Universal Adaptor features a broad set of readily available formats from industry
standards, banks and major ERPs. By selecting the appropriate format within the library, clients can
integrate overnight through a “plug n play” process, which reduces significantly the time and the effort
required at both ends of the connection.
To get to use a standard template within the library, a request has to be raised to the Standard
Chartered CBS team, which will in turn copy the template from the source group ID for the standard
templates SCBUSRGP to the desired group ID.
29
The user’s manual for the online mapping tool
CHAPTER 6: TEMPLATES AT WORK
Once the template creation is completed, the client can start sending transaction files to Standard
Chartered via the Web or throught an host-to-host connection. In each case, the transaction file will
be paired with the template to facilitate the conversion of the message to file format understandable
by the bank.
1. Web upload
With a template ID, the transaction file can be uploaded via Bulk Import or File Upload.
1.1 Bulk Import
Using the Bulk Import screen on Straight2Bank Web platform, the user can upload its transaction file,
select the appropiate template, and push the file to the bank. The Bulk Import screen is accessible
through Cash Management Transactions Utilities Bulk Import.
1.2 File Upload
The File Upload screen is accessible through Cash Management Transactions Utilities
File Upload. This option required a CBS configuration to enable the template id.
2. Host-to-host integration
For clients opting for a host-to-host client integration, a JH2H connectivity has to be set up between
the clients’ systems and the bank. As part of the setup, the delivery schedule will be established, and
a specific folder (for the template ID) will be created for files which have to be paired with the template
created.
Integration via any of the available H2H channels, including SwiftNet File Act, is also possible. In this
case, a CBS configuration must be performed in order to create an APRF code.
30
The user’s manual for the online mapping tool
ANNEXE A – UNIVERSAL ADAPTOR FIELD M APPING CHANGES
Date of
Change Details
Change
th
8 February
2015
1. Affected Transaction Types : Cross Border Payments
2. Affected Countries : All
3. Field Name Changes :
S/No
UA Sub-Product
Original Field Name
New Field Name
1.
Payee
Payee Address 3 in BO
Beneficiary Country Code
2.
Payment
On Behalf Of Address 3
On Behalf Of - Country Code
3.
Payment
Beneficiary Address 3
Beneficiary Country
4. Mapping Requirement Change :
S/No
New Field Name
Original Field Mapping
New Field Mapping
1.
Beneficiary
This field carries the delta payee
This field should contain only the 2
Country Code
address details after Payee Address
digit ISO Country Code of the
1 and Payee Address 2.
Payee. Any delta payee address
should be contained within Payee
Address 1 and Payee Address 2.
2.
On Behalf Of -
This field carries the delta address
This field should contain only the 2
Country Code
of the actual beneficiary for
digit ISO Country Code of the actual
payment on behalf scenarios, after
beneficiary for payment on behalf
utilizing Address 1 and Address 2
scenarios. Any delta beneficiary
fields.
address data should be contained
within Address 1 and Address 2
fields.
3.
Beneficiary
This field carries remaining Bene
Country
Address after address 1 and 2.
Specify Beneficiary Country name.
5. Additional Instructions :
a)
b)
Ensure your payment files include the country of the beneficiary and other address details. As
the payment files are populated with the beneficiary data from your systems, ensure you
have captured the relevant information.
If you are making the payment on behalf of another organization (OBO), please ensure you
provide the name and address, including country code, in the payment of the organization on
whose behalf you are making the payment
31
The user’s manual for the online mapping tool
17th April
1. Affected Transaction Types : ID ACH Payments, MY NBPS
2015
2. Affected Countries : ID, MY, TW
3. Field Name Changes :
S/No
UA Sub-Product
Original Field Name
New Field Name
1.
Payment
Receiver ID
Receiver ID / Beneficiary
Identifier
2.
Payment
Receiver ID Type
Receiver ID Type / Beneficiary
Type
4. Mapping Requirement Change :
S/No
New Field Name
Original Field Mapping
1.
Receiver ID /
This field is used for populating
TW
Beneficiary
Receiver ID for TW use only
No change in usage
Identifier
New Field Mapping
ID ACH
This field would also be used for
populating Beneficiary Identifier for
ID ACH transactions.
MY NBPS
This field would also be used by MY
NBPS transactions for populating
“Biller Code” information.
2.
Receiver ID Type /
This field is used for populating
TW
Beneficiary Type
Receiver ID Type for TW use only
No change in usage
ID ACH
This field would also be used for
populating Beneficiary Type for ID
ACH use.
5. Additional Instructions :
NIL.
32