1
ffi
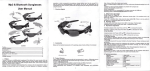
FILM SCANNER
USER'S MANUAL
VER.1.2A
Safety precautions
lmportant Do not expose this product to rain or moisture.to rain or moisture to
praserye the lifs of your product.
Ceution: Do not disassemble this unit. To prevent this risk of electric shock, do
rpt remove @vor.
Vontllation: The devi@ should be situated so that its lomtion or position does
not interfere with ib proper ventilation. For example, the unit should not b€
situated on a b€d, sofa, rug or similar surface that may bl@k the ventilation
openings.
Haal: The devie should be situated away from sources of high heat such as
mdiators or stoves.
Clsaning: We strongly suggest using a clean, dry, non-al@hol cotton swab to
clean the glass surfae periodically to produce a clear image.
Non use period: The USB mrd for the devie should be unplugged from tho
computer when the unit is bn unused for a long period of time.
USB overldding: Do not overload the USB connstions on your computer. lf
you have too many devies onngcled to your @mputer such as a wireless
mouse, Media player, Mobile phone or other USB powered devices. There
may not be enough power for ths film scanner to operate prcperly.
Servicing: The user should not attempt to seruie the devi@ beyond those
means described in the operating instruclions. All other servicing should be
refered to qualified person.
Film Holder: The design offilm holder is fouow ISO standard.
ln some mses the holes on the film will not match exactly to alignment of the
holder. This is eused by a non-standard €mera. ln this ese, there will be a
small black line on the edge of the fEme that €n €sily be crcpped out using
Description of parts:
photo editing software.
ISo-intemational Organization for Standardization
Package contents:
a
a
a
t
a
i)
a
a
Film s€nner
USB cable
Video €ble
Negative Film holder
Positive slide holder
DCsV adapter
User's Manual
Brush
Positlve slide Holder
NOTE: You can use the proyided brush to clean the backlight panel
Place the film smnner on the side and insert the end of the brush into the
door on the right side
Clean the backlight panel placed in the film scanner
-
a
i)
d
|
*Brush
Negative film Holder
Loading Negatives
Loading Slides
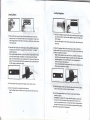
(1)
(2\
(1) Hold up the slide toward the light. Fae the trademark stide
ofthe slide
away from you. Look through the slide and it should appear nomally (not a
mirror image). Now turn the slide so the image is upside dom while lmking
at the same side.
(2) Open the slide holder at the marked spot on the top. With the stide
hotder
laid open place the slide into reessed area in the holder
the slide
should lit perfectly.
Note: Handle slides with care. Any dust, Scratches orfinger prints will show
up on your saved images. lf possible, use cotton gloves wtren handing
slides. lt is recommended to use compressed air to remove any dust on the
slides. This is not included with the film senner but mn be purchased from
an office supply or electroni6 retailer.
-
(3)
-_(r,ry____-___-_______
(2)
(1) Hold up the negative toward the light.
As you look through the ne
negative,
you should be able to read the smail
neg"tir" nurO"o io*"fiy t""i
mirror image).
"
Now turn the negative so the image is upside
down while looking at the
same side.
(2) Open the negative holder at the marked
spot on the top. With the
negative holder raid open prace the negative into
horder so the notches rine
up with the notches on the holder.
Note: Handle negatives with mre. Any dust, scratches
or finger prints
will show up on your saved images. lf possible
use cotto,
nandting negatives. lt is re@mmended to use
compressedlir to
remove any dust on the negatives,
This is not included with the tilm scanner but
can be purchased from an
office supply or electronic retailers.
gf;r"J*i*
(4)
(3)
(3) Close the slide holder and press the edges so that it locks in place.
(4) Hold it in the position as showing the film smnner
lnsert the Slide Holder into the slot on the righl side of the film s€nner as
shown.
(4\
(3) Close the negativ€ holder and press
the edges so that it locks in place.
Hold it in the position as shown in the film scanner.
(4) lnserl the negative holder into the
slot on the right side ofthe flm
scanner as shown,
Film HoldeE: The design offilm holder is follow ISO
standard. ln some @ses,
the holes on the film will not match exacdy to
alignment ofthe holder. This is
caused by a non-standard camera. ln this case,
there will be a small black line on
edge ofthe fEme that can easily be cropped
out usihg photo editing software.
.^-the
lsontemational Organization for Standardiation
d
\rJ
Proper Operation Sequence
1.
2,
3.
4.
5.
6.
7.
8.
Load film or negative film to board holder
lnsert board holderlo scanner
Connect scanner USB cableto PC
Press power button to turn on s€nner
Press s€nning button to start senning
Operation according to indimtion of mnual on screen
After finishing working, take stoEge €rd out
Picture also en be read from pc thrcugh USB onnection
I
I
llE
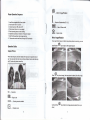
-Minor
=r*r-
lmage/Rotation
-2-2)
"ompensation(Ev
Menu&poweron/off
6].-"o,rr"roo"
Mirror lmage/Rotation
lf you need mirror image or rotation image when picture be scanning, you can
Operation Guide:
press Rotation
€
tey to a iust
it, then
mpture picture.
Capture Picture
When video frequency has been stated, the image en be eptured about 3
sec. You mn enter into main menu to chmse Capfure mode to set slide style
and EV value when press manual key.
pr""" S
5M-
Resolution
ffi
00000-
lE
key (miror image), the image ptace be altered (from teft to right)
signto*ro
Smnning amount available
Phybackmode
Continue Press
down)
*
key (rotation), the image place be altered (from up to
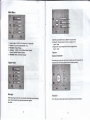
Main Menu
1.8&W film:choose B&W if there is B&W lilm at board holder
2.Positive film :choose positive lilm if there is positive film at
Capture mode: A: BEWfilm B: PGitivefilm C: Negaliveflm
2. Exposure: Exposure Cornpensatirn(fll -2-2)
3. Resolution: smega /1ornega
4. Language: Englisli, FEncfr, Deutsch, ltalian, Spanish,
1.
board holder
3. Negative film :choose negative film ifthere is negative film at
Board holder
Exposure
Chinese, Simplified Chinese, Japanese.
5. USB If,SDC: MSDC mode (mas stomge)
Exposure Compensation
Press menu key to enter into main menu to choose exposute compensation on
Exposure )node, then setting exposure value of smnning picture.
Capture mode
Slide style
Resolution
Press manual key to enter into main manual to choose slide style on shooting
mode. Choose needed image type like positive film, negative
Film, B&W.
5M
i
I
I
I
I
o|l0M
can be chosen after enter into subordinate manual of resolution
Produc't Specfficdon
Sizs
Wehht
88.15(1X86.25{WX1 1'l
Aborl 2969
Seffi
1/3.2" smeqa CMOS
Efisdive resolrJtion
Slorag€ medid
5meqa
20fi Ifln
Extemal: SD card, compatible SDHC
card
Language
Sensitivity
auto
Lens
Fixed focus F/6.0, F=6.34mm
5.6cm
range
FOCUS
Still image
Format: JPEG, resolution: 5M, 10M
(interpolation)
Note: Ch@sing English,French,Deutsdl,lbtian,spanish,Chinese,simplifed
Chinese, Japaneso. according to use/s need
Zoom
no
Display
2.36"
TV outout fomat
NTSC/PAL
Lioht sources
Backlight @mpensation
White balanca
auto
Exposure compensation
auto
lnterfae
MSDC: USB2.0 (hish speed)
Auto tum on
m
Power
ODeration svstem
CPU
DC 5V
Wndows XP, Msta , 7
lntel Pentium 42.8GHz above
Memory
5l2MB above
Video
USB MSDC
A: After connect USB mble to pC and tum on senner, then enter
into main
menu
B: Choose storage thrcugh left/right key. The senner have got through pC
when there show black on sseen
C: Preview and read picture on pC
€rd
I
64MB or high top video card
TEnsmission connedbn
Standard uSB2-0
Hard disk caD€citv
AtbadAnMB
User Manual
Yes
Yes
Adapter
i
.|-FT
Positive board holder
Neqaiive board holder
Yes
Brush
Yes
USB @ble
Yes
Yes
tr aborc
Waranty
Conditions
I
This product is fully-wamnted against defective materials and manufacturing
faults for a poriod of Twelve Months fom the date of registered purchase
under the following provisions:
'1. This warranty is non-tEnsferable and
dGs not @ver damage to products
€used by amident, rental, abus and other public disturban@s in any
way.
2.
3.
This warEnty becomes invalid if th€ sedal number has been removad,
d6faced, changed or alteralions have been mde and equipment is
repaired or alteEtion changed by any other unaulhorized dealeE.
The dealer's invoices and this wamnty card take efiect when they have
been verified.
This warranty invalid under following conditions:
A. Waranty card is altered or defaced;
B. Serial Number sticker don't accord with its original state;
C. Unauthorized repair or modifications to the producl;
D. Arcidents, abuse, improper installation,
any improper manure and
unauthorized repair;
Using unmatched pow6rsupply/Voltage;
F. Using mismatch opeEtion manual;
G. Abnomalwom and tea[
H. Corosion, rusting o. stains:
Any lo$es, damag6s, defects and malfunctions €used fore maieure, fire
and civil unrest.
The waranty enter into effect one the customeB agree to abide by the terms
and conditions of waranty
E.
l.
User Name:
Model No:
Barcode Co:
Purchase Date:
t2
I
I