1
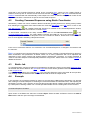
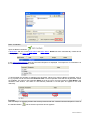
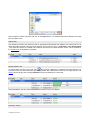
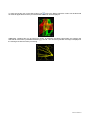
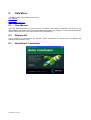
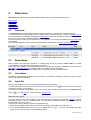
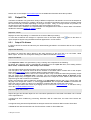
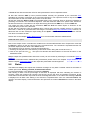
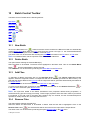
Batch Coordinator V 1.0 User Manual 1 Introduction Batch Coordinator is easy to use software designed especially for effective image processing and analyses. It simplifies and automates image processing and analysis by executing the specified and customized commands on each image within a multiple image data set. By applying a specific Command Sequence to a large numbers of images, Batch Coordinator allows the benefits of: Significantly reducing multiple image analysis and processing time Increasing the reproducibility of repetitive procedures by decreasing risk of inconsistency Facilitating comparison and evaluation of multiple data sets by standardized output Improving and optimizing the overall system utilizations by reducing resource consumption Increasing the flexibility of the system and reusability by decoupling the software components © Bitplane 2008 1.1 Preface Information in this book is subject to change without notice and does not represent a commitment on the part of Bitplane AG. Bitplane AG is not liable for errors contained in this book or for incidental or consequential damages in connection with the use of this software. This document contains proprietary information protected by copyright. No part of this document may be reproduced, translated, or transmitted without the expressed written permission of Bitplane AG, Zurich, Switzerland. For further questions or suggestions please visit our web site at: www.bitplane.com or contact [email protected]. Bitplane AG Badenerstrasse 682 8048 Zurich Switzerland © April 2009, Bitplane AG, Zurich. All rights reserved. Printed in Switzerland. Batch Coordinator User Manual V 1.0 Imaris Batch 1.2 Product Overview Batch Coordinator collects commands that you might ordinarily issue in Imaris, into a single Batch Job and execute them together, rather than entering each command individually and processing each image separately. Batch Coordinator ensures that image analysis and processing is carried out in exactly the same way, every time for every single image in a large data set. The Imaris Batch work-flow has four stages: 1. To start batch processing, a Command Sequence is created from Imaris by running a command in the usual way, interactively adjusting the parameters, and finally submitting it to the Batch Coordinator with the Add to Batch button. 2. The next step is to Select images for processing and analysis using Batch Coordinator. Images are placed in the input file list via Add Files. Output file names and directories are automatically generated and placed in the output file list. 3. Thirdly, using Batch Coordinator, Run the Batch. This will execute the complete Command Sequence on selected input files and collect the results in the output file list. 4. Lastly, review the results, which can be modified images, Imaris Scene Files, or statistics files. Batch Coordinator Features The Batch Coordinator has the following features: Customize and standardize Command Sequence executed on each input file within a multi-image data set. Automatically generate a new directory and output file names for each Batch Job Pause, resume, cancel, and obtain the status for any submitted batch and/or any individual job Manage Batch Job by adding or deleting commands and fine-tuning parameter values Launch external applications to inspect input / output data files (i.e. Imaris, or Excel) Runs on both Mac and Windows. Command Sequence An Imaris Batch Command Sequence can include the following commands: - Flip, rotate, convert, channel shift, etc. - Crop, resample, add / delete/ swap channels and time points etc. - Change the data type, voxel size and time stamps - Apply a Gaussian or Median filter - Threshold Adjustment by baseline and background subtraction, threshold cut-off, connective baseline - Contrast change by Linear Stretch, invert, gamma correction, normalize intensity - Display Adjustment - Spots and Surfaces analysis with detection, tracking and statistics © Bitplane 2008 1.3 About this Manual This User Manual describes all the features of the Batch Coordinator software. The manual provides a description of all menu entries, display modes, functions and parameters. It is arranged into 14 Chapters as follows: Chapter 1: Provides an introduction to Batch Coordinator, describing its function and demonstrating its basic capabilities and features. Chapter 2: Describes the installation procedure, system requirements, licensing options and file formats. Chapter 3: Displays the Main Screen and gives an overview of the principal areas and toolbars. Chapter 4: Provides details of Batch Job creation. It describes the principles of Command Sequence design, explaining the benefits of creating Command Sequence using Imaris. An example with screenshots, describing how to create a Command Sequence and execute a Batch Job, is also included in this chapter. Chapter 5: Describes the File Menu. This section examines the techniques for saving and implementing existing Command Sequences, as well as the options for submitting and executing a Batch Job on different machines. Chapter 6: Contains information about the Edit Menu. It describes creation/deletion of a Batch as well as addition/removal of Batch files. Chapter 7: Gives an overview of the Control Menu and explains how to execute a Batch Job. Chapter 8: Describes the Help Menu. It presents the commands for displaying documentation or other information about Batch Coordinator. Chapter 9: Provides details of the Batch Area and summarizes the specific elements of Batch Jobs. Chapter 10: Discusses frequently used commands found in the Batch Control Toolbar. Chapter 11: Describes the Command/Parameter Area. It defines all the commands recognized by Batch Coordinator. In addition, it gives guidance on modifying parameter values and emphasizes the importance of ensuring correct parameter values. Chapter 12: Discusses control shortcuts in the Command/Parameter Toolbar used for managing commands in the Command Parameter area. Chapter 13: Explains the unique features of the Spots and Surfaces commands. Chapter 14: Describes the Output Statistics File. It provides a screenshot example of managing statistical files after executing a Batch Job with the Spots and Surfaces commands. Imaris Batch 2 Getting Started This chapter describes: Installation License Starting Batch Coordinator 2.1 Installation The software is delivered on a standard CD or downloaded from www.bitplane.com. The CD includes a folder containing the necessary manuals, or the manuals can be downloaded. Minimum hardware/software requirements are: Windows XP, Vista or higher Mac OS x10.40 or higher CD-ROM Network facilities for image import from the microscope 512 MB RAM (> 1 GB recommended) Bitplane also recommends: A database for storing images (e.g., Image Access) Installation To install the software, please proceed as follows, or double-click the downloaded installer package: Insert your Batch Coordinator CD-Rom in the computer. Follow the instructions on the screen. The installation is completed automatically. 2.2 Licensing Options Batch Coordinator is designed as a high-throughput high-availability software that targets both individuals as well as large institutes and corporations. The Batch Coordinator itself is free and open source (GPL) software, but does not provide any data processing ability unless combined with a “Batch Agent” such as Imaris Batch. Batch Coordinator provides the confidence of high-assurance trustworthy systems, in addition to the benefit of low-cost software support and maintenance, plus guaranteed long-term support through participation from a booming Imaris community. The Imaris community benefits from frequent updates, better portability to different computer systems and the ability to directly contribute through software enhancements and improvements. Any software (from any software provider) can be designed to interface with Batch Coordinator. License terms for any such software “Batch Agent” are set by that software’s owner(s)/publisher(s). Bitplane provides the ability to use many features from our flagship Imaris software within Batch Coordinator, in the form of a license for “Imaris Batch, Stand-Alone” or “Imaris Batch, Imaris-Dependent”. This is one example of a Batch Agent, with commercial license options. Stand Alone Imaris Batch, Stand-Alone This licensing option allows Imaris Batch to be placed on a Mac or Windows computer system. Imaris does not have to be present and this version of Imaris Batch does not use or depend on the licenses of Imaris. Imaris Batch Stand-Alone is available in the following configurations: - Stand-Alone up to 2 parallel jobs - Stand-Alone up to 4 parallel jobs - Stand-Alone up to 8 parallel jobs - Stand-Alone up to 16 parallel jobs - Stand-Alone up to 32 parallel jobs © Bitplane 2008 Imaris Dependent Imaris Batch, Imaris-Dependent This licensing option allows Imaris Batch to be placed on a Mac or Windows computer system, but utilizes licenses of Imaris and its modules as part of its operation. For example, if you want to perform a Batch Job that requires tracking, and output the statistics from those tracks, this version of Batch Coordinator would use the Imaris, Imaris MeasurementPro, and ImarisTrack licenses. The advantage of this option is that it is lower cost than the Stand-Alone version. The Imaris-Dependent version of Batch Coordinator comes in two configurations: - Imaris-Dependent – up to 2 parallel jobs - Imaris-Dependent – up to 4 parallel jobs 2.3 Starting Batch Coordinator Starting Batch Coordinator The Batch Coordinator Service is by default configured to launch automatically at system boot, and run invisibly in the background, waiting to receive new commands or Batch Jobs to run. At any time, the user can launch the application called Batch Coordinator, which provides an interactive window to view and control the work of the Batch Coordinator Service. When using Imaris Batch to create a new Command Sequence, the user normally runs the Batch Coordinator and Imaris at the same time. The Batch Coordinator can be started either before or after starting Imaris. To open Batch Coordinator, double-click on the Batch Coordinator application icon, or click on the Batch Coordinator icon in the main toolbar of Imaris. The software opens to the main screen. After a user is finished creating a Command Sequence in Imaris, it is not necessary to have Imaris running anymore while a batch is running within the Batch Coordinator. If you close the Batch Coordinator window, the Batch Coordinator Service continues to run in the background; the status and progress is merely hidden from view when the window is closed. Supported Input Image File Formats Imaris Batch can read the following image file formats, i.e. it can read the image and the parameters. Andor: Multi-TIFF series (*.tif, *.tiff) Applied Precision, Inc: DeltaVision (*.i3d, *.dv) Biorad: MRC-600, MRC-1024 (*.pic) BioVision: IPLab Mac (*.ipm) Bitplane: Imaris 5.5 (*.ims) Bitplane: Imaris 3.0 (*.ims) Bitplane: Imaris 2.7 Classic/Old (*.ims) Carl Zeiss: LSM 510 (*.lsm) Carl Zeiss: LSM 410, LSM 310 (*.tif, *.tiff) Carl Zeiss: Axiovision (*.zvi) Image Cytometry Standard: ICS - used by Nikon, Huygens, and others (*.ics, *.ids) Leica: TCS-NT (*.tif, *.tiff) Leica: LCS (*.lei, *.raw, *.tif, *.tiff) Leica: series (*.inf, *.info, *.tif, *.tiff) Leica: Image File Format (*.lif) Molecular Devices: Metamorph STK (series) (*.stk) MRC - primarily electron density volumes as in cryo-EM (*.mrc, *.st, *.rec) Nikon: ND2 (*.nd2) Olympus: FluoView TIFF (*.tif, *.tiff) Olympus: FluoView 1000 OIF (*.oif) Olympus: FluoView 1000 OIB (*.oib) Olympus: Cell^R 1.1/standard (*.tif, *.tiff) Imaris Batch OpenLab: LIFF (*.liff) OpenLab: RAW (*.raw) Open Microscopy Environment XML (*.ome) Open Microscopy Environment TIF (*.tif, *.tiff) Perkin Elmer: UltraView (*.tim, *.zpo) Scanalytics: IPLab (*.ipl) TILL Photonics: TILLvisION (*.rbinf) Plus it can read generic TIFF series (or BMP series). Supported Output File Formats from Imaris Batch Image Files Bitplane: Imaris 5.5 (*.ims) Bitplane: Imaris 3.0 (*.ims) Bitplane: Imaris 2.7 Classic/Old (*.ims) TIFF (series) (*.tif, *.tiff) RGBA TIFF (series) (*.tif, *.tiff) Image Cytometry Standard: ICS (*.ics, *.ids) Olympus: Cell^R 1.1/standard (*.tif, *.tiff) Open Microscopy Environment XML (*.ome) Open Microscopy Environment TIF (*.tif, *.tiff) BMP (series) (*.bmp) Statistics Files Comma Separated Values text files (*.csv) Excel XLS file (*.xls) Excel XML file (*.xml) Image File with interactive analysis results from Spots/Surfaces commands Imaris Scene File (*.imx) © Bitplane 2008 3 Main Screen The main screen in Batch Coordinator provides the facility to build, submit and process Batch Jobs. The main screen is divided into two areas and has two Toolbar buttons sections: Batch Area Command/Parameter Area Batch Control Toolbar Command Toolbar From this screen all of the batch components can be accessed, edited and managed. The menu bar at the top of the window contains the entries: File, Edit, Control and Help. Each Main screen component is documented in more detail in the following sections. The figure below presents the Main screen for the Batch Coordinator. Batch Area The central area of the screen is the Batch Area. The Batch Area provides detailed specification of the batch. It contains all the information of the batch: batch name, input and output files names, user name and batch status information. Batch Control Toolbar The Batch Control Toolbar contains shortcut buttons named New Batch, Delete Batch, Add Files, Remove Files, Run, Stop, and Reset. These shortcuts represent the core tools available to the user. The same action can be accessed via the menus File, Edit or Control . Command/Parameter Area In the Command/Parameter Area, for the selected batch, the Command Sequence with the command-specific parameter values is displayed. Command Toolbar The Controls Toolbar lets you add or delete commands, or edit the Command Sequence arrangement. Imaris Batch 4 Batch Creation A Batch consists of Command Sequence executed on the selected input files as a single command unit, and the output files, collected in a newly created image file and/or statistical files. The Command Sequence contains the commands with the specified parameters values. A command describes the operation you want to execute on an input dataset; and the specifications that a command uses to perform its action are called parameters. Imaris Batch offers a variety of available commands for Batch processing, some most frequently used ones for image processing (Gaussian filter, Threshold adjustment) and some more complex, like Surface and Spot detection. A Command Sequence can be created either using Imaris or directly in Batch Coordinator. 4.1 Creating Command Sequence using Imaris A Command Sequence can be created from Imaris with the Add to Batch button . Imaris commands that can be submitted to Batch are in the Image Processing menu and Edit menu. For the Commands Surfaces and Spots, the Imaris Creation Wizard for Spots or Surfaces for selecting and adjusting parameters, and then switch to the Creation Tab must be used first and use the Add to Batch button to submit the command with all parameters to the Batch Coordinator. Use the following procedure to set up a Command Sequence in Imaris and submit it to the Batch Coordinator. Using following procedure, to set a Command Sequence in Imaris and submit it to the Batch Coordinator. 1. Open an image in Imaris. 2. Select the first command that will be applied to all images. 3. Adjust the command's parameters either in the Command's window or, for Spots and Surfaces, throughout the Creation Wizard.The effect of modifying parameter values can be previewed within Imaris (on a single image) as changes to the image and/or the Spots/Surfaces object are applied. 4. Submit the adjusted command to Batch Coordinator by clicking on the Add to Batch button . Add to batch button is available at the bottom of the command window. For Spots and Surfaces select the Creation Tab and the Add to batch button is available at the bottom of the panel under the Creation Tab . 5. Repeat process for a series of command that you would like to be execute in Batch Coordinator. Note: Bear in mind that in the Batch Coordinator commands are submitted in the Command Sequence by the order they are entered in Imaris. For example, if the commands Flip and Rotate were added in that order to the batch, the Flip action will be executed first and then the Rotate. So, before progressing to the next step make sure the batch commands are ordered properly and all parameters are confirmed. You can also use the command toolbar of Batch Coordinator to change the order of the commands after they have been submitted. 6. The last step is selecting the command Save as command in Imaris and submitting the Save command in the Batch Command Sequence. 7. Open Batch Coordinator. In the Batch Area, when commands are added to the Batch Coordinator, if no batch already exists (or no existing batch is selected while adding the commands) a new batch will be created with User name and Batch Name automatically assigned. The default Batch Name always matches the name of the first submitted Imaris command. In the Command/Parameter Area the Command Sequence will contain the list of Imaris selected commands. A Command Sequence always begins with the command called Open. The last © Bitplane 2008 command in the Command Sequence should be the command Save, unless you are creating Spots or Surfaces, and only wish to save the Imaris Scene File and the statistics file(s). The Spots command and the Surfaces command will both automatically create output in the form of statistics file(s) and an Imaris Scene File, even if the Save command is not part of the Command Sequence. 4.2 Creating Command Sequence using Batch Coordinator Alternatively, a Batch Job can be created in Batch Coordinator (possibly without ever starting Imaris). Rather than selecting the commands from Imaris select the command New Batch in the File menu or click on the New Batch button and a default Command Sequence is created. In the command/parameter window, the Command Sequence will contain the command Open. To add another command to the newly created batch, click on the Add Command button in the Command/Parameter Toolbar. The newly added command will initially be set to the command Open. To change an entry in the Command Sequence from one command to another, double click on the command line. An arrow appears indicating a drop down window. From a list of commands select a new command. The Command Sequence is changed in accordance with the selection. Note: In contrast to the Command Sequence creation by Imaris, creating a Command Sequence directly by Batch Coordinator sets parameters at default values. As a result, parameters will not be adjusted and optimized to fit the image content and analysis-specific requirements. Therefore, it is highly advisable to create a Command Sequence with adjusted parameters using Imaris. Please refer to the section Values for additional reference. 4.3 Batch Job To complete a Batch Job the input files must be added to the batch by clicking on the button Add Input files. All selected files will be added to the Input and Output file names will be generated automatically and added to the Output file list. To initialize a Batch select the command Run. The Command Sequence will be executed all the input files. The resulting image and statistical files will be collected and saved in the output file list. 4.4 Example In this example, the compete procedure for setting up and executing a Batch will be presented. You will start with creating a Command Sequence containing the commands Rotate and Gaussian Filter, and adjusting the parameters in Imaris. Then, selection of the input files and output file list creation will be described, followed by a description of starting a Batch Job. The last part will illustrate how the resulting files can be reviewed. Command Sequence Creation Open Imaris. In the File menu select the command Open. Select the data set Retina. Click on the Add to Batch button and then open the image named Retina. Imaris Batch A Retina image is displayed on the Imaris Main screen. In the Image Processing menu, select the command Rotate. The Rotate Channels window will appear and select the Counter-clockwise rotation direction of all channels along the Z axis. Click on the Add to Batch button to submit the command into Batch Coordinator. In the Image Processing menu, select the command Smoothing -> Gaussian Filter. In the Gaussian Filter window select both channels and enter 0.2um as a Filter Width value. Click on the Add to Batch button to submit the command into Batch Coordinator. The last step in creating the Command Sequence in Imaris is selecting the Imaris command Save as. Click on the Add to batch button and the command Save is added to the Command Sequence in Batch Coordinator. © Bitplane 2008 Batch Coordinator Open the Batch Coordinator . A New Batch with the current User Name and Batch Name: Rotate has been automatically created and is now displayed in the Batch Area. In the Command/Parameter area the Command Sequence is displayed. The sequence of commands is in the same order as submitted by Imaris. To demonstrate the principle of submitting the parameter values from Imaris to Batch Coordinator click on the (+) symbol next to the command Gaussian Filter. On the expanded command line all parameter values are available. The value for the parameter Sigma is set to be 0.2 um, as set by Imaris for Filter Width in the Gaussian Filter window. The value for the Channel parameter is on on (filter be applied to the both channels). Input files The next step in is selecting all files that will be processed with the created Command Sequence. Click on the Add files Button and the Choose input files winnow appears. Imaris Batch Select all files for Batch execution and click on the Open button. The selected files will be added to the Input list in the Batch Area. Output Files The Output file names and directories will be generated automatically and added to the Output file list. All output files will be placed under the same directory as the input file, but in a new folder, called batch-output . The output file names are created in accordance with the rule of output filename, which can be modified in the Preferences for the Batch Coordinator. Starting a Batch Job To start a Batch Job click on the icon Run . By Running a Batch the completed Command Sequence is executed on all input files and Batch processing results are collected and stored in the output file list. The Status column will give the message Queued for all the file waiting to be executed. Completed Batch Jobs are marked Finished and remain in the batch display. Reviewing results © Bitplane 2008 To verify the results, click on the Quick Open icon next to the Retina output file. Imaris will be launched as externals applications and the processed Retina data set will be displayed. Additionally, resulting files can be opened in Imaris, by selecting the batch-output folder and opening the selected file. Select the PyramidalCell-Rotate-yyyy-mm-dd-1.ims and the Pyramidal cell image is displayed in the viewing area after the batch processing. Imaris Batch 5 File Menu The File menu has the following commands and shortcuts: New Batch New Batch from Command Sequence Save Command Sequence Import Batch Export Batch Exit 5.1 (Ctrl+N or Cmd+N) (Ctrl+O or Cmd+O) (Ctrl+S or Cmd+S) (Ctrl+ Q or Cmd+Q) New Batch In the File menu click on New Batch. A Batch structure will be created in the Batch Area with an automatically created Batch Name-New Batch and User name to match the current user. In the Command/Parameter area the Command Sequence will contain the command Open. The same action can be achieved by clicking on the New Batch button in the Batch Control Toolbar. Note:To initialize a Batch Job the input-files must selected and added first. 5.2 New Batch from Command Sequence To set up a new Batch based on a Command Sequence, that was previously saved to a Command Sequence File, select New Batch from Command Sequence in the File menu. The Open Command Sequence window will appear. Select the Command Sequence File from the list and click on Open or double-click on the requested file entry. As a result, the selected Command Sequence is loaded. In the Batch Area, the Batch structure is created (Batch Name matches the name of the first command) based on the Command Sequence described by the chosen Command Sequence File. Please refer to the Chapter Commands for more information about the organization and modification of the Command Sequence. 5.3 Save Command Sequence Save Command Sequence saves the Command Sequence with a set of parameter values. It provides the advantage of creating a new Batch faster and/or the possibility of reusing standardized and complex Commands Sequences. Thereby saving time and increasing the reproducibility of data processing. Select the Save Command Sequence option in the File menu. This will open the Save Command Sequence window. Select the directory and enter a name for the Command Sequence to be saved or confirm the suggestion. Click Save. The Command Sequence is saved, and available to be used later in creating a new batch process. The default Command Sequence File extension is *.bcx. 5.4 Import Batch This option allows the user to rerun the same Batch or to import data from outside your Batch Coordinator system. Select Import Batch in the File menu. An import Batch window will appear. Click on Open or double-click on the selected Batch from the list. A new Batch is loaded into the Batch Coordinator, including the original input and output files list. 5.5 Export Batch Export Batch allows the Batch to be saved and later executed, exchanged with another Batch Coordinator user or emailed as part of a question for the support team. In the Batch Area, select the Batch you would like to Export. Select Export Batch in the File menu and the Export Batch window will open. © Bitplane 2008 Select the directory and enter a name for the Batch to be exported, or confirm the suggested name and then click on Save. The default Batch File extension is *.bjx. 5.6 Exit Terminates the Batch Coordinator application. Note: The Batch Coordinator automatically saves current settings (Command Sequences and files) even after exiting the program. The Batch Coordinator Service continues to run invisibly in the background, and will even continue to execute Batch Jobs for a Batch that has already been started running. Imaris Batch 6 Edit Menu The Edit menu has the following commands and shortcuts: New Batch Delete Batch Add Files... Remove Files Select All Select None Preferences 6.1 (Ctrl+N or Cmd+N) (Ctrl+M or Cmd+M) (Ctrl+A or Cmd+A) (Ctrl+P or Cmd+P) New Batch In the Edit menu click on New Batch. A Batch structure will be created in the Batch Area with an automatically created Batch Name-New Batch and User name to match the current user. In the Command/Parameter Area the Command Sequence will contain the command Open. The same action can be achieved by clicking on the New Batch button in the Batch ControlToolbar. Note:To initialize a Batch Job the input-files must selected and added first. 6.2 Delete Batch This option allows the user to delete the selected Batch. In the Batch Area, Select the Batch to be deleted. The batch will be highlighted. In the Edit menu select the option Delete Batch. Selected Batch will be removed. The same action can be achieved by clicking on the Delete Batch button 6.3 in the Toolbar. Add Files To Add files for Batch processing, select the Edit menu and choose Add Files. The Choose input files window will appear. Select the file to batch, or select multiple files with the Ctrl or Shift key (Command or Shift on Mac). The selected files will be added to the Input list and the output files will be generated automatically and added to the Output file list. Refer to the Chapter Preference for the further information about modifying output file name and directory. The same action can be achieved by clicking on the Add Files button in the Toolbar. To modify input files list click on the line to select the file and either click on the Remove File Button or in the Edit menu select the option Remove File. Note: The input files added to the Batch Coordinator have properties defined during acquisition, or sometimes during previous image processing. These image properties effect how files could be processed. For example, if you add a file to the Batch that contains only one channel, but the Command Sequence specifies to modify channel two, this will produce an error. 6.4 Remove Files This option allows the removal of files from the Batch Area. Select the Batch and the files to be deleted in the Batch Area. The files will be highlighted . In the Edit menu select the option Delete Files. The selected files will be removed from the Input and Output columns. The same action can be achieved by clicking on the Remove Files Button 6.5 from the Batch Toolbar. Select All The Select All command will create a new selection that includes all the Batch Jobs in the Batch Area. © Bitplane 2008 6.6 Select None Select None cancels all selections. If nothing is selected, this function will perform no action. 6.7 Preferences The Preferences dialog allows you to customize various settings and to customize the Batch environment setting. Any changes you make to the Batch Preferences settings take effect during image processing. Batch Agent Path This Preference option is set in conjunction with Imaris at the time of installation. It is advised that only the system administrator has access to it, since any incorrect change can have a serious effect on the system. Click Browse to choose the new directory and filename of the Batch Agent. The default Batch Agent file for Imaris Batch 1.0 is named bpImarisBatchAgent6.dll. That file is installed to the same directory as the Imaris application. Number of commands loaded After the path to the Batch Agent is set, Batch Coordinator runs a test by trying to discover all the batchable commands available within that Batch Agent. Number of commands loaded will display a number indicating how many commands were discovered. If the number is 0, this indicates a problem, most likely with the Batch Agent Path. The Reload button can be used to force a new query for the number of commands available in the Batch Agent (typically after some change has been made to the Batch Agent Path). Data Cache Limit (MB): Batch Coordinator uses a data caching mechanism that allows you to process images that are significantly larger than the physical memory (RAM) installed in the computer system. If the total data size for images being simultaneously processed is larger than the Data Cache Limit setting, this mechanism writes image data blocks that are beyond this size limit to the disk and reads them back into the physical memory when they are needed. This setting does not control the overall memory usage for Batch Coordinator; only how much memory should be used specifically for storing the image data. The overall idea is to make sure there is still plenty of free RAM available for intermediate calculations, as well as the operating system and other programs. The number of simultaneous jobs is determined by your Imaris Batch license, the number of CPUs, and the Preferences setting for Maximum number of instances. Maximum Number of instances Default setting defined by license type and by default is set to be the maximum available number. Inserting a smaller number limits the number of CPUs (and indirectly the amount of RAM required) and permits the use of other applications. Batch setting Batch Job path This preference option is set in conjunction with Imaris at the time of installation. It is advised that only the system administrator has access to it, since any change can have serious effect on the system if incorrectly set. Click Browse to choose a new path to the Batch Job executable file. Coordinator path This preference option is set in conjunction with Imaris at the time of installation. It is advised that only the Imaris Batch system administrator has access to it, since any change can have serious effect on the system if incorrectly set. Click Browse to choose a new path to the Batch Job executable file. Remote address installation This preference option is set in conjunction with Imaris at the time of installation. It is advised that only the system administrator has access to it, since any change can have serious effect on the system if incorrectly set. In Batch Coordinator 1.0, there should generally be no need to change this setting. Default output name This preference can be adapted and changed by all users. Changing the setting allows you to define default the directory of output files as well the default output file names. The default location is a subdirectory of the input file directory. In the input file directory, a new folder is created with the name is batch-output. The default output file name is created by the input file name with addition of the Batch Name and the command name, date stamp and file number. The output file extension is predetermined by the type of batch file being created. The default setting looks like: <source_path>/batch-output/<source_name>-<batch_name>-<command_name>-<year>-<month>-<d ay>-<file_no>.<default_ext> Edit the field Default Output Names and you can save the output file in the directory and filename pattern you specify. All future Output filenames will be changed according to the rule the user has defined. Note: Both forward (/) and backward slashes can be used (\) and be mixed in the same filename without problems. Jobs file name This preference option is set in conjunction with Imaris at the time of installation. It is advised that only the system administrator has access to it, since any change can have serious effect on the system if incorrectly set. Click Browse to choose a new path to the Jobs File. OK button To confirm any changes in Preference setting click on the OK button. Cancel If you make changes but decide not to use them, click on Cancel. © Bitplane 2008 7 Control Menu The Control menu has the following commands and shortcuts: Run Pause Stop Reset (Ctrl+R or Cmd+R) (Ctrl+U or Cmd+U) (Ctrl+T or Cmd+T) (Ctrl+D or Cmd+D) The Control commands will be performed on the selected entry (either files or entire Batch Job). 7.1 Run Start an execution of batch process by selecting the command Run in the Control menu. The Command Sequence will be executed on all of the input data set files. The same action can be achieved by clicking on the Run Button 7.2 in Batch Toolbar. Pause Pause a batch process by selecting the command Pause in the Control menu. When batch is running, it can be paused by selecting the Pause command. As a result the percentage of finished job and message Paused will be displayed in the Status column. 7.3 Stop When batch is running by selecting the option Stop in the Control menu an execution of batch process is stopped. Currently running Batch Jobs will be canceled and returned to "un-executed" state. In the Status column Waiting will be displayed. The same action can be achieved by clicking on the Stop button 7.4 in Batch Toolbar. Reset In the Control menu select the option Reset and finished batch process(es) will be restored to an "un-executed" state. This option allows modifying Batch Job by inserting a new command in the Command Sequence or new input files. The same action can be achieved by clicking on the Reset button in Batch Toolbar. Imaris Batch 8 Help Menu The Help menu has the following commands: User Manual Bitplane AG About Batch Coordinator 8.1 User Manual The User Manual provides you with the basic information about Batch Coordinator: The menu(s), the different Batch Coordinator views and all adjustable parameters in the program. To find a specific parameter use the "Search function" in the online version of the User Manual. 8.2 Bitplane AG If your computer is connected to the Internet, homepage (www.bitplane.com). 8.3 About Batch Coordinator © Bitplane 2008 Batch Coordinator can directly open the Bitplane AG 9 Batch Area Batch Area summarizes all information related to Batch Jobs. It contains following columns: Batch Name User Name Input file list Output file list Status column 9.1 Overview In the Batch Area the hierarchical structure provides information on existing and completed batches. To expand a Batch and display Batch-specific details, click on the plus symbol (+) next to the Batch Name. The selected Batch is expanded, displaying the Batch Name, all input and output file names within the batch, the name of the user who submitted the Batch, and status line. Click on the minus symbol (-) next to Batch name to collapse the content and only Batch and User names will be displayed. The Command Sequence of the currently selected Batch is displayed in the Command Parameter Area. 9.2 Batch Name When a Batch and Command Sequence is created using Imaris, by default a Batch Name is created corresponding to the name of the first selected command. In the case when a Batch and Command Sequence is created directly Batch Coordinator using the menus File, Edit or New Batch button, the default option for the Batch name is New Batch. In order to change the Batch Name, double click on it and enter a new, customized name. 9.3 User Name The User is automatically generated each time when a new Batch is created by referring to the user login session that submitted the Batch. 9.4 Input file The input file displays the list of all the files selected for Batch processing. To verify and confirm the input file selections click on the quick open icon next to file name. The input file is opened in Imaris in a new window. To remove a file from the input file, list click on the line to select the file and either click on the Remove File button , or in the Edit menu select the option Remove File. Advanced users option: Input files column could be also modified in the Command Area. Expand the command line Open by clicking on the plus symbol (+) next to command name. The command is expanded and the File parameter displays the file name in the Value column. The Input file name or directory could be changed either by: 1. Entering in the Value column the full path to the new directory along with a new file name, or 2. In the Command/Parameter Area, click on the Open file icon . The Open File window will allow selection of the new file name or new destination folder. Imaris Batch Please refer to the Chapter Commands-Open for the additional information about the input files. 9.5 Output File The Batch Coordinator can generate a variety of different output files and therefore a rule must be adopted to prevent output file names from colliding. Secondly, in the Batch Coordinator the process of creating output file names manually can differ depending on the type of output. Lastly, for a large number of input files, it is not practical to manually define an output file name and location for each one. These issues have resulted in the sophisticated but straightforward method in which Batch Coordinator handles the automatic Output file names creation Output file column Displays the list of all pending or created files as a result of Batch processing. To view and re-examine the changes in output file click on the Quick Open icon opens output file by launching the default external application in a new window. 9.5.1 next to file name. It Output File Names In Output column file names and directory are automatically generated in accordance with the rule of output filename. Output Files Directory By default, all output files will be placed in the same directory as the input files, in a new folder, called batch-output. The user can change this setting in the Batch Coordinator Preferences. Output File Names The Output file names are generated by using a naming rule comprised of the following: By default the output file name is automatically generated from the input file name, than adding suffixes batch name, command name, date stamp and file number. The output files inherit the input file name as the first part of the output file name. The next part in the output file name will be the insertion of the Batch Name. Please refer to the Chapter Batch Area-Batch Name for the complete details on setting the Batch name. The next part of the Output file name is the command name. Only commands linked with generating output files can appear as a command name. Therefore, only the commands Save, Spots or Surfaces (which generate output files) can appear as the command name in the output file name. Please refer below to the Output file types and formats for more details. Finally, the Output file name includes the insertion of a date stamp, with the year (yyyy), month (mm) and day (dd) of the output files creation in format yyyy-mm-ddand also a sequential number is inserted at the end of the name to make sure there is no attempt to create two files with exactly the same name. User can change value of this column by changing the rule in the menu Edit-Preference, or edit items one by one in the Command/Parameter Area. Output file types and formats Output file types and formats depend on the commands specified to be executed in the Batch Job. Formats of the output files are: 1.Images that were modified by processing. Extension IMS for Imaris files, but other File Formats are supported. 2.Images showing interactive Spots/Surfaces analysis results with extension IMX for Imaris Scene files 3.Statistical files with the extensions XLS for Excel files or XML for Excel XML files © Bitplane 2008 4.Statistical files with the extension CSV for data presented as comma separated values. All files with extension IMS (or other pixel/voxel-based formats) are generated by the command Save regardless of preceding commands in the Command Sequence. The output file names of any such images will contain Save as the command name portion of the file name. All files with extension IMX and XLS are generated either by the command Spots or Surfaces regardless of preceding commands in the Command Sequence. Files with extension XML are a special case, because a file with that extension could either be an Open Microscopy Environment XML file, or an Excel XML file. The output file name of files with the extensions IMX and XLS will contain Spots or Surfaces as the command name portion of the file name. All files with the extension CSV are statistical files, however there are two possible sources of a CSV file. Most often, a CSV file is generated after executing the command Merge Csv Statistics [Post]. However, an advanced user can also modify the output setting for the Spots or Surfaces commands to create a CSV file from those commands as well. Please refer to the Chapter Output Statistics File for more information about the statistical files. Advanced users option: Files in the Output column could also be modified in the Command/Parameter Area. Expand the command line Save by clicking on the plus sign next to the command name. The command is expanded and the File parameter displays the file name in the Value column. The Output file name or directory could be changed either by: 1. Entering the full path to the new directory in the Value column along with a new file name, or 2. Click on the open file icon . The Open File Window will allow selection of the new file name or new destination folder. Multiple output files (statistical files and Imaris scene) can be created by selecting the commands: Spots or Surfaces. For further information about statistical files presentation please refer to the Chapter Output Statistics File and the Chapter Commands-Save for the output file presentation and arrangement. 9.6 Status The Status line displays and reports the full status messages on any batch. Possible values for the status of a Batch job include: Waiting, Queued, Crashed and Finished. For unprocessed files, in the Status line message is Waiting. After starting a Batch Job the percentage of execution is displayed with bars indicating the amount of progress. When the progress bar reaches 100 percent, the file has been successfully processed, all the commands executed and the output file saved in the designated folder. In the status line message, Queued is displayed for all Batch Jobs waiting to be executed. Completed Batch Jobs are marked Finished, and remain in the batch display. Unsuccessful batch and job items are marked Crashed and remain in the batch display. Imaris Batch 10 Batch Control Toolbar The Batch Control Toolbar has the following buttons: New Batch Delete Batch Add Files Remove Files Run Stop Reset 10.1 New Batch Click on the New Batch icon . A Batch structure will be created in the Batch Area with an automatically created Batch Name-New Batch and user name from the current user login. In the Command/Parameter Area the Command Sequence will contain the command Open. The same action can be achieved with selecting the New Batch command in the File menu or Edit menu. Note: To initialize a Batch Job the input-files must selected and added first. 10.2 Delete Batch This option allows deleting the selected Batch(es). Select the Batch to be deleted. The batch will be highlighted in the Batch Area. Click on the Delete Batch button and the selected Batch will be removed. The same action can be achieved by selecting the Delete Batch in the Edit menu. 10.3 Add Files To Add files for Batch processing click on the Add Files Button . The Choose input files window appears. Select the single file to batch or multiple files with Ctrl or Shift key (Command or Shift on Mac). The selected files will be added to the Input list and the output files will be generated automatically and added to the Output file list. The same action can be achieved by the option Add Files in the Edit menu. To remove input file(s) click on the line to select the file and either click on the Remove File Button in the Edit menu select the option Remove File. or Note: The input files added to the Batch Coordinator have properties defined during acquisition, or sometimes during previous image processing. These image properties effect how files could be processed. For example, if you add a file to the Batch that contains only one channel, but the Command Sequence specifies to modify channel two, this will produce an error. 10.4 Remove Files This option allows deleting selected Files. Select the Batch and files within to be deleted. In Batch Area the files will be highlighted. Click on the Remove Files button . The selected files will be removed from the Input and the Output file list. The same action can be achieved by selecting the option Remove Files in the Edit menu. © Bitplane 2008 10.5 Run Start an execution of batch process. Click on the Run Button and the Command Sequence will be executed on all of the input data set files. The same action can be achieved by selecting the Run in the Control menu. 10.6 Stop To stop a batch once it is running, click on the Stop button . The currently running Batch Jobs will be canceled and returned to "un-executed" state. In the Status column, Waiting will be displayed. The same action can be achieved by selecting the Stop in the Control menu. 10.7 Reset Click on the Reset button and finished Batch Job will be restored to an "un-executed" state. This option allows modifying the Batch Job by inserting a new command in the Command Sequence or new input files. The same action can be achieved by selecting the Reset in the Control menu. Imaris Batch 11 Command/Parameter Area This chapter describes all commands that are recognized by Imaris Batch. Commands could be defined as a set of actions executed on each file in the input file list. Information and specifications that a command uses to perform its action are called parameters. In simple terms, the command is what is done; the parameter is how it does it. All commands supported by Imaris Batch are closely associated with the commands in Imaris. However it is the Batch Agent component that directly defines what commands are available. 11.1 Overview In the Command/ Parameter Area the Command Sequence of the selected Batch is displayed. A full list of the commands is accessible by double clicking on the command line. An arrow appears indicating a drop down window with a list of all Imaris Batch available commands. In the Commands/Parameter Area the hierarchical structure of a Command Sequence provides information about the currently selected command. To expand a Command within the Command Sequence, click on the (+) symbol next to the Command Name. The selected Command line is expanded, displaying the all the parameters values specific to the selected Command. Click on the (-) symbol next to the Command name to collapse the content and only the Command name is shown. To change order of Commands in the sequence the Up and Down buttons of Command/Parameter Toolbar can be used. When the Command is expanded double click on the Value column (in parameter line) to fine-tune the values within the command. Note: For each command in the Parameters collection, a Value must be set from a specific list of valid choices. Please refer to the section Values for the possibilities and risks of modifying command values. 11.2 Commands The following Commands are available in Batch Coordinator. Open Save Flip Rotate Channel Shift Gaussian Filter Median Filter Linear Stretch Gamma Correction Invert Normalize Layers Baseline Subtraction Threshold Cutoff Background Subtraction Connective Baseline Display Adjustment Set Coordinates © Bitplane 2008 Set Time Points Add Slices Add Channels Add Time Points Delete Slices Delete Channels Delete Time Points Crop 3D Crop Time Resample Time Resample 3D Change Data Type Swap Time and Channels Swap Time and Z Spots Surfaces Matlab Merge Csv Statistics Post Please also refer to the Imaris Reference Manual for a more detailed description of the commands and parameters. 11.2.1 Open The Open command is, by default, set to be the first command in the Command Sequence created either by Batch Job creation in Imaris or directly in Batch Coordinator. Expand the Command line Open by clicking on the plus sign next to the Command name. The Command is expanded and the parameter File displays the file name in the Value column. The Input file name or directory could be modified either by: 1. Entering in the Value column the full path to the new directory along with a new file name, or 2. Click on the Open file icon . The Open File window will allow selection of the new file name or the new source folder. To verify and confirm the input file click on the Quick Open icon file with Imaris (default application) in a new window. next to file name. This opens the input 11.2.2 Save In order to save output files from the Batch Job other than statistics files and/or Imaris Scene Files, it is necessary to include Save as the last command in the Command Sequence. The command Save becomes part of the file name of the output file, and the parameters of the Save Command determine the file type. All files with extension IMS are generated by the command Save regardless of preceding commands in the Command Sequence. The output file name of files with extension IMS will contain Save as the command name portion of the output file name. Expand the Command line called Save by clicking on the plus sign next to the Command name. The Command is expanded and the File parameter displays the file name in the Value column. The Output file name or directory could be changed either by: 1. Entering the full path to the new directory in the Value column along with a new file name, or 2. Click on the Open file icon . The Open File window will allow selection of the new file name or new destination folder. To verify and confirm the output file click on the Quick Open icon file with Imaris (default application) in a new window. next to file name. This opens the input 11.2.3 Flip Flip image channels either as a group or individual channels in x, y z direction. 11.2.4 Rotate Rotates all the image channels as a group in Counter Clockwise or Clockwise direction around the x, y, or z axis. Imaris Batch 11.2.5 Channel Shift Allows moving channels relative to one another in the x, y or z direction a distance equal to a certain number of voxels. 11.2.6 Gaussian filter The Gaussian filter smoothes the image, usually to reduce noise. The filter value can be applied separately to any of channels or to all of them. The intensity of each voxel is replaced with the overall intensity of all voxels roughly within the specified distance, but within that distance, intensities of very nearby voxels have a stronger effect on the resulting intensity than voxels that are farther away (but still in range). The relationship between distance and weight of influence on the final value follows the curve of a Gaussian distribution, and the Filter Width parameter corresponds to the Sigma value of the Gaussian distribution (Sigma is the standard deviation, which estimates the peak width). 11.2.7 Median Filter The Median Filter replaces the intensity of each voxel with the statistical median of the intensities of neighboring voxels. The filter value can be applied separately to any of channels or to all of them. 11.2.8 Linear Stretch Linear stretch extends the image contrast of a selected intensity range by scaling all intensities equally that were between the initial “Old” range. Linear Stretch can be applied separately to any of the channels or to all of them. Values that are initially between the Old Minimum and Old Maximum will be scaled in a linear fashion, according to the difference between the New Minimum and New Maximum. Values that are initially below the Old Minimum or above the Old Maximum will accumulate in the “border bins”, e.g. intensities 0 and 255 in the case of an 8-bit image. 11.2.9 Gamma Correction Adjusts the intensities in a non-linear fashion. The mid-range intensities are altered the most, and the change in intensity is progressively less significant toward the extreme high and low ends of the intensity range. The gamma value determines the difference between the effect on the middle range vs. the high and low ranges. 11.2.10 Invert Inverts the intensities (“negative image”) of some or all of the channels. 11.2.11 Normalize Layers Normalize Layers for each channel individually or all channels together. The output will be z layers that each have the same mean intensity and standard deviation. 11.2.12 Baseline Subtraction Baseline Subtraction subtracts the baseline value from the intensity of every voxel in the image. The value can be applied separately to any of the channels or to all of them. 11.2.13 Threshold Cutoff Threshold compares the intensity of every voxel in the image to the threshold value. The voxel intensity values below the threshold are assigned a new intensity., a threshold value new. The Threshold Cutoff values may differ for each channels. 11.2.14 Background Subtraction Applies a large-width Gaussian filter to define the background intensity (overall local intensity) at each voxel and then performs a Background Subtraction using this variable background value. The subtraction can be applied separately to any of the channels or to all of them. © Bitplane 2008 11.2.15 Connective Baseline The Connective Baseline works with two threshold values (a lower and an upper). It uses the lower threshold as a Baseline Subtraction to divide the image into disconnected regions that are separated by voxels below the lower threshold intensity. The upper threshold is used to filter out (remove by setting all voxels to zero) all the regions that don’t contain at least one “bright” voxel (a voxel above the upper threshold). Connective Baseline can be applied separately to any of the channels or to all of them. 11.2.16 Display Adjustment The Display Adjustment manages channel visibility, controls opacity and limits color contrast range. The changes to Display Adjustment will only be saved if using the Imaris IMS file format as the Output file. 11.2.17 Set Coordinates Defines image coordinates, including the spacing between voxels along x,y,z. 11.2.18 Set Time Point Manages file time stamp, modification and last accessed time. 11.2.19 Add Slices Adds image z-slices. Added slices must correspond to initial slices in x-y dimensions, channels, time points and data type. 11.2.20 Add Channels Adds channels to extend or complete the data set information. Added channels must correspond to initial channels in x-y-z dimensions, time points, and data type. 11.2.21 Add Time points Adds time points to the data set. Added time points must correspond to initial time points in x-y-z dimensions, channels and data type. 11.2.22 Delete Slices Deletes slices from data set. 11.2.23 Delete Channels Deletes channels from Data set. 11.2.24 Delete Time Points Deletes time points from Data set. 11.2.25 Crop 3D Crops unwanted parts of an image reducing data set down to the region of interest. 11.2.26 Crop Time Reduces the total number of time points by removing some from the beginning and/or end of the series of images. 11.2.27 Resample Time Reduces or increases the voxel density in a data set, but keeps the correct sizes and distances in the image. 11.2.28 Resample 3D Reduces or increases the voxel density in a data set, but keeps the correct sizes and distances in the image. Imaris Batch 11.2.29 Convert Data Type Changes the data type to 8-bit unsigned integer, 16-bit unsigned integer or 32-bit floating point. Unsigned means that no negative intensity values are supported. The floating point data type is used to store non-integer intensity values. It is common practice to store 12-bit image data inside the 16-bit data type. When the output is an integer type, there is a Range Adjustment/Conversion Mode parameter that needs to be chosen. If the value is set to FromDataRange, the lowest and highest intensity voxels that exist in the input image will be mapped to the lowest and highest possible values in the output image, with linear scaling for all the values in-between. If the value is set to FromSourceRange, the lowest and highest possible values from the input image (e.g. 0 and 255 for 8-bit) are mapped to the lowest and highest possible values in the output image. All intensities in the image are scaled linearly, according to their initial intensity value within the Source Range. 11.2.30 Swap Time and Channels Exchanges the t-axis and the channels, so that playing through time causes the different channels to appear on the screen sequentially. Also used to correct problems with a file that does not load correctly. 11.2.31 Swap Time and Z Exchange the t-axis and the z-axis and re-formatting the image that the time dimension is mapped onto the z-axis and the z-dimension is mapped onto the t-axis. 11.2.32 Spots Multiple step procedure for automatic detection of point-like or blob-like structures. Please refer to the Chapter Spots and Surfaces for further information and Imaris Reference Manual for Spots Creation Wizard. The command Spots determines the extension and part of the file name for some or all of the output files. All files with extension IMX and XLS are generated by the command Spots (or Surfaces) regardless of preceding commands in the Command Sequence. The output file name of files with extension IMX and XLS will contain Spots as the command name portion of the output file name (Unless some of the IMX and XLS files were also created by the Surfaces command). 11.2.33 Surfaces Multiple step procedure for automatic detection of structures with irregular/arbitrary/unpredictable shapes. Please refer to the Chapter Spots and Surfaces for further information and Imaris Reference Manual for Surfaces Creation Wizard. The command Surfaces determines the extension and part of the file name for some or all of the output files. All files with extension IMX and XLS are generated by the command Surfaces (or Spots), regardless of preceding commands in the Command Sequence. The output file name of files with extension IMX and XLS will contain Surfaces as the command name portion of the output file name (Unless some of the IMX and XLS files were also created by the Spots command). 11.2.34 Matlab Develop and integrate custom algorithms specifically tailored to scientific applications. The Matlab command for Imaris Batch allows sending the dataset to Matlab to run a specified Matlab function as an intermediate processing step. 11.2.35 Merge Csv Statistics [Post] Merge all batch statistics CSV files with matching statistical variables in to one statics combined file for an entire multi-image dataset (entire Batch). Please refer to the Chapter Output Statistics File for a more detailed description of the command . 11.3 Values Batch should be able to be run unattended. To obtain correct values and valid output from batch processing, it is important to ensure that the chosen parameter values correspond correctly to the image properties in © Bitplane 2008 every regard. Therefore, it is absolutely critical that values are checked in Imaris. Test and verify all the command parameter values in the Imaris before placing them in a batch process. The simplest method of setting correct variables for a Command Sequence is to open Imaris and create a New Batch with the selected Imaris Commands. Please refer to the Chapter Batch Creation for the additional references. Manual parameter value entry Double-clicking on the value will open a field, into which a new value can be entered. The newly selected value will be automatically displayed in the parameter lines. If the value of the parameter entered does not lie within the boundaries covered by the image processing and analysis requirements, no error message will be displayed. Therefore, it is essential to ensure that command parameters lines contain the correct value. Risks and Cautions Avoid editing batch commands values directly in Batch Coordinator. In order for the batch file to work correctly, parameters must be set in accordance with image acquisition and exactly fitting processing and analysis requirements. Replacing and adjusting variables directly in a batch file could result in the Batch Job not executing properly, as the batch commands act in accordance with the parameters entered. Because the batch process is operating automatically, if the parameter values are used incorrectly, any command can stop the process without necessarily giving the user any indication there is a problem. Note: Parameter values are case sensitive. Imaris Batch 12 Command/Parameter Toolbar This toolbar provides users with control of the Command/ Parameter Area. Use the command toolbar to move commands up or down through the Command Sequence or to add or delete commands in the Command Sequence. The changes can be seen immediately in the command list. Move Up Move the selected command up in the Command Sequence. Move Down Move the selected command down in the Command Sequence Add Command Add a new command to the existing Command Sequence. The new added command by default is the command Open. To modify the command double click on the command line. An arrow appears indicating a drop down window. From a list of commands select a new command. The Command Sequence is changed in accordance with the selection. Please refer to the section Values for the guidelines for modifying command values. Remove Command Remove the command from the Command Sequence. Please refer to the section Commands Values for the additional information and advices. © Bitplane 2008 13 Spots and Surfaces The commands Spots and Surfaces have many similarities to the other Batch commands, but there are some distinct differences that need to be taken into account when creating a Batch Job with the commands Spots or Surfaces in the Command Sequence. Due to the Commands' complexities, it is essential to create the Command Sequence with the commands Spot and Surface using the Spots and Surfaces Creation Wizard in Imaris. In Imaris, adjust commands parameters throughout the Creation Wizard Surfaces applied. for Spots and . The effect of adjusting the parameters can be seen instantly in the image as changes are After completion of the Creation Wizard, select the Creation Tab displayed. and all the parameters values are Click on the Add to Batch button at the bottom of the Creation Tab panel. Like other commands, Spots (or Surfaces) is submitted to the Command Sequence and listed in the Command/Parameter Area. Please refer to the Chapter Batch Creation for the additional references. Note: The commands Spots or Surfaces are creating multiple output files from a single input file. The two generated output files by default are: Imaris scene, with, extension IMX, and a Statistics file, with extension XLS. Please refer to the Chapter Output Statistics File for the additional information about statistical files and Chapter Output File for the output file presentation and arrangement. Imaris Batch 14 Output Statistics File In Batch Coordinator all files with the XLS extension are used to save statistical tabular data. Statistics files are generated by either of the commands Spots or Surfaces. XLS Statistical File Output After executing Batch Job all statistical files will be in the batch-output folder. For each individual input file one new XLS file is created within the batch output folder. Excel files will be organized in spreadsheets, one worksheet for each individual statistical variable. (Refer to the Chapter Output files for the additional information about the output files name and directory). Therefore, a Batch Job, containing the commands Spots or Surfaces, applied to multiple input files, can generate as a result multiple statistics files. As a consequence, a large number of statistics files must be processed and analyzedif there are a large number of input files.. Batch Coordinator provides a merge option for combining multiple statistics files and creating the statistical output summaries. Merger of multiple statistical files Merging of multiple statistics files is possible by first changing the type of output files from Excel file (XLS) to comma-separated values (CSV) files. A merge of CSV files is facilitated by the uniform structure within the automatically generated CSV statistics folders and standardized file naming. The merge command will fuse together, from all CSV statistics folders, all CSV files with matching statistical variables (area, volume, intensity). The following steps are used to first change the statistics file output to CSV and then combine image related XLS files into a single statistical variable clustered CSV file. Please proceed as follows: Statisticswriter Expand the command Spots (or Surfaces) by clicking on the (+) symbol. The parameter list is displayed. In the Scenefile line, the value is the name of the resulting image file, Imaris Scene with extension .IMX. (Refer to Chapter Output files for generating output files name). In the Statisticsfile line the value is the name of batch resulting Excel (XLS) statistics file. The type of statistical output files is defined in the parameter StatisticsWriter and value is set to be bpStatisticswriterExcelXls. The value of Statisticswriter can be changed. Double-clicking on the bpStatisticsWriterExcelXls value will open a field, into which the new value can be entered. Change the type of statistical output files by entering bpStatisticsWriterCsv as the Statisticswriter value. Note: Parameter values are case-sensitive. Command Merge Csv Statistics Post To merge the CSV Output files of all jobs within a Batch, a new command must be inserted into the © Bitplane 2008 Command Sequence. In the Command/Parameter Tool bar click on the Add command Button and the new command (Open) is added. Double click on the added command line and an arrow appears indicating a drop down window. From the list of the commands select the command Merge Csv Statistics [Post] (very last command in the Command list). The command Merge Csv Statistics [Post] will combine datasets with a common statistical variable and incorporate them into one file containing the specific variable of all similar input files (e.g. one file for Volume, one file for Speed, etc). Expand the command Merge Csv Statistics Post by clicking on the (+) symbol. Two parameters are available, InputFiles and OutputFiles. A value for Input files is automatically generated from the individual CSV statistical files. A value for the merged Output folder name must be created. Select the OutputFile parameter and the entire row will be highlighted in blue. Click on the Open file icon and a new window will be opened. Specify the folder name for merged Statistics CSV files and save it. Alternatively, a new folder name can be entered directly in the parameter OutputFile Value line. The new statistics CSV folder name will be written as a value of the parameter OutputFile. The new merged statistics folder name will be generated by appending _Statistics to the entered name defined by the OutputFile value. The command merge will identify and retrieve all files that share a common statistical variable and merge them into one common file. As a result, a new, merged file will be created containing specific statistical variables from all individual files. The names of the new merged files will correspond to the names of the statistical variables (Volume, Speed, etc.). The resulting merged folder will have the same number of files as the number of calculated statistical variables. If the commands Spots or Surfaces are not present in the Command Sequence, the Merge Csv Statistics command will be ignored. Imaris Batch