1
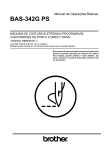
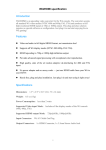
application
note
Indigo AV Mixer
Effective Use Of The Hi-Res Option
Chris Merrill, Product Marketing Manager
Version 2, August 2010
Adding the hi-res option to Indigo adds HD and
computer I/O source options to the program
mix. This application note explains how to
install, setup, and effectively use the hi-res
option.
www.grassvalley.com
Contents
Overview & Architecture
Designed for Live Events
High-Resolution vs. High-Definition
Installing the High-Resolution Card
1
1
2
2
Source Routing
3
Setting Indigo to Scale Up/Down
4
Setting Indigo to Scale Up
4
Setting Indigo to Scale Down
4
Additional Options
5
Running Two Separate Programs
5
Audio Setup
5
High-Resolution Keys
5
High-Resolution Effects
5
Other Options 5
Basic Workflow
6
Switching a Live Event
7
Suggestions for Success
8
Indigo AV Mixer – Effective Use Of The High-Res Option
Overview & Architecture
Combining features normally found in
video production switchers, presentation mixers, and audio mixers, the Grass
Valley™ Indigo™ audio/video (AV) mixer is
a powerful, cost-effective, and easy-tooperate platform for professional-video
applications.
Designed for Live Events
The basic architecture of Indigo is shown
in Figure 1. This flow diagram illustrates
how adding a high-resolution (Hi-Res)
option to the mixer’s SD base unit
provides:
• Two external inputs in either HD-SDI
or DVI-I format
• Program (PGM) and Preview (PVW)
outputs in DVI-I format
• High-quality scaling up to 1080i and
down to SD
• Two separate chroma/luma keys
• Basic wipes for high-resolution inputs
You can save the settings for the Hi-Res
option in the E-MEM™ banks of the
Indigo mixer; For more information
on creating and saving E-MEM steps,
please consult the Indigo operator
manual.
Digital Hi-Res Option
- 8-bit RGB
- Resolution up to 1080i
- 2 keys
- Wipes
PGM PVW
2x Scalar
Sync
Scalar
2x Downscalar
AUX
-10-bit RGB
- Standard definition
- 2 keys
- 2 channel 3D
Digital Audio
- 24-bit /48 kHz
- 4-band EQ per channel
- Auto timing
PGM PVW
De-embedded
Audio (SDI, DV)
Digital Video
Embedded
Audio
8 Stereo Inputs
12 SD Inputs
Selectable
to scalar
Main Sub
2 High-Resolution Inputs
While users have found many different applications for it, the Indigo mixer
was originally developed for live-event
production. Its synchronization and processing of multiple video types, minimal
delay, audio integration, and externaldevice control have distinct advantages
for control and cost containment in live
situations.
To match the current state of the market,
the mixer’s inputs are primarily standard
definition (SD); optional high-definition
(HD) and computer inputs are available
for mixing to a DVI-I output to support
high-resolution projectors, video walls, or
flat panel monitors; the HD-SDI inputs let
you bring in HD sources as effects or as
a primary I-MAG background over which
you can layer scaled keys.
Figure 1 – Indigo architecture with Hi-Res option
www.grassvalley.com
1
Indigo AV Mixer – Effective Use Of The High-Res Option
High-Resolution vs. High-Definition
To match the many formats used for
live events, the Indigo mixer offers an
option for upscaling rather than simply
high-definition. Called Hi-Res, this option
enables it to scale inputs to a full range
of outputs, including:
• 800x600 50/59.94
• 1024x768 50/60/75
• 1280x720 50/60/75
• 1280x768 50/60/75
• 1366x768 50/60/75
• 1280x1024 50/60
• 1400x1050 50/60
For the best picture quality, the output
resolution of the mixer should match the
optimal resolution of your projector or
monitor. The mixer will scale all inputs to
match the desired output resolution. You
can select the output resolution in the
Setup menu on the Indigo touchscreen
under SETUP> VIDEO> OUTPUT.
Installing the High-Resolution
Card
When ordered with the Indigo mixer,
the optional Hi-Res input card will arrive
uninstalled. To safely install it, remove it
and the base unit from the box and place
on an anti-static work surface.
With all power disconnected, remove the
cover plate from the back of the mixer.
The location of the cover plate is shown
in the QuickStart instructions that ship
with the mixer.
Remove the plastic cover from the multipin connector on the edge of the card.
Gently and firmly slide the card into the
open slot until it is flush with the back
of the mixer. Tighten the screws on each
edge of the card to hold it in place.
After the card is correctly inserted,
power up the unit. No additional software installation is required.
• 1920x1080i 50/60
2
www.grassvalley.com
Indigo AV Mixer – Effective Use Of The High-Res Option
Source Routing
The flow diagram in Figure 2 illustrates
how the Indigo mixer can process a
total of three sources in its mix with
the Hi-Res option. You can select two of
the sources from the external DVI-I and
HD-SDI connectors. The third source is
always upscaled from SD. If you choose
to scale up one or two additional SD
sources, they must be substituted for
the external inputs.
When connecting video to the external
inputs, keep in mind that both the DVI-I
Input 1 and the HD-SDI Input 1 are
routed to the same crosspoint. The same
is true for Input 2. To use both formats,
you will need to physically attach one
connector to Input 1 and one connector
to Input 2. Connecting both sources to
the first physical connector of its type
will mean that one of the inputs cannot
be selected in the setup menu.
There are a few additional points
reflected in this diagram:
• Hi-Res Input 3 is always an upscaled
SD source. It is not possible to assign
an external source to this input
• Using the setup menu, you can assign
the downscaled PGM and PVW
outputs of the Hi-Res option as SD
sources. By default, PGM is Input 9
and PVW is Input 10. These sources
can be used as SD backgrounds, keys,
or auxiliary outputs like any other SD
source
• While the Hi-Res option supports
chroma and luma keys, these are
video or self keys. It is not possible to
assign a separate key and fill in highresolution mode
• Because you are routing the entire
high-resolution program to SD, it
is important not to have the SD
program routed to scale back up to
high resolution. If you include the
scaled sources in the SD program
under these conditions, you will
create a video feedback loop. This is
not harmful to the mixer, but it does
create significant picture distortion in
the looped sources
• You cannot assign the same source
twice in high-resolution mode. For
example, the same source cannot
be assigned to both keys or to the
background and a key. This is different
from the SD keys which can be
assigned to the same source
• In high-resolution mode, there is no
option for de-embedding
HD-SDI audio
Hi-Res Video Processor
(8-bit, High Resolution to 1400 x 1050 or HD to 1920 x 1080i)
Input 3
(From SD side)
Inputs 1-2
(From SD side)
Inputs 1-2
(DVI-D/DVI-A)
Inputs 1-2
(HD-SDI)
Input Selector
(DVI-A/DVI-D/SD/HD-SDI)
Scalar
8-bit
Scalar
8-bit
Scalar
8-bit
3 x 4 matrix with frame-rate converter/synchronizer
Self-key
(luminance, chroma)
Self-key
(luminance, chroma)
Downscalar
Mixing (with simple wipe)
PGM1 Output
(DVI-D/DVI-A)
PVW Output
(DVI-D/DVI-A)
Downscalar
PGM Output
(to SD Input 9)
PVW Output
(to SD Input 10)
Figure 2 – The Indigo mixer can support a total of three sources in its Hi-Res mix
www.grassvalley.com
3
Indigo AV Mixer – Effective Use Of The High-Res Option
Setting Indigo to Scale Up/Down
Setting Indigo to Scale Up
After you have made the physical connections on the Indigo mixer’s back
panel, you can use its touchscreen
menus to finish setting it up.
As shown in Figure 3, the high-resolution
inputs are set up in the SETUP> VIDEO>
INPUT menu. Scroll down through the
input list to bring the IN01 HR into view.
Touch the input you wish to assign and
the property options on the right will
change accordingly.
Assigning the video TYPE to Internal SD
allows you to select whether the video
will be scaled up from the following:
• SD PGM
• SD PVW
• SD AUX 1
• SD AUX 2
Please note that scaling up from SD AUX
3 is not an option.
There are additional options available for
internal scaling. In the alignment area,
for example, you can choose to overscan
an upscaled video signal beyond the visible boundary by using:
• Overscan X to stretch the video signal
horizontally
• Overscan Y to stretch the video signal
vertically
• Position X and Position Y to change the
position of the video
As well, you can select the Preserve
Aspect button to keep the video signal
at the aspect ratio of the source signal
regardless of the overscanning parameters. If the video does not match the
output window exactly, the mixer automatically generates black borders to fill
the remaining viewing area.
Setting Indigo to Scale Down
You can use same touchscreen menus
for scaling down high-resolution video as
you did to scale up SD video.
As shown in Figure 4, the SD inputs are
set up in the SETUP> VIDEO> INPUT
menu. In the current version of the
mixer, there are limited setup options
for downscaling. Selecting SD IN09 and
then video TYPE Downscaled will map
the high-resolution PGM output to Input
9. Selecting SD IN10 and then video
TYPE Downscaled will map the highresolution PVW output to Input 10. There
are no other options for downscaling.
If the Preserve Aspect button is not
selected, the mixer resizes the image
to the full output window, regardless of
its original aspect ratio. For background
signals, the output window is the
Figure 3 – Setting scale-up parameters via touchscreen menus
4
screen of the PGM or PVW monitor. For
high-resolution keyers in PiP mode, it is
the size that you define in the KEYER>
TRANSFORM menu section.
Figure 4 – Setting scale-down parameters via touchscreen menus
www.grassvalley.com
Indigo AV Mixer – Effective Use Of The High-Res Option
Additional Options
Running Two Separate
Programs
It is possible to set up two different
PGM outputs from a single Indigo mixer:
one in SD and one in high resolution.
If you are scaling sources between SD
and high resolution, the PGM outputs
may contain similar sources but can be
combined in different ways.
For example, the high-resolution PGM
output going to a projector may show
a PowerPoint slide with a picture-inpicture (PiP) box of the speaker keyed in
its corner. The SD PGM output going to
recording could be just the slide without
the key, or a wide shot of the audience
listening intently.
Audio Setup
High-Resolution Effects
There is not a separate audio menu in
the Indigo mixer’s high-resolution mode.
Audio signals coming into the mixer via
HD-SDI are lost. Audio-follow-video for
high-resolution sources is assignable in
the audio menus.
The the Indigo mixer’s Hi-Res option
contains a basic library of wipes that you
can assign to the background or to either
of its keys. This library includes:
• Left
High-Resolution Keys
• Top
• Cross
You can set up high-resolution keys
(Figure 5) using the same menus as
the SD keys. The menu options change
according to the selection. The highresolution key parameters for border and
patterns are not available.
• Rectangle
As mentioned earlier, the current version
of the Indigo mixer does not support the
assignment of the same high-resolution
source twice.
Still stores are available for high-resolution graphics. Color correction has fewer
gradation steps.
The Hi-Res option does not have digital
effects.
Other Options
Figure 5 – Setting high-resolution keys via touchscreen menus
www.grassvalley.com
5
Indigo AV Mixer – Effective Use Of The High-Res Option
Basic Workflow
Using the Indigo mixer to run an event
with both SD and high-resolution
sources is similar to using a 1.5 M/E
broadcast mixer. You have to switch
between M/Es (SD and high resolution)
to change the sources routed to that
particular M/E.
When you select a mode, the source
buttons in the M/E are automatically
configured according to the touchscreen
setup menus. For this example, we will
assume that selecting SD mode activates the following setup:
• IN01 SD SDI
Selecting VGA as an input type lets you
use a commonly available VGA-to-DVI
converter to connect a computer source
to the DVI-I input. By setting up the
sources this way, you can achieve the
following:
• Hi-Res PGM Out
➔ Projector
Since these M/Es use the same hardware, you may think of them as modes.
You can switch between SD mode and
high-resolution mode by selecting either
the SD button or the Hi-Res button in
the delegation area of the mixer control
panel just below the left corner of the
touchscreen (Figure 6).
• IN02 SD SDI
• Hi-Res PVW Out
program)
➔ Monitor (final
• IN03 SD SDI
• IN08 SD SDI
• IN09 SD Hi-Res PGM
• SD PGM Out ➔ Monitor (viewing submix for high-resolution main PGM out)
• IN10 SD Hi-Res PVW
• SD PVW Out ➔ Monitor (preview of
sub-mix cameras and other sources)
Selecting Hi-Res mode activates the
following setup:
• IN01 HR VGA
• Aux 1 Out ➔ SD recording of
full program (source is Input 9 –
downscaled high-resolution PGM)
• IN02 HR HD-SDI
• Aux 2 Out ➔ Monitor (source is Input
10 – downscaled high-resolution PVW
in case you need to switch to another
SD source for recorded mix)
• IN03 HR Internal SD PGM
Figure 6 – Select the SD or the Hi-Res button in the delegation
area to switch between SD mode and high-resolution mode
6
www.grassvalley.com
Indigo AV Mixer – Effective Use Of The High-Res Option
Basic Workflow (cont.)
If your projectors are high-resolution
capable, the best quality picture would
result from:
• Setting the mixer‘s output to match
the projector’s target resolution. This
approach avoids having the projector
scale the input
Assume that for most of an event, you
will use the Indigo mixer in high-resolution mode, switching between computerbased graphics, wide screen shots of the
stage, and taking a key on and off with a
close up of the speaker.
• Keeping the VGA at its native
resolution. Your computer output
should be set to the resolution of the
projector. Text is one of the first things
to show scaling artifacts
To bring in a recorded clip for the projected PGM, you would need to do the
following:
1. Mix or cut off the Hi-Res key. PGM will
show either computer or wide shot
• Keeping the HD-SDI camera at its
native resolution. Use the camera for
wide shots of the entire stage and
audience
2. Go to the delegated area and select
SD mode
• Upscaling SD video but keeping its
native resolution by constricting it in a
PiP key. The SD video will be used for
close-ups and recorded footage.
3. Switch sources in the Background row
of the M/E to select the recorded source
To simplify your operation, use a
single PiP key. Its source is always the
upscaled SD. You can change the size
and position of the key through E-MEM
banks. You can change the content in the
key by switching sources in SD mode.
5. Cut or mix on the Hi-Res key
S-VIDEO
SDI / COMP
4. Go to the delegated area and select
Hi-Res mode
It is not required to turn off the Hi-Res
key, but if you do not then whatever
action you take on the SD M/E will
show in the PGM key. This could be the
desired result if, for example, you are
mixing from one source to another in SD
mode.
SD Cameras and
Recorded Sources
SDI / COMP
S-VIDEO
SDI / COMP
SDI
Changing to a recorded source with an
E-MEM bank can be as simple as selecting E-MEM Recorded Source, Recall, and
the Auto button.
SDI
SDI
SDI
HD Camera
COMP
S-VIDEO
COMP
COMP
COMP
COMP
IN
AC POWER IN
OUT
TYPE
Indigo 1-HD
PART NO. 000 219 410 110
SER. NO. 0100
1
1
3
3
5
2
2
4
4
6
7
9
11
8
10
12
1
2
3
SDI
SDI
1
LOOP
1
2
USB - B
USE ONLY WITH
250V FUSES
VIDEO IN ( ANALOG / DIGITAL )
SDI
VIDEO IN ( DIGITAL )
COMPUTER VIDEO IN
PGM OUT
HD IN
1
2
DVI - I
DVI - I
SDI - 1
SDI
PREVIEW OUT
AUX
DISCONNECT POWER
BEFORE REPLACING FUSES
2
ANALOG REF
RS422
IEEE 1394
MAIN
PREVIEW
DVI - I
DVI - I
ANALOG AUDIO LINE IN
L
GPI / TALLY / GPO
2
3
R
Monitor
www.grassvalley.com
4
R
5
R
48V
OFF
OFF
L
Monitor
6
R
L
Projector
CAUTION: Two pole neutral wire fuse.
ANALOG AUDIO MAIN OUT
48V
7
R
R
1
100 - 240 V
max. 3A - 50/60Hz
AES / EBU
DIGITAL AUDIO I/O
LINE / MIC IN
L
L
L
LAN
COMPUTER VIDEO OUT
SDI - 2
This device complies with part 15 of the FCC Rules. Operation is subject to the following conditions: (1) This device may not cause harmful interference, and (2) this device must accept any interference received, including interference that may cause undesired operation.
L
REMOTE
CAUTION: For continued protection against risk of fire, replace only
with same type and rating of fuse. 2*4A T / H 250V
Computer
This process can be streamlined for
actual operation by recording each of
these steps one after the other in an
E-MEM bank. To do so, go to the E-MEM
menu, select an empty location, turn
on Learn and then hit Enter after Step 3
and Step 4. Then turn off Learn. Please
note that you can include Step 5 in the
E-MEM bank, but performing a manual
or auto transition will provide a smoother
entry of the key. You can add more steps
to the E-MEM bank to change the size
and position of the key—to full screen
for example. For control of the time
lapse between E-MEM steps or keyframes, please consult your user manual.
Switching a Live Event
SUB - OUT
L
L
R
R
PHONE OUT
L
8
R
L
Monitor
R
L
Turbo or other
recording device
R
R
Monitor
7
Indigo AV Mixer – Effective Use Of The High-Res Option
Suggestions for Success
When using both the SD and highresolution modes of the Indigo platform,
plan through the event in advance and
determine the mode in which you will
do most of your mixing and use the
other mode only for defined supporting
tasks. The mode you choose to mix in
will determine the types of transitions
and effects you are able to achieve as
well as the optimal routing of sources.
Give yourself time to set up the switcher,
using E-MEM banks to help reduce the
number of steps you will need to take
during the actual event. Then save the
E-MEM settings on a USB device so you
can standardize a look or workflow from
event to event.
SALES
SUPPORT
Local and regional sales contacts can be found by visiting
www.grassvalley.com/sales
Local and regional support contacts can be found by visiting
www.grassvalley.com/support
© Copyright 2010 Technicolor USA, Inc. dba Grass Valley. All rights reserved. Grass Valley, E-MEM, Indigo, and Turbo are trademarks of Technicolor USA, Inc.
All other tradenames referenced are service marks, trademarks, or registered trademarks of their respective companies. Specifications subject to change
without notice.
SWT-4016M-2