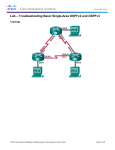
1
OSPF Test Suite and Router configuration
Codenomicon Solution Note
Version: 2012-03-02
1 INTRODUCTION
This document will give detailed information how to configure Cisco routers and OpenBSD servers to
interoperate with Codenomicon OSPF (v2) and OSPFv3 test suites. This document is not intented to fully
document the test suites, however, so the test suite built-in help should also be consulted in parallel when
preparing a test setup. The following chapters will demonstrate example settings and procedures that can be
used to validate the OSPF functionality between the test suite and system under test (SUT); parameters
which are not needed for basic interoperability will not be explained here.
Tips and notes:
-
Wireshark is a useful tool for verifying that the router at least sends Hello messages even if no
response is detected by the test suite. If Wireshark indicates that Hello messages are sent by the
router, OSPF is correctly enabled on the router, but the suite/SUT configurations do not match.
-
Wireshark is also useful to verify that suite and SUT have the same AreaID and the SUT’s RouterID
is correctly set.
-
If there are other OSPF capable devices connected to the network, bear in mind that the router
might set the other device as master router; this will most likely affect to interoperability between the
SUT and the test suite. Router’s hello packets contain a ‘designated neighbors’ field which should
indicate if the SUT has already set some other device as a master.
-
When testing on Windows 7 remember that administrator privileges are required for the test suite to
work. Also, Windows firewall might block the incoming OSPF messages – in such a case, consider
specifying additional firewall rules for OSPF or disabling the firewall completely.
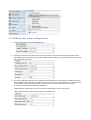
2 TEST SUITE CONFIGURATION
Both test suites contain 3 different test sequences: master, slave and p2p. Suite options must be adjusted
according to which sequence is used. Most importantly the source, router-id and router priority value must be
specified to match master or slave sequence selection.
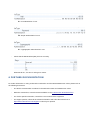
The test sequence can be selected from the Interoperability view:
2.1 OSPFv2 test suite configuration
1. First set the source and target IP addresses:
2. When the router ID is the same as the router IP address, leave the ‘Customize Router IDs’ checkbox disabled since suite will use the source/target address settings. If you’re using customized router
IDs, enable the check-box:
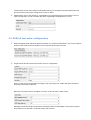
3. The Source Router ID must be set to match the used sequence; the ID must be smaller when using
slave sequence and larger when master sequence is in use. In the screenshot above, the target-id is
‘172.20.10.10’ and by setting source ID to ‘172.20.10.11’, the test suite will act as a master.
‘172.20.10.9’ could be used with slave sequence.
‘OSPF Area ID’ must match to the one in router’s configuration, in this case 0.0.0.0.
‘Hello Network mask’ needs to be the same as the router has:
‘OSPF Router Priority value’ affects master/slave priority, but usually the RouterID determines the
priority and the router priority setting doesn’t have an effect.
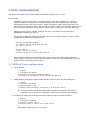
4. Authentication can be null, simple or cryptographic. Key-id and password must match the ones in
router configuration. Key-id is needed only when cryptographic authentication is in use:
2.2 OSPFv3 test suite configuration
1. When configuring IPv6 addresses please remember to use link-local addresses. The source address
should be the correct link-local address of the computer running the test suite:
2. Target Router ID and Area ID must match the SUT configuration:
Source router-id must be specified according to the used sequence; smaller with slave sequence
and larger with master sequence.
Router priority value must be set higher in master mode and lower in slave mode:
Message interval and dead interval values sometimes affect interoperability; some devices require
these values to be identical on both the master and the slave.
3 CISCO CONFIGURATION
This chapter will explain how to enable OSPFv2 and OSPFv3 usage in Cisco routers.
Some remarks:
-
Depending on Cisco router version, interface is choisen either with ‘FastEthernet’ or ‘Ethernet’
command. OSPFv2 examples will use ‘FastEthernet6/0’ and OSPFv3 ‘Ethernet0/0’. This option
really depends on the Cisco router version – before configuration, please check which one to use.
Also note that the interface numbers ‘6/0’ and ‘0/0’ in following chapters are examples, please check
your active Cisco settings for what numbers should be used, or define your own if they are blank.
-
OSPF process-id range is 1-65535, examples use value 1 and OSPF area ID has range 04294967295, examples use value 0.
-
Active router configuration can be checked with ‘show running-config’ command. If OSPF is active,
configuration should look something like this:
…
interface FastEthernet6/0
ip address 10.10.10.20 255.255.0.0
ip ospf 1 area 0
…
router ospf 1
router-id 172.20.10.10
network 10.10.0.0 0.0.255.255 area 0
…
-
OSPF changes shouldn’t require restarting but if router doesn’t start sending hello messages or
doesn’t respond to the suite, use the ‘reload’ command to restart the router. Remember to save the
changes at the corresponding router prompt.
3.1 OSPFv2 Cisco configuration
1. Set IP address:
> enable
# configure terminal
(config)# interface FastEthernet6/0
(config-if)# ip address 10.10.10.10 255.255.0.0
2. Enable OSPF by defining the OSPF number and the network in which the router belongs to:
> enable
# configure terminal
(config)#router ospf 1
(config-router)#network 10.10.0.0 0.0.255.255 area 0
The router should start sending OSFP Hello messages. Wireshark or other packet
capturing tools can be used to verify that the router is really sending Hello messages.
3. By default, the router uses its IP address as the router-id. It can be changed if needed:
> enable
# configure terminal
(config)# router ospf 1
(config-router)# router-id 172.20.10.10
Router-id needs to be in a.b.c.d format.
4. Authentication is disabled by default, it can be switched on by choosing either simple or md5
authentication:
Simple authentication:
> enable
# configure terminal
(config)# interface FastEthernet6/0
(config-if)# ip ospf authentication-key password
(config-if)# exit
(config)# router ospf 1
(config-router)# area 0 authentication
(config-router)# exit
Cryptographic authentication:
> enable
# configure terminal
(config)# interface FastEthernet6/0
(config-if)# ip ospf message-digest-key 1 md5 password
(config-if)# exit
(config)# router ospf 1
(config-router)# area 0 authentication message-digest
(config-router)# exit
5. Enable the OSPF for the particular network interface:
> enable
# configure terminal
(config)# interface FastEthernet6/0
(config-if)#ip ospf 1 area 0
The OSPF and area vales should be the same as in step 2.
6. Point-to-point support can be enabled using the following command:
> enable
# configure terminal
(config)# interface FastEthernet6/0
(config-if)#ip ospf network point-to-point
3.2 OSPFv3 Cisco configuration
1. The OSPFv3 uses IPv6 addresses but the router only needs a link-local address which is assigned
by enabling ipv6:
> enable
# configure terminal
(config)# interface Ethernet0/0
(config-if)# ipv6 enable
2. Default router-id is the 32-bit IPv4 address and it can be changed as following:
> enable
# configure terminal
(config)# ipv6 router ospf 1
(config-rtr)# router-id 0.0.0.7
Router-id needs to be in a.b.c.d format. Note that only the last integer value matters, e.g.
0.0.0.7 means that value will be 7 in suite configuration.
3. OSPF area needs to be defined for the particular address range:
> enable
# configure terminal
(config)# ipv6 router ospf 1
(config-rtr)# area 0 range fe80::/64
4. Enable OSPF for the particular network interface:
> enable
# configure terminal
(config)# interface Ethernet0/0
(config-if)#ipv6 ospf 1 area 0
5. Point-to-point support can be enabled with following command:
> enable
# configure terminal
(config)# interface Ethernet0/0
(config-if)#ipv6 ospf network point-to-point
4 OpenBSD
OpenBSD also supports OSPF and its configuration is quite simple. The parameters are quite similar the
what Cisco routers and the Codenomicon test suites have. The configuration file is /etc/ospfd.conf:
router-id 10.10.100.11
fib-update yes
stub router no
spf-holdtime 1
hello-interval 10
metric 10
retransmit-interval 5
router-dead-time 40
router-priority 1
transmit-delay 1
# areas
area 0.0.0.0 {
interface em0 {
# Crypt:
auth-type crypt
auth-md 1 "password"
auth-md-keyid 1
# Simple:
#auth-type simple
#auth-key "password"
}
}
The service can be started with command ‘ospfd’. If the configuration file is modified, the daemon can be
reloaded with the ‘ospfd reload’ command.
5 RESULTS
When a valid case is run successfully, the log should look something like this:
Suite
Suite
Suite
Suite
Suite
Suite
Suite
Suite
Suite
Suite
Suite
Suite
Suite
-->
-->
-->
<-<--->
<-<--->
<--->
-->
-->
SUT
SUT
SUT
SUT
SUT
SUT
SUT
SUT
SUT
SUT
SUT
SUT
SUT
Hello-Init
Hello-2Way
Database Description-ExStart
Any Message
Database Description-ExStart
Database Description-Exchange
Any Message
Database Description-Exchange
Link State Request-Loading
Link State Update-Loading
Link State Acknowledgment-Loading
Link State Update-Full
Hello-Init
There might be some extra “any messages” sent by the SUT. The test suite ignores the extra messages and
checks only the messages it expects.
If interoperability cannot be verified between the test suite and the SUT, the suite log usually lists no
received messages at all or only “any message”. As stated before, you should use, please use e.g.
Wireshark if there are no received messages in the log – this way you can verify that the SUT is sending
OSPF Hello messages. This is helpful in determining whether OSPF is really enabled on the router.
If there’s only “any message” in the log and the test case has failed due to a timeout, check the message
contents: the received message might be the wrong one or the the test suite and SUT settings do not match.
The test suite contains a chapter regarding the test groups that explains what kinds of messages are
expected. You can also use the the suite’s sequence editor to verify which message is needed. Also
consider the possibility that the SUT is not functioning correctly if several anomalized messages have been
sent to it – in such a case, a router reboot may be needed.
Here are couple of things that might help you identify the error in configuration:
-
Check that the RouterID and AreaID match the suite configuration:
Here the routerID is ‘ac 10 14 01’ (172.10.20.1 in decimal notation), and AreaID is 0. Similar header
values can also be investigated for Hello messages.
-
Verify that correct authentication method is used:
No authentication in use.
Simple authentication in use.
Cryptographic authentication in use.
-
Check that the Master/Slave (MS) bit is set correctly:
When MS bit is 1, the SUT is acting as a master.
6 FURTHER DOCUMENTATION
For further information on using Codenomicon Defensics and the OSPF/OSPFv3 test suites, please refer to
the following documents:
-
The built-in documentation contained in the Defensics OSPF and OSPFv3 test suites
-
Defensics Instructions, a PDF document available on the Codenomicon Download Arena
-
For device specific information, consult the user's manual of the equipment
-
For support queries, collect all the relevant information and follow the instructions at
http://www.codenomicon.com/support to submit your question