1
User’s manual
Models:
FS6325A
FS6325-2A
ht t p: // hk p h o ne s.v te c h.c o m
TABLE OF CONTENTS
1.
IMPORTANT SAFETY INSTRUCTIONS..................1
2.
SET UP THE TELEPHONE....................................3
2.1
2.2
2.3
2.4
2.5
Package Contents............................................................3
Location............................................................................3
Connect the Base Station.................................................4
Connect the Charger Base (for FS6325-2A only) ...........5
Install and Charge the Handset Batteries.........................6
3. GET TO KNOW YOUR PHONE...............................7
3.1
3.2
3.3
3.4
3.5
3.6
4.
Overview of the Handset...................................................7
Overview of the Base Station..........................................10
Base Station LED Display Behaviour..............................12
Handset LCD Display Icons.............................................14
Menu Structure................................................................16
Text and Digit Entry Table................................................18
3.6.1 English Character Set.........................................18
®
BLUETOOTH ......................................................20
4.1
4.2
4.3
Introducing BLUETOOTH® ............................................20
Important Information.....................................................20
Bluetooth Setup .............................................................22
4.3.1 Add a Mobile Phone . ........................................22
4.3.2 Add a Headset ..................................................23
4.3.3 Auto Connection . ..............................................25
4.3.4 Device Lists and Connection.............................25
4.3.5 Review the Active Device List ...........................26
4.3.6 Connect/Disconnect a Device . .........................26
4.3.7 Remove an Active Device .................................26
4.3.8 Add an Active Device.........................................27
4.3.9 Review the Paired Device List ..........................27
4.3.10 Rename a Paired Device ..................................28
4.3.11 Remove a Paired Device...................................28
4.3.12 Replace an Active Device .................................29
4.3.13 Change PIN ......................................................29
5.
USING THE PHONE.............................................30
5.1
5.2
5.3
5.4
5.5
5.6
5.7
5.8
5.9
5.10
5.11
5.12
5.13
5.14
5.15
5.16
5.17
5.18
Make a Home Call..........................................................30
5.1.1 Preparatory Dialling a Home Call.......................30
5.1.2 Direct Dialling a Home Call................................30
5.1.3 Call from the Contacts.......................................30
5.1.4 Call from the Call Log........................................30
5.1.5 Call from the Redial List.....................................30
Answer a Home Call.......................................................31
End a Home Call............................................................31
Call Waiting on the Home Line.......................................31
Make a Mobile Call.........................................................32
5.5.1 Preparatory Dialling a Mobile Call......................32
5.5.2 Direct Dialling a Mobile Call...............................32
Answer a Mobile Call......................................................32
End a Mobile Call...........................................................32
Call Waiting on the Mobile Line......................................33
Answer an Incoming Mobile Call While on a
Home Call.......................................................................33
5.9.1 Answer the Incoming Mobile Call.......................33
5.9.2 End the Mobile Call............................................33
5.9.3 Resume the Home Call on Hold........................33
Answer a Home Call While On a Mobile Call
34
5.10.1 Answer the Incoming Home Call........................34
5.10.2 End the Home Call.............................................34
5.10.3 Resume the Mobile Call on Hold.......................34
Conference Calls............................................................34
5.11.1 Make a Conference Call between Home Call and Mobile Call...........................................34
5.11.2 End a Conference Call.......................................34
5.11.3 Using the Home and Mobile Lines Together......35
Handsfree.......................................................................35
Earpiece / Handsfree Volume.........................................35
Silencing the Ringer.......................................................35
Auto Answer....................................................................36
Lock Keypad...................................................................36
Call Timer.......................................................................36
Out of Range Warning....................................................36
5.19
5.20
5.21
5.22
5.23
5.24
5.25
5.26
6.
Mute................................................................................37
Hold................................................................................37
Chain Dialling.................................................................37
5.21.1 Access a Number in the Contact List ..
While on a Call...................................................37
5.21.2 Access a Number in the Call Log While
on a Call.............................................................38
Redial.............................................................................38
5.22.1 Review the Redial List.......................................38
5.22.2 Dial a Redial Entry.............................................39
5.22.3 Save a Redial Entry to the Contact List.............39
5.22.4 Delete a Redial Entry.........................................39
5.22.5 Delete all Redial Entries.....................................40
Call Recording................................................................40
Find Handset (Paging)....................................................41
Power On/Off Handset...................................................41
Turn On/Off LCD Backlight.............................................41
CONTACTS...........................................................42
6.1
6.2
6.3
6.4
6.5
6.6
6.7
6.8
Create and Review Entries.............................................42
6.1.1 Create a New Entry............................................42
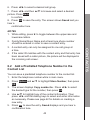
Add a Predialled Telephone Number to the
Contact List.....................................................................43
View the Contacts...........................................................44
Alphabetical Search........................................................44
Dial, Edit or Delete a Contact Entry................................44
6.5.1 Dial a Contact Entry...........................................44
6.5.2 Edit a Contact Entry...........................................45
6.5.3 Delete a Contact Entry.......................................45
6.5.4 Delete All Contact Entries..................................45
View Capacity.................................................................45
Edit Call Group...............................................................46
6.7.1 Rename the Call Group.....................................46
6.7.2 Set the Ringtone of the Call Group....................46
Speed Dial......................................................................47
6.8.1 Assign a Speed Dial Contact Entry....................47
6.8.2 View the Speed Dial List....................................47
6.8.3
6.8.4
6.8.5
7.
CALL LOG............................................................49
7.1
7.2
7.3
8.
Calling Number Display..................................................49
7.1.1 View the Call Log...............................................50
7.1.2 Dial a Call Log Entry..........................................50
7.1.3 Save a Call Log Entry to the Contact List
50
7.1.4 Delete a Single Entry in the Call Log.................51
7.1.5 Delete the Entire Call Log..................................51
Call Log Settings............................................................51
7.2.1 Set the Call Log Type.........................................51
7.2.2 Set the New Call Alert........................................52
Voicemail Indicator ........................................................53
MEDIA...................................................................54
8.1
8.2
9.
Dial a Speed Dial Entry......................................47
Reassign a Speed Dial Entry.............................48
Delete a Speed Dial Entry..................................48
View Caller Pictures.......................................................54
View Slideshow of Wallpapers........................................54
NEW EVENTS.......................................................55
9.1
View New Events............................................................55
10. PHONE SETTINGS...............................................56
10.1
10.2
10.3
Alarm Settings................................................................56
10.1.1 Turn On or Off the Alarm....................................56
10.1.2 Set the Alarm Time.............................................56
10.1.3 Set the Alarm Name...........................................56
10.1.4 Set the Alarm Melody.........................................57
10.1.5 Set the Alarm Repetition....................................57
Date and Time Settings..................................................58
10.2.1 Set the Clock Format.........................................58
10.2.2 Set the Date and Time.......................................58
10.2.3 Set the Time/Date Master..................................59
Handset Display Settings...............................................59
10.3.1 Set the Screensaver..........................................59
10.3.2 Set the Brightness Level....................................60
10.3.3 Set the LCD Backlight........................................60
Handset Audio Settings..................................................60
10.4.1 Set the Ringer Tones.........................................60
10.4.2 Set the Ringer Volume.......................................61
10.4.3 Set the Silent Mode............................................61
10.4.4 Set the Voice Ringer..........................................62
10.4.5 Set the Advisory Tones......................................63
10.4.6 Set the Wideband Sound...................................63
10.4.7 Set the Vibrating Alert........................................64
10.5 Set the Direct Call...........................................................64
10.6 Select the Base..............................................................65
10.7 Set the Auto Answer Mode.............................................65
10.8 Set the Room Monitor.....................................................66
10.8.1 Activate the Room Monitor.................................67
10.8.2 Deactivate the Room Monitor............................67
10.9 Reset the Handset..........................................................68
10.10 Base Settings...............................................................68
10.10.1 Ringer Settings................................................68
10.10.2 Set the Flash Time...........................................69
10.10.3 Set the Dial Mode............................................69
10.10.4 Manage the Handsets......................................70
10.10.5 Change the System PIN..................................71
10.10.6 Reset the Base................................................71
10.10.7 Set the Manual ECO Mode..............................72
10.10.8 Set the Enhanced ECO Mode..........................72
10.10.9 Set the Handset Ringer Priority.......................73
10.10.10 Set the Call Share...........................................73
10.10.11 Set the Exchange Code..................................73
10.11 Register a Handset to a Base.......................................74
10.4
11. ANSWERING MACHINE.......................................75
11.1
11.2
11.3
11.4
11.5
Message Playback..........................................................75
Delete All Old Messages.................................................76
Answer On/Off................................................................77
Record and Play Memos................................................78
CareMemo......................................................................78
11.5.1 Play a CareMemo .............................................78
11.5.2 Record a CareMemo .........................................79
11.5.3 Turn the CareMemo ON/OFF . ..........................79
11.6 Outgoing Message ........................................................80
11.6.1 Play Outgoing Message ....................................80
11.6.2 Record Your Own Outgoing Message ...............80
11.6.3 Delete your Outgoing Message . .......................81
11.7 TAM Settings...................................................................81
11.7.1 Set the Answer Mode.........................................81
11.7.2 Set the Answer Delay.........................................82
11.7.3 Set the Recording Time......................................82
11.7.4 Enable/Disable Call Screening...........................82
11.8 Call Screening................................................................82
11.9 Remote Access...............................................................84
11.9.1 Enable/Disable Remote Access.........................84
11.9.2 Operate Your Answering
Machine Remotely.............................................84
11.9.3 Activate Remote Access if TAM is Off................85
11.10 Answering System and Voicemail..................................85
11.10.1 Using the Answering System
and Voicemail Together......................................86
11.10.2 Voice Prompts..................................................86
12. ADDITIONAL HANDSETS....................................87
12.1
12.2
12.3
Transfer a Call................................................................87
Intercom..........................................................................87
12.2.1 Initiate an Intercom Call.....................................87
12.2.2 Answer an Intercom Call at the
Destination Device.............................................87
12.2.3 Silence an Intercom Call....................................87
12.2.4 Mute while on an Intercom Call..........................88
12.2.5 End an Intercom Call.........................................88
Answer an Incoming Call during an
Intercom Call....................................................................88
12.3.1 Answer a Home Call during an
Intercom Call.....................................................88
12.3.2 Answer a Mobile Call during an
Intercom Call.....................................................89
12.4
12.5
12.6
Conference Call.............................................................89
12.4.1 Make a 3-Way Conference Call........................89
12.4.2 Make a 3-Way Conference Call with
Call Share.........................................................90
12.4.3 Make a Conference Call between Two Ext.
Lines and One Handset....................................90
Register Handsets.........................................................90
12.5.1 Automatic Registration for Handset..................90
12.5.2 Register a Handset through the Menu..............91
Deregister Handsets......................................................92
13. TROUBLESHOOTING.........................................93
14. TECHNICAL SPECIFICATIONS..........................96
15. CARE AND MAINTENANCE INSTRUCTIONS...97
1. IMPORTANT SAFETY INSTRUCTIONS
When using your telephone equipment, basic safety precautions
should always be followed to reduce the risk of fire, electric shock
and injury, including the following:
Read and understand all the instructions.
2.
Follow all warnings and instructions marked on the product.
3.
Unplug this product from the wall outlet before cleaning. Do not
use liquid cleaners or aerosol cleaners. Use a damp cloth for
cleaning.
4.
Do not use this product near water (for example, near a bath
tub, kitchen sink, swimming pool).
5.
Do not expose the telephone to direct sunlight or extreme cold
environment. Do not put the telephone close to heating sources
such as radiators, cookers, etc.
6.
Do not overload wall outlets and extension cords as this can
result in the risk of fire or electric shock.
7.
Unplug this product from the wall outlet and refer servicing to
VTech under the following conditions:
•
When the power supply cord or plug is damaged or frayed.
•
If the product does not operate normally by following the
operating instructions.
•
If the product has been dropped and the cabinet has been
damaged.
•
If the product exhibits a distinct change in performance.
8.
Avoid using a telephone (other than a cordless type) during an
electrical storm. There may be a remote risk of electric shock
from lightning.
9.
Do not use the telephone to report a gas leak in the vicinity of
the leak.
10. Use only the supplied Li-ion batteries! The operation periods
for the handsets are only applicable with the default battery
capacities.
IMPORTANT SAFETY INSRUCTIONS
1.
11. The use of other battery types or non-rechargeable batteries/
primary cells can be dangerous. These may cause interference
and/or unit damages. The manufacturer will not be held liable
for damage arising from such non-compliance.
12. Do not use third party charging bays. The batteries may
be damaged.
13. Please note the correct polarity while inserting the batteries.
14. Do not immerse batteries in water, do not place in fire.
Disposal warning
1.
When this crossed-out wheeled bin symbol is
attached to a product, it means the product is
covered by the European Directive 2002/96/EC.
2.
All electrical and electronic products/battery
should be disposed of separately from the
municipal waste stream via designated
collection facilities appointed by the government
or the local authorities.
3.
The correct disposal of your old appliance/battery will help
prevent potential negative consequences for the environment
and human health.
For more detailed information about disposal of your old appliance/
battery, please contact your city office, waste disposal service or The
Shop where you purchased the product.
If you have questions about this product, or having difficulty with
setup or operation, call or Customer Service Centre.
Customer Service Hotline: (852) 2666 5558
Technical Inquiry Hotline: (852) 2667 7433
2.
SET UP THE TELEPHONE
2.1
Package Contents
The package contains the following items:
1 Handset (1 for FS6325A, 2 for FS6325-2A)
•
1 Base unit
•
1 AC power adapter
•
Charger (1 for FS6325-2A)
•
1 Telephone line cord
•
1 Li-ion rechargeable battery pack (1 for FS6325A, 2 for FS6325-2A)
•
1 English user’s manual
•
1 Traditional Chinese user’s manual
•
1 Warranty card
2.2
Location
For maximum coverage and reduce the interference, here are some
guidelines you should consider when you place the base unit:
•
Place your telephone within 2 metres of the mains power socket
and telephone socket so that the cables will reach.
•
Make sure it is at least 1 metre away from other electrical
appliances to avoid interference. Your telephone works by
sending radio signals between the handset and base. The
strength of the signal depends on where you locate the base.
Putting it as high as possible ensures the best signal.
•
The maximum range between the base station and the handset is
approximately 300 metres.
If the reception for a base unit location is not satisfactory, move it to
another location for better reception.
Depending on the surrounding conditions as well as spatial and
structural factors, the range may be reduced. The range indoors is
normally less than outdoors.
SET UP THE TELEPHPONE
•
2.3
Connect the Base Station
Insert the other end of
the power adapter into
the wall outlet.
Insert the other end of the
telephone line cord into a
telephone wall jack.
Telephone line
cord
Mains power
cable
1. Insert the DC plug of the power adapter and the telephone line
cord into the base station, as shown above.
2. Insert the other end of the power adapter into the wall outlet and
the telephone line cord into a telephone wall jack. If you have
DSL high speed internet service, a DSL filter (not included) is
required.
NOTES
1. Always use the cables supplied with the product.
2. Use only the power adapter supplied with the base station.
2.4
Connect the Charger Base (for FS6325-2A only)
Plug the charger adapter
into the mains power
wall socket.
Plug the charger adapter into the mains power wall socket and
switch the power on.
NOTE
Ensure power cord is fed through slot on the charger so unit sits
flush with the desk.
SET UP THE TELEPHPONE
Mains power cable
2.5
Install and Charge the Handset Batteries
1. Slide open the battery compartment cover.
2. Place the supplied rechargeable battery in the battery
compartment, with the battery connector plugged in, as shown.
3. Slide the battery compartment cover back on until it clicks into
place.
4. Place the handset on the base to charge for at least 10 hours. A
beep indicates that the handset is properly placed on the base or
charger.
NOTES
1. Use only the supplied Li-ion rechargeable batteries.
2. If you do not use the handset for a long time, disconnect and
remove the batteries to prevent possible leakage.
3. GET TO KNOW YOUR PHONE
3.1
Overview of the Handset
12
13
2
11
3
10
4
5
9
6
8
7
1.
▲ UP KEY
In menu mode: Press to scroll up the menu items.
In contact list / redial list / call log: Press to scroll up the list.
During a call or TAM message playback: Press to increase the
listening volume.
While predialling or editing: Press to move the cursor one line
upwards or to the beginning of the strings.
GET TO KNOW YOUR PHONE
1
2.
SOFT KEYS
Press to select a menu item above the key..
While in a menu, press to select an item, or save an entry or setting.
3.
≡ NEW EVENT KEY
In main menu: Press to show the event summary if there are
multiple types of new events, or access the event directly if there
is only one type of new events. If there are no new events, the
screen displays No New Events and returns to main menu.
4. ► RIGHT KEY
In main menu: Press to move to the next main menu item
horizontally.
In sub menu / redial list / call log: Press to access the next menu level.
While predialling or editing: Press to move the cursor one
character right.
5.
TALK OFF
In main menu: Press and hold to power on/off the handset.
When the handset is off cradle: Press once to dim the LCD
backlight and press again to turn off the LCD backlight in cyclic
(i.e. Dim > Off > On).
In menu / editing mode: Press to return to idle mode.
During a call: Press to hang up and return to idle mode.
6. ▼ DOWN KEY
In menu mode: Press to scroll down the menu items.
In contact list / redial list / call log: Press to scroll down the list.
During a call or TAM message playback: Press to decrease the
listening volume.
While predialling or editing: Press to move the cursor one line
downwards or to the end of the strings.
7. MICROPHONE
8. ALPHANUMERIC KEYPAD
Press to insert a digit / character / * / #.
Number keys in main menu: Press and hold to perform speed dial.
9.
TALK ON/FLASH
In contact list / predial mode / redial list / call log: Press to make
a call to the selected entry.
In main menu: Press and hold to access the redial list.
During ringing: Press to answer a call.
In predial mode: Press and hold to insert a flash.
10. ◄ LEFT KEY
In main menu: Press to move to the previous main menu item
horizontally.
In sub menu / redial list / call log: Press to access the previous
menu level.
During a call: Press to mute/unmute the call.
While predialling or editing: Press to move the cursor one
character left.
11.
SPEAKERPHONE
In main menu: Press and hold to access the redial list.
In contact list / redial list / call log: Press to make a call to the
selected entry
with speakerphone.
During ringing: Press to answer a call with speakerphone.
In main menu: Press to turn on the handset speakerphone and
press again to resume normal handset use.
12. EARPIECE
13. HEADSET CONNECTOR
GET TO KNOW YOUR PHONE
in main menu: Press and hold to dial the voicemail number.
in editing mode: Press to toggle between uppercase or
lowercase character input.
in main menu: Press and hold to turn off / on the handset
ringer.
in main mode: Press and hold to lock / unlock the keypad.
0 in idle / predialling / number editing mode: Press and hold to
insert a pause.
3.2
Overview of the Base Station
1
7
2
3
4
5
6
1.
/
SKIP BACKWARD/SKIP FORWARD
During message playback: Press once to repeat playing the
current message from the beginning. Press twice to skip
backward to play the previous message.
During message playback: Press to skip to play the next
message.
2. ►/ PLAY/STOP
In idle mode: Press once to play the new message.
During message playback: Press to stop the message playback.
3. DEL (DELETE)
In idle mode: Press and hold to delete all old messages.
During message playback: Press to delete the current message
playing.
10
4.
ANSWER ON/OFF
Press to turn on/off the answering machine.
5.
/
VOLUME DOWN/VOLUME UP
In idle / TAM message playing mode: Press to decrease or
increase the volume
of speaker.
PAGING
Press to page the registered handsets.
7. CHARGING CRADLE
11
GET TO KNOW YOUR PHONE
6.
3.3
Base Station LED Display Behaviour
2-digit 7-seg
LED Display
Behaviour
No matter answering machine is on or off:
--
Flashing when date/time not set.
--/XX
Flashing between -- and XX when there are
new messages (XX is the number of new
messages).
When answering machine is off:
Blank
No display when no old/new messages.
XX
Flashing when there are new messages (XX is
the number of
new messages).
F
Flashing when the memory of answer machine
is full.
When answering machine is on:
0
Steadily on when there is no message.
XX
Steadily on when there are XX old messages.
XX
Flashing when there are XX new messages.
F / XX
Flashing XX alternatively with FF when there
are XX new voice messages received and the
memory of answer machine is full.
F
Steadily on when memory is full and there is
no new message.
A / XX
Flashing XX alternatively with A when the new
voice message XX is recording.
12
XX
XX Steadily ON: Playing the old incoming
message.
XX Flashing: Playing the new incoming
message.
XX is the sequential number of message.
Flashing when playing/recording OGM (A1 =
Answer & Record,
A2 = Answer Only).
rA
Flashing when remote access is in progress.
LX
Steadily ON: Indicate the current volume level
where X is from 1 to 8 (non-cyclic, optional for
0 to 8) during message playback, or from 0 to
8 during call screening or incoming message
recording.
Bluetooth
LED 1 and 2
LED Steadily ON: Bluetooth device 1 and/or 2
is/are connected.
LED Flashing: Bluetooth device 1 and/or 2
is/are being paired.
LED OFF: Bluetooth device 1 and/or 2 slot(s)
is/are empty..
13
GET TO KNOW YOUR PHONE
A1/A2
3.4
Handset LCD Display Icons
The screen display gives you information on the current status of the
telephone.
Menu Icon
Description
Contacts
Call Log
Settings
Answering Machine Off
Answering Machine On
Bluetooth
Media
Answering Machines memory full
3 new TAM messages
More than 9 new calls
Incoming call
Outcoming call
Unread missed call
Keypad locked
Keypad unlocked
14
Recording in progress
Alarm notification
Description
Signal strength
Handset number
New voicemail message
Answering Machine On
Bluetooth On
Ringer Off
Alarm On
Battery
Battery charging
Battery empty
Speakerphone On
Mute On
Room monitoring
15
GET TO KNOW YOUR PHONE
Status Icon
3.5
Menu Structure
When the handset LCD backlight is off, press any key to turn on the
backlight, then press ▲/▼/◄/► to browse the main menu. Refer to
the following table for the menu structure.
Key Press MENU
▲▼
▲▼
▲▼
Main
Menu
CONTACTS
CALL LOG
SETTINGS
Sub
menu
If contact list is
empty:
If call log is
empty:
ALARM CLOCK
NEW ENTRY
SETTINGS
HANDSET
CAPACITY
If contact list is
not empty:
If call log is not
empty:
Entry list
NEW ENTRY
Entry list
Under a selected
call log entry:
Under a selected
contact entry:
DETAILS
CALL NUMBER
EDIT ENTRY
VIEW ENTRY
DELETE ENTRY
DELETE ALL
CAPACITY
DELETE
ENTRY
DELETE ALL
CALL NUMBER
STORE
NUMBER
SETTINGS
EDIT CALL
GROUP
SPEED DIAL
16
CLOCK
BASE
REGISTRATION
Key Press MENU
▲▼
▲▼
▲▼
TAM
BLUETOOTH
MEDIA
Sub
menu
PLAY MESSAGES
SETUP
MOBILE
CALLER
PICTURES
SETUP
HEADSET
SLIDESHOW
DEL ALL OLD MSG
ANSWER ON/OFF
RECORD MEMO
OUTGOING MSG
TAM SETTINGS
REMOTE ACCESS
ACTIVE
DEVICES
PAIRED
DEVICES
CHANGE PIN
17
GET TO KNOW YOUR PHONE
Main
Menu
3.6
Text and Digit Entry Table
The following table shows you where each letter and punctuation
character can be found. This will be helpful when storing a name in
the contacts or renaming your handset.
In editing mode, a cursor is displayed to indicate the current text entry
position. It is positioned at the right of the last character entered.
NOTES
1. Once a character is selected, the cursor will move to the next
position after a short pause.
2. You can move the cursor within the text by pressing ◄/► to
amend the text entry.
3. Press Clear to delete the last character.
4. Press and hold Clear to delete the entire text string.
3.6.1 English Character Set
Upper Case
Key
Press
Alphanumeric Editing
(For contact name editing and renaming handset)
1
space 1 @ _ # = < > ( ) & £ $ ¥ € [ ] { } ¤ §
2
ABC2ÄÀÁÂÃÅÆÇ
3
DEF3ÈÉËÊΔΦ
4
GHI4ĞÌÍÎÏİΓ
5
JKL5Λ
6
MNO6ÖÒÓÔÕØÑ
7
PQRS7βŞΠΘΣ
8
TUV8ÜÙÚÛ
9
WXYZ9ÝΫΩΞΨ
0
.0,/:;“‘!¡?¿*+-%\^~|
18
Lower Case
Alphanumeric Editing
(For contact name editing and renaming handset)
1
space 1 @ _ # = < > ( ) & £ $ ¥ € [ ] { } ¤ §
2
abc2äàáâãåæç
3
def3èéëêΔΦ
4
ghi4ğìíîïıΓ
5
jkl5Λ
6
mno6öòóôõøñ
7
pqrs7βşΠΘΣ
8
tuv8üùúû
9
wxyz9ýÿΩΞΨ
0
.0,/:;“‘!¡?¿*+-%\^~|
19
GET TO KNOW YOUR PHONE
Key
Press
4.
BLUETOOTH
4.1
Introducing BLUETOOTH®
®
Your new telephone system with BLUETOOTH® wireless technology
has the following features:
•
Pair up to four Bluetooth enabled devices (mobile phones or
headsets) with the telephone base.
•
Connect a maximum of two Bluetooth devices (two mobile or one
mobile + one headset) to make and receive mobile calls. Only
one device (one mobile or one headset) can be active on a call at
a time.
•
Paired devices will be shown in Paired Devices list, while
Connected devices will be shown in the Active Devices list.
•
Connect a Bluetooth enabled headset for making and receiving
home calls.
•
Conference mobile and home calls.
•
Make and receive calls using your mobile phone plan with your
cordless system handsets.
4.2
Important Information
•
After plugging in the telephone base, wait at least 20 seconds
before connecting a Bluetooth device. The screen shows
Bluetooth system busy if you try to connect too soon.
•
Refer to the user’s manual of your Bluetooth enabled mobile
phone or headset for more information about how that device
uses Bluetooth connectivity.
•
Bluetooth wireless technology operates within a short range (up
to 9 metres) from the telephone base. Keep connected mobile
phones and headsets within this range.
20
•
If your mobile phone has poor reception in your home, the
telephone cannot improve the reception. However, if you have
a location in your house with better reception, you can leave
your mobile phone in that location while you use the mobile
line. In order for this to work, the mobile phone must be within
4.5 metres of the telephone base for optimal performance.
•
Charge your mobile phone while it is connected to the
telephone base. Your mobile phone’s battery discharges faster
while it is connected to the telephone base via Bluetooth
wireless technology.
•
Monitor your mobile phone’s usage, because minutes may be
deducted from your mobile plan for the duration of all mobile
calls, depending on the terms of your plan.
21
BLUETOOTH
The BLUETOOTH® word mark and logos are owned by Bluetooth
SIG, Inc.
4.3
Bluetooth Setup
To use a Bluetooth enabled mobile phone with your telephone, you
must first pair and connect your Bluetooth mobile phone with the
telephone base. All handsets can be used to make or answer calls on
the mobile phone line.
Bluetooth wireless technology operates within a short range (up to
9 metres). When you pair a Bluetooth mobile phone or Bluetooth
headset to the telephone base, keep the device within 4.5 metres of
the telephone base for optimal performance.
4.3.1
Add a Mobile Phone
Before you begin, make sure that you have mobile coverage and
your Bluetooth enabled mobile phone is not connected to any other
Bluetooth device. Refer to your mobile phone user’s manual to learn
how to search for or add new Bluetooth devices.
To pair and connect a mobile phone:
1. In main menu, press Bluetooth.
2. Press OK to select Setup Mobile.
3. If there is free pairing slot, the screen displays Place the mobile
phone next to the base. Press OK.
If there are already four paired devices on the device list, the
screen displays Maximum of 4 devices can be paired. Follow the
instructions to replace a device and remove it from the paired list.
4. The screen displays Please set your mobile to search for
devices. The telephone base is in discoverable mode. Promptly
turn on the Bluetooth feature of your mobile phone and search for
the device FS6325A, then press OK.
All devices that are connected to the telephone base are
disconnected until the pairing process completes.
5. The screen displays the Base Name and Code. Enter the PIN
of the telephone base (the default PIN is 0000) into your mobile
phone, if necessary, to continue the pairing process. The handset
displays Pairing is in progress. On your mobile phone, press to
choose FS6325A to connect with the telephone base.
22
Your mobile phone may require a passcode. In this case, enter
the mobile phone passcode into the handset and press OK.
6. Upon successful pairing, the handset displays Paired with
Mobile. Press OK.
7. If there are already two connected devices on the Active
Device list, the handset shows Maximum of 2 devices can
be connected. Follow the instructions to replace a device and
remove it from the Active Device list.
8. The handset displays Connecting Mobile X to the base...,
then Mobile setup is completed. Device is connected. when
the operation is successful.
Notes
1. The pairing process may take up to one minute. If the pairing
process fails, try again.
2. If you put the handset back in the telephone base or charger
while pairing, the process is cancelled and the handset returns
to idle mode.
3. If the device connection fails, the disconnected device will
be displayed in the Paired Devices list and the Auto-connect
function will be enabled.
4.3.2
Add a Headset
Before you begin, make sure that your Bluetooth enabled headset is
not connected to any other Bluetooth device. Refer to your headset
user’s manual to learn how to search for or add new Bluetooth
devices.
To pair and connect a headset:
1. In main menu, press Bluetooth.
2. Press ▲/▼ to highlight Setup Mobile, then press OK.
23
BLUETOOTH
9. When a device is successfully connected, you hear a
confirmation tone. The corresponding status icon (
1 or
2)
displays, and the corresponding device light on the telephone
base (
1 or
2) turns on.
3. If there is free pairing slot, the screen displays Place Bluetooth
headset next to the base. Press OK.
If there are already four paired devices on the device list, the
screen displays Maximum of 4 devices can be paired. Follow the
instructions to replace a device and remove it from the paired list.
4. The screen displays Please set your headset to discoverable
mode. The telephone base is in discoverable mode. Set your
headset to discoverable mode (refer to the user’s manual of your
headset), then press OK.
All devices that are connected to the telephone base are
disconnected until the pairing process completes.
5. The screen displays Searching for Bluetooth headset...
6. When the screen displays the found devices, press ▲/▼ to
highlight your desired headset and then press OK.
7. Enter the PIN of your headset. The PIN for most Bluetooth
devices is 0000 (refer to the user’s manual of your headset).
Then press OK.
8. The handset displays Pairing is in progress, then Paired with
Headset when the operation is successful. Press OK.
If there is another headset already active, the screen shows
Only 1 headset can be connected. and prompts you to replace
an existing active device. Follow the instructions to remove the
handset from the Active Device list.
9. The handset then displays Headset X is paired to the base.
Connect now?. Press Yes to connect.
If there are already two connected handsets on the Active
Device list, the handset shows Maximum of 2 devices can
be connected. Follow the instructions to replace a device and
remove it from the Active Device list.
10. The handset displays Connecting Headset X to the base...,
then Headset setup is completed. Device is connected. when
the operation is successful.
24
11. When a device is successfully connected, you hear a
confirmation tone. The corresponding status icon (
1 or
2)
displays, and the corresponding device light on the telephone
base (
1 or
2) turns on.
Notes
1. The pairing process may take up to one minute. If the pairing
process fails, try again.
2. When a connected headset is charging, it may disconnect
from the telephone base and the corresponding light on the
telephone base (
1 or
2) turns off. For some headset
models, you may need to turn on the headset and reconnect it
to the telephone base again.
Auto Connection
When an active device moves within Bluetooth range of the telephone
base, or is turned on within range, the telephone base tries to connect
to the device. When the device moves out of range, it is disconnected.
Your device might make a connect or disconnect sound.
A connected device could also be disconnected by:
Turning off the Bluetooth device.
Turning off the Bluetooth feature of the device.
Disconnecting through the telephone base Active Device list
or Paired Device list. The telephone base will not attempt to
reconnect until your device is moved out of range and then moves
back in range again.
4.3.4
Device Lists and Connection
Up to four devices can be paired to the telephone base. All paired
devices are shown on the Paired Device list. To use a paired device,
it must be in an active slot on the Active Device list and connected.
Only one Bluetooth mobile phone or a headset can be on a call at a time.
Once you have paired a device with the telephone base, you do not
need to repeat the pairing procedure again unless you delete the
device from the Paired Device list.
25
BLUETOOTH
4.3.3
Note
When connecting a Bluetooth device to the device list, all connected
devices will be temporarily disconnected until the procedure is
complete. It may take up to two minutes to reconnect.
4.3.5
Review the Active Device List
1. In main menu, press Bluetooth.
2. Press ▲/▼ to highlight Active Devices, then press OK.
3. Press ▲/▼ to browse the list.
4.3.6
Connect/Disconnect a Device
While in the active devices or paired devices menu, you may connect
or disconnect your device.
1. In main menu, press Bluetooth.
2. Press ▲/▼ to highlight Active Devices or Paired Devices, then
press OK.
3. Press ▲/▼ to highlight a device, then press OK.
4. Press ▲/▼ to highlight Connect or Disconnect (whichever is
applicable), then press OK to confirm.
5. The handset displays Device Connected or Device
Disconnected. You hear a confirmation tone.
Note
When your active device is connected, you are prompted to select
Disconnect. When your active device is disconnected, you are
prompted to select Connect.
4.3.7
Remove an Active Device
When you already have the maximum of two active devices and you
want to add another device, you must first delete a device from the
Active Device list.
1. In main menu, press Bluetooth.
2. Press ▲/▼ to highlight Active Devices, then press OK.
3. Press ▲/▼ to highlight a device, then press OK.
26
4. Press ▲/▼ to highlight Remove Active, then press OK to
confirm.
5. The handset displays Device removed from the active device
list and you hear a confirmation tone.
Notes
1. The removed device will be shown as Empty in the Active
Device list.
2. The removed device will still be shown in the Paired Device list.
4.3.8
Add an Active Device
If there is only one device active or no device is active, you can add
a device to the Active Devices list.
2. Press ▲/▼ to highlight Active Devices, then press OK.
3. Press ▲/▼ to highlight Empty, then press OK.
4. Press OK to select Add.
5. If there are devices paired but not all connected, press ▲/▼ to
highlight a desired device and then press OK.
If paired devices already exist and all of them are connected,
the handset displays All paired devices are already
connected.
If you want to add a headset to the Active Device list but
another headset has been connected already, the handset
displays Only 1 headset can be connected.
6. The handset displays OK. You hear a confirmation tone.
4.3.9
Review the Paired Device List
1. In main menu, press Bluetooth.
2. Press ▲/▼ to highlight Paired Devices, then press OK.
3. Press ▲/▼ to browse the list.
27
BLUETOOTH
1. In main menu, press Bluetooth.
4.3.10 Rename a Paired Device
You can change the name of a paired device on the Paired
Device list.
1. In main menu, press Bluetooth.
2. Press ▲/▼ to highlight Paired Devices, then press OK.
3. Press ▲/▼ to highlight a device, then press OK.
4. Press ▲/▼ to highlight Rename, then press OK to confirm.
5. Press ◄/►, Clear and the dialling keys to edit the device name
as necessary. Then press OK to confirm.
6. The handset displays Saved and you hear a confirmation tone.
Notes
1. A maximum of 16 characters can be entered in the device name.
2. If the revised name is duplicated with any paired device, you will
be prompted to rename the device again.
4.3.11 Remove a Paired Device
When you already have the maximum of four paired devices and
you want to pair another device, you must first delete a device from
the Paired Device list.
1. In main menu, press Bluetooth.
2. Press ▲/▼ to highlight Paired Devices, then press OK.
3. Press ▲/▼ to highlight a device, then press OK.
4. Press ▲/▼ to highlight Remove Paired, then press OK.
5. The handset displays Remove device from the paired list?.
Press Yes to confirm.
6. The handset displays OK and you hear a confirmation tone.
28
4.3.12 Replace an Active Device
If you want activate a paired device but the Active Device list has no
free slot, you can replace an active device.
1. In main menu, press Bluetooth.
2. Press ▲/▼ to highlight Paired Devices, then press OK.
3. Press ▲/▼ to highlight a device, then press OK.
4. Press OK to select Replace Active, then press OK.
5. Press ◄/► to highlight a device to be replaced, then press OK.
6. The handset displays Device added to active list. Connect
now?. Press No to connect later or press Yes to connect now.
7. If you choose to connect the active device, the handset displays
Device Connected and you hear a confirmation tone.
When adding, removing, or replacing a Bluetooth device on
the Active Device list, all connected devices are temporarily
disconnected until the procedure is complete. It may take up to two
minutes to reconnect.
4.3.13 Change PIN
You are required to enter a PIN when establishing a Bluetooth
connection. The default PIN of your telephone base is 0000.
To change the PIN:
1. In main menu, press Bluetooth.
2. Press ▲/▼ to highlight Change PIN, then press OK.
3. The handset displays Enter New PIN and the existing PIN.
4. Use the dialling keys to enter a new 4-digit code.
Press Clear to erase a digit.
Press and hold Clear to erase all digits.
Press ◄/► to move the cursor to the right or left.
5. Press OK to confirm.
6. The handset displays Saved and you hear a confirmation tone.
29
BLUETOOTH
Note
5.
USING THE PHONE
5.1
Make a Home Call
5.1.1
Preparatory Dialling a Home Call
Enter the telephone number, then press
5.1.2
Press
5.1.3
or
.
Direct Dialling a Home Call
or
, then enter the telephone number.
Call from the Contacts
1. In main menu, press Contacts.
2. Press ▲/▼ to browse the list and highlight the desired contact
entry.
3. Press Option and OK to select Call Number.
OR
Press
or
.
4. If the contact has one number only, the number will be dialled
immediately.
If the contact has multiple numbers, press ▲/▼ to highlight the
desired one and press OK.
5.1.4
Call from the Call Log
1. In main menu, press Call Log.
2. Press ▲/▼ to browse the list and highlight the desired call log
entry.
3. Press Option and ▲/▼ to highlight Call Number, then press OK.
OR
Press
5.1.5
or
.
Call from the Redial List
1. In main menu, press and hold
or
to enter the redial list.
2. Press ▲/▼ to browse the list and highlight the desired redial list
entry.
30
3. Press Option and ▲/▼ to highlight Call Number, then
press OK.
OR
Press
5.2
or
.
Answer a Home Call
If the handset is not on the charging cradle:
Press
,
or Answer to answer the call.
If the handset is on the charging cradle:
Pick up the handset from the cradle to answer the call.
Note
You need to turn on Auto Answer before you can answer a call by
this method. Please see page 36 for details.
5.3
Press
End a Home Call
during a call to end the call.
OR
Put the handset on the telephone base or charger.
5.4
Call Waiting on the Home Line
If you subscribe to call waiting service from your telephone service
provider, you hear a tone if someone calls while you are already on
a call.
Press Option and then OK to select CW Accept to put your current
call on hold and take the new call.
Press Brok at any time to switch back and forth between calls.
31
USING YOUR PHONE
OR
5.5
Make a Mobile Call
You can connect a maximum of two Bluetooth enabled mobile
phones to the telephone base, but only one mobile phone can be
used on a mobile call at a time.
5.5.1
Preparatory Dialling a Mobile Call
Enter the telephone number, then press Option and ▲/▼ to highlight
Call with Mobile X, and press OK to dial the number.
5.5.2
Direct Dialling a Mobile Call
In main menu, press Mobile. Enter the telephone number, then press
or .
Note
If you have only one mobile phone connected to the telephone
base, it is automatically selected to make mobile calls. If you have
two mobile phones connected to the telephone base, the telephone
system prompts you to select a mobile phone before you make a
mobile call. Press ◄/► to select the desired mobile phone, then
press OK.
5.6
Answer a Mobile Call
Press
,
5.7
End a Mobile Call
Press
or Answer to answer the call.
during a call to end the call.
OR
Put the handset on the telephone base or charger.
Note
You can also use your mobile phone to answer the call. If you answer
with your mobile phone, it disconnects from the telephone base.
32
5.8
Call Waiting on the Mobile Line
If you subscribe to call waiting service from your mobile phone
service provider, you hear a beep if someone calls while you are
already on a call.
Press Option and then OK to select CW Accept to put your current
call on hold and take the new call.
Press Brok on the handset at any time to switch back and forth
between calls.
When you receive an incoming mobile call during a home call,
the handset displays the mobile device name and then the calling
number display. The telephone base and all other handsets ring.
5.9.1
Answer the Incoming Mobile Call
Press Option and then OK to select CW Accept to answer the
mobile call.
The home call will be put on hold automatically.
5.9.2
Press
5.9.3
End the Mobile Call
on the handset. The home line will also be hang up.
Resume the Home Call on Hold
Press Brok to put the home line off hold.
Note
If you have voicemail service active on your mobile phone, and you
do not answer the incoming mobile call, the call is answered by
your mobile phone’s voicemail. Contact your mobile phone service
provider for more information about voicemail service.
33
USING YOUR PHONE
5.9
Answer an Incoming Mobile Call While on a
Home Call
5.10
Answer a Home Call While On a Mobile Call
When you receive a home call during a mobile call, the handset
displays External Call and then the calling number display. The
telephone base and all other handsets ring.
5.10.1 Answer the Incoming Home Call
Press Option and then OK to select CW Accept to answer the
home call.
The mobile call will be put on hold automatically.
5.10.2 End the Home Call
Press
on the handset. The mobile line will also be hang up.
5.10.3 Resume the Mobile Call on Hold
Press Brok to put the mobile line off hold.
Note
If you have turned on your answering system and you do not
answer the incoming home call, the call is answered by your
answering system.
5.11
Conference Calls
5.11.1 Make a Conference Call between Home Call and
Mobile Call
When you have calls established on the home and mobile lines
with either one put on hold, you can press Conf to create a 3-way
conference. For more information on conference calls, please refer
to page 89.
5.11.2 End a Conference Call
Put the handset back in the telephone base or charger.
OR
Press End or
on the handset.
34
5.11.3 Using the Home and Mobile Lines Together
5.12
Handsfree
During a call, press on the handset to switch between the
speakerphone and normal handset use.
5.13
Earpiece / Handsfree Volume
There are five volume levels (Level 1 to Level 5) to choose from
for each of earpiece and speaker volume. While on a call, you can
adjust the listening volume on the handset. If it is a mobile call and
the volume is too loud, too quiet or drops out, try changing the
volume on your mobile phone.
On some mobile phones, changing the volume on the mobile phone
affects your mobile call volume on the handsets or telephone base.
During a call, press ▲/▼ to increase or decrease the volume level
respectively. The current setting is shown.
When you end the call, the settings will remain at the last selected
level.
5.14
Silencing the Ringer
When the telephone is ringing, you can temporarily silence the
ringer of the handset or telephone base without disconnecting the
call. The next call rings normally at the preset volume.
35
USING YOUR PHONE
You can be on two different calls at the same time using the mobile
line and home line and two handsets.
You cannot be on a call using the mobile line and a Bluetooth
headset via the home line at the same time. These are both
Bluetooth devices and only one can be used at a time.
If you are on a call using the mobile line, you cannot join the call
using your paired mobile phone. However, you can join the call
using another FS6325A device. Your mobile phone is being used
for the phone call so only features that are normally available during
a call can be used.
To silence the handset ringer:
Press Silent or
on the handset and Ringer mute appears.
To silence the base ringer:
Press
until the screen displays L0.
Note
While in idle mode, you can press and hold
ringer on or off.
5.15
to turn the handset
Auto Answer
As long as you have Auto Answer set to On you can answer a call by
lifting the handset off the base. If you have switched Auto Answer off,
you will need to press , or Answer on the handset. Please see
page 65 for details.
5.16
Lock Keypad
Lock the keypad to prevent accidental dialling while carrying the
handset around.
In idle mode, press and hold
. The display shows Keypad locked.
To unlock the keypad, press and hold
Unlocked.
5.17
. The display shows Keypad
Call Timer
Your handset will automatically time the duration of all external calls.
The handset display shows the call duration both during and for a few
seconds after your call is terminated.
5.18
Out of Range Warning
When the handset goes out of range of the base, the line will hang up
if you are on a call. When you move back within range, the handset
will automatically reconnect to the base.
36
5.19
Mute
Use the mute function to turn off the microphone. You can hear the
caller, but the caller cannot hear you.
While on a call, press ◄ to mute the microphone and call muted icon
will be displayed. Your caller cannot hear you.
Press ◄ again to unmute the microphone.and the call muted icon
disappears.
5.20
Hold
While on a call, press
on hold.
Press
5.21
on the handset. The current call will be put
again to resume the call.
Chain Dialling
Use this feature to initiate a dialling sequence from numbers stored
in the contact list or call log while you are on a call.
Chain dialling can be useful if you wish to access other numbers
(such as bank account numbers or access codes) from the contact
list or call log.
5.21.1 Access a Number in the Contact List While on a Call
1. Press Option and ▲/▼ to highlight Contact list, then press OK
to select.
2. Press ▲/▼ to highlight the desired contact entry and press OK
or .
3. If the contact has one number only, the number will be dialled
immediately. If the contact has multiple numbers, press ▲/▼ to
highlight the number and press OK.
37
USING YOUR PHONE
You can place any call on hold. You hear an alert tone at the
telephone base if you have not taken the call off of hold after 14
minutes. You hear another alert tone at the telephone base 30
seconds later. At 15 minutes on hold, the call on hold
automatically disconnects.
5.21.2 Access a Number in the Call Log While on a Call
1. Press Option and ▲/▼ to highlight Call log, then press OK to
select.
2. Press ▲/▼ to highlight the desired number and press OK to dial
the number.
Notes
1. You can only view the numbers in the contact list and call log. You
cannot edit, delete or save entries.
2. You cannot copy a call log entry into the contact list while on a
call.
3. Press Back to exit the contact list or call log while on a call.
5.22
Redial
You can redial up to 30 of the last numbers called. If you have stored
a name in the contact list to go with the number, the name will be
displayed instead.
Note
After making a call, further key input after call timer is displayed will
not be stored in the redial list.
5.22.1 Review the Redial List
1. In main menu, press and hold
or
to enter the redial list.
2. Press ▲/▼ to browse the redial list.
3. Press Details or ◄ to view the details of an entry. If the number
is already stored in contact list, the name and number will all be
displayed.
Note
If there are no numbers in the redial list, the handset will display List
Empty!.
38
5.22.2 Dial a Redial Entry
1. In main menu, press and hold
or
.
2. Press ▲/▼ to browse the redial list and highlight an entry.
3. Press Options and ▲/▼ to highlight Call Number, then
press OK.
OR
Press
or
to dial the number displayed.
5.22.3 Save a Redial Entry to the Contact List
or
.
2. Press ▲/▼ to browse the redial list and highlight an entry.
3. Press Option and ▲/▼ to highlight Store Number, then
press OK.
4. The screen displays Copy number to:. Press ◄/► to select
the desired type for the number, then press OK.
5. Use ▲/▼ to highlight any of the contact information. Then
press ◄/► and the dialling keys to select and enter information
as necessary. Please see page 42 for details on creating a new
entry.
6. Press OK to save the entry. Saved displays and you hear a
confirmation tone.
5.22.4 Delete a Redial Entry
1. In main menu, press and hold
or
.
2. Press ▲/▼ to browse the redial list and highlight an entry.
3. Press Option and ▲/▼ to highlight Delete Entry, then
press OK.
4. The handset displays Delete?. Press Yes to confirm.
39
USING YOUR PHONE
1. In main menu, press and hold
5.22.5 Delete all Redial Entries
1. In main menu, press and hold
or
.
2. Press ▲/▼ to browse the redial list and highlight an entry.
3. Press Option and ▲/▼ to highlight Delete All, then press OK.
4. The screen displays Delete All Dialled Calls?. Press Yes to
confirm. All redial list entries will be deleted.
5.23
Call Recording
1. During a call, press Option and ▲/▼ to highlight Record Call,
then press OK.
2. You hear a beep and the call recording starts.
3. Press Stop when you finish recording. The display returns to the
call screen.
4. The recorded conversation is saved like a recorded memo. It can
be played back from the new TAM messages, similar to memo
playback. During the recorded conversation playback, name,
number, date and time will display if available.
Note
2-way recording is applicable to record conversation with an external
call.
40
5.24
Find Handset (Paging)
This feature helps you find a misplaced handset.
You can locate the handset by pressing
on the base station.
All handsets registered to the base will ring up and display
<<Paging>>.
You can stop the paging by pressing any key on the handset or
on the base again.
Notes
2. If there is no response after 60 seconds, paging ends.
5.25
Power On/Off Handset
In idle mode, press and hold
for around five seconds to power
off the handset. The handset displays Switch off handset?. Press
Yes to confirm.
When the handset is off, press and hold
to power on the handset.
5.26
for around five seconds
Turn On/Off LCD Backlight
When the handset LCD backlight is off, press
once to turn it on.
When the handset LCD backlight is on, press
once to dim it.
When the handset LCD backlight is dim, press
41
once to turn it off.
USING YOUR PHONE
1. If the handset ringer volume is set to off, the handset still rings
when paged.
6.
CONTACTS
The contact list stores up to 500 entries with up to 24 digits for each
phone number (Home/Mobile/Office) and 16 characters for each
name (Family Name/Given Name).
Contact list entries are sorted alphabetically by Family Name. Spaces
and digits take the first priority. If only the Given Name was entered in
the contact list, this is incorporated into the sort order instead of the
Family Name.
6.1
Create and Review Entries
6.1.1
Create a New Entry
1. In main menu, press Contacts.
2. Press OK to select New Entry.
3. Press ▲/▼ to highlight one of the following contact information:
Family Name
Given Name
Home Number
Mobile Number
Office Number
Group
Picture
4. Press the dialling keys to enter the name(s) as appropriate.
Press Clear to erase a character.
Press and hold Clear to erase all characters.
Press ◄/► to move the cursor to the left or right.
5. Press the dialling keys to enter the telephone number(s)
as appropriate.
Press Clear to erase a digit.
Press and hold Clear to erase all digits.
Press ◄/► to move the cursor to the right or left.
Press and hold 0 to insert a dialling pause (a P appears).
42
6. Press ◄/► to select a desired call group.
7. Press ◄/► and then ▲/▼ to browse and select a desired
picture. Press Back
to confirm.
8. Press OK to save the entry. The screen shows Saved and you
hear a
confirmation tone.
Notes
1. While editing, press to toggle between the uppercase and
lowercase letters.
2. Family Name/Given Name and at least one phone number
should be entered in order to save a contact entry.
4. If the caller ID matches with the contact entry and that entry has
been saved with a caller picture, the picture will be displayed in
the incoming call screen.
6.2 Add a Predialled Telephone Number to the
Contact List
You can save a predialled telephone number to the contact list.
1. Enter the telephone number while in main menu.
2. Press Option and ▲/▼ to highlight Store Number, then press
OK.
3. The screen displays Copy number to:. Press ◄/► to select
the desired type for the number, then press OK.
4. Use ▲/▼ to highlight any of the contact information. Then
press ◄/► and the dialling keys to select and enter information
as necessary. Please see page 42 for details on creating a
new entry.
5. Press OK to save the entry. Saved displays and you hear a
confirmation tone.
43
CONTACTS
3. A contact entry can only be assigned to one call group at
a time.
6.3
View the Contacts
Contact entries are sorted alphabetically.
1. In main menu, press Contacts.
2. Press ▲/▼ to browse the list and highlight an entry.
3. Press Option and ▲/▼ to highlight View Entry, then press OK.
4. Press ▲/▼ to view the entry details.
6.4
Alphabetical Search
You can use the 1-character search to find your contacts quickly and
efficiently.
To start the search:
1. In main menu, press Contacts.
2. When the contact entries appear, use the dialling keys to enter
a letter associated with the initial of the desired contact name.
For example, press 7 four times to view entries beginning with
S if Brown, Queenie, Rita, Samuel exist in the contact list. The
handset will show the first entry named with the same first letter
with the quick search key. If there is no name matching the letter
entered, the next closest match in alphabetical order appears.
6.5
Dial, Edit or Delete a Contact Entry
6.5.1
Dial a Contact Entry
1. In main menu, press Contacts.
2. Press ▲/▼ to highlight the desired contact entry.
3. Press Option to highlight Call Number, then press OK.
OR
Press
or
.
4. If the contact has one number only, the number will be dialled immediately.
If the contact has multiple numbers, press ▲/▼ to select the
desired one and press OK.
44
6.5.2
Edit a Contact Entry
1. In main menu, press Contacts.
2. Press ▲/▼ to browse the list and highlight an entry.
3. Press Option and ▲/▼ to highlight Edit Entry, then press OK.
4. Press ▲/▼ to highlight any of the contact information. Then
press ◄/►, Clear and the dialling keys to edit information as
necessary. Please see page 42 for details.
5. Press OK to save the entry. Saved displays and you hear a
confirmation tone.
6.5.3
Delete a Contact Entry
1. In main menu, press Contacts.
3. Press Option and ▲/▼ to highlight Delete Entry, then press OK.
4. The screen displays Delete XX?, where XX denotes the contact
name.
5. Press Yes to confirm. The entry will be deleted.
Note
Once a contact entry is deleted, it cannot be retrieved.
6.5.4
Delete All Contact Entries
1. In main menu, press Contacts.
2. Press ▲/▼ to browse the list and highlight an entry.
3. Press Option and ▲/▼ to select Delete All, then press OK.
4. The screen displays Delete All?.
5. Press Yes to confirm. All entries will be deleted.
6.6
View Capacity
If there are no contacts in the contact list:
1. In main menu, press Contacts.
2. The handset displays List Empty!
45
CONTACTS
2. Press ▲/▼ to browse the list and highlight an entry.
3. Press ▲/▼ to highlight Capacity, then press OK.
4. The handset displays Memory Details: 0/500 Used.
If there is/are contact entry(ies) in the contact list:
1. In main menu, press Contacts.
2. Press ▲/▼ to browse the list and highlight an entry.
3. Press Option and ▲/▼ to highlight Capacity, then press OK.
4. The handset displays Memory Details: X/500 Used, where X
denotes the number of the existing contacts.
6.7
Edit Call Group
6.7.1
Rename the Call Group
1. In main menu, press Contacts.
2. Press ▲/▼ to browse the list and highlight an entry.
3. Press Option and ▲/▼ to highlight Edit Call Group, then
press OK.
4. Press ▲/▼ to highlight a desired call group entry, then press OK.
5. Press ◄/►, Clear and the dialling keys to edit the call group
name as necessary.
6. Press OK to save. Saved displays and you hear a
confirmation tone.
6.7.2
Set the Ringtone of the Call Group
1. In main menu, press Contacts.
2. Press ▲/▼ to browse the list and highlight an entry.
3. Press Option and ▲/▼ to highlight Edit Call Group, then press OK.
4. Press ▲/▼ to highlight a desired call group entry, then press OK.
5. Press ▲/▼ to highlight Set Ringtone.
6. Press ◄/► to select a desired a ringtone. A sample of each tone
plays as you scroll through the choices.
7. Press OK to save. Saved displays and you hear a
confirmation tone.
46
6.8
Speed Dial
6.8.1
Assign a Speed Dial Contact Entry
You can assign eight of your contact entries to a speed dial slot (2-9).
The speed dial entries are shared by all handsets.
Up to eight speed dial entries can be stored. The speed dial number
must be created from an existing entry in the contacts.
1. In main menu, press Contacts.
2. Press ▲/▼ to browse the list and highlight an entry.
3. Press Option and ▲/▼ to highlight Speed Dial, then press OK.
4. Press ▲/▼ to highlight an empty speed dial key slot, then press
OK.
5. Press ▲/▼ to highlight a desired contact entry, then press OK.
6.8.2
View the Speed Dial List
1. In main menu, press Contacts.
2. Press ▲/▼ to browse the list and highlight an entry.
3. Press Option and ▲/▼ to highlight Speed Dial, then press OK.
4. Press ▲/▼ to browse the speed dial list.
6.8.3
Dial a Speed Dial Entry
In main menu, press and hold the dialling key (2-9) corresponding to
the assigned entry you wish to call.
OR
In main menu, press
or , then press and hold the dialling key
(2-9) corresponding to the assigned entry you wish to call.
47
CONTACTS
6. If the contact has one number only, the screen displays Saved
and you hear a confirmation tone. If the contact has multiple
numbers, press ▲/▼ to select the desired one and press OK.
The number will be assigned to the speed dial key.
6.8.4
Reassign a Speed Dial Entry
1. In main menu, press Contacts.
2. Press ▲/▼ to browse the list and highlight an entry.
3. Press Option and ▲/▼ to highlight Speed Dial, then press OK.
4. Press ▲/▼ to highlight an assigned speed dial key, then press
OK.
5. Press OK again to select Edit Entry.
6. Press ▲/▼ to highlight a desired contact, then press OK.
7. If the contact has one number only, the speed dial key will be
reassigned to the selected number. If the contact has multiple
numbers, press ▲/▼ to select a desired one and press OK.
6.8.5
Delete a Speed Dial Entry
1. In main menu, press Contacts.
2. Press ▲/▼ to browse the list and highlight an entry.
3. Press Option and ▲/▼ to highlight Speed Dial, then press OK.
4. Press ▲/▼ to highlight an assigned speed dial key, then press
OK.
5. Press ▲/▼ to highlight Delete Entry, then press OK.
6. The handset displays Delete?
7. Press Yes to confirm. The contact number stored in the speed
dial key will be deleted.
Note:
Deleting speed dial entries does not affect the contact entries.
48
7.
CALL LOG
7.1
Calling Number Display
If you have subscribed to Calling Number Display service, you will be
able to see your caller’s number on your handset display (provided
it is not blocked) prior to answering the call. If your caller’s name is
stored in the contact list and a number match is found, you will see
the caller’s name on the display instead.
You will see the following displays on handset if the corresponding
data are received from network:
Withheld: When the caller ID data is hidden by the caller.
•
Unavailable: When the caller ID data is not provided by the
network.
•
Callback: When the caller uses ringback service to initiate a call
when line is free.
•
International: When the caller ID data is received as an
international number.
•
Public: When the call is made from a network public phone.
•
Operator: When the call is from network operator.
Notes
Your phone can store up to 50 incoming calls and 30 outgoing calls
with date/time information in the call log.
1. For each call log entry, 16 characters (for name) and 24 digits (for
number) can be stored.
2. If the phone number has more than 24 digits, it will not be saved
or shown in the call log.
3. “No Number” calls will not be displayed in the call log.
49
CALL LOG
•
7.1.1
View the Call Log
Review the call log to find out who called, to easily return a call, or to
copy the caller’s name and number into your contact list. List Empty!
appears if there are no records in the call log.
1. In main menu, press Call Log.
2. Press ▲/▼ to browse the list and highlight an entry.
3. Press Details to view the date and time information of the
selected entry.
Notes
1. The call log (including received calls, dialled calls and missed
calls) is arranged in the date/time order with the most recent one
putting at the top of the list.
2. When the call log is full, the oldest call will be replaced by a
new call.
7.1.2
Dial a Call Log Entry
1. In main menu, press Call Log.
2. Press ▲/▼ to browse the list and highlight an entry.
3. Press Option and ▲/▼ to highlight Call Number, then press OK.
OR
Press
or
.
4. The number will be dialled.
7.1.3
Save a Call Log Entry to the Contact List
1. In main menu, press Call Log.
2. Press ▲/▼ to browse the list and highlight an entry.
3. Press Option and ▲/▼ to highlight Store Number, then press OK.
4. The handset displays Copy number to:. Press ◄/► to select
the desired type for the number, then press OK.
5. Use ▲/▼ to highlight any of the contact information. Then
press ◄/► and the dialling keys to select and enter information
as necessary. Please see page 42 for details on creating a
new entry.
50
6. Press OK to save the entry. Saved displays and you hear a
confirmation tone.
Note
When you try to save a number already stored in the contacts, the
screen shows Number Exist. When you try to save a name already
stored in the contacts, the handset displays Name Exist.
7.1.4
Delete a Single Entry in the Call Log
1. In main menu, press Call Log.
2. Press ▲/▼ to browse the list and highlight an entry.
3. Press Option and OK to select Delete Entry.
4. The handset displays Delete?.
7.1.5
Delete the Entire Call Log
1. In main menu, press Call Log.
2. Press ▲/▼ to browse the list and highlight an entry.
3. Press Option and ▲/▼ to highlight Delete All, then press OK.
4. The handset displays Delete All Calls?.
5. Press Yes to confirm. All call log entries will be deleted.
7.2
Call Log Settings
7.2.1
Set the Call Log Type
If there are no call log entries:
1. In main menu, press Call Log.
2. The handset displays List Empty!
3. Press OK to select Settings.
4. Press ◄/► to select All Calls or Missed Calls.
5. Press OK to confirm. Saved displays and you hear a
confirmation tone.
51
CALL LOG
5. Press Yes to confirm. The selected call log entry will be deleted.
If there is/are call log entry(ies):
1. In main menu, press Call Log.
2. Press ▲/▼ to browse the list and highlight an entry.
3. Press Option and ▲/▼ to highlight Settings, then press OK.
4. Press ◄/► to select All Calls or Missed Calls.
5. Press OK to confirm. Saved displays and you hear a
confirmation tone.
Notes
1. If All Calls is selected, all incoming and outgoing calls including
answered and missed calls, will be displayed in the call log.
2. If Missed Calls is selected, all unanswered calls will be displayed
in the call log. The unanswered calls which have not been read
will also be marked with a Solid dot in the call log. The dot will
become hollow after the entry is read.
7.2.2
Set the New Call Alert
If there are no call log entries:
1. In main menu, press Call Log.
2. The handset displays List Empty!
3. Press OK to select Settings.
4. Press ▲/▼ to highlight New Call Alert.
5. Press ◄/► to select On or Off.
6. Press OK to confirm. Saved displays and you hear a
confirmation tone.
If there is/are call log entry(ies):
1. In main menu, press Call Log.
2. Press ▲/▼ to browse the list and highlight an entry.
3. Press Option and ▲/▼ to highlight Settings, then press OK.
4. Press ▲/▼ to highlight New Call Alert.
5. Press ◄/► to select On or Off.
6. Press OK to confirm. Saved displays and you hear a
confirmation tone.
52
7.3
Voicemail Indicator
Voice Mail Waiting Indication (VMWI)
is an indication given to
you when a new voice mail message is waiting on the telephone
service provider. This feature is available if you have subscribed to
the voicemail service from you network
service provider.
The telephone is designed to provide visual indication when a new
message is left in your telephone service provider. When a new
message is left,
will be displayed and the New Event LED ≡ will
flash on the handsets. After you have listened to your message(s),
the
icon will disappear and the indicators on the handsets turn
off automatically.
To dial to the voicemail number:
in the keypad. The voicemail
OR
When there is/are new voicemail(s), press ≡ in the main menu.
If new voicemail(s) is the only new event, the voicemail number will
be dialled directly.
If there are other new events, press ▲/▼ to highlight VoiceBox and
press OK to dial the voicemail number.
Note
The voicemail number is customer dependent and user
programmable. For China, dialling to the voicemail number equals to
dialling to the IP number.
53
CALL LOG
In main menu, press and hold
number will be dialled.
8.
MEDIA
8.1
View Caller Pictures
1. In main menu, press Media.
2. Press OK to select Caller Pictures.
3. Press ◄/► or View and then ▲/▼ to view the default caller
pictures.
4. Press Back to exit.
Note
Please see page 43 for details on setting a caller picture for a
contact entry.
8.2
View Slideshow of Wallpapers
1. In main menu, press Media.
2. Press ▲/▼ to highlight Slideshow, then press OK.
3. Press Start to view the slideshow of the default wallpapers.
4. Press Back to exit.
Note
Please see page 59 for details on setting slideshow of wallpapers as
handset screensaver.
54
9.
NEW EVENTS
In the main menu of the handset, a blue circle appearing at the top
right corner of Call Log or TAM denotes the new event status. The
blue circle displays a number or sign with indications as below:
• 1-9: New calls or TAM messages
• ...: More than nine new calls or TAM messages
The new events screen will not appear when all new calls and new
TAM messages have been read. Thus, if there is no new event,
pressing ≡ on the handset will display No New Event and return to
main menu.
Any new events (calls, TAM messages) will be shown as New. When
new voicemail is received, a <!> will display.
In idle state, the New Event LED ≡ will flash for any new calls, new
TAM messages or new voicemails.
9.1
View New Events
In main menu, press ≡.
When there is only one type of new event:
•
If the new event is new call(s), the call log will display.
•
If the new event is new TAM message(s), the new TAM
message(s) will play.
•
If the new event is new voicemail(s), the voicemail number will be
dialled.
OR
When there are multiple types of new events:
Press ▲/▼ to highlight Calls, Messages or Voicemails, then press OK.
Based on your selection, the call log will display, the new TAM
message(s) will play, or the voicemail number will be dialled.
55
NEW EVENT
If one of the new calls or new TAM messages has been read, the
counter of new will diminish by one. In the event that a new event
is decremented to zero, this event shall be removed from the new
events screen.
10. PHONE SETTINGS
10.1
Alarm Settings
10.1.1 Turn On or Off the Alarm
1. In main menu, press Settings.
2. Press OK to select Alarm Clock.
3. Press ▲/▼ to browse the alarm list and highlight an alarm, then
press OK.
4. Press ◄/► to turn on or off the selected alarm. The tick sign
denotes the alarm is activated.
5. Press OK to confirm. Saved displays and you hear a
confirmation tone.
Note
If alarm is set and the preset alarm time arrives, the alarm name
will display and flash with the set time. Press Snooze to snooze the
alarm or press Off to switch it off.
10.1.2 Set the Alarm Time
1. In main menu, press Settings.
2. Press OK to select Alarm Clock.
3. Press ▲/▼ to browse the alarm list and highlight an alarm, then
press OK.
4. Press ▲/▼ to highlight Time.
5. Press the dialling keys and ◄/► to enter the alarm time.
6. Press OK to confirm. Saved displays and you hear a
confirmation tone.
56
10.1.3 Set the Alarm Name
1. In main menu, press Settings.
2. Press OK to select Alarm Clock.
3. Press ▲/▼ to browse the alarm list and highlight an alarm, then
press OK.
4. Press ▲/▼ to highlight Name.
5. Press ◄/►, Clear and the dialling keys to enter the alarm name.
6. Press OK to confirm. Saved displays and you hear a
confirmation tone.
1. In main menu, press Settings.
2. Press OK to select Alarm Clock.
3. Press ▲/▼ to browse the alarm list and highlight an alarm, then
press OK.
4. Press ▲/▼ to highlight Melody.
5. Press ◄/► to select a desired melody. A sample of each melody
plays as you scroll through the choices.
6. Press OK to confirm. Saved displays and you hear a
confirmation tone.
10.1.5 Set the Alarm Repetition
1. In main menu, press Settings.
2. Press OK to select Alarm Clock.
3. Press ▲/▼ to browse the alarm list and highlight an alarm, then
press OK.
4. Press ▲/▼ to highlight Repeat.
5. Press ◄/► to turn on or off alarm repetition. The tick sign
denotes the repetition is activated.
6. Press ▲/▼ to highlight any day, then press ◄/► to set the
alarm to repeat on the desired day(s).
7. Press OK to confirm. Saved displays and you hear a
confirmation tone.
57
PHONE SETTINGS
10.1.4 Set the Alarm Melody
10.2
Date and Time Settings
The answering system announces the day and time of each message
prior to playing it. If you subscribe to calling number display service,
the day, month and time are set automatically with each incoming
call. However, the year must be correct so that the day of the week
can be calculated from the calling number display information. Before
using the answering system, set the date and time as follows.
After handset registration or a power failure, the handset will prompt
you to set the date and time.
10.2.1 Set the Clock Format
1. In main menu, press Settings.
2. Press ▲/▼ to highlight Clock, then press OK.
3. Press OK to select Clock Format.
4. Press ◄/► to select the desired time format between 12-Hour
and 24-Hour.
5. Press ▲/▼ and then ◄/► to select the desired date format
between DD.MM.YYYY and MM.DD.YYYY.
6. Press OK to confirm. Saved displays and you hear a
confirmation tone.
10.2.2 Set the Date and Time
1. In main menu, press Settings.
2. Press ▲/▼ to highlight Clock, then press OK.
3. Press ▲/▼ to highlight Set Time/Date, then press OK.
4. Press the dialling keys to enter the time. You can press ◄/► to
move the cursor to different input fields. Then press OK to continue.
5. Press the dialling keys to enter the date. You can press ◄/► to
move the cursor to different input fields.
6. Press OK to confirm. Saved displays and you hear a
confirmation tone.
58
Note
If the date and time are not set when a message is recorded, the
system announces, “System date and time not set.” before each
message plays.
10.2.3 Set the Time/Date Master
1. In main menu, press Settings.
2. Press ▲/▼ to highlight Clock, then press OK.
3. Press ▲/▼ to highlight Time/Date Master, then press OK.
4. Press ◄/► to select the desired time/date master between
Handset and Network.
10.3
Handset Display Settings
10.3.1 Set the Screensaver
1. In main menu, press Settings.
2. Press ▲/▼ to highlight Handset, then press OK.
3. Press OK to select Display.
4. Press ◄/► to preview the screensaver. Then press ◄/► to
browse different types of screensaver and select one, including
Analog Clock, Digital Clock and Slideshow (Wallpaper 1-5).
If you want to turn screensaver off, select Off.
5. Press OK to confirm. Saved displays and you hear a
confirmation tone.
Note
If screensaver is set, the selected screensaver appears when the
LCD backlight goes to dim mode automatically after 30 seconds in
idle state, or you press
to turn the handset LCD backlight to dim
mode manually.
59
PHONE SETTINGS
5. Press OK to confirm. Saved displays and you hear a
confirmation tone.
10.3.2 Set the Brightness Level
1. In main menu, press Settings.
2. Press ▲/▼ to highlight Handset, then press OK.
3. Press ▲/▼ to highlight Brightness, then press ◄/► preview
different brightness levels.
4. Press ◄/► to select a appropriate brightness level.
5. Press OK to confirm. Saved displays and you hear a confirmation
tone.
10.3.3 Set the LCD Backlight
1. In main menu, press Settings.
2. Press ▲/▼ to highlight Handset, then press OK.
3. Press ▲/▼ to highlight LCD Backlight, then press ◄/► select
Off, On or Dim.
4. Press OK to confirm. Saved displays and you hear a
confirmation tone.
10.4
Handset Audio Settings
10.4.1 Set the Ringer Tones
1. In main menu, press Settings.
2. Press ▲/▼ to highlight Handset, then press OK.
3. Press ▲/▼ to highlight Audio, then press OK.
4. Press OK to select Ringer Settings.
5. Press OK to select Ringer Tones.
6. Press ▲/▼ to highlight Home - Ext. Calls, Home - Int. Calls,
Mobile 1 or Mobile 2.
7. Press ◄/► to select your desired ringer tone. A sample of each
ringer tone plays as you scroll through the choices.
8. Press OK to confirm. Saved displays and you hear a
confirmation tone.
60
10.4.2 Set the Ringer Volume
1. In main menu, press Settings.
2. Press ▲/▼ to highlight Handset, then press OK.
3. Press ▲/▼ to highlight Audio, then press OK.
4. Press OK to select Ringer Settings.
5. Press ▲/▼ to highlight Ringer Volume, then press OK.
6. Press ▲/▼ to highlight Home - Ext. Calls, Home - Int. Calls,
Mobile 1 or Mobile 2.
If you want to turn off the ringer, select Off.
8. Press OK to confirm. Saved displays and you hear a
confirmation tone.
Notes
1. “Crescendo” means the ringer volume will be increased
gradually from lower to higher.
2. Changing the handset ringer volume does not affect base ringer
volume.
3. The ringer volume level also determines the ringer levels of
intercom calls.
10.4.3 Set the Silent Mode
1. In main menu, press Settings.
2. Press ▲/▼ to highlight Handset, then press OK.
3. Press ▲/▼ to highlight Audio, then press OK.
4. Press OK to select Ringer Settings.
5. Press ▲/▼ to highlight Silent, then press OK.
6. Press ◄/► to select Off or Beep.
7. Press OK to confirm. Saved displays and you hear a
confirmation tone.
61
PHONE SETTINGS
7. Press ◄/► to select your desired ringer volume from Off, Level
1 to Level 5 and Crescendo. A sample of each ringer volume
plays as you scroll through the choices.
Notes
1. If you set Off, there will be no tone when you turn off the ringer
during an incoming call. While if you set Beep, there will be a
beep tone instead.
2. In idle mode, you can also turn on/off the silent mode by pressing
and holding .
10.4.4 Set the Voice Ringer
To record a voice ringer:
1. In main menu, press Settings.
2. Press ▲/▼ to highlight Handset, then press OK.
3. Press ▲/▼ to highlight Audio, then press OK.
4. Press OK to select Ringer Settings.
5. Press ▲/▼ to highlight Voice Ringer, then press OK.
6. Press ▲/▼ to highlight a voice ringer entry, then press OK.
7. Press OK to select Record.
8. Speak towards the handset microphone to record the voice ringer.
9. Press Save when you finish recording.
To playback a voice ringer:
1. In main menu, press Settings.
2. Press ▲/▼ to highlight Handset, then press OK.
3. Press ▲/▼ to highlight Audio, then press OK.
4. Press OK to select Ringer Settings.
5. Press ▲/▼ to highlight Voice Ringer, then press OK.
6. Press ▲/▼ to highlight a recorded voice ringer entry, then press
OK.
7. Press ▲/▼ to highlight Playback, then press OK.
8. The recorded voice ringer will play.
9. Press Stop to stop the voice ringer or press Delete to delete it
while playing.
62
To delete a voice ringer:
1. In main menu, press Settings.
2. Press ▲/▼ to highlight Handset, then press OK.
3. Press ▲/▼ to highlight Audio, then press OK.
4. Press OK to select Ringer Settings.
5. Press ▲/▼ to highlight Voice Ringer, then press OK.
6. Press ▲/▼ to highlight a recorded voice ringer entry, then press OK.
7. Press ▲/▼ to highlight Delete, then press OK.
8. The handset displays Deleted. You hear a confirmation tone.
1. In main menu, press Settings.
2. Press ▲/▼ to highlight Handset, then press OK.
3. Press ▲/▼ to highlight Audio, then press OK.
4. Press ▲/▼ to highlight Advisory Tones, then press OK.
5. Press ◄/► to turn on or off Key Tone.
6. Press OK to confirm. Saved displays and you hear a
confirmation tone.
Note
The procedure to set the Confirm Tone, Low Battery Tone and No
Coverage Tone is the same.
10.4.6 Set the Wideband Sound
With wideband sound turned on, the sound from the handset
earpiece or the speaker will be in higher quality, and you can get a
better speech experience.
1. In main menu, press Settings.
2. Press ▲/▼ to highlight Handset, then press OK.
3. Press ▲/▼ to highlight Audio, then press OK.
4. Press ▲/▼ to highlight Wideb. Sound, then press OK.
5. Press ◄/► to select On or Off.
6. Press OK to confirm. Saved displays and you hear a
confirmation tone.
63
PHONE SETTINGS
10.4.5 Set the Advisory Tones
10.4.7 Set the Vibrating Alert
With the vibrating alert on, the handset will vibrate when there is an
incoming call.
1. In main menu, press Settings.
2. Press ▲/▼ to highlight Handset, then press OK.
3. Press ▲/▼ to highlight Audio, then press OK.
4. Press ▲/▼ to highlight Vibrating Alert, then press OK.
5. Press ◄/► to select On or Off.
6. Press OK to confirm. Saved displays and you hear a confirmation
tone.
10.5
Set the Direct Call
To turn on the direct call:
1. In main menu, press Settings.
2. Press ▲/▼ to highlight Handset, then press OK.
3. Press ▲/▼ to highlight Direct Call, then press OK.
4. Press the dialling keys to enter the 4-digit system PIN, then press
OK. The default PIN is 0000.
5. Press ◄/► to turn on direct call.
6. Press ▲/▼ to highlight Number, then press the dialling keys to
enter the
direct call number.
7. Press OK to confirm. You hear a confirmation tone and Direct
Call displays in the main menu.
If direct call is turned on and number is set, press any key in main
menu will dial the set number except Option.
To turn off the direct call from main menu:
1. In main menu, press Options.
2. Press the dialling keys to enter the 4-digit system PIN, then press
OK. The default PIN is 0000.
64
3. Press ◄/► to turn off direct call.
4. Press OK to confirm. You hear a confirmation tone and the
screen returns to main menu.
10.6
Select the Base
Your handset can be registered to a maximum of four bases, and
you can select the desired base which you would like to connect
from your handset.
1. In main menu, press Settings.
2. Press ▲/▼ to highlight Handset, then press OK.
4. Press ◄/► to select a desired base, then press OK. The
currently used base is displayed with an asterisk.
5. Press OK. The handset displays Searching.
6. The handset will return to main menu if the registration is
successful.
Note
Only the registered base(s) is/are displayed in the list.
10.7
Set the Auto Answer Mode
If you turn on the auto answer, you would be able to answer the
incoming call simply by picking up the handset from the charging cradle.
1. In main menu, press Settings.
2. Press ▲/▼ to highlight Handset, then press OK.
3. Press ▲/▼ to highlight Auto Answer, then press OK.
4. Press ◄/► to select On or Off.
5. Press OK to confirm. Saved displays and you hear a
confirmation tone.
65
PHONE SETTINGS
3. Press ▲/▼ to highlight Select Base, then press OK.
10.8
Set the Room Monitor
You can set your registered handset(s) as a room monitor. You can
save an internal or external number in the handset as the destination
number, and then activate the room monitor, the previously saved
destination number will be called automatically, as soon as a set
noise level is reached. All handset keys will be deactivated, except
the two soft keys shown on screen and
.
The room monitor call to an external number will be terminated after
around 90 seconds, no matter the call is answered or not. While
call to an internal number (another handset) will be terminated after
around 100 seconds as well if no body answers it. When room
monitor call is triggered, press
to end the call.
When the room monitor is activated, the keypad will be disabled
except the two soft keys, no call can be made on the room monitor
handset. Incoming calls to the handset are indicated without ringtone
and only shown on the screen. The display will be in dim mode,
keypad will not be illuminated and advisory tones will also be turned
off. The vibration alert will be disabled. Vibration alert settings will be
resumed after room monitor is deactivated.
If you accept an incoming call, the room monitor will be suspended
for the call duration, but will be resumed after the call ended.
Notes
1. You should always check and verify the operation of the room
monitor before use, to ensure it is working normally.
2. Enabling this feature will reduce the operating time of the handset
considerably. Please place the handset in the base/charging
cradle to ensure the battery does not run down.
3. Please put the handset directly towards the baby. But should be
1-2 metres away from the baby.
4. The connection to which the room monitor is diverted must not be
blocked by any activated answering machine.
66
10.8.1 Activate the Room Monitor
1. In main menu, press Settings.
2. Press ▲/▼ to highlight Handset, then press OK.
3. Press ▲/▼ to highlight Room Monitor, then press OK.
4. Press ◄/► to turn on or off room monitor activation.
5. If you select On, press ▲/▼ to highlight Call To and press ◄/►
to select Internal Call or External Call as the destination.
If you select Internal Call:
6. Press ▲/▼ to highlight Handset and press ◄/► to select the
desired internal handset.
8. Press OK to save. Saved displays and you hear a confirmation
tone.
If you select External Call:
6. Press ▲/▼ to highlight Number and press the dialling keys to
enter the external destination number.
7. Press ▲/▼ to highlight Sensitivity and press ◄/► to select the
desired sensitivity of room monitor between Low and High.
8. Press OK to save. Saved displays and you hear a confirmation
tone.
Note
Higher sensitivity means lower sound can be detected, vice versa.
10.8.2 Deactivate the Room Monitor
In main menu with room monitor activated, press Off.
Or
Press Option and ◄/► to select Off, then press OK.
Or
Accept the call from the room monitor handset, then press 8 and #
continuously.
67
PHONE SETTINGS
7. Press ▲/▼ to highlight Sensitivity and press ◄/► to select the
desired sensitivity of room monitor between Low and High.
NOTES
1. To use this option, the room monitor should be diverted to an
external destination number, and the destination phone must
support tone dialling.
2. With this option to deactivate the room monitor, there will be no
further room monitor calls, but the other settings (e.g. no ringtone
for incoming call) will remain activated until you turn it off with the
other two options above.
10.9
Reset the Handset
1. In main menu, press Settings.
2. Press ▲/▼ to highlight Handset, then press OK.
3. Press ▲/▼ to highlight Reset Handset, then press OK.
4. Press the dialling keys to enter the 4-digit system PIN, then press
OK. The default PIN is 0000.
5. The handset displays Reset Handset to default?. Press Yes to
confirm.
6. The handset will be reset to default settings.
10.10
Base Settings
10.10.1 Ringer Settings
To set the ringer tones:
1. In main menu, press Settings.
2. Press ▲/▼ to highlight Base, then press OK.
3. Press OK to select Ringer.
4. Press ◄/► to select your desired ringer tone. A sample of
each tone plays as you scroll through the choices. (A total of 10
melodies are provided for base ringer.)
5. Press OK to confirm. Saved displays and you hear a confirmation
tone.
68
To set the ringer volume:
1. In main menu, press Settings.
2. Press ▲/▼ to highlight Base, then press OK.
3. Press OK to select Ringer.
4. Press ▲/▼ to highlight Ringer Volume.
5. Press ◄/► to select your desired ringer volume from Off,
Level 1 to Level 5.
6. Press OK to confirm. Saved displays and you hear a
confirmation tone.
The default flash time is best suitable for your country and network
operator. It is unlikely that you should need to change this setting
unless advised to do so.
1. In main menu, press Settings.
2. Press ▲/▼ to highlight Base, then press OK.
3. Press ▲/▼ to highlight Flash Time, then press OK.
4. Press ◄/► to select the desired flash time.
5. Press OK to confirm. Saved displays and you hear a
confirmation tone.
Note
Flash time options are country dependent. Possible options are
80/100/120/180/200/250/300/600ms.
10.10.3 Set the Dial Mode
1. In main menu, press Settings.
2. Press ▲/▼ to highlight Base, then press OK.
3. Press ▲/▼ to highlight Dial Mode, then press OK.
4. Press ◄/► to select Tone or Pulse.
5. Press OK to confirm. Saved displays and you hear a
confirmation tone.
69
PHONE SETTINGS
10.10.2 Set the Flash Time
10.10.4 Manage the Handsets
To rename the handset:
1. In main menu, press Settings.
2. Press ▲/▼ to highlight Base, then press OK.
3. Press ▲/▼ to highlight Manage HS, then press OK.
4. All registered handsets are displayed. Press ▲/▼ to highlight a
desired handset, then press OK.
5. Press OK to select Rename HS.
6. Press ◄/►, Clear and the dialling keys to rename the handset.
7. Press OK to save. Saved displays and you hear a confirmation
tone.
To deregister the handset:
1. In main menu, press Settings.
2. Press ▲/▼ to highlight Base, then press OK.
3. Press ▲/▼ to highlight Manage HS, then press OK.
4. Press ▲/▼ to highlight a desired handset, then press OK.
5. Press ▲/▼ to highlight Deregister HS, then press OK.
6. Press the dialling keys to enter the 4-digit system PIN, then press
OK. The default PIN is 0000.
7. The handset displays De-register?. Press Yes to confirm.
8. When the deregistration is successful, the handset displays
Deleted and returns to main menu.
Note
The handset you are using cannot deregister itself.
To set the call interception:
With call interception turned on, when a caller is leaving a message
on your answering system, you can stop recording and talk to the
caller by pressing
or on the handset.
70
1. In main menu, press Settings.
2. Press ▲/▼ to highlight Base, then press OK.
3. Press ▲/▼ to highlight Manage HS, then press OK.
4. Press ▲/▼ to highlight a desired handset, then press OK.
5. Press ▲/▼ to highlight Call Interception, then press OK.
6. Press ◄/► to turn call interception on or off.
7. Press OK to confirm. Saved displays and you hear a
confirmation tone.
10.10.5 Change the System PIN
2. Press ▲/▼ to highlight Base, then press OK.
3. Press ▲/▼ to highlight Change PIN, then press OK.
4. Press the dialling keys to enter the old 4-digit PIN. The default
PIN is 0000.
5. Press the dialling keys to enter the new 4-digit PIN.
6. Press the dialling keys to reconfirm and save the new PIN.
7. Press OK to confirm. Saved displays and you hear a
confirmation tone.
10.10.6 Reset the Base
1. In main menu, press Settings.
2. Press ▲/▼ to highlight Base, then press OK.
3. Press ▲/▼ to highlight Reset Base, then press OK.
4. Press the dialling keys to enter the 4-digit system PIN, then
press OK. The default PIN is 0000.
5. The handset displays Reset Base to default?. Press Yes to
confirm.
6. The base will be reset to default settings and will then return
to standby.
71
PHONE SETTINGS
1. In main menu, press Settings.
10.10.7 Set the Manual ECO Mode
With Manual ECO set at lower level, the radiation between the base
and handset will be lower, as well as the range of the base.
1. In main menu, press Settings.
2. Press ▲/▼ to highlight Base, then press OK.
3. Press ▲/▼ to highlight Manual ECO, then press OK.
4. Press ◄/► to select the desired manual ECO level from Level 1
to Level 4.
5. Press OK to confirm. Saved displays and you hear a
confirmation tone.
Note
Level 1 Indicates lower radiation and shorter range.
10.10.8 Set the Enhanced ECO Mode
With Enhanced ECO mode turned on, the radiation (DECT
transmission power) between the base and handset will be switched
off automatically and only turns on when calls are made.
1. In main menu, press Settings.
2. Press ▲/▼ to highlight Base, then press OK.
3. Press ▲/▼ to highlight Enhanced ECO, then press OK.
4. Press ◄/► to turn enhanced ECO mode on or off.
5. Press OK to confirm. Saved displays and you hear a
confirmation tone.
Note
When the Enhanced ECO mode is activated, call setup will be
delayed by around 2 seconds and the handset standby time will be
reduced as well.
72
10.10.9 Set the Handset Ringer Priority
1. In main menu, press Settings.
2. Press ▲/▼ to highlight Base, then press OK.
3. Press ▲/▼ to highlight Ringer Priority, then press OK.
4. Press ◄/► to select All, Handset 1 or Handset 2.
If you select All:
5. Press OK to confirm. Saved displays and you hear a
confirmation tone.
If you select Handset 1 or Handset 2:
6. Press OK to confirm. Saved displays and you hear a
confirmation tone.
10.10.10 Set the Call Share
Call share allows two handsets to share the same external call
conveniently, instead of setting up a conference call by complicated
call transfer. Please refer to page 90 for operation details.
1. In main menu, press Settings.
2. Press ▲/▼ to highlight Base, then press OK.
3. Press ▲/▼ to highlight Call Share, then press OK.
4. Press ◄/► to select On or Off.
5. Press OK to confirm. Saved displays and you hear a
confirmation tone.
10.10.11 Set the Exchange Code
1. In main menu, press Settings.
2. Press ▲/▼ to highlight Base, then press OK.
3. Press ▲/▼ to highlight Exchange Code, then press OK.
4. Press the dialling keys to enter the exchange code.
5. Press OK to confirm. Saved displays and you hear a
confirmation tone.
73
PHONE SETTINGS
5. Press ▲/▼ to highlight Rings, then select the ring delay from 2
Rings, 4 Rings, 6 Rings and 8 Rings.
Note
Only one digit can be entered for the exchange code and it can be
null.
10.11
Register a Handset to a Base
You can register up to five handsets to a telephone base.
1. In main menu, press Settings.
2. Press ▲/▼ to highlight Registration, then press OK.
3. Press ◄/► to select a desired base, then press OK. The
currently used base,
if any, is displayed with an asterisk.
4. Press the dialling keys to enter the 4-digit system PIN, then press
OK. The default PIN is 0000.
5. The handset displays Press and Hold Page Button!
6. Press and hold
Registering...
on the telephone base, the handset displays
7. The handset will return to main menu if the registration is
successful. An unused handset number will be assigned
automatically.
74
11. ANSWERING MACHINE
The total recording time for the outgoing message, messages and
memos is approximately 60 minutes with HQ (low compression) or
30 minutes with SHQ.
The messages remain available for replay until you delete them.
You can operate your answering machine from the handset, the
base, or via remote access.
Message Playback
You can play the TAM messages no matter the answer machine is
on or off. If you have both new and old messages, the telephone will
play the new ones first.
When playback begins, the handset and telephone base screens
display the message status, caller’s information (if the number of the
caller is stored in the contacts), and time and date of the message
recorded. You hear the total number of messages followed by the
day and time of the message. After the last message, the telephone
announces, “End of messages.” and the handset displays End of
Messages.
To listen to messages with a handset:
1. In main menu, press TAM.
2. Press OK to select Play Messages.
3. If you have either new or old messages, the messages will play
automatically.
Options during playback:
Press to play the messages through the handset earpiece. Press
again to return to playing messages through the speakerphone.
Press ▲/▼ to adjust the speakerphone volume.
Press 2 or Stop to stop the message playback and go back to
previous screen.
Press 4 once to repeat playing the current message from the
75
ANSWERING MACHINE
11.1
beginning. Press twice to skip backward to play the previous
message.
Press 5 or Delete to delete the current message. The handset
displays Deleted briefly and the system advances to the next
message.
Press 6 to skip forward to play the next message.
Press
to stop the current message playback and return to
main menu.
Notes
1. At the end of playback the handset display will return to
main menu.
2. If there are no TAM messages, No Messages! will display on
the handset and the handset will return to the previous screen.
To listen to messages with the telephone base:
Press ►/. New messages will be played first.
Options during playback:
Press DEL to delete the voice message during playback. The system
advances to the next message.
Press ►/ to stop or resume the message playback.
Press once to repeat playing the current message from the
beginning. Press twice to skip backward to play the previous
message.
Press
to skip to the next message.
Press
/
to increase or decrease the speaker volume during
message playback.
11.2
Delete All Old Messages
Using a handset:
1. In main menu, press TAM.
2. Press ▲/▼ to highlight Del All Old Msg, then press OK.
76
3. The screen displays Delete All Old Messages?. Press Yes
to confirm.
4. The handset displays Deleted and the telephone announces,
“All old messages deleted.”
Using the telephone base:
Press and hold DEL when the phone is not in use. All previously
reviewed messages are erased and the telephone announces, “All
old messages deleted.”
You can only delete the old messages which have been previously
reviewed.
11.3
Answer On/Off
If you turn the answering system on, it answers calls and records
messages only on the home line. If your paired mobile phone has
voicemail, callers can leave messages with the voicemail service.
When the answering system is turned on,
handset status bar.
displays on the
Using a handset:
1. In main menu, press TAM.
2. Press ▲/▼ to highlight Answer On/Off, then press OK.
3. Press ◄/► to select On or Off.
4. Press Yes to confirm.
5. TAM will be turned on or off and you hear a confirmation tone.
Using the telephone base:
Press
to turn the answering system on or off when the
phone is not in use. When the answering system is turned on, it
announces, “Answer on.” When the answering system is turned off,
it announces, “Answer off.”
77
ANSWERING MACHINE
Note
Notes
1. If there is no remaining recording time, the answering system
announces “Calls will not be answered.” and cannot be turned on.
2. If TAM is off,
11.4
will be disappeared on the handset status bar.
Record and Play Memos
Memos are messages you record as reminders for yourself or others
using the same answering system. You can record your own memos
using a system handset. Play and delete them the same way as
incoming messages.
To record and play a memo:
1. In main menu, press TAM.
2. Press ▲/▼ to highlight Record Memo, then press OK.
3. The system announces, “Please speak after the tone. To end
recording, press SAVE.” After the tone, speak towards the
handset microphone.
4. Press Save when you finish recording. The saved memo will be
played back automatically.
5. Press Stop to stop playing or press Delete to delete the memo.
Note
Newly recorded memo is also treated as a new TAM message.
11.5
CareMemo
You can record CareMemos that will be played automatically through
the base speaker when the set time reaches.
11.5.1 Play a CareMemo
1.
2.
3.
4.
5.
In main menu, press TAM.
Press ▲/▼ to highlight CareMemo, then press OK.
Press OK to select CareMemo 1 or CareMemo 2.
Press OK to select Playback.
Press OK to play the desired memo.
78
Note
If no memo recorded before, the handset will display “No Messages!”.
11.5.2 Record a CareMemo
1. In main menu, press TAM.
2. Press ▲/▼ to highlight CareMemo, then press OK.
3. Press OK to select CareMemo 1 or CareMemo 2.
4. Press OK to select Record.
Note
If there is already a memo recorded before, the handset will display
“Replace?”. Press YES to record the new memo.
6. Press SAVE to save and the recorded memo will play
automatically.
11.5.3 Turn the CareMemo ON/OFF
1. In main menu, press TAM.
2. Press ▲/▼ to highlight CareMemo, then press OK.
3. Press OK to select CareMemo 1 or CareMemo 2.
4. Press OK to select On/Off.
5. Press OK to select Daily, Once or Off.
• If you selected Daily or Once, press ▼ and then enter the time to
set the alert time.
6. Press OK to confirm.
Note
If you selected OFF, and if there is a memo preset by user, the
date/ time
setting will be removed, but the recorded memo will be kept. You can
turn it on for next use.
79
ANSWERING MACHINE
5. The system announces, “Please record your CareMemo
message after the tone. Press SAVE to stop recording.” After the
tone, speak towards the handset microphone.
11.6
Outgoing Message
An outgoing message is the greeting callers hear when calls are
answered by the answering system. There are two pre-recorded
outgoing messages, one for Answer & Record mode and the other
for Answer Only mode. You can also record your own outgoing
message.
The telephone is preset with a greeting that answers calls with “Hello,
please leave a message after the tone.” You can use this default
outgoing message, or replace it with your own.
11.6.1 Play Outgoing Message
1. In main menu, press TAM.
2. Press ▲/▼ to highlight Outgoing Msg, then press OK.
3. Press OK to select Play OGM.
4. Press ◄/► to select Ans & Rec or Ans Only.
5. If you have recorded your own outgoing message, it will be
played; otherwise, the pre-recorded one will be played.
6. Press Stop to stop the message playback.
11.6.2 Record Your Own Outgoing Message
1. In main menu, press TAM.
2. Press ▲/▼ to highlight Outgoing Msg, then press OK.
3. Press ▲/▼ to highlight Record OGM, then press OK.
4. Press ◄/► to select Ans & Rec or Ans Only.
5. The system announces, “Please speak after the tone. To end
recording, press SAVE.” After the tone, speak towards the
handset microphone.
6. Press Save when you finish recording. The newly recorded
outgoing message will be played back automatically.
7. Press Stop to stop playing or press Delete to delete the outgoing
message. After deleting the message, the handset displays
Deleted and the pre-recorded outgoing message will be played.
80
Notes
1. Your outgoing message can be up to 90 seconds in length.
2. Outgoing messages shorter than three seconds are not recorded.
11.6.3 Delete your Outgoing Message
1. In main menu, press TAM.
2. Press ▲/▼ to highlight Outgoing Msg, then press OK.
3. Press OK to select Play OGM.
5. If you have recorded your own outgoing message, it will be
played.
6. Press Delete to delete your own recorded outgoing message.
7. After deleting the message, the handset displays Deleted and the
pre-recorded outgoing message will be played.
Note
The pre-recorded message cannot be deleted.
11.7
TAM Settings
In the answering system setup menu, you can change the settings for
answer mode, answer delay, recording time and call screening.
11.7.1 Set the Answer Mode
1. In main menu, press TAM.
2. Press ▲/▼ to highlight TAM Settings, then press OK.
3. Press ◄/► to select Ans & Rec or Ans Only as the desired
answer mode.
4. Press OK to confirm.
5. The handset displays Saved and you hear a confirmation tone.
81
ANSWERING MACHINE
4. Press ◄/► to select Ans & Rec or Ans Only.
11.7.2 Set the Answer Delay
1. In main menu, press TAM.
2. Press ▲/▼ to highlight TAM Settings, then press OK.
3. Press ▲/▼ to highlight Answer Delay.
4. Press ◄/► to select from Time Saver, 2 Rings, 3 Rings, 4
Rings, 5 Rings, 6 Rings, 7 Rings, 8 Rings, and 9 Rings.
5. Press OK to confirm.
6. The handset displays Saved and you hear a confirmation tone.
11.7.3 Set the Recording Time
1. In main menu, press TAM.
2. Press ▲/▼ to highlight TAM Settings, then press OK.
3. Press ▲/▼ to highlight Recording Time.
4. Press ◄/► to select the recording time from 30 seconds, 60
seconds, 120 seconds and Unlimited.
5. Press OK to confirm.
6. The handset displays Saved and you hear a confirmation tone.
11.7.4 Enable/Disable Call Screening
1. In main menu, press TAM.
2. Press ▲/▼ to highlight TAM Settings, then press OK.
3. Press ▲/▼ to highlight Call Screening.
4. Press ◄/► to select On or Off.
5. Press OK to confirm.
6. The handset displays Saved and you hear a confirmation tone.
11.8
Call Screening
The call screening feature lets you listen at the telephone base and
handset to a caller leaving a message. While monitoring an incoming
message, you can answer the call by pressing
or on the
handset.
82
To screen calls at the handset:
If TAM and call screening are on and the answering system is
recording a message, press Screen to screen the call and Scanning
in progress... displays.
Keys
Functions
While message is not
playing
Press to play remote
access menu.
2
Press to play the
message(s).
4
Press to repeat playing the
current message from the
beginning. Press twice to
skip backward to play the
previous message.
5
Press to delete the current
message playback.
6
Press to skip forward to
play the next message
7
Press to turn TAM on.
9
Press to turn TAM off.
Press and enter the
remote access PIN if the
answering machine is on
and during OGM is playing.
At any time if you want to pick up the call, you can press
on the
handset and the message recording will be stopped automatically. If
the answering machine is in the process of recording, the message
already stored will be saved.
83
ANSWERING MACHINE
1
While message is
playing
To screen calls at the telephone base:
If the answering system and call screening are on, the outgoing
message and the incoming message broadcast at the telephone
base when a call is answered by the answering system.
Options while a message is being recorded:
Press
/
volume.
on the telephone base to adjust the call screening
Press ►/ to stop the message recording.
11.9
Remote Access
You can operate your answering machine from any phone by calling
your phone and entering a 4-digit security code. The preset code is
0000. You can change the code to any 4-digit number.
11.9.1 Enable/Disable Remote Access
To enable or disable remote access:
1. In main menu, press TAM.
2. Press ▲/▼ to highlight Remote Access, then press OK.
3. Press ◄/► to select On or Off, then press OK.
4. If you select On, enter the old PIN, then press OK. The default
PIN is 0000.
5. Enter the new PIN and press OK, then enter the new PIN again.
6. Press OK to confirm.
7. The handset displays Saved and you hear a confirmation tone.
Notes
1. If the old PIN or the repeat PIN entered is incorrect, Incorrect
PIN! will display on the screen.
2. If you select Off for remote access, the PIN previously stored will
be removed. A new PIN will be needed to be entered to enable
remote access.
11.9.2 Operate Your Answering Machine Remotely
1. Dial your phone number from another phone.
84
2. Press when you hear the outgoing message and then enter the
4-digit remote access PIN.
3. When you have accessed your phone, you can use the keypad to
operate your answering machine (see the Remote Commands
table below). Follow the announcements and instructions you hear.
Notes
1. If you enter the incorrect PIN code for three times, your phone
system will hang up.
3. Once the new messages have played, the telephone announces
the help menu options. If you do not press any key within 20
seconds, the remote access call automatically disconnects.
11.9.3 Activate Remote Access if TAM is Off
1. Dial your number from another phone and let it ring.
2. After 10 rings, the answering machine will switch on and answer
your call.
3. Press and then enter your remote access PIN.
4. When you have accessed your phone, you can use the
keypad to operate your answering machine (refer to the table
in Operate Your Answering Machine Remotely). Follow the
announcements and instructions you hear.
Note
If you do not choose to turn TAM On, it will turn off when the call ends.
11.10 Answering System and Voicemail
Your telephone has separate indicators for two different types of
voice messages: those recorded on its built-in answering system and
those recorded in your service provider’s voicemaiI (fees may apply).
Your telephone’s built-in answering system messages and voicemail
messages are separate. Each alerts you to new messages differently.
85
ANSWERING MACHINE
2. If you do not press any keys after you entered the remote access
code, all new messages play. If there are no new messages, all
old messages play.
If there is a blue circle appearing at the top right corner of TAM
in the main menu of the handsets and a number is flashing on
the telephone base, there is/are new message(s) in the built-in
answering system. To listen to messages recorded on your digital
answering system, press ►/ on the telephone base.
If
displays on handsets, your telephone service provider
is indicating that it has new voicemaiI for you. To listen to your
voicemail, you typically dial an access number provided by your
telephone service provider, followed by a security code or PIN.
Some service providers bundle or combine multiple services like
voicemail and call waiting, so you may not be aware that you have
voicemail. To check what services you have and how to access
them, contact your telephone service provider.
To use your voicemail service rather than your answering system,
turn off your answering system. To use your answering system
rather than your voicemail service, contact your telephone service
provider to deactivate your voicemaiI service.
11.10.1 Using the Answering System and Voicemail Together
You can also use your telephone answering system and voicemail
together by setting your built-in answering system to answer before
voicemail answers as described below. To learn how to program
your voicemaiI settings, contact your telephone service provider.
Then, if you are on a call, or if the answering system is busy
recording a message and you receive another call, the second caller
can leave a voicemail message.
Set your answering system to answer calls at least two rings earlier
than your voicemaiI is set to answer. For example, if your voicemail
answers after six rings, set your answering system to answer after
four rings. Some voicemail providers may program the delay before
answering calls in seconds instead of rings. In this case, allow six
seconds per ring when determining the appropriate setting.
11.10.2 Voice Prompts
The system provides voice prompts to guide you through the setup
procedures at the telephone base, message playback, remote
access and recording outgoing messages.
86
12. ADDITIONAL HANDSETS
12.1
Transfer a Call
While on an outside call, you can transfer the call from one handset
to another.
1. Press Intern. It will call the other handset.
2. The external call is put on hold automatically and the called
handset rings.
4. The current call with the external party ends on the calling
handset and the called handset rings.
5. Press Answer,
or on the called handset to answer the call.
The external call is now transferred to the called handset.
Note
If the destination device does not answer within 30 seconds, the
caller device displays No response to transfer and rings. If the caller
device does not answer the call on hold within 30 seconds, the call
will end automatically.
12.2
Intercom
Use the intercom feature for conversations between two handsets
You can buy additional expansion handsets for this telephone
system. You can register up to five handsets to the telephone base.
12.2.1 Initiate an Intercom Call
In main menu, press the one-digit destination handset number in the
keypad, then press Intern. The destination handset rings.
12.2.2 Answer an Intercom Call at the Destination Device
Press Answer,
or
on the destination handset.
12.2.3 Silence an Intercom Call
Press Silent on the destination handset and Ringer mute appears.
87
ADDITIONAL HANDSETS
3. Press Transf on the calling handset.
12.2.4 Mute while on an Intercom Call
Press ◄ to mute the microphone and call muted icon will be
displayed on screen. Your caller cannot hear you.
Press ◄ again to unmute the microphone and call muted icon
disappears.
12.2.5 End an Intercom Call
Press
to end the intercom call.
OR
Put the handset on the telephone base or charger.
Note
If you are calling all devices, only the first handset to pick up can
answer the intercom call. If the destination device does not answer
the intercom call within 100 seconds, is in the contact list or call log,
or is out of range, the initiating device displays Not possible.
12.3
Answer an Incoming Call during an Intercom Call
When you receive an incoming home call during an intercom call,
the two handsets display External Call and then the calling number
display. The telephone base and all other handsets ring.
12.3.1 Answer a Home Call during an Intercom Call
Press Option and then OK to select CW Accept to answer the home
call. The intercom call will be put on hold automatically.
During the home call, you have the following options:
•
If you want to resume the intercom call, press Brok. The home
call will be put on hold automatically.
•
If you want to establish a 3-way conference call, press Conf. The
other handset will join the call. For details on conference call, refer
to page 89.
Press
to end the intercom call without answering the incoming
call. The telephone continues to ring.
88
12.3.2 Answer a Mobile Call during an Intercom Call
When you receive an incoming mobile call during an intercom call,
the two handsets display the mobile device name and then the calling
number display. The telephone base rings and all other handsets ring.
Press Option and then OK to select CW Accept to answer the
mobile call.
The intercom call will be put on hold automatically.
During the mobile call, you have the following options:
If you want to resume the intercom call, press Brok. The mobile
call will be put on hold automatically.
•
If you want to establish a 3-way conference call, press Conf. The
other handset will join the call. For details on conference call, refer
to the next section.
Press
to end the intercom call without answering the incoming
call. The telephone continues to ring.
12.4
Conference Call
12.4.1 Make a 3-Way Conference Call
The conference call feature allows one external call to be shared
with two handsets (in intercom). The three parties can share the
conversation and no network subscription is required.
During an external call with internal call put on hold:
1. Press Brok to toggle between the external and internal call.
2. Press Conf to establish a 3-way conference.
3. From the conference call, you have the following options
• Press Single to talk to the external call and put the internal call
on hold. Then press Brok to toggle the line between external
and internal call. When user talks to the internal or external call,
another line will be put on hold automatically. If you want to reestablish the 3-way conference call, press Conf.
• Press End or
on any handset during a conference call will
leave the other handset still in connection with the external call.
89
ADDITIONAL HANDSETS
•
12.4.2 Make a 3-Way Conference Call with Call Share
If you turn on the call share function (see page 73 for details on
setting call share), you can conduct a conference call between
handsets easily as following.
During an external call:
Press
or on the handset to establish the conference call if
another handset has answered the call.
Note
Any party hangs up during a conference call will leave the other party
still in connection with the external call.
12.4.3 Make a Conference Call between Two Ext. Lines and
One Handset
During an external call:
1. Press , and then enter the external number. Or press Option
and ▲/▼ to select an entry from the Contacts or Call Log.
2. Press OK to call the external number and the first external call
will be on hold automatically.
3. Press Brok to toggle the line between two external lines.
4. Press Conf to establish a conference call.
5. Press
to end the call and back to main menu.
NOTE
This feature requires network subscription.
12.5
Register Handsets
Your handset and telephone base is pre-registered. If for some
reason, the handset is not registered to the telephone base,
Register! will be displayed on the handset screen, register your
handset according to the following procedure.
12.5.1 Automatic Registration for Handset
1.
Make sure the handset battery is fully charged before you begin
registration.
90
2.
Put the handset you wish to register on the telephone base
cradle, not the charger, when it shows Register!
3.
Registration is automatically performed by the system. The
handset displays Registering...
4.
When the registration is complete, the handset displays
Registered, and you hear a confirmation tone.
12.5.2 Register a Handset through the Menu
1. In main menu, press Reg..
3. Press the dialling keys to enter the 4-digit system PIN, then press
OK. The default PIN is 0000.
4. The handset displays Press and Hold Page Button!
5. Press and hold
Registering...
on the telephone base, the handset will display
6. The handset will return to main menu if the registration is successful.
If registration fails, please try again from step 1 or follow the
automatic registration procedure as above.
OR
1. In main menu, press Settings.
2. Press ▲/▼ to highlight Registration, then press OK.
3. Press ◄/► to select a desired base, then press OK.
4. Press the dialling keys to enter the 4-digit system PIN, then press
OK. The default PIN is 0000.
5. The handset displays Press and Hold Page Button!
6. Press and hold
Registering...
on the telephone base, the handset will display
7. The handset will return to main menu if the registration is successful.
If registration fails, please try again from step 1 or follow the
automatic registration procedure as above.
Notes
1. Additional handsets are assigned numbers in the sequential order
they are registered.
91
ADDITIONAL HANDSETS
2. Press ◄/► to select a desired base, then press OK.
2. You cannot register a handset if any other system handset is in use.
12.6
Deregister Handsets
If you want to replace a handset or reassign the designated handset
number of a registered handset, you must deregister all the handsets
and then individually register each handset again.
To deregister a single handset:
1. In main menu, press Settings.
2. Press ▲/▼ to highlight Base, then press OK.
3. Press ▲/▼ to highlight Manage HS, then press OK.
4. Press ▲/▼ to highlight a desired handset, then press OK.
5. Press ▲/▼ to highlight Deregister HS, then press OK.
6. Press the dialling keys to enter the 4-digit system PIN, then press
OK. The default PIN is 0000.
7. The handset displays De-register?. Press Yes to confirm.
8. When the deregistration is successful, the handset displays
Deregistered and returns to main menu.
Note
The handset you are using cannot deregister itself.
To deregister all handsets:
1. Make sure that all handsets are out of the telephone base and
chargers before you begin deregistration.
2. Unplug the telephone base power adapter from the power outlet.
Make sure all handsets are plugged with charged batteries before
proceeding.
3. While you press and hold
on the telephone base, plug the
telephone base power adapter back to the power outlet.
4. Keep pressing and holding
for about 10 seconds, then release it.
5. The base enters deregistration mode and all handsets display
Register!
92
13. TROUBLESHOOTING
If you have difficulty with your phone, please try the suggestion
listed below.
Solutions
My telephone
does not
work at all.
•
Make sure the batteries are installed and
charged correctly. For optimum daily
performance, return the handset to the
telephone base after use.
•
Make sure the power adapter is securely
plugged into an outlet.
•
Make sure the telephone line cord is plugged
firmly into the telephone base and the
telephone wall jack.
•
Unplug the electrical power to the telephone
base. Wait for approximately 15 seconds,
then plug it back in. Allow up to one minute
for the handset and telephone base to
synchronize.
•
Remove and re-insert the batteries. If that
still does not work, it might be necessary to
purchase new batteries.
•
Disconnect the telephone base from the
telephone wall jack and plug in a working
telephone. If the other telephone does not
work, the problem is probably in the wiring or
the telephone service. Call your telephone
service provider.
•
Place the handset in the telephone base for
recharging.
•
Remove and re-install the batteries and use it
until fully depleted, then recharge the handset
in the telephone base.
•
If the above measures do not solve the
problem, replace the batteries.
Low battery
shows on
screen.
93
ADDITIONAL HANDSETS
Problem
The batteries
do not
charge in the
handset or
the handset
batteries do
not accept
charge.
•
•
•
Make sure the handset is placed in the
telephone base correctly.
Remove and reinstall the batteries, then
change the handset for about 10 hours.
Purchase new batteries.
94
There is
interference
during a
telephone
conversation.
My calls fade
out when I
am using the
handset.
•
•
Common
cure for
electronic
equipment.
If the telephone is not responding normally, put
the handset in the telephone base. If it does not
respond, try the following (in the order listed):
• Disconnect the power to the telephone base.
• Disconnect the batteries on the handset.
• Wait a few minutes before connecting power
to the telephone base.
• Re-install the batteries and place the handset
in the telephone base.
• Wait for the handset to synchronize with the
telephone base. Allow up to one minute for
this to take place.
Please contact the technical support of the network provider for
further information. This telephone is not equipped with a grounding
function! Therefore some of the functions may be limited when used
in PBX systems.
Technical Support
For technical support, please call VTech Technical Inquiry Hotline
852-2667 7433. Please read out the serial number of this telephone
to Technical Center. The serial number can be found in the battery
compartment after having the batteries removed.
95
ADDITIONAL HANDSETS
•
The location of your telephone base can impact
the performance of your cordless phone. For
better reception, install the telephone base in a
centralized location within your home or office,
away from walls or other obstructions. In many
environments, elevating the telephone base
improves overall performance.
Disconnect the telephone base from the
telephone wall jack and plug in a corded
telephone. If calls are still not clear, the
problem is probably in the wiring or telephone
service. Contact your telephone service
provider (charges might apply).
If the other telephones in your home are having
the same problem, the problem is in the wiring
or telephone service. Contact your telephone
service provider (charges may apply).
14. TECHNICAL SPECIFICATIONS
Basic Information
Dimensions
Handset: width / length / height = 50 X 160 X 18 mm
Base: width / length / height = 85 X 140 X 70 mm
Charger: width / length / height = 79 X 85 X 68 mm
Weight
Handset: 117g (without battery); 140g (with
battery)
Base: 186g
Charger: 63g
Valid range
Indoor: 50m
Outdoor: 300m
Handset
Operating Time
Standby time: 200Hours approx.
Talk time: 20Hours approx.
RF Parameter
Frequency
1.8GHz
Number of
Channels
10 channels
Power Supply
Base
Input AC 100-240V 50/60Hz 150mA
Output 6VDC 750mA SMPS
Handset
Li-ion; 3.7V; 1000mAH rechargeable
batteries pack.
Charger
Input AC 100-240V 50/60Hz 150mA
Output 6VDC 450mA SMPS
96
15. CARE AND MAINTENANCE
INSTRUCTIONS
NOTE
Remember that electrical appliances can cause serious injury if
used when you are wet or standing in water. If the telephone base
should fall into water. DO NOT RETRIEVE IT UNTIL YOU UNPLUG
THE POWER CORD AND TELEPHONE LINE CORDS FROM THE
WALL. Then pull the unit out by the unplugged cords.
CAUTION
RISK OF EXPLOSION IF BATTERY IS REPLACED
BY AN INCORRECT TYPE.
DISPOSE OF USED BATTERIES ACCORDING
TO THE INSTRUCTIONS.
97
CARE AND MAINTENANCE
Take care of your telephone
• Your cordless telephone contains sophisticated electronic parts,
so you must treat it with care.
• Avoid rough treatment.
• Place the handset down gently.
• Save the original packing materials to protect your telephone if
you ever need to ship it.
Avoid water
• You can damage your telephone if it gets wet. Do not use the
handset in the rain, or handle it with the wet hands. Do not install
the telephone base near a sink, bathtub or shower.
Electrical storms
• Electrical storms can sometimes cause power surges harmful to
electronic equipment. For your own safety, take caution when
using electric appliances during storms.
Cleaning your telephone
• Your telephone has a durable plastic casing that should retain
its luster for many year. Clean it only with a soft cloth slightly
dampened with water or a mild soap.
• Do not use excess water or cleaning solvents of any kind.
Customer Service Centre
Suite 1601, Lever Tech Centre, 69-71 King Yip Street,
Kwun Tong, Kowloon, Hong Kong.
Customer Service Hotline: (852) 2666 5558
Technical Inquiry Hotline: (852) 2667 7433
VTECH TELECOMMUNICATIONS LTD.
A member of THE VTECH GROUP OF COMPANIES.
© 2014 VTech Telecommunications Ltd. All Rights Reserved.
91-007573-010-100
98