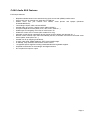
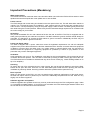
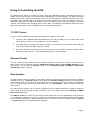
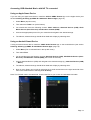
1
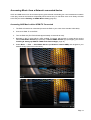
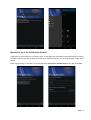
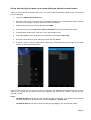
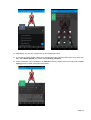
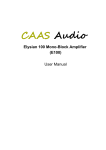
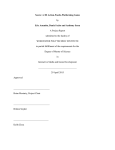
CAAS Audio
Elysian Audio Server (EAS)
User Manual
Table of Contents
Elysian Audio Server (EAS) Overview..................................................................................................................................3
CAAS Audio EAS Features......................................................................................................................................................................4
CAAS Audio EAS Specification................................................................................................................................................................5
Supported Devices / Peripherals..............................................................................................................................................................5
Important Precautions (Mandatory).......................................................................................................................................6
EAS Front Panel Explained...................................................................................................................................................7
EAS Rear Panel Explained...................................................................................................................................................7
Using & Controlling the EAS.................................................................................................................................................8
TV CEC Control .......................................................................................................................................................................................8
Network Control........................................................................................................................................................................................8
Web Interface...........................................................................................................................................................................................8
Adjusting the EAS Volume....................................................................................................................................................9
Changing the EAS Input........................................................................................................................................................9
Recommended EAS Switch On & Shut Down procedure...................................................................................................10
Quick Start...........................................................................................................................................................................11
Adding Music Files to your USB Storage...............................................................................................................................................11
Accessing USB Device Music Files........................................................................................................................................................11
Accessing USB Attached Music with a HDMI TV Connected..........................................................................................................11
Accessing USB Attached Music with NO TV connected..................................................................................................................13
Accessing Music from a Network connected device..............................................................................................................................14
Accessing NAS Music with a HDMI TV Connected.........................................................................................................................14
Accessing NAS Music with NO TV connected.................................................................................................................................15
DLNA / UPnP Audio Interface, Networking & File Sharing..................................................................................................16
Networking the EAS...............................................................................................................................................................................16
Windows Network (SMB) file sharing.....................................................................................................................................................16
Accessing a UPnP Network Device.......................................................................................................................................................17
Installing & Setting up XBMC & CAAS Audio Remote Apps...............................................................................................18
Installing CAAS Remote on an Android Device.....................................................................................................................................18
Manual Set up of the CAAS Audio Remote.....................................................................................................................................19
Set up after the App has been run or when adding an alternative media centre............................................................................20
Using CAAS Audio Remote App ...........................................................................................................................................................21
Building a Playlist.............................................................................................................................................................................23
CAAS Audio Remote App Volume Control & Input Select...............................................................................................................24
CAAS Audio Remote Control Help.........................................................................................................................................................25
Installing Official XBMC Remote on an Apple Device............................................................................................................................26
Adding a Host at a later time............................................................................................................................................................27
Using Official XBMC Remote App..........................................................................................................................................................28
Using Official XBMC Remote volume control..................................................................................................................................29
Official XBMC Remote Control Help......................................................................................................................................................29
Building an XBMC Music Library.........................................................................................................................................30
Building a Library....................................................................................................................................................................................30
Updating a current Library......................................................................................................................................................................31
Streaming Music from a smart phone / tablet to the EAS...................................................................................................32
Party Mode (Random Song Play).......................................................................................................................................32
Audio Server Software Update............................................................................................................................................33
CAAS Audio Configuration Set Up......................................................................................................................................33
Returns, Repairs and Weee recycling.................................................................................................................................33
EAS Factory Reset..............................................................................................................................................................34
EAS FAQ.............................................................................................................................................................................35
Warranty (3 Year Guarantee)..............................................................................................................................................36
Page 2
Elysian Audio Server (EAS) Overview
The Elysian Audio Server (EAS) is an extension of the reference standard DAS, machined from a single
piece of aluminium, incorporating an integrated Pre-amp with remote volume control, single ended &
balanced outputs and additional power supplies with improved isolation.
The EAS is a true reference designed for the discerning Audiophile. Our aim was to produce an outstanding
sounding, unsurpassed audio server and consolidate several very expensive units into one thus bringing true
high end performance to a much lower price point.
The EAS has an extremely low noise floor with greater spacial refinement, dynamic accuracy and fine detail
retrieval than any other CD Player, audio server or pre-amp on the market.
The EAS is an audio server with an integrated pre-amp and is capable of driving a power amplifier directly,
thus replacing up to 4 separate units (e.g. CD transport, DAC, pre-amp, PSUs) and interconnects.
The EAS is an extremely versatile audio server with four USB inputs, network capability through a LAN
connection and an S/PDIF input. The EAS is primarily an audio server and the best performance will be
achieved when files are accessed from a USB pen or Hard Disk Drive (HDD). Alternatively digital audio can
be streamed from either a NAS, PC, tablet or smart phone over the LAN connection. A CD transport or other
devices can be connected to the EAS S/PDIF input, however this input bypasses our bespoke low jitter reclocking system and therefore is not the primary input.
The EAS has been designed to produce the highest audio quality possible. This has been achieved through
our custom bespoke 8 wire digital interface, featuring 176.4k samples per second up-converting parallel
DACs, data buffering and ultra low jitter clock, allowing near perfect data re-clocking and bit perfect I 2S type
digital signal transfer.
The EAS is fitted with a Raspberry Pi 2 micro computer and a bespoke ultra low jitter re-clocking system that
up-samples digital data to 176.4k samples per second and feeds a parallel arrangement of 16 bit R-2R
DACs. The EAS is fitted with eight dedicated discrete regulated power supplies for both Left and Right
analogue channels and seven separate regulated supplies for the digital sections.
All music files and data can be accessed through the on screen interface once the EAS has been connected
to a TV or monitor (though HDMI). If the TV has HDMI CEC then all the EAS functions can be accessed
through the TV remote, alternatively the functionality can be accessed through a LAN interface, tablet or
smart phone. A tablet or smart phone can also be used to control the pre-amp section and volume control.
The EAS is fitted with single ended and balanced variable (volume control) outputs. These can be connected
directly to a power amplifier. The single ended outputs have the purest most direct connection to the DACs,
with just one JFET in the signal path. The balanced outputs have more circuitry in the signal path, however
many power amplifiers will perform better though the balanced connection and as a result, with certain
amplifiers, truly excellent sound reproduction can be achieved through balanced inter-connection.
Volume control is achieved through a state of the art 128 step, silver contact relay switched, fixed precision
resistor volume control. This is a state of the art complex system of switching relays, however sonically it out
performs all standard potentiometer based volume controls.
All the analogue signal sections of the EAS are DC coupled from DAC ICs to the output and have a very
short signal path.
The power supply is a key component in achieving the maximum performance from the audio sections and
for this reason the EAS is fitted with a high specification mains filter and three separate transformers, one for
the analogue sections and two for the digital sections.
Page 3
CAAS Audio EAS Features
EAS unique features:
•
•
•
•
•
•
•
•
•
•
•
•
•
•
•
•
Bespoke software based on the award winning open source Kodi (XBMC) media centre.
Plays music from an external 3.5" hard drive or USB Pen.
Stream music over your network from tablets, smart phones and laptops (Windows
shares/DLNA/UPnP).
Two analogue inputs, USB, LAN and S/PDIF.
Sample rates up to 24 bit / 192kHz (16 bit / 96kHz S/PDIF).
Accepts multiple file formats (WAV, FLAC, AIFF, ALAC, APE etc...).
HDMI output for navigating music files on a flat screen TV.
HDMI CEC control via TV remote (CEC enabled TVs only).
Alternate control through networked devices (smart phones, tablets, web browser etc...).
Remote control volume, input select and standby function, accessible via network connected smart
device (tablet, smart phone etc...).
Parallel 176.4k up-sampling R-2R DACs.
A single, ultra linear, ZERO feedback, JFET Class A buffer stage.
A 128 step, relay switched, fixed resistor volume control.
15 regulated power supplies including 8 dedicated discrete regulated supplies.
Separate transformers for the analogue and digital sections.
DC Coupled from input to output.
Page 4
CAAS Audio EAS Specification
Gain:
Frequency Response:
Pre-amp RCA Outputs
Pre-amp XLR Outputs
Analogue RCA Input
Analogue RCA Output
Analogue XLR Output
Input Impedance
Output Impedance
Preamp THD
DAC THD
Crosstalk
Output SNR (A-WTD)
Output DC Offset
Power Consumption
Fuse Rating
Analogue Inputs
Analogue Outputs
Digital Inputs
Network Inputs
Video Output
DAC
Mains Transformers
Dimensions
Weight
0dB to -50dB & Mute (128 steps)
+3dB for XLR output
0.2Hz to 1MHz (-3dB) Pre-amp DC Coupled
10Hz to 100kHz (-0.1dB)
0.8Hz to 400kHz (-3dB) Pre-amp DC Coupled
10Hz to 50kHz (-0.1dB)
4V RMS (Max at 0dB Gain)
4V RMS (Max)
3V RMS Balanced (Max)
> 27 kohms
60 ohms (Pre-amp RCA)
360 ohms per phase (Pre-amp XLR)
110 ohms (DAC RCA)
< 0.01% @1kHz (0dB level, 2V RMS, RCA output)
< 0.03% @1kHz (0dB level, 2V RMS, Balanced XLR output)
< 0.03% @1kHz (0dB level, 2V RMS output)
<-90dB
~100dB
+/-1mV
< 20W
< 0.5W (Standby)
T500mA
2 x L/R Pair RCA
1 x L/R Pair RCA (Variable)
1 x L/R Pair XLR (Variable)
1 x L/R Pair RCA (Fixed Line Level DAC output)
1 x RCA (S/PDIF)
4 x USB (connect to hard drive or PC)
1 x RJ45 LAN (wired connection)
1 x HDMI (with CEC capability)
Parallel 176.4k up-sampling 16Bit R-2R DACs
3 x 15VA (toroidal)
80mm high, 350mm wide, 330mm deep
8.6kg
Subject to change without notice.
Supported Devices / Peripherals
WiFi adapter: EDiMax EW-7811Un
Recommended Apps: CAAS Audio Remote App (for Android) & Official XBMC Remote (for iOS)
Page 5
Important Precautions (Mandatory)
Water and moisture
The EAS should not be used near water. Care should be taken not to allow the EAS to fall into water or other
liquids and ensure that liquids are never spilled onto or into the EAS.
Power sources
The EAS voltage and current rating is indicated on the rear panel of the unit. This will state either 240Vac or
120Vac. Two T1A time-lag fuses are included for 120V versions and two T0.5A fuses are included for the
240V versions. The input frequency rating of the power supply is 50Hz to 60Hz. The EAS typically draws less
than 20W during the normal operation. Please verify that the indicated voltage requirement is consistent with
the mains voltage in your location.
Grounding
We provide a standard IEC AC main cable that fits into the rear of the EAS. The EAS is equipped with an
earth ground provided by this cable and connection. DO NOT defeat this ground, the EAS should always be
grounded. It is dangerous to operate the EAS without a ground connection. Additionally the EAS may not
function correctly without a ground connection.
Power and Signal cables
The EAS is supplied with a power cable that meets UK legislated requirements. As with all audiophile
equipment the power cable should be the last item attached and the first item removed whenever equipment
is added or removed from the audio chain. Any cables (power or signal) should never be connected or
removed while the equipment or supporting equipment is powered up. Failure to pay attention to this
precaution may result in damaged equipment.
Ventilation
Audio equipment may run hot. The installation must allow for this heat dissipation. We recommend free air
circulation around the product. This can best be achieved by leaving at least a 20cm gap around the unit.
The EAS should not be installed or situated near any other source of heat (e.g. central heating radiator or on
top of an amplifier).
Servicing
To reduce the risk of fire, electrical shock or other injuries, the user should not attempt to service the EAS.
Please do not open the EAS. There are no user serviceable parts inside the EAS. Opening the EAS will
invalidate any warranty offered. Servicing must be referred to qualified service personnel only.
Burn in period
When you first power up the EAS, you may not experience the maximum performance of this audio server,
the EAS can require a burn in period of up to 100 hours. Additionally the performance of the EAS can vary
slightly over its warm up period.
Software upgrades and updates
Software upgrades and updates should only ever be performed through the EAS configuration page. Under
no circumstance update Rasbmc or Kodi as this will overwrite the CAAS Audio digital interface kernel and
the unit will have to be returned to the manufacturer.
Page 6
EAS Front Panel Explained
(1) (2)
1.
2.
3.
4.
5.
6.
7.
8.
(3)
(4)
(5)(6) (7)(8)
Standby LED (red for standby).
Standby / On select button.
Volume control knob.
Input select button (toggles through inputs).
AS LED (Audio Server input selected).
DI LED (Digital S/PDIF input selected, D IN on the rear panel).
1 LED (Analogue input 1 selected).
2 LED (Analogue input 2 selected).
The selector switch on the front panel cycles through the inputs. By pressing and releasing this button, you
can toggle through the inputs, audio server AS, S/PDIF input D in DI, analogue input one 1, analogue input
two 2 and then back to AS etc... Audio server AS is the default turn on selection.
EAS Rear Panel Explained
(2)
(1)
1.
2.
3.
4.
5.
6.
7.
8.
9.
10.
11.
12.
13.
(4)
(3)
(5)
(6)
(7) (8)
(9)
(12) (13)
(10)
(11)
Mains power input and Fuse.
Power switch.
HDMI should be connected to a CEC enabled TV, using a CEC enabled cable.
LAN allows the Audio Server to be networked and accessed through the network, web server, tablet
and smart phone.
CAAS Link (12V trigger for the control of CAAS power amplifiers).
Four USB ports mainly used for external storage devices.
Factory reset button.
D IN is an S/PDIF input, selected through the front panel as the DI selection.
Balanced outputs (variable volume for connection to power amps).
Single ended outputs (variable volume for connection to power amps).
The DAC output is a fixed line level output straight from the DAC. DO NOT CONNECT STRAIGHT
TO A POWER AMP!
Analogue input two (selection 2 on the front panel).
Analogue input one (selection 1 on the front panel).
Page 7
Using & Controlling the EAS
The Elysian Audio Server is primarily an audio server with integrated pre-amp. The audio server has an
S/PDIF input at the rear that can be selected by the DI selection on the front panel. This allows third party
digital sources to be connected to the audio server, such as CD transports. It should be noted that by far the
best audio quality playback will be achieved through using the audio server as it is intended, that is as a
dedicated audio server (the AS input selection on the front panel) and not through third party connected
devices. The EAS also has 2 analogue inputs (1 & 2). Note: The S/PDIF input bypasses CAAS Audio's low
jitter re-clocking system, so this advantage can not be utilised with this input.
TV CEC Control
If your TV is CEC enabled you can control the audio server using the TV remote:
1. Connect a CEC enabled HDMI cable between the TV and the HDMI port on the rear of the audio
server. (Note: On some TVs only HDMI port 1 is CEC enabled).
2. If the EAS does not recognise the CEC connection, turn off both the TV and audio server and then
back on again whilst the HDMI cable is connected.
3. Once CEC has been recognised, you can scroll through the music files stored on the USB media.
Play track, pause, stop etc... is all viewable through the on screen interface.
Network Control
You can control the audio server from other devices connected to your network, such as a smart phone or
tablet. To do this you must first install the CAAS Audio Remote App or Official XBMC Remote on your
smart device. The procedure is highlighted below in the Installing & Setting up XBMC & CAAS Audio
Remote Apps section, page 18.
Web Interface
The web interface can be accessed on port 80 by opening a web browser and typing the EAS IP address
followed by :80 ( e.g. ://192.168.1.14:80 ) into the URL bar. The EAS IP address will pop up in the right hand
bottom corner of the TV on EAS boot up (the EAS must be networked first for this to happen). Alternatively
you may be able to type the host name followed by :80 ( i.e. http://EAS:80 ). Note: this may not work with
some routers.
The web browser interface can be used to navigate around the HDMI connected TV interface, adjust the
EAS volume or browse through and play tracks from your music library (see section Building an XBMC
Music Library, page 30).
The EAS IP address can also be found through other techniques, such as downloading the App Fing to
your smart phone / tablet. You can then run Fing and it will display the IP addresses of all devices connected
to your network. Alternatively if CEC is enabled on your TV, you can use the TV remote to scroll to System
→ System info where the IP address will be displayed.
Page 8
Adjusting the EAS Volume
The EAS volume can be changed through the following methods:
1. Manually using the volume knob on the front of the EAS.
2. Remotely using the CAAS Audio Remote App.
(see section Using CAAS Audio Remote App, page 21).
3. Remotely using the Official XBMC Remote App.
(see section Using Official XBMC Remote App, page 28).
4. Remotely on your PC using a web browser.
(see section Using & Controlling the EAS, page 8).
Changing the EAS Input
The EAS input can be changed either by:
1. Pressing the input select button on the front of the EAS (just right of the knob).
2. Pressing the input select button on the CAAS Audio Remote App (bottom right of the screen),
(see section Using CAAS Audio Remote App, page 21).
Note: Pressing the EAS input select button will toggle through the inputs, AS, DI, 1, 2 and then back to AS.
Page 9
Recommended EAS Switch On & Shut Down procedure
The EAS should always be shut down in a controlled manner just as you would a PC or laptop. The rear
panel mains switch should only ever be turned off while the EAS is in standby mode, not while the EAS is on.
Switching the EAS ON
1. Switch the rear panel mains switch ON.
2. The EAS will now be in Standby mode (Red front panel LED illuminated).
3. Press the front panel Standby / ON button next to the red LED.
4. The red LED will go OFF and the blue AS LED will come ON.
5. The EAS may take up to 30 seconds to boot. You will hear relays switching during this period.
6. The EAS is now ready to use.
Placing the EAS into Standby mode
The EAS should always be shut down in a controlled manner just as you would a PC. This can be achieved
in the following ways:
1. By pressing the front panel Standby button (the red LED will illuminate).
2. By navigating on a HDMI TV (using either a CEC TV remote, web browser or smart device):
◦ Select the Power icon in the bottom left corner of the screen.
◦ Then toggle down and select Power off system.
◦ The computer will then power down and the EAS will enter Standby mode.
3. By using a web browser and selecting the power down icon (see section Using & Controlling the
EAS, page 8).
4. By using the CAAS Audio Remote App on an Android smart device (see section Installing &
Setting up XBMC & CAAS Audio Remote Apps, page 18):
◦ Select the remote screen from the menu.
◦ Click on the Power down icon.
◦ Then select Shutdown.
5. By using the Official XBMC Remote App on an iOs Apple device (see section Installing & Setting
up XBMC & CAAS Audio Remote Apps, page 18):
◦ Click on the Power down icon (top right on the CAAS App and bottom right on the iPad App).
◦ Then select Power off.
The CAAS Link outputs will be activated while in Standby mode and when connected to CAAS power
amplifier, will power down the amplifiers.
Switching the EAS OFF
The EAS can be fully Powered OFF by switching the rear panel mains power switch to the OFF position.
This should only be done while the EAS is in Standby mode.
Note: The CAAS Link outputs will not work when the EAS has been turned off at the rear mains switch.
Page 10
Quick Start
The next few pages are designed to help you play music quickly (with reduced functionality).
EAS set up time can be reduced and music can be accessed reasonably quickly with reduced functionality
and without building music libraries. To access all the functionality, sources will need to be added to Kodi
(XBMC) and music libraries will need to be built. Adding sources and building libraries can take a large
amount of time. The procedure to achieve this is explained in the following sections.
Adding Music Files to your USB Storage
We recommend you use EAC (exact audio copy). Download and install EAC onto your PC / Laptop and RIP
your CDs using EAC (We recommend WAV or FLAC format). Then simply plug your USB storage into your
PC / Laptop and copy the music files across. Once finished, remove the USB device and plug it in to the
USB socket on the rear of the EAS. The EAS should then auto-detect the drive and you're ready to go. See
the next section for accessing these music files.
Accessing USB Device Music Files
Music can be accessed quickly from a USB device with reduced functionality. This can be done either using
a HDMI TV and CEC remote, a web browser or smart device App:
Accessing USB Attached Music with a HDMI TV Connected
1. Insert the USB storage device in one of the rear USB ports.
2. Connect a HDMI TV to the EAS.
3. Turn the EAS ON (The EAS will take approximately 30 seconds to boot).
4. Navigate on the TV using either a CEC enabled TV remote, web browser or smart device running
either CAAS Audio Remote App (Android) or Official XBMC Remote App (iOS Apple), (see section
Installing & Setting up XBMC & CAAS Audio Remote Apps, page 18).
5. Select Music → Files → Attached Devices (USB) and navigate to your desired storage (see
screen shots below).
Note: The EAS will need to be networked if you are using a smart device App or web browser to navigate.
Connect the EAS to your router via a standard LAN cable.
Page 11
Page 12
Accessing USB Attached Music with NO TV connected
Using an Apple Smart Device
If you are using an Apple smart device, Install the Official XBMC Remote App on the Apple device (see
section Installing & Setting up XBMC & CAAS Audio Remote Apps, page 18).
1. Select Music (top left corner).
2. Then select the Folder icon (at the bottom).
3. You should then have the following choices: Music Add-ons, Attached Devices (USB), UPnP
Media Servers (Auto-Discover) and Windows network (SMB).
4. Choose the appropriate protocol for your network and navigate to the desired storage.
5. The albums, artists and songs should all be listed and will play by selecting them.
Using an Android Smart Device
If using an Android smart device, Install the CAAS Audio Remote App on the Android device (see section
Installing & Setting up XBMC & CAAS Audio Remote Apps, page 18).
1. Select Menu (The 3 horizontal lines in the top left corner).
2. Then select Files.
3. You should then have the following choices: Attached Devices (USB), UPnP Media Servers (AutoDiscover) and Windows network (SMB) (See screen shot below).
4. Choose Attached Devices (USB) and navigate to the desired storage (e.g. Attached Devices (USB)
→ Music).
5. The albums, artists and songs should all be listed and will play by selecting them.
6. Note: A music library can be built by selecting the 3 small vertical dots on the right hand side of the
main music folder and then selecting scan to library.
Note: The EAS will need to be networked. Connect the EAS to your router via a standard LAN cable.
Page 13
Accessing Music from a Network connected device
UPnP and SMB servers can be accessed quickly (with reduced functionality) for near instantaneous network
music play, however the interface will probably list file names only. For full album art a music library will need
to be built (see section Building an XBMC Music Library, page 30).
Accessing NAS Music with a HDMI TV Connected
1. The EAS will need to be networked (Connect the EAS to your router via a standard LAN cable).
2. Connect a HDMI TV to the EAS.
3. Turn the EAS ON (The EAS will take approximately 30 seconds to boot).
4. Navigate on the TV using either a CEC enabled TV remote, web browser or smart device running
either CAAS Audio Remote App (Android) or Official XBMC Remote App (iOS Apple), (see section
Installing & Setting up XBMC & CAAS Audio Remote Apps, page 18).
5. Select Music → Files → UPnP Media Servers (or Windows network SMB) and navigate to your
desired storage (see screen shot below).
Page 14
Accessing NAS Music with NO TV connected
Using an Apple Smart Device
If you are using an Apple smart device, Install the Official XBMC Remote App on the Apple device (see
section Installing & Setting up XBMC & CAAS Audio Remote Apps, page 18).
1. Select Music (top left corner).
2. Then select the Folder icon (at the bottom).
3. You should then have the following choices: Music Add-ons, Attached Devices (USB), UPnP
Media Servers (Auto-Discover) and Windows network (SMB).
4. Choose the appropriate protocol for your network (UPnP or SMB) and navigate to the desired
storage and music folder (e.g. Windows network (SMB) → Workgroup → NAS → Music).
5. The albums, artists and songs should all be listed and will play by selecting them.
Using an Android Smart Device
If using an Android smart device, Install the CAAS Audio Remote App on the Android device (Installing &
Setting up XBMC & CAAS Audio Remote Apps, page 18).
1. Select Menu (The 3 horizontal lines in the top left corner).
2. Then select Files.
3. You should then have the following choices: Attached Devices (USB), UPnP Media Servers (AutoDiscover) and Windows network (SMB).
4. Choose the appropriate protocol for your network (UPnP or SMB) and navigate to the desired
storage and music folder (e.g. Windows network (SMB) → Workgroup → NAS → Music).
5. The albums, artists and songs should all be listed and will play by selecting them.
6. Note: A music library can be built by selecting the 3 small vertical dots on the right hand side of the
main music folder and then selecting scan to library.
Note: The EAS will need to be networked. Connect the EAS to your router via a standard LAN cable.
Page 15
DLNA / UPnP Audio Interface, Networking & File Sharing
The EAS can connect to a home network and play audio files stored on DLNA / UPnP enabled devices.
The EAS can be connected to a TCP/IP network via a wired connection. Network connection enables the
EAS to play audio files stored on DLNA / UPnP servers, computers and network drives. The EAS has a
standard Ethernet socket fitted on the rear panel. For wired network connection this socket should be
connected to a spare Ethernet socket on your network router.
Networking the EAS
1. Connect a CAT5 LAN cable to the LAN port on the rear of the EAS and the other end to a free LAN
port on your router.
2. The EAS should now be networked. The EAS is DHCP aware by default, so if connected to a DHCP
enabled router (most are), your router will assign an IP address to the audio server.
3. You should be able to access the audio server through the assigned IP address. If you download
Fing App for your smart device it will scan all your network attached devices and return their IP
address etc.. this can be quite useful.
4. Alternatively you can view / adjust the IP address and other setting in the EAS Configuration
window on your TV (see section CAAS Audio Configuration Set Up, page 33).
5. If you are using a smart device, the CAAS Audio Remote App will scan your network, find the EAS
and also display the IP address (see section Installing & Setting up XBMC & CAAS Audio
Remote Apps, page 18).
Note: For UPnP and SMB protocols to operate correctly, the EAS will require the right time and date. As soon
as the EAS detects an internet connection, it will automatically update it's time and date. This may take a
minute or two. If the EAS is connected to a network that does not have an internet connection and the EAS
time and date are wrong, then SMB and UPnP protocols may not function correctly.
Windows Network (SMB) file sharing
This is the preferred method of sharing files between the EAS and Windows network devices or NAS.
1. Connect the network cable between the EAS and your router.
2. Ensure that file sharing is enabled on your window device (PC / Laptop) or NAS.
3. On the EAS: You will need to add the shared device as a media source. You can do this by selecting
Music → Files →Windows network (SMB) and then selecting the appropriate discovered device.
4. Alternatively by selecting: Music → Files → Add source→ Browse → (and scroll down to)
Windows network (SMB) (See screen shot below).
5. Select your workgroup / shared folder and then select OK. You may need to select OK on the next
screen as well.
Page 16
You should now be able to access / view your shared files as you would a local device / drive from the main
menu. From the Home screen, select Music → Files and your shared device should be listed.
Note: You may be prompted for a user name and / or password. This will be your router / system password.
Accessing a UPnP Network Device
This option is only to be used to access other UPnP devices (e.g. file sharing between two XBMC devices).
The procedure is fundamentally the same as SMB sharing:
1. Firstly you need to enable UPnP on the source XBMC device (the files you wish to share / access).
2. On the EAS, you will need to add the source device as a media source: This can be done easily on
a CEC connected TV by selecting Music → Files → UPnP Media Servers (Auto-Discover) and
then selecting the appropriate discovered device.
3. Alternatively by selecting: Music → Files → Add source→ Browse → (and scroll down to) UPnP
Devices (see screen shot below).
4. Select the source that you wish to share. You may wish to re-name the source.
5. You should now be able to access / view your shared files as you would a local device / drive from
the main menu. Select Music → Files and your shared device should be listed.
Page 17
Installing & Setting up XBMC & CAAS Audio Remote Apps
There are many Kodi (XBMC) control Apps on the market. Some will work well and others will not. We have
designed our software to work with the CAAS Audio Remote App for an android operating system and
Official XBMC Remote for an Apple (iOS) operating system.
Installing CAAS Remote on an Android Device
The CAAS Audio Remote App can be downloaded free from the Google play App store or from the
CAAS Audio website (www.caasaudio.com).
Note: The following procedures may differ slightly from device to device:
1. Download CAAS Audio Remote App to the device you wish to use.
2. Install the CAAS Audio Remote App and select the CAAS icon to Launch the CAAS App.
3. If this is the first launch of the App, you will be taken directly to the set up screen (see below).
4. Click on next and the App will search for the CAAS equipment. Select CAAS once it has been
found. If the EAS is not found, click search again (see screen shot below).
5. Once the EAS has been found, select it and you will then see the All done screen (see below).
6. Select Finish and you will be taken to the menu screen (see screen shot below).
Note: If you are downloading from the CAAS Audio website, you may need to select Allow installation of
apps from unknown sources in the smart device settings menu.
Page 18
Manual Set up of the CAAS Audio Remote
If the EAS can not be found or you wish to set it up manually click next after the first search and you will be
directed to the manual set up window where the IP address and port can be entered (see screen shots
below).
Note: Use port 80 (e.g. 192.168.1.14:80) and leave the username & password blank, they are not needed.
Page 19
Set up after the App has been run or when adding an alternative media centre
If this is not the first time the App has been run or you wish to add an alternative media centre, you will need
to do the following:
1. Launch the CAAS Audio Remote App.
2. Access the main menu. The menu can be accessed by tapping the 3 horizontal line button in the top
left corner or by swiping from left to right (see screen shot below).
3. Select the top picture box with may already read CAAS.
4. From this screen you can Add / Edit / Remove and Select your media centres (see below).
5. To add another media centre, click the + icon in the top right corner.
6. Then select Next to scan for devices. If no devices are found select Scan again.
7. Once the media centre is found, select the device and click Finish.
8. To edit or remove a current media server, select the 3 small vertical dots at the right of the media
centre icon (see screen shot below).
If the EAS can not be found or you wish to set it up manually click next after the first search and you will be
taken to the manual set up window where the IP address and port can be entered. Use port 80 (e.g.
192.168.1.14:80).
Notes:
• The EAS IP address will pop up in the right hand bottom corner of the TV on EAS boot up (the EAS
must be networked) or can be found by scrolling to System → System info.
•
The EAS IP address can also be found by using the App Fing on your smart phone / tablet.
Page 20
Using CAAS Audio Remote App
All the functions can be accessed from the menu screen. The menu can be accessed by tapping the 3
horizontal line button in the top left corner or by swiping from left to right (see screen shot below):
1. Open / Run the CAAS Audio Remote App.
2. Select the Menu screen (three lines in the top left corner or swipe from left to right).
3. Select Remote to bring up a remote key pad. This will allow you to navigate all the EAS functions
viewable on a HDMI TV (see screen shot below).
•
There are 3 screens available in the remote section (Remote, Now playing & Playlist). Swipe
the screen sideways to access them.
4. Select Music to bring up your whole music library (a library must be built first, see section Building
an XBMC music library, page 30).
5. The CAAS Audio Remote App will need synchronising with the EAS:
◦
◦
◦
While in the Music window, press the screen and swipe down to sync (see below).
You will see a whirling arrow (if you have a large music library this may take a while).
When finished, the arrow will disappear and the message sync successful will appear for a
short time. Your music library will be stored along with all thumbnails and cover art.
6. You can now scroll though your music library and select and play any tracks you wish.
7. If you swipe sideways you can switch between Artists, Albums and Genres.
8. To play an album or song, select the relevant album or artist, this will either bring up the artist's
albums (then select the one you want) or the song list of the album selected (see screen shots
below).
9. To play the full album select the blue play button towards the bottom right of the screen. This will
load the whole album into your playlist and take you to the remote screen (see below).
Page 21
10. Alternatively you can play a single track by just selecting the track.
11. If you wish to build a playlist, select the 3 vertical dots at the right hand side of the song / track and
then select Add to playlist (see section below Building a Playlist).
12. Album information can be viewed on the Remote screen by swiping from left to right until the Now
playing screen is visible (see screen shot below).
Page 22
Building a Playlist
A playlist can be built by using the CAAS Audio Remote App and doing the following:
1. Select the Menu screen (three lines in the top left corner or swipe from left to right).
2. Select Music to bring up your whole music library (a library must be built first, see section Building
an XBMC music library) and synchronised.
3. Scroll though your music library, when you find a track you wish to add to the playlist, click on the 3
vertical dots at the right hand side of the track and then select Add to playlist.
4. Repeat step 3 above for different tracks from other albums until your playlist is built.
5. Alternatively the whole album can be added to the playlist by selecting the blue play button near
the bottom right corner of the screen while you are in the album screen.
6. The Playlist can be viewed from the Remote screen by swiping from right to left (see screen shots
below).
Page 23
CAAS Audio Remote App Volume Control & Input Select
The EAS volume can be controlled from your smart device.
The volume control can be found at the bottom of every screen of the CAAS Audio Remote App, when in
portrait mode. When in Landscape mode the volume control can be found at the right hand side of every
screen (see screen shots below).
This will control the EAS volume, you will see the knob move on the EAS and the volume status can be seen
on a HDMI connected TV.
Using the Tablet or Phone's hardware volume control
The tablet or phone's (smart device) hardware volume control (normally situated on the left side of the phone
/ tablet) can be used to control the EAS volume. The CAAS Audio Remote App must be running for this to
work.
Page 24
CAAS Audio Remote Control Help
The CAAS Audio Remote control buttons and descriptions can be seen below:
Page 25
Installing Official XBMC Remote on an Apple Device
CAAS Audio recommend the Official XBMC Remote App for an Apple (iOS) platform. Alternative Apps are
available, however we can not guarantee successful operation with other Apps.
Note: The following procedures may differ slightly from device to device.
The Official XBMC remote App can be installed by performing the following steps:
1. Make sure the EAS is networked.
2. Download (from the App store) and install Official XBMC remote on your iOS (Apple) smart device.
3. Open / Run Official XBMC remote on your smart phone or tablet.
4. Once installed and running you should see the following screen (this will differ slightly for an iPad).
5. You'll be notified that there are No hosts detected.
6. On an iPad: Select Add Host (it will be at the bottom of the box) and then select Find XBMC.
7. On an iPhone: Select Settings.
8. The App will then automatically find XBMC hosts on your network.
9. If the correct host has been found (CAAS) then Click Save.
10. Then select the appropriate host from the list (CAAS) and you should be connected.
If Auto-detect fails to find the correct host then the information will need to be entered manually, as follows:
1. Click on Manually add a host and dismiss the error message should one appear.
2. You will see a form where you can define how to connect to XBMC on the Audio Server (see below).
Page 26
3. Enter the following:
◦ Name: CAAS
◦ Host or IP: Enter the EAS IP address (recommended), see notes below. Also you may be able
to enter the host name here CAAS although this may not work with some routers.
◦ HTTP API: 80
(NOT 8080 as shown above)
◦ Username:
(leave blank)
◦ Password:
(leave blank)
4. Click Done
Notes:
• The EAS IP address will pop up in the right hand bottom corner of the TV on EAS boot up (the EAS
must be networked first for this to happen and a TV connected to the EAS HDMI port).
•
The EAS IP address can also be found by using the App Fing on your smart phone / tablet.
Alternatively if CEC is enabled on your TV, you can use the TV remote to scroll to System →
System info where the IP address will be displayed.
•
Leave the login and password blank, they are not needed.
•
The EAS needs to be running before you configure Official XBMC Remote.
Adding a Host at a later time
You can add a host / connect to the EAS at any time by navigating as follows:
1. On an iPhone:
◦ Menu → Settings → Manage XBMC Hosts.
2. On an iPad:
◦ At the bottom of the screen you should see a box that reads No connection.
◦ Click on the No connection box and the New server screen should pop up (see below).
◦ Select Find XBMC.
◦ The App should auto-detect the EAS and fill in the IP address and port.
◦ If the auto-detect does not work or finds the wrong host, then fill in each box manually, as above.
◦ Click Save.
◦ Then select the host you want from the list and you should be connected (see below).
Page 27
Using Official XBMC Remote App
Once a library has been built (see section Building an XBMC Music Library, page 30) you can synchronise
Official XBMC Remote with the EAS. Your music library will then be stored along with all thumbnails and
cover art.
Official XBMC Remote can be synchronised with the EAS by:
1. Start Official XBMC Remote App.
2. Select Music from the menu window (left hand side window).
3. Then select either the Artists or Albums icon from the bottom of the new right hand side window.
4. Place your finger in the window, press and hold while dragging downwards.
5. At the top of the screen, you should see the message Release to sync with XBMC.
6. Release your finger to see the message Syncing (for a large library, this may take a while).
Page 28
Using Official XBMC Remote volume control
On an iPad: The volume control can be found at the bottom of the main screen window. This will control the
EAS volume, you will see the knob move on the EAS and the volume status can be seen on a connected TV.
Using a iPhone's hardware volume control
The iPhone's (smart device) hardware volume control (normally situated on the left side of the phone) can be
used to control the EAS volume. The Official XBMC Remote App must be running for this to work.
Official XBMC Remote Control Help
The Official XBMC remote control buttons and descriptions can be seen below:
Page 29
Building an XBMC Music Library
The music library information can be updated / downloaded from online servers. Note: The EAS must be
networked and have a connection to the internet for this feature to work.
This feature should allow more information to be displayed on the TV screen and smart device, including
cover art and thumbnails.
Building a library can take time. For example a 200GB music library can take an hour or more to build.
Building a Library
A library can be built using either a web browser or a TV CEC remote control (Samsung works well) but is
most easily built using a smart device.
To build a library using a smart device, first download and install the CAAS Audio Remote App (Android) or
Official XBMC remote App (iOS, Apple).
The procedure to build a library is as follows:
1. Select CAAS Audio Remote (Android) or Official XBMC (iOS, Apple) remote control (on the smart
device).
2. Using the smart device remote control function to navigate while viewing on the HDMI connected TV,
from the home screen select Music → files.
3. Hover over the source you want to build a library from (this could be a USB connected device or a
networked device).
4. On the smart device press and hold the Context menu.
◦ In Official XBMC Remote this button looks like 5 horizontal lines, (see Official XBMC Remote
Control Help section, page 29).
◦ In CAAS Audio Remote this button looks like 4 horizontal lines in a square box.
◦ On a Samsung CEC TV remote this is the return button.
◦ In a Web browser use the update button.
5. The context menu should then pop up on the TV; scroll down the menu and select scan item to
library.
6. Scanning the library may take from a few minutes to several hours, depending on the size of the
music library. The status should be displayed on the TV in the top right corner.
IMPORTANT: Building a library takes serious CPU time. Any user interaction with the EAS while a
library is being built will slow the build and under extreme circumstances may cause a reboot.
Please Note: Library information and thumbnails are downloaded based on the metadata information stored
in your music files and not the music file name, please ensure this metadata is correct to ensure an accurate
XBMC music library is created. Different file formats and external applications may have better metadata
support than others.
For the library updates and downloads to activate properly please check that the Download additional
information during updates is enabled in Settings → Music. This should be enabled as default.
Page 30
Updating a current Library
Use this option when new songs / albums are added to your collection. Updating a library is much faster than
building a new library.
Using either a CEC TV remote, a web browser, Official XMBC Remote (for iOS, Apple) or CAAS Audio
Remote (for Android) you can instruct the EAS to re-scan the library for just new content. When doing this
the EAS does not rebuild the whole library, it just scans for new files / content.
Updating a Library using Official XBMC Remote on an Apple device
1. Click the Power icon in the bottom right corner of the App.
2. This will bring up a menu. Select the option Update Audio Library.
The progress can be viewed on a HDMI connected TV.
Updating a Library using CAAS Audio Remote on an Android device
1. Click the menu button (3 horizontal lines in the top left corner).
2. Select the remote screen from the menu.
3. Click on the 3 vertical dots (top right corner).
4. Select Library maintenance.
5. Select Update audio library.
The progress can be viewed on a HDMI connected TV.
Updating a Library using a CEC TV remote control
1. From the home screen, select Music → Artists (or Albums).
2. While hovering over the 2 dots at the top of the list, press the context menu button (not available on
all CEC remotes, on Samsung it is the return button).
3. Select update library.
The progress can be viewed on a HDMI connected TV.
Updating a Library using a Web browser
The web interface can be accessed on port 80 by opening a web browser on your PC and typing the EAS IP
address followed by :80 ( e.g. ://192.168.1.14:80 ) into the URL bar. Alternatively you may be able to type the
host name followed by :80 ( i.e. http://EAS:80 ). Note: this may not work with some routers.
1. To update the library press the update button under audio library.
Note: The remote control function can be used in both CAAS Audio Remote and Official XBMC Remote to
navigate through the TV menu. Both these Apps have the context menu button available (several horizontal
lines).
Page 31
Streaming Music from a smart phone / tablet to the EAS
This procedure differs from device to device, so outlined here is a generic procedure that will be similar to
that required (device specific information is readily available on the internet):
1. The EAS must be networked. Connect a LAN cable between the EAS LAN port and your router.
2. Set up a connection between your smart device and the audio server. This can be done using a
procedure similar to the following (i.e. 3 to 8) although this procedure may differ from device to
device.
3. Make sure your smart device is connected to your home network via WiFi. If you are not sure how to
do this, the required information can be found on the internet or in your smart device manual.
4. On your smart device: you first need to install and set up Official XBMC Remote (iOS Apple) or
CAAS Audio Remote (Android), (see section Installing & Setting up XBMC & CAAS Audio
Remote Apps, page 18).
5. Once a remote has been installed, you should be able to access your music files on your smart
device (e.g. on Android: All Apps → Music).
6. Once in Music, there should be an icon for selecting a player, possibly at the top of the screen.
Choose Select player.
7. Then under WiFi player you should see CAAS or similar, select this and hit Done.
8. Any music files you play on your smart device should now be sent to the EAS.
Party Mode (Random Song Play)
The EAS is equipped with a Party mode. Once selected the EAS will continuously select random tracks from
your music library. This mode will keep the playlist full and therefore continuously play random music.
The party mode can be selected via the HDMI TV connected interface by selecting Music and then the left
arrow button to bring out the side menu where Party mode can then be activated (see below).
Alternatively by selecting Party mode in the bottom left corner of Official XBMC Remote App (for Apple iOS).
Page 32
Audio Server Software Update
See section CAAS Audio Configuration Set Up below.
CAAS Audio Configuration Set Up
The EAS network settings can be configured under Programs → EAS Configuration or System → EAS
Settings. This procedure is outlined below:
1. Switch the EAS ON, once the audio server has booted.
2. On the TV, scroll right and select the Programs menu; this should give you a list of programs.
3. Scroll down to and select EAS Configuration; this will open the configuration window.
4. The configuration window has 6 tabs down the left side (System, Network etc...).
5. On the System page, you can select: Check for updates now, once selected the EAS will search
for any CAAS software upgrades. It is recommended to follow the on-screen advice during the
upgrade process.
6. Additionally a factory reset can be performed under this window, by selecting Reset EAS to defaults
(see section EAS Factory Reset below).
IMPORTANT: Do NOT reboot or power off the unit during a software update or system reset, this
could fatally corrupt the EAS software!
Note: Please refer to your router manual for further details about configuring DHCP and changing device IP
addresses should you need to.
Returns, Repairs and Weee recycling
For returns, repairs or Weee recycling, please contact CAAS Audio at [email protected] or via the
contacts page on our website www.caasaudio.com
Page 33
EAS Factory Reset
Important
The factory reset function is a last resort function.
Warning !
Under no circumstances should the EAS be powered off during the factory reset function as this could result
in a catastrophic disk failure and the EAS will have to be returned to the manufacturer.
Please ensure that the EAS is fully powered with no chance of the power disengaging or the standby button
being pressed during the factory reset procedure.
! DO NOT power the EAS OFF until the factory reset has fully finished !
Once the factory reset function is activated, all user data (play lists etc..) will be lost, as a full disk format will
be undertaken followed by a full software re-install.
It should be noted, that the users music library can be backed up (i.e. exported) up to USB or network
storage via the Kodi (XBMC) music settings menu and re-imported after factory reset in the same way. To
avoid disappointment as with any system we recommend that you make regular backups of you data and
music library. For more information see:
http://kodi.wiki/view/Import-export_library
Initiating a Factory Reset
A factory reset can be performed either by using the factory reset button or via the HDMI user interface.
Performing a reset via the factory reset button on the rear of the EAS:
1. Turn the EAS ON at the rear and make sure the EAS is in Standby mode (the red LED is ON).
2. The reset button is mounted behind a small hole in the rear panel (see photograph of the rear panel
in section EAS Rear Panel Explained, page 7).
3. Press and hold this button pressed in (using a thin object such as a cocktail stick) while turning the
EAS ON (press the front panel standby / ON button). It will need to be continuously pressed while
the EAS boots (10 to 15 seconds). The progress can be viewed on a HDMI connected TV.
Performing a reset via the HDMI TV connected user interface:
1. Turn the EAS fully ON (On at the rear and then on at the front, out of Standby mode).
2. Reset the EAS through the on screen interface: Programs → EAS Configuration → System.
3. Select Reset EAS to defaults (at the bottom of the screen) and follow the on screen instructions.
A full factory reset may take up to 10 minutes to complete. Important: Do NOT turn off the EAS or
undertake the shut down procedure until the full factory reset has finished.
Page 34
EAS FAQ
Q: Where is the remote?
A: There is no remote with the EAS, if your TV is HDMI-CEC enabled, the TV remote will operate the EAS.
Additionally the EAS can be networked and controlled via smart phones, tablets, web browsers, PCs etc...
There are different trade names for HDMI CEC, depending on who is the manufacturer of your TV, so it
doesn’t have to be stated as HDMI-CEC, see the below list:
Samsung Sony Sharp Hitachi AOC Pioneer Toshiba Onkyo LG Panasonic –
Philips Mitsubishi -
Anynet+
BRAVIA Link or BRAVIA Sync
Aquos Link
HDMI-CEC
E-link
Kuro Link
Regza Link or CE-Link
RIHD (Remote Interactive over HDMI)
SimpLink
VIERA Link or HDAVI Control or EZ-Sync
EasyLink
NetCommand for HDMI
Q: Do I need a remote control because my television does not support CEC?
A: No, you can connect the EAS to your network (via the LAN port on the rear) and use a smart phone,
tablet, web browser or PC to control the EAS.
Q: Can I connect a USB WiFi adapter?
A: Yes, however some WiFi adapters are not compatible. We have had good results with EDiMax EW7811Un.
Q: Can I install add-ons?
A: The on-screen user interface is based on the award winning Kodi software and a number of tested and
verified add-ons come pre-installed, please note the installation of additional music add-ons (such as last.fm
and shoutcast) is done at the owners own risk. Please also note that any legacy XBMC video add-ons
(Youtube, iPlayer etc.) are not supported and will not work, do not install them under any circumstance.
There should be no need to install additional add-ons to play, stream music from your home network, or build
your music library and cover art.
Q: Can I update Rasbmc or XBMC?
A: NO! under no circumstance update either as this will overwrite our digital interface kernel.
Q: Can I use a 2.5inch HDD?
A: A typical 2.5inch HDD draws its power from the USB port. The EAS may not be capable of supplying the
additional power that some 2.5inch HDDs require, others may work perfectly. We therefore recommend that
you don't use a 2.5inch HDD.
Q: What is the maximum capacity USB Pen?
A: We recommend a maximum capacity of 64GB (depending on make and model), you may be able to use a
128GB or higher. However if the pen requires more power than the EAS can deliver, it may force the EAS to
reboot. If you are experiencing periodic EAS reboots this is more than likely the issue.
Q: Can I use a powered USB Hub?
A: Yes this may allow you to use higher capacity USB pens and possibly even a 2.5inch HDD.
Q: Can I play video?
A: NO, the EAS has been designed to support audio only and any legacy video support in XBMC is not
supported.
Page 35
Warranty (3 Year Guarantee)
To reduce the risk of fire, electrical shock or other injuries, the user should not attempt to service the EAS.
Please do not open the EAS. There are no user serviceable parts inside the EAS. Opening the EAS will
invalidate any warranty offered. Servicing must be referred to qualified service personnel only.
This warranty is offered in relation to purchases made in the United Kingdom, Eire and European Economic
Area (EEA) only and shall be governed by the laws [applying in the country in which purchase of the product
takes place]. Consumer statutory rights applying under the laws [pertaining in the country of purchase] shall
not be adversely affected by any terms and conditions contained herein. All CAAS Audio products are
covered by a standard 3-year manufacturers’ warranty. This covers parts and labour, subject to terms &
conditions. This warranty is not transferable outside the European Economic Area.
If a CAAS Audio product is defective in normal domestic use, due to a fault in materials or workmanship,
CAAS Audio will at its discretion (and subject to the terms contained herein) either repair or
replace it free of charge within a reasonable time after return of such product to CAAS Audio during the
warranty period. This warranty is offered to the first purchaser only and covers the cost of parts and
associated labour required to correct such defects in materials or workmanship arising and advised to your
retailer or CAAS Audio during a period of three (3) years from the original date of purchase.
This Warranty does NOT cover:
1. Damage to CAAS Audio products while in the possession of a shipper, retailer, or consumer and not
caused by defects in materials or workmanship.
2. Damage or defects caused by abnormal or unreasonable use (including repairs or alterations of
products by a person or company other than CAAS Audio).
3. Damage to CAAS Audio products arising due to or from normal wear and tear.
4. Damage resulting from misuse, neglect, abuse, accidents, acts of nature, improper installation,
improper removal or cleaning.
5. Damage resulting from failure to follow the instructions in the user manual or repair or attempted
repair by unauthorised personnel or company.
6. Initial set-up, check-ups or charges incurred for installation of the product.
7. Any cause other than a product defect due to a fault in materials or workmanship.
8. Any product where the serial number has been defaced, modified or removed.
9. Any CAAS Audio product purchased outside the European Economic Area.
Note: The term “Damage” includes, malfunction, deterioration and failure to meet specifications.
CAAS Audio will pay for all parts and labour covered by this warranty. The purchaser must pay all shipping
charges if it is necessary to return the product to CAAS Audio or your retailer. However, if the required
repairs are covered by this warranty CAAS Audio will pay for the return shipping to any destination within the
UK & Eire. Whenever warranty service is required you must present the original dated sales receipt or other
proof of purchase.
The equipment should be packed in its original packing. Do not return your product to CAAS Audio without
consulting with and approval from CAAS Audio. If you are returning any product, you should use a reputable
carrier - do NOT post. CAAS Audio cannot accept responsibility for the unit while in transit to the retailer or
CAAS Audio.
Please ensure that your equipment is insured by you during any transit or shipment for repair.
This warranty applies from the date of purchase for the duration of three (3) years. Under no circumstances
will this change. If a product is returned for repair or servicing or other, the remainder of the warranty from
the original date of purchase is the warranty given on the repair, service or other and NOT a further three (3)
year warranty.
Page 36