1
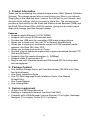
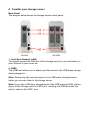
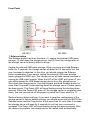
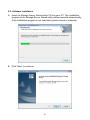
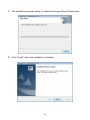
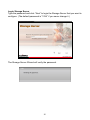
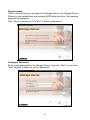
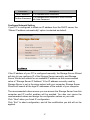
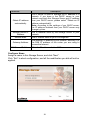
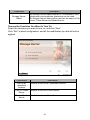
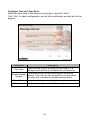
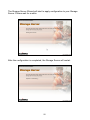
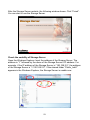
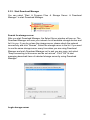
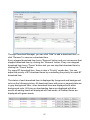
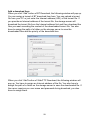
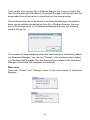
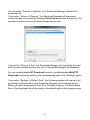
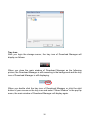
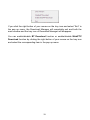
Index
1.Product Information ................................................................................... 3
2.Package Content ........................................................................................ 3
3.System requirement .................................................................................. 3
4.Familiar your storage server ..................................................................... 4
5.Device Installation.................................................................................... 10
5.1.
Hardware installation ....................................................................................... 10
5.2.
Software Installation ......................................................................................... 12
5.3.
Getting Start your device .................................................................................. 14
5.3.1. Storage Server Wizard ..................................................................................... 14
5.3.2. Start Download Manager ................................................................................. 25
1
Copyright© by Edimax Technology Co, LTD. all rights reserved. No part of this
publication may be reproduced, transmitted, transcribed, stored in a retrieval
system, or translated into any language or computer language, in any form or
by any means, electronic, mechanical, magnetic, optical, chemical, manual or
otherwise, without the prior written permission of this company.
This company makes no representations or warranties, either expressed or
implied, with respect to the contents hereof and specifically disclaims any
warranties, merchantability or fitness for any particular purpose. Any software
described in this manual is sold or licensed "as is". Should the programs prove
defective following their purchase, the buyer (and not this company, its
distributor, or its dealer) assumes the entire cost of all necessary servicing,
repair, and any incidental or consequential damages resulting from any defect
in the software. Further, this company reserves the right to revise this
publication and to make changes from time to time in the contents hereof
without obligation to notify any person of such revision or changes.
The product you have purchased and the setup screen may appear slightly
different from those shown in this QIG. For more detailed information about
this product, please refer to the User's Manual on the CD-ROM. The software
and specifications are subject to change without notice. Please visit our web
site www.edimax.com for the update. All right reserved including all brand and
product names mentioned in this manual are trademarks and/or registered
trademarks of their respective holders.
2
1. Product Information
Thank you for purchasing this network storage server (NAS, Network Attached
Storage). This storage server lets you easily share your files in your network.
Simply plug in the hard disk drive, connect the LAN port to your network, and
do some basic settings, and you're ready to share files. The storage server
provides a total solution for the Small and Medium-sized Business (SMB) and
the Small Office/Home Office (SOHO) markets, giving you an instant way to
share and manage your files through network.
Features
z
Supports gigabit Ethernet (10/100/1000M)
z
Supports one internal SATA hard disk drive
z
Provides two USB ports for connecting USB mass storage devices
z
Allows you to share your files via FTP or Network Neighborhood
z
Allows you to share your multimedia content to DLNA compliant media
adapters, like Xbox 360, Sony PS3…
z
Allows you to share your music to iTunes
z
Provides Internet download engine which supports download through FTP,
Web and BitTorrent.
z
Supports High file transfer throughput (> 100Mbps)
z
Supports static IP and dynamic IP
z
Easy to use both Windows-based and Web-based GUI for configuration
and management
2. Package Content
z
z
z
z
z
One Network Storage Server with hard disk drawer (NS-2502 with 2 Bay
hard disk drawers)
One Quick Installation Guide
One CD (Multi-language Quick Installation Guide, User Manual,
Wizard/Utility)
One Power Adapter
One Holding Base
3. System requirement
z
z
z
At least One SATA hard disk drive
Desktop or Laptop with Network Interface Card (NIC)
Computer with a Web-Browser (Internet Explorer 6.0 or higher, Netscape
Navigator 7.2 or higher, Firefox 2.0.0.3 or higher)
3
4. Familiar your storage server
Back Panel
The diagram below shows the storage server’s back panel.
3
2
1
NS-2501
NS-2502
1. Local Area Network (LAN)
You should connect the LAN port of this storage server to your hub/switch, or
one LAN port of your router etc.
2. USB2
The USB2 port allows you to share your files stored in the USB mass storage
device plugged in.
Note: Please plug the external power of your USB mass storage devices
before you connect them to the storage server.
Note: If you have USB mass storage device (like USB external HDD), please
plug it to this storage server’s USB 2 port, and plug the USB flash disk you
wish to share to the USB 1 port.
3. Power switch
When the storage server is not working, switch the Power switch to “1” will
switch on the power and make the storage server start. When the storage
server has been shut down, switch the Power switch to “0” will switch off the
power.
Note: Please do not directly switch off the power when the storage server is
running. This will make some data not correctly saved in the storage server
and may make the storage server not work properly. Before switch off the
power, please press Release button for more than 5 seconds to shut down the
storage server first.
Note: If you did not switch off the power after your previous shut down (just
press Release button for more than 5 seconds) and you want to start the
storage server now, you should switch off the power first and then switch on
the power, and the storage server will start again.
Note: After you shut down the storage server and before switch off the power,
the storage server is still providing power to the hard disk drives and the hard
disk drives are still running. You have to switch off the power after you shut
down the storage server to make the whole system completely stopped.
5
Front Panel
4
1
2
3
NS-2501
NS-2502
1. Release button
The Release button has three functions: (1) unplug the external USB mass
storage, (2) shut down the storage server, and (3) reset the configuration of
the storage server to factory default settings.
Unplug the external USB mass storage: When you press and hold Release
button for 2 seconds, the storage server will beep for 0.5 second to hint that
your command is detected. At this time, you should release the Release
button immediately if you want to unplug the external USB mass storage
device plugged in USB1 port. The storage server will take several seconds to
unplug the USB mass storage. When the LED of the USB1 port goes off, you
can safely detach the USB mass storage device from this storage server.
Shut down the storage server: You should press and hold Release button for
more than 5 seconds to start shutting down the storage server. Please ignore
the beep sound. The Power LED will keep flashing during the shutting down
process. When the Power LED goes off, the storage server is completely shut
down. You can now switch off the power by switch the Power switch to “0”.
Restore factory default settings: If you want to reset the configuration of the
storage server to factory default settings, you should press and hold BOTH the
Release button and the Copy button at the same time for more than 5 seconds,
the storage server will beep for 2 seconds to hint that your command is
accepted. The Power LED will keep flashing during the restore process. After
the restore is complete, the storage server will restart itself automatically.
2. Copy button
The Copy button has two functions: (1) copy the content of one external USB
mass storage device to another attached storage device, and (2) reset the
configuration of the storage server to factory default settings.
To Copy USB mass storage device: When you press and hold the Copy button
for 2 seconds, the storage server will beep for 0.5 second to hint that your
command is detected. At this time, you should release the Copy button
immediately if you want to copy the content of one external USB mass storage
device to another attached storage device. During the process of copy, the
LED of corresponding USB port will flash slowly. When the LED of
corresponding USB port stops flashing and is lit steady, the copy job is
finished. If any error occurs during the process of copy, the LED of
corresponding USB port will flash very fast. The default source storage is
USB1, you can change the source storage by USB Copy settings in Web user
interface of storage server.
Restore factory default settings: Please refer to the description of Release
button.
Note: Before you trigger the USB Copy function by pressing the Copy button,
make sure that the destination folder has enough free space to store all data
of the source USB mass storage device.
Note: USB Copy function does not support length of file name longer than 255
bytes. If the source USB mass storage device contains any file with file name
longer than 255 bytes, the copy job will fail.
3. USB1
The USB1 port allows you to share your files stored in the USB mass storage
device plugged in.
Note: Please plug the external power of your USB mass storage devices
before you connect them to the storage server.
Note: If you have USB mass storage device (like USB external HDD), please
plug it to this storage server’s USB 2 port, and plug the USB flash disk you
wish to share to the USB 1 port.
7
4. LED
On the storage server’s front panel there are LEDs, which show the status of
this storage server. Below is the list of each LED and its description.
NS-2501
LED
Power
NS-2502
Light
Status
Description
ON
Storage server is powered on
Off
Storage server is shut down
Storage server is starting; or the storage server is
Slow
shutting down; or the storage server is restoring its
Flashing
settings to factory default values.
LAN
ON
LAN port is connected
Off
LAN port is unconnected
Flashing Data is transferring through the network
Status
ON
The storage server is working well
Off
The storage server is not ready to provide service.
Please go to the Web GUI to configure the storage
server.
The storage server has some problem. Please go to
Slow
the Web GUI to check the status of the system to
Flashing
find out the problem.
8
USB1
ON
USB storage device is connected to USB1 port
Off
USB storage device is not connected to USB1 port
or is not detected due to hard disk failure or the
system is doing partition/format on this hard disk
drive.
The used space of the USB mass storage is over
Slow
95% or the USB Copy tool is copying from the USB
Flashing
mass storage device plugged to USB1 port.
The USB mass storage is full or the USB Copy tool
is copying from the USB mass storage device
Fast
plugged to USB1 port, but this job faces some error
Flashing
and is stopped (In this situation, the LED will keep
flashing about 30 seconds and go off).
USB2
ON
USB storage device is connected to USB2 port
Off
USB storage device is not connected to USB2 port
or is not detected due to hard disk failure or the
system is doing partition/format on this hard disk
drive.
The used space of the USB mass storage is over
Slow
95% or the USB Copy tool is copying from the USB
Flashing
mass storage device plugged to USB2 port.
The USB mass storage is full or the USB Copy tool
is copying from the USB mass storage device
Fast
plugged to USB2 port, but this job faces some error
Flashing
and is stopped (In this situation, the LED will keep
flashing about 30 seconds and go off).
HDD
ON
Internal SATA hard disk drive is installed
Off
Internal SATA hard disk drive is not installed or is not
detected due to hard disk failure or the system is
doing partition/format on this hard disk drive.
Slow The used space of the internal SATA hard disk drive
Flashing is over 95%.
Fast
The internal SATA hard disk drive is full.
Flashing
9
5. Device Installation
5.1. Hardware installation
This is a step-by-step instruction on how to start using the storage server.
(NS-2502 as an example)
1. Pull out the disk drawer from the case of storage server as shown in the
setup diagram below.
2. Fix your SATA hard disk driver in the drawer by screws as shown in the
setup diagram below.
3. Push the disk drawer with hard disk driver installed back into the case of
storage server as shown in the setup diagram below.
10
Note: Please make sure the disk drawer is safely installed.
For example, please do not install hard disk by the way showed in the following
pictures.
The disk drawer is not
safely installed
4. Plug the power adaptor to the storage server and connect the storage
server to your network as shown in the setup diagram below.
5. Power on the storage server by pressing the power switch of the storage
server on as shown in the setup diagram below.
6. When the Power LED is steady lighted, the storage server is ready.
11
5.2. Software Installation
A. Insert the Storage Server Wizard utility CD into your PC. The Installation
program of the Storage Server Wizard utility will be executed automatically.
If the Installation program is not executed, please execute it manually.
B. Click “Next” to continue.
12
C. The installation program starts to install the Storage Server Wizard utility.
D. Click “Finish” when the installation is finished.
13
5.3. Getting Start your device
After the installation, there are two utilities installed: Storage Server Wizard
and Download Manager. They are located under “Start Æ Program Files Æ
Storage Server” as the following picture shows.
5.3.1. Storage Server Wizard
The Installation program will start Storage Server Wizard automatically after
the installation is finished.
Auto-search for Storage Server
When the Storage Server Wizard starts, all Storage Servers in your local area
network will be listed. Select the Storage Server you want to configure, and
click “Next”. If you do not find the Storage Server you want to configure, please
check the network connection, and then click “Rescan” to restart searching.
14
Login Storage Server
Type the password and click “Next” to login the Storage Server that you want to
configure. (The default password is “1234” if you never change it.)
The Storage Server Wizard will verify the password.
15
System check
If this is the first time you configure this Storage Server with Storage Server
Wizard or you installed any new internal SATA hard disk drive, this warning
page will be displayed.
Click “Next” to continue, Click “Exit” to abort configuration.
Configure Password
Enter a new password for the Storage Server, and click “Next”, or just click
“Next” directly to keep the current password.
16
Parameter
New Password
Confirm Password
Description
0~30 alphanumeric characters.
0~30 alphanumeric characters. Must be same
with New Password.
Configure Network Setting
If your PC is configured to obtain an IP address from the DHCP server, the
“Obtain IP address automatically” option is selected as default.
If the IP address of your PC is configured manually, the Storage Server Wizard
will also let you configure IP of the Storage Server manually, and Storage
Server Wizard will search for an available IP address as the recommended
value of “Storage Server IP Address” if the IP address currently used by
Storage Server is not in the same subnet with your computer. Storage Server
Wizard will search all the legal IP addresses of the subnet of your computer
.
The recommended values ensure you can access the Storage Server from this
computer and IP conflict problem will be avoided. You also can ignore the
recommended values and assign the configuration values on your own.
Click “Next” when you finish IP configuration.
Click “Exit” to abort configuration, and all the modification you did will not be
applied.
17
Parameter
Description
Obtain IP address
automatically
DHCP server is used to manage the IP address of a
network. If you have a live DHCP server in your
network and wish this Storage Server get IP address
from your DHCP server, please select “Obtain an IP
address automatically”.
Note: According to the settings of you DHCP server,
the IP address obtained from your DHCP server may
change by time.
Storage Server IP
Address
The IP address used by this Storage Server in your
network.
Subnet Mask
Gateway Address
The IP Subnet Mask of your LAN segment.
The gateway IP address of your network. Normally, it is
the LAN IP address of the router you are using to
access the Internet.
DNS Server IP Address Fill in the IP address of a live DNS server.
Configure Name
Assign a name to this Storage Server, and click “Next”.
Click “Exit” to abort configuration, and all the modification you did will not be
applied.
18
Parameters
Description
Storage Server
Name
The Storage Server Name must be 4-15 characters. Only
alphanumeric and underline characters can be used.
The Storage Server Name will be used as the name of File
Server, iTunes Server and Media Server.
Choose the Functions You Want to Turn On
Select the functions you want to turn on, and click “Next”.
Click “Exit” to abort configuration, and all the modification you did will not be
applied.
Parameters
Turn on BT
download
function
Description
Whether to turn on BT download function.
Turn on iTunes Whether to turn on iTunes Server.
Server
Turn on Media
Server
Whether to turn on Media Server.
19
Configure Time and Time Zone
Select the time zone of the area you are living in, and click “Next”.
Click “Exit” to abort configuration, and all the modification you did will not be
applied.
Parameters
Time Zone
Description
Select the time zone of the area you are living in. The
Storage Server will set its time based on your selection.
The storage server can also take daylight saving into
Enable Daylight
account. If you wish to use this function, you must select
Savings
the check box to enable the daylight saving function.
Times From
Assign the starting date of daylight saving period.
Times to
Assign the ending date of daylight saving period.
20
Confirm Your Configuration
Confirm your configuration, and click “Apply”.
Click “Exit” to abort configuration, and all the modification you did will not be
applied.
If some internal SATA disk(s) will be formatted, the following dialog will be
popped up.
Click “OK” to continue.
21
The Storage Server Wizard will start to apply configuration to your Storage
Server. Please wait for a while.
After the configuration is completed, the Storage Server will restart.
22
After the Storage Server restarts, the following window shows. Click “Finish”.
You can start to use the Storage Server.
Check the usability of Storage Server
Open the Windows Explorer. Input the address of the Storage Server. The
address is “\\” followed by the name of the Storage Server’s IP address. For
example, if the IP address of the Storage Server is “192.168.2.5”, the address
of the Storage Server is “\\ 192.168.2.5”. If the shared folder “Public_hdd1”
appears in the Windows Explorer, the Storage Server is usable now.
23
Shared folders created
Storage Server Wizard will automatically create some shared folders for you.
The shared folder names and their usage are listed as follows:
z Public_hdd1: You can access “Public_hdd1” anonymously with reading
and writing privilege by FTP and Windows Neighborhood (Samba). The
absolute path in the storage server of “Public_hdd1” is “[HDD1]C:\Public\”.
z Media: The “Media” folder is located under the “Public_hdd1” folder, so the
“Media” folder is also accessible by FTP and Windows Neighborhood
(Samba) with reading and writing privilege. The music files in “Media”
folder can be accessed by iTunes clients. The video, music and image files
in “Media” folder can be accessed by DLNA compliant media adapters like
Sony PS3, Xbox 360…etc. The absolute path in the storage server of
“Media” is “[HDD1]C:\Public\Media\”.
24
5.3.2. Start Download Manager
You can select “Start Æ Program Files Æ Storage Server Æ Download
Manager” to start Download Manager.
Search for storage server
After you start Download Manager, the Select Server window will pop up. The
Download Manager will scan your network for all available storage servers and
list it to you. If you do not see the storage server, please check the network
connectivity and click “Rescan”. Select the storage server in the list. If you want
to use the same storage server every time when you are using Download
Manager and wish Download Manager not to ask you any more, just select
“Keep connecting to this server and do not ask me”. Click “OK” to start
managing download items of selected storage server by using Download
Manager.
Login storage server
25
The Download Manager will prompt you for the login password of the storage
server. You can select “Remember my password” to let Download Manager
save your password and automatically use it to login next time. Click “OK” to
login.
Manage download items
After you login, the main window of Download Manger will pop up as following
picture. There are two major parts in the window. The BT Download part is to
manage the download items of BT, the Web/FTP Download part is to manage
the download items of Web/FTP.
All BT download items are listed in the BT Download list and all Web/FTP
download items are listed in the Web/FTP Download list. The Download
Manager will automatically refresh both lists every 60 seconds.
26
Through Download Manager, you can click “Add” to add a download item, or
click “Remove” to remove a download item.
Every stopped download item has a “Resume” button and you can resume that
stopped download item by clicking the “Resume” button; Every non-stopped
download item has a “Pause” button and you can stop that download item by
clicking the “Pause” button.
For every BT download item, there is also a “Priority” combo box. You can
adjust the priority of BT download items by re-selecting the priority for each BT
download item.
The status of each download item is displayed by foreground and background
color as the following picture. All download items with error or paused state are
in gray background color; other download items are displayed with white
background color. All trying or downloading items are displayed with blue
words; all waiting items are displayed with red words; all finished items are
displayed with green words.
27
Add a download item
When you click “Add” button of BT Download, the following window will pop up.
You can assign a torrent of BT download item here. You can upload a torrent
file from your PC or just enter the Internet address (URL) of the torrent file. If
you provide an Internet address of the torrent file, the storage server will
download the torrent file from the Internet address first and then download the
files you want according the content of the downloaded torrent file. You also
have to assign the path of a folder on the storage server to save the
downloaded files and the priority of the download item.
When you click “Add” button of Web/FTP Download, the following window will
pop up. You have to assign an Internet address of the file. You also have to
assign the path of a folder on the storage server to save the downloaded file. If
the server requires you user name and password during download, you also
have to assign them.
28
If you are using Microsoft IE to surf the Internet and find a link of an interesting
file that you want to download, you can click the right button of your mouse on
the link and the following menu will pop up.
Select “Download with Download Manager”, then the download job will be
added to Download Manager automatically and the downloaded files will be
saved in default path on the storage server.
29
If you double click a torrent file in Windows Explorer (try to open a torrent file),
then the download job with added to Download Manager automatically and the
downloaded files will be saved in default path on the storage server.
If the download job can not be added to the Download Manager immediately
when you are adding a download job from IE or Windows Explorer, this may
due to the storage server or the Download Manager are busy, the following
window will pop up.
This window will keep displaying before the download job is successfully added
into Download Manager. You can click “Cancel” in this window to abort adding
it to the Download Manager. After the download job is added to the Download
Manager, this window will disappear automatically.
Main menu
There are “Actions” and “Settings” menu in the main window of Download
Manager.
30
You can select “Actions Æ Refresh” to let Download Manager refresh both
download lists.
If you select “Actions Æ Rescan”, the Download Manager will disconnect
current storage server and the following Select Server window will pop up. You
can search and connect to the other storage server here.
If you select “Actions Æ Exit”, the Download Manager will completely exit and
both the main window and the tray icon of Download Manager will disappear.
You can enable/disable BT Download function or enable/disable Web/FTP
Download function by selecting the corresponding item in the “Settings” menu.
If you select “Settings Æ Default Path”, the following window will pop up to let
you assign a default path for the Download Manager on the storage server.
When you add a download job from IE or Windows Explorer, the downloaded
files of the download job will be saved to the default path on the storage server.
31
Tray Icon
After you login the storage server, the tray icon of Download Manager will
display as follows.
When you close the main window of Download Manager as the following
picture, the Download Manager is still executing in the background and the tray
icon of Download Manager is still displaying.
When you double click the tray icon of Download Manager or click the right
button of your mouse on the tray icon and select “Show Window” in the pop up
menu, the main window of Download Manager will display again.
32
If you click the right button of your mouse on the tray icon and select “Exit” in
the pop up menu, the Download Manager will completely exit and both the
main window and the tray icon of Download Manager will disappear.
You can enable/disable BT Download function or enable/disable Web/FTP
Download function by clicking the right button of your mouse on the tray icon
and select the corresponding item in the pop up menu.
33
Federal Communication Commission Interference Statement
This equipment has been tested and found to comply with the limits for a Class B digital
device, pursuant to Part 15 of FCC Rules. These limits are designed to provide reasonable
protection against harmful interference in a residential installation. This equipment
generates, uses, and can radiate radio frequency energy and, if not installed and used in
accordance with the instructions, may cause harmful interference to radio communications.
However, there is no guarantee that interference will not occur in a particular installation. If
this equipment does cause harmful interference to radio or television reception, which can
be determined by turning the equipment off and on, the user is encouraged to try to correct
the interference by one or more of the following measures:
1. Reorient or relocate the receiving antenna.
2. Increase the separation between the equipment and receiver.
3. Connect the equipment into an outlet on a circuit different from that to which the receiver
is connected.
4. Consult the dealer or an experienced radio technician for help.
FCC Caution
This device and its antenna must not be co-located or operating in conjunction with any
other antenna or transmitter. This device complies with Part 15 of the FCC Rules. Operation
is subject to the following two conditions: (1) this device may not cause harmful interference,
and (2) this device must accept any interference received, including interference that may
cause undesired operation. Any changes or modifications not expressly approved by the
party responsible for compliance could void the authority to operate equipment.
Please check the CE declaration of conformity on www.edimax.com
34
35