1
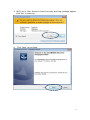
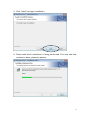
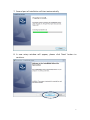
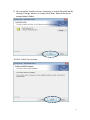
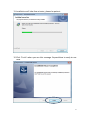
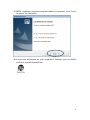
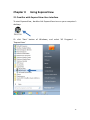
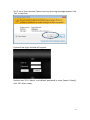
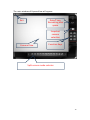
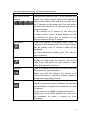
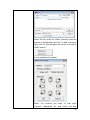
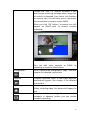
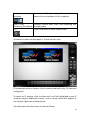
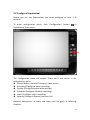
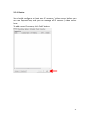
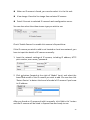
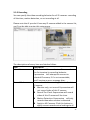
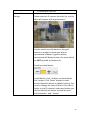
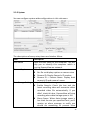
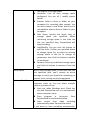
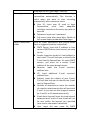
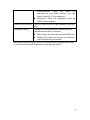
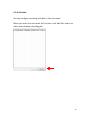
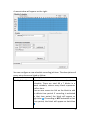
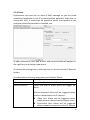
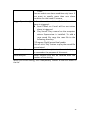
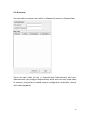
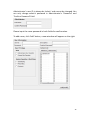
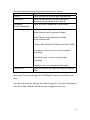
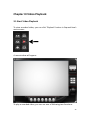
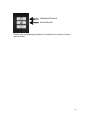
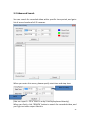
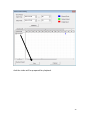
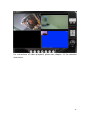
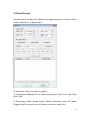
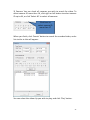
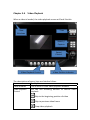
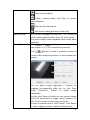
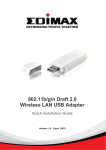
ExpressView User Manual Release: 01, Sep. 2011 ‐ CONTENTS ‐ Chapter I Introduction ......................................................................................................... 2 1.1 Highlights of your ExpressView ................................................................................ 2 1.2 System Requirements .............................................................................................. 3 1.3 Setup ExpressView ................................................................................................... 4 Chapter II Using ExpressView ............................................................................................ 12 2.1 Familiar with ExpressView User Interface ..................................................................... 12 2.2 Configure Expressview .................................................................................................. 20 2‐2‐1 Device ..................................................................................................................... 21 2‐2‐2 Recording ............................................................................................................... 25 2‐2‐3 System .................................................................................................................... 28 2‐2‐4 Schedule ................................................................................................................. 32 2‐2‐5 Event ...................................................................................................................... 35 2‐2‐6 Security .................................................................................................................. 37 Chapter III Video Playback ....................................................................................................... 40 3.1 Start Video Playback ...................................................................................................... 40 3‐2 Advanced Search ........................................................................................................... 42 3‐3 Event Search .................................................................................................................. 46 Chapter 3‐4 Video Playback ............................................................................................. 49 Chapter IV Appendix ................................................................................................................ 52 4.1 Troubleshooting ............................................................................................................ 52 1 Chapter I Introduction 1.1 Highlights of your ExpressView ExpressView is an easy‐to‐use, multifunctional IP camera / video server central management software system. It manages up to 64 IP cameras / video servers at the same time, as long as you have network connection to these IP cameras / video servers, you can view videos and manage them remotely, without the restriction of geographical limitation. Other highlights of ExpressView include: Multi‐language support (Supports English, Traditional Chinese…) Supports SMAX and EDIMAX IP cameras and this camera. Supports from 1 IP camera / Video server to 64 IP cameras / video servers. Supports PTZ control for both IP dome cameras / traditional dome cameras via RS‐485 control interface. 2 1.2 System Requirements Minimal System Requirements Windows XP, Vista and 7 operating systems (both 32 and 64 bits version) 2GB of system memory (up to 16 IP cameras) 20GB of available hard disk space on system drive Recommended System Requirements Windows XP, Vista, and 7 operating systems (64 bits version) 4GB or more of system memory (up to 64 IP cameras) 100GB of available hard disk space on system drive 3 1.3 Setup ExpressView 1.3.1 Windows Vista / 7 Operating Systems 1. Please follow the following instructions to setup ExpressView on Windows Vista / 7 operating system. Please note: You must login as system administrator when you’re installing ExpressView. 2. Locate ExpressView setup file, and double‐click on it to start ExpressView software installation. 4 3. You’ll see a User Account Control security warning message appear, click ‘Yes’ to continue. 4. Click ‘Next’ to continue. 5 5. Click ‘Install’ to begin installation. 6. Please wait while installation is being performed. This may take few minutes to done, please be patient. 6 7. Second part of installation will start automatically. 8. A new setup window will appear, please click ‘Next’ button to continue. 7 9. You can select a folder on your computer to install ExpressView by clicking ‘Change’ button, or simply click ‘Next’ button directly to accept default folder. 10.Click ‘Install’ to continue. 8 11.Installation will take few minutes, please be patient. 12.Click ‘Finish’ when you see this message. ExpressView is ready to use now. 9 13.MSDE (Microsoft SQL Database Engine) installation procedure will start at the same time. Please wait until it completes. 14.You’ll be prompted that this program has compatibility issues, click ‘Run program’ to continue. 10 15.MSDE installation requires computer reboot to complete, click ‘Finish’ to reboot the computer. 16.A new icon will appear on your computer’s desktop, you can double click on it to start ExpressView . 11 Chapter II Using ExpressView 2.1 Familiar with ExpressView User Interface To start ExpressView , double‐click ExpressView icon on your computer’s desktop: Or click ‘Start’ button of Windows, and select ‘All Programs’ ‐> ‘ExpressView’ 12 You’ll see a User Account Control security warning message appear, click ‘Yes’ to continue. ExpressView login window will appear. Default user ID is ‘admin’ and default password is none (leave it blank), click ‘OK’ when ready. 13 The main window of ExpressView will appear: Date/Time, Remaining disk space Exit Snapshot camera selection Camera View Function Keys Split‐screen mode selector 14 The descriptions of every item are listed as follow: Item Description Split‐screen mode ExpressView supports from 1 to 64 cameras split selector views. The video from IP camera will display in split‐screen display cells, and you can view up to 64 IP cameras at the same time. Click the button to select the number of IP cameras you wish to view on display. If the number of IP camera is less than the number of split screen, unused display cell will be displayed as grey color to indicate it’s not being connected to any IP camera. Click this button to display video from IP Full‐screen cameras in full‐screen mode. All control buttons will be hidden, only IP camera’s video will be displayed. To leave full‐screen mode, press ‘Esc’ key on your keyboard. When you click this button, ExpressView will Camera Scan display the video from one camera only at the same time, and switch to next camera’s video after few seconds, and so on. Take a snapshot of selected IP camera and save Snapshot the picture on your computer. When you click this button, the picture of IP camera selected in ‘snapshot camera selection’ dropdown menu will be saved. EMAP Display the EMAP (Electronic map) image on camera view area, which indicates the position and orientation in physical environment of every IP camera. To set a picture as EMAP’s background picture: Right‐click on the EMAP display area, and you’ll be prompted to select a picture on your computer: 15 Select the file, and click ‘Open’ button to use the picture as background picture. To add a camera, right‐click on the background picture and select ‘Add Camera…’ A new window will appear: Select the camera you wish to add from ‘Camera’ dropdown list, and check the box 16 ‘Image Lost’ and / or ‘Motion Detected’ if you want to get a warning message when image lost of motion is detected, then select the direction of camera icon, this will help you to remember the orientation of camera on the EMAP. After you click ‘OK’ button, a camera icon will appear on EMAP with its camera number indicated: Configuration Playback Recording Schedule You can add more cameras to EMAP by repeating procedures listed above. Enter ExpressView configuration page. See next chapter for detailed instructions. Playback recorded video. A new video playback window will appear. See chapter III for detailed instructions. Start / stop video recording. When recording video, this button will appear as red. Enable schedule recording. You must define schedule in advance before you can enable schedule recording. 17 Snapshot camera selection Here lists all IP cameras you have, select one camera from dropdown list for snapshot. Date / Time, Displays current date, time, and remaining disk Remaining Disk Space storage space. Exit Click this button to leave ExpressView All camera’s video will displayed in ‘Camera View’ area: (This example picture shows a 4‐split camera view with only 2 IP cameras configured) To select an IP camera, click its video and it will be highlighted; some IP cameras support additional control, and a control panel will appear at the bottom‐right area of Expressview . The description of these items is listed as follow: 18 Item Pan / Tilt control Pan / Tilt speed Zoom Description Click the direction arrow to control camera’s pan / tilt. Drag the slide bar to adjust the pan / tilt speed when you click pan / tilt control arrow. Optical zoom control. Click + or ‐ to control zoom level. Exposure Exposure control. Click + or ‐ to control exposure level. Cruise control Click ‘Go’ button to start camera cruise and click ‘Stop’ button to stop cruise. 19 2.2 Configure Expressview Before you can use Expressview, you must configure at least 1 IP cameras. in To enter configuration menu, click ‘Configuration’ button Expressview’ main menu: The configuration menu will appear. There are 6 sub menus in the configuration menu: Device (Add or remove IP camera / video server) Recording (Configure video recording) System (Configure system‐wide settings) Schedule (Configure schedule recording) Event (Configure event recording) Security (Configure ExpressView user list) Detailed descriptions of every sub menu will be given in following chapters. 20 2‐2‐1 Device You should configure at least one IP camera / video server before you can use ExpressView, and you can manage all IP camera / video server here. To add a new IP camera, click ‘Add’ button: 21 IP camera setup window will appear on the right: If your IP camera is located on local area network, click ‘Search’ button. Wait for few seconds or few minutes until the search is complete, and all IP cameras found on your local area network will be listed: In this example, an IP camera has been found at IP address 192.168.2.3. If this is the IP camera you wish to add, click ‘Add to list’ button. You can repeat above procedures to add all IP cameras you wish to connect. 22 When an IP camera is found, you can also select it in the list and: View Image: View the live image from selected IP camera. Detail: Connect to selected IP camera’s web configuration menu. You can also select the video stream type you wish to use: Check ‘Enable Camera’ to enable this camera is ExpressView. If the IP camera you wish to add is not located on local area network, you have to input the details of IP camera manually: 1. Input the network settings of IP camera, including IP address, HTTP port number, user name / password. 2. Click button (located at the right of ‘Model’ item), and select the brand and model of the IP camera you wish to add. You can also click ‘Detect Device’ to detect the brand of model of IP camera if you know its IP address. After you found an IP camera of add it manually, click ‘Add to list’ button and the IP camera will be listed in ExpressView and ready to use: 23 Every IP camera has a check box, indicating if it is enabled. If a camera is not enabled, it will not be displayed in ExpressView’s video view. You can also manage IP camera list by the following function: Enable All: Enable all IP cameras in the list. Disable All: Disable all IP cameras in the list. Remove: Remove selected IP camera. When you selected an IP camera in the list, you can also click ‘Update to list’ button to update its information, like IP address and user name / password. 24 2‐2‐2 Recording You can specify the video recording behavior for all IP cameras: recording all the time, motion detection, or not recording at all. Please note that if you don’t have any IP camera added in the camera list, you’ll not be able to enter this setup menu. The descriptions of every item are listed as follow: Item Description Select Camera All IP camera’s Please select an IP camera from the list to setup its recording behavior. Expressview will attempt to connect to selected IP camera, if it’s not connectable, you’ll receive an error message later. Record Mode You can decide the recording behavior for this IP camera: Monitor only, not record: Expressview will not record video of this IP camera. Round‐The‐Clock: Expressview will record video of this IP camera all the time. Motion Detection: Expressview will only record video when motion is detected. Apply to All Cameras: Click this button to apply current record control settings to all 25 Motion Detection Setting IP cameras on the list. Sets motion detection area and sensitivity. Please select an IP camera from the list, and its video will appear with a grid pattern: Use the mouse to click blocks on the grid pattern to assign the areas you wishes Expressview to detect / ignore motion. Expressview will detect motion for areas which are NOT covered by blocks only. To add or erase blocks: To add blocks, click + button; to erase blocks, click‐ button. Click ‘Reset’ button to reset motion detection blocks to default setting. You can also change the color of block if its color is similar to the IP camera’s video and makes you hard to identify the blocks by click the color brick between + and ‐ button: 26 Drag red, green, and blue slide bar to set color, and click ‘Set’ button to save changes, click ‘Default’ button to reset settings, and click ‘Cancel’ to leave this menu without saving changes. You also have to setup sensitivity: Drag the slide bar to setup sensitivity level from 1 to 10. Larger number indicates more sensitivity. To apply this motion detection settings to all IP cameras, click ‘Apply to All Cameras’ button. When you finish setting, click ‘OK’ button to save changes you made, or click ‘Cancel’ button to discard all settings you made. 27 2‐2‐3 System You can configure system‐wide configurations in this sub menu. The descriptions of every setup items are listed as follow: Item Description Host Name Input the host name of this computer. This will help you to identify this computer which is running ExpressView on network. Camera Caption Add a text caption on camera view or not: No: Do not display caption on camera view Camera ID: Display Camera’s ID number Camera ID + Camera Name: Display both camera’s ID and camera’s name. Data Storage Setting Setup hard disk data storage: Enable Recycle: Check this box and the latest recording video will overwrite oldest recorded video file automatically. If you didn’t check this box, ExpressView will stop recording when data storage space is full. Alarm Space: When data storage space is less than the size you specified here, you’ll receive an alarm message to notify you should do something to prevent from 28 Alarm Space Start‐up Condition running out of storage space. Locations: Lists all data storage space configured. You can all / modify spaces below. Browse: Select a drive or folder on your computer for recording data storage. You can also create a new folder when you’re prompted to select a drive or folder on your computer. Safe Space: Specify the lower limit of storage space you specified. When remaining storage space is less than the size you specified here, ExpressView will stop recording. Add/Modify: You can click this button to add the drive / folder you specified above to storage space list, or select an existing storage space in the list to change its parameters then click this button to update its parameter. Remove: Select a pre‐defined storage space and click this button to remove it from the list. When data storage space is less than the size you specified here, you’ll receive an alarm message to notify you should do something to prevent from running out of storage space. Select the behavior of ExpressView when computer starts up. You can select multiple options you want to use: Auto run, when Windows start: Check this box and ExpressView will run automatically when computer starts. Start program in minimum: Start ExpressView as minimized window. Auto record: Start video recording automatically when ExpressView starts. If you want to start recording automatically, 29 Auto Login Alarm Transmitted e‐Mail remember to use ‘Auto Login’ function. Input the user ID and password to login ExpressView automatically. This function is useful when you want to start recording automatically when computer starts. User ID: Input user ID used to login ExpressView, must have adequate privileges to perform the action you wish to execute. Password: Input user’s password. Full screen view when auto login: Switch to full screen display mode when auto login. Send an E‐mail notification with picture when alarm is triggered (motion is detected): SMTP Server: Input the IP address or host name of SMTP server (mail server) you wish to use. Sender: Input the sender’s E‐mail address in sent email. This will help you to identify the E‐mail sent by ExpressView. For some SMTP servers, you must set a sender E‐mail address of the same domain name. Receiver: Input the E‐mail receiver’s address here. CC: input additional E‐mail receiver’s address here. Subject: Input the subject of sent E‐mail. This will also help you to identify the E‐mail sent by ExpressView . Number of attachments: Input the number of snapshot attachments that will sent with E‐mail, so you can see the image of camera by E‐mail (1 to 10 attachments only). Email alerts Interval: Input the time interval between two E‐mails. A new E‐mail will not be sent within the interval you specified here even a new event is detected. User: Input the user name for SMTP 30 authentication. Input only when it’s required by your SMTP server, you can leave it blank if it’s not required. Password: Input the password used by SMTP authentication. Camera Scan Interval Input the time interval to wait between camera scan. Connection Retry Decides the behavior when ExpressView lost communication with IP camera: Retry: Retry for the time you specified here. Always retry: Retry to connect to IP camera until successfully connected. When you finishes setting, click ‘OK’ button to save changes you made, or click ‘Cancel’ button to discard all settings you made. 31 2‐2‐4 Schedule You can configure recording schedule in this sub‐menu. When you enter this sub‐menu for first time, click ‘Add Job’ button to add a new schedule recording job: 32 A new window will appear on the right: You can configure a new schedule recording job here. The descriptions of every setup items are listed as follow: Item Description Weekly Schedule Select the time period in a week of this schedule. There are total 48 x 7 blocks in a week schedule, where every block represents half an hour. You can use mouse to click on the block to add or delete time period. If recording is activated in that time period, the block will appear as light blue . If recording is NOT activated in that time period, the block will appear as dark blue . 33 To add or delete a time period, select ‘ADD’ or ‘DEL’ first, then click the time period block. Events Select the event to trigger recording: Round‐The‐Clock: Recording is time‐activated (according to schedule). Motion Detection: Recording is motion‐activated. DI Input: Recording is activated by DI (Digital Input) signal located on IP camera. IP camera must have DI port and not every IP camera is equipped with DI. Dedicated Schedule If you just want to add a new recording schedule between certain time and this schedule will only happen once but not every week, you can use this function to specify a time period. Select ‘Start’ and ‘End’ date / time, and click ‘Add/Modify’ button to add the time period to the list. You can also select an existing time period and make changes, and click ‘Add / Modify’ button to save changes. To remove an existing schedule, select an existing schedule, and then click ‘Remove’ button. Comment You can input some text to help you to memorize the purpose of this schedule Cameras/Devices Check all IP cameras that will be activated by this schedule. Add to list Click this button to add this schedule to the list. When you finishes setting, click ‘OK’ button to save changes you made, or click ‘Cancel’ button to discard all settings you made. 34 2‐2‐5 Event Expressview can send you an alarm E‐Mail message so you can know something happened on the IP camera (motion detected, video lost, or connection lost). A sound can be played to notify the operator at the computer where Expressview is installed, too. To add a new event, click ‘Add’ button, and a new window will appear on the right for you to setup a new event. To remove an existing event, select an event in the list and click ‘Remove’ button. The descriptions of every setup items are listed as follow: Description Item Select Camera Select the IP camera to define its event detail. Alarm Condition Define the type of event which will trigger an alarm: Motion detected: Alarm will be triggered when motion is detected at this IP camera. Video lost: Alarm will be triggered when video server’s external camera signal is lost. Connection Lost: Alarm will be triggered when network connection to this IP camera 35 is lost. You can select one alarm condition only here. If you want to specify more than one alarm condition for the same IP camera, Trigger Operation(s) Define the action which will be taken when alarm is triggered: Send E‐Mail: an E‐mail will be sent when alarm is triggered. Play Sound: Play a sound on the computer where Expressview is installed. To add a new sound file, copy the .wav file to the following directory: C:\Program Files\ExpressView\media You can click ‘Play’ button to play the sound file you selected. Alarm Remark You can input descriptive text here to help you to remember the purpose of this event. Alarm Recycle Alarm records (list) will be covered after the number of the setting. When you finish setting, click ‘Add/Modify’ button to add this event to the list. 36 2‐2‐6 Security You can add or remove users which is allowed to access to ExpressView. There are two kinds of user in ExpressView: Administrator and user. Administrator can configure ExpressView, while user can only view video of camera, and perform limited system configuration (schedule, record, and video playback). 37 Administrator’s user ID is always be ‘admin’ and cannot be changed. You can only change admin’s password in Administrator’s ‘Password’ and ‘Confirm Password’ field. Please input the same password in both fields for confirmation. To add a user, click ‘Add’ button, a new window will appear on the right: 38 The descriptions of every setup items are listed as follow: Item Description User ID Input the user ID used to login ExpressView Description Input any descriptive text to help you to memorize the purpose of this user ID. Password / Input this user’s password in both fields. Confirm Password User Privilege Defines the privilege of this user (Check the boxes that you wish to give privilege): Multi‐Camera View Operation: Allows multi‐camera view. Camera Map Operation: Allows to show E‐MAP. Scheduling: User can start or stop schedule recording. Recording: User can start or stop video recording. Playback: User can playback saved video. Camera List Select IP cameras you wish to allow this user to view. When you finished settings, click ‘Add/Modify’ button to add this new user. You can also select an existing user and change his / her user information, then click ‘Add / Modify’ button to save changes for this user. 39 Chapter III Video Playback 3.1 Start Video Playback To view recorded video, you can click ‘Playback’ button in ExpressView’s main screen: A new window will appear: To play a recorded video, you can use one of following two functions: 40 Advanced Search Event Search Please refer to following chapters for detailed instructions of every search mode. 41 3‐2 Advanced Search You can search for recorded video within specific time period, and get a list of record modes of all IP cameras. When you enter this menu, please specify start time and stop time: Hour in a day DATE (You can input 0 ‐ 23 in ‘Hour in a day’ field by keyboard directly). When you finish, click ‘SEARCH’ button to search for recorded video, and you’ll get a similar output like this: 42 In this picture, a recorded video of ‘Camera 1’ has been found at 12 o’clock. A blue mark indicates it’s a ‘Round Clock’ (manual) recording. Other record types include: Blue: Manual Recording Green: Recording is triggered by motion Red: Recording is triggered by Digital Input To view the video, check the box of camera ID, then click ‘Play’ button. 43 And the video will be prepared for playback. 44 For instructions of video playback, please see chapter 3‐4 for detailed instruction. 45 3‐3 Event Search You can search for video for playback by triggering event: round the clock, motion detection, or digital input. To search for video, you have to specify: 1) starting and ending time for video searching in ‘Start time’ and ‘Stop time’ field 2) Recording mode: Round Clock, Motion Detection, and I/O Mode (Digital Input). You can check all boxes you wish to search for. 46 3) Camera: You can check all cameras you wish to search for video. To select camera ID more than 16, click right or left button to select camera ID up to 64, or click ‘Select All’ to select all cameras. Click here to select camera ID more than 17 When you finish, click ‘Search’ button to search for recorded video, and a list similar to this will appear: You can select the video clip you wish to play, and click ‘Play’ button. 47 For instructions of video playback, please see chapter 3‐4 for detailed instruction. 48 Chapter 3‐4 Video Playback When a video is loaded, the video playback screen will look like this: Close Windows Time Search / Capture Speed Control Video Playback Control Video Position Indicator The descriptions of every item are listed as follow: Item Description Close Window Click X mark to close video playback window. Video Playback You can use following buttons to control video Control playback: Skip to the beginning position of video Skip to previous video frame Stop video playback 49 Start video playback Pause a playing video, click ‘Play’ to resume video playback Skip to next video frame Skip to the ending position of video clip Speed Control Search / Capture When video is stopped, you can click + or – button to adjust video playback speed: from 1/4 to 4x speed. You cannot adjust video playback speed when video is playing. Click or button to search for video (see chapter 3‐2 / 3‐3 for detailed instruction). Click button to take a snapshot picture of current video playback position. A new window will appear: You can adjust image brightness / contrast by dragging corresponding slide bar, or click ‘Gray Scale’, ‘Sharpness’, ‘Soften’ to adjust image parameters. You can click ‘Save as’ button to save current image (you’ll be prompted for image saving location), or click ‘Print’ to print current image to printer. To back to previous menu, click ‘Cancel’; click ‘Reset’ to reset image parameters back to default value. 50 Time Current time will be displayed here. You can click ‘ button to display video zoom in, or click button to display video zoom out. 51 Chapter IV Appendix 4.1 Troubleshooting Please don’t panic when you found Expressview is not working properly. Before you contact us, you can do some simple checks to save your time: Problem description Possible solution(s) Can’t connect to IP 1) Please make sure your computer’s network camera cable is correctly connected to your local area network. No IP camera found 1) ‘Auto search’ function only works on IP cameras located on local area network. To add a remote IP camera, you must use manual configuration. 2) Only ‘SMAX’, ‘EDIMAX’ IP cameras and this camera are supported currently. 52