1
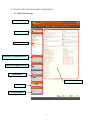
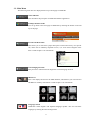
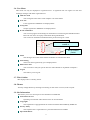
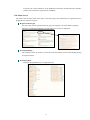
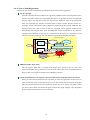
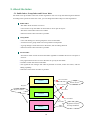
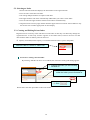
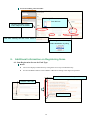
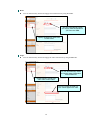
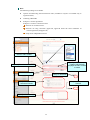
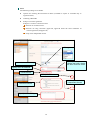
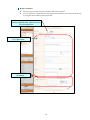
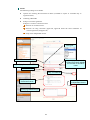
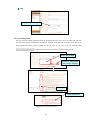
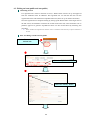
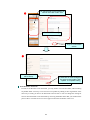
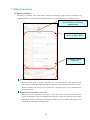
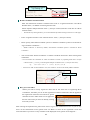
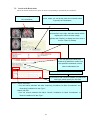
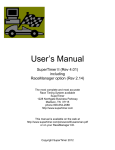
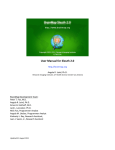
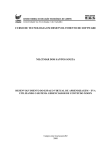
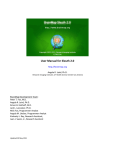
NeuroImaging-Platform (NIMG-PF)
User Manual
Contents
• 1. ABOUT NIMG-PF.............................................................................................................................................. 1
・1.1. WHAT IS NIMG-PF?................................................................................................................... 1
・1.2. USER OF THE SYSTEM AND USER RIGHTS. ................................................................................... 1
• 2. BEFORE USING NIMG-PF. ............................................................................................................................. 1
・2.1. USER REGISTRATION ................................................................................................................... 1
・2.2.LOGIN .......................................................................................................................................... 3
・2.3. EDITING YOUR PROFILE .............................................................................................................. 3
• 3. SCREEN FORMAT AND BASIC OPERATION............................................................................................. 4
・3.1. NIMG-PF MAIN PAGE ................................................................................................................. 4
・3.2. MAIN MENU ............................................................................................................................... 5
・3.3. SEARCH ...................................................................................................................................... 6
・3.4. INDEX TREE ................................................................................................................................ 6
・3.5. EVALUATION OF REGISTERED ITEM ............................................................................................. 6
・3.6. USER MENU................................................................................................................................ 7
・3.7. WHO’S ONLINE ........................................................................................................................... 7
・3.8. THEMES ...................................................................................................................................... 7
・3.9. SITE INFORMATION ..................................................................................................................... 7
・3.10. MAIN SCREEN ........................................................................................................................... 8
• 4. ITEMS ................................................................................................................................................................. 9
・4.1. ABOUT ITEMS.............................................................................................................................. 9
・4.2. META-INFORMATION .................................................................................................................. 9
・4.3. ITEM TYPE .................................................................................................................................. 9
・4.4. A NOTE ON ITEM REGISTRATION .............................................................................................. 10
・4.5. HOW TO REGISTER ITEMS ..........................................................................................................11
• 5. ABOUT THE INDEX ....................................................................................................................................... 12
・5.1. PUBLIC INDEX, GROUP INDEX AND PRIVATE INDEX.................................................................. 12
・5.2. SELECTING AN INDEX ............................................................................................................... 13
・5.3. CREATING AND EDITING PRIVATE INDEX .................................................................................. 13
• 6. ADDITIONAL INFORMATION ON REGISTERING ITEMS................................................................... 14
・6.1. ITEM REGISTRATION SCREEN FOR EACH TYPE ......................................................................... 14
・6.2. ASSOCIATING ITEMS ................................................................................................................. 21
・6.3. EDITING AN ITEM (PUBLIC AND NON-PUBLIC) ........................................................................... 22
• 7. OTHER FUNCTIONS ..................................................................................................................................... 24
・7.1. BRAIN COORDINATES ................................................................................................................ 24
・7.2. SEARCH WITH BRAIN ATLAS ..................................................................................................... 27
・7.3. BRAIN IMAGE 3D BROWSER ..................................................................................................... 29
・
1. About NIMG-PF
1.1. What is NIMG-PF?
The Neuroimaging-Platform (NIMG-PF) is a database system for sharing various relevant data about
neuroimaging on the Internet. You can access the NIMG-PF at this URL:
http://platform.nimg.neuroinf.jp/
Since NIMG-PF is created based on XooNIps*1, it has three key characteristics:.
Flexibility of database format
NIMG-PF is constructed based on a content management systems (CMS*2) called “XOOPS,”
so it permits easy design change and extension of functions. Therefore, even those are not
familiar with the system can set up the database.
Variety and extendibility of data handled by database
XooNIps already has stored data forms in its standard configuration, and it is equipped with
an extension function for handling new data forms, so it is capable of handling large datasets.
Distribution function for meta-information
Since a standard protocol called OAI-PMH (Open Archives Initiative Protocol for Metadata
Harvesting)*3 is implemented in the NIMG-PF, metadata in the system have
interchangeability with the database system in OAI-PMH.
*1 For more, please see http://xoonips.sourceforge.jp/manuals/usersman-ja/index.html
*2 This is the generic name for a system that comprehensively manages digital data, both text and images.
*3 Here, meta-information is exchanged through automatic data collection.
1.2. User of the system and user rights
Moderator
The moderator is the manager who sets up NIMG-PF. He or she manages registered users,
evaluates the registration of items in disclosure areas, and makes decisions regarding the
approval and withdrawal of items for registration.
Registered user
A user registration is approved by the moderator to
Moderator
allow access to NIMG-PF. The registered user can
Approval
register items and manage the registered items.
He or she can also join groups with approval.
XooNIps
Registered user
Guest user
The guest user is someone who has not registered
or logged in. He or she is allowed to browse the
items registered in the disclosure domain and
download those items to which access is allowed.
2. Before using NIMG-PF
2.1. User registration
1
Guest user
Register・Use
Use
Item
In NIMG-PF, a guest user is able to access a certain amount of data. However, the guest is not able to
register items or access the items that are accessible only by registered users. To become a registered
user, it is necessary to apply for an account and receive approval from the moderator.
First, select “Register (new registration)” at the top of the main page and input all of the necessary
items marked with an asterisk (*) in the application account windows in English. Then submit the
application form. Also, be sure to input “None” in the section for affiliation if you are not affiliated
with any institution such as a school or company.
New registration
Registration procedure
In order to prevent spoofing, there are two application stages. After sending in the first
application, the URL of the official registration site will be sent to you automatically by
e-mail. Please register at the site, after which the moderator will evaluate your application.
① Applying
for
a
new
registration
Guest user
② Automatic delivery of URL for account registration
to the registered mail account
③ Account registration at the site
of delivered URL
④Approval
2
Moderator
2.2. Login
After your account is approved, please log in by inputting your username and password in “login” at
the top of the main page.
Login
2.3. Editing your profile
After login, you can edit your profile, for instance, changing your password. Actually, you should
change the password given to you as part of the initial setup immediately after your account is
approved. The screenshots below show how to change the password.
① Click “Account”
② Click “Edit Profile”
③ Input the new password in these two password
boxes.
at the bottom of the screen. After this step, your
After entering the new password, please click
password change is complete.
You can change the other profile items in the “edit profile” window by using the same procedure.
3
3. Screen format and basic operation
3.1. NIMG-PF main page
Main Menu
Search
Index Tree
Evaluation of registered item
Menu for registered user
Online user
Main Display Area
Theme
Site Information
4
3.2. Main Menu
The following menu bars are displayed at the top of each page in NIMG-PF.
About This Site
This introduces the principles of NIMG-PF and their application.
XooNIps database mode
You can go back to the main page of NIMG-PF by choosing the banner on the left
top of the page.
Search with Brain Atlas
This allows you to search for a paper that reports on the brain activity of a specific
site, which can be arbitrarily depicted in an X, Y, Z cross-section diagram of the
brain. Check Chapter 7 for more details.
Neuroimaging Tutorials
This provides a useful tutorial for beginners in neuroimaging research.
3D Browse
This is the display function for the MRI database, which allows you to browse the
3D-MRI of a monkey and a human. Check Chapter 7 for more details.
Language Switch
NIMG-PF is both English- and Japanese-language capable. You can switch the
language by clicking the national flag banner.
5
3.3. Search
You may search for the registered items by entering a keyword. It is possible to refine your search by
entering multiple keywords with AND (with space) or specific items.
Enter the keyword for search
Specify the range of the search
Also, you can make an advanced search by specifying the date or other attribute for each item after
clicking “Advanced Search.”
Advanced Search
3.4. Index Tree
The Index Tree is an index for classifying and managing registered items in an easy-to-understand
format. You can search for a group of registered items by selecting the item in the Index Tree. Its
hierarchical structure allows you to refine your search from top to bottom of the hierarchy.
3.5. Evaluation of registered item
It is possible for registered users to evaluate a registered item.
6
3.6. User Menu
This menu can only be displayed to registered users. A registered user can register an item and
exchange messages with other registered users.
Add New Item
You can register items here. Check Chapter 4 for more details.
User List
Users registered in NIMG-PF are displayed here.
Group List
Groups registered in NIMG-PF are displayed here.
Event Notification
You can set up approval and change of notification of events using the XOOPS function.
Please be sure not to set up any notification during initialization.
You can choose notification method between private message or e-mail.
Check the items you want to be
notified of
Set up notified
parties
Inbox
The messages from other users and the moderator are stored in this inbox.
Item Listing
The list of items registered by you is displayed here.
Edit Private Tree
You can create or edit your private tree here. More details are explained in Chapter 5
Logout
This allows you to log out.
3.7. Who’s Online
This displays who is currently online.
3.8. Themes
You may change themes by selecting from among several in the overview, such as layout.
3.9. Site Information
This allows you to see various pieces of information on NIMG-PF.
Instructions for Use
Operating environment and instructions for use are listed here.
Copyrights
This explains the copyright details for each item and the data handled by NIMG-PF.
Privacy Policy
This explains how a registered user’s personal information is handled.
Operation Matrix
7
Listed are the contact addresses of the NIMG-PF committee, the Brain Science Institute,
and the Neuroinformatics Japan Center of RIKEN.
3.10. Main Screen
The main screen occupies most of the space on the main page. The information for registered items is
displayed here in three categories.
Registered Item Types
You can search for the registered items by type (see Chapter 4 for more details regarding
Item Type). Click the item banner to list the items you wish to be displayed.
XooNips Ranking
The ranking of items by number of times browsed and number of times downloaded among
all registered items.
XooNips Update
Displays the updated history of registered items.
8
4. Items
4.1. About Items
Varied contents, such as data and text, are registered in NIMG-PF, and these are all known as “items.”
When registering an item, you attach the meta-information (Chapter 4.2) as well as one of three types
of indexes, depending on the disclosure level (See Chapter 5 for Public Index, Group Index and
Private Index).
4.2. Meta-Information
Meta-information (also called “meta-data”) indicates information about an item’s attributes such as
registration, creation, explanation, and usage approval. The inputted content of meta-information will
change at the time of registration due to its having different information for each item type (See 4.3).
4.3. Item Type
You can register nine kinds of items in total. These are called Item Types and are listed below.
Binder
Binder is the list of registered items related to a specific theme and displayed in the Private
Index or Public Index. You can easily know what kinds of items are registered for each
specific theme.
This is the item type for registering books on neuroimaging. If you know its ISBN, you can
automatically obtain and save the book’s information by entering the ISBN.
This is the item type for registering scholarly papers. If you know the PubMed ID, you can
enter it to automatically obtain and save the meta-information through MedLine.
This item type is for registering presentation materials and lecture materials.
This item type is for registering the data of audio-visual stimuli used in experiments and raw
data for measurement.
This item type is for registering the program for stimulus presentation and data analysis.
This item type is for registering the coordinate data of the activation region. Registering the
coordinate data enables you to search for a paper based on its coordinates.
This item type is for registering simulators constructed from models based on experiments as
well as the experimental results.
This is the item type for registering a web site with information content on neuroimaging.
9
4.4. A Note on Item Registration
Please take care to note the following considerations at the time of item registration.
About copyright
Consent is required from test subjects for registering a database item concerning them on the
Internet; also there needs to be confirmation that there is no problem in terms of intellectual
property rights. The copyright of the item registered in NIMG-PF shall not be transferred.
Thus, the registered user himself or herself needs to obtain consent from the owner of a
copyright for the nonexclusive right to duplicate and distribute the item in NIMF-PF. The
registered user also needs to discuss with the copyright owner approval conditions for
downloading and using the items. NIJC and NIMG-PF are not responsible for any decisions
regarding such conditions. In the case of a complaint from the owner of a copyright, we will
refer the case to the registered user, who shall be responsible for handling the matter.
PF
Negotiation, Consent
UI
Item
PF
Registered user
Owner of
A
copyright A
A
User
公
開
停
Discontinuation
Condition of Usage
止
The right of PF to duplicate and distribute item
Item
B
Condition of usage
Registered
Owner of
user B
copyright B
Notification
NIJC
PF Committee
Dispute
settlement
Complaint
PDF Data under Paper Item
You can register PDF data in a paper under Paper Item. However, only the user who
registered the PDF data is allowed to access the data, while other users are prohibited from
doing so due to copyright ownership of the publishing company.
About Item Disclosure (see Chapter 6 for more information on the disclosure of an item)
When you select Private Index only for registering an item, the registered user has access to
the item, but other users are not allowed to access it. You need to select more than one Public
Index and obtain approval from the moderator for the item to be open to the public. When
you select Group Index and obtain the approval from the group manager, only designated
group members will then have access to the item.
10
4.5. How to Register Items
To start registration, click “Registration of New Item” from the User Menu.
Select “Add New Item” from
User Menu
①
③
②
①
Specify the type of item.
②
Enter the item’s meta-information. The boxes marked with “*” are required. Please take care in
entering information since the meta-information content differs for each item.
③
Designate the Index for entering the item. You need to designate at least one Index from the
Private Index (see Chapter 5 for more details).
Click the
button after filling out all of the required boxes.
④
④
Click
after confirming there is no mistake in the entered information on the
“Register” page.
⑤
When you select Public Index, you see a window displaying “Approval from moderator….” This
is the end of the registration process. Once the moderator approves the item, it will be open to any
user. You will not receive a notice of decision from the moderator unless you set up Event
Notification.
※See p. 7 for more details on Setting Up Event Notification.
11
5. About the Index
5.1. Public Index, Group Index and Private Index
You need to set up an Index at the time of item registration. You can set up the following three Indexes
according to the open level of the item. Also, you can change the Index setup even after registration.
Public Index
・The Index which all users can access.
・Users need to set up this Index for items that are to be open to anyone.
・The terms in the Index cannot to be edited.
・Selection of more than one index is possible.
Group Index
・Users who belong to a certain group have access to this Index.
・An item used in a group needs to be set up with the Group Index.
・A group manager creates the terms in the Index, with no editing allowed.
・Selection of more than one index is possible.
Private Index
・You need to select at least one from this Index regardless of whether the item is to be open to
all users.
・Only registered users have access to the item set up only for this Index.
・Outsiders cannot enter the Private Index.
・The registered user manages this Index by himself or herself, creates new items, and has
editing capability.
・Selection of more than one index is possible.
Private Index
Not accessible
Item A
Guest Users
Not accessible
Register
Group Index
Registered User
Register
Accessible
Item B
Not accessible
Public Index
Accessible
Registered Users
Item C
Accessible
12
(Group member)
5.2. Selecting an Index
1. Please select the Index that displays the information on the registered item.
2. You can select more than one Index.
3. All among multiple Indexes are equal to each other.
4. The upper Indexes will not be automatically added when you select a lower Index.
5. You can select the upper Indexes and the lower Indexes simultaneously.
6. Registered users need to judge whether both the upper and lower indexes will be added or only
the one the user considers appropriate for item display.
5.3. Creating and Editing Private Index
Registered users can freely create and edit a Private Index so that they can efficiently manage the
registered items. At first only “Private” appears as the Index below; however the user can add
other Indexes under an arbitrary name at this level.
※ Capacity is limited (but the capacity is not limited when the item is open to the public)
Switch the tab to “Private” in “Index Tree”
Screen for Creating a Private Index
By selecting “Edit Private Tree” in User Menu, the screen for creating and editing appears.
① Confirm the Index you are currently
focused on
② Enter the Index name that goes
under the Index you are focused on
③ Click
Please follow the same procedure to add a new Index.
13
Screen for Editing a Private Index
To change the order, select it
from this box
Click the checkbox for the
Index subject to be edited
Changing the Index name
Click after entering the new Index name in
To change item hierarchy,
select destination by using
6.
Additional information on Registering Items
6.1. Item Registration Screen for Each Type
Binder
•
•
The screen displays related items by listing them in an easy-to-understand way.
Private and Public Indexes can be added to a Binder according to the degree of openness.
Put a check mark on the item you wish to add
Click the “Item List”
Click “Select”
14
Book
z
You can automatically obtain and supply meta-information by using the ISBN.
You can automatically obtain
and supply meta-information if
you know the ISBN
Specify at least one Index from
Private Index
Paper
z
You can automatically obtain and supply the meta-information by using PubMed ID.
You can automatically obtain
and supply meta-information
from PubMed ID
Please specify at least one
Index from Private Index
You can upload the data in a
PDF-format paper from here
15
Presentation & Document
The following settings are available.
•
Options for Limiting the Download of Files (available to anyone or available only to
registered users).
•
•
Attaching a Read Me.
Setup for a consent agreement.
Setup for a Creative Commons license.
Decision on commercial use.
Decision on using correction (approved, approved under the same conditions of
consent agreement, disapproved).
Setup for an independent license.
File types:
Name of the file’s creator
Specify the Preview
and Caption that
briefly display the
file’s content to users
Specify the file to be attached
Download limit
Setup of Read me
Setup of an independent
license
License setup for
Creative Commons
Specify related item(s)
16
Data
The following settings are available.
•
Options for Restricting the Download of Files (available to anyone or available only to
registered users).
•
•
Attaching a Read Me.
Setup for a consent agreement.
Setup for a Creative Commons license.
Decision on commercial use.
Decision on using correction (approved, approved under the same conditions of
consent agreement, disapproved).
Setup for an independent license.
File types:
Name of file’s creator
Specify the Preview and
Caption which briefly
displays the file’s content
to users
Specify file to be attached
Download limit
Setup for Read Me
Setup for a Creative
Commons license
Setup an independent
license
Specify related item(s)
17
Tools
The following settings are available.
•
Options for Limiting the Download of Files (available to anyone or available only to
registered users).
•
•
Attaching a Read Me.
Setup of a consent agreement.
Setup for a Creative Commons license.
Decision on commercial use.
Decision on using correction (approved, approved under the same conditions of
consent agreement, disapproved).
Setup of an independent license.
File types:
Specify the Preview and
Caption that briefly display
the file’s content to users
Name of file’s creator Settup
Specify file to be attached
Download limit
Setup for Read Me
Setup for an
independent license
Setup for a Creative
Commons license
Specify related item(s)
18
Brain Coordinates
•
•
The item type for registering the coordinate data of the activation.
You can search for a paper based on the display and coordinates of an activated brain map
by using the search function of the brain atlas.
When adding coordinate data to an
already registered item, please enter the
ID of the target item
Information on base item,
e.g. Paper, Book
Brain Coordinate
information
19
Model
The following settings are available.
•
Options for Limiting the Download of Files (available to anyone or available only to
registered users).
•
•
Attaching a Read Me.
Setup of a consent agreement.
Setup for a Creative Commons license.
Decision on commercial use.
Decision on using correction (approved, approved under the same conditions of
consent agreement, disapproved).
Setup of an independent license.
File types:
Name of file’s creator
Specifying Preview and
Caption that briefly display
the content of the file to
users
Specifying file to be attached
Download limit
Setup for Read Me
Setup for a Creative
Commons license
Setup for an
independent license
Specifying related item(s)
20
URL
Register the link banner
6.2. Associating Items
You can associate already registered items by specifying the item you wish to associate with the Item
ID (which the system automatically distributes). Type the target item ID in the box at the bottom of
Item Registration Screen. Please register one ID per line. If you don’t know the Item ID, click
to open a search window to search for your desired item’s ID.
Enter Item ID here
Search for related item
(open search window)
Item ID
This window is for searching only and you can’t register ID
Associated Item
Registration confirmation screen
21
6.3. Editing an item (public and non-public)
Disclosing an item
If a registered user wishes to disclose an item, a Public Index must be set up and approval
from the moderator must be obtained. The registered user can edit the item the user has
registered and also edit and disclose unpublicized items (items set up for the Private Index).
Once the registered user completes editing by setting up the Public Index of the target item on
the edit screen, the moderator evaluates the content of the item and, if the moderator sees no
problem, approval is granted. Unpublicized items can also be disclosed by following this
procedure.
※
Please remember that registered users shall not receive an evaluation result unless they set up the notification of
an event.
Flow for editing to make an item public
Select Private Index for
desired item
①
②
Select item you want to edit
③
Select the “Modify” button
22
④
Put check marks on all indexes you
need in the Public Index Tree
Edit meta-information
To go to confirmation
screen
⑤
The Index you check
will be set up
If there are no more changes to
be made to the content, click
“update” to complete editing
Non-disclosure of an item
In order to set the item as non-disclosed, you only need to set a Private Index, without setting
any Public Index. You may set an item to be non-public by editing it after registration in the
same way as setting an item to be disclosed as shown above. You can change the setting for
an item from disclosed to non-disclosed by removing the Public Index that you marked in the
process above. You don’t have to receive approval from the moderator in this case.
23
7. Other Functions
7.1. Brain Coordinates
The Brain Coordinates setup adds brain coordinate information, such as brain coordinates and
cognition function, to the information of other items such as Paper and Data (so-called base items).
Enter ID of target item when you add
coordinate data to the already
registered item
Information on the base
item, e.g. Paper, Book
Information on Brain
Coordinate
Supplementing base item information
When the base item is already registered, you can automatically input the base item
information by entering its ID in the “base item ID” box and pressing the “Complete” button.
Please remember that changes to the information of the base item are not reflected in the
original base item.
Registering the base item as a new item
When you want to register the base item as a new item, select an item type and enter the
required information in the box designated for each type. In this case, please leave the “Base
Item ID” box empty. Through this registration procedure, you can register both the base item
and the Brain Coordinates simultaneously.
24
Supplement information
by entering ID
Select the type
Brain Coordinate item information
Enter the information of Brain Coordinate items such as “Cognition Function” and “Brain
Domain Name,” in addition to entering the base item.
Please separate multiple domains with “,” (one-byte comma) and enter in the box for “Brain
Domain Name”
-
Besides directly entering domains, you can also add them by double-clicking in the list box on the right.
・ Enter “Cognition Function” and “Citation Source” with “,” (one-byte comma).
・ Please specify either MNI coordinate system or Talairach coordinate system to be entered for
“Type of Brain Coordinates.”
-
“Details Unknown” is selected by default, and Talairach Coordinate System is assumed for “Brain
Coordinate.”
・ You can use either “Brain Coordinates” or “Brain Coordinate list format” when entering brain
coordinates.
- You can describe the coordinates for “Brain Coordinate List Form” by separating them with a one-byte
comma such as x, y, z. Also, you can designate multiple coordinates with “:” (one-byte semi-colon).
e.g.
1, 2, 3: 4, 5, 6: 7, 8, 9
→ (1, 2, 3)
(4, 5, 6)
(7, 8, 9)
- Please click “Add” to add coordinates. Also, click “Remove” to remove the already added coordinates.
Added coordinates
How to Use the Index
When you want to newly register the base item at the same time as registering Brain
Coordinates, the Index you set for the registration of Brain Coordinates shall be applied to
the registration of the base item. However, please
remember that the Index shall not be applied to
the base item when you select an already existing
item with your ID.
After entering all required items, please click “Next” to go to the confirmation screen. If you see any
errors on the confirmation screen, please click “Go Back“ to return to the registration screen and
correct the data. If you don’t see any mistakes on the displayed screen, please click “Register.”
25
Example confirmation screen
Once you register the item without any problem, you will see the following screen indicating that
the item was successfully registered.
Animated Description
You can also use the animated operation manual for Brain Coordinates available at “How to
Use This Site,” which is linked to “About NIMG-PF” in the Main Menu.
26
7.2.
Search with Brain Atlas
This is the search mode used to search for items corresponding to specified brain coordinates.
The current coordinate values are shown in these
Click the brain image to specify
the coordinates
boxes, where you can directly enter the numerical value
to specify the coordinates
If you select a brain domain from the list at left
and transfer it to the right, the brain domain will be
displayed in red on the brain image
(please click “Display” to display this form since it
is set to “Hide” by default)
You can specify the area to be
searched by distance in radius from
the specified coordinates; enter a
value in millimeters here
Click this button to execute a search
If you wish to add a search condition or a title to an
item type, please specify it in this form
Notes: “Search with AND”
→You can search matches with both “Searching Conditions for Brain Coordinates” and
“Searching Conditions for Item Type.”
“Search with OR”
→You can search matches with either “Search Conditions for Brain Coordinates” or
“Search Conditions for Item Type.”
27
The following search result will be displayed by executing search.
Click this tab to go back to the prior
search form
The contents of items are displayed
You can “Display the Next 10 Search Results,”
as shown here, one at a time
“Change Displayed Number” and “Shuffle items”
[DETAIL], [INFO] AND [SPOT] buttons are available for each item
[DETAIL]
This displays a detailed page of the item
[INFO]
This displays a list for brain coordinates related to the item
[SPOT]
This displays the brain coordinates corresponding to the item on the brain image
(You can toggle between Display or Non-display for [INFO] [SPOT] by clicking here)
Animated description
You can also use the animated operation manual for Search with Brain Atlas available at
“How to Use This Site,” which is linked to “About NIMG-PF” in the Main Menu.
28
7.3. Brain Image 3D Browser
The Brain Image 3D Browser is comprised of 4 parts:
Upper right
Operation form for cross-section position, angle, and depth of brain
Upper left
Brain image viewed from above (or below)
Lower left
Brain image viewed from front (or back)
Lower right
Brain image viewed from right (or left)
Description of Navigation Form
You can designate the time
and date of the data here
After correcting the values, the image can be
refreshed by clicking this button
Designate a cross-section
position of the brain
Designate the tilt (angle) of the
brain
Designate the noise level
29
Button Descriptions
Displays coordinates
Hides coordinates
(Cubic diagram) Returns to initial screen
(Flat diagram) Returns to initial screen
Displays gridlines
Hides gridlines
Displays cubic diagram
Displays flat diagram
Displays skin image (not available on image print of
human brain)
Displays image without skin (brain)
Rotates diagram in the direction of the arrow
Rotates diagram in the direction of the arrow
Rotates diagram in the direction of the arrow
Rotates diagram in the direction of the arrow
Rotates diagram in the direction of the arrow
Rotates diagram in the direction of the arrow
Reverse the image horizontally
Invert the image vertically
Move cross section axis of image higher
Move cross section axis of image lower
Mouse Operation
The user can operate the mouse in the following ways while the coordinates are displayed.
•
When clicked, the clicked points are set at the original
points of the coordinates.
•
When clicking, the coordinate values of the clicked points
are displayed.
•
The cross-section axis can be moved by dragging.
Animated Description
The operation instructions for 3-D Browsing is shown by animation at the
“How-to site” at the link for “About NIMG-PF” on the main menu, so please
refer to that site as well.
30